What to do when you can't format SD card

SD memory cards have surfaced as standard cards for digital cameras and microSD as phone standard memory cards. Most people have and use at least one daily, so naturally copying files and even formatting SD cards is a natural thing to do, but what if you cannot copy files or format SD cards?

SD cardsFear not because we had this issue and tried several things in order to overcome the problem and after some time here is a list of what can you do if you are facing this exact issue. The list is written from most simple solutions to more complex ones and it is advisable to follow it as presented. That being said, let's dive into solving the problem.

1. Remove Write Protection on SD card

First and in my experience the most usual thing preventing deleting, copying files, and formating SD card is due to write protection. Take an SD card out of the laptop, camera, or card reader and visually inspect it. On side of almost every SD card, there is a hardware lock switch and mark where it needs to be positioned in order to be locked. Even if the switch is positioned on unlocked state, switch it to locked and then back to unlocked. Sometimes this easy moving of switch can resolve some contact issues and the card will start working normally.

Another type of lock that could be turned ON is a software one. If for any kind of reason data protection has been turned ON, you will need to turn it off in order to be able to format an SD card. In order to do this follow this guide:

  1. Press ⊞ WINDOWS + R to open the Run dialog
  2. In run dialog type in diskpart and press ENTER
  3. Once diskpart is opened in command prompt type in: list disk and press ENTER
  4. Locate your SD card and type in select disk x, where x is disk number followed by ENTER
  5. After the SD card is selected type in: attributes disk clear read-only and press ENTER

This process will clear the software lock on the SD card, after following this method try to format the card again, if the problem still exists go to the next solution.

2. Format SD card using Command prompt

Command prompt is a great tool and can perform some commands that are not been able to be completed using file explorer or another tool inside Windows.

  1. In the taskbar search box, search for cmd and select the Command prompt
  2. On the right part select run as administrator
  3. If needed click on YES on UAC prompt
  4. Inside command prompt type in diskpart and press ENTER
  5. type in list disk followed by ENTER
  6. Select your SD card by locating its number in the list and typing select disk X, where is X SD cards number in list and press ENTER
  7. Once SD card is selected type in format fs=ntfs quick and press ENTER

This should format SD card but if for reason even this step is provided as unproductive, go to the next solution.

3. Format your card with the Disk Management tool

  1. Go into the taskbar and search for Disk Management and open it
  2. Select SD card partition that you wish to format
  3. Right-click on the partition and select format
  4. After the format is done, enter the volume label, file system, and allocation unit size. Confirm with OK
  5. Press OK again to confirm the formatting process.

If you have not managed to format your SD card even with this method go to the next solution.

4. Repartition card with Disk part

If all previous solutions have failed there is a chance that the SD card has bad sectors on it. If this is the case that we will need to partition cards in order to isolate bad sectors and use healthy ones.

  1. Press ⊞ WINDOWS + R to open the Run dialog
  2. In run dialog type in diskpart and press ENTER
  3. Once diskpart is opened in command prompt type in: list disk and press ENTER
  4. Locate your SD card and type in select disk x, where x is disk number followed by ENTER
  5. Type in Clean and press ENTER
  6. Type in Create partition primary and press ENTER
  7. To select a new partition type select partition 1 followed by ENTER
  8. Make partition active by typing active and pressing ENTER
  9. Format the drive by typing format fs=ntfs label=SDCard quick followed with ENTER
  10. Assign a letter to drive by typing assign letter=h followed with ENTER
  11. Type exit to close Command prompt followed again by ENTER and open File Explorer to check if the drive is active

5. Try a dedicated SD card formating fool

If anything failed so far, one last thing you could do is to download and try a dedicated SD card formatting tool. One that I would recommend is SD Memory Card Formatter, which is free software make specifically for formatting SD memory cards.

If you like to learn and find out more about various Windows errors, and how to repair them go to our vast archive or use search to find articles that will explain and help you in solving your issue.
However, if you prefer to do things fast and with automatization then we are proposing to use an automated solution for your issues. The application that we are recommending is Advanced System Repair Pro
Advanced System Repair utilizes multiple tools all in one to give you a quick, simple, reliable, and very thorough diagnosis of your PC. It brings you all the tools you need in one program to clean, fix, protect, optimize and boost your PC!
1-Click Maintenance
All the tools to make it simple and easy! It's like having a professional technician at the click of a mouse.

Junk Cleaner
Keeping your computer free from unnecessary clutter also helps make your computer last longer. Like any other machine, if you keep it clean and take care of it, it will serve you better for longer!

Optimize background apps
Optimize applications background activity with the built-in Application Optimizer feature.

Disk Defrag
With a simple 1-click, Advanced System Repair speeds up your PC by assembling fragmented files on your machine and organizing them more efficiently.

Malware Removal
Finds and removes all types of harmful malware including trojans, worms, bots, adware, spyware, PUPs, and more!

Privacy Cleaner
The all-in-one privacy suite to Clean Your Tracks & Protect Your Privacy! Make your computer safe, secure, and more efficient!

System Tweak/Optimizer
ASR will analyze your complete system and settings to adjust your PC to function at its maximum performance.

Registry Cleaner
Over time, as you install and uninstall applications, the registry can become cluttered with old entries and broken settings which can result in program crashes, and annoying messages and slow the computer down.
Visit our Advanced System Repair Pro Download page to inform yourself about all the benefits of this software and get a free trial copy of it.
advanced system repair pro

Advanced System Repair Pro

One-click automated PC repair solution
ASR logo
With Advanced System Repair Pro you can easily
Replace damaged files
Restore performance
Free disk space
Remove Malware
Protects WEB browser
Remove Viruses
Stop PC freezing
DOWNLOAD
Privacy Policy | Terms of Use | Uinstall
Advanced System Repair Pro is compatible with all versions of Microsoft Windows including Windows 11

Share this article:

You might also like

Windows 11 Home edition account requirements
Windows 11 has been officially presented during Microsoft’s virtual event on June 24th. Since presentation internet has been pretty live and busy with a discussion about it, some discussions are positive, some not so much but that is expected and it happens always when a new product is presented. One of information that we have about Windows 11 is tied to the home edition of this OS, Windows 11 home edition will require an internet connection at setup, and a Microsoft account in order to be installed and used. Previous versions of Windows could be installed and used with local accounts but it seems Microsoft has abandoned that idea for its new OS. OS will be delivered mostly as updates or via internet download so internet and online requirement make sense but why it cannot use the local account and must have a Microsoft one is beyond me.
Read More
Fix 0x800F0825 update error in Windows 10
Windows updates have become a regular occurrence in our digital lives. They are frequent and have become quite necessary. Most of the time they bring us quality content like fixed security, resolved bugs, and even new features but from time to time update itself can be not downloaded properly or it can have some issues when installing. Windows Update Error 0x800F0825 is one of these update errors that will be reported seemingly after applying the update. Altho annoying error it is nothing system breaking and can be easily resolved. Hello and welcome everyone, today we will provide you with solutions on how to resolve error 0x800F0825 when trying to complete a Windows update.

Run Windows troubleshooter

Built-in Windows troubleshooter can help a lot in resolving these issues and we will try it as a first solution because of its simplicity and ease of use.
  • Click on START
  • Click on settings Windows 10 Start menu with marked settings icon
  • Navigate to Update & Security > Troubleshoot > Additional Troubleshooter > Windows Update
  • Click on Run the troubleshooter
  • Follow onscreen instructions and let the troubleshooter try to solve the issue

Clear contents of SoftwareDistribution & Catroot2 folders

Altho SoftwareDistribution and Catroot2 folders are essential for the update process it can happen that badly downloaded updates or similar corruption can be stored there and thus producing this error.
  • Open file explorer and locate these two folders, go inside and delete content inside them
  • Try updating again to see if corruption inside folders was the issue.

Update manually

If the previous two solutions have not produced a result and the error is still present then go to the official Microsoft Update Catalog and download the update manually The catalog is here. Search for updates from the Windows Update Catalog In the Search box, type your search terms. You can carry out a full-text search, using a keyword, KB article, MSRC bulletin, driver manufacturer, driver model, driver version, product, and a classification. Select the appropriate version of Windows. Search or click on Advanced Search if you want to refine your search. A list will be displayed. Select the updates that you want to download. Click Add for each selection to add it to the download basket.
  • Download the updates. You may be asked to install an Active-X download control to be able to download files from this site
  • Double-click on the downloaded updates to install them
Administrators can download updates from the Microsoft Download Center or the Windows Update Catalog to deploy to multiple computers If you are running Windows Server Update Services (WSUS) 3.0, System Center Essentials (SCE), or System Center Configuration Manager (SCCM) you can import updates directly into these applications. Security updates, critical updates, service packs, update rollups, definition updates, and critical drivers can be configured to synchronize with your server automatically. You can still import these updates into your application by using Microsoft Update Catalog; however, depending on how you configure WSUS, SCE, and SCCM, you may not need to import the updates.

Disable system protection

In some rare cases, antivirus or firewall could interfere with both downloads and execution of certain files. If each previous solution failed disable temporarily your security software and try executing the update again.
Read More
How to Fix Installer Error 1603

Correct Installer Error 1603

Installer Error 1603 - What is it?

Installer Error 1603 message occurs during the installation of the Microsoft Windows installer Package. The error message is often displayed as the following:
'Error 1603: A fatal error occurred during installation.'
It indicates a problem occurred during the installation process and unsuccessful installation.

Solution

Restoro box imageError Causes

The installer error 1603 may occur if:
  • The folder you are trying to install the Windows Installer package to is encrypted
  • The system account does not have full control permissions
  • Incorrect installation
  • Registry issues

Further Information and Manual Repair

To resolve this error on your system, try the solutions listed below:

Solution 1: Install-Package in an Un-Encrypted Folder

Try installing the package to a folder that is not encrypted. However, if the error still persists, try other solutions listed below.

Solution 2: Enable Full System Control Permissions

Sometimes the error may occur when you don’t have system full control permissions. To enjoy full control permissions here’s what you need to do, go to my computer and right-click the drive that you wish to install the Windows Installer Package to. After that click properties and the security tab. If you can’t locate the security tab, this means your Simple File Sharing feature is turned on. You need to turn it off to continue. For that go to my computer, tools, and then click folder options. Now here press the view tab and check the Simple File Sharing box to turn it off. Press OK to save changes. Now you will be able to locate the security tab. Click on the Security tab and verify the name box that contains the system user account. If the system user account is empty then insert the account name. To insert, click Add, and then select user's dialog box, add a name, and close. Now go to the permissions section and check the box ‘Allow’ under full control. After that go to the ‘Advanced’ tab and do the following: If you are an XP user, select ‘Replace permission entries on all child objects with entries shown here that apply to child objects’ and then press OK to confirm. If you are not an XP user, then follow the same instructions but select the check box that says ‘Reset permissions on all child objects and enable propagation of inheritable permissions’ for the system account. Now click OK to confirm. To activate changes you will have to wait for a while. Once the changes are activated, try installing the Windows Installer package again.

Solution 3: Clean and Repair Registry

The Installer error 1630 can occur due to registry problems as well. To resolve registry-related issues download Restoro. This is a cutting-edge and advanced registry cleaner that scans your entire PC for registry-related errors in seconds and resolves them spontaneously. It removes all the unnecessary junk files, bad keys, invalid registry entries, cookies, and internet history cluttering and corrupting the registry. It repairs the damaged system files and repairs the registry right away thereby resolving Installer Error 1630 on your PC. It is safe and efficient. It is embedded with an intuitive algorithm and a sophisticated user-friendly interface. It is easy to use and operate. You can download it on any Windows version. Besides functioning as a registry cleaner, it also functions as an antivirus and a system optimizer. Click here to download Restoro on your PC to resolve all registry issues generating the installer error 1603 on your system.
Read More
New vulnerability found in Windows
Windows users need to be on high alert. Microsoft has confirmed a critical vulnerability has been found in all versions of Windows which presents an immediate threat, and you need to act now. A critical new zero-day hack has been found which affects all Windows versions. windows vulnerabilityTracked as CVE-2021-34484, the “zero-day” flaw enables hackers to breach all versions of Windows (including Windows 10, Windows 11, and Windows Server 2022) and take control of your computer. Microsoft mistakenly thought it had patched the vulnerability (which was first found in August) when it was publicly disclosed in October. But the fix itself was found to be flawed, something the company admitted, and this drew even more attention to the vulnerability. Microsoft subsequently promised to “take appropriate action to keep customers protected” but two weeks later, a new fix has still not arrived. Luckily the third-party security specialist 0patch has beaten Microsoft to the punch with a ‘micropatch that it has now made available for all Windows users “Micropatches for this vulnerability will be free until Microsoft has issued an official fix," 0patch confirmed. You will need to register for a 0patch account and install its download agent before the fix can be applied, but with 0patch fast becoming a go-to destination for hot fixes which beat software companies to the punch this is a no brainer. Hopes will be high that Microsoft can release an effective patch sooner rather than later but, until then, all Windows users must act now if they want to be safe. Download 0patch here: https://blog.0patch.com/2021/11/micropatching-incompletely-patched.html
Read More
Razer unveils their first internal PC hardware
razer pc hardware componentsRazer is a well-known brand among PC gamers and users, it started as a peripheral manufacturer focused on keyboards and mouse but after years passed Razer expanded its inventory offerings. It soon started offering headphones and lately has branched into wider product lines like gaming chairs and protection masks. It is not a big surprise that Razer is expanding into other branches of the PC industry. This time, however, it has revealed not one but three new hardware for your PC. Case fans, all in one liquid cooler and power supply. There are not many details about the products themselves but one thing is one hundred percent confirmed, they come with Razer Chroma, all of them, even the fans.

Katana Chroma ATX PSU

razer power supply
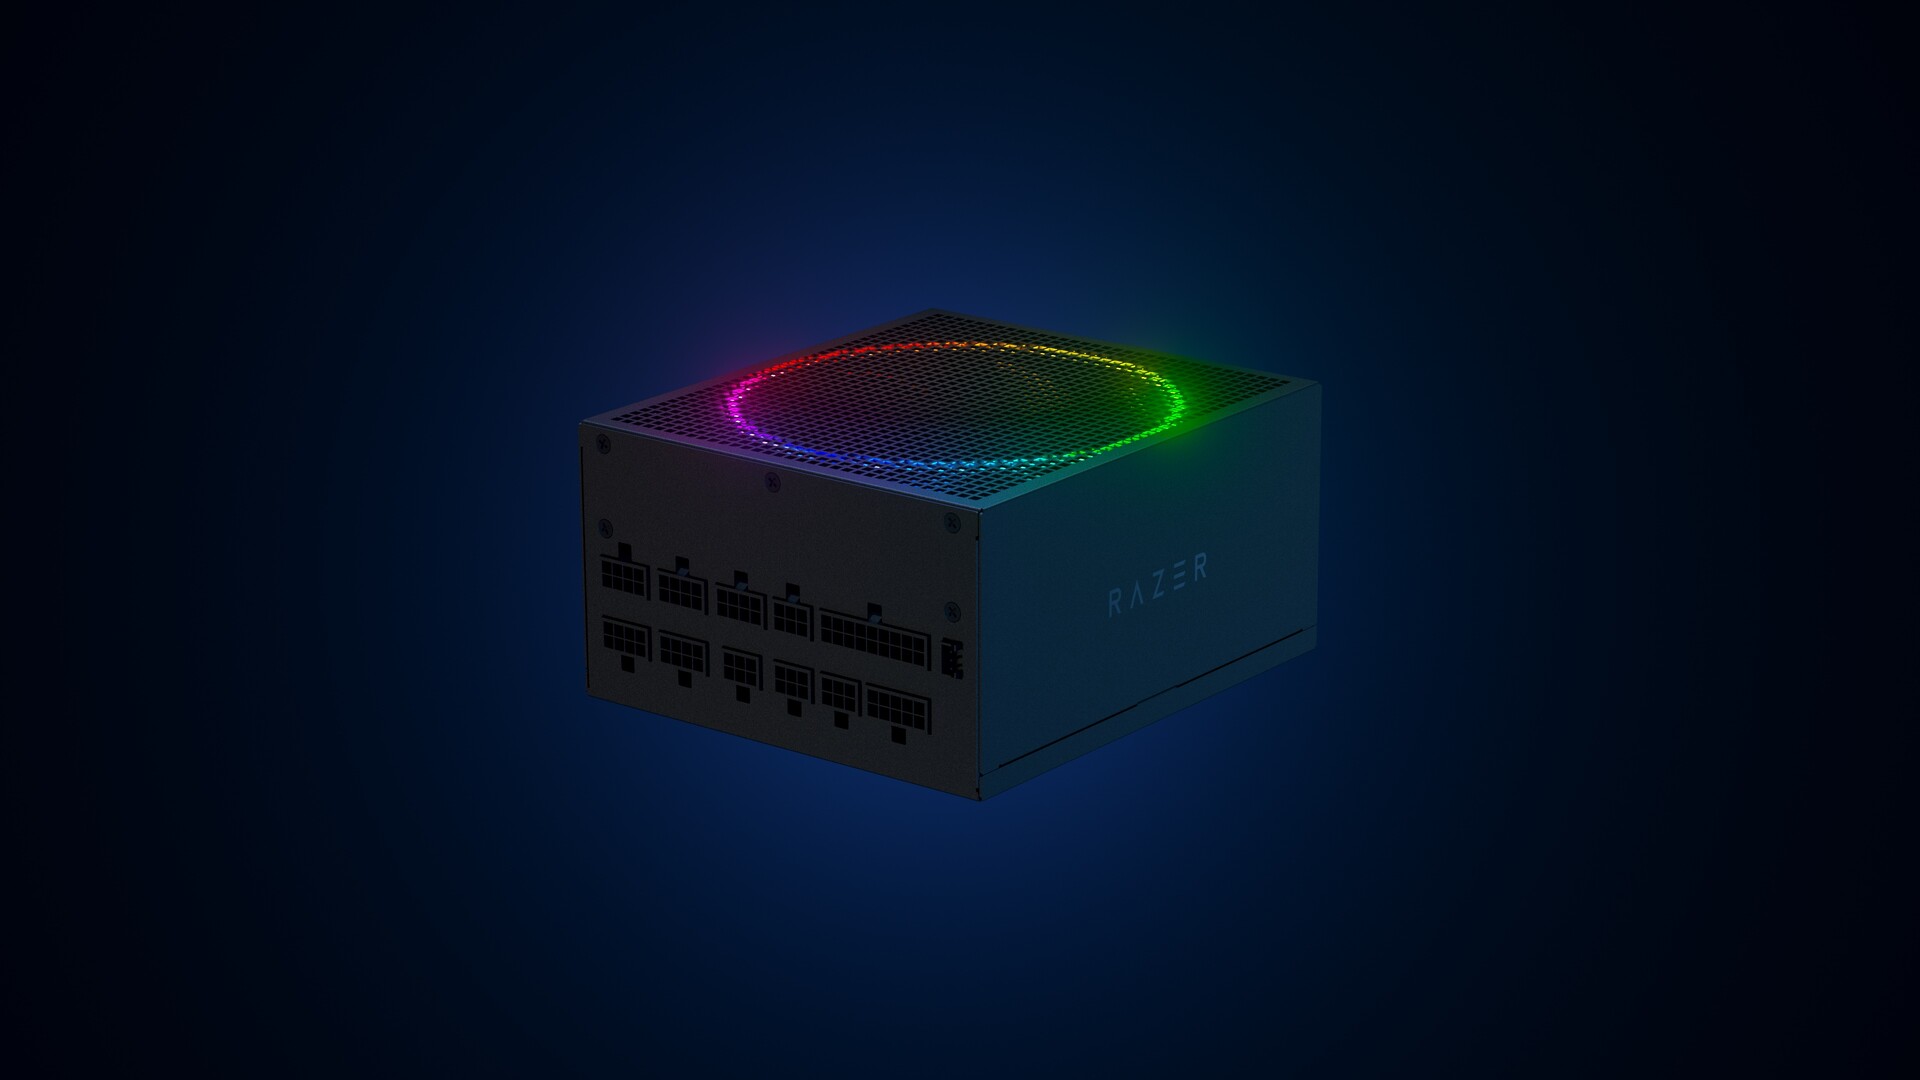
Most interesting for me personally is Razers Katana, the power supply unit. It is a modular power supply ranging from 750W to 1200W with the additional option of Titanium rated one with an impressive 1600W of power. Power supply will start shipping in early 2022 and at the time of writing this article no price range has been released.

Razer Hanbo AIO

razer water coolingHanbo liquid cooler will feature an optimized intake design so it can ensure greater heat transfer and fluid dynamic for improved reliability and silent operation. Radiator comes in 240mm size with two fans and a larger one of 360mm with three fans. The pump will be able to rotate in any direction of full 360 degrees so it can fit in any case. Hanbo will be released in November this year but no pricing has been released so far.

Razer Kunai Chroma case fans

razer case fansKunai fans will boast high static pressure performance with lowered noise. They will go as far as 2200rpm for the 120mm version where the 140mm version will go up to 1600rpm. They will come with addressable LEDs and up to eight fans will be able to be connected to Razer’s PWM fan controller that will come with a magnet at the back for easy attachment to any steel part of PC casing. PWM will use Razer’s Synapse software to customize pulse width modulation in order to improve airflow and noise. PWM will be priced at $49.99 in the Razer Store and it is available for preorder. Fans are priced at $44.99 for one 120mm or $129.99 for a three-pack of 120mm. One 140mm will go for $49.99 and a three-pack will be $129.99.
Read More
Media Player can't detect the length of file
Even with the new Groove Music in Windows 10, a lot of users still prefer to use the old Windows Media Player. This isn’t surprising since Windows Media Player still remains to be one of the best players you can find. However, that does not mean that it is without flaws as it could still encounter some issues from time to time. One of the issues you might encounter when using the Windows Media Player is when you try to burn DVDs or CDs but end up failing due to an error that pops up that says, Windows Media Player cannot detect the length of the file. At the time of writing, it isn’t clear yet what the real cause of the error is. However, there are several fixes that are provided in this post for you to check out so you can resolve the problem. You can try to get rid of any unsupported files from the burning list or you could also try running the Windows Media Player troubleshooters. Aside from that, you could also try to drag and drop music or change the burning speed. For more details, refer to the following options.

Option 1 – Get rid of the unsupported files from the burning list

You must get rid of the unsupported files from the list of files to burn. This list can be found on the right-hand side of the Windows Media Player. One of the indications that a file is causing problems is when there is a white cross in a red circle next to the file. You can simply click on that icon to remove the file from the burning list. Once you’ve gotten rid of all the unsupported files, try to burn your files to the CD or disk once more.

Option 2 – Try running the Windows Media Player troubleshooters

The next thing you can do to fix the error is to run the built-in troubleshooters for the Windows Media Player. Windows 10 actually comes pre-packed with three troubleshooters designed for Windows Media Player. They can help in fixing the “Windows Media Player cannot detect the length of the file” error. To run these troubleshooters, simply tap the Win + R keys to open the Run dialog box and type “msdt.exe -id WindowsMediaPlayerConfigurationDiagnostic” for the Windows Media Player Settings troubleshooter or type “msdt.exe -id WindowsMediaPlayerLibraryDiagnostic” for the Windows Media Player Library troubleshooter, or type “msdt.exe -id WindowsMediaPlayerDVDDiagnostic” for the Windows Media Player DVD troubleshooter.

Option 3 – Try to drag and drop music

Another thing you can check out is to drag and drop all the tracks into the Windows Media Player before you burn them. All you have to do is open the folder where the tracks are located and highlight all of them and then drag them to the Windows Media Player. It should now be able to detect the length of each one of the tracks without any errors.

Option 4 – Try to change the burning speed

Since the burning speed is set to fastest by default, you can try to change the burning speed to resolve the problem. Just open the Options window and then go to the Burn tab. From there, select either Medium or Slow burning speed and save the changes made. Now try to burn your files to the CD or disk once again.
Read More
Error 740 Requested operation requires elevation
If you are trying to open a folder or run a program or delete a file but you encounter an error message instead saying, “Error (740), The requested operation requires elevation” on your Windows 10 computer, then this post should help. Make sure that you follow each one of the options given below carefully.

Option 1 – Always run the program as an administrator

There are some apps that require administrator privilege before they can be opened. So if you are got the “Error (740), The requested operation requires elevation” error when you try to open a particular app on your computer, you have to try opening it as administrator instead. On the other hand, if you are already using an administrator account or if you are a member of the administrator group, this option may not work for you so just proceed to the next one but if you’re only using a regular account, then follow these steps:
  • First, right-click on the app you are trying to open and select Properties.
  • After that, go to the Compatibility tab and check the checkbox labeled “Run this program as an administrator”.
  • Next, click the Apply and OK buttons and see if the app opens without any problem.

Option 2 – Try to change the folder permissions

If you encounter Error 740 while opening a folder, then you need to try changing the folder permissions.
  • First, right-click on the folder and click Properties.
  • Next, go to the Security tab and click the Advanced button.
  • After that, check the checkbox labeled, “Replace all child object permission entries with inheritable permission entries from this object” and then click the Apply and OK buttons to save the changes made.

Option 3 – Try disabling UAC

The User Account Control or UAC settings might be the one that’s responsible for Error 740 which is why you have to disable the User Account Control and then verify if it’s the one that triggers the error or not. To do that, simply search for “Change user account control settings” in the Taskbar search box and then drag the blue bar down to the bottom and click the OK button to save the change made.

Option 4 – Select the Elevate without prompting option in the Group Policy Editor

There is an option in the Group Policy Editor which allows you to disable the UAC prompt. Disabling the “Elevate without prompting” option can help in resolving Error 740 and to disable it, follow the steps below.
  • Tap the Win + R keys to open the Run dialog box.
  • Then type “gpedit.msc” in the field and hit Enter to open the Group Policy Editor.
  • Next, navigate to the following path:
Computer Configuration > Windows Settings > Security Settings > Local Policies > Security Options
  • From there, go to the Security Options folder where you can find a policy named “User Account Control: Behavior of the elevation prompt for administrators in Admin Approval Mode”. Double click on it to open its options.
  • Now select the Elevate without prompting option from the drop-down menu and click OK.
Read More
Fix Windows is still setting up ... Code 56
If your internet suddenly stops working on your Windows 10 computer and you get an error message saying, “Windows is still setting up the class configuration for this device (Code 56)”, then read on as this post will show you what you can do to resolve it. This kind of issue has something to do with the Network Adapter and you can see this error message in the Properties menu of the corresponding Network Adapter under the Device Manager. This kind of issue could be caused by many things. For one, it could be caused by your VPN connection if you are using one or it could also be due to an outdated driver. Whatever the cause may be, here are some suggestions you have to check out to fix the error.

Option 1 – Check your VPN

When you install a virtual machine or VPN software on your computer, a new setup will be added in the Network Connection settings and helps your computer in using that adapter setting each time the VPN is turned on. Assuming that you are using an Ethernet connection but your system is trying to use another adapter or settings, that’s when issues occur and one of them is the “Windows is still setting up the class configuration for this device” error. To fix it, you can try to disable your VPN temporarily and see if the error is resolved or not and if turns out that your VPN is the culprit, you have to uninstall it and install a new one or its latest version. To uninstall it, follow the steps below.
  • Tap the Win + R keys to open the Run dialog box
  • Then type “appwiz.cpl” in the field and hit Enter to open the Programs and Features in Control Panel.
  • From there, look for the VPN service you are using, select it and then click on Uninstall to remove it.
  • After that, restart your computer and try to install the latest version of the program again. It should work now. If not, proceed to the next available option below.

Option 2 – Try to update or rollback or uninstall the Network Adapter drivers

You might also want to update, roll back or disable your Network drivers to fix the “This operation failed as no adapter is in the state permissible for this operation” error.
  • Tap the Win + R keys to launch the Run window and then type in the “devmgmt.msc” command and hit Enter to open the Device Manager window.
  • Under the Device Manager, you will see a list of drivers. From there, look for the Network Adapters and expand it.
  • Then right-click on each one of the Network drivers and depending on your preference, you can either select “Update driver”, “Disable device” or “Uninstall device”.
  • After that, restart your PC and see if it helped in fixing the netio.sys Blue Screen error.

Option 3 – Try to run the Network Adapter troubleshooter

To run the Network Troubleshooter, refer to these steps:
  • Open the Search bar on your computer and type in “troubleshoot” to open the Troubleshoot settings.
  • Next, scroll down and select the “Network Adapter” option from the right pane.
  • Then click on the Run Troubleshooter” button.
  • After that, your computer will check for any possible errors and will pinpoint the root cause of the problem if possible.
  • Restart your computer.

Option 4 – Try to reset the Network

You might perform a Network Reset to resolve the problem if none of the three given options above worked. This will reset the entire network configuration including your IP address. To perform Network Reset, follow these steps:
  • Tap the Win + I keys to open Settings.
  • From there, go to the Network and Internet section.
  • Next, scroll down and look for “Network Reset” under the status pane.
  • After that, click on Network Reset and then on Reset now to start resetting the network configuration. Once done, check if it is able to fix the error or not.
Read More
How to remove weather widget from W11
The latest Windows 11 update has brought with it not so popular widget from Windows 10, the weather widget that will reside into the taskbar and constantly show stuff like temperature, weather conditions, etc. The weather widget is not a bad thing but most users found it a little annoying and turned it off in Windows 10. If you wonder how can you do the same but this time inside Windows 11 please keep reading. weather widget
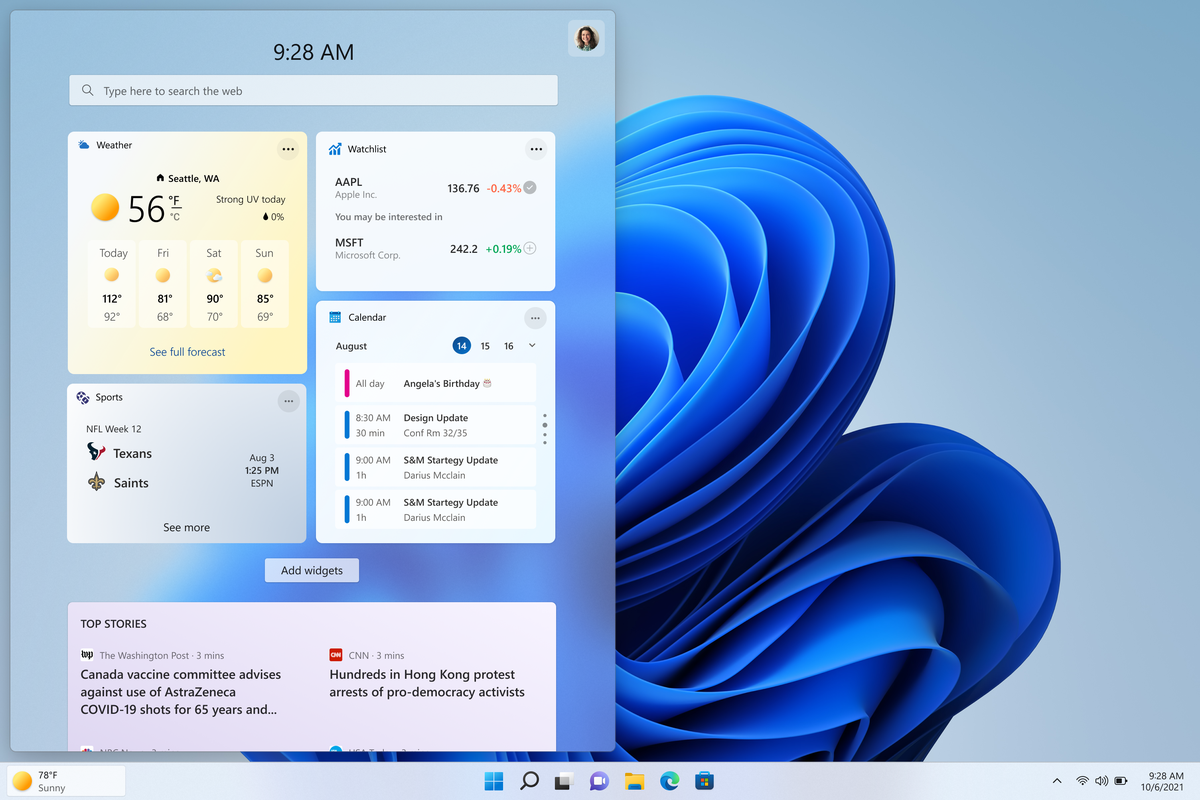
The first step is to right-click  anywhere on the taskbar (in empty space) and choose Taskbar settings Once the taskbar settings are opened, find Widgets and click on the switch on the far right to turn it off, immediately no more information will be shown on the taskbar and it will be free again. And that is all there is to it.
Read More
Nostalgic gaming with Retroid pocket 2
We have talked about gaming on old computers and have covered new and upcoming Steam deck handheld console. Today we are combining old gaming with a handheld console and our target of talk is Retroid pocket 2. This product is packed with really high-quality plastic and with some great features in it. retroid pocket 2So let's dive into this cool handheld in more detail and find out why we like it so much.

Good manufacturing quality

Plastic and overall manufacturing quality are really, really good. The battery is great, packing 4000mAh that can hold over 3 hours of nonstop gaming, and all buttons and joysticks are great. The screen is a 640 x 480 60Hz 3.5″ IPS screen (4:3 aspect ratio) that performs really great for its purpose, retro gaming. There is a Digital D-Pad and dual analog joysticks. The right joystick is the lower profile to avoid being accidentally moved when pressing the four gaming buttons. There are three buttons at the bottom which are Home, Start, and Select. On either side are good-quality stereo speakers. On the bottom of the device are a Micro SD Card slot and a 3.5mm headphone port. On the top of the device are Left and Right shoulder and trigger buttons. There are the power button and volume adjustments. There are a USB Type-C OTG port and a Micro HDMI output for connection to a TV.

Good technical statistics

Good, not great but then again since this is retro handheld you cannot really expect some crazy stuff like alder lake inside. So the console is punching ARM Cortex A7 CPU with 2 cores and a clock of 1.5GHz paired with ARM Mali 400-MP2 500MHz GPU. The console has 1GB LPDDR3 RAM memory and 8GB eMMC Storage where 5GB is freely available, the rest is taken for OS. As mentioned before the display is 640x480 resolution with a size of 3.5″. The battery is Lithium-Ion with a power of 4000mAh and on the handheld, there is a USB Type-C connector, 3.5mm headphone jack, and Micro-HDMI. It also has Wifi/Bluetooth 4.0

Retroid Pocket 2 OS and support

Pocket 2 comes with Android 6 but you can update its firmware to the 8.1 version on the official site that I would highly recommend. New versions of the handheld will come with 8.1 on it from the box. Having Android as OS opens many possibilities like you can download Android apps such as Steam Link, allowing you to play actual PC games on your Retroid Pocket 2. Not just that, if it does get a newer version of Android it could even have the ability to use xCloud, Xbox’s cloud gaming service. Of course, hardware will not be able to handle modern games but the option is still there and for some old PC titles available on steam like Commander Keen, for example, this is a great option. The console can emulate basically everything up to Dreamcast, including N64, PSP, and Playstation 1. It can emulate Nintendo DS also, but it can only do so with one screen. The only problem with this console is you will need to install and update Apps. You’ll need to learn about RetroArch, an app that lets you download emulators or cores to play games.

Retroid price

The last thing on the list is the price of the console itself. Going just under the 100$ mark this really makes it an affordable option for plenty of people that would like to experience retro handheld gaming or for ones like me, nostalgic gamers wanting to relive some era of playing games on the road.

Conclusion

Among Chinese handheld devices for retro gaming, Retroid Pocket 2 is really on top of what the market can offer. If you are looking for a great handheld retro console and are not afraid of little dive-ins into the OS and various configurations, Pocket 2 will reward you with plenty and wide emulation support.
Read More
1 2 3 162
Logo
Copyright © 2022, ErrorTools. All Rights Reserved
Trademarks: Microsoft Windows logos are registered trademarks of Microsoft. Disclaimer: ErrorTools.com is not affiliated with Microsoft, nor claim direct affiliation.
The information on this page is provided for information purposes only.
DMCA.com Protection Status