Media Player can't detect the length of file

Even with the new Groove Music in Windows 10, a lot of users still prefer to use the old Windows Media Player. This isn’t surprising since Windows Media Player still remains to be one of the best players you can find. However, that does not mean that it is without flaws as it could still encounter some issues from time to time.

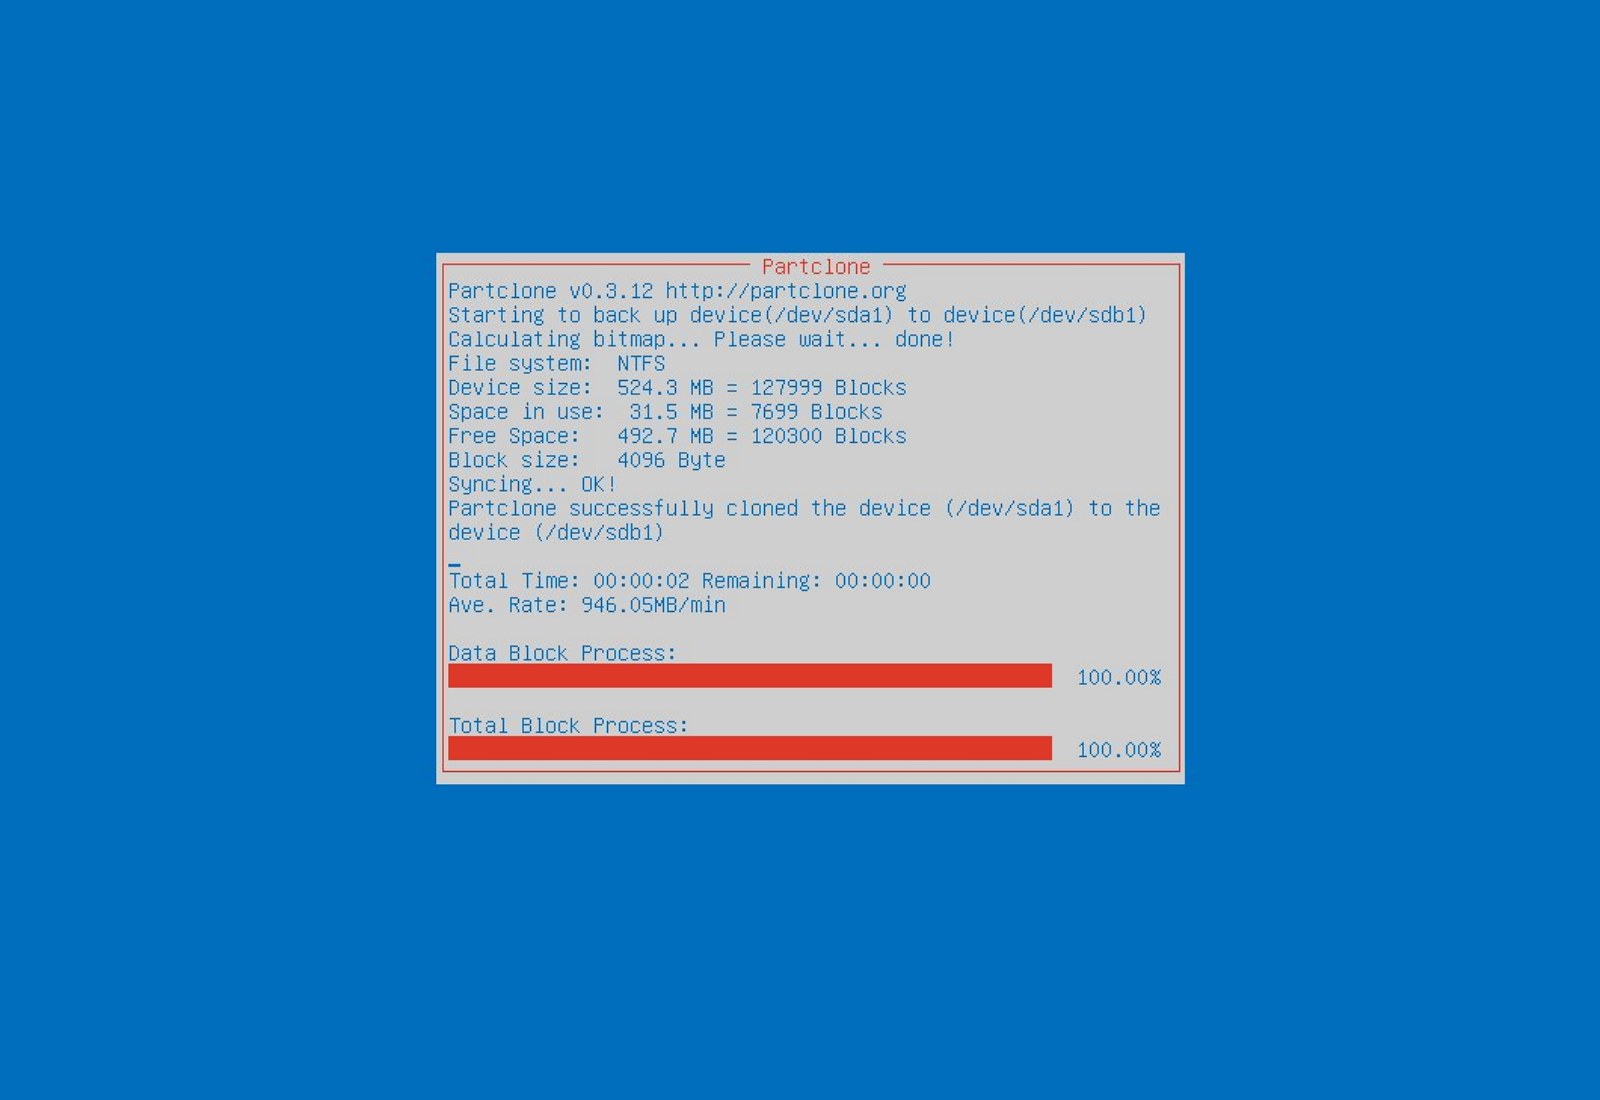
One of the issues you might encounter when using the Windows Media Player is when you try to burn DVDs or CDs but end up failing due to an error that pops up that says, Windows Media Player cannot detect the length of the file. At the time of writing, it isn’t clear yet what the real cause of the error is. However, there are several fixes that are provided in this post for you to check out so you can resolve the problem. You can try to get rid of any unsupported files from the burning list or you could also try running the Windows Media Player troubleshooters. Aside from that, you could also try to drag and drop music or change the burning speed. For more details, refer to the following options.

Option 1 – Get rid of the unsupported files from the burning list

You must get rid of the unsupported files from the list of files to burn. This list can be found on the right-hand side of the Windows Media Player. One of the indications that a file is causing problems is when there is a white cross in a red circle next to the file. You can simply click on that icon to remove the file from the burning list. Once you’ve gotten rid of all the unsupported files, try to burn your files to the CD or disk once more.

Option 2 – Try running the Windows Media Player troubleshooters

The next thing you can do to fix the error is to run the built-in troubleshooters for the Windows Media Player. Windows 10 actually comes pre-packed with three troubleshooters designed for Windows Media Player. They can help in fixing the “Windows Media Player cannot detect the length of the file” error. To run these troubleshooters, simply tap the Win + R keys to open the Run dialog box and type “msdt.exe -id WindowsMediaPlayerConfigurationDiagnostic” for the Windows Media Player Settings troubleshooter or type “msdt.exe -id WindowsMediaPlayerLibraryDiagnostic” for the Windows Media Player Library troubleshooter, or type “msdt.exe -id WindowsMediaPlayerDVDDiagnostic” for the Windows Media Player DVD troubleshooter.

Option 3 – Try to drag and drop music

Another thing you can check out is to drag and drop all the tracks into the Windows Media Player before you burn them. All you have to do is open the folder where the tracks are located and highlight all of them and then drag them to the Windows Media Player. It should now be able to detect the length of each one of the tracks without any errors.

Option 4 – Try to change the burning speed

Since the burning speed is set to fastest by default, you can try to change the burning speed to resolve the problem. Just open the Options window and then go to the Burn tab. From there, select either Medium or Slow burning speed and save the changes made. Now try to burn your files to the CD or disk once again.

If you like to learn and find out more about various Windows errors, and how to repair them go to our vast archive or use search to find articles that will explain and help you in solving your issue.
However, if you prefer to do things fast and with automatization then we are proposing to use an automated solution for your issues. The application that we are recommending is Advanced System Repair Pro
Advanced System Repair utilizes multiple tools all in one to give you a quick, simple, reliable, and very thorough diagnosis of your PC. It brings you all the tools you need in one program to clean, fix, protect, optimize and boost your PC!
1-Click Maintenance
All the tools to make it simple and easy! It's like having a professional technician at the click of a mouse.

Junk Cleaner
Keeping your computer free from unnecessary clutter also helps make your computer last longer. Like any other machine, if you keep it clean and take care of it, it will serve you better for longer!

Optimize background apps
Optimize applications background activity with the built-in Application Optimizer feature.

Disk Defrag
With a simple 1-click, Advanced System Repair speeds up your PC by assembling fragmented files on your machine and organizing them more efficiently.

Malware Removal
Finds and removes all types of harmful malware including trojans, worms, bots, adware, spyware, PUPs, and more!

Privacy Cleaner
The all-in-one privacy suite to Clean Your Tracks & Protect Your Privacy! Make your computer safe, secure, and more efficient!

System Tweak/Optimizer
ASR will analyze your complete system and settings to adjust your PC to function at its maximum performance.

Registry Cleaner
Over time, as you install and uninstall applications, the registry can become cluttered with old entries and broken settings which can result in program crashes, and annoying messages and slow the computer down.
Visit our Advanced System Repair Pro Download page to inform yourself about all the benefits of this software and get a free trial copy of it.
advanced system repair pro

Advanced System Repair Pro

One-click automated PC repair solution
ASR logo
With Advanced System Repair Pro you can easily
Replace damaged files
Restore performance
Free disk space
Remove Malware
Protects WEB browser
Remove Viruses
Stop PC freezing
DOWNLOAD
Privacy Policy | Terms of Use | Uinstall
Advanced System Repair Pro is compatible with all versions of Microsoft Windows including Windows 11

Share this article:

You might also like

Creating custom Keyboard shortcuts in Windows
Keyboard shortcuts are undeniably one of the most utilized ways and are helpful in maximizing productivity through the various applications at top speed in Windows 10. It offers the option to create custom keyboard shortcuts that allow users to launch apps, and even websites, instantly. There are already tons of keyboard shortcuts that are built-in in Windows 10 but in case you don’t know, you can actually create new ones. Doing so is not a difficult task and in this post, you will be guided on how you can exactly create custom keyboard shortcuts in your Windows 10 computer. Most users would create desktop shortcuts or pin the apps in the taskbar to speed up the process of working on their computers. It is an easy task to do since you can easily do it by dragging an app from the Start Menu to the desktop or by simply right-clicking on the executable app and selecting the “Create Shortcut” option. However, doing so would take physical effort and there are times when you have to minimize all the apps to get to the desktop so you can click the shortcut and this is where the Custom Keyboard Shortcuts come in handy. You can create Custom Keyboard Shortcuts in Windows 10 for various programs – from the traditional desktop apps to the new universal apps – you can fling in a shortcut so that you can instantly open them faster compared to when doing it manually and besides this also wouldn’t affect any of the ongoing system activity. To get started, you need to follow the steps provided below carefully.

To add Custom Keyboard hotkeys to a program and website desktop shortcuts, here’s what you have to do:

Step 1: First, you have to right-click on the app or website and select Properties. Step 2: After that, go to the Shortcut tab and from there, you will see the “Shortcut key” textbox which allows you to enter a new or custom keyboard shortcut for the app or website. Step 3: In the textbox field, input your preferred letters to set up the new hotkey. Keep in mind that this custom shortcut has to be combined with the Ctrl + Alt keys which means that if you want to select “N”, you have to tap the Ctrl + Alt + N keys. Step 4: Once done, click on the Apply and OK buttons to save the changes made and then close the window. Step 5: After that, tap the newly created keyboard shortcut, Ctrl + Alt + N keys again to open the app or website you’ve set up earlier.

To add Custom Keyboard hotkeys to a desktop app or an independent program that can be installed using direct download, here’s what you have to do:

Step 1: First, open the Start Menu and look for the icon/tile of the required app in the menu. However, if you are not able to find the desired app, then just click on the All Apps option to navigate through all the apps that are installed on your PC. Step 2: Once you find the app, just right-click on it and select More and then click on the “Open file location” option. Step 3: This will open a new window with the shortcut icon. Right-click on the app’s shortcut icon and select Properties. Step 4: This will open the Properties window where you can add the shortcut combination. Keep in mind that just like the previous method, the custom shortcut has to be combined with the Ctrl + Alt keys. For instance, if you select E, then you also have to set a keyboard shortcut that includes Ctrl + Alt, so it will be, Ctrl + Alt + E. Step 5: Once you’re done, click on the Apply and OK buttons to save the changes made. You should now be able to use the custom shortcut key you’ve set.
Read More
Fix Minecraft Won’t Launch in Windows 10
Minecraft has taken the world by the storm, it was an indie project game and it went mainstream. Dream of every game developer I guess. The dream of every gamer on the other hand is to double click on the game and to play it and not to deal with various issues, especially if they are launch issues. Luckily for all of you gamers, here at errortools we game as well and we are happy to bring you a solution on how to fix Minecraft won't launch issue. So sit back, relax and keep on reading, and hopefully enough you will be gaming again in no time. Follow the guide presented step by step, point by point how it is presented for the quickest way to get back in Minecraft. This guide also presumes that your hardware configurations meet at least the minimum system requirements for running Minecraft.
  1. Disable antivirus and firewall

    90% of the time this is the issue why Minecraft is not working, your antivirus or firewall has detected it as a false positive, and access to system internet, etc has been cut. Try disabling it and if everything is working fine add it to the antivirus or the firewall exception list.
  2. Run Minecraft as admin

    Minecraft will sometimes refuse to run if it does not has administrator privileges. To make sure this is the case locate the Minecraft executable, right-click on it and choose properties. Go to the compatibility tab and check Run as Administrator box.
  3. End Minecraft process

    It came to knowledge that even if Minecraft is not running it can have its processes active in the background. Press CTRL + SHIFT + ESC to open task manager Locate if Minecraft has a process running If you find the Minecraft process right-click on it and choose End Task
  4. Run Minecraft in compatibility mode

    If Minecraft still refuses to start try running it in compatibility mode in the previous Windows version Locate Minecraft executable file in its install location Right-click on it and choose properties In the properties, windows go to the compatibility tab Check run this program in compatibility mode for: Select previous version of the operating system, try Windows 8 or Windows 7
  5. Update graphic card driver

    The best bet is to go to your GPU manufacturer's website and download the latest version of the driver of your GPU.
  6. Remove mods, plugins, texture packs

    Mods, plugins, texture packs are all great but sometimes they can cause GPU overloads and other issues to see if this is the case try running Minecraft in Vannila mode without anything installed, just pure and clean Minecraft as it was just downloaded and installed.
  7. Reinstall Minecraft

    If everything else failed, reinstall Minecraft. There might be a chance that some DLL file was deleted or corrupted by mistake or that some crucial files are missing. Clean reinstallation will fix all of these issues.
Read More
Make FLASH content available in your browser
FLASH icon Hello and welcome everyone, just a few years ago we had FLASH video content on the internet, we had FLASH games, full FLASH website experiences, and more, but then flash was shut down mostly due to security reasons meaning that in just a few months we have lost most of FLASH web content. However, there is still FLASH content on the internet even today, there are still FLASH videos and flash games, but we can not play any of that content since browsers do not support FLASH and you can not get the FLASH plugin for browsers. So what might be the solution for this situation?

Ruffle and FLASH emulation

Emulation of course. We will not be able to get the flash player working, well at least not the original and official one, but we can make flash content playable again inside our browsers. The first thing is first, we need to get an emulator package from the internet in order for this trick to work, one we will be using is RUFFLE. It is lightweight, it is free, it is open source and it is reliable, everything we need. Download RUFFLE from its official website here. For Chrome and Edge download the ZIP package, for Firefox, go to the Firefox section of the tutorial. There is also a desktop version of RUFFLE there so if you are keen on playing your flash content on your desktop computer you might well grab that as well, but for the sake of this tutorial where we are enabling flash in our browsers, we will not focus on that part since it is pretty straightforward. Now once you have downloaded the RUFFLE emulator, please extract it to the desired folder somewhere on your computer. Once it is extracted, start your browser of choice and follow instructions.

FOR CHROME:

  1. Navigate to: chrome://extensions/
  2. Turn ON developer mode in the top right corner
  3. Click on Load unpacked
  4. Navigate to the folder where you have extracted RUFFLE
chrome extensions

FOR EDGE:

  1. Navigate to: edge://extensions/
  2. Turn ON developer mode on the bottom left corner
  3. Navigate to the folder where you have extracted RUFFLE
  4. Turn RUFFLE ON
edge extensions

FOR FIREFOX:

  1. Go to the RUFFLE download page, we can not use the zip package we were using for Chrome and Edge
  2. Right-click on the Firefox download link
  3. Save link by clicking on Save link as...
  4. Navigate to about: debugging
  5. Click on this Firefox
  6. Click Load Temporary Add-on
  7. Select the .xpi that you have downloaded

BONUS:

If you want to enable FLASH content live on your website use:  <script src="path_to_ruffle/ruffle.js"></script>
Read More
How to Fix REGISTRY_ERROR in Windows
As you know, you can encounter Blue Screen errors at any given point after your computer boots up and can just reboot it randomly which results in loss of unsaved work. One of these Blue Screen errors is the “REGISTRY_ERROR”. This kind of Stop error has a bug check value of 0x00000051 which indicates your computer’s registry has encountered a severe error. There could be a number of causes for this error but at the time of writing, it is quite difficult to narrow them down to one component. If you face this kind of Blue Screen error, worry not as this post will guide you in fixing it. As mentioned, this error indicates that there is something wrong with the registry, particularly an I/O error while it tried to read one of its files. This may be caused by hardware issues or file system corruption. It could also be due to failure in a refresh operation which is only used by the security system and only when resource limits are encountered. To fix the Registry_Error Blue Screen, you can try to use the CHKDSK utility or the System File Checker, or the DISM tool or run the Blue Screen troubleshooter. You may also try to reset your computer or repair Windows by using installation media.

Option 1 – Run the Check Disk utility

The first thing you can do to fix the REGISTRY_ERROR Blue Screen error is to run the Check Disk utility. How? Follow these steps:
  • In the Windows Search box, type “command prompt” and from the search results, right-click on Command Prompt and select “Run as administrator”.
  • After opening Command Prompt, type this command and tap Enter: chkdsk <Drive Letter>: /f /r /x /b
  • The command you entered will start to check for errors and fix them automatically. Else, it will throw an error message saying, “Chkdsk cannot run because the volume is in use by another process. Would you like the schedule this volume to be checked the next time the system restarts? (Y/N)”.
  • Tap the Y key to schedule Disk Check the next time your computer restarts.

Option 2 – Run the Blue Screen Troubleshooter

The Blue Screen troubleshooter is a built-in tool in Windows 10 that helps users in fixing BSOD errors like REGISTRY_ERROR. It can be found in the Settings Troubleshooters page. To use it, refer to these steps:
  • Tap the Win + I keys to open the Settings panel.
  • Then go to Update & Security > Troubleshoot.
  • From there, look for the option called “Blue Screen” on your right-hand side and then click the “Run the troubleshooter” button to run the Blue Screen Troubleshooter and then follow the next on-screen options. Note that you might have to boot your PC into Safe Mode.

Option 3 – Run System File Checker

  • Open Command Prompt with admin privileges.
  • After that, execute this command: sfc /scannow
  • Once the scan is completed, restart your computer and then check if the REGISTRY_ERROR is now fixed.

Option 4 – Run the DISM tool

You can try running the Deployment Imaging and Servicing Management or DISM tool to fix the REGISTRY_ERROR Blue Screen error. Using this built-in tool, you have various options such as the “/ScanHealth”, “/CheckHealth”, and “/RestoreHealth”.
  • Open the Command Prompt with admin privileges.
  • Then type in the following commands and make sure to hit Enter right after you type each one of them:
    • Dism /Online /Cleanup-Image /CheckHealth
    • Dism /Online /Cleanup-Image /ScanHealth
    • exe /Online /Cleanup-image /Restorehealth
  • Do not close the window if the process takes a while as it will probably take a few minutes to finish. Once it’s done, restart your computer.

Option 5 – Reset your computer

  • Tap the Win key or click on the Start button located in the Taskbar.
  • Then click on the Power button at the bottom right portion of the screen.
  • Next, press and hold the Shift key on your keyboard and then click on Restart. This will restart your Pc into the Advanced Startup options.
Note: Once you have access to the Advanced Startup options, you have to go to the setting which allows you to Reset your Windows 10 PC. All you have to do is select Troubleshoot > Reset this PC to reach the following screen Afterward, select either the “Keep my files” option and then proceed to the next on-screen instructions that follow to reset your Windows 10 computer without losing your files.

Option 6 – Try to perform repair install by creating a Windows 10 installation media

  • Click this link and then click the Download Tool Now button.
  • Next, click the “Use the tool to create installation media (USB flash drive, DVD, or ISO file)…” option and follow the next given instructions on the screen.
  • Now select the ISO file option in step 5.
  • After that, you should now have an ISO file.
  • Next, go to the location where you’ve downloaded the ISO file.
  • Then right-click on the Windows 10 ISO file and select the Open with option and then select File Explorer.
  • Now click on “setup.exe” and follow the next instructions that appear on the screen. When asked, you have to select either Nothing (clean install) or Keep personal files only option. Take note that you must not select the “Keep personal files, apps, and Windows settings”.
Read More
Open Source Software Alternatives
Open Source Software is developed, tested, or improved through public collaboration and distributed with the idea that the must be shared with others, ensuring an open future collaboration. In other words, it is free software developed and maintained by public contribution. Many open-source projects have reached performance and usability like their paid alternatives, some have even surpassed them. Here we will explore open source alternatives to paid applications, you will find alternatives to paid ones that aim to do the same task.
  1. LINUX - alternative to Windows or macOS

    When it comes to the operating system, Windows and macOS mostly dominate the home market, but if you go a little deeper into the OS world you will hear this talk about LINUX and its distributions. LINUX is an open-source operating system, it has many various distributions aimed at different types of users and they are also open source as well. Its security and account privileges, as well as complete control over it, make it one of the best-operating systems in the world, many servers that run websites today use LINUX as their choice of operating system mostly due to its superior security features. If LINUX is good enough for big web companies, I am sure it will be at least satisfactory to you as well. Get your LINUX distribution here. open source os linux
  2. Thunderbird - alternative to outlook

    A great alternative to any mail client actually, connect all of your emails into thunderbird and use it as the centralized email client for all of your email needs. Thunderbird does not lack any features that its paid counterparts have and overall it is a great application worth installing. Grab it from here. open source email client thunderbird
  3. VLC media player - media player able to play almost anything

    Are you looking for a great media player alternative to Windows media player or iTunes? Look no further, VLC is a lightweight media player that can play almost any file type, it is customizable and packed with features even its paid counterparts would envy. Its playback features are unmatched by other applications and once you try it, I am sure you will hardly go back from it. Give it a go and grab it from here. open source media player vlc
  4. KeePass - password manager

    Keepass is a simple, user-friendly lightweight password generator and manager, it uses industry-standard AES encryption and two-factor authentication to keep the details of your accounts safe and secure. you can store him and the database on a USB stick for safekeeping making it a great one to use on a go, wherever you need it. Get it from this link. open source password manager keypass
  5. FileZilla - FTP client

    A lightweight and future-rich FTP solution. It supports remote file editing and resuming of lost transfers, overall great application which anyone who needs this type of software should not overlook. Download it from its official website. open source FTP client FileZilla
  6. Audacity - alternative to Audition, Fl, apple logic pro,...

    Digital audio editor and recording computer software with some great features like recording audio from multiple sources, post-processing of all types of audio, including podcasts by adding effects such as normalization, trimming, and fading in and out. Audacity has a great following and it is well documented, easy to learn and use. Grab it from here. open source sound editor audacity
  7. Shortcut - alternative to adobe premiere, avid media composer, DaVinci resolve

    The shortcut is a video editor application that demonstrates how long an open-source project can go if enough dedication and work are put into it, started as not so great and not so feature-packed in beginning, today it can easily contend with its paid counterparts with its non-destructive editing, color gradation, keyframing, etc. It is running and using FFmpeg, an open-source video framework that lets it open and works with virtually any video or audio format. Download it from here. open source video editor shotcut
  8. Gimp - alternative to adobe photoshop

    This one has been around since 1996 and it is one of the best maintained open source applications. With its features like built-in support for layers, filters, and automatic photo enhancement. It also makes it easy to create new graphic design elements and you can really take things to the next level by downloading plug-ins created by the broader GIMP open source community. Gimp is the best pixel manipulation-free tool on the market and with the right skills, it can go side by side with adobe's flagship product. Check it out here. open source photo editor gimp
  9. Inkscape - alternative to adobe illustrator, Corel draw

    What is Gimp for photoshop that is Inkscape for illustrator. This free open-source vector graphic tool does not fall behind with its tools in comparison to its paid counterparts and I would highly recommend it for anyone. Features like alpha blending, cloning on-point path manipulations can assure that you can create anything you want inside it. get your copy from here. open source vector tool inkscape
  10. Libre office - alternative to MS office

    Libre office is one of the most quality office suite there, it has spreadsheets, word processor, presentation app, calculation applications, database application, and diagrams. All these applications create and make one great suite that can open Microsoft Office files and even work with them naturally. Completely free and active in development there is no reason, not t use it in your daily routine. Go to its official website and download it for a test run. open source office suite libre office
  11. Amarok - alternative to iTunes

    Amarok is an audio player with a broad range of features like integration with multiple Web audio services, dynamic playlists, bookmarks, scripting, context view, and more. get it from here. open source music player amarok
  12. PDF Creator - alternative to adobe acrobat

    As its paid counterpart PDF Creator lets you make PDF files from any application that could print. It works the same way as adobe acrobat and supports encryption and digital signature, it lacks in PDF forms a little but if that is not something that you need, it is a great alternative to acrobat and completely free. Download it from here. open source PDF maker PDFCreator
  13. Blender - Alternative to Autodesk Maya, Autodesk 3dmax, foundry Modo, cinema4d,...

    3D modeling and animation software is very expensive. From the point of home user long it has been lost dream to have industry quality 3D modeling, animation, and rendering application for an affordable price. Blender has made that dream a possibility, completely free and open-source this package offers everything that its paid counterparts offer, some could even argue that since its open-source nature and availability of full code it offers even more. Why you are still here? Go get it here. open source 3d application blender
  14. Bluefish - alternative to Adobe Dreamweaver

    When it comes to web editing and code editing applications, notepad ++ seems like a person go-to application, but if you prefer a more professional suited IDE for web development check out Bluefish, auto-filling, code syntax, and constant development make sure that this application will not go away soon and it is worth investing your time in it. Get it from here. open source wed editor bluefish
  15. ClamWin - alternative to Kaspersky, BItdefender, Norton

    This antivirus has over 600000 users and active database updates also feature a full email scanner, scanning scheduler, and File Explorer integration. It is far better than other freeware alternatives and if you are looking for a free antivirus option look no further, ClamWin is here to stay. Grab it from here. open source anti virus ClamWin
  16. Natron - alternative to adobe aftereffects, foundry nuke

    Full-featured node-based composition and effects suite. Natron is a powerful Digital Compositor that can handle all of your 2D/2.5D needs. Its robust OIIO file formats and OpenFX architecture is what makes Natron the most flexible open-source compositor for the visual effects community. Its interface and functionally are the same across all platforms such as macOS, Linux, and Windows. Natron has a powerful keying, roto/roto paint, 2D tracking tools that are staple for all current film production project that requires visual effects. Get natron from here. open source composition and effect application natron
  17. Clonezilla - alternative to Norton Ghost

    When it comes to cloning hard drives usually there is only one application, Norton ghost. Clonezilla tends to change that by offering the same usability as the ghost. Grab your copy from here. open source HD clone clonezilla
  18. FreeCAD - alternative to Autodesk AutoCAD

    Autodesk AutoCAD has years of development and dedication of its team behind it to keep it as the best CAD application on the market and it shows. However, if you are not really a hardcore professional who needs all of AutoCAD features and can live without some automation inside it FreeCAD is one of the best free open source options, it will certainly get the job done and with its dynamic simulation and analysis, it is guaranteed that you can achieve same results as in AutoCAD with little more time investment. Get if here. open source CAD freecad
  19. Octave - alternative to MATLAB

    Octave is the best open-source educational tool used for numerical computation with an interactive environment. The tool features powerful mathematics-oriented syntax with built-in plotting and visualization tools and also Octave syntax is largely compatible with Matlab. Get your copy from here. open source math tool octave
  20. Godot - alternative to Unity3D, Unreal

    Godot is a lightweight feature-packed node-based game development engine, completely open-source and free to use for commercial projects. The engine has reached 3.2 version and it is more and more adopted by various independent game makers across the globe, recently there are to of video tutorials and documentation to get you up and running and its open-source nature lets you modify the engine itself in any way that suits and benefits you. Also, any project made with Godot is completely yours, there are no hidden fees or anything similar. Download it from here. open source game engine godot

Conclusion

That's it, my pick for 20 open source alternatives which I believe you should at least try and if you end up with at least one, you have saved some hard-earned money. And always remember:
  1. Open-source programs give you complete freedom without any shady terms and conditions.
  2. Open-source software code is readily available for anyone who wants it, so anyone can use it, share it, modify it for their own needs, and study it.
  3. No spying eyes, no tracking, and no telemetry
  4. In some cases, open-source tools offer features or performance benefits that surpass their commercial counterparts.
  5. No hidden charges, completely free.
If you would like to read more helpful articles and tips about various software and hardware visit errortools.com daily.
Read More
How to Fix Libcurl.dll Error Code

Repair Libcurl.dll Error Code

Libcurl.dll - What is it?

Libcurl.dll is a Dynamic Link Library file; a component of Google Earth. Google Earth is a 3D software tool. Libcurl.dll file is visible within a 3D application with the help of which software users can see satellite images, maps, and other geography-related information from their computers. The Libcurl.dll file enables users to map the earth using superimposing images received via satellite imagery and also aerial photography. However, Libcurl.dll error messages may occur while using or installing this program. The libcurl.dll error message is displayed in either of the following formats:
  • "Cannot find [PATH]libcurl.dll"
  • "The file libcurl.dll is missing."
  • "Libcurl.dll Not Found"
  • "This application failed to start because libcurl.dll was not found. Re-installing the application may fix this problem."

Solution

Restoro box imageError Causes

Libcurl.dll may occur due to several reasons. These include:
  • Bugged program
  • Viral infection may add malicious codes to Libcurl.dll file and generate error messages
  • Registry issues
  • Missing libcurl.dll file
  • Hard disk failure
  • Misconfigured system files
If you experience difficulty in using Google Earth and come across libcurl.dll error message, it is advisable to resolve the error immediately typically because this error has severe consequences. If not fixed timely, it can lead to the blue screen of death errors, system hang-ups and freezes, sluggish PC performance, PC crashes and browser crashes, slow internet speed, and other system errors.

Further Information and Manual Repair

This error is crucial but the good news is that it is easy to fix. To resolve it, you don’t have to hire a technical expert and pay hundreds of dollars. You can repair the issue with ease by yourself regardless of whether or not you are technically sound. Continue reading to find out the best solutions to fix libcurl.dll error code on your system without any hassle. Here are some of the easiest and the best methods to resolve libcurl.dll error:

1. Check your recycle bin

Since .dll files are shared by multiple programs, there is a possibility that you might have accidentally deleted libcurl.dll file when uninstalling a certain program on your system which was also sharing this file. And because of this, you may experience the missing libcurl.dll error message. To resolve it, all you have to do is to check your recycle bin. If you find the file here, restore it. Once restored, try running the program again! If the error code does not appear, then this means it is resolved. However, if it continues to persist, then try other solutions given below.

2. Scan for Malicious Software on your System

While downloading files and checking unknown emails malicious software like viruses, malware and spyware can also enter your PC. Such software can damage and corrupt dll files. This could be the underlying cause of libcurl.dll error on your PC too. So, to resolve the issue, scan and remove malicious viruses and spyware from your system by using a powerful anti-virus. However, please note, anti-viruses are notorious for slowing PC performance and also sometimes you may also have to stop all other activities on your PC.

3. Clean the Cluttered Disk, Repair dll files and Restore the Registry

Libcurl.dll file error may also occur due to hard disk failure. This triggers registry issues. If you don’t clean the registry every now and then, it overloads the hard disk with files. These include both important and unnecessary files like internet history, temporary files, cookies, junk files, invalid registry entries, and bad keys. These clutter the disk, damaged dll files, and the registry. Therefore first you need to clean the cluttered disk, repair libcurl.dll files and restore the registry. Executing it manually can take a lot of time as you may find it complex if you are not a computer programmer. However, the best, easiest, and quickest way to clean, repair, and restore the registry is to download Restoro

Why Restoro?

Restoro is an innovative, advanced, and multi-functional PC repair tool loaded with powerful and PC performance boosting utilities including an intuitive registry cleaner,  an antivirus, Active X controls, and class module, and a system optimizer. So, whether the libcurl.dll error message is triggered by a viral infection, hard disk failure, or registry issues, this tool takes care of all! The registry cleaning feature scans all registry issues, cleans the hard disk by removing unnecessary and obsolete files, repairs damaged and corrupt dll files, and restores the registry thereby resolving libcurl.dll error in seconds. Simultaneously, the antivirus utility removes viruses and malware if found. And the system optimizer feature ensures optimum PC performance. Restoro is easy to navigate and operate. It is user-friendly, safe, bug-free, and efficient. Furthermore, it is compatible with all Windows versions. Click here to download Restoro and repair your PC and resolve libcurl.dll error today!
Read More
KFConsole enters the console competition
Yes, you read that right, KFC is making a console partnered with Cooler Master. Bizzare at it sounds, it is even more bizarre that the console is designed to keep your food warm!!! You can pull out the drawer from the console out on its top and place some food there in order to keep it warm. kfconsole drawerThe console itself is coming in cylindrical shape powered by Intel CPU and ASUS GPU of the unknown chipset. It has Seagate Baraccuda 1TB SSD and it is VR-ready. The console will have raytracing and will be 4K ready.

My thoughts

Well, my thoughts are somewhat strange, on one side I am not really sold on food heating gimmicks and without specific hardware specifications, it is difficult to say how much power the console will have. Price is also not leaked so that is also a stumbling stone for making an informed opinion. I am a little puzzled and concerned about this whole heating food thing because personally, I can see 2 issues: Console overheating and fat dripping on inside hardware, I am sure they have somehow eliminated this but I would be very interested to see how.
Read More
Fix Chrome is Waiting for cache in Windows
There are times when you may encounter some glitches on your Google Chrome browser in your Windows 10 computer. One of these glitches is when the connection status of Chrome keeps on saying “Waiting for cache” which is displayed at the bottom-left side of the browser in the Status bar. At the time of writing, it isn’t clear yet what could be causing this problem. Although it is possible that it’s caused by browser cache, some extensions in the browser. On the other hand, it could also be caused by the browser profile or due to some fragmented files or that the SSD is occupied. Whatever the cause is, you can check out each one of the given options below to fix the problem.

Option 1 – Try clearing browser cache

There are times when some data in the browser is conflicting with the loading of the website and triggers some problems like “Waiting for cache”. And so you can try to clear your browser’s data. This might be a very basic solution but oftentimes it works in fixing this kind of error in Google Chrome. Follow the steps below to clear the data in your browser.
  • Open your Google Chrome browser.
  • After that, tap the Ctrl + H keys. Doing so will open a new panel that allows you to delete the browsing history and other data in your browser.
  • Now select every checkbox that you see and click on the Clear browsing data button.
  • Then restart your Chrome browser and check if you can now open any website or not.

Option 2 – Try to disable writing of Cache files to the SSD

You can also disable the writing of Cache files to the SSD to stop Google Chrome’s dependency on the SSD to gather all the cache files.

Option 3 – Delete the User Profile in Chrome

You can also try deleting the User Profile folder in Chrome. To do so, follow these steps:
  • You need to first end every single process of Google Chrome. To do so, right-click on the Taskbar then select the Task Manager. And if the Task Manager is not responding, you can just use the Alt + Ctrl + Del keys and then select the Task Manager.
  • After opening the Task Manager, under Processes, look for Google Chrome’s process which would most likely be named “chrome.exe”.
  • Right-click on Google Chrome’s process and then select the End task option.
  • Next, tap the Win + R keys to open the Run dialogue box.
  • Then copy and paste “%USERPROFILE%AppDataLocalGoogleChromeUser Data” and hit Enter.
  • From there, look for a folder named “Default folder” and then copy the folder to another drive as a backup.
  • After creating a copy of the folder, delete the Default folder.
  • Next, open Google Chrome again and go to Settings > Advanced > Reset.

Option 4 – Reset Chrome

Resetting Chrome can also help you fix the error. This means that you will be restoring its default settings, disabling all the extensions, add-ons, and themes. Aside from that, the content settings will be reset as well and the cookies, cache, and site data will also be deleted. To reset Chrome, here’s what you have to do:
  • Open Google Chrome, then tap the Alt + F keys.
  • After that, click on Settings.
  • Next, scroll down until you see the Advanced option, once you see it, click on it.
  • After clicking the Advanced option, go to the “Restore and clean up option and click on the “Restore settings to their original defaults” option to reset Google Chrome.
  • Now restart Google Chrome.

Option 5 – Try to clean reinstall Chrome

There are instances when programs leave files behind after you’ve uninstalled them and the same thing can happen to Chrome so before you reinstall Chrome, you have to make sure that you have deleted the User Data folder. To do so, refer to the following steps:
  • Hit the Win + R keys to open the Run dialog box.
  • Next, type “%LOCALAPPDATA%GoogleChromeUser Data” in the field and hit Enter to open the User Data folder.
  • From there, rename the default folder and name it something else, e.g. “Default.old”.
  • After that, install Google Chrome again and check if the issue is now fixed.
Read More
Software Licensing Service 0xC004F009 Error
A copy of Windows gets into a grace period when it is installed on a computer which means that you can use your Windows computer without any constraints on its feature. However, if you suddenly encounter an error code 0xC004F009 then this means that the grace period has already expired. In such cases, you will see the following error message on your screen:
“Error Code 0xC004F009, The Software Licensing Service reported that the grace period expired.”
One of the possible causes of this error is that it could be that the grace period has already expired way before the system was activated which is a result of which the system is in the Notifications state at this moment. The error code 0xC004F009 has something to do with MAK-enabled computers in an enterprise when it comes to Volume Licensing. One of the reasons that this error pops up is due to the possibility that the computer was not activated yet even when it was already connected to the Enterprise. Another most likely cause of the error is when the system was never connected with the Enterprise at all and the given grace period has expired before your computer system is activated. Whatever the real cause of this error, this post will guide you in fixing it. Just refer to the instructions given below to fix it.

Option 1 – Try activating Windows using the command-line tool

  • First, you need to obtain your MAK key from the IT administrator.
  • Once you have it, tap the Win + R keys on your keyboard and then type “cmd” in the field and hit Enter to open an elevated Command Prompt.
  • After that, type this command and hit Enter to install the product key or replace the existing one: Slmgr.vbs –ipk <your mak key>
  • Next, type another command and hit Enter: slmgr.vbs –ato
  • Once you’ve executed the given commands, Windows should be activated after it connects to Microsoft servers and then gives it some time and try to check if error code 0xC004F009 is now fixed or not.

Option 2 – Try activating Windows using your mobile phone

Activating Windows 10 can also be done using your phone. Just note that you have to call Microsoft to do so.
  • In the Start Search box, type in “Slui 4” and tap Enter.
  • Next, select your country and click on Next.
  • Keep the window open and call the toll-free number of the country you’re from.
  • Afterward, a confirmation ID should be given by the automated system which you must take a note of.
  • Finally, in the box on the window, type in the confirmation ID and click on the Activate button. That should do it.

Option 3 – Try to prolong the grace period

On the other hand, it is also possible for you to prolong the grace period but you might have to get another genuine Windows key for that. Before you proceed, you need to create a System Restore point first afterwards, refer to the steps given below to increase the grace period of the Software Licensing Service on your Windows 10 computer.
  • Tap the Win + R keys to open the Run dialog box and type “Regedit” in the field then hit Enter to open the Registry Editor.
  • After that, navigate to this registry key: HKEY_LOCAL_MACHINESOFTWAREMicrosoftWindowsCurrentVersionSetupOOBEmediabootinstall
  • Next, change the value of the “mediabootinstall” key to “0”.
  • Now open Command Prompt with admin privileges and then type this command and hit Enter: slmgr –rearm
  • The command you just entered will add another grace period to your system activation. After that, you have to obtain a new key and then activate Windows.

Option 4 – Try running the Windows 10 Activation Troubleshooter

You can also try to run the Windows 10 Activation troubleshooter to help resolve the error code 0xC004F009.
  • Go to Settings and then select Activation.
  • After that, click on the Windows Activation and then troubleshoot. This will help you address most of the commonly found activation issues in Windows devices.
Read More
Outlook: We are unable to connect right now
If you are trying to start the Microsoft Outlook application on your Windows 10 computer but you suddenly receive a message box with an error message that says, “We are unable to connect right now, Please check your network and try again later”, read on as this post will guide you on how you can fix this error. This kind of error in Microsoft Outlook could be due to some issues with your internet connection or it could also be due to the VPN software if you’re using one. Whatever the cause is, there are several potential fixes you can check out to fix the error. You have to check your internet connection or try changing it. You could also try to disable your VPN software or restart your computer or Microsoft Outlook and try starting the app again. In addition, you can also try entering your password again or check some settings in the Windows Registry or open Microsoft Outlook in Safe Mode. Refer to the guidelines provided below to further troubleshoot the problem.

Option 1 – Try to check your internet connection

The first thing you can do to resolve the problem is to check your internet connection. You have to make sure that you are connected to the internet and that it has a stable connection.

Option 2 – Try to restart your computer or Microsoft Outlook and try again

The next thing you can do to fix the error is to restart your computer or Microsoft Outlook. This simple process can actually help you fix the problem as it could only be a glitch that can be fixed with a simple restart.

Option 3 – Try to enter your password again

You could also try entering your password again to resolve the error. Just click on the Cancel button to open a dialog box and then enter your password again and see if it helps. Note that you might have to do it for all your email IDs in Microsoft Outlook.

Option 4 – Try opening Microsoft Outlook in Safe Mode and disabling its add-ins

Putting Microsoft Outlook into Safe Mode can help you identify the problems in it. Safe Mode also helps you fix a certain issue caused by some corrupted add-in. To start your Microsoft Outlook in Safe Mode, refer to these steps:
  • Tap Win + R on your keyboard to open the Run dialog box.
  • Next, type in “Outlook /safe” and press Enter to run the command.
  • After that, it will ask you to select a profile that you want to use. Just simply select a profile from the drop-down menu and click on the OK button.
  • Now you have successfully opened Microsoft Outlook in Safe Mode. As a result, it will start with disabling the add-ins. Meaning to say, there is some corrupted add-in that’s causing the problem, and that you need to look for that add-in and either disable it or have it permanently removed.
  • Once you’ve identified the corrupted add-in, you can disable or remove it by going to File > Options > Add-ins. From there, select the option “COM Add-ins” from the drop-down menu and then click the Go button.
  • Finally, close Microsoft Outlook once you’ve covered the given steps above and then try to open it normally.

Option 5 – Try disabling the VPN

As pointed out earlier, if you are using VPN, this could be the reason why you’re getting the “We are unable to connect right now, Please check your network and try again later” error so the most obvious thing to do is for you to turn off the VPN and try to run the Windows Update once more. And if you use a VPN software that works using their software, you can just completely exit or log-off from its account. On the other hand, if you are using a built-in Windows 10 VPN, you can simply turn it off or delete all the settings you have created there.

Option 6 – Try to check the settings in the Registry

  • Tap the Win + R keys to open the Run utility and type “Regedit” in the field and tap Enter to open the Registry Editor.
  • Next, navigate to this registry path: HKEY_LOCAL_MACHINESYSTEMCurrentControlSetservicesNlaSvcParametersInternet
  • From there, look for the DWORD named “EnableActiveProbing” and make sure that its value is set to “1”. When the value is set to 1, it means that it is Enabled. This is the default setting and is used to identify the status of the network connectivity of your computer.
Read More
1 2 3 162
Logo
Copyright © 2022, ErrorTools. All Rights Reserved
Trademarks: Microsoft Windows logos are registered trademarks of Microsoft. Disclaimer: ErrorTools.com is not affiliated with Microsoft, nor claim direct affiliation.
The information on this page is provided for information purposes only.
DMCA.com Protection Status