Windows is unable to run Automatic Maintenance

As you know, Windows has a built-in Automatic Maintenance feature that takes care of important tasks such as security scanning and updating, Windows software updates, Disk Defragmentation, System Diagnostics, Disk Volume Errors, and many more. So if you receive an error message saying, “Windows is unable to run automatic maintenance, The maintenance schedule is unavailable”, then this post will guide you in what you can do to resolve this issue.

Here are some suggestions you can try if the Automatic Maintenance in your Windows 10 PC is not able to run.

Option 1 – Enable Automatic Maintenance

It is possible that Automatic Maintenance has been disabled so you can try enabling Automatic Maintenance on your Windows 10 PC. To do so, follow these steps:

  • Go to Control Panel.
  • From there, select System and Security > Security and Maintenance > Automatic Maintenance.
  • After that, set the time you want to run the Automatic Maintenance and then check the checkbox saying, “Allow scheduled maintenance to wake up my computer at the scheduled time”.
  • Click OK to save the changes.

On the other hand, you can also enable Automatic Maintenance via the Registry Editor. But before you proceed, you need to create a System Restore Point first.

  • Tap the Win + R keys to open the Run dialog box.
  • After that, type “Regedit” in the field and hit Enter to open the Registry Editor.
  • Navigate to the following path:

HKEY_LOCAL_MACHINESOFTWAREMicrosoftWindows NTCurrentVersionScheduleMaintenance

  • Next, look for the “MaintenanceDisabled” key and then double click on it to open it and then set its value to “0”.
  • Click OK and exit the Registry Editor.
  • Restart your computer.

Option 2 – Check the Task Scheduler Services status

Majority of the tasks in Windows 10 run via services. So it is most likely that either the Service has been stopped or is set to the manual which is why Windows is unable to run Automatic Maintenance. Thus, you need to change it to automatic mode.

  • Tap the Win + R keys to open Run.
  • Type “services.msc” in the field and hit Enter to open Services.
  • Next, look for the Task Scheduler service and tap the T key on your keyboard which should take you to the services that start with T.
  • Double click on the Task Scheduler service and select the Automatic option under the Startup Type.
  • If it is not started yet, click on the Start button.
  • Then click Apply and OK to save the changes.

Option 3 – Check the Status in Task Scheduler

You can also try checking the status in the Task Scheduler. Just open the Task Scheduler > Task Scheduler Library > Microsoft > Windows > TaskScheduler. From there, make sure that Idle Maintenance, Maintenance Configurator, and Regular Maintenance are enabled.

Option 4 – Run the System File Checker

The SFC or System File Checker scan could detect and automatically repair damaged system files that could be causing the Automatic Maintenance issue. SFC is a built-in command utility that helps in restoring corrupted files as well as missing files. It replaces bad and corrupted system files with good system files. To run the SFC command, follow the steps given below.

  • Tap Win + R to launch Run.
  • Type in cmd in the field and tap Enter.
  • After opening Command Prompt, type in sfc /scannow and hit Enter.

The command will start a system scan which will take a few whiles before it finishes. Once it’s done, you could get the following results:

  1. Windows Resource Protection did not find any integrity violations.
  2. Windows Resource Protection found corrupt files and successfully repaired them.
  3. Windows Resource Protection found corrupt files but was unable to fix some of them.

Option 5 – Run the DISM tool

The DISM tool is another command-line tool in the Windows operating system that could help users fix various corrupted system files. To use it, follow these steps:

  • Open the Command Prompt as admin.
  • Then type in this command: DISM /Online /Cleanup-Image /RestoreHealth
  • The DISM command you entered will repair the corrupted system image. Do not close the window if the process takes a while as it will probably take a few minutes to finish.
  • Restart your PC.
If you like to learn and find out more about various Windows errors, and how to repair them go to our vast archive or use search to find articles that will explain and help you in solving your issue.
However, if you prefer to do things fast and with automatization then we are proposing to use an automated solution for your issues. The application that we are recommending is Advanced System Repair Pro
Advanced System Repair utilizes multiple tools all in one to give you a quick, simple, reliable, and very thorough diagnosis of your PC. It brings you all the tools you need in one program to clean, fix, protect, optimize and boost your PC!
1-Click Maintenance
All the tools to make it simple and easy! It's like having a professional technician at the click of a mouse.

Junk Cleaner
Keeping your computer free from unnecessary clutter also helps make your computer last longer. Like any other machine, if you keep it clean and take care of it, it will serve you better for longer!

Optimize background apps
Optimize applications background activity with the built-in Application Optimizer feature.

Disk Defrag
With a simple 1-click, Advanced System Repair speeds up your PC by assembling fragmented files on your machine and organizing them more efficiently.

Malware Removal
Finds and removes all types of harmful malware including trojans, worms, bots, adware, spyware, PUPs, and more!

Privacy Cleaner
The all-in-one privacy suite to Clean Your Tracks & Protect Your Privacy! Make your computer safe, secure, and more efficient!

System Tweak/Optimizer
ASR will analyze your complete system and settings to adjust your PC to function at its maximum performance.

Registry Cleaner
Over time, as you install and uninstall applications, the registry can become cluttered with old entries and broken settings which can result in program crashes, and annoying messages and slow the computer down.
Visit our Advanced System Repair Pro Download page to inform yourself about all the benefits of this software and get a free trial copy of it.
advanced system repair pro

Advanced System Repair Pro

One-click automated PC repair solution
ASR logo
With Advanced System Repair Pro you can easily
Replace damaged files
Restore performance
Free disk space
Remove Malware
Protects WEB browser
Remove Viruses
Stop PC freezing
DOWNLOAD
Privacy Policy | Terms of Use | Uinstall
Advanced System Repair Pro is compatible with all versions of Microsoft Windows including Windows 11

Share this article:

You might also like

Choosing default browser in Windows 11
Default applications in previous Windows versions were a pretty straightforward process. The user went to the settings application and picked for each category which application he would like to choose from the list of installed ones. In Windows 11 things are little changed. In this article, we will show you how to choose the default internet browser inside Windows 11, and sadly it is a more tedious task than in previous versions.

windows 11 default browser
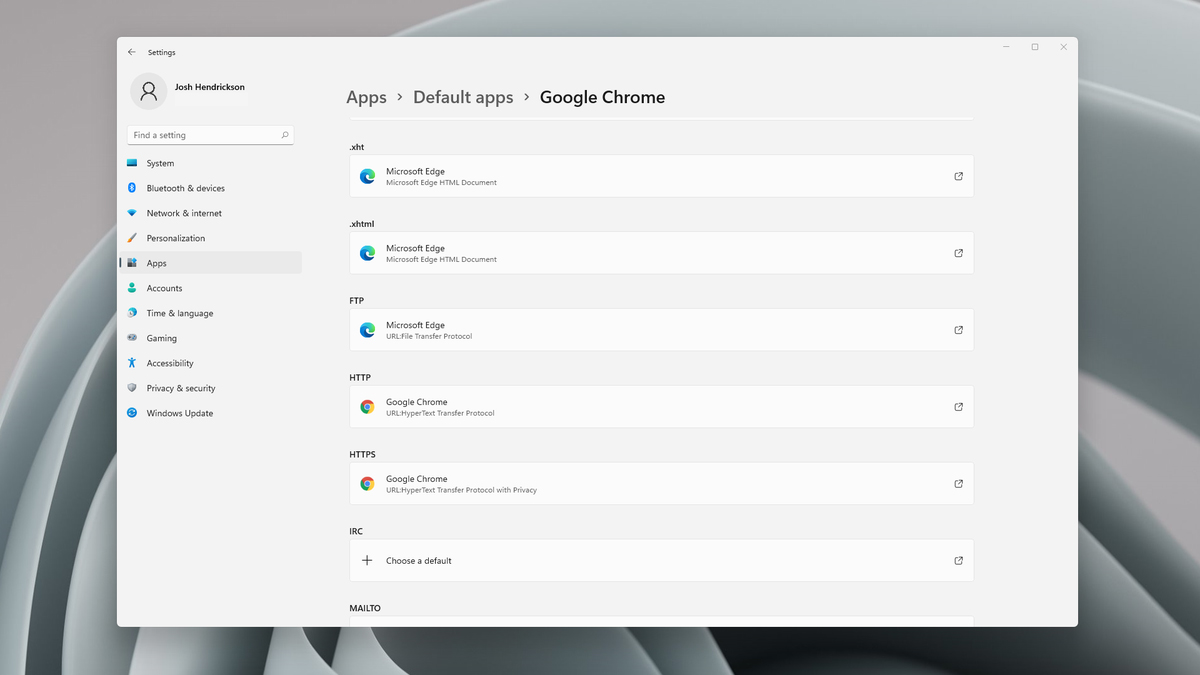
Choosing default browser in settings

As in previous versions of the Windows operating system you will need to use the settings application in order to change your default Internet browser. Previously, in Windows 10, a variety of general categories like email, web browser, and photo viewer were all listed under the Default Apps section of the Settings panel. It was easy to click on one of those categories and click on the option you like best from the small pop-up suggestion window. In the Windows 11 Insider Build, you’ll see a gauche list of an individual file or link types that you’ll need to specify your preferred browser for. The types include: HTM, HTML, PDF, SHTML, SVG, WEBP, SHT, FTP, HTTP, and HTTPS. There are additional optional types you can specify your preferred browser for as well. The issue here is in order to use a single browser which most users do you will have to go through each file type and set your preferred one. I am really not sure why this was introduced or why it has to be this way, all I can do is hope that in the final release of Windows 11 this feature will be rolled back as it used to be and that you could set your default browser in just one simple click.
Read More
Software Licensing Service 0xC004F009 Error
A copy of Windows gets into a grace period when it is installed on a computer which means that you can use your Windows computer without any constraints on its feature. However, if you suddenly encounter an error code 0xC004F009 then this means that the grace period has already expired. In such cases, you will see the following error message on your screen:
“Error Code 0xC004F009, The Software Licensing Service reported that the grace period expired.”
One of the possible causes of this error is that it could be that the grace period has already expired way before the system was activated which is a result of which the system is in the Notifications state at this moment. The error code 0xC004F009 has something to do with MAK-enabled computers in an enterprise when it comes to Volume Licensing. One of the reasons that this error pops up is due to the possibility that the computer was not activated yet even when it was already connected to the Enterprise. Another most likely cause of the error is when the system was never connected with the Enterprise at all and the given grace period has expired before your computer system is activated. Whatever the real cause of this error, this post will guide you in fixing it. Just refer to the instructions given below to fix it.

Option 1 – Try activating Windows using the command-line tool

  • First, you need to obtain your MAK key from the IT administrator.
  • Once you have it, tap the Win + R keys on your keyboard and then type “cmd” in the field and hit Enter to open an elevated Command Prompt.
  • After that, type this command and hit Enter to install the product key or replace the existing one: Slmgr.vbs –ipk <your mak key>
  • Next, type another command and hit Enter: slmgr.vbs –ato
  • Once you’ve executed the given commands, Windows should be activated after it connects to Microsoft servers and then gives it some time and try to check if error code 0xC004F009 is now fixed or not.

Option 2 – Try activating Windows using your mobile phone

Activating Windows 10 can also be done using your phone. Just note that you have to call Microsoft to do so.
  • In the Start Search box, type in “Slui 4” and tap Enter.
  • Next, select your country and click on Next.
  • Keep the window open and call the toll-free number of the country you’re from.
  • Afterward, a confirmation ID should be given by the automated system which you must take a note of.
  • Finally, in the box on the window, type in the confirmation ID and click on the Activate button. That should do it.

Option 3 – Try to prolong the grace period

On the other hand, it is also possible for you to prolong the grace period but you might have to get another genuine Windows key for that. Before you proceed, you need to create a System Restore point first afterwards, refer to the steps given below to increase the grace period of the Software Licensing Service on your Windows 10 computer.
  • Tap the Win + R keys to open the Run dialog box and type “Regedit” in the field then hit Enter to open the Registry Editor.
  • After that, navigate to this registry key: HKEY_LOCAL_MACHINESOFTWAREMicrosoftWindowsCurrentVersionSetupOOBEmediabootinstall
  • Next, change the value of the “mediabootinstall” key to “0”.
  • Now open Command Prompt with admin privileges and then type this command and hit Enter: slmgr –rearm
  • The command you just entered will add another grace period to your system activation. After that, you have to obtain a new key and then activate Windows.

Option 4 – Try running the Windows 10 Activation Troubleshooter

You can also try to run the Windows 10 Activation troubleshooter to help resolve the error code 0xC004F009.
  • Go to Settings and then select Activation.
  • After that, click on the Windows Activation and then troubleshoot. This will help you address most of the commonly found activation issues in Windows devices.
Read More
Fix Failed to transfer logged messages ...
One of the most common hardware issues with any PC usually has something to do with the hard drive so if your hard drive experiences some errors, you could end up losing a lot of important information that’s stored in your computer. This is why Windows provided users with the CHKDSK utility which helps in looking for bad sectors on the drive. However, there are times when the CHKDSK utility could also face issues like the following error:
“Failed to transfer logged messages to the log event with status 50.”
According to security experts, this error is most likely due to the hard drive or RAM being in a “Read-only” state. It could also be due to some physical issues with the hard drive. On the other hand, it could be that the system is prevented from creating logs by some drive, service, or malware. To fix this error, you have to check if the hard disk is writable. You could also try to run the CHKDSK utility in Safe Mode or you could also check the physical status of your hard disk or external drive.

Option 1 – Check if the hard disk is writable

Although the CHKDSK utility checks for bad sectors in the hard drive, it also has to create logs of the result. And as states in the error message, the CHKDSK utility is not able to log the logged messages. This kind of error occurs when the log can’t be written to an installation disk. You can find the log in this location, “C:WindowsSystem32LogfilesSrtSrtTrail.txt”. Now you have to check if the drive writable by following these steps:
  • Log in as administrator and right-click on the system drive.
  • Select Properties and then go to the Security tab. Here, check if you are allowed to modify the drive. If not, click on Edit (as an administrator).
  • Now edit the permissions for the SYSTEM and Administrators group. Note that these are the only default settings for these two groups or usernames.
  • Then click on the Apply button save the changes made and exit.

Option 2 – Run the CHKDSK utility in Safe Mode

You could also try to run the CHKDSK utility in Safe Mode as this might solve the error.
  • Boot your computer in Safe Mode.
  • Next, open Command Prompt with admin privileges.
  • Then type and enter this command to execute it: chkdsk c: /f /r
  • Wait until the process is completed and boot your computer normally and then run the CHKDSK utility again and check if the “Failed to transfer logged messages to the log event with status 50” error is now fixed.

Option 3 – Try to check the hard disk or external drive physically

If the first two options didn’t work, you might want to check the physical status of your hard disk or external drive as the problem could root from there. You can try to tighten the wires that connect the hard disk to the motherboard. However, if it doesn’t help, you should seek out assistance from a hardware technician.
Read More
Fatal error occurred while trying to sysprep
There are several kinds of errors you could encounter when you are running Windows 10 on a virtual machine. The Windows OS knows the difference between booting up in a standalone computer or in a virtual machine. This is why some specific drivers and system capabilities are used while emulating the Windows OS on software and during this phase, there are times when the System Preparation may throw up an error that says, “A fatal error occurred while trying to sysprep the machine”. This kind of error arises due to a race condition wherein the Sysprep command tries to stop the Microsoft Distributed Transaction Coordinator or MSDTC service and the VMware tool tries to start the MSDTC service. You may also see the following messages logged in the Setuperr.log file:
  • [0x0f0082] SYSPRP LaunchDll:Failure occurred while executing ‘C:Windowssystem32msdtcprx.dll,SysPrepDtcCleanup’, returned error code -2146434815[gle=0x000000b7]
  • [0x0f0070] SYSPRP RunExternalDlls:An error occurred while running registry sysprep DLLs, halting sysprep execution. dwRet = -2146434815[gle=0x000000b7]
  • [0x0f00a8] SYSPRP WinMain:Hit failure while processing sysprep cleanup providers; hr = 0x80100101[gle=0x000000b7]
To fix the 0x0f0082, 0x0f0070, 0x0f00a8 Sysprep errors, you can check out two potential fixes. First, you have to check the status of the MSDTC service and the second one is to check the settings in the Windows Registry. Note that these fixes are proven to be effective on many users and apply to several versions of Windows, including Windows 10.

Option 1 – Check the status of the MSDTC service via Command Prompt

As mentioned, the error could be caused by the malfunctioning of the MSDTC service or it. Thus, you have to uninstall and reinstall the MSDTC service to resolve the problem and you can do that using Command Prompt. Follow the steps below.
  • In the Start Search, type “command prompt” and from the results, right-click on Command Prompt and then select the “Run as administrator” option to open it with admin privileges.
  • If a User Account Control or UAC prompt appears, just click on Yes to proceed.
  • Once you’ve opened Command Prompt, execute this command: msdtc –uninstall
  • The command you just entered will uninstall the MSDTC service. After that, you need to execute this second command to reinstall the service: msdtc –install
  • Now exit Command Prompt and check if the error is now fixed.

Option 2 – Check the Registry settings

  • Tap the Win + R keys to open the Run dialog box and type “Regedit” in the field and click OK or hit Enter to open the Registry Editor.
  • After opening the Registry Editor, navigate to this registry path: HKEY_LOCAL_MACHINESOFTWAREMicrosoftWindows NTCurrentVersionSoftwareProtectionPlatform
  • From there, look for a DWORD value that’s named “SkipRearm” and double click on it.
  • Then change its value data to “1”.
  • Restart your computer to apply successfully apply the changes made and check if it was able to fix the error.
Read More
How to Fix the 0x800ccc92 Error Code
[vc_row][vc_column][vc_column_text]

Effective Error 0x800ccc92 Repair

0x800ccc92 - What is it?

The 0x800ccc92 is a Microsoft Outlook error. The error restricts your ability to send and receive emails on your Outlook email address successfully. This error is very similar to 0x800cc90 and 0x800ccc91 Outlook error codes. The 0x800ccc92 error message is often displayed as:

‘Receiving reported error (0x800ccc92): Your email server rejected your login.’

This error is quite common and is faced by many Microsoft Outlook users. It is advisable to fix this error immediately because besides restricting you from sending and receiving emails via Outlook, due to this error the data on your Outlook also becomes inaccessible and unreadable, and sometimes Outlook also begins to freeze unexpectedly.

Error Causes

Some of the most common causes of the error code 0x800ccc92 are:
  • PST files get corrupt
  • Incorrect Outlook configuration settings
  • PST file crosses its fixed file size limit
  • Failure of POP3 and Protocol STMP in database server connection
  • Improper synchronization between Outlook and the server
  • Usage of invalid password or username
  • Virus Infection

Further Information and Manual Repair

Any of the above causes may result in the 0x800ccc92 error message display. If you encounter this Outlook error, you don’t need to panic and call the network personnel in your office to fix and repair the error. In fact, it is very easy to fix and you can repair it by yourself: Here are some of the best and easy ways to resolve this error in the shortest time:
  • If the error message 0x0800ccc92 is displayed as POP3: Invalid Password, then in this case it is advisable to cross-check your Outlook account ID and password. Sometimes this error message may pop up if you insert an incorrect password or ID. Therefore the best way to resolve it to check where you went wrong and then re-enter your ID and Password correctly.
If the error is not related to POP3 (Post Office Protocol) then you can try some other alternative to resolve this issue.
  • Another alternative is to install the latest available Server Service Pack for Exchange. This solution works best if compatibility is the issue.
  • However, when nothing works, then it is advisable to download PST repair tool. The PST repair software is designed to scan, detect, repair, and resolve Outlook errors like 0x800ccc92.  The PST repair software is built with special algorithms that help repair PST corrupt files in seconds. This tool works on all Windows Operating Systems including Windows 8, Windows 7, Windows Vista, Windows XP, Windows 2003, and Windows 2008.
  1. All you need to do is, download and install this software on your system.
  2. Once you download it, run it on your PC to detect errors.
  3. Press scan to get started
  4. The scanning may take about a couple of minutes to complete.
  5. Once it is complete, click on the repair tab to fix the errors.
  6. Now restart your Outlook again and now try sending emails. This solution is likely to work if the above-mentioned solutions don’t.
Congratulations, you have just fixed the 0x800ccc92 Error Code in Windows 10 all by yourself. If you would like to read more helpful articles and tips about various software and hardware visit errortools.com daily. Now that’s how you fix the 0x800ccc92 Error Code in Windows 10 on a computer. On the other hand, if your computer is going through some system-related issues that have to get fixed, there is a one-click solution known as [product-name] you could check out to resolve them. This program is a useful tool that could repair corrupted registries and optimize your PC’s overall performance. Aside from that, it also cleans out your computer for any junk or corrupted files that help you eliminate any unwanted files from your system. This is basically a solution that’s within your grasp with just a click. It’s easy to use as it is user-friendly. For a complete set of instructions in downloading and using it, refer to the steps below Perform a full system scan using [product-code]. To do so, follow the instructions below.
      1. Download and install [product-code] from the official site.
      2. Once the installation process is completed, run [product-code] to perform a full system scan. restoro application screen
      3. After the scan is completed click the “Start Repair” button. restoro application screen
[/vc_column_text][/vc_column][/vc_row]
Read More
How to Remove RelevantKnowledge From PC

RelevantKnowledge is a potentially unwanted program. It is typically bundled by 3rd-party installers and download managers that include other potentially unwanted programs (PUPs). In most cases, the installer will present the user with an RK survey at the end of the setup in order to relate the user’s future behavior to various questions.

From the published: RelevantKnowledge is an online market research community consisting of over 2 million members worldwide, which provides insight into how its members interact with the Internet. In exchange for an agreement to have their Internet behavior monitored, computer users who join RelevantKnowledge are offered various value propositions, including the ability to download screensavers or other software offerings, entry into sweepstakes, and a host of other benefits.

Multiple anti-virus scanners have detected possible malware in RelevantKnowledge.

About Browser Hijackers

If you’ve ever downloaded software via the internet (shareware, freeware, etc,), it’s quite possible you’ve unintentionally installed unwanted programs on your PC. Potentially Unwanted Programs (PUP), also referred to as Potentially Unwanted Applications (PUA), are applications that you never wanted in the first place and often come bundled with freeware. Once installed, the majority of these applications can be tough to get rid of and become much more of an annoyance rather than a necessity. It is clear by its name – unwanted applications – but did not really constitute “malware” in the traditional sense. This is because, the majority of PUPs get into a computer not because they slip through the security holes, for instance, but because the users have got installed them themselves – 100 % unknowingly needless to say. A PUP might not be regarded as malicious or dangerous but nevertheless, it is a common reason for clunky OSs; some PUPs are a lot more aggressive by deliberately slowing down your PC.

The harm unwanted programs could do

PUPs come in various forms. Typically, they could be seen in adware bundlers that are known to use aggressive and misleading advertising. The majority of bundlers install many adware programs from a number of vendors, each of which features its own EULA policy. Safebytes Anti-Malware totally eradicates this threat and safeguards your computer against PUP or adware infection. Additionally, the majority of free programs nowadays come with a few unwanted add-ons; in most cases a web browser toolbar or browser modification such as a homepage hijacker. They can modify browser settings, change the default search engine, replace the default home page with their own websites, slow down internet speed, and also will damage your system as well. PUPs carry a dangerous bite if left unchecked. The most detrimental part of installing a PUP is the spyware, adware, and keystroke loggers that might hide inside. These are programs that don’t really do anything good for you; in addition to taking up space on your hard disk drive, they also slow down your PC, often modify settings without your authorization, the list of frustrating features goes on and on.

Tips on how to avoid getting a PUP

• When installing anything on your personal computer, always study the fine print, including the license agreement. Do not accept terms of use that are for bundled programs. • Use ONLY custom or manual install method – and never thoughtlessly click Next, Next, Next. • Use good antimalware software, such as Safebytes Anti-Malware which offers real-time protection against PUPs. • Think carefully before you download any kind of shareware or freeware. Turn off or get rid of toolbars and browser extensions you don’t actually need. • Always download applications from the original website. The majority of PUPs find their way onto your laptop or computer is via download portals, so steer clear of it entirely.

What To Do If You Cannot Install Safebytes Anti-Malware?

Viruses may cause a lot of damage to your personal computer. Some malware is meant to interfere with or block things that you want to do on your computer system. It may well not allow you to download anything from the net or stop you from accessing some or all websites, particularly the anti-malware sites. If you are reading this article now, you’ve probably realized that virus infection is the real cause of your blocked internet connectivity. So how to proceed if you need to download and install an anti-malware program like Safebytes? Although this kind of problem can be harder to get around, there are a few actions you can take.

Download the application in Safe Mode with Networking

In Safe Mode, you may change Windows settings, un-install or install some applications, and remove hard-to-delete viruses. If the malware is set to load automatically when the computer starts, shifting to this mode can prevent it from doing so. To start the computer into Safe Mode, press the “F8” key on your keyboard just before the Windows boot screen appears; Or right after normal Windows boot up, run MSCONFIG, look over “Safe Boot” under Boot tab, and then click Apply. As soon as you reboot into Safe Mode with Networking, you can download, install, and update anti-malware software from there. Right after installation, run the malware scanner to eliminate standard infections.

Use an alternate web browser to download antivirus software

Web-based viruses could be environment-specific, aiming for a specific internet browser or attacking specific versions of the browser. The most effective solution to overcome this problem is to go with a browser that is well known for its security measures. Firefox has built-in Phishing and Malware Protection to keep you secure online.

Install anti-malware on a USB drive

Another option is to save and operate an antivirus software tool entirely from a Flash drive. Do these simple actions to clean up your infected PC using a portable antivirus. 1) On a virus-free computer, download and install Safebytes Anti-Malware. 2) Insert the USB drive into the clean PC. 3) Double click on the downloaded file to open the installation wizard. 4) Select the drive letter of the flash drive as the location when the wizard asks you exactly where you would like to install the antivirus. Follow the directions to complete the installation process. 5) Transfer the thumb drive from the uninfected computer to the infected PC. 6) Double-click the Safebytes Anti-malware icon on the pen drive to run the application. 7) Simply click “Scan Now” to run a complete scan on the affected computer for malware.

Protect Your Computer & Privacy With SafeBytes Anti-Malware

Want to download the best anti-malware software program for your laptop? There are lots of applications on the market that comes in free and paid versions for Windows systems. A few are really worth your money, but many aren’t. You need to pick a tool that has got a good reputation and detects not only computer viruses but other types of malware also. Among few good applications, SafeBytes Anti-Malware is the highly recommended program for the security-conscious individual. SafeBytes antimalware is a highly effective and user-friendly protection tool that is suitable for end-users of all levels of IT literacy. After you have installed this application, SafeByte's sophisticated protection system will make sure that no viruses or malware can seep through your PC. SafeBytes has excellent features when compared to other anti-malware programs. Here are some popular features present in this tool: World-class AntiMalware Protection: Safebytes is made on the best virus engine within the industry. These engines will detect and remove threats even during the early stages of a malware outbreak. Real-time Active Protection: SafeBytes delivers complete and real-time security for your laptop or computer. They’re highly efficient in screening and getting rid of numerous threats because they’re constantly revised with the latest updates and safety measures. Internet Security: Through its unique safety score, SafeBytes informs you whether a site is safe or not to visit it. This will ensure that you’re always certain of your safety when browsing the net. Very Low CPU and Memory Usage: This program is not “heavy” on the computer’s resources, so you will not notice any overall performance difficulties when SafeBytes is operating in the background. 24/7 Online Technical Support: SafeBytes provides 24/7 technical support, automatic maintenance, and upgrades for the best user experience.

Technical Details and Manual Removal (Advanced Users)

If you wish to manually remove RelevantKnowledge without the use of an automated tool, it may be possible to do so by removing the program from the Windows Add/Remove Programs menu, or in cases of browser extensions, going to the browsers AddOn/Extension manager and removing it. You will likely also want to reset your browser. To ensure the complete removal, manually check your hard drive and registry for all of the following and remove or reset the values accordingly. Please note that this is for advanced users only and may be difficult, with incorrect file removal causing additional PC errors. In addition, some malware is capable of replicating or preventing deletion. Doing this in Safe Mode is advised.

The following files, folders, and registry entries are created or modified by RelevantKnowledge

Files: File%COMMONPROGRAMSRelevantKnowledgeAbout RelevantKnowledge.lnk. File%COMMONPROGRAMSRelevantKnowledgePrivacy Policy and User License Agreement.lnk. File%COMMONPROGRAMSRelevantKnowledgeSupport.lnk. File%COMMONPROGRAMSRelevantKnowledgeUninstall Instructions.lnk. File%PROGRAMFILESRelevantKnowledgechrome.manifest. File%PROGRAMFILESRelevantKnowledgecomponentsrlxg.dll. File%PROGRAMFILESRelevantKnowledgecomponentsrlxh.dll. File%PROGRAMFILESRelevantKnowledgecomponentsrlxi.dll. File%PROGRAMFILESRelevantKnowledgecomponentsrlxj.dll. File%PROGRAMFILESRelevantKnowledgeinstall.rdf. File%PROGRAMFILESRelevantKnowledgerlcm.crx. File%PROGRAMFILESRelevantKnowledgerlcm.txt. File%PROGRAMFILESRelevantKnowledgerlls.dll. File%PROGRAMFILESRelevantKnowledgerlls64.dll. File%PROGRAMFILESRelevantKnowledgerloci.bin. File%PROGRAMFILESRelevantKnowledgerlph.dll. File%PROGRAMFILESRelevantKnowledgerlservice.exe. File%PROGRAMFILESRelevantKnowledgerlvknlg.exe. File%PROGRAMFILESRelevantKnowledgerlvknlg64.exe. File%PROGRAMFILESRelevantKnowledgerlxf.dll. Directory %COMMONPROGRAMSRelevantKnowledge. Directory %PROGRAMFILESRelevantKnowledgecomponents. Directory %PROGRAMFILESRelevantKnowledge. Registry: Key mkndcbhcgphcfkkddanakjiepeknbgle at HKEY_LOCAL_MACHINESOFTWAREGoogleChromeExtensions. Key RelevantKnowledge at HKEY_LOCAL_MACHINESOFTWAREMicrosoftWindows NTCurrentVersionWinlogonNotify. Key rlvknlg at HKEY_LOCAL_MACHINESOFTWAREMicrosoftESENTProcess. Value 3C5F0F00-683D-4847-89C8-E7AF64FD1CFB at HKEY_LOCAL_MACHINESOFTWAREMozillaFirefoxExtensions. Value %PROGRAMFILESrelevantknowledgerlvknlg.exe at HKEY_LOCAL_MACHINESYSTEMControlSet001ServicesSharedAccessParametersFirewallPolicyStandardProfileAuthorizedApplicationsList. Value %PROGRAMFILESrelevantknowledgerlvknlg.exe at HKEY_LOCAL_MACHINESYSTEMControlSet002ServicesSharedAccessParametersFirewallPolicyStandardProfileAuthorizedApplicationsList. Value %PROGRAMFILESRelevantKnowledgerlvknlg.exe at HKEY_LOCAL_MACHINESYSTEMControlSet003ServicesSharedAccessParametersFirewallPolicyStandardProfileAuthorizedApplicationsList.
Read More
Fix Windows Update Error 0x80070652
If you encounter a Windows Update error with an error code 0x80070652 and an error message saying, “ERROR_INSTALL_ALREADY_RUNNING”, then it indicates that there was a previous Windows Update that was not installed successfully. This kind of Windows Update error typically happens when it gets stuck and so to resolve it, here are some suggestions that might help.

Option 1 – Restart your computer and try installing the Updates again

You can restart your computer and then try installing the updates once again. There are instances when a simple restart resolves Windows Update errors. Thus, after you restart your computer, check for updates once again and see if you’re still getting the error or not.

Option 2 – Try running the Windows Update troubleshooter

You might also want to run the Windows Update Troubleshooter as it could also help in fixing Windows Update error code 0x80070652. To run it, go to Settings and then select Troubleshoot from the options. From there, click on Windows Update and then click the “Run the troubleshooter” button. After that, follow the next on-screen instructions and you should be good to go.

Option 3 – Try downloading the Windows Update that failed

If the Windows Update that has failed is not a feature update and only a cumulative update, you can download the Windows Update and install it manually. But first, you need to find out which update has failed, and to do so, refer to the following steps:
  • Go to Settings and from there go to Update and Security > View Update History.
  • Next, check which particular update has failed. Note that Updates that have failed to install will be displayed under the Status column which has a label of “Failed”.
  • After that, go to the Microsoft Download Center and look for that update using its KB number and once you find it, download and then install it manually.
Note: You can also use the Microsoft Update Catalog, a service from Microsoft that provides a list of software updates that can be distributed over a corporate network. With the help of this service, it can be easier for you to find Microsoft software updates, drivers as well as fixes.

Option 4 – Try to restart the Background Intelligent Transfer Service

The Background Intelligent Transfer Service or BITS is a part of the Windows Update service and is the one that manages the background download of Windows Update, as well as scans for new updates and so on. And if Windows Update is experiencing some problems, you can try restarting BITS but make sure that you have admin privileges to do so.
  • Tap the Win + R keys to open the Run dialog box.
  • Next, type “services.msc” in the field and hit Enter to open Windows Services.
  • From the list of Services, look for the Background Intelligent Transfer Service and double-click on it to open Properties.
  • After that, you need to set the Startup type to “Automatic (Delayed Start) and click on Apply.
  • Now click the Stop button to stop BITS and then click the Start button to restart the service.
  • Click OK to save the changes made and then restart your PC.

Option 5 – Try to update Windows after a couple of minutes or an hour

There are times when the issue is from Microsoft’s end. It could be that there’s some issue with Microsoft’s server so it would be better if you give it a couple of minutes or an hour or so before trying to run Windows Update again.
Read More
Windows requires a digitally signed driver
Device drivers are needed in order for the hardware and software to communicate in an operating system. Some of these drivers are digitally signed. These kinds of drivers are drivers that are signed by their issuing authority in a way that the end-user or any third party won’t be able to modify them. And there are times when you encounter an error that says, “Windows requires a digitally signed driver” when you try to install or update device drivers. Driver Signing is the process of associating a digital signature with a driver package. Digital signatures are used in Windows device installations to verify the identity of the vendor providing the driver packages as well as to verify the integrity of the driver packages. All the drivers you usually install on your PC from Windows Update, Original Equipment Manufacturers, or some other third-party driver download software and so on must be verified digitally by Microsoft through the digital signature. A digital signature is an electronic security mark that verifies the publisher for the driver and all the relevant information related to it. That’s why Windows won’t run a driver if it isn’t certified by Microsoft, be it a 32-bit or 64-bit system – this is called the Driver Signature Enforcement. The only Kernel-mode drivers that Windows 10 will load are the ones that are digitally signed by the Dev Portal. However, the changes only affect the new installations of the operating system with Secure Boot on while the non-upgraded fresh installations would require drivers that are signed by Microsoft. The “Windows requires a digitally signed driver” error indicates that the driver you are trying to update or install hasn’t been signed digitally by the issuing authority, preventing you from installing or updating it. To resolve this issue, you can try to update the drivers directly from the manufacturer’s site. You could also disable driver signing via Group Policy Editor.

Option 1 – Update the device drivers directly from the manufacturer’s site

The reason why you’re getting the “Windows requires a digitally signed driver” error in the first place is that you might have downloaded the drivers from external media. It could also be that the drivers didn’t update for some time now and the issuing authority changed its policies. Thus, you can try to update the drivers straight from the manufacturer’s website and install them. If this option didn’t work, then you’ll have to disable the driver signing or its recognition in Windows 10. Keep in mind that doing so is not advisable if you have to use the concerned driver.

Option 2 – Disable driver signing via Group Policy Editor

  • Tap the Win + R keys to open the Run utility and type “gpedit.msc” in the field and tap Enter to open the Group Policy Editor.
  • After that, navigate to this policy setting: User configuration > Administrative templates > System > Driver installation
  • Next, double click on the “Code signing for device drivers” entry located on the right pane to open its properties where you’ll see the following description:
“This setting determines how the system responds when a user tries to install device driver files that are not digitally signed. It establishes the least secure response permitted on the systems of users in the group. Users can use the System in Control Panel to select a more secure setting, but when this setting is enabled, the system does not implement any setting less secure than the one the setting established. When you enable this setting, use the drop-down box to specify the desired response. “Ignore” directs the system to proceed with the installation even if it includes unsigned files. “Warn” notifies the user that files are not digitally signed and lets the user decide whether to stop or to proceed with the installation and whether to permit unsigned files to be installed. “Warn” is the default. “Block” directs the system to refuse to install unsigned files. As a result, the installation stops, and none of the files in the driver package are installed. To change driver file security without specifying a setting, use System in Control Panel. Right-click My Computer, click Properties, click the Hardware tab, and then click the Driver Signing button.”
  • Now select the radio button for “Enabled” and select Ignore from the drop-down menu under “When Windows detects a driver file without a digital signature”.
  • Then click on the Apply and OK buttons to save the changes made. This will get rid of the “Windows requires a digitally signed driver” error but take note that this will also make your system less secure.
Read More
Assigning Multiple IP Addresses to Adapter
There are times when an IT admin has to set up multiple IP addresses to the same network adapter. Setting up multiple IP addresses in scenarios like hosting various SSL sites, speed up traffic exchanges can help in avoiding being blacklisted in the SPAM filters, and so on. So in this post, you will be guided on how exactly you can assign multiple IP addresses to the network adapter in your Windows 10 computer. There are several ways to assign multiple IP addresses in a network adapter. You can do it using the Network Adapter settings or using the Netsh utility, as well as the Windows PowerShell utility. To get started, refer to each one of the options provided below.

Option 1 – Assign multiple IP addresses via Network Adapter settings

  • Go to Settings first and from there, select Network & Internet, and then click on the Change adapter options. This will show you a list of both the physical and virtual network adapters in your computer.
  • Next, double click on the Ethernet adapter where you want to assign the multiple IP addresses and then click on the Properties button.
  • After that, you should see the Ethernet properties where you have to select the “TCP/IPv4” or “TCP/IPv6”.
  • Once done, click on the Properties button and then select the “Use the following IP address” option under the General tab.
  • Now you have to add an IP address, subnet, and default gateway to the network adapter and then click on the Advanced button.
  • This will open the Advanced TCP/IP settings where you have to click on the Add button so you can add an IP address. From here, you can keep adding multiple IP addresses to the network adapter. You also have the option to add multiple gateways or DNS IP addresses.
  • Once done, if you execute the “ipconfig” command, you should see all the secondary IP addresses listed.

Option 2 – Assign multiple IP addresses using the Netsh command

Another way to assign multiple IP addresses to your network adapter is via the Netsh command.
  • In the Start Search, type “command prompt” and from the search results that appear, right-click on Command Prompt and then select the “Run as administrator” to open it with admin privileges.
  • If a User Account Control or UAC prompt pops up, just click on Yes.
  • After that, run this command: Netsh int ipv4 add address name="Local Area Connection" 192.168.100.100 255.255.255.0 SkipAsSource=True
Note: You have the option to set “SkepAsSource” since it depends on your needs using the Netsh command. When it is configured as true, the IP address won’t be used by the OS for outbound connections.

Option 3 – Assign multiple IP addresses via Windows PowerShell

  • Tap the Win + X key combination and click on the “Windows PowerShell (Admin)” option.
  • After opening Windows PowerShell as admin, use the NetIPAddress command so you can add more IP addresses. Execute this command: Get-NetIPAddress | ft IPAddress, InterfaceAlias, SkipAsSource
  • Next, assign an IP address to a network adapter by executing this command: New-NetIPAddress –IPAddress 192.168.100.100 –PrefixLength 24 –InterfaceAlias “vEthernet” –SkipAsSource $True
  • Now to modify the “SkipAsSource” parameter, use this command: Get-NetIPAddress 192.168.100.100 | Set-NetIPAddress -SkipAsSource $False
Read More
Fixing the Port in use, please wait
Recently, a number of Windows 10 users reported an issue wherein they try to print from their PCs but were unable to and got an error message instead that states, “Port in use, please wait”. However, no matter how long they waited, nothing changed and they were still unable to print from their computers. On the other hand, when some of the users attempted to print wirelessly from their mobile devices, the printing continues which indicates that there is some issue between the computer and the printer. So if you are one of the users who are currently facing this problem, then this post should help. To fix this issue with your Printer, here are some possible fixes you can try that might work.

Option 1 – Run the Printer Troubleshooter

The first thing you can do to fix the “Port in use, please wait” error is to run the Printer Troubleshooter. This built-in troubleshooter in Windows 10 can help you fix most print issues. It checks if you have the latest printer drivers and then tries to fix and update them automatically. Aside from that, it also checks if you have connectivity issues or if the Print Spooler and the required Services are running fine. To run it, follow the steps below.
  • Tap the Win + R keys to open the Run dialog box.
  • Next, type “msdt.exe /id PrinterDiagnostic” in the field and click OK or hit Enter to open the Printer Troubleshooter.
  • Then click the Next button and follow the next on-screen instructions to fix the issue with the printer.

Option 2 – Try updating the Printer drivers

You might also want to try updating your printer drivers. All you have to do is locate the USB Composite Device. For complete details, follow the steps below.
  • First, click the Start button and type “device manager”.
  • Then click on the “Device Manager” from the search results to open it.
  • From there, look for the USB Composite Device option and right-click on it, and select the Update Driver from the options.
  • Restart your PC and then click the “Search automatically for updated driver software” option.
Note: You also have the option to download the latest version of your Printer from the manufacturer’s website.

Option 3 – Try selecting the correct port for your Printer

If the first two options given above didn’t work, then maybe it’s time to select a correct port for your printer since the wrong port has been selected which is why you’re getting the “Port in use, please wait” error.
  • Open “Devices and Printers” from the Start search.
  • Next, look for your printer from the list of devices and right-click on it, and then select Printer Properties.
  • Now go to the Ports tab under the newly opened Properties window and make sure that the port type matches the connection on the list of ports currently in use.
Note: If your printer is using a USB connection then the port should have a USB or DOT 4 in its description but if your printer is using a network connection then it should have the following description:
  • WSD
  • Network
  • IP
And if you notice that there are several listings for the same type of port, you have to change the selection to a different one and then click the OK button to save the changes made.
Read More
1 2 3 162
Logo
Copyright © 2022, ErrorTools. All Rights Reserved
Trademarks: Microsoft Windows logos are registered trademarks of Microsoft. Disclaimer: ErrorTools.com is not affiliated with Microsoft, nor claim direct affiliation.
The information on this page is provided for information purposes only.
DMCA.com Protection Status