Windows could not find a driver for adapter

Device drivers serve as a connection between the hardware in your computer and the operating system. So if any of the device drivers fail, the concerned hardware will stop communicating with Windows. And when you encounter some network-related issues, you can run the Network Adapter troubleshooter to fix them. However, this built-in troubleshooter does not work all the time as there are still problems that it can’t fix on its own and you’ll see the following error message:

“Windows could not find a driver for your network adapter.”

If you encounter this kind of error, read on as this post will help you in fixing the problem but before you get started in troubleshooting the problem, try running the Network Adapter Troubleshooter again.

  • Open the Search bar on your computer and type in “troubleshoot” to open the Troubleshoot settings.
  • Next, scroll down and select the “Network Adapter” option from the right pane.
  • Then click on the Run Troubleshooter” button.
  • After that, your computer will check for any possible errors and will pinpoint the root cause of the problem if possible.

Refer to each one of the solutions given below to get started:

Option 1 – Update the Network Adapter drivers

Of course, the first thing you can try to do is to update the Network Adapter drivers to resolve the error.

  • Tap the Win + R keys to launch the Run window and then type in the “devmgmt.msc” command and hit Enter to open the Device Manager window.
  • Under the Device Manager, you will see a list of drivers. From there, look for the Network Adapters and expand it.
  • Then right-click on each one of the Network drivers and update them all.
  • Restart your PC and see if it helped in fixing the BSOD error.

Note: If updating the network drivers didn’t help in fixing the “Windows could not find a driver for your network adapter” error, you can also try to uninstall the very same drivers and restart your Windows 10 PC. After that, the system itself will reinstall the drivers you just uninstalled. Alternatively, you can also download and install the drivers from the manufacturer’s website directly.

To reinstall the network adapter driver, refer to these steps:

  • Open the Devices Manager from the Win X Menu.
  • Then locate the device drivers and right-click on them to open the Properties.
  • After that, switch to the Driver tab and click on the Uninstall Device button.
  • Follow the screen option to completely uninstall it.
  • Finally, restart your computer. It will just reinstall the device drivers automatically.

Option 2 – Try running the Hardware and Devices Troubleshooter

Apart from the Network Adapter Troubleshooter, you can also run another built-in troubleshooter in Windows, the Hardware and Devices Troubleshooter, as it can also help you in resolving the “Windows could not find a driver for your network adapter” error.

  • The first thing you need to do is click on Start and then on the gear-like icon to pull up the window for Settings.
  • After opening Settings, look for the Update and Security option and select it.
  • From there, go to the Troubleshoot option located on the left-hand side of the list.
  • Next, select Hardware and Devices from the list and open the Troubleshooter and run it. Once it is doing its job, wait for it to complete the process and then restart the system.
  • After the system restarts, check if the problem’s now fixed. If not, refer to the next option given below.

Option 3 – Try performing a System Restore

You might also want to perform a System Restore that might help you in fixing the error. You can do this option either by booting into Safe Mode or in System Restore. If you are already in the Advanced Startup Options, just directly select System Restore and proceed with the next steps. And if you have just booted your PC into Safe Mode, refer to the steps below.

  • Tap the Win + R keys to open the Run dialog box.
  • After that, type in “sysdm.cpl” in the field and tap Enter.
  • Next, go to the System Protection tab then click the System Restore button. This will open a new window where you have to select your preferred System Restore point.
  • After that, follow the on-screen instructions to finish the process and then restart your computer and check if the problem is fixed or not.
If you like to learn and find out more about various Windows errors, and how to repair them go to our vast archive or use search to find articles that will explain and help you in solving your issue.
However, if you prefer to do things fast and with automatization then we are proposing to use an automated solution for your issues. The application that we are recommending is Advanced System Repair Pro
Advanced System Repair utilizes multiple tools all in one to give you a quick, simple, reliable, and very thorough diagnosis of your PC. It brings you all the tools you need in one program to clean, fix, protect, optimize and boost your PC!
1-Click Maintenance
All the tools to make it simple and easy! It's like having a professional technician at the click of a mouse.

Junk Cleaner
Keeping your computer free from unnecessary clutter also helps make your computer last longer. Like any other machine, if you keep it clean and take care of it, it will serve you better for longer!

Optimize background apps
Optimize applications background activity with the built-in Application Optimizer feature.

Disk Defrag
With a simple 1-click, Advanced System Repair speeds up your PC by assembling fragmented files on your machine and organizing them more efficiently.

Malware Removal
Finds and removes all types of harmful malware including trojans, worms, bots, adware, spyware, PUPs, and more!

Privacy Cleaner
The all-in-one privacy suite to Clean Your Tracks & Protect Your Privacy! Make your computer safe, secure, and more efficient!

System Tweak/Optimizer
ASR will analyze your complete system and settings to adjust your PC to function at its maximum performance.

Registry Cleaner
Over time, as you install and uninstall applications, the registry can become cluttered with old entries and broken settings which can result in program crashes, and annoying messages and slow the computer down.
Visit our Advanced System Repair Pro Download page to inform yourself about all the benefits of this software and get a free trial copy of it.
advanced system repair pro

Advanced System Repair Pro

One-click automated PC repair solution
ASR logo
With Advanced System Repair Pro you can easily
Replace damaged files
Restore performance
Free disk space
Remove Malware
Protects WEB browser
Remove Viruses
Stop PC freezing
DOWNLOAD
Privacy Policy | Terms of Use | Uinstall
Advanced System Repair Pro is compatible with all versions of Microsoft Windows including Windows 11

Share this article:

You might also like

Mapi32.dll Outlook Error - Quick Fix

Mapi32.dll Outlook Error

What is Mapi32.dll Outlook Error?

Mapi32.dll is a Windows Messaging Application Programming Interface that enables Windows to perform various email functions and launch messaging programs like Microsoft Outlook and Microsoft Office. The inability of the interface to execute email functions properly results in the Mapi32.dll Outlook Error. This error occurs mostly when you are attempting to upgrade the operating system to a new version.

Solution

Restoro box imageError Causes

The common causes of the Mapi32.dll Outlook Error during the OS upgrade are:
  • Damaged or Corrupt Outlook user profile
  • The software is overwritten by some other program
  • Outlook PST file corruption
The Mapi32.dll Outlook Error message is displayed in either of the following forms:
  • Mapi32.dll is missing
  • Cannot start Microsoft Office Outlook. Mapi32.dll is corrupt or the wrong version.
  • Mapi32.dll was not found
  • Mail is not installed

Further Information and Manual Repair

So, what if you experience this issue and how do you fix it? Well, first there is no need to panic as Microsoft has recognized this issue and provided adequate solutions to fix this problem in no time. However, to ensure the Mapi32.dll Outlook error is a quick fix, you must first understand the cause of the issue and the message displayed on the screen.
  1. Let’s say the errors occur because your Outlook profile is corrupt. In this scenario, the best solution is to create a new Outlook profile. Regardless of whether you have Windows Vista or XP, to create your new Outlook profile, first, you will have to click on the Control Panel, then User Account, and then Mail. Once you click on the Mail tab, the mail set up dialog box will open. In this dialog box there will be a ‘Show Profiles’ tab, click and then click the Add tab that appears next. Now type the name for your new Outlook profile and then click ‘OK’. After that, add an email account to go with the profile.
  2. If Mapi32.dll is missing or corrupt, you will have to run ‘Fixmapi.exe’ to resolve the problem. It is located in the System32 folder inside the Windows directory in Windows Explorer.
  • Therefore, first start Windows Explorer and then locate the following folder on your computer: C: /Program Files/Common Files/System/Msmapi1033
  • Now find Fixmapi.exe and double click it
  • After that locate the Mapi32.dll file and rename it to MSmapi32.old and press enter.
  • Restart your computer when finished.
A word of advice for computer users is to scan for viruses with an antivirus program or a registry cleaner regularly to prevent the Mapi32.dll Outlook error from occurring in the first place. Viruses often latch onto .dll files and corrupt them. It’s always best to have a forward-looking approach.
Read More
Fix Error 0xe0434f4d
[vc_row][vc_column][vc_column_text]

How To Fix Error 0xe0434f4d

What is Error 0xe0434f4d?

Error 0xe0434f4d displays when a remote computer runs an instance of the SQL Server 2005 but it fails to initialize. When the plan is started, this error displays in a status window on the SQL Server. Also, when the Update-OffilineAddressBook cmdlet is started in Microsoft Exchange Server, this error can occur.

Solution

Restoro box imageError Causes

Error 0xe0434f4d can occur for possibly two main reasons. The first one is when the System Attendant Service is not properly running, and the second when you don’t have the permission to run the update. Other causes are when the .NET Framework 2.0 security does not allow sqlplanlaunch access to run from a shared network. Another cause is when the Offline Address Book (OAB) is not found in the Configuration Domain Controller server that the server of OAB generation uses.

Further Information and Manual Repair

In case you didn’t know, the Offline Address Book generation server is a mailbox server, and in order to resolve error 0xe0434f4d, you will have to replicate the OAB object to the Configuration Domain Controller server. In order to do so, follow steps:
  • Go to start and click on All Programs, then go and click on Microsoft Exchange Server 2010. Click on Exchange Management Console
  • In Exchange Management Console, go to Server Configuration and click on Mailbox
  • In the details, go to mailbox server that generates Offline Address Book and right-click it, then go to Properties
  • In the Properties, click on System Setting and locate the domain controller name in the box that reads Domain controller servers being used by Exchange
Make sure the OAB object is reproduced in the Configuration Domain Controller Server. Follow these steps to do that:
  • Go to Start and click on Run. Type Adsiedit.msc in Open box and press Enter. Right-click on ADSI Edit and click on Connect to
  • Locate a list reading Select a well-known naming context, and from there select Default naming context. In a Select or type a domain or server window, type FQDN (fully qualified domain name) of the Configuration Domain Controller server which was determined in step 1, and click OK
  • Expand Configuration [dc.domain.com], expand CN=Configuration, DC=domain, DC=com, expand CN=Services, expand CN=First Organization, and expand CN=Address Lists Container
  • Click on CN=Offline Address Lists and make sure the OAB object is listed on the details pane
When the OAB generation server receives this, then it will connect to the Configuration Domain Controller server and will locate the OAB object. If the OAB generation server is unable to find the OAB object, then the error will return on the cmdlet. On SQL Server, you should change the .NET permissions to allow sqlplanlaunch application access to run from shared administration. For that, follow these steps:
  • On ArchiveIQ Server, open System from the Control Panel and note down the computer name
  • On SQL Server, log in as administrator and open the command prompt
  • On the command prompt type, ‘C:windowsmicrosoft.netframeworkv2.0.50727caspol.ece –m –ag l – url file:\[Archive IQServer Computer Name]AlQRemote$*FullTrust and Press Enter. Type yes and press Enter again to confirm the permission changes.
[/vc_column_text][/vc_column][/vc_row]
Read More
Photo viewer on clean Windows 10 instalation
Windows photo viewer was a popular photo viewing application integrated into Windows 7, 8, and 8.1 but in Windows 10 it has been replaced with photos, Microsoft's new application aimed at photo viewing on your desktop. Now if any one of you wonders why should be bringing the old application back to Windows 10 since we have an alternative one, the answer would be resources and speed. The old photo viewer application is lightweight, fast, and reliable, opening the same photo in both photo viewer and in new photos shows us that Microsofts new viewer application takes even three times more RAM, and it's visibly slower in loading times for pictures. Since I am a person who prefers speed and functionality over fancy looks I would be very glad to have the option to bring back a photo viewer. If you have by any chance Windows 10 as an upgrade, bringing back photo viewer is easy as 1,2,3. you just need to open settings and go to default apps, under photo viewer you should see your current default viewing application, probably photos, click on it to see options and choose photo viewer and exit the Settings menu, and you're done. Sadly if Windows 10 has been installed clean on the system and not as upgrade things are a little bit more complicated but do not worry, stay with us, keep reading and you will get there.

Activating photo viewer

How technically photo viewer is still in the system but not used we will have to make it available again and this we will do by adding some lines in the Windows registry, that being said, open a notepad and paste the following code as it is in it.
Windows Registry Editor Version 5.00 [HKEY_CLASSES_ROOT\jpegfile\shell\open\DropTarget] "Clsid"="{FFE2A43C-56B9-4bf5-9A79-CC6D4285608A}" [HKEY_CLASSES_ROOT\pngfile\shell\open\DropTarget] "Clsid"="{FFE2A43C-56B9-4bf5-9A79-CC6D4285608A}" [HKEY_CLASSES_ROOT\Applications\photoviewer.dll\shell\open] "MuiVerb"="@photoviewer.dll,-3043" [HKEY_CLASSES_ROOT\Applications\photoviewer.dll\shell\open\command] @=hex(2):25,00,53,00,79,00,73,00,74,00,65,00,6d,00,52,00,6f,00,6f,00,74,00,25,\ 00,5c,00,53,00,79,00,73,00,74,00,65,00,6d,00,33,00,32,00,5c,00,72,00,75,00,\ 6e,00,64,00,6c,00,6c,00,33,00,32,00,2e,00,65,00,78,00,65,00,20,00,22,00,25,\ 00,50,00,72,00,6f,00,67,00,72,00,61,00,6d,00,46,00,69,00,6c,00,65,00,73,00,\ 25,00,5c,00,57,00,69,00,6e,00,64,00,6f,00,77,00,73,00,20,00,50,00,68,00,6f,\ 00,74,00,6f,00,20,00,56,00,69,00,65,00,77,00,65,00,72,00,5c,00,50,00,68,00,\ 6f,00,74,00,6f,00,56,00,69,00,65,00,77,00,65,00,72,00,2e,00,64,00,6c,00,6c,\ 00,22,00,2c,00,20,00,49,00,6d,00,61,00,67,00,65,00,56,00,69,00,65,00,77,00,\ 5f,00,46,00,75,00,6c,00,6c,00,73,00,63,00,72,00,65,00,65,00,6e,00,20,00,25,\ 00,31,00,00,00 [HKEY_CLASSES_ROOT\Applications\photoviewer.dll\shell\open\DropTarget] "Clsid"="{FFE2A43C-56B9-4bf5-9A79-CC6D4285608A}" [HKEY_CLASSES_ROOT\PhotoViewer.FileAssoc.Bitmap] "ImageOptionFlags"=dword:00000001 "FriendlyTypeName"=hex(2):40,00,25,00,50,00,72,00,6f,00,67,00,72,00,61,00,6d,\ 00,46,00,69,00,6c,00,65,00,73,00,25,00,5c,00,57,00,69,00,6e,00,64,00,6f,00,\ 77,00,73,00,20,00,50,00,68,00,6f,00,74,00,6f,00,20,00,56,00,69,00,65,00,77,\ 00,65,00,72,00,5c,00,50,00,68,00,6f,00,74,00,6f,00,56,00,69,00,65,00,77,00,\ 65,00,72,00,2e,00,64,00,6c,00,6c,00,2c,00,2d,00,33,00,30,00,35,00,36,00,00,\ 00 [HKEY_CLASSES_ROOT\PhotoViewer.FileAssoc.Bitmap\DefaultIcon] @="%SystemRoot%\\System32\\imageres.dll,-70" [HKEY_CLASSES_ROOT\PhotoViewer.FileAssoc.Bitmap\shell\open\command] @=hex(2):25,00,53,00,79,00,73,00,74,00,65,00,6d,00,52,00,6f,00,6f,00,74,00,25,\ 00,5c,00,53,00,79,00,73,00,74,00,65,00,6d,00,33,00,32,00,5c,00,72,00,75,00,\ 6e,00,64,00,6c,00,6c,00,33,00,32,00,2e,00,65,00,78,00,65,00,20,00,22,00,25,\ 00,50,00,72,00,6f,00,67,00,72,00,61,00,6d,00,46,00,69,00,6c,00,65,00,73,00,\ 25,00,5c,00,57,00,69,00,6e,00,64,00,6f,00,77,00,73,00,20,00,50,00,68,00,6f,\ 00,74,00,6f,00,20,00,56,00,69,00,65,00,77,00,65,00,72,00,5c,00,50,00,68,00,\ 6f,00,74,00,6f,00,56,00,69,00,65,00,77,00,65,00,72,00,2e,00,64,00,6c,00,6c,\ 00,22,00,2c,00,20,00,49,00,6d,00,61,00,67,00,65,00,56,00,69,00,65,00,77,00,\ 5f,00,46,00,75,00,6c,00,6c,00,73,00,63,00,72,00,65,00,65,00,6e,00,20,00,25,\ 00,31,00,00,00 [HKEY_CLASSES_ROOT\PhotoViewer.FileAssoc.Bitmap\shell\open\DropTarget] "Clsid"="{FFE2A43C-56B9-4bf5-9A79-CC6D4285608A}" [HKEY_CLASSES_ROOT\Applications\photoviewer.dll\shell\print] "NeverDefault"="" [HKEY_CLASSES_ROOT\Applications\photoviewer.dll\shell\print\command] @=hex(2):25,00,53,00,79,00,73,00,74,00,65,00,6d,00,52,00,6f,00,6f,00,74,00,25,\ 00,5c,00,53,00,79,00,73,00,74,00,65,00,6d,00,33,00,32,00,5c,00,72,00,75,00,\ 6e,00,64,00,6c,00,6c,00,33,00,32,00,2e,00,65,00,78,00,65,00,20,00,22,00,25,\ 00,50,00,72,00,6f,00,67,00,72,00,61,00,6d,00,46,00,69,00,6c,00,65,00,73,00,\ 25,00,5c,00,57,00,69,00,6e,00,64,00,6f,00,77,00,73,00,20,00,50,00,68,00,6f,\ 00,74,00,6f,00,20,00,56,00,69,00,65,00,77,00,65,00,72,00,5c,00,50,00,68,00,\ 6f,00,74,00,6f,00,56,00,69,00,65,00,77,00,65,00,72,00,2e,00,64,00,6c,00,6c,\ 00,22,00,2c,00,20,00,49,00,6d,00,61,00,67,00,65,00,56,00,69,00,65,00,77,00,\ 5f,00,46,00,75,00,6c,00,6c,00,73,00,63,00,72,00,65,00,65,00,6e,00,20,00,25,\ 00,31,00,00,00 [HKEY_CLASSES_ROOT\Applications\photoviewer.dll\shell\print\DropTarget] "Clsid"="{60fd46de-f830-4894-a628-6fa81bc0190d}" [HKEY_CLASSES_ROOT\PhotoViewer.FileAssoc.JFIF] "EditFlags"=dword:00010000 "ImageOptionFlags"=dword:00000001 "FriendlyTypeName"=hex(2):40,00,25,00,50,00,72,00,6f,00,67,00,72,00,61,00,6d,\ 00,46,00,69,00,6c,00,65,00,73,00,25,00,5c,00,57,00,69,00,6e,00,64,00,6f,00,\ 77,00,73,00,20,00,50,00,68,00,6f,00,74,00,6f,00,20,00,56,00,69,00,65,00,77,\ 00,65,00,72,00,5c,00,50,00,68,00,6f,00,74,00,6f,00,56,00,69,00,65,00,77,00,\ 65,00,72,00,2e,00,64,00,6c,00,6c,00,2c,00,2d,00,33,00,30,00,35,00,35,00,00,\ 00 [HKEY_CLASSES_ROOT\PhotoViewer.FileAssoc.JFIF\DefaultIcon] @="%SystemRoot%\\System32\\imageres.dll,-72" [HKEY_CLASSES_ROOT\PhotoViewer.FileAssoc.JFIF\shell\open] "MuiVerb"=hex(2):40,00,25,00,50,00,72,00,6f,00,67,00,72,00,61,00,6d,00,46,00,\ 69,00,6c,00,65,00,73,00,25,00,5c,00,57,00,69,00,6e,00,64,00,6f,00,77,00,73,\ 00,20,00,50,00,68,00,6f,00,74,00,6f,00,20,00,56,00,69,00,65,00,77,00,65,00,\ 72,00,5c,00,70,00,68,00,6f,00,74,00,6f,00,76,00,69,00,65,00,77,00,65,00,72,\ 00,2e,00,64,00,6c,00,6c,00,2c,00,2d,00,33,00,30,00,34,00,33,00,00,00 [HKEY_CLASSES_ROOT\PhotoViewer.FileAssoc.JFIF\shell\open\command] @=hex(2):25,00,53,00,79,00,73,00,74,00,65,00,6d,00,52,00,6f,00,6f,00,74,00,25,\ 00,5c,00,53,00,79,00,73,00,74,00,65,00,6d,00,33,00,32,00,5c,00,72,00,75,00,\ 6e,00,64,00,6c,00,6c,00,33,00,32,00,2e,00,65,00,78,00,65,00,20,00,22,00,25,\ 00,50,00,72,00,6f,00,67,00,72,00,61,00,6d,00,46,00,69,00,6c,00,65,00,73,00,\ 25,00,5c,00,57,00,69,00,6e,00,64,00,6f,00,77,00,73,00,20,00,50,00,68,00,6f,\ 00,74,00,6f,00,20,00,56,00,69,00,65,00,77,00,65,00,72,00,5c,00,50,00,68,00,\ 6f,00,74,00,6f,00,56,00,69,00,65,00,77,00,65,00,72,00,2e,00,64,00,6c,00,6c,\ 00,22,00,2c,00,20,00,49,00,6d,00,61,00,67,00,65,00,56,00,69,00,65,00,77,00,\ 5f,00,46,00,75,00,6c,00,6c,00,73,00,63,00,72,00,65,00,65,00,6e,00,20,00,25,\ 00,31,00,00,00 [HKEY_CLASSES_ROOT\PhotoViewer.FileAssoc.JFIF\shell\open\DropTarget] "Clsid"="{FFE2A43C-56B9-4bf5-9A79-CC6D4285608A}" [HKEY_CLASSES_ROOT\PhotoViewer.FileAssoc.Jpeg] "EditFlags"=dword:00010000 "ImageOptionFlags"=dword:00000001 "FriendlyTypeName"=hex(2):40,00,25,00,50,00,72,00,6f,00,67,00,72,00,61,00,6d,\ 00,46,00,69,00,6c,00,65,00,73,00,25,00,5c,00,57,00,69,00,6e,00,64,00,6f,00,\ 77,00,73,00,20,00,50,00,68,00,6f,00,74,00,6f,00,20,00,56,00,69,00,65,00,77,\ 00,65,00,72,00,5c,00,50,00,68,00,6f,00,74,00,6f,00,56,00,69,00,65,00,77,00,\ 65,00,72,00,2e,00,64,00,6c,00,6c,00,2c,00,2d,00,33,00,30,00,35,00,35,00,00,\ 00 [HKEY_CLASSES_ROOT\PhotoViewer.FileAssoc.Jpeg\DefaultIcon] @="%SystemRoot%\\System32\\imageres.dll,-72" [HKEY_CLASSES_ROOT\PhotoViewer.FileAssoc.Jpeg\shell\open] "MuiVerb"=hex(2):40,00,25,00,50,00,72,00,6f,00,67,00,72,00,61,00,6d,00,46,00,\ 69,00,6c,00,65,00,73,00,25,00,5c,00,57,00,69,00,6e,00,64,00,6f,00,77,00,73,\ 00,20,00,50,00,68,00,6f,00,74,00,6f,00,20,00,56,00,69,00,65,00,77,00,65,00,\ 72,00,5c,00,70,00,68,00,6f,00,74,00,6f,00,76,00,69,00,65,00,77,00,65,00,72,\ 00,2e,00,64,00,6c,00,6c,00,2c,00,2d,00,33,00,30,00,34,00,33,00,00,00 [HKEY_CLASSES_ROOT\PhotoViewer.FileAssoc.Jpeg\shell\open\command] @=hex(2):25,00,53,00,79,00,73,00,74,00,65,00,6d,00,52,00,6f,00,6f,00,74,00,25,\ 00,5c,00,53,00,79,00,73,00,74,00,65,00,6d,00,33,00,32,00,5c,00,72,00,75,00,\ 6e,00,64,00,6c,00,6c,00,33,00,32,00,2e,00,65,00,78,00,65,00,20,00,22,00,25,\ 00,50,00,72,00,6f,00,67,00,72,00,61,00,6d,00,46,00,69,00,6c,00,65,00,73,00,\ 25,00,5c,00,57,00,69,00,6e,00,64,00,6f,00,77,00,73,00,20,00,50,00,68,00,6f,\ 00,74,00,6f,00,20,00,56,00,69,00,65,00,77,00,65,00,72,00,5c,00,50,00,68,00,\ 6f,00,74,00,6f,00,56,00,69,00,65,00,77,00,65,00,72,00,2e,00,64,00,6c,00,6c,\ 00,22,00,2c,00,20,00,49,00,6d,00,61,00,67,00,65,00,56,00,69,00,65,00,77,00,\ 5f,00,46,00,75,00,6c,00,6c,00,73,00,63,00,72,00,65,00,65,00,6e,00,20,00,25,\ 00,31,00,00,00 [HKEY_CLASSES_ROOT\PhotoViewer.FileAssoc.Jpeg\shell\open\DropTarget] "Clsid"="{FFE2A43C-56B9-4bf5-9A79-CC6D4285608A}" [HKEY_CLASSES_ROOT\PhotoViewer.FileAssoc.Gif] "ImageOptionFlags"=dword:00000001 "FriendlyTypeName"=hex(2):40,00,25,00,50,00,72,00,6f,00,67,00,72,00,61,00,6d,\ 00,46,00,69,00,6c,00,65,00,73,00,25,00,5c,00,57,00,69,00,6e,00,64,00,6f,00,\ 77,00,73,00,20,00,50,00,68,00,6f,00,74,00,6f,00,20,00,56,00,69,00,65,00,77,\ 00,65,00,72,00,5c,00,50,00,68,00,6f,00,74,00,6f,00,56,00,69,00,65,00,77,00,\ 65,00,72,00,2e,00,64,00,6c,00,6c,00,2c,00,2d,00,33,00,30,00,35,00,37,00,00,\ 00 [HKEY_CLASSES_ROOT\PhotoViewer.FileAssoc.Gif\DefaultIcon] @="%SystemRoot%\\System32\\imageres.dll,-83" [HKEY_CLASSES_ROOT\PhotoViewer.FileAssoc.Gif\shell\open\command] @=hex(2):25,00,53,00,79,00,73,00,74,00,65,00,6d,00,52,00,6f,00,6f,00,74,00,25,\ 00,5c,00,53,00,79,00,73,00,74,00,65,00,6d,00,33,00,32,00,5c,00,72,00,75,00,\ 6e,00,64,00,6c,00,6c,00,33,00,32,00,2e,00,65,00,78,00,65,00,20,00,22,00,25,\ 00,50,00,72,00,6f,00,67,00,72,00,61,00,6d,00,46,00,69,00,6c,00,65,00,73,00,\ 25,00,5c,00,57,00,69,00,6e,00,64,00,6f,00,77,00,73,00,20,00,50,00,68,00,6f,\ 00,74,00,6f,00,20,00,56,00,69,00,65,00,77,00,65,00,72,00,5c,00,50,00,68,00,\ 6f,00,74,00,6f,00,56,00,69,00,65,00,77,00,65,00,72,00,2e,00,64,00,6c,00,6c,\ 00,22,00,2c,00,20,00,49,00,6d,00,61,00,67,00,65,00,56,00,69,00,65,00,77,00,\ 5f,00,46,00,75,00,6c,00,6c,00,73,00,63,00,72,00,65,00,65,00,6e,00,20,00,25,\ 00,31,00,00,00 [HKEY_CLASSES_ROOT\PhotoViewer.FileAssoc.Gif\shell\open\DropTarget] "Clsid"="{FFE2A43C-56B9-4bf5-9A79-CC6D4285608A}" [HKEY_CLASSES_ROOT\PhotoViewer.FileAssoc.Png] "ImageOptionFlags"=dword:00000001 "FriendlyTypeName"=hex(2):40,00,25,00,50,00,72,00,6f,00,67,00,72,00,61,00,6d,\ 00,46,00,69,00,6c,00,65,00,73,00,25,00,5c,00,57,00,69,00,6e,00,64,00,6f,00,\ 77,00,73,00,20,00,50,00,68,00,6f,00,74,00,6f,00,20,00,56,00,69,00,65,00,77,\ 00,65,00,72,00,5c,00,50,00,68,00,6f,00,74,00,6f,00,56,00,69,00,65,00,77,00,\ 65,00,72,00,2e,00,64,00,6c,00,6c,00,2c,00,2d,00,33,00,30,00,35,00,37,00,00,\ 00 [HKEY_CLASSES_ROOT\PhotoViewer.FileAssoc.Png\DefaultIcon] @="%SystemRoot%\\System32\\imageres.dll,-71" [HKEY_CLASSES_ROOT\PhotoViewer.FileAssoc.Png\shell\open\command] @=hex(2):25,00,53,00,79,00,73,00,74,00,65,00,6d,00,52,00,6f,00,6f,00,74,00,25,\ 00,5c,00,53,00,79,00,73,00,74,00,65,00,6d,00,33,00,32,00,5c,00,72,00,75,00,\ 6e,00,64,00,6c,00,6c,00,33,00,32,00,2e,00,65,00,78,00,65,00,20,00,22,00,25,\ 00,50,00,72,00,6f,00,67,00,72,00,61,00,6d,00,46,00,69,00,6c,00,65,00,73,00,\ 25,00,5c,00,57,00,69,00,6e,00,64,00,6f,00,77,00,73,00,20,00,50,00,68,00,6f,\ 00,74,00,6f,00,20,00,56,00,69,00,65,00,77,00,65,00,72,00,5c,00,50,00,68,00,\ 6f,00,74,00,6f,00,56,00,69,00,65,00,77,00,65,00,72,00,2e,00,64,00,6c,00,6c,\ 00,22,00,2c,00,20,00,49,00,6d,00,61,00,67,00,65,00,56,00,69,00,65,00,77,00,\ 5f,00,46,00,75,00,6c,00,6c,00,73,00,63,00,72,00,65,00,65,00,6e,00,20,00,25,\ 00,31,00,00,00 [HKEY_CLASSES_ROOT\PhotoViewer.FileAssoc.Png\shell\open\DropTarget] "Clsid"="{FFE2A43C-56B9-4bf5-9A79-CC6D4285608A}" [HKEY_CLASSES_ROOT\PhotoViewer.FileAssoc.Wdp] "EditFlags"=dword:00010000 "ImageOptionFlags"=dword:00000001 [HKEY_CLASSES_ROOT\PhotoViewer.FileAssoc.Wdp\DefaultIcon] @="%SystemRoot%\\System32\\wmphoto.dll,-400" [HKEY_CLASSES_ROOT\PhotoViewer.FileAssoc.Wdp\shell\open] "MuiVerb"=hex(2):40,00,25,00,50,00,72,00,6f,00,67,00,72,00,61,00,6d,00,46,00,\ 69,00,6c,00,65,00,73,00,25,00,5c,00,57,00,69,00,6e,00,64,00,6f,00,77,00,73,\ 00,20,00,50,00,68,00,6f,00,74,00,6f,00,20,00,56,00,69,00,65,00,77,00,65,00,\ 72,00,5c,00,70,00,68,00,6f,00,74,00,6f,00,76,00,69,00,65,00,77,00,65,00,72,\ 00,2e,00,64,00,6c,00,6c,00,2c,00,2d,00,33,00,30,00,34,00,33,00,00,00 [HKEY_CLASSES_ROOT\PhotoViewer.FileAssoc.Wdp\shell\open\command] @=hex(2):25,00,53,00,79,00,73,00,74,00,65,00,6d,00,52,00,6f,00,6f,00,74,00,25,\ 00,5c,00,53,00,79,00,73,00,74,00,65,00,6d,00,33,00,32,00,5c,00,72,00,75,00,\ 6e,00,64,00,6c,00,6c,00,33,00,32,00,2e,00,65,00,78,00,65,00,20,00,22,00,25,\ 00,50,00,72,00,6f,00,67,00,72,00,61,00,6d,00,46,00,69,00,6c,00,65,00,73,00,\ 25,00,5c,00,57,00,69,00,6e,00,64,00,6f,00,77,00,73,00,20,00,50,00,68,00,6f,\ 00,74,00,6f,00,20,00,56,00,69,00,65,00,77,00,65,00,72,00,5c,00,50,00,68,00,\ 6f,00,74,00,6f,00,56,00,69,00,65,00,77,00,65,00,72,00,2e,00,64,00,6c,00,6c,\ 00,22,00,2c,00,20,00,49,00,6d,00,61,00,67,00,65,00,56,00,69,00,65,00,77,00,\ 5f,00,46,00,75,00,6c,00,6c,00,73,00,63,00,72,00,65,00,65,00,6e,00,20,00,25,\ 00,31,00,00,00 [HKEY_CLASSES_ROOT\PhotoViewer.FileAssoc.Wdp\shell\open\DropTarget] "Clsid"="{FFE2A43C-56B9-4bf5-9A79-CC6D4285608A}" [HKEY_CLASSES_ROOT\SystemFileAssociations\image\shell\Image Preview\command] @=hex(2):25,00,53,00,79,00,73,00,74,00,65,00,6d,00,52,00,6f,00,6f,00,74,00,25,\ 00,5c,00,53,00,79,00,73,00,74,00,65,00,6d,00,33,00,32,00,5c,00,72,00,75,00,\ 6e,00,64,00,6c,00,6c,00,33,00,32,00,2e,00,65,00,78,00,65,00,20,00,22,00,25,\ 00,50,00,72,00,6f,00,67,00,72,00,61,00,6d,00,46,00,69,00,6c,00,65,00,73,00,\ 25,00,5c,00,57,00,69,00,6e,00,64,00,6f,00,77,00,73,00,20,00,50,00,68,00,6f,\ 00,74,00,6f,00,20,00,56,00,69,00,65,00,77,00,65,00,72,00,5c,00,50,00,68,00,\ 6f,00,74,00,6f,00,56,00,69,00,65,00,77,00,65,00,72,00,2e,00,64,00,6c,00,6c,\ 00,22,00,2c,00,20,00,49,00,6d,00,61,00,67,00,65,00,56,00,69,00,65,00,77,00,\ 5f,00,46,00,75,00,6c,00,6c,00,73,00,63,00,72,00,65,00,65,00,6e,00,20,00,25,\ 00,31,00,00,00 [HKEY_CLASSES_ROOT\SystemFileAssociations\image\shell\Image Preview\DropTarget] "{FFE2A43C-56B9-4bf5-9A79-CC6D4285608A}"="" [HKEY_LOCAL_MACHINE\SOFTWARE\Microsoft\Windows Photo Viewer\Capabilities] "ApplicationDescription"="@%ProgramFiles%\\Windows Photo Viewer\\photoviewer.dll,-3069" "ApplicationName"="@%ProgramFiles%\\Windows Photo Viewer\\photoviewer.dll,-3009" [HKEY_LOCAL_MACHINE\SOFTWARE\Microsoft\Windows Photo Viewer\Capabilities\FileAssociations] ".cr2"="PhotoViewer.FileAssoc.Tiff" ".jpg"="PhotoViewer.FileAssoc.Jpeg" ".wdp"="PhotoViewer.FileAssoc.Wdp" ".jfif"="PhotoViewer.FileAssoc.JFIF" ".dib"="PhotoViewer.FileAssoc.Bitmap" ".png"="PhotoViewer.FileAssoc.Png" ".jxr"="PhotoViewer.FileAssoc.Wdp" ".bmp"="PhotoViewer.FileAssoc.Bitmap" ".jpe"="PhotoViewer.FileAssoc.Jpeg" ".jpeg"="PhotoViewer.FileAssoc.Jpeg" ".gif"="PhotoViewer.FileAssoc.Gif" ".tif"="PhotoViewer.FileAssoc.Tiff" ".tiff"="PhotoViewer.FileAssoc.Tiff"
Yup, that is a lot of keys and settings but you are almost done. Once you have pasted text into your new notepad document save it but as .REG, you can name it however you want but it has to be .REG extension. Once the file is saved double click on it to merge it into the Windows registry. You might need to turn off UAC for this operation (check our tutorial on this topic) and accept warning messages but once it is done you should now have an old photo viewer as a choice for your default viewing application. All you have to do now is to go to settings and go to default apps, under photo viewer you should see your current default viewing application, probably photos, click on it to see options and choose photo viewer and exit the Settings menu, and you're done.
Read More
PUP - Driver Pro complete removal guide

Driver Pro Description

DriverPro is a program developed by PC Utilities Pro. This program is often found bundled in other installations.

From the author: PC Utilities Pro is a leading software development company founded in 2009. As a group of young enthusiastic programmers, we constantly strive in creating powerful, yet easy-to-use solutions that would enable even the most basic computer users to keep their PCs running like new.

When installed, DriverPro will add registry entries for the current user that allow it to run each time to computer is started. It will also add a scheduled task in Windows, that allows it to run at various times. The optimizing nature of the application allows it to access any file and information on your computer without your knowledge.

Multiple anti-virus programs have marked this application as a Potentially Unwanted Program, and it is not recommended to keep it on your computer.

About Potentially Unwanted Applications

Have you ever discovered an unwanted program running on your PC and wondered exactly how the heck it got there? A PUA / PUP (potentially unwanted application / potentially unwanted program) is a software program that comes bundled with freeware/shareware and you agree to install on your computer. These are programs you certainly don’t want on your computer since it doesn’t provide any useful service. Despite being regarded very dangerous, PUPs aren’t necessarily computer viruses or malware What makes a PUP different from malware is the fact that whenever you download one, you are doing it with your consent – though in most instances unwittingly and unwillingly. PUPs might not be malware but still, they’re harmful programs to your computer. At best, these unwanted applications provide hardly any benefit, and at worst, they could be quite damaging to your computer.

What do PUPs do on your computer, really?

Most Potentially Unwanted Programs will come in the form of adware, which typically aims to exhibit numerous irritating pop-up ads, banners, coupons, and bargains on websites you go to. PUPs that come as browser add-ons and toolbars are readily identifiable. They’ll track your online activities, redirect your search results to unsafe websites where spyware and adware can be downloaded, hijack your home page, and slow your internet browser down to a crawl. PUPs load up a dangerous bite if kept unchecked. They will often include things like information gathering program code which could gather and send your sensitive information back to 3rd parties. These are programs that don’t really do anything good for you; in addition to occupying space on the hard drive, they also slow down your PC, often alter settings without your authorization, the list of annoying features goes on and on.

Great tips on protecting yourself from unwanted software

• When setting up anything on your computer system, always study the fine print, like the license agreement. Don’t accept terms of use that are for bundled programs. • Only Use the “custom” or “manual” install method – and never blindly click Next, Next, Next. • Use an advert blocker/pop-up blocker; Install anti-malware products such as Safebytes Anti-malware. These software programs could establish a wall between the computer and cybercriminals. • Think twice before you decide to download any type of freeware or shareware. Just before adding a plug-in or web browser extension, think about whether it is really necessary. • Only download programs from the original providers’ websites. Avoid download portals because they use their very own download manager to pack extra programs along with the initial download.

Help! Malware Blocking Anti-virus Installation And Access To The Web

All malware is bad, but certain kinds of malicious software do a lot more damage to your computer than others. Some malware is meant to hinder or block things that you wish to do on your computer. It may well not allow you to download anything from the net or it will stop you from accessing some or all websites, particularly the anti-malware sites. So what you should do if malware prevents you from downloading or installing Safebytes Anti-Malware? Do as instructed below to get rid of the malware in alternate ways.

Get rid of malware in Safe Mode

The Windows operating system has a special mode known as “Safe Mode” where just the bare minimum required programs and services are loaded. In the event, the virus is set to load automatically when the PC starts, shifting to this mode may well prevent it from doing so. To start the computer into Safe Mode, press the “F8” key on the keyboard just before the Windows boot screen appears; Or right after normal Windows boot up, run MSConfig, check the Safe Boot under the Boot tab, and click Apply. After you restart into Safe Mode with Networking, you could download, install, and update the anti-malware program from there. Now, you are able to run the anti-virus scan to eliminate computer viruses and malware without any interference from another malicious application.

Switch to some other internet browser

Web-based viruses could be environment-specific, aiming for a particular internet browser or attacking particular versions of the browser. If you appear to have malware attached to Internet Explorer, then switch over to a different internet browser with built-in safety features, such as Firefox or Chrome, to download your favorite antivirus program – Safebytes.

Run anti-virus from your USB drive

Another way is to download and transfer an anti-malware program from a clean computer to run a scan on the affected system. Adopt these measures to run the anti-malware on the infected computer system. 1) On a clean computer, download and install Safebytes Anti-Malware. 2) Plug the pen drive into the uninfected computer. 3) Run the setup program by double-clicking the executable file of the downloaded application, which has a .exe file format. 4) Select the USB flash drive as the location when the wizard asks you where you intend to install the software. Follow the activation instructions. 5) Remove the flash drive. You may now utilize this portable antivirus on the infected computer. 6) Run the Safebytes Anti-malware directly from the flash drive by double-clicking the icon. 7) Press the “Scan” button to run a full system scan and remove viruses automatically.

Detect And Remove Viruses With SafeBytes Anti-Malware

Want to download the very best anti-malware software for your laptop or computer? There are many applications available that come in paid and free versions for Microsoft Windows computers. A few are worth your money, but many aren’t. You need to pick a company that creates industry-best antimalware and has earned a reputation as reliable. Among few good programs, SafeBytes Anti-Malware is the strongly recommended software for the security-conscious end user. Safebytes is one of the well-established PC solutions firms, which provide this complete anti-malware software program. This software program can easily detect, remove, and protect your computer from the most advanced malware intrusions such as adware, spyware, trojan horses, ransomware, parasites, worms, PUPs, along with other potentially harmful software applications. SafeBytes anti-malware offers a plethora of advanced features that set it apart from all others. The following are some of the good ones: Real-time Protection: SafeBytes provides complete and real-time security for your personal machine. It will regularly monitor your computer for hacker activity and also gives users superior firewall protection. Best AntiMalware Protection: This deep-cleaning anti-malware program goes much deeper than most antivirus tools to clean out your computer system. Its critically acclaimed virus engine finds and disables hard to remove malware that hides deep within your PC. Web Protection: SafeBytes gives an instant safety rating about the web pages you are about to check out, automatically blocking unsafe sites and ensuring that you are certain of your safety while browsing the world wide web. Fast Scan: SafeBytes Anti-Malware has a multi-thread scan algorithm that works up to 5x faster than any other antivirus software. Very Low CPU and RAM Usage: This software program is not “heavy” on your computer’s resources, so you’ll not notice any overall performance problems when SafeBytes is operating in the background. Fantastic Tech Support Team: You will get 24/7 technical assistance to promptly resolve any issue with your security application.

Technical Details and Manual Removal (Advanced Users)

To remove Driver Pro manually, navigate to the Add/Remove programs list in the Control Panel and choose the offending program you want to get rid of. For web browser plug-ins, go to your web browser’s Addon/Extension manager and select the add-on you want to remove or disable. You may also want to reset your web browser settings, as well as clear your web browser cache and cookies. Lastly, check your hard disk for all of the following and clean your registry manually to remove leftover application entries after uninstalls. Please note that only professional computer users should try to manually edit the system files mainly because removing any single vital registry entry leads to a major problem or even a computer crash. Also, certain malware is capable of replicating itself or preventing its removal. Carrying out this in Safe Mode is suggested.
Files: %Program Files%\Driver Pro\Driver Pro.exe %UserProfile%\Desktop\Driver Pro.lnk %UserProfile%\Start Menu\Driver Pro\Driver Pro.lnk %UserProfile%\Start Menu\Driver Pro\Help.lnk %UserProfile%\Start Menu\Driver Pro\Registration.Lnk Registry: HKEY_CURRENT_USER\Software376694984709702142491016734454 HKEY_CURRENT_USER\Software\Microsoft\Windows\CurrentVersion\Run 13376694984709702142491016734454
Read More
Fix PDC WATCHDOG TIMEOUT BSOD
If you suddenly encountered the PDC WATCHDOG TIMEOUT BSOD Blue Screen stop error with a bug check value of 0x0000014F, then it’s probably due to a system component that has failed to respond with the allocated period which prevents the system from exiting connected standby. This kind of Blue Screen error could be caused by both hardware and software components. To fix this Stop error, here are some possible fixes you can try that might help but before you proceed, make sure that you create a System Restore point first and boot your computer into Safe Mode with Networking.

Option 1 – Try to rollback, update or disable drivers

The next thing you can do to fix the PDC_WATCHDOG_TIMEOUT Stop error is to roll back, or update, or disable device drivers. It is most likely that after you updated your Windows computer that your driver also needs a refresh. On the other hand, if you have just updated your device drivers then you need to roll back the drivers to their previous versions. Whichever applies to you, refer to the steps below.
  • Open the Devices Manager from the Win X Menu.
  • After opening the Device Manager, look for the device driver named “IDE ATA/ATAPI controllers” and expand it.
  • Then look for the SATA AHCI Controller entry and right-click on it. If you haven’t updated this driver in a while, select the “Update Driver” option. On the other hand, if you’ve just updated this driver, then select the Uninstall Device option.
  • Next, follow the screen option to update or uninstall it.
  • Finally, restart your computer. It will just reinstall the device drivers automatically if you have chosen to uninstall them.
Note: You can install a dedicated driver on your computer in case you have it or you could also look for it directly from the website of the manufacturer.

Option 2 – Try to disconnect or disable newly installed hardware

In this option, you will have to disable or remove the hardware you’ve just installed recently since external devices could be the one that’s causing the Blue Screen of Death error to appear. To do that, just disconnect any external device that’s connected to your computer physically and then check if it fixes the PDC_WATCHDOG_TIMEOUT Blue Screen error.

Option 3 – Try running the Memory Diagnostic Tool

The Memory Diagnostic tool in windows can help resolve the PDC_WATCHDOG_TIMEOUT Blue Screen error by checking and automatically fixing any memory-based issues. To run it, refer to these steps:
  • Tap the Win + R keys to open Run and type mdsched.exe and hit Enter to open the Windows Memory Diagnostic Tool.
  • After that, it will give two options such as:
    • Restart now and check for problems (Recommended)
    • Check for problems the next time I start my computer
  • Once your computer has restarted, perform a basic scan or you could also go for the “Advanced” options such as “Test mix” or “Pass count”. Simply tap the F10 key to start the test.

Option 4 – Try to update the BIOS

Updating the BIOS can help you fix the PDC_WATCHDOG_TIMEOUT BSOD error but as you know, BIOS is a sensitive part of a computer. Even though it is a software component, the functioning of the hardware depends on it largely. Thus, you must be careful when modifying something in the BIOS. So if you don’t know much about it, it’s best if you skip on this option and try the other ones instead. However, if you are well-versed in navigating the BIOS, then follow the steps below.
  • Tap the Win + R keys to open the Run dialog box.
  • Next, type “msinfo32” in the field and press Enter to open System Information.
  • From there, you should find a search field on the bottom where you have to search for the BIOS version and then press Enter.
  • After that, you should see the developer and version of the BIOS installed on your PC.
  • Go to your manufacturer’s website and then download the latest version of BIOS on your computer.
  • If you are using a laptop, make sure that you keep it plugged in until you have updated the BIOS.
  • Now double click on the downloaded file and install the new BIOS version on your computer.
  • Now restart your computer to apply the changes made.

Option 5 – Try running the Blue Screen Troubleshooter

The Blue Screen troubleshooter is a built-in tool in Windows 10 that helps users in fixing BSOD errors like PDC_WATCHDOG_TIMEOUT. It can be found in the Settings Troubleshooters page. To use it, refer to these steps:
  • Tap the Win + I keys to open the Settings panel.
  • Then go to Update & Security > Troubleshoot.
  • From there, look for the option called “Blue Screen” on your right-hand side and then click the “Run the troubleshooter” button to run the Blue Screen Troubleshooter and then follow the next on-screen options. Note that you might have to boot your PC into Safe Mode.
Read More
Razer unveils their first internal PC hardware
razer pc hardware components
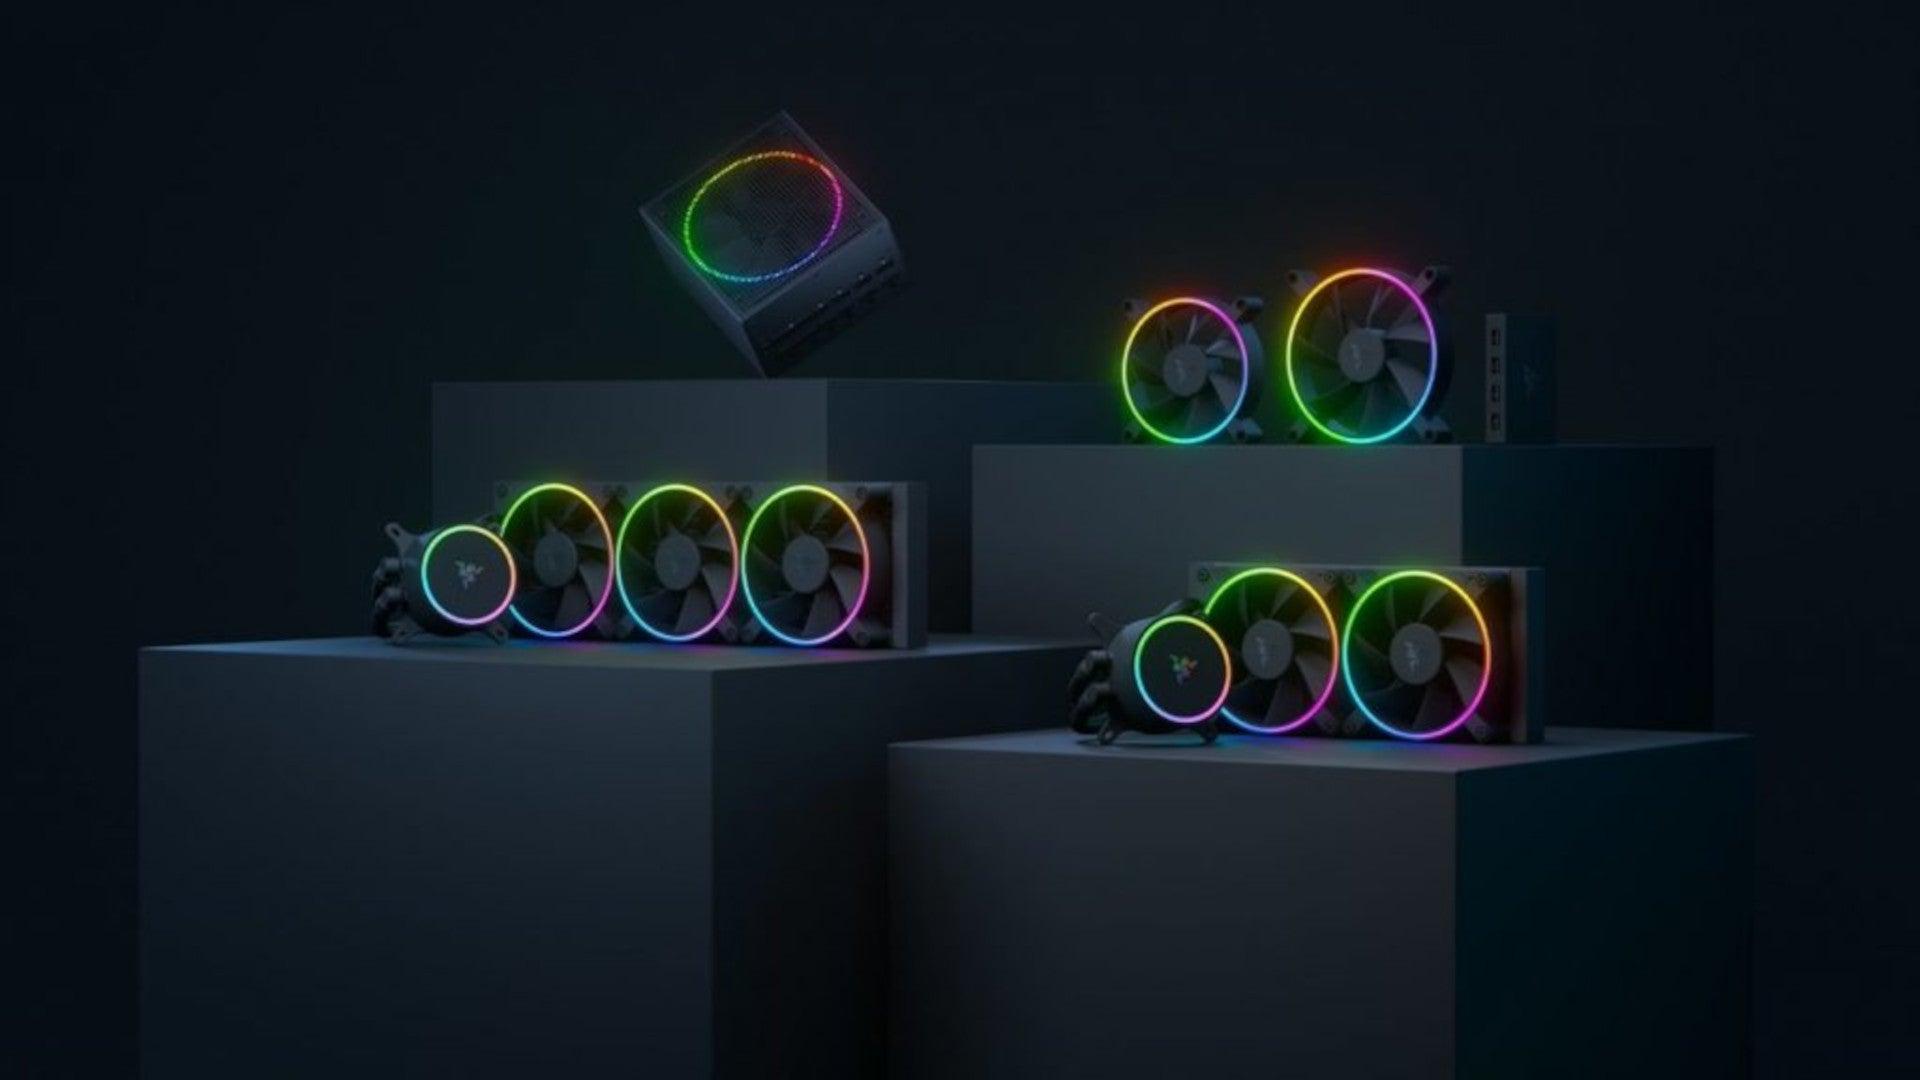
Razer is a well-known brand among PC gamers and users, it started as a peripheral manufacturer focused on keyboards and mouse but after years passed Razer expanded its inventory offerings. It soon started offering headphones and lately has branched into wider product lines like gaming chairs and protection masks. It is not a big surprise that Razer is expanding into other branches of the PC industry. This time, however, it has revealed not one but three new hardware for your PC. Case fans, all in one liquid cooler and power supply. There are not many details about the products themselves but one thing is one hundred percent confirmed, they come with Razer Chroma, all of them, even the fans.

Katana Chroma ATX PSU

razer power supply
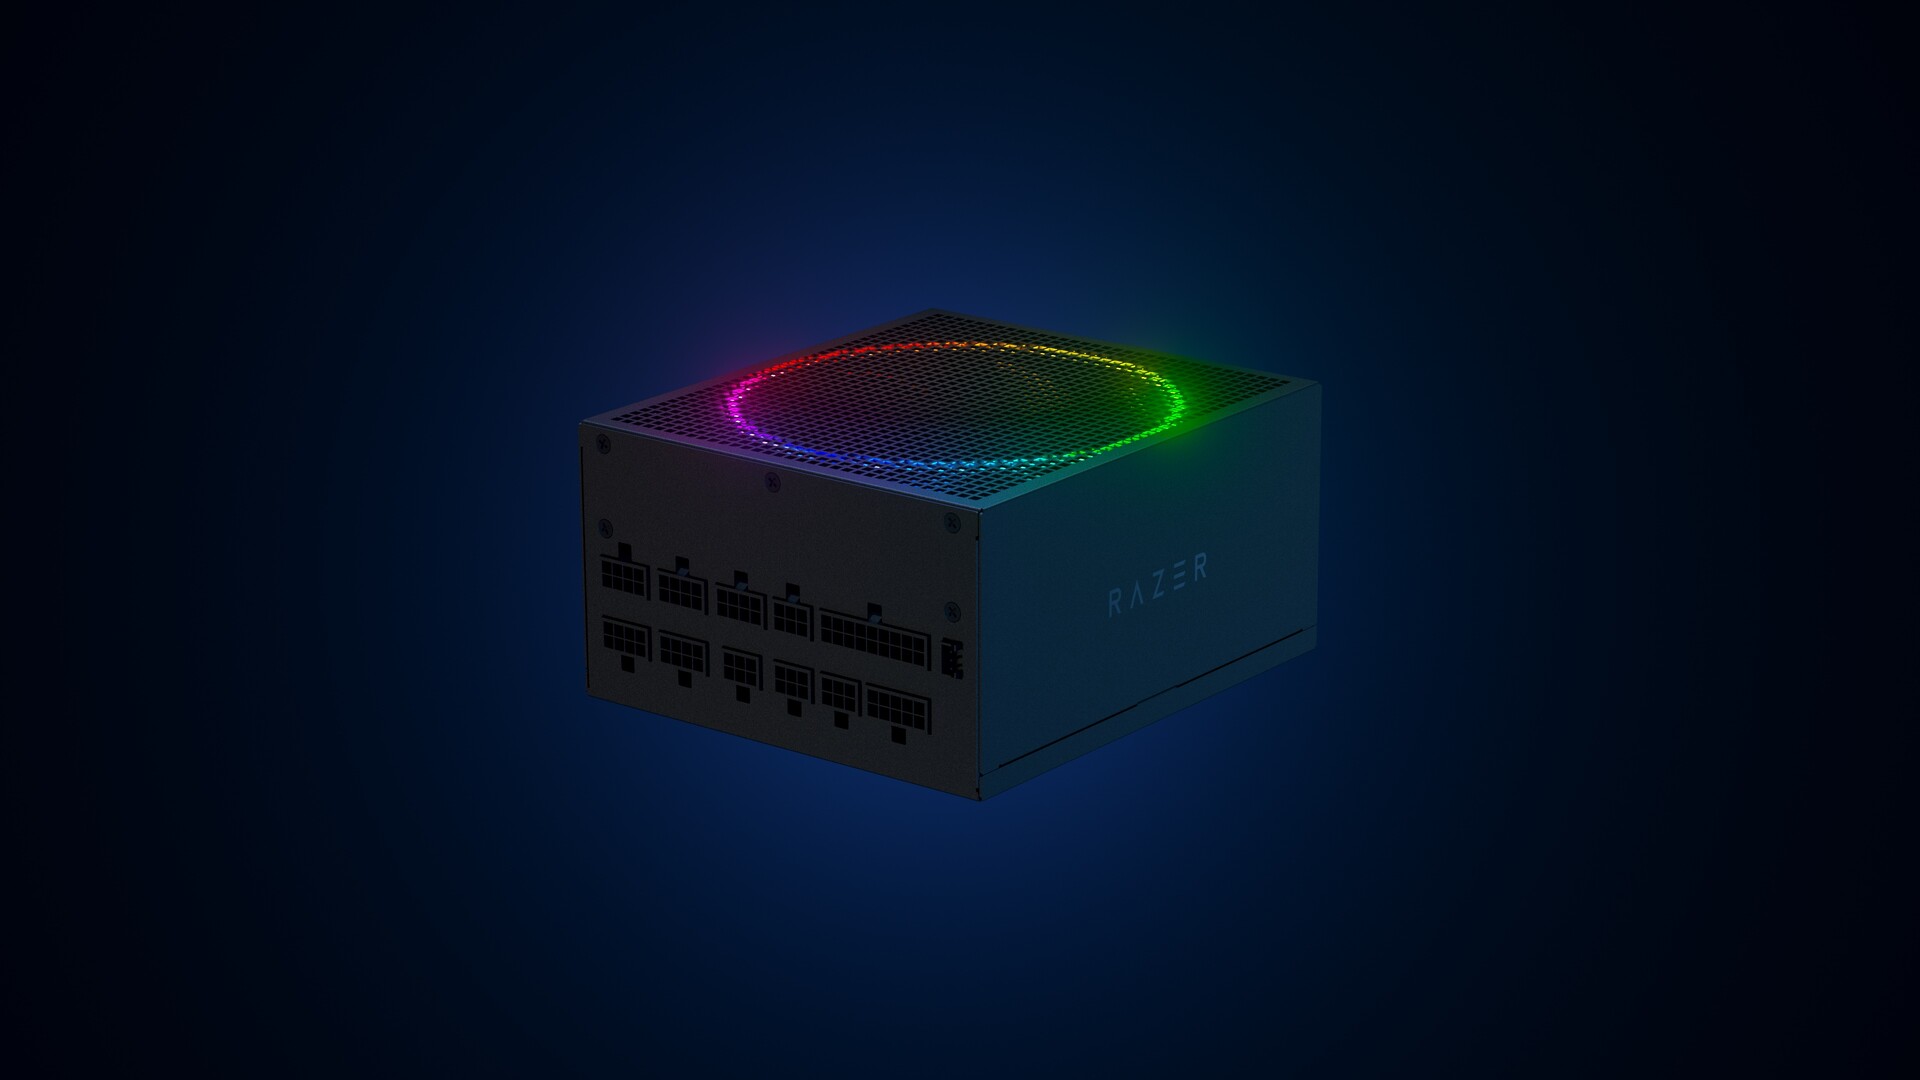
Most interesting for me personally is Razers Katana, the power supply unit. It is a modular power supply ranging from 750W to 1200W with the additional option of Titanium rated one with an impressive 1600W of power. Power supply will start shipping in early 2022 and at the time of writing this article no price range has been released.

Razer Hanbo AIO

razer water cooling
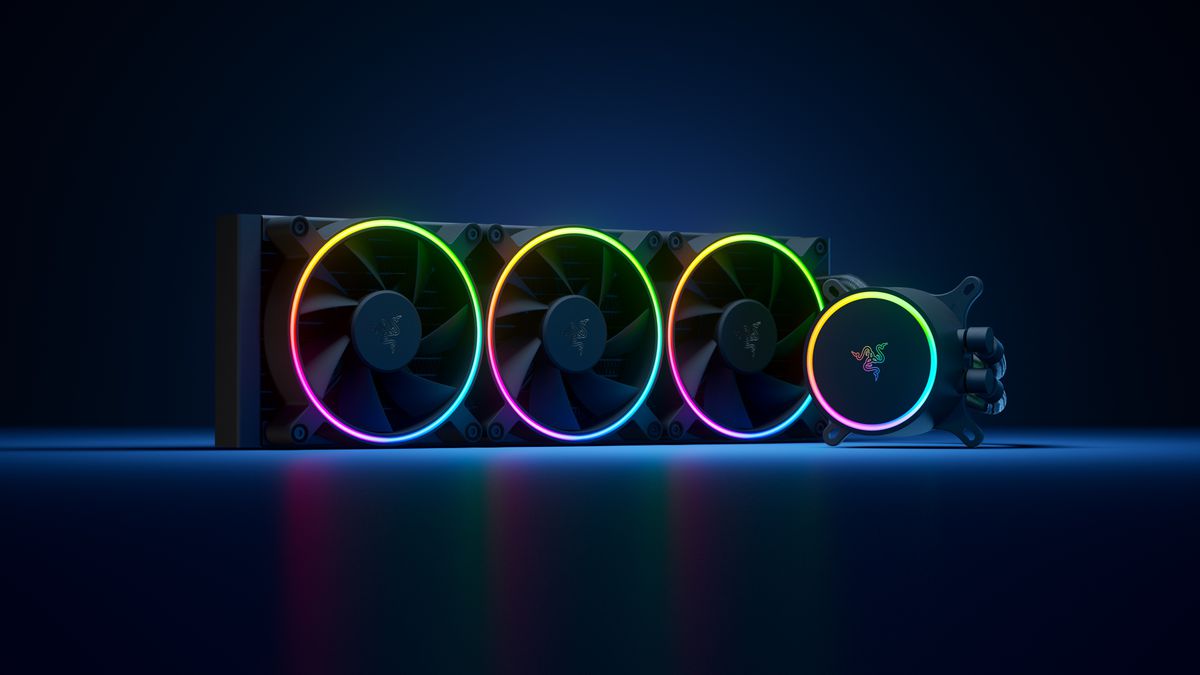
Hanbo liquid cooler will feature an optimized intake design so it can ensure greater heat transfer and fluid dynamic for improved reliability and silent operation. Radiator comes in 240mm size with two fans and a larger one of 360mm with three fans. The pump will be able to rotate in any direction of full 360 degrees so it can fit in any case. Hanbo will be released in November this year but no pricing has been released so far.

Razer Kunai Chroma case fans

razer case fans
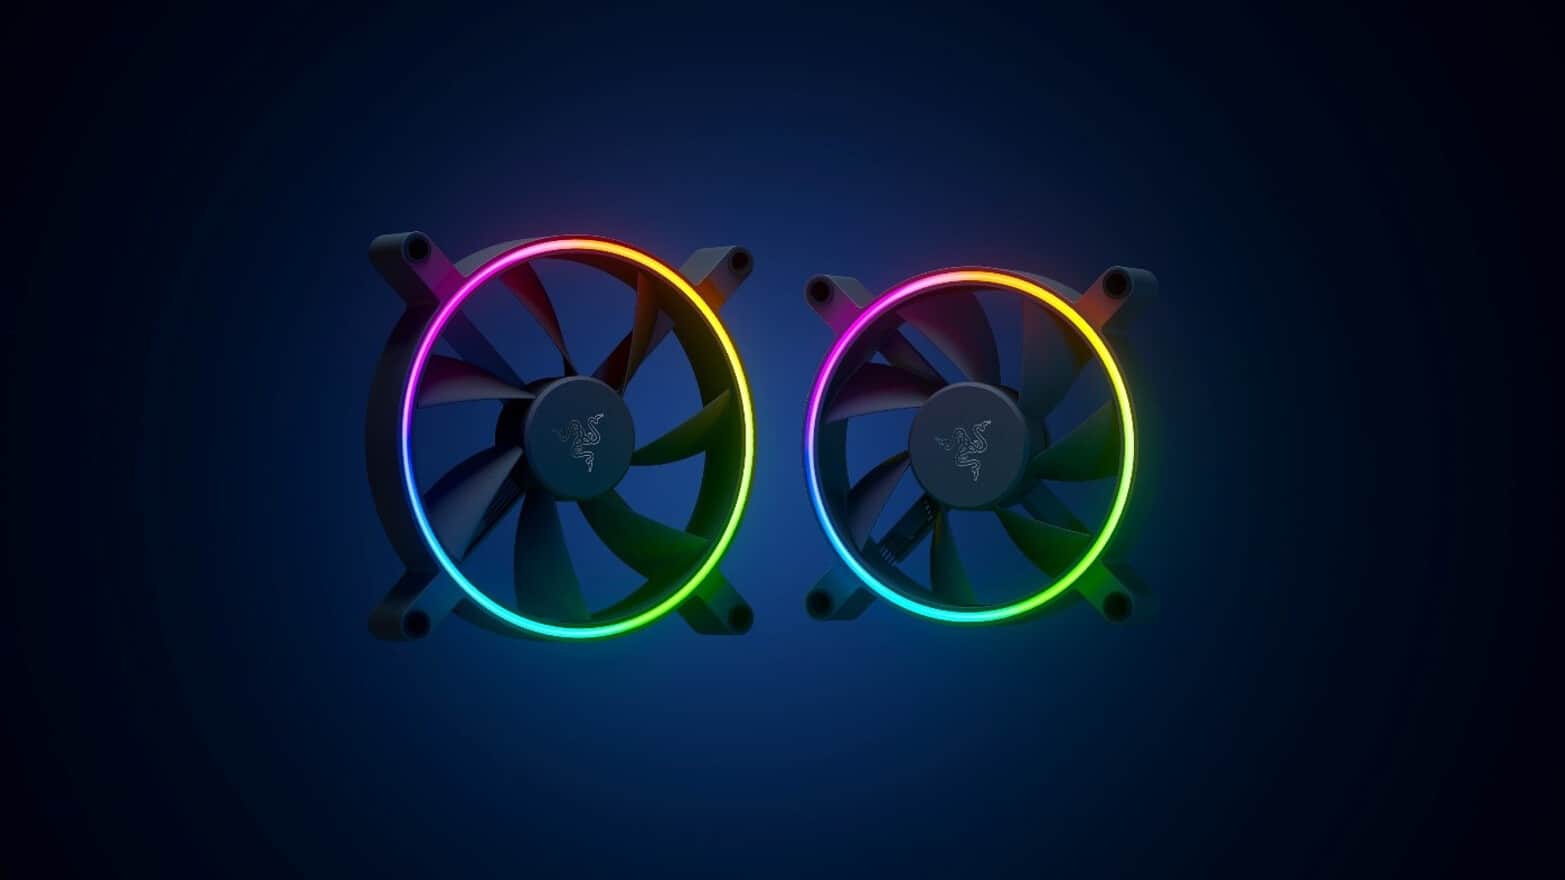
Kunai fans will boast high static pressure performance with lowered noise. They will go as far as 2200rpm for the 120mm version where the 140mm version will go up to 1600rpm. They will come with addressable LEDs and up to eight fans will be able to be connected to Razer’s PWM fan controller that will come with a magnet at the back for easy attachment to any steel part of PC casing. PWM will use Razer’s Synapse software to customize pulse width modulation in order to improve airflow and noise. PWM will be priced at $49.99 in the Razer Store and it is available for preorder. Fans are priced at $44.99 for one 120mm or $129.99 for a three-pack of 120mm. One 140mm will go for $49.99 and a three-pack will be $129.99.
Read More
NVIDIA GameStream is not working
The GameStream is an NVIDIA service that allows users to stream games from their Windows 10 computers to other supported devices which includes the NVIDIA SHIELD devices. However, a number of users reported that the NVIDIA GameStream is not working on their Windows 10 computers. This kind of issue is most likely caused by improper installation, some glitches with the network, and many more. To fix this issue in the NVIDIA GameStream, there are several options you need to check out to fix the problem. You can try to lo logout of GameStream and try logging back in again. You could also try to update or uninstall and reinstall the drivers related to NVIDIA or fix some network glitches or update the NVIDIA SHIELD device. For more details, you can refer to each one of the given potential fixes below.

Option 1 – Try to logout and log back into NVIDIA GameStream

The first thing you can do is to log out and then log back into NVIDIA GameStream. Some users claimed that by doing this simple task, they were able to resolve the problem. This is probably because with the re-login, the entire cache of the system and service is rebuilt and any bad sectors of that data will be replaced with the fresh one so this should resolve the problem with the NVIDIA GameStream, if not, refer to the other given options below.

Option 2 – Try updating the drivers from the official site of NVIDIA

If both the first and second given options didn’t work, you can also try updating the drivers from the official NVIDIA website. And in case you don’t know the type of Nvidia graphics card that your computer is on, follow the steps below:
  • Tap the Win + R keys to open the Run dialog box.
  • Next type in “dxdiag” in the field and click OK or hit Enter to open the DirectX Diagnostic Tool.
  • From there, you can see what type of Nvidia graphics card that your system is on.
  • Take note of your graphics card information and then look for the best drivers for your operating system. Once you’ve downloaded and installed the file, restart your PC.

Option 3 – Try to roll back the driver to the previous version

If updating the NVIDIA display drivers didn’t work for you, then it’s time to roll back the device drivers. It is most likely that after you updated your Windows computer that your driver also needs a refresh.
  • Tap the Win + R keys to launch the Run window and then type in the “MSC” command and hit Enter to open the Device Manager window.
  • Under the Device Manager, you will see a list of drivers. From there, look for the NVIDIA Drivers and expand it.
  • Next, select the driver entries that are labeled appropriately.
  • Then select each one of them and double click to open a new mini window.
  • After that, make sure that you’re on the Driver tab and if you are not, just navigate to it then click the Roll Back Driver button to switch back to the previous version of the NVIDIA Drivers.
  • Now restart your computer to successfully apply the changes made.

Option 4 – Try fixing your network

The next thing you can do to fix the problem with the NVIDIA GameStream is to fix the glitches in your network. Make sure that you connect both of your devices to a 5 GHz Wi-Fi network and you also have to ensure that the Wi-Fi connection you’re connected to is strong enough for both the devices for the latency to go down. Once you’ve covered all of these things with your network, restart your computer and change the Wi-Fi channel both devices are connected to. This should resolve the problem.

Option 5 – Try to update the NVIDIA SHIELD device

You might also want to update the NVIDIA SHIELD device. There are times when an outdated NVIDIA SHIELD device can result to several issues like the problem with the NVIDIA GameStream. Thus, you need to update NVIDIA SHIELD and check if it fixes the problem or not.
Read More
Creating a new Windows 10 user account
When we purchase a computer, usually it is meant to be used by one person. Sometimes we would like to share our computer with other people, with friends and family members but we would also like to keep some privacy for ourselves in the process. Lucky for us Windows 10 will let us create multiple user accounts which then can be used by other persons with their own settings, documents, etc. The only requirement is to already have one user account which is automatically created when Windows is installed. This guide will lead you step by step in the creation of a new user account within Windows 10, so grab your favorite drink, and let's begin.

Creating new account

First thing is to click on the windows icon on the bottom left and open start menu, from start menu click once on settings. Windows 10 Star menu with marked settings iconWhen the settings window opens, choose ACCOUNTS on it. Windows settings accounts section selectedWindows will then go to the accounts settings page. Within that page, click on the Family & other users to open the setting for the chosen section on right. On the right settings, screen navigate to the lower section and click once with the left button on add someone else to this PC When add someone else to this PC is clicked, pop up window will appear which will ask you to provide the persons email address and later on the password of his/her Microsoft account, after the required information is provided you are done, a new user has been added and he can use his Microsoft credentials on the login screen to use this computer.

Setting up a user without Microsoft ID

However, if you do not wish to add a new user via his Microsoft login credentials or the person does not have them, on the pop-up window click on I don't have this person's sign-in information. User account no informationThis will open yet another pop-up giving you the option to create a Microsoft account for this person, to use a phone number instead of a Microsoft account, or to create a new email address for the user. Any of these options will create a new user for this computer with provided credentials but there is the last option at bottom of the pop-up which will allow you to create a local user only without a Microsoft account. This user will be able to use this computer, will not be able to transfer his document through various devices like he/she would if using a valid Microsoft account but it could use the computer and personalize it fully to his/her liking. user account new account without ms idOnce the link is clicked, you will be presented with a floating window requiring you to input needed information in order for the account to be created. You will need to provide username, password, and answers to 3 security questions. user account create an accountOnce all information has been provided, click on next and your new non-Microsoft local user has been created. Now when you click on Family & other users you will see that Windows has added a new user with the provided name to this computer. If you wish, you can add another user in the same manner, following the previous steps. Microsoft Windows does not have a limit for how many users can be on one computer so feel free to create as many as you like.

User account options

Now, clicking on the existing created user will open user options. From there you will have options to remove the user, therefore removing him/her from this computer, note that removing the local user will remove permanently his/her settings and they would not be able to be restored, or you can change the user account type. User account new accountClick on Change account type. User account account typeUnder account type, you will have the option to promote this user to an administrator if you wish or you can leave it as a standard user.
Read More
Best graphic design software for 2022

2021 is nearing toward the end and with just a couple of days remaining in this year, we are happy to look forward to the next year. So in large anticipation of what will next year bring us, we are taking a good design look at this one and making a list for you of what graphic design software you should learn and use in the upcoming 2022.

graphic design softwareBefore we dive into it in more detail and predictions please be aware that this article is based upon my personal opinion drawn from the research of current trends and standards. That being said let's dive right into details.

Adobe Photoshop

Whatever you like it or not, Adobe has cemented itself with its flagship application Photoshop and how things are looking this situation will not change any time soon. Photoshop is an extraordinary pixel manipulation software that has the ability to work with both animations and vector graphics as well making it a great single application for all-around design needs. It has been industry-standard design software for the web, print, and all other kinds of design all over the globe and this will not change in near future. With its constant updates and expansion of its abilities, this is a must-have tool in your design tool belt. If you are looking to find work as a designer you will have to know how to work with photoshop.

Adobe illustrator

Many will tell you that what is photoshop for raster graphics, the illustrator is for vector. First started as illustrator 88 on Mac right away it took first place for vector graphics from FreeHand and it continued on its path of vector dominance. After some time and more integration with photoshop Adobe managed to overthrow Corel Draw as well winning the title for best vector editing software with illustrator. Same as with photoshop, if you are planning to work in a serious industry you will need to know the illustrator.

Adobe InDesign

We are still in Adobe train and it is moving hard, InDesign is graphic design software aimed for paper publications. If you need to create and prepare any kind of professional publication for printing InDesign is the application to go to. With its specific print aimed features it is a must-have for any graphic designer.

Corel Draw Graphic Suite

Once the king of vector and print design but dethroned by Adobe Corel Draw still has some punches to stay relevant in the field. With some cool features like symmetry and long shadows, it stands out from its competitors for its ease of use. Corel was always focused on easy to learn, difficult to master and it is still following that kind of thinking. Granted not many employers will require you to be a master of Corel Draw but some of them will request that you are familiar with the application. One of perhaps the greatest advantages of Corel over Adobe is not locking you into subscription making Draw suite as a great choice for freelancers and designers that want to own software, not rent it.

Affinity Designer

The first software from Affinity was Photo, made as a cheap version one-time purchase competitor for photoshop. Later it has released Designer, also a one-time purchase competitor for illustrator. If we are going to take a good look into a feature for feature comparison, both Adobe and Corel will win over Affinity but if we take a look at a price that is a one-time purchase Affinity will win over easily. Priced only at $54.99 it is a steal, and taking into account that many designers will not require any very advanced features found in Corel or Adobe applications Affinity is the way to go.

Inkscape & GIMP

Speaking of price, nothing beats free, and both Inkscape and GIMP are completely free. offering very decent and competitive features applications will require you to get used to their own specific UI and workflow, but once you get a grasp of them, you will be able to do most design work in them. One of the downsides of using these free open source apps is their limited export options but if all that is required from you is to deliver a typical SVG, JPG, EPS, PNG, or PDF file you are good to go.

Conclusion

If you have followed the graphic design scene you will notice that nothing has changed and it will not change in near future. This just speaks about how much industry is defined and how little change is there over time. I advise if you can to get and learn adobe suite since it is industry standard and it is required from almost every employer today. Rest applications of the list are great alternatives and can bring you income and offer you a way to finish your project.

Read More
Attempt was made to reference a token
If you were trying to open File Explorer but it suddenly stopped working and you encounter an error message that states, “An attempt was made to reference a token that does not exist”, read on as this post will guide you in fixing this problem. This problem was initially reported after the April Update and Microsoft was able to fix it right after correcting the build. However, this effort seems futile for some users as recently, some reported getting the same error when they try to open not just Windows File Explorer but also with utilities like Microsoft Management Console or MMC, Visual Studio, Task Manager, Printer, Recycle Bin, etc. Two of the most likely causes of this error are a troublesome Windows Update and corrupted system files. Whatever the cause is, here are some suggestions you can follow to fix the “An attempt was made to reference a token that does not exist” error.

Option 1 – Try to re-register the problematic DLL file

You may have to re-register the ntdll.dll file using the regsvr32.exe before you can successfully install the program and fix the ntdll.dll file crash error. The Regsvr32 tool is a command-line utility that can be used to register and unregister OLE controls like DLL and ActiveX (OCX) control in the Windows operating system. Follow the steps below to use it.
  • Open Command Prompt as admin from the WinX menu.
  • Next, type the following commands in the elevated Command Prompt and hit Enter to execute the command. This will re-register the affected DLL file using the Windows operating system tool, regsvr32.exe.
    • exe /[DLL file]
    • exe [DLL file]
Note: Replace “[DLL file]” with the name of the DLL file that was pointed out in the error.
  • After you execute the given commands, you should see a message saying, “DllRegisterServer in vbscript.dll succeeded” if the Regsvr32 tool was able to run successfully. After that, try to install the program again and see if it now works.

Option 2 – Replace the DLL file from a trusted source

  • First, you need to get the new DLL file from another computer with preferably the same file version number.
  • After that, you need to boot your PC into Safe Mode and navigate to the paths listed below and then replace the file using a USB drive or other external storage devices.
    • x86: This PC > C:/Windows/System32
    • x64: This PC > C:/Windows/SysWOW64
  • Next, type “cmd” in the Cortana search box and right-click on Command Prompt, and select “Run as administrator” to open it with administrator privileges.
  • Now type the “regsvr32 ntdll.dll” command and hit Enter.
  • Restart your PC and check if the error is now fixed.

Option 3 – Perform a System File Checker scan

The System File Checker or SFC scan could detect and automatically repair damaged system files that could be causing the “An attempt was made to reference a token that does not exist” error to pop up. SFC is a built-in command utility that helps in restoring corrupted files as well as missing files. It replaces bad and corrupted system files with good system files. To run the SFC command, follow the steps given below.
  • Tap Win + R to launch Run.
  • Type in cmd in the field and tap Enter.
  • After opening Command Prompt, type in sfc /scannow and hit Enter.
The command will start a system scan which will take a few whiles before it finishes. Once it’s done, you could get the following results:
  1. Windows Resource Protection did not find any integrity violations.
  2. Windows Resource Protection found corrupt files and successfully repaired them.
  3. Windows Resource Protection found corrupt files but was unable to fix some of them.

Option 4 – Try reverting back to the previous build of Windows

This kind of error might have something to do with a Feature Update so you can try to revert your computer to a previous build of Windows 10 as it could help you fix the problem. In this case, it would better if you refrain from updating your Windows 10 computer until this problem is completely resolved by Microsoft.
Read More
1 2 3 162
Logo
Copyright © 2022, ErrorTools. All Rights Reserved
Trademarks: Microsoft Windows logos are registered trademarks of Microsoft. Disclaimer: ErrorTools.com is not affiliated with Microsoft, nor claim direct affiliation.
The information on this page is provided for information purposes only.
DMCA.com Protection Status