Computer is stuck on the Hi there screen

As you know, installing Windows 10 is quite a complicated process in the background even though it may look like an easy task in the foreground. There are times when the setup is stuck on the “Hi there” screen where you won’t be able to input any information in the fields given and you wouldn’t be able to do anything else since the screen does not move ahead.

There are a lot of possible reasons why this issue occurs. It could be due to a damaged setup image, invalid boot configuration, and many more. To resolve this problem, there are several options you can check out. You can try to get a new setup image or run the Automatic Repair or you could also try to recreate the Boot Configuration files or BCD. To get started in checking out these solutions, make sure to follow the instructions provided below.

Option 1 – Try to run the Automatic Repair Utility

You might also want to use Automatic Repair in fixing the error. To do so, follow the steps below.

  • You can start by creating and booting from a bootable Windows 10 USB Stick.
  • After that, click on Repair your computer located on the bottom left corner when you are on the initial Windows Startup screen.
  • Next, click on Troubleshoot, and then on the other screen, click the Startup Repair option.
  • Now select the operating system you want to repair. Once you do that, it will start to repair your operating system. Wait until the process is completed and then check if the problem’s now fixed.

Option 2 – Try to rebuild the BCD files

You can also try rebuilding the BCD files to resolve stuck screen issue in your Windows 10 computer.

  • You can start by booting into the installation environment for Windows 10 from an installation media.
  • After that, click on Repair your computer and on the blue screen, select Troubleshoot and then select the Advanced options menu.
  • From there, select Command Prompt and once you open it, enter each one of the commands given below by sequence.
    • bootrec /FixMbr
    • bootrec /FixBoot
    • bootrec /ScanOS
    • bootrec /RebuildBcd
  • Once you’re done executing the commands given above, type “exit” to close the Command Prompt window and then restart your computer and see if it fixed error code 0xc000014c.

Option 3 – Try recreating the Windows 10 installation USB

Recreating the Windows 10 installation USB might help in fixing the problem. You can use a USB drive to do so but make sure that it has a great read-write speed. Follow the steps below to recreate Windows 10 installation USB”

  • Click this link and then click the Download Tool Now button.
  • Next, click the “Use the tool to create installation media (USB flash drive, DVD, or ISO file)…” option and follow the next given instructions on the screen.
  • Now select the ISO file option in step 5.
  • After that, you should now have an ISO file.
  • Next, go to the location where you’ve downloaded the ISO file.
  • Then right-click on the Windows 10 ISO file and select the Open with option and then select File Explorer.
  • Now click on “setup.exe” and follow the next instructions that appear on the screen. When asked, you have to select either Nothing (clean install) or Keep personal files only option. Take note that you must not select the “Keep personal files, apps, and Windows settings since it doesn’t really work.

Option 4 – Try getting a new Windows image file

If none of the four given options above worked, you might want to get a newer installation image using the Windows Media Creation tool. After that, create the bootable USB drive and once completed and then try to run the Windows 10 setup again.

If you like to learn and find out more about various Windows errors, and how to repair them go to our vast archive or use search to find articles that will explain and help you in solving your issue.
However, if you prefer to do things fast and with automatization then we are proposing to use an automated solution for your issues. The application that we are recommending is Advanced System Repair Pro
Advanced System Repair utilizes multiple tools all in one to give you a quick, simple, reliable, and very thorough diagnosis of your PC. It brings you all the tools you need in one program to clean, fix, protect, optimize and boost your PC!
1-Click Maintenance
All the tools to make it simple and easy! It's like having a professional technician at the click of a mouse.

Junk Cleaner
Keeping your computer free from unnecessary clutter also helps make your computer last longer. Like any other machine, if you keep it clean and take care of it, it will serve you better for longer!

Optimize background apps
Optimize applications background activity with the built-in Application Optimizer feature.

Disk Defrag
With a simple 1-click, Advanced System Repair speeds up your PC by assembling fragmented files on your machine and organizing them more efficiently.

Malware Removal
Finds and removes all types of harmful malware including trojans, worms, bots, adware, spyware, PUPs, and more!

Privacy Cleaner
The all-in-one privacy suite to Clean Your Tracks & Protect Your Privacy! Make your computer safe, secure, and more efficient!

System Tweak/Optimizer
ASR will analyze your complete system and settings to adjust your PC to function at its maximum performance.

Registry Cleaner
Over time, as you install and uninstall applications, the registry can become cluttered with old entries and broken settings which can result in program crashes, and annoying messages and slow the computer down.
Visit our Advanced System Repair Pro Download page to inform yourself about all the benefits of this software and get a free trial copy of it.
advanced system repair pro

Advanced System Repair Pro

One-click automated PC repair solution
ASR logo
With Advanced System Repair Pro you can easily
Replace damaged files
Restore performance
Free disk space
Remove Malware
Protects WEB browser
Remove Viruses
Stop PC freezing
DOWNLOAD
Privacy Policy | Terms of Use | Uinstall
Advanced System Repair Pro is compatible with all versions of Microsoft Windows including Windows 11

Share this article:

You might also like

How to block websites in Windows
There are a lot of reasons to ban or block different websites in your Windows. From wanting to limit yourself from distraction to block certain sites for sake of kids not going into them. Whatever your reason might be, keep reading in order to find out how you can block any website inside Windows for all browsers. The technique I am going to share with you is universal and not tied to Windows versions, they will work in any Windows from XP onward. Also, the technique will block desired websites on any browser, already installed or even ones that will be installed after doing the trick. And we will also be looking at applications that can help you in this task if you do not wish to do it manually.

Block websites using dedicated software

A small free application called Focal Filter which can be found here: https://www.focalfilter.com/ is a software solution for your needs. It is a pretty straightforward and easy-to-understand application and not really much can be said here about it. You simply download and install it, set your websites, and you are done, the app does rest.

Blocking manually via host file

Another method besides mentioned one using the dedicating application is to manually set site addresses inside the Windows host file. The first thing, of course, is to open the host file, run a notepad with administrator privileges, go to file open, and navigate to c:\windows\system32\drivers\etc\hosts. Once the file is opened go all the way down and add: 127.0.0.1 SITENAME For example: 127.0.0.1 www.youtube.com or 127.0.0.1 www.facebook.com This way each time user on a PC tries to access a listed website computer will reroute it to the given address which is your PC's local address and asked website will not be able to load.
Read More
Fixing Upside Down Screen in Windows 10
As you know, Windows 10 comes with a pre-packed feature that allows you to rotate the screen at different angles, and to facilitate this feature, there are keyboard shortcuts you can use as well. However, from time to time, no matter how useful this feature is, users still experience a handful of issues. One of which is that they suddenly find their screen rotated or Upside Down even when they didn’t do a thing or adjust the setting. You may have pressed the shortcut on the keyboard by accident or some other program changed the setting on your computer without your permission – whichever the case is, this post will show you what you can do to fix the upside-down screen on your Windows 10 PC using the options laid out below.

Option 1 – Try using hotkeys

As mentioned earlier, Windows have hotkeys in the UI that changes the orientation of the display. So the first thing you need to do is to make sure that these hotkeys are enabled and if they are, you can use the keyboard shortcut to adjust the orientation of your screen.
  • Right-click on an empty part of your Desktop and then select the Graphic options.
  • Next, select “Hot Keys” > “Enable”. After verifying that the hotkeys are enabled, you can tap the Ctrl + Alt + Up arrow keys to change your computer screen’s orientation.
  • Alternatively, you can also tap the Ctrl + Alt + Right or Left or Down arrow keys to change the direction the other way.

Option 2 – Try using the Graphics Properties

You will probably see the “Graphics Properties” option if you use the Intel HD Graphics every time you click on your Desktop. Note that this option has all the graphics driver properties and helps you in changing the configurations as well as control several options like refresh rate, resolution, color-depth and many more. You have to navigate to these options to see if the orientation is changed in these properties. To do so, follow the steps below.
  • Right-click on any empty space on your Desktop and then select Graphics Properties or Intel Graphics Settings.
  • After that, select Display from the list of sub-options that appears.
  • From there, you will see the rotation of the screen under the “Display settings” option where you have to make sure that the slider is set to “0”.
  • Click the Apply button to save the changes made and then click on Exit. The orientation of your screen should automatically change.

Option 3 – Try using the Windows Display Settings

Since the Windows Settings have a section where you can manage the display settings of your computer, you can use them to help control the resolution of your PC’s display without any trouble. There is a possibility that the settings are changed there so that’s probably why your screen is turned upside down all of a sudden.
  • Tap the Win + S keys to open search and then type in “settings” in the field and then hit Enter to open Settings.
  • After opening Settings, click on System and then on Display using the left navigation bar and then scroll to the end and select the Advanced display settings.
  • Next, click on the Display adapter properties and click on Intel HD Graphics control panel.
  • Now change the rotation to 0 Degrees. Afterward, the display should revert back to its original form automatically.

Option 4 – Check your monitor’s physical controls

There are monitors that have buttons in them that allows users to shift the rotation of the screen to 90 degrees. It could be that your monitor has these buttons without you knowing and you suddenly pressed them by mistake which caused your screen to rotate. Thus, you have to check your monitor for any physical buttons on the side and if you see a menu, navigate to its options and check if there are screen rotation options. To make it easier for you, you can simply search your monitor’s model online and see if these buttons exist. You could also go over your monitor’s manual if you still have it as it contains details with regards to screen rotation.

Option 5 – Update your Graphics drivers

  • Tap the Win + R keys to open the Run dialog box and then type in devmgmt.msc and tap Enter or click OK to open the Device Manager.
  • Expand the section for the outdated device drivers.
  • And then select the outdated driver(s) and right-click on it/them.
  • From the drop-down menu, select the Update Driver option if you wish to update the driver or select the Uninstall device if you want to uninstall the driver and then follow the on-screen instructions to install the latest version of the driver.
  • Restart your PC after the installation to allow the system to reinstall the driver.
Read More
IW Unicorn and Scorpion PC Chair cockpits
Recently on errortools.com, we were talking about Cooler Master’s Orb X gaming chair that is an absolute beast and an amazing product. One downside of Orb X is its price. IW product line is somewhat competing with Orb X with a much more affordable price aiming to probably take customer base with lower income but offering them a great experience as well. The first thing you will notice is a different design and somewhat feeling of cheaper quality if you compare it to Orb X but that is quite reasonable considering the chair itself is around 3.5 times cheaper than Orb X which really puts it in range of everyone can get it. But does a much cheaper price means low quality? Let’s explore.

IW Unicorn

IW unicorn
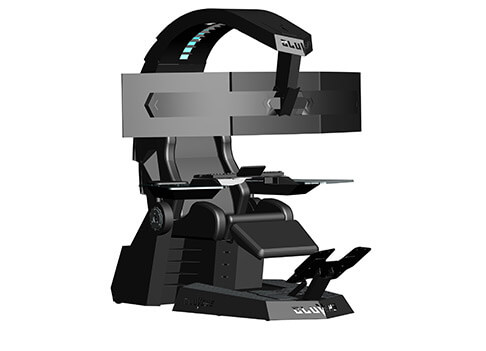
The 2021 CLUVENS BRAND newly issued model UNICORN has fully electrical tilting capabilities to 160 degrees, Reading light-two LED & RGB illumination lighting, manual open/close keyboard tray, and armrests. This model is suitable for home and office, and also gaming computer work environments. It offers functions that enable the user to experience unprecedented comfort and quasi total immersion through strategically positioned 1-3 monitors, audio systems, and accessories. The result is a complete computer office, ergonomically optimized, with a minimal footprint that improves overall performance and productivity and health and comfort. Sitting on a chair can help a lot for relieving health problems like lower back pain, herniated discs, sciatica, and neck pain and also enhance performance and viewing effects.

More Luxury and More comfortable:

Equipped with Luxury feeling reclining Gaming chair made with high-density Mold Shaping Foam and superior quality PU leather with very comfortable texture, electrical recline to 128 degrees, and more to 160 degrees for the flat position for the user.

More High-End Setting and more High-tech:

Manual push for open / close of big sized (87x34cm) Self-Balancing Keyboard tray, adjustable with 20cm distance range with Electrical control for the height of roof arm & monitors. Electrical control for reclining Zero Gravity position or even flat position, Manual adjusted Feet pedal for a more comfortable position for feet. Using a High-Quality PU leather Gaming chair that has Heat/Massage functions with it! The IW-Unicorn monitor mounts allow the use of a single monitor up to Ultra-wide 49” or 43” in size or triple monitor setups up to 3 x 29” other monitors configurations are available upon request. (VESA standard)

IW Scorpion

IW scorpion
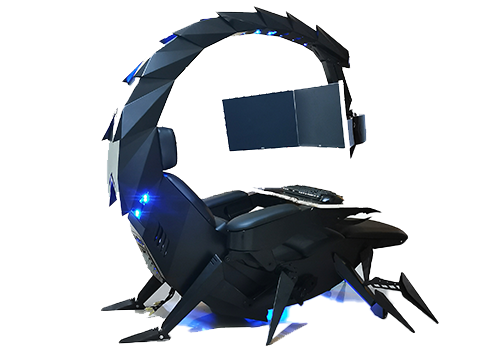
Scorpion is basically a premium version of Unicorn with being able to hold more weight, having cup holders on the armrest, etc. The look is also similar with Scorpion being more sinister-looking but overall Steel frame and chair are the same.

Conclusion

Sadly I have not personally experienced neither of these products including Orb X but from all information I have found and looked over, I would say these products are not trying to compete with each other. Although Products are similar in nature, Orb X is aimed at hi end-users focusing on privacy and robustness while IW is filling the gap of users that would like an advanced chair but are not willing or ready to shell hi amount of money for it offering advanced chairs with advanced features in somewhat affordable price.
Read More
How to Fix Error Code 0xc0000001 on Windows 10

Error Code 0xc0000001 – What Is It?

Error code 0xc0000001 on Windows 10 has been reported by some users when attempting to install Windows 10. When you encounter this error, the setup will be in a loop and the error message will keep popping up.

Solution

Restoro box imageError Causes

If you encounter the error code 0xc0000001 while trying to install Windows 10, it most probably be due to corrupted installation file. However, it can also be caused by any of the following:”

  • Damaged SAM file
  • Damaged system files
  • File system integrity compromised
  • Damaged RAM

Further Information and Manual Repair

Here are some methods that will help you fix the error code 0xc0000001 while trying to install Windows 10. Do not perform these methods unless you’re absolutely confident you can do it properly. Otherwise, you might make things worse.

If you’re not that confident, consider seeking advice from a technical expert. If you can’t afford one, you may want to consider getting an automated software to fix the job.

Method 1: Convert drive/partition to GPT

If you need to manually wipe the drive and then convert it to GPT, follow these steps:

  • Step 1: Power down your computer and put your Windows 10 installation DVD or USB drive
  • Step 2: Boot your computer to the USB or DVD key in UEFI mode.
  • Step 3: Once you’re at the Windows 10 Setup, press the Shift+F10 keys. This will open the command prompt window.
  • Step 4: Open diskpart tool from CMD. Just type diskpart and enter.
  • Step 5: Then, type the list disk on CMD again. Press enter. This will allow you to identify your computer’s drive that you want to reformat.
  • Step 6: Choose the drive and reformat it by typing the following on the command prompt:

select disk <disk number> (press enter)

clean (press enter)

convert gpt (press enter)

exit (press enter)

  • Step 7: Proceed with the Windows 10 Setup installation.

Note: when you’re prompted to choose the installation type, make sure to choose Custom. Then, choose unallocated space and click Next. This will automatically start the installation of Windows 10.

Method 2: Use Media Creation Tool to Perform Automatic Repair

Automatic Repair is a Windows feature/utility that allows you to fix certain system problems preventing you from installing or starting Windows. It works by scanning your computer system for any potential problem and tries to fix it.

  • Step 1: Download the Media Creation Tool
  • Step 2: Boot your computer using the Windows 10 DVD, or the System Repair disc. When you’re asked to press any key to boot, just press any key on your keyboard.
  • Step 3: Choose the right time and the keyboard type.
  • Step 4: Click Repair your computer. You’ll see this in the lower-left corner of your screen.
  • Step 5: Choose Troubleshoot from Choose an option screen
  • Step 6: Click Advanced options
  • Step 7: Choose an automatic repair

This will automatically run the utility.

Method 3: Check Hardware Devices

Another possible reason why you are getting this error while installing Windows 10 is due to the connected external hard drives. To fix this, power down your computer. Afterward, unplug and remove all connected external hard drives. If you’re using USB device to install Windows 10, ensure your BIOS is set to boot your computer from the USB.

Method 4: Create New Copy of Windows 10 Installer

Another possible reason why you experience this error is that your copy of the Windows 10 installer is corrupted. To fix this, it’s better to create a new copy of the Windows 10 installer.

  • Step 1: Go to this link
  • Step 2: Click the Download tool now. Choose Run with admin privileges
  • Step 3: On What do you want to do? section, choose installation media for another PC. Click Next.
  • Step 4: Select edition, language, and architecture (32-bit or 64-bit).
  • Step 5: Choose the media you want to use. If you want to use a USB flash drive, make sure the device at least has 5GB of free space. If you’re using an ISO file, you need to save the file first on your computer and then burn the file to a DVD.

Method 5: Use a Powerful Automated Tool

If you still encounter these errors after performing the above methods, find a trustworthy automated tool. As long as the automated tool is powerful and reliable, it will help you fix this error.

Read More
How to Resolve Dsound.dll Error Code

Patch Dsound.dll Error

Dsound.dll Error Code - What is it?

Dsound.dll is a type of Dynamic Link Library. This is one of the many files that are associated with DirectX software. And DirectX software is used by most Windows-based games. Dsound.dll contains small programs that help run and load Windows-based games on your system. The Dsound.dll error pops when Windows-based games are unable to load and run on the computer. The error code appears on the screen in one of the following formats:
  • "The file dsound.dll is missing"
  • "File dsound.dll not found"
  • "Dsound.dll not found. Reinstalling might help fix this."
  • "Dsound.DLL Not Found"

Solution

Restoro box imageError Causes

Dsound.dll error is generated due to multiple reasons. These include:
  • Corrupt, damaged, or missing Dsound.dll file
  • Malware infection
  • Outdated drivers
To play the games on your computer, it is important to fix the Dsound.dll error immediately.

Further Information and Manual Repair

To resolve Dsound.dll error at home on your own without hiring a professional and spending hundreds of dollars in repair, here are some methods you can try:

Method 1 - Restart Your PC to Resolve

Sometimes the error may be a fluke and can be resolved by simply restarting your PC. So, before you try other methods, it is recommended that you restart your system first. If it resolves the issue, then that’s great. If it doesn’t, then try other methods given below!

Method 2 - Reinstall the Deleted Dsound.dll File

Since DLL files are shared files, there is a possibility that while uninstalling a game on your PC, you might have accidentally deleted this file too. If so, check your recycle bin and search for the deleted file. If you locate it, simply restore it. But if you can’t, then download the Dsound.dll file from a reliable DLL website. Make sure that the site is authentic because the last thing you want is to download malware instead of a DLL file.

Method 3 - Update Driver for Your Video Card

If Dsound.dll error occurs because of outdated drivers, then update them to resolve. You can do this by using a driver update wizard from within Device Manager. The wizard will guide you through the process, making updates simple.

Method 4 - Remove Malware

Download a powerful antivirus to scan and remove malware from your system. A malware infection can trigger a Dsound.dll error too.

Method 5 - Uninstall the Game and then reinstall it again

Try uninstalling the game during which you experienced this error. Sometimes the error may pop because of improper game installation. Uninstall it and then reinstall it. Once you’ve reinstalled it, try accessing it again. If it is accessible, the error is resolved.

Method 6 - Repair the Registry

DLL errors are also related to the registry. These files can get damaged if the registry gets loaded with junk files and cookies. In such as situation clean and repair the registry. You can do this manually but it can be time-consuming and tricky if you are not technically sound. Therefore download Restoro. It is a powerful and user-friendly PC Fixer embedded with a registry cleaner. The registry cleaner scans and removes all junk files clean the registry and repairs damaged DLL files immediately. Click here to download Restoro and resolve error Dsound.dll today!
Read More
INET_E_RESOURCE_NOT_FOUND
The previous Windows versions all came with Microsoft's browser Internet Explorer. A lot of users love it because not only that it is easy to use. It is also very fast. Users didn’t have to worry about compatibility because it is almost always compatible with its Windows Version. When they introduced Windows 10, they changed the name of the browser from Internet Explorer to Microsoft Edge. It is faster and more user-friendly compared to its predecessors. But after the Creator Update, some experienced receiving the inet_e_resource_not_found error code. In contrary to what everyone expects, you actually don’t have to uninstall and reinstall the Microsoft Edge App. What you can do is reset the browser in your Apps & Features Settings in your Microsoft Settings.

To reset the browser you can follow the steps below:

  1. Click on the Windows icon and go to settings.
  2. Click on Apps and this will bring you to the Apps & Features page. Look for Microsoft Edge from the list of Apps and click on it.
  3. Choose Advance Option
  4. Scroll down then Under Reset, click on repair or reset. When you repair it will fix the existing problem but the data that caused the problem may still be present and can still cause problems. If you click on reset, it will delete all the cache and cookies that are installed in your browser but it will save your Favorites as well as your bookmarks.

Another way to resolve this is by disabling the feature TCP Fast Open on Microsoft Edge. To disable this, go ahead and follow the steps below:

  1. Open the Microsoft Edge browser.
  2. Type in about: flags on the Address (URL) bar.
  3. Under Networking, uncheck the Enable TCP Fast Open.
  4. Close your Microsoft Edge browser and open a new one.
Flushing the DNS also worked for other Users. Sometimes, the error code the inet_e_resource_not_found is caused by a corrupted DNS cache. There are 2 ways to flush your DNS. The first option is to use the command prompt to run the command.
  1. To access the Command prompt or CMD, you can search for it on Cortana or you can click on the Windows icon to access the Programs, scroll down to the Windows System folder and click on it.
  2. A dropdown menu will show up, click on Command Prompt which is the first on the list.
  3. Type in the code ipconfig /flushdns and press enter.
  4. There will be a message that will show that says Windows IP configuration successfully flushed the DNS Resolver Cache
  5. Exit the CMD by typing exit and press enter.
The easiest way to do this is to Press the keys Window + R on your keyboard. Type in ipconfig /flushdns in the search box and hit enter or click on OK. These are only some of the ways to resolve the inet_e_resource_not_found. There are other ways to further troubleshoot this issue such as reinstalling your Wifi Adapter Driver or adjusting the DNS Server Address. But most of the time, users are able to resolve the issue with the steps provided above.
Read More
How to fix the Javaw.exe Error Code

Troubleshoot Javaw.exe Error

Javaw exe - What is it?

Javaw.exe is a type of executable file or a process used by Sun Microsystems. It is in charge of executing programs created with Java on Windows PC. It is a part of the Oracle Java Runtime Environment. The javaw exe error hampers your ability to run programs supported by Java. Common Javaw.exe error messages include:
  • "Javaw.exe Application Error."
  • "Javaw.exe is not a valid Win32 application."
  • “Cannot find javaw.exe.""Javaw.exe not found."
  • "Error starting program: javaw.exe."
  • "Javaw.exe is not running.""Javaw.exe failed."
  • "Javaw.exe has encountered a problem and needs to close. We are sorry for the inconvenience."

Solution

Restoro box imageError Causes

There can be many reasons for javaw.exe error code on your PC such as:
  • Viral infection
  • Malware attack
  • Invalid registry entries
Ignoring such error messages is not wise. You must resolve it right away as such errors can lead to serious PC threats like system failure and data security threats.

Further Information and Manual Repair

Scan the Javaw.Exe File For Malware

To fix Java Exe error on your system, first you need to find out the cause of the error. Is it triggered by malware or invalid registry entries? The best way to identify the cause is to check your system’s CPU usage. This can be done through assessing the Task Manager by pressing Ctrl+Alt+Del all at the same time. After that, click ‘Processes and locate the javaw.exe file. Remember this file does not require too much memory, so abnormal memory usage is a surefire sign that the java.exe file on your system is a virus. To resolve it, download an antivirus and run it to scan and remove viruses from your PC. However, running an antivirus may slow down your PC performance. On the other hand, if you find the memory usage is fine, then this means the error is not caused by malware but it occurred either due to old version system files on your PC or registry corruption.

Update the Javaw.Exe File

To remove the old version files, go to the start menu. Click Control Panel and then Add/Remove programs. Here find the Java program and uninstall it. Now after the program is completely uninstalled, go to Java’s official website and download the latest version of your desired program. Restart your PC after the installation is successfully complete.

Clean & Repair Registry

If the problem still persists, then the javaw exe error is mostly likely triggered due to registry corruption. The best way to resolve it is to clean and restore the registry. You can do it manually but you may find the manual procedure slightly time-consuming and complex especially you are not a computer programmer. Therefore we recommend you download Restoro.

Why Restoro?

Whether the javaw exe error occurs due to viral infection, invalid entries, or registry corruption, Restoro takes care of all. This is a new, cutting edge, and multi functional PC fixer deployed with multiple performance-boosting and system repair utilities including a powerful registry cleaner, an antivirus, a system optimizer, and Active X controls, and a Class ID detector. The registry cleaning utility wipes out all the unnecessary files, clearing up the cluttered disk. It cleans the registry and restores it. Simultaneously, the antivirus feature detects and scans all malicious software infecting your PC and removes them right away. The system optimizer module boosts the speed of your system and ensures your PC performs at its optimum pace. This is a safe, efficient, and bug-free tool. It has a user-friendly interface and easy navigation. Furthermore, it is compatible with all Windows versions. Click here to download Restoro and resolve Javaw exe error on your PC today!
Read More
How to Fix Windows Update Error 0x80070103

How to Fix Windows Update Error 0x80070103

What is error code 0x80070103?

When visiting the Windows Update Website or the Microsoft Update Website to download the latest update for hardware drives, you could possibly receive Error Code 0x80070103 when clicking on the update driver. This error code occurs when Windows tries to download a piece of identical hardware for a second time. It could also occur when Windows tries to update a currently installed driver to an unsuitable version of that driver.

Solution

Restoro box imageFurther Information and Manual Repair

There aren’t many ways to handle this issue. Below are two methods of fixing Error Code 0x80070103.

Method 1:

  • Visit the Microsoft Update Website
  • After the "scan for updates" is complete, click the Welcome or Custom page.
  • Next, click Hardware, in the navigation panel, and then on the tab for "optional hardware Updates", the Update client will display the available updates.
  • For the graphics card, scan the second update after which you'll click to select the option that says "do not show this update again".
  • Hit the "Review and install updates" button.
  • Confirm that the second update for the graphics card is not present, then move on the installing the updates.
  • Click on the start button, go to All Programs, and then click on Windows Update.
  • Hit the "Check for updates" tab.
  • After the "scan for updates" is over, click the"Optional updates" link.
  • In the "Select the updates you want to install" section, right-click the update that is not needed and hide them.
  • Hit the OK button.
  • To install any additional updates that are selected, click "Install Updates". Close Windows Update if no other updates are selected,
  • For touch screens, swipe in from the right edge of the screen, tap Search (or point to the upper-right corner of the screen if you're using a mouse, moving the pointer down, before clicking Search). Enter "Windows Updates" in the search box, click Settings, and then click "Check for updates".
  • After the scan is complete, click the"Optional updates are available" link.
  • Right-click or Tap and hold the update you want to hide, select"Hide update", and then select OK.
  • If any other updates are available, save all work in "other programs", then restart the computer to the install updates; otherwise, opt out of the Windows Update window.
Open the search window and type “Windows Update” in the search box.

Method 2:

When trying to repair error code 0x80070103, if you find method one hard to follow, can contact Microsoft directly. Call up the help center number listed on their website, and a technician will be able to walk you through the process of ensuring the updater is not attempting to download multiple copies of hardware or trying to install unusable updates on your computer. Because the Windows Updater is set to a generic method of searching for updates, it may not be set to optimize the personal computer's settings. This is why you must select all of the optional update options and why this process is so long. It may be made easier by having a computer repairs technician walk you through it. However, if you want to automate the process of getting that problem solved, you can use a powerful tool to get the job done.
Read More
Fix Your system requires SMB2 or higher Error
SMB which stands for “Server Message Block”, is a protocol used for file sharing. It provides the Read and Writes operating on network devices. Thus, it is why it is widely used when accessing a server-based in Linux. Its latest version is the SMB2 which follows after SMB1. The SMB2 contains more fixes to vulnerabilities that were found in SMB1. The predecessor was vulnerable since it served as a gateway to various modern ransomware which is why Microsoft disabled it by default starting with Windows 10 v1709. When you try to share a file, you will get the following error message:
“Microsoft Windows Network: You can’t connect to the file share because it is not secure. This share requires the obsolete SMB1 protocol, which is unsafe and could expose your system to attack. Your system requires SMB2 or higher.”
In this post, you will be guided on how to check if the SMB2.0 version can be installed on your Windows 10 computer. To get started, follow the steps below. Step 1: Tap the Win + X keys to open the Device Manager. Step 2: After that, click on the Windows PowerShell (Admin) option. Step 3: In the Windows PowerShell window, type the following command and hit Enter:
Get-SmbServerConfiguration | Select EnableSMB2Protocol
Note: After entering the command, you will see the following content on your screen which means that your Windows 10 computer is now capable of running the SMB2 protocol Now all that’s left for you to do is to enable the SMB 2 protocol on your Windows computer by enabling the SMB 1 protocol first and then upgrading it to SMB 2 afterward. Refer to the steps below for more details. Step 1: Tap the Win + I keys to open the Settings app. Step 2: Then type in “control panel” in the search area and click on Control Panel from the search results. Step 3: After opening Control Panel, click on Programs. From there, select the “Turn Windows features on or off” option under the larger menu of Programs and Features. Step 4: After that, Windows Features will appear on your screen. And from there, make sure that you select SMB 1.0/CIFS File Sharing Support and then click on OK. Step 5: Now let it install all the required files and then restart your computer to apply the changes made successfully. After your computer has restarted, the SMB 2 protocol should now be supported on your Windows 10 computer. Note: On the other hand, you can also enter the following command in the Windows PowerShell window. Just make sure you have admin rights to enable it.
Set-SmbServerConfiguration –EnableSMB2Protocol $true
Read More
10 Worst Computer Viruses in history
Computers viruses, worms, ransomware, etc. are kinds of malicious software that no user should take lightly. On several occasions, we have touched upon security steps that each user should take in order to protect its identity and data. Sadly sometimes even when all precautions are taken some malware can still slip through and wreak havoc. Today we are looking at some of the worst or the best, depending on your view that has indeed wreaked plenty of havoc.

viruses10 worst computer viruses in history

In the list of the 10 most famous computer viruses below, we show the costs, dates, reach, and other key facts. First a note about terms: we use the words “virus” and “worm” interchangeably because most readers search for them that way. But there’s a subtle difference that we explain after the list.

1. Mydoom – $38 billion

The worst computer virus outbreak in history, Mydoom caused estimated damage of $38 billion in 2004, but its inflation-adjusted cost is actually $52.2 billion. Also known as Novarg, this malware is technically a “worm,” spread by mass emailing. At one point, the Mydoom virus was responsible for 25% of all emails sent. Mydoom scraped addresses from infected machines, then sent copies of itself to those addresses. It also roped those infected machines into a web of computers called a botnet that performed distributed denial of service (DDoS) attacks. These attacks were intended to shut down a target website or server. Mydoom is still around today, generating 1% of all phishing emails. That’s no small feat considering the 3.4 billion phishing emails sent each day. By that figure, Mydoom has taken on a life of its own, infecting enough poorly-protected machines to send 1.2 billion copies of itself per year, 16 years after its creation. Though a $250,000 reward was offered, the developer of this dangerous computer worm was never caught. Wondering what makes the world’s most secure computers so safe? See the Tech@Work guide: Upgrade to the World's Most Secure and Manageable PC

2. Sobig – $30 billion

The 2003 Sobig computer virus is actually another worm. It is second only to the Mydoom virus in its scope. The $30 billion figure is a worldwide total, including Canada, the U.K., the U.S., mainland Europe, and Asia. Several versions of the worm were released in quick succession, named Sobig.A through Sobig.F, with Sobig.F being the most damaging. This cybercriminal program masqueraded as legitimate computer software attached to emails. It disrupted ticketing at Air Canada and interfered with countless other businesses. Despite its widespread damage, the creator of the successful bug was never caught.

3. Klez – $19.8 billion

Klez is a close third on the list of the worst computer viruses ever created. With nearly $20 billion in estimated damages, it infected about 7.2% of all computers in 2001, or 7 million PCs. The Klez worm sent fake emails, spoofed recognized senders and, among other things, attempted to deactivate other viruses. As with other viruses and worms, Klez was released in several variants. It infected files, copied itself, and spread throughout each victim’s network. It hung around for years, with each version more destructive than the last. Windows has come a long way since most of the computer viruses on this list hit the web. Thankfully, built-in protection with Microsoft Defender is always on the watch.

4. ILOVEYOU – $15 billion

The year 2000’s ILOVEYOU virus worked by sending a bogus “love letter” that looked like a harmless text file. Like Mydoom, this attacker sent copies of itself to every email address in the infected machine’s contact list. Shortly after its May 4 release, it had spread to more than 10 million PCs. The virus was created by a college student in the Philippines named Onel de Guzman. Lacking funds, he wrote the virus to steal passwords so he could log into online services he wanted to use for free. He reportedly had no idea how far his creation would spread. This virus is also known as Loveletter. Need to up your remote work security game before there’s another entry on the list of most deadly computer viruses? See our guide: How to Work Remotely and Securely

5. WannaCry – $4 billion

The 2017 WannaCry computer virus is ransomware, a virus that takes over your computer (or cloud files) and holds them hostage. The WannaCry ransomware ripped through computers in 150 countries, causing massive productivity losses as businesses, hospitals, and government organizations that didn’t pay were forced to rebuild systems from scratch. The malware raged like wildfire through 200,000 computers worldwide. It stopped when a 22-year-old security researcher in the U.K. found a way to turn it off. Computers with out-of-date operating systems were hit especially hard. That’s why security experts always recommend updating your systems frequently.

Ransomware strikes again

In September 2020, one of the potentially largest computer virus attacks in medical history hit Universal Health Services. The U.S. hospital chain, which has more than 400 locations, was reportedly struck by damaging ransomware. The attack forced the cancellation of surgeries and made healthcare workers switch to paper records.

6. Zeus – $3 billion

The Zeus computer virus is an online theft tool that hit the web in 2007. A whitepaper by Unisys three years later estimated that it was behind 44% of all banking malware attacks. By then, it had breached 88% of all Fortune 500 companies, 2,500 organizations total, and 76,000 computers in 196 countries. The Zeus botnet was a group of programs that worked together to take over machines for a remote “bot master.” It originated in Eastern Europe and was used to transfer money to secret bank accounts. More than 100 members of the crime ring behind the virus, mostly in the U.S., were arrested in 2010. It’s not as prominent today, but some of the virus’ source code lives on in newer botnet viruses and worms. Zeus caused documented damage of $100 million. But the real cost in terms of lost productivity, removal, and undocumented theft is undoubtedly much higher. A $3 billion estimate, adjusted for inflation, puts this virus at a cost of $3.7 billion in today’s dollars.

7. Code Red – $2.4 billion

First observed in 2001, the Code Red computer virus was yet another worm that penetrated 975,000 hosts. It displayed the words “Hacked by Chinese!” across infected web pages, and it ran entirely in each machine’s memory. In most cases it left no trace in hard drives or other storage. Financial costs are pegged at $2.4 billion. The virus attacked websites of infected computers and delivered a distributed denial of service (DDoS) attack on the U.S. White House’s website, www.whitehouse.gov. In fact, the White House had to change its IP address to defend against Cod Red. Can your printer get a virus? See our cool infographic: The State of Printer Security

8. Slammer – $1.2 billion

The SQL Slammer worm cost an estimated $750 million across 200,000 computer users in 2003. This computer virus randomly selected IP addresses, exploiting vulnerabilities and sending itself on to other machines. It used these victim machines to launch a DDoS attack on several internet hosts, significantly slowing internet traffic. The Slammer worm hit banks in the U.S. and Canada especially hard, taking ATMs offline in many locations. Customers of Toronto’s Imperial Bank of Commerce found themselves unable to access funds. The attack reared its ugly head again in 2016, launching from IP addresses in Ukraine, China, and Mexico.

9. CryptoLocker – $665 million

Thankfully, ransomware attacks like the 2013 CryptoLocker virus have dipped since their 2017 peak. This malware attacked upwards of 250,000 machines by encrypting their files. It displayed a red ransom note informing users that “your important files encryption produced on this computer.” A payment window accompanied the note. The virus’ creators used a worm called the Gameover Zeus botnet to make and send copies of the CryptoLocker virus. According to a report by security firm Sophos, the average ransomware attack costs a business $133,000. If we estimate that CryptoLocker hit 5,000 companies, that would put its total cost at $665 million. Where will cybersecurity go next? See our guide: The Future of Cybersecurity

10. Sasser – $500 million

The Sasser worm was written by a 17-year-old German computer science student named Sven Jaschan. He was arrested at the age of 18 in 2004 after a $250,000 bounty was posted for the computer virus’ creator. A friend of Jaschan’s tipped authorities that the youth had penned not only the Sasser worm but also the damaging Netsky.AC attack. Jaschan was given a suspended sentence after it was found he was a minor when he wrote the malware. The Sasser worm crashed millions of PCs, and though some reports put damages at $18 billion, the relatively low infection rate suggests a more likely cost of $500 million. Other notable viruses The top 10 worst computer viruses above are just the ugly tip of a gargantuan digital iceberg. With a million new malware programs popping up every 3 years, we may miss the forest for a few outstanding trees. Here are just a few more viruses that have wreaked havoc over the years: Mimail: This worm tried to harvest data from infected machines to launch a string of DDoS attacks, but was relatively easy to remove. Yaha: Yet another worm with several variants, thought to be the result of a cyber-war between Pakistan and India. Swen: Written in C++, the Swen computer worm disguised itself to look like a 2003 OS update. Its financial cost has been pegged at $10.4 billion, but not reliably. Storm Worm: This worm showed up in 2007 and attacked millions of computers with an email about approaching bad weather. Tanatos/Bugbear: A 2002 keylogger virus that targeted financial institutions and spread to 150 countries. Sircam: A computer worm from 2001 that used counterfeit emails with the subject line, “I send you this file in order to have your advice.” Explorezip: This worm used fake emails to spread to every machine on thousands of local networks. Melissa: The most dangerous computer virus in 1999, Melissa sent copies of itself that looked like NSFW pics. The U.S. FBI estimated cleanup and repair costs at $80 million. Flashback: A Mac-only virus, Flashback infected over 600,000 Macs in 2012 and even infected Apple’s home base in Cupertino, Calif. In 2020, there’s now more malware on Macs than on PCs. Conficker: This 2009 virus still infects many legacy systems and could do significant damage if it ever activates. Stuxnet: This worm is reported to have destroyed Iranian nuclear centrifuges by sending damaging instructions.
Read More
1 2 3 162
Logo
Copyright © 2022, ErrorTools. All Rights Reserved
Trademarks: Microsoft Windows logos are registered trademarks of Microsoft. Disclaimer: ErrorTools.com is not affiliated with Microsoft, nor claim direct affiliation.
The information on this page is provided for information purposes only.
DMCA.com Protection Status