USB Security key is not working on Windows

As you know, the USB security keys are a secure medium to validate a lot of components in a computer. They can be used to log in to Windows 10. Now with the advancement of APIs, you can authenticate across the website as well using the same key. However, there are times when it may not work and it could be caused by several factors. It could be due to corrupted or incompatible drivers or it could also be due to compromised integrity of the key, and many more.

So if you happen to encounter an issue with the USB security key on your Windows 10 computer, then there are several potential fixes you can try. You can try toggling the Internet Options settings or reinstall the respective USB drivers. You could also try changing the PIN of the security key or disable the antivirus program on your computer or troubleshoot the web browser. Refer to the potential fixes provided below to fix the problem.

Option 1 – Try to toggle the settings of the Internet Options

  • In the Windows Search box, search for Internet Options to open it.
  • Next, go to the Security tab and drag the security slider to the lowest possible security for all the given zones.
  • After that, click on OK to save the changes made and close the Internet Options.

Note that this option is only a temporary measure as it can make your computer vulnerable. Make sure to press the Reset all zones to default level button.

Option 2 – Try to update or reinstall the respective drivers

If updating the drivers of the device did not fix the problem with the USB security key, you can try to update or reinstall the Universal Serial Bus Controller drivers instead of using the Device Manager. Refer to the following steps:

  • First, click the Start button and type “device manager”.
  • Then click on the “Device Manager” from the search results to open it.
  • From there, look for the “Universal Serial Bus controllers” option and then right-click on each one of the USB drivers and select the Update Driver from the menu.

Note: If it is a regular USB drive, then it will be listed as a USB Mass Storage Device but if you have a USB 3.0 device, then look for a USB 3.0 Extensible Host Controller.

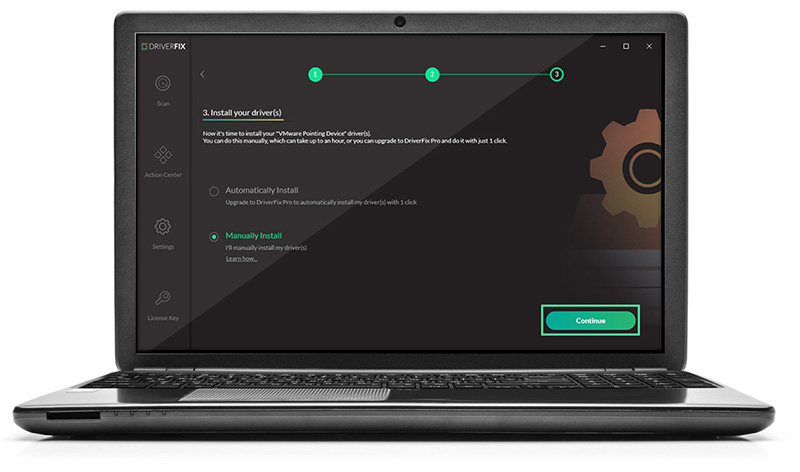
  • Restart your PC and then click the “Search automatically for updated driver software” option.

Note: If updating the USB Controller drivers didn’t work, you can try to reinstall them instead.

Option 3 – Try to change the PIN of the security key

If the first two options didn’t work, you can try changing the PIN of the security key. There are instances when the PIN for the security key might have been corrupted. Thus, resetting it can help you resolve the problem.

Option 4 – Temporarily disable Firewall and third-party antivirus

Firewall and antivirus programs are known to block the proper functioning of the USB security key. Thus, your antivirus or firewall programs might be the reason why you can’t download anything on your Windows 10 computer. To isolate the issue, you need to temporarily disable both the Firewall and antivirus programs and then check if you can now download anything from the internet. Do not forget to enable them again as disabling them can leave your computer vulnerable to cyber threats.

Option 5 – Try to troubleshoot the web browser

Troubleshooting your web browser can also help you fix the USB security key problem. You can do that by checking if your web browser supports the security key and you can do that by checking on the official website of your browser. You can also try to update your web browser to its latest version but if it didn’t help, you can try to reinstall it or switch to another web browser.

If you like to learn and find out more about various Windows errors, and how to repair them go to our vast archive or use search to find articles that will explain and help you in solving your issue.
However, if you prefer to do things fast and with automatization then we are proposing to use an automated solution for your issues. The application that we are recommending is Advanced System Repair Pro
Advanced System Repair utilizes multiple tools all in one to give you a quick, simple, reliable, and very thorough diagnosis of your PC. It brings you all the tools you need in one program to clean, fix, protect, optimize and boost your PC!
1-Click Maintenance
All the tools to make it simple and easy! It's like having a professional technician at the click of a mouse.

Junk Cleaner
Keeping your computer free from unnecessary clutter also helps make your computer last longer. Like any other machine, if you keep it clean and take care of it, it will serve you better for longer!

Optimize background apps
Optimize applications background activity with the built-in Application Optimizer feature.

Disk Defrag
With a simple 1-click, Advanced System Repair speeds up your PC by assembling fragmented files on your machine and organizing them more efficiently.

Malware Removal
Finds and removes all types of harmful malware including trojans, worms, bots, adware, spyware, PUPs, and more!

Privacy Cleaner
The all-in-one privacy suite to Clean Your Tracks & Protect Your Privacy! Make your computer safe, secure, and more efficient!

System Tweak/Optimizer
ASR will analyze your complete system and settings to adjust your PC to function at its maximum performance.

Registry Cleaner
Over time, as you install and uninstall applications, the registry can become cluttered with old entries and broken settings which can result in program crashes, and annoying messages and slow the computer down.
Visit our Advanced System Repair Pro Download page to inform yourself about all the benefits of this software and get a free trial copy of it.
advanced system repair pro

Advanced System Repair Pro

One-click automated PC repair solution
ASR logo
With Advanced System Repair Pro you can easily
Replace damaged files
Restore performance
Free disk space
Remove Malware
Protects WEB browser
Remove Viruses
Stop PC freezing
DOWNLOAD
Privacy Policy | Terms of Use | Uinstall
Advanced System Repair Pro is compatible with all versions of Microsoft Windows including Windows 11

Share this article:

You might also like

Fix Partner did not connect to router Error
One of the great remote assistance software that helps you remotely access and control computers is TeamViewer. However, despite how efficient it is, there are still times when it throws up some errors and one of them is when TeamViewer is not able to connect and throws an error that says, “No connection to partner, Partner did not connect to router, Error Code WaitforConnectFailed”. This kind of error in TeamViewer mostly occurs when the Partner computer is not connected to a network. On the other hand, it could also occur when they are connected to a network so there are various causes for this issue. It could also be that the installation of the program itself was at fault or there is an incompatibility between the TeamViewer versions installed on both the computers and so on. Although there are several causes for this error, the potential fixes are still the same. You can try to restart the network or allow Full Access Control to TeamViewer or flush the DNS cache. For more information, refer to the following options but before you proceed, make sure that both your Windows 10 computer and TeamViewer program are updated to their latest stable versions.

Option 1 – Reboot your router

The first thing you can try to do to fix the error is to simply restart your router. All you need to do is reboot the router from its Admin panel or you can also turn it off manually and turn it back on after a couple of seconds so that it can completely reboot. Once you’re done, try accessing your server again and see if the error is now fixed.

Option 2 – Allow Full Access Control to TeamViewer

  • First, open TeamViewer, and then from the Menu bar, click on Extras.
  • After that, click on Options and select Advanced from the left side navigation panel.
  • Next, click on the “Show advanced options” button located on the right-hand side.
  • Then select Full Access from the drop-down menu of the Access Control option under the “Advanced settings for connection to this computer section”.
  • Now click OK and check if the error is now fixed or not.

Option 3 – Try to flush the DNS configuration

You could also try to flush the DNS configuration in your computer to fix the error. How? Refer to these steps:
  • Tap the Win + X key combination and click on the Command Prompt (Admin) option or you could also search “cmd” in the Cortana search box and right-click on Command Prompt from the search results and select the “Run as administrator” option.
  • After opening Command Prompt with admin privileges, enter each one of the commands given below sequentially in order to flush the DNS cache.
    • ipconfig/release
    • ipconfig/renew
    • ipconfig/flushdns
  • Now type the exit command to close Command Prompt and then restart your computer and see if the problem is fixed.
On the other hand, you could also try to reset Winsock as well as the TCP/IP.

Option 4 – Run the Network Adapter troubleshooter

To run the Network Troubleshooter, refer to these steps:
  • Open the Search bar on your computer and type in “troubleshoot” to open the Troubleshoot settings.
  • Next, scroll down and select the “Network Adapter” option from the right pane.
  • Then click on the Run Troubleshooter” button.
  • After that, your computer will check for any possible errors and will pinpoint the root cause of the problem if possible.
  • Restart your computer.

Option 5 – Try to perform Network Reset

You might perform a Network Reset to resolve the problem if none of the four given options worked. This will reset the entire network configuration including your IP address. To perform Network Reset, follow these steps:
  • Tap the Win + I keys to open Settings.
  • From there, go to the Network and Internet section.
  • Next, scroll down and look for “Network Reset” under the status pane.
  • After that, click on Network Reset and then on Reset now to start resetting the network configuration. Once done, check if it is able to fix the error or not.
Read More
Disable Taskbar on the second display
If you have a dual monitor setup on your Windows 10 computer and you mostly use the second screen when you are presenting something, this makes the Taskbar completely unnecessary and is not really required. So if you are using your computer generally and do not want the taskbar on your second screen, read on as this post will guide you in disabling Taskbar on your second display. The good thing is, Windows comes with a built-in feature to disable Taskbar on your second screen or projector connected to your computer. In this post, you will be guided on how you can hide or disable the Taskbar from the second monitor in Windows 10. This post is coming in handy especially if you are using projectors or multiple displays. Refer to the steps given below to disable Taskbar on the second display in Windows 10. Step 1: Go to Settings and click on Taskbar from the left menu. Step 2: After that, scroll down to lo look for Multiple Displays. Step 3: Next, turn off the toggle labeled, “Show taskbar on all displays”. Note: After completing the steps given above, it will disable the Taskbar on all the secondary displays. Bear in mind that these settings will work only if you are running a second screen in Extended mode. Contrariwise, if you are in the Duplicate mode, this setting will not work but you can always set your Taskbar to Autohide so that it won’t be displayed.

On the other hand, if you are facing some issues in finding which screen is primary and which one is secondary, refer to these steps:

Step 1: Go to Settings and select System. Step 2: Next, from the left menu open Display. Step 3: From there, select the desired display and make it the primary one as required by your setup.
Read More
Microsoft blocking Office users
Microsoft Office 365 banerMicrosoft starting as of today will block its Office 365 users if they are using Internet Explorer or early versions of Edge browsers. So if you are using older non Chromium Edge versions of Microsoft browsers you can no longer access Office services until you switch. Now normally I would fully support this kind of decision since Internet explorer is a slow and vulnerable browser and the edge is similar in that regard. The new edge browser is great and it should be used but the issue I have is that Office 365 is not free, it is a premium feature and I am wondering how Microsoft plans to deal with people that have already paid for service but suddenly cannot access it anymore.
Read More
Deleting a User Account in Windows
There are instances when there are multiple accounts which is the result when there are a lot of users who use the computer. Some may use it more often, while others may seldom use it. Having multiple accounts can be quite confusing and inconvenient especially if it takes a lot of space. Thus, in this post, you will be guided on how you can delete a User Account on your Windows 10 computer, as well as how you can create a backup of the existing profile data and files. All the data of user accounts can be found at C:/Users, where its folder name will be exactly the same as the name of the user. You can check the exact user’s name by simply using the “net user” command either via Command Prompt or Windows PowerShell. Once you delete a user account, its folder, along with its files, will also be deleted. You can also create a backup for user files and the best way to do that is by copying the folder to other partitions or to an external drive. Here are two methods you can check out to delete a user account in Windows 10 – you can do it via Windows Account settings or via the command line. For more details, follow each one of the options provided below.

Option 1 – Delete the user account using Windows Account settings

  • First, go to Settings > Accounts > Family & other users.
  • Next, select the account you want to delete and click on the Remove button. This will open a confirmation window along with a warning message and two buttons that say, “Delete account & data” and “Cancel”.
  • Click on the Delete account & data button to delete the user account.
Note: Once you remove a user account, it will also remove all its corresponding data such as items like Documents, Photos, Music, Desktop, and other related folders. Thus, if you have not created a backup, then you won’t be able to recover those files.

Option 2 – Delete the user account using the command line

If you want to delete several user accounts, then doing it via Command Prompt or Windows PowerShell is a lot quicker. To get started, follow these steps:
  • In the Start Search, type “command prompt” and from the search results that appear, right-click on Command Prompt and select the “Run as administrator” option.
  • Next, type the “net user” command and hit Enter to execute it. This will show you the exact usernames on the computer.
  • After that, type the “net user <username> /delete” command and hit Enter to execute it. This will delete the account and all of its data without any warning. You have to replace “<username>” with the name of the user account.
Read More
Fix Sechost.dll missing error in Windows 10
If you are facing a missing sechost.dll error in your Windows 10, welcome, you have come to the right place to solve it and get back your computer in working order. Sechost.dll is a file that allows other programs to function and complete their tasks as well as control and change the behavior of other programs. The file is found in Windows subfolder System32, it is a completely safe file and should not be deleted. Sometimes however various other reasons can corrupt it or delete it. This guide will lead you to common solutions on how to get file back up and running.
  1. Update device driver

    Have you installed a new device and all of a sudden you get the error message that Sechost is missing? Update device driver, it is possible that the file has been corrupted or replaced with an older version and therefore reported as missing. Update device driver to lastest version and issue should run away.
  2. Re-register file via command prompt

    If Sechost got corrupted re-registering will solve the issue, press ⊞ WINDOWS + X and choose Command prompt (administrator), click on it. type regsvr32 sechost.dll and press ENTER Reboot your PC
  3. Reinstall application

    Usually, Sechost gone bad or missing is due to the installation of another application that corrupts the file. Reinstall the application to try to solve errors. In order to properly reinstall the application first use the control panel to remove it completely from the system and then install it again, hopefully, this time correct version of Sechost.dll will be installed in the system.
  4. Check your hard drive

    In some cases, a hard drive malfunction can cause several files to be corrupted or gone missing. To eliminate hard drive malfunction run check disk from Windows on C drive to check it and find if there are any errors.
  5. Uninstall Windows update

    Same as with some application, even Windows update could corrupt some files due to update not being properly downloaded. Try uninstalling the latest update and revert to the previous Windows state, then update it again.
  6. Solve issue with Restoro

    Restoro is a premium software solution for PC issues, security, and broken files, go to the download page and get it for free.
Read More
How to add Windows Store games to Steam
  1. Open the Steam app and select Add a Game.
  2. Click Add a Non-Steam Game and choose Browse.
  3. Access: C:\Windows\
  4. Then, scroll down, open explorer.exe, and click Add Selected Programs.
  5. Hold Windows + R keyboard shortcut, type shell:AppsFolder, then press Enter.
  6. Select the game you want to add, right-click on it, and choose Create Shortcut.
  7. Right-click on the desktop shortcut, go to Properties, type in Target Type or Target, delete the shortcut.
  8. Go to Steam, access Library, select Games, right-click on the game explorer, choose Properties, choose the name of the game you want to add.
  9. Choose Select Launch Options, write: shell:AppsFolder\<Target Type or Target Here>
  10. Click OK, then Close.
If you would like to read more helpful articles and tips about various software and hardware visit errortools.com daily.
Read More
How to Fix the Error Code 28

How to Fix the Error Code 28

Error Code 28- What is it?

The error code 28 is a driver error. This is one of the many device manager error codes. When this error occurs on your computer, the following message is displayed:

“The drivers for this device are not installed. (Code 28)”

Another driver device error message you might encounter is error code 41. 

Error Causes

Error 28 occurs because of unsuccessful device driver installation. This usually happens when you try to update new drive versions on your system. It is advisable to repair this error right away as it can hamper your ability to use certain hardware. For example, if error 28 occurs due to the unsuccessful installation of the USB driver, then it if not fixed and resolved it may prevent you from using hardware devices. Unsuccessful driver installation means you either didn’t install it properly or your computer has registry issues. If it’s the registry then you must fix it without any delay because it can expose your PC to serious threats like system crash and failure. To avoid such inconvenience, repair it.

Further Information and Manual Repair

When it comes to repairing the error code 28, here’s what you can do: Simply go to the control panel and click on the Device Manager option:
  • In the details pane with the list of devices, locate the device for which you want to reinstall the driver software.
  • Double click on it to open the properties dialog box.
  • Now click on the driver tab and then click update driver.
After updating, try using that device again if it doesn’t work and shows the error code 28 on your computer screen then this means the underlying cause is the registry. Congratulations, you have just Fixed Error Code 28 In Windows 10 all by yourself. If you would like to read more helpful articles and tips about various software and hardware visit errortools.com daily. Now that’s how you fix Error Code 28 In Windows 10 on a computer. On the other hand, if your computer is going through some driver-related issues that have to get fixed, there is a one-click solution known as DRIVERFIX you could check out to resolve them. This program is a useful tool that could repair corrupted drivers and optimize your PC’s overall performance. This is basically a solution that’s within your grasp with just a click. It’s easy to use as it is user-friendly. For a complete set of instructions in downloading and using it, refer to the steps below Perform a full system scan using DRIVERFIX. To do so, follow the instructions below.
  1. Download and install DRIVERFIX. from the official site.
  2. Once the installation process is completed, run DRIVERFIX. to perform a full system scan. driverfix screenshot
  3. After the scan is completed click the “Update All” button. driverfix screenshot
Read More
How to map a network drive in Windows 11
windows 11 network drive
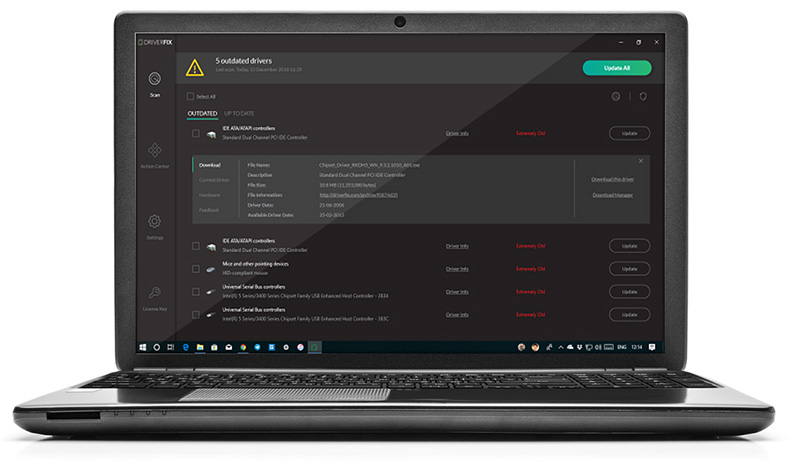
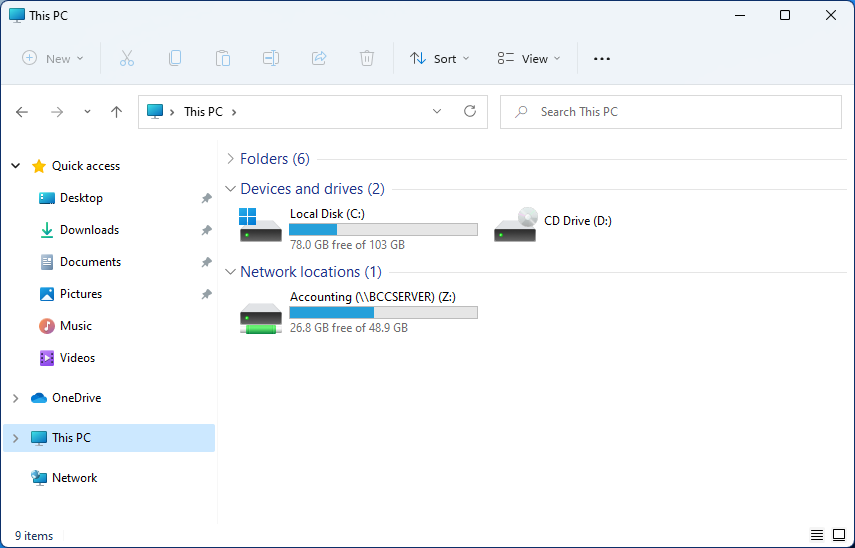
Mapping network drive has many benefits in terms of speed and ease of access of files via network. It lets you access the hard drive over the whole network like it was the hard drive inside your PC case. In order to easily and quickly map a folder as a network drive follow the guide below.
  1. Open File Explorer
  2. Click on the three dots icon in the Toolbar
  3. Select Map Network Drive
  4. Click the Drive drop-down menu
  5. Select a driver letter that you wish to assign as a network drive
  6. In the folder field enter network device and share name (click on browse to see all devices on local network)
  7. Check the box beside Reconnect at sign-in if you wish to automatically connect to a network drive on Windows startup
  8. Check Connect Using Different Credentials if you wish to connect to a network drive using different credentials that one used to login into Windows.
  9. Click Finish
After finishing setting Windows 11 will try to connect to the network drive and if successful drive icon will appear inside File Explorer and the drive will open up to see its content. If for any reason it cannot connect try checking user credentials, cables, network adapters, etc.
Read More
A Quick Guide to Fixing Error Mswrd632.wpc

Error Mswrd632.wpc Fix Guide

Mswrd632.wpc - What is it?

Mswrd632.wpc is a Microsoft Office Word error message.  This error message is often displayed in the following format:
‘Word cannot start the converter mswrd632.wpc’
The error message mswrd632.wpc may pop up when computer users try to open certain MS Word documents using the .doc extension.

Solution

Restoro box imageError Causes

Error Mswrd632.wpc may be triggered due to several reasons. Some of the common reasons for the mswrd632.wpc error code include:
  • Issues with Microsoft Word application
  • MSwrd632.wpc file corrupted
  • Changes in the registry configuration settings
  • Issues with security updates
Sometimes when you attempt to access the Word file of the older version of the MS Word application after new security updates, you may experience this error code. This happens because the new security features that you have installed in the updated version blocks old files from being accessed.

Further Information and Manual Repair

If you can’t access important MS Word files on your PC, due to the error Mswrd632.wpc, then don’t you worry! The good news is that it is easy to fix and repair. By following a few simple methods, you can easily resolve this issue and access your MS Word files. Try the methods listed below to repair error Mswrd632.wpc on your system:

Method 1: Copy the MSwrd632.wpc file From Another Computer

The error may also occur if the MSwrd632.wpc file is corrupted. In such as situation, copy the MSwrd632.wpc file on your PC from another computer. You can usually find this file in the following path C:\Program Files\Common Files\Microsoft SharedTextConv. However, please note this method is not secure and may make your PC vulnerable to a possible security hack. Do it when your PC is not connected to the internet.

Method 2: Unregister the Text Converter

This issue can also be resolved by unregistering the converter. Here is a step-by-step guide to unregister the converter.
  • First, go to the start menu and select RUN.
  • Type REGEDIT and press the OK button.
  • Next, what you have to do is find and click on registry subkeys. Here are the keys that you have to click on
HKEY_LOCAL_MACHINESOFTWAREMicrosoftSharedToolsText ConvertersImportMSWord6.wpc (Windows 32 bit OS) HKEY_LOCAL_MACHINESOFTWAREWow6432NodeMicrosoftSharedToolsText ConvertersImportMSWord6.wpc (Windows 64 bit OS)
  • Choose the key according to your Windows bit operating system. After that, click on the Edit menu, select the Delete option and click ‘Yes’ to activate changes.
This change will effectively unregister the text converter and disable it for third-party applications and for Microsoft Office enabling you to access your desired MS Word files easily.

Method 3 - Download Restoro to Resolve Registry issues

If the error is related to the registry, then the best and most efficient way to fix it is to download Restoro. This is a powerful registry cleaner and a PC Fixer deployed with a user-friendly interface and compatible with all Windows versions. It scans and removes all registry errors and repairs the registry in seconds. Click here and download Restoro to resolve the MSwrd632.wpc error now!
Read More
Windows got stuck on Preparing Windows screen
You might have experienced a situation when you restarted your Windows 10 PC after an upgrade and you tried logging into your account but only a screen with a message saying, “Preparing Windows”. If the screen only stays that way, this indicates that Windows 10 is trying to complete the upgrade or waiting for some files to load up so that you can use your account. Some users also reported that when they tried logging into their accounts, they also get the same message on their screens. To resolve this issue, read on as this post will show you what you can do if your Windows 10 PC is stuck on the “Preparing Windows” screen. A lot of users have tried logging back into their account once more but to no avail as the same screen still greets them. And even when they tried the Ctrl + Alt + Del combo, it still didn’t work. This only goes to show that your account might somehow be corrupted.

Option 1 – Try booting your PC into Safe Mode

The first thing you can do to resolve the issue is to try booting your computer into Safe Mode and then log in using an Admin account. If it seems like your admin account has caused the problem, you need to create an admin account first and then log in after you reboot into the account and then log off. After that, restart your PC normally and check if the problem’s resolved or not. If not, refer to the next given option below.

Option 2 – Try to repair your corrupted profile via Registry

In this second option, you can try to repair the corrupted profile using the Registry but before you proceed, make sure to create a System Restore Point and then follow the steps below.
  • Tap the Win + R keys to open the Run dialog box.
  • Then type “regedit” in the field and hit Enter or click OK to open the Registry Editor.
  • Next, go to this registry key: ComputerHKEY_LOCAL_MACHINESOFTWAREMicrosoftWindows NTCurrentVersionProfileList
  • Once you’ve opened the registry key, you should see a list of all the user profiles on your computer. Now click on each S-1-5 folder and look for the “ProfileImagePath” entry and double-click on it to check which user account it is related to. You will see a path like “CUsersACK” where “ACK” is the username.
  • You should know which among the user account is corrupted. Just look for a key named “RefCount” and change its Value data to “0” and click OK. And if it isn’t available, simply right-click on the right pane and create it.
  • After that, double click on the key named “State” and make sure that the Value data is “0” and click OK.
  • Exit the Registry Editor and restart your computer to apply the changes made.

Option 3 – Try running the System File Checker

System File Checker or SFC is a built-in command utility that helps in restoring corrupted files as well as missing files. It replaces bad and corrupted system files with good system files that might be the cause why your screen is stuck at “Preparing Windows”. To run the SFC command, follow the steps given below.
  • Tap Win + R to launch Run.
  • Type in cmd in the field and tap Enter.
  • After opening Command Prompt, type in sfc /scannow
The command will start a system scan which will take a few whiles before it finishes. Once it’s done, you could get the following results:
  1. Windows Resource Protection did not find any integrity violations.
  2. Windows Resource Protection found corrupt files and successfully repaired them.
  3. Windows Resource Protection found corrupt files but was unable to fix some of them.

Option 4 – Try to repair hard disk errors using the Chkdsk utility

You can also run the Chkdsk utility to resolve the problem. If your hard drive has issues with integrity, the update will really fail as the system will think that it’s not healthy and that’s where the Chkdsk utility comes in. The Chkdsk utility repairs hard drive errors that might be causing the problem.
  • Open Command Prompt with admin privileges.
  • After opening Command Prompt, execute the commands listed below, and don’t forget to hit Enter right after you type in each one of them.
  • chkntfs /t
  • chkntfs /t:10
Read More
1 2 3 162
Logo
Copyright © 2022, ErrorTools. All Rights Reserved
Trademarks: Microsoft Windows logos are registered trademarks of Microsoft. Disclaimer: ErrorTools.com is not affiliated with Microsoft, nor claim direct affiliation.
The information on this page is provided for information purposes only.
DMCA.com Protection Status