Copy and Paste feature is not working

One of the most basic and commonly used features in the Windows operating system is the copy and paste feature that helps users accomplish tasks in a faster and easier way. However, if you notice that it’s not working properly for some reason, then this post might be of help as it will provide you with options you can check out to resolve the problem.

You can encounter this kind of problem with the copy and paste feature if some system files are corrupted or if there’s some third-party application or process that interferes with this function. Worry not though for there are some options you can check out to fix this. You can try to restart the
rdpclip.exe process or the explorer.exe process. You could also try to reinstall the program where you encountered the issue with the Copy and Paste function. In addition, you could try clearing the clipboard history or run the built-in tools like the DISM tool and SFC scan. You could also troubleshoot the problem in a Clean Boot State or use the Refresh Windows tool. For more information, refer to each one of the options below.

Option 1 – Try to restart the rdpclip.exe and the explorer.exe processes

The first thing you can do to resolve the problem is to restart certain processes namely, the rdpclip.exe process and the explorer.exe process via Task Manager.

  • First, right-click on your Taskbar and select the Task Manager.
  • Next, look for the rdpclip.exe process and right-click on it, and select the End process option.
  • After that, click on the File tab > Run new task and then type “rdpclip.exe” and tap Enter.
  • This should help fix the problem. If not, you could also try to restart the explorer.exe process – just look for the explorer.exe process in the Task Manager and right-click on it, and then select the Restart option.

Option 2 – Try reinstalling the concerned program

If you only experience this issue on a particular program, you might want to uninstall this program and install it back again, and then see if it fixed the problem or not.

Option 3 – Try to clear the clipboard history

You could also try clearing the clipboard history as it has been known to help in fixing this kind of issue. You can clear the clipboard history using the command line.

  • Tap the Win + R keys to launch the Run dialog box and type “cmd” in the field and hit Enter to open Command Prompt.
  • Next, execute this command: echo off | clip
  • After that, check if the Copy and Paste function is now working properly or not.

Option 4 – Try running the DISM tool

You can run the DISM tool as well to help fix the “Tile Database is corrupt” error. Using this built-in tool, you have various options such as the “/ScanHealth”, “/CheckHealth”, and “/RestoreHealth”.

  • Open the Command Prompt with admin privileges.
  • Then type in the following commands and make sure to hit Enter right after you type each one of them:
    • Dism /Online /Cleanup-Image /CheckHealth
    • Dism /Online /Cleanup-Image /ScanHealth
    • DISM.exe /Online /Cleanup-image /Restorehealth
  • Do not close the window if the process takes a while as it will probably take a few minutes to finish.
  • Once it’s done, check if it was able to fix the corrupted Start Menu or not.

Option 5 – Try to run System File Checker or SFC scan

  • Tap Win + R to launch Run.
  • Type in cmd in the field and tap Enter.
  • After opening Command Prompt, type in sfc /scannow and hit Enter.
  • Once done, restart your computer.

Option 6 – Restart your computer in a Clean Boot State

If a third party program like antivirus is the one that’s causing the problem, you can try to put your computer in a Clean Boot State to isolate the issue by following these steps:

  • Log onto your PC as an administrator.
  • Type in msconfig in the Start Search to open the System Configuration utility.
  • From there, go to the General tab and click “Selective startup”.
  • Clear the “Load Startup items” check box and make sure that the “Load System Services” and “Use Original boot configuration” options are checked.
  • Next, click the Services tab and select the “Hide All Microsoft Services” check box.
  • Click Disable all.
  • Click on Apply/OK and restart your PC. (This will put your PC into a Clean Boot State. And configure Windows to use the usual startup, just simply undo the changes.)
  • Now try to connect your device or copy the files to your external device again and check if the problem with the Copy and Paste function is fixed.
If you like to learn and find out more about various Windows errors, and how to repair them go to our vast archive or use search to find articles that will explain and help you in solving your issue.
However, if you prefer to do things fast and with automatization then we are proposing to use an automated solution for your issues. The application that we are recommending is Advanced System Repair Pro
Advanced System Repair utilizes multiple tools all in one to give you a quick, simple, reliable, and very thorough diagnosis of your PC. It brings you all the tools you need in one program to clean, fix, protect, optimize and boost your PC!
1-Click Maintenance
All the tools to make it simple and easy! It's like having a professional technician at the click of a mouse.

Junk Cleaner
Keeping your computer free from unnecessary clutter also helps make your computer last longer. Like any other machine, if you keep it clean and take care of it, it will serve you better for longer!

Optimize background apps
Optimize applications background activity with the built-in Application Optimizer feature.

Disk Defrag
With a simple 1-click, Advanced System Repair speeds up your PC by assembling fragmented files on your machine and organizing them more efficiently.

Malware Removal
Finds and removes all types of harmful malware including trojans, worms, bots, adware, spyware, PUPs, and more!

Privacy Cleaner
The all-in-one privacy suite to Clean Your Tracks & Protect Your Privacy! Make your computer safe, secure, and more efficient!

System Tweak/Optimizer
ASR will analyze your complete system and settings to adjust your PC to function at its maximum performance.

Registry Cleaner
Over time, as you install and uninstall applications, the registry can become cluttered with old entries and broken settings which can result in program crashes, and annoying messages and slow the computer down.
Visit our Advanced System Repair Pro Download page to inform yourself about all the benefits of this software and get a free trial copy of it.
advanced system repair pro

Advanced System Repair Pro

One-click automated PC repair solution
ASR logo
With Advanced System Repair Pro you can easily
Replace damaged files
Restore performance
Free disk space
Remove Malware
Protects WEB browser
Remove Viruses
Stop PC freezing
DOWNLOAD
Privacy Policy | Terms of Use | Uinstall
Advanced System Repair Pro is compatible with all versions of Microsoft Windows including Windows 11

Share this article:

You might also like

How to Fix Windows Error 0x8024402f

How to Fix Windows Error 0x8024402f

Error Code 0x8024402f What is it?

Error code 0x8024402f is a Windows Update error indicating some sort of connectivity issue. Windows may show you the Error 0x8024402f in Windows 10 whenever you try to download and install new updates. This error is caused by small interruptions in communications between the computer to be updated and the update to be downloaded. These issues usually resolve themselves. Windows Firewall settings may also be blamed for this problem. Common symptoms
  • Error code 0x8024402f prevents you from installing the latest version of Windows 10
  • This Error prevents you from downloading new and latest updates from Microsoft

Solution

Restoro box imageError Causes

  • This error is caused by a problem with the Microsoft .NET Framework 4 Client Profile.
  • This error can occur even if no changes are made to network settings.
  • Your Firewall settings may cause this problem.
  • A high number of update requests on the Windows Update server may cause this problem.

More Information and Manual Repair

Method 1:

  1. Exit Windows Update. Wait for 10 to 15 minutes, and then restart Windows Update to check for updates. OR
  2. Turn on Windows Automatic Update so that updates are installed automatically every 24 hours.

Method 2:

Uninstall the Microsoft .NET Framework 4 Client Profile:
  1. Click Start>Control Panel>Programs and Features
  2. Locate the Microsoft .NET Framework 4 Client Profile
  3. Right-click and then select Uninstall/Change
  4. Confirm that you want this component to be uninstalled. This may take a few minutes.
  5. Reboot your computer
  6. When the system has restarted, re-run Windows Update as you normally would.

Method 3:

Check your internet connection: As mentioned earlier the error code 0x8024402f is related to connection problems with Windows Update. It means that your computer isn’t able to connect with the Microsoft Update server; therefore you’re unable to receive any new updates. So, you either have a problem with the internet connection or the Microsoft Update server is corrupted. If the problem is caused by the Microsoft Update server, you just need to wait a while because Microsoft staff will most probably solve the problem quickly.

Method 4:

But, if the issue isn’t related to your internet connection, you should perform the following method:
  1. Got to Search and enter Identify and Repair
  2. Open Identify and repair network problems
  3. Click on the Search Result.
  4. It should automatically Start the identifying process
  5. If your network has any issue then it will show you and ask you to fix it.
Now, establish your internet connection. The problem 0x8024402 should be solved by now and you’ll be able to update your Windows 10 Technical Preview to the latest 10049 builds.

Method 5:

Turn on Windows Firewall: If you have some anti-malware or antivirus on your Windows 10 PC, then it might turn off Windows Firewall on its own or create its own Firewall as default. If this is the case, you will need to turn on Windows Firewall.
  • Search for "Firewall" OR
  • Click on Windows Firewall from Control Panel.
  • On the left pane, Click on Turn Windows Firewall ON or OFF.
  • Click on Turn on Windows Firewall then Click Ok.
  • That is it. Now, try again and see if you are still getting Windows Update Error 0x8024402f in your Windows 10.

Method 6:

This is an advanced method:
  • If the above steps fail, then you might surely want to try this advanced method, which is Enabling ActiveX in your Router Firewall settings.
  • If you had turned off ActiveX in your Router Firewall settings then this must be the culprit and so Error 0x8024402f is shown whenever you try to get Windows Update.
  • All you need to do is Enable ActiveX by going to your Router Firewall settings and that should do it. The Error should be gone for good now and you will be easily able to install the Updates in your Windows 10.
If you do not possess the technical expertise required to accomplish this yourself or do not feel comfortable doing so, download and install a powerful automated tool to get the job done.
Read More
Computer gets stuck on Preparing to configure
If you suddenly find your Windows 10 computer stuck on the “Preparing to configure” screen for quite a long time now after you run Windows Update, read on as you will be guided on how you can fix that issue in this post. During an update process, there’s a lot of things that go on in the background which is why Windows Updates take quite a while before it finishes. It can be at 25%, 50%, or even 100% but the only message you’re going to see on your screen is the “Preparing to configure Windows, Don’t turn off your computer”. However, if you notice that the Windows Update is taking a longer time than it’s supposed to, the first option is to wait some more but if it’s still the same, then there’s definitely something wrong. This kind of issue occurs when Windows Update fails to configure in short correctly download and install the update. When this happens, it will revert all the changes which are why you were advised to wait for a couple of hours. There are two possibilities why your computer is stuck on the “Preparing to configure Windows, Don’t turn off your computer” screen. The first one is that the Windows 10 operating system is installing any updates. The second one is when the user profile takes time to load or encounters an error. There are several options you can try to fix the problem. You can try running System Restore or boot your computer in Safe Mode or repair the corrupted profile via Registry Editor. You might also want to try using installation media to boot and repair your computer if the other options didn’t work.

Option 1 – Perform System Restore

  • Tap the Win + R keys to open the Run dialog box.
  • After that, type in “sysdm.cpl” in the field and tap Enter.
  • Next, go to the System Protection tab then click the System Restore button. This will open a new window where you have to select your preferred System Restore point.
  • After that, follow the on-screen instructions to finish the process and then restart your computer and check if the problem is fixed or not.
Note: If you can’t boot into the desktop of your computer, you can run System Restore in the Advanced Startup Options by following these steps:
  • Boot your computer into the Advanced Startup Options screen.
  • From there, you will see some options to troubleshoot when you can’t log in to Windows in the usual way.
  • Now select Troubleshoot > Advanced Options > Command Prompt.
  • After that, type “rstrui” and hit Enter to execute the command which will start the System Restore process.
  • Once it’s done, restart your computer.

Option 2 – Boot your computer in Safe Mode

You can try to tap the F8 key if you have it enabled in your Windows 10 computer, as you start your system to boot into Safe Mode. Once your computer is in Safe Mode, you can access the Start Menu and the Mouse and Keyboard. Aside from that, you can also access your files and other built-in tools in Windows such as Command Prompt, PowerShell, Computer Manager, Device Manager, Event Log Viewer, and many more. On the other hand, if you haven’t enabled the F8 key, you can just go to the Advanced Startup options to boot your computer into Safe Mode. Once you’re there, select Troubleshoot > Advanced Options > Startup Settings > Restart > Tap the number 4 key. After that, your computer will restart in Safe Mode. If you want to reboot into Safe Mode with Networking instead, you can tap the number 5 key and for Safe Mode with Command Prompt, tap the number 6 key. Once your computer is in Safe Mode, you can use any of the built-in tools to restore your computer or troubleshoot the problem that’s causing your computer to get stuck at the “Preparing to configure” screen.

Option 3 – Try to repair your corrupted profile via Registry

In this third option, you can try to repair the corrupted profile using the Registry but before you proceed, take note that you can only try this if you can boot into your desktop and if you can, make sure to create a System Restore Point and then follow the steps below.
  • Tap the Win + R keys to open the Run dialog box.
  • Then type “Regedit” in the field and hit Enter or click OK to open the Registry Editor.
  • Next, go to this registry key: ComputerHKEY_LOCAL_MACHINESOFTWAREMicrosoftWindows NTCurrentVersionProfileList
  • Once you’ve opened the registry key, you should see a list of all the user profiles on your computer. Now click on each S-1-5 folder and look for the “ProfileImagePath” entry and double click on it to check which user account it is related to. You will see a path like “CUsersACK” where “ACK” is the username.
  • You should know which of the user account is corrupted. Just look for a key named “RefCount” and change its Value data to “0” and click OK. And if it isn’t available, simply right-click on the right pane and create it.
  • After that, double click on the key named “State” and make sure that the Value data is “0” and click OK.
  • Exit the Registry Editor and restart your computer to apply the changes made.

Option 4 – Try to use installation media to boot and repair your computer

Another thing you can try to resolve the issue is to use the Windows installation bootable media so you can boot and repair the operating system. To use it, follow these steps:
  • You need to first create an installation media which has the dame version of the operating system installed in your computer.
  • After that, once you reach the Install Windows screen, click on the “Repair your computer” link.
  • Wait until the repair is completed and then shut down your computer
  • Now once your computer has restarted, check if it can now boot properly.
Read More
CLR20R3 error while launching an Application
CLR20R3 error is received when you are launching an application in Windows 10. It can happen because of two reasons, a corrupted application file or missing system components. Keep on reading in order to find solutions to fix this error.
  1. Run the program in compatibility mode

    Locate problematic application executable file Right-click on executable Click on properties Go to the compatibility tab and try running the application in the previous version of Windows or as an administrator.
  2. Reset Windows media component

    Right-click on Start, then left-click on command prompt (admin) In command prompt type next command and after each line of command press ENTER regsvr32 atl.dll cd C:\WINDOWS\eHome ehSched /unregServer ehSched /service ehRecvr /unregServer ehRecvr /service ehRec.exe /unregServer ehRec.exe /regserver ehmsas.exe /unregServer ehmsas.exe /regserver
  3. Reinstall Windows media player

    Go to control panel Click on Program and Features > Turn Windows feature on or off. Expand Media Features, uncheck Windows Media Player, and click Ok. Restart your PC, go through the same steps, tick Windows Media Player, and restart your computer once again.
  4. Reinstall .NET framework

    Go to control panel Click on Program and Features > Turn Windows feature on or off. Uncheck “.NET Framework 3.5” and “.NET Framework 4.8”, and click Ok. Restart your computer, go through the same steps, check “.NET Framework 3.5” and “.NET Framework 4.8”, and restart your computer once again.
  5. Update Windows

    Go to settings and check for updates
Read More
CHKDSK cannot open volume for direct access
One of the most useful built-in tools in Windows 10 is the Check Disk or CHKDSK utility. It is the one that maintains the integrity of the disk that’s connected to a computer which can be launched using the GUI or graphical user interface and using the command line. There are a lot of things that warrant the running of this built-in utility and one of these things is the readability of the disk. Recently, a number of users reported that they encountered an error when they tried to run the CHKDSK utility – the error states, “Cannot open volume for direct access”. This kind of error in CHKDSK appears each time the command line is launched according to the affected users. As per the users who encountered this issue, they receive the following error messages when they tried running a ChkDsk command:
“C:WINDOWSsystem32>chkdsk /f g: Cannot open volume for direct access. C:WINDOWSsystem32>chkdsk /f f: The type of the file system is NTFS. Volume label is 0529357401.”
To fix the “Cannot open volume for direct user access” error, here are some suggestions that might help. Follow them carefully.

Option 1 – Try running the CHKDSK utility on Boot

On the other hand, you can also try to run the CHKDSK utility on Boot so you can fix the error and recover any damaged segments of the drive.
  • Open an elevated Command Prompt and enter this command: chkdsk /x /f /r
  • After that, you will a message that says, “Chkdsk cannot run because the volume is in use by another process. Would you like to schedule this volume to be checked the next time the system restarts? (Y/N)”
  • Type Y and tap Enter to schedule a CHKDSK scan once your computer reboots next time.

Option 2 – Try to run the Primary Hard Disk Self Test

The next thing you can do to fix the problem is to run the Primary Hard Disk Self Test by following the steps below.
  • You need to boot your computer into the BIOS first.
  • After that, go to the Diagnostics tab and select the “Primary Hard Disk Self Test” option. Note that it may be different depending on the motherboard with different manufacturers but they should imply the same thing.
  • Now, wait until the test is completed, and then boot your computer normally.

Option 3 – Try to check the hard drive’s health

The next thing you can do to resolve the issue is to check the health of your hard drive using the WMIC utility in the Windows Command Prompt. This utility will check if your hard drive has any problems which resulted in the “Cannot open volume for direct user access” error.

Option 4 – Try to disable various restrictions on your hard drive

You might also want to disable the various restrictions on your hard drive since it is possible that it is encrypted or restricted which explains why you are unable to perform any operations in it and throws the “Cannot open volume for direct user access” error instead. For instance, if you have BitLocker, you can try to disable it and see if it fixes the error or not.

Option 5 – Try to uninstall or disable the Drive Locking feature on your hard drive

You could also look for any Drive Locking feature on your hard drive that tricks disk changes as it might be the root cause of the problem. Thus, if you find one, you need to either uninstall or disable it and then execute a check disk command to resolve the problem.

Option 6 – Try to disable the application service

Disabling the application service can also help you fix the problem. How? Refer to these steps:
  • Tap the Win + R keys to launch the Run utility and type “services.msc” in the field and then hit Enter to open the Services Manager.
  • Next, scroll down among the list of services and look for the service related to the security software or disk checker software.
  • Once you find it, right-click on that service and select Properties.
  • After that, change its Startup type to Disabled and click on the OK and Apply buttons to save the changes made.
  • Now restart your computer and don’t forget to enable the service back once the disk check is completed.

Option 7 – Try to use Repair Volume via Windows PowerShell

You could also try to use the Repair Volume using Windows PowerShell. All you have to do is open PowerShell as admin and type the “repair-volume -drive letter <DRIVE LETTER>” command and then tap Enter to run Repair Volume. This should resolve the error.
Read More
Fix Msvcr120.dll_clr0400.dll Missing Error
DLL files have certain functions that help the programs in the computer run properly. One of these DLL files is the Msvcr120.dll_clr0400.dll. This particular DLL file is responsible for the extraction of the required resources during the installation of a program and is used when the program is launched or when games are launched in the C++ language. However, a number of users recently reported that they’ve encountered an error that says, “Msvcr120.dll_clr0400.dll is missing” when they tried to install an application or when they tried opening an application. This kind of error could be due to several factors. It is possible that the DLL file is corrupted or there are some programs that interfere with the DLL file. On the other hand, it is also possible that it has been infected by a virus. To resolve this error, here are some potential fixes you need to check out:

Option 1 – Run System File Checker scan

The first thing you can do to fix the error is to try running the System File Checker or SFC scan. System File Checker is a command utility built into your computer that helps restore corrupted files and missing files. Refer to the following steps to run it:
  • Hit the Win + R keys to launch Run.
  • Type in cmd in the field and tap Enter.
  • After opening Command Prompt, type in sfc /scannow
The command will start a system scan which will take a few whiles before it finishes. Once it’s done, you could get the following results:
  1. Windows Resource Protection did not find any integrity violations.
  2. Windows Resource Protection found corrupt files and successfully repaired them.
  3. Windows Resource Protection found corrupt files but was unable to fix some of them.
  • Reboot your computer.

Option 2 – Troubleshoot the missing Msvcr120.dll_clr0400.dll error in a Clean Boot State

You can also troubleshoot the isDone.dll error in a Clean Boot state. It could be that there are some third-party applications in your computer that are preventing the application from getting installed and to isolate this possibility, you need to boot your computer in a Clean Boot State and then try installing the program again. Putting your computer in this state can help you identify which program is the culprit and thus isolates the problem. In a Clean Boot state, your computer will start using only the pre-selected minimal set of drivers and startup programs. Note that you have to disable and enable one process at a time.
  • Log onto your PC as an administrator.
  • Type in MSConfig in the Start Search to open the System Configuration utility.
  • From there, go to the General tab and click “Selective startup”.
  • Clear the “Load Startup items” check box and make sure that the “Load System Services” and “Use Original boot configuration” options are checked.
  • Next, click the Services tab and select the “Hide All Microsoft Services” check box.
  • Click Disable all.
  • Click on Apply/OK and restart your PC. (This will put your PC into a Clean Boot State. And configure Windows to use the usual startup, just simply undo the changes.)
  • After you’ve set your computer into a Clean Boot State, make sure that you’re signed in as administrator and then try to install the application again.

Option 3 – Try to re-register the problematic DLL file

You can also try to re-register the DLL to resolve the problem. The Regsvr32 tool is a command-line utility that can be used to register and unregister OLE controls like DLL and ActiveX (OCX) controls in the Windows operating system. Follow the steps below to use it.
  • Open Command Prompt as admin from the WinX menu.
  • Next, type the following commands in the elevated Command Prompt and hit Enter to execute the command. This will re-register the affected DLL file using the Windows operating system tool, regsvr32.exe.
    • exe /[DLL file]
    • exe [DLL file]
Note: Replace “[DLL file]” with the name of the DLL file that was pointed out in the error.
  • After you execute the given commands, you should see a message saying, “DllRegisterServer in vbscript.dll succeeded” if the Regsvr32 tool was able to run successfully. After that, try to install the program again and see if it now works.

Option 4 – Try to replace the DLL file with a trusted source

  • First, you need to get the new DLL file from another computer with preferably the same file version number.
  • After that, you need to boot your PC into Safe Mode and navigate to the paths listed below and then replace the file using a USB drive or other external storage devices.
    • x86: This PC > C:WindowsSystem32
    • x64: This PC > C:WindowsSysWOW64
  • Next, type “cmd” in the Cortana search box and right-click on Command Prompt, and select “Run as administrator” to open it with administrator privileges.
  • Now type the “regsvr32 ntdll.dll” command and hit Enter.
  • Restart your PC and check if the error is now fixed.

Option 5 – Scan your computer using Windows Defender

The DLL file might also be infected with malware or virus and to eliminate it which could explain why you’re getting the “Msvcr120.dll_clr0400.dll is missing” error. Thus, you have to scan your computer using security programs like Windows Defender.
  • Tap the Win + I keys to open Update & Security.
  • Then click on the Windows Security option and open Windows Defender Security Center.
  • Next, click on Virus & threat protection > Run a new advanced scan.
  • Now make sure that Full Scan is selected from the menu and then click the Scan Now button to get started.
Read More
Error Code 0xc00000e9
If Error Code 0xc00000e9 appears on your screen, there is no cause to panic yet as there are different ways to fix this. Here, I will list down different methods to get your computer back on track:
  1. Check peripheral connections
  2. Check your SATA cables
  3. Check your hard drive
  4. Check your BIOS settings

Quick Fix 1. Check Peripheral Connections

  1. Turn off your computer.
  2. After the computer has been shut down, take off all the peripherals or the USB cables that are connected to your USB ports. This includes even the keyboard and the mouse. We just need to have only the monitor plugged in for this one.
  3. Turn on your computer and see if it starts as it normally does.
  4. If it does, try connecting back your external devices or peripherals one by one until you find the one that causes the error.
  5. Once you trace the device that’s causing the error, you will have to change its USB cable and update its driver to support your operating system.

Quick Fix 2. Check your SATA cables

It is possible that what causes a barrier between your operating system and your hard drive from communicating is the SATA cable used. For example, if you’re using an older SATA with a SATA III port, there might not be adequate support for the transfer of data from one another. Or, the problem might be a loose SATA cable which would still require you to buy a new one to replace your loose or damaged cable. To check if your SATA cables are causing the error, simply follow these steps:
  1. Turn off your computer.
  2. Carefully open its case.
  3. Check the hard drive and the SATA port where it’s connected.
  4. Try to use a newer cable and connect it to your SATA port. (If you used a SATA II cable, you can see if a SATA III cable is more compatible.)
  5. Replace your SATA cable with a newer one if Step 4 proves to be successful.

Quick Fix 3. Check your hard drive.

  1. Try to use a different hard drive and see if error code 0xc00000e9 still appears.
  2. If it works out just fine, then the problem might be physical damage to your hard drive and would need to be repaired depending on the case. Just simply take it to a technician and let him know about the issue.

Quick Fix 4. Check your BIOS settings

  1. Restart your computer.
  2. Once your computer starts, press and hold the ESC, F2, F12, or DEL key to go to BIOS settings.
  3. You will then be redirected to the BIOS Setup Utility screen. From here, go to Boot options.
  4. In the Boot Options, see if your first boot device is your hard drive. If it isn’t, press the arrow key to select the hard drive and move it to the top of the boot device list.
  5. Save the settings.
  6. Reboot your computer.
Note: If all the methods above do not work, the problem might be on your drivers and you might need to update them. You can update your driver in two ways: Manual driver update and Automatic driver update. You can find procedures online in updating your drivers.
Read More
A Guide to Fixing Error Code 80070490

A guide to fixing Error Code 80070490

Error Code 80070490 - What is it?

This error 80070490 code may occur when you try to update your PC either through the Microsoft Update website or with a Windows update. The error message is displayed in the following format:
Error 80070490 (Element not found)

Solution

Restoro box imageError Causes

Error Code 80070490 is triggered because of a couple of reasons. It indicates the file CBS Manifest that is needed to install Windows update is corrupt or damaged. CBS (Component Based Servicing) Manifest is the file that is used to help your computer recognize various components inside your PC. Another reason for error occurrence is registry corruption. If the registry that stores all the information and activities performed is not cleaned frequently, the obsolete files saved in the registry like the junk files, bad entries and cookies eventually accumulate and corrupt it thereby generating such error codes.

Further Information and Manual Repair

Here are some effective and proven methods that you can try by yourself to resolve error code 80070490 on your PC.

Method 1 - Use the System Update Readiness Tool

Download the System Update Readiness Tool from the Windows website and run it on your PC. This tool is designed to detect and scan for abnormalities and inconsistencies that could be preventing and causing problems during the system update. Once you have downloaded and scanned your PC, try to install the updates again. If the error still persists, try other methods illustrated below.

Method 2 - Repair Windows

Here are the steps that you need to follow to repair Windows:
  • First, close all programs and then reboot your PC. Insert the Windows DVD into the computer’s disk drive and wait for the setup to begin.
  • If for any reason, the setup doesn’t start automatically, then don’t worry simply click start, then type Drive: setup.exe in the search box. Please note, in the drive insert the letter of your computer’s DVD drive for example D:setup.exe.
  • Now in the programs list, click setup.exe  And then click install now.
  • After that click ‘go online to obtain the latest updates for installation’, if you are asked for the Windows Product Key, then simply type it to proceed.
  • In the ‘Which kind of Installation do you want?’ option, click Upgrade.
When the Windows installation is complete, restart your PC and then run Windows update.

Method 3 - Clean the Registry

If the cause of error code 80070490 on your PC is related to registry corruption, then it is advisable to download Restoro. This is an advanced and easy-to-use PC Repair Tool embedded with a registry cleaner. The registry cleaner scans your entire PC, removes all obsolete and unnecessary files corrupting the registry, and cleans it right away. Click here to download Restoro to repair error code 80070490
Read More
How to Fix REGISTRY_ERROR in Windows
As you know, you can encounter Blue Screen errors at any given point after your computer boots up and can just reboot it randomly which results in loss of unsaved work. One of these Blue Screen errors is the “REGISTRY_ERROR”. This kind of Stop error has a bug check value of 0x00000051 which indicates your computer’s registry has encountered a severe error. There could be a number of causes for this error but at the time of writing, it is quite difficult to narrow them down to one component. If you face this kind of Blue Screen error, worry not as this post will guide you in fixing it. As mentioned, this error indicates that there is something wrong with the registry, particularly an I/O error while it tried to read one of its files. This may be caused by hardware issues or file system corruption. It could also be due to failure in a refresh operation which is only used by the security system and only when resource limits are encountered. To fix the Registry_Error Blue Screen, you can try to use the CHKDSK utility or the System File Checker, or the DISM tool or run the Blue Screen troubleshooter. You may also try to reset your computer or repair Windows by using installation media.

Option 1 – Run the Check Disk utility

The first thing you can do to fix the REGISTRY_ERROR Blue Screen error is to run the Check Disk utility. How? Follow these steps:
  • In the Windows Search box, type “command prompt” and from the search results, right-click on Command Prompt and select “Run as administrator”.
  • After opening Command Prompt, type this command and tap Enter: chkdsk <Drive Letter>: /f /r /x /b
  • The command you entered will start to check for errors and fix them automatically. Else, it will throw an error message saying, “Chkdsk cannot run because the volume is in use by another process. Would you like the schedule this volume to be checked the next time the system restarts? (Y/N)”.
  • Tap the Y key to schedule Disk Check the next time your computer restarts.

Option 2 – Run the Blue Screen Troubleshooter

The Blue Screen troubleshooter is a built-in tool in Windows 10 that helps users in fixing BSOD errors like REGISTRY_ERROR. It can be found in the Settings Troubleshooters page. To use it, refer to these steps:
  • Tap the Win + I keys to open the Settings panel.
  • Then go to Update & Security > Troubleshoot.
  • From there, look for the option called “Blue Screen” on your right-hand side and then click the “Run the troubleshooter” button to run the Blue Screen Troubleshooter and then follow the next on-screen options. Note that you might have to boot your PC into Safe Mode.

Option 3 – Run System File Checker

  • Open Command Prompt with admin privileges.
  • After that, execute this command: sfc /scannow
  • Once the scan is completed, restart your computer and then check if the REGISTRY_ERROR is now fixed.

Option 4 – Run the DISM tool

You can try running the Deployment Imaging and Servicing Management or DISM tool to fix the REGISTRY_ERROR Blue Screen error. Using this built-in tool, you have various options such as the “/ScanHealth”, “/CheckHealth”, and “/RestoreHealth”.
  • Open the Command Prompt with admin privileges.
  • Then type in the following commands and make sure to hit Enter right after you type each one of them:
    • Dism /Online /Cleanup-Image /CheckHealth
    • Dism /Online /Cleanup-Image /ScanHealth
    • exe /Online /Cleanup-image /Restorehealth
  • Do not close the window if the process takes a while as it will probably take a few minutes to finish. Once it’s done, restart your computer.

Option 5 – Reset your computer

  • Tap the Win key or click on the Start button located in the Taskbar.
  • Then click on the Power button at the bottom right portion of the screen.
  • Next, press and hold the Shift key on your keyboard and then click on Restart. This will restart your Pc into the Advanced Startup options.
Note: Once you have access to the Advanced Startup options, you have to go to the setting which allows you to Reset your Windows 10 PC. All you have to do is select Troubleshoot > Reset this PC to reach the following screen Afterward, select either the “Keep my files” option and then proceed to the next on-screen instructions that follow to reset your Windows 10 computer without losing your files.

Option 6 – Try to perform repair install by creating a Windows 10 installation media

  • Click this link and then click the Download Tool Now button.
  • Next, click the “Use the tool to create installation media (USB flash drive, DVD, or ISO file)…” option and follow the next given instructions on the screen.
  • Now select the ISO file option in step 5.
  • After that, you should now have an ISO file.
  • Next, go to the location where you’ve downloaded the ISO file.
  • Then right-click on the Windows 10 ISO file and select the Open with option and then select File Explorer.
  • Now click on “setup.exe” and follow the next instructions that appear on the screen. When asked, you have to select either Nothing (clean install) or Keep personal files only option. Take note that you must not select the “Keep personal files, apps, and Windows settings”.
Read More
How to send your PDF file to amazon Kindle
Kindle is, without doubt, a great piece of hardware, perhaps it is the closest thing to a book within the domain of digital devices. With its low price and usability, it has found itself in many homes and within the grasp of many readers in the world. You can buy digital books in the Amazon store for fraction of a regular price if it digital Kindle edition. You keep your library in the cloud and download just books you want to read on your device. In this article, we will explore how you can send your existing PDF or any other supported file that you already have to your kindle device so you can read it on it.

Before we begin, you should make sure the file you're trying to convert is compatible with the Kindle:

HTML RTF JPEG GIF PNG BMP or PDF The compatible file types cover most formats you're likely using, but if you find the document you want on your Kindle isn't compatible, there are a few ways to convert it. In the program it typically opens into, like Microsoft Word for .doc files or an image editing apps for .PNG ones, select 'Save As', and in the drop-down menu, see if any of the compatible options are available. If not, you could try a PDF converter tool. There are plenty of great paid options and a few good free ones too.

Transfering PDF

To get a PDF on a Kindle, you're going to need to know your Kindle's email address. You'll need to head over to the Amazon website and sign in first. Select 'Your devices and content', click 'Manage Devices'. You should see a list of the books you have assigned to your Kindle account, above this list, in a toolbar should be some options - you'll currently be on 'Content', which should be followed by 'Devices', 'Preferences' and 'Privacy Settings'. Click on 'Devices', and in the next menu, select the option for the Kindle you want the document on. You'll be brought to a Device Summary page which tells you your Kindle email as well as the type of device it is. You now need to approve your personal email, so that when the Kindle receives your PDF, it knows to download this. Make sure the email you approve is the one you're planning to send documents to your Kindle from otherwise it won't work. To approve your email address follow the steps for finding your Kindle email address but instead of selecting 'Devices' in the top bar, click 'Preferences'. Scroll down this list until you find Personal Document Settings, and select this option so it expands into more options. From here, scroll down until you find 'Approved Personal Document E-mail List'. This list will show people who can email stuff to your Kindle, Below the emails is an option to 'Add a new approved e-mail address', which you should select. Enter your email address and click 'Add address' to get yourself approved. Head over to your email client of choice, attach the file to an email, and send the email to your Kindle email address. You're able to send multiple documents at once, so if you have loads of files you want on your Kindle, you don't need to send separate emails. If you're sending over a PDF file, you can ask Amazon to automatically convert the file into a Kindle one, which lets you annotate the sections and change the font size. Simply put the word 'convert' as the subject line and the rest will be handled for you. 'Sync Your Kindle'.
Read More
How to enable God mode inside Windows 11
God mode windows 11
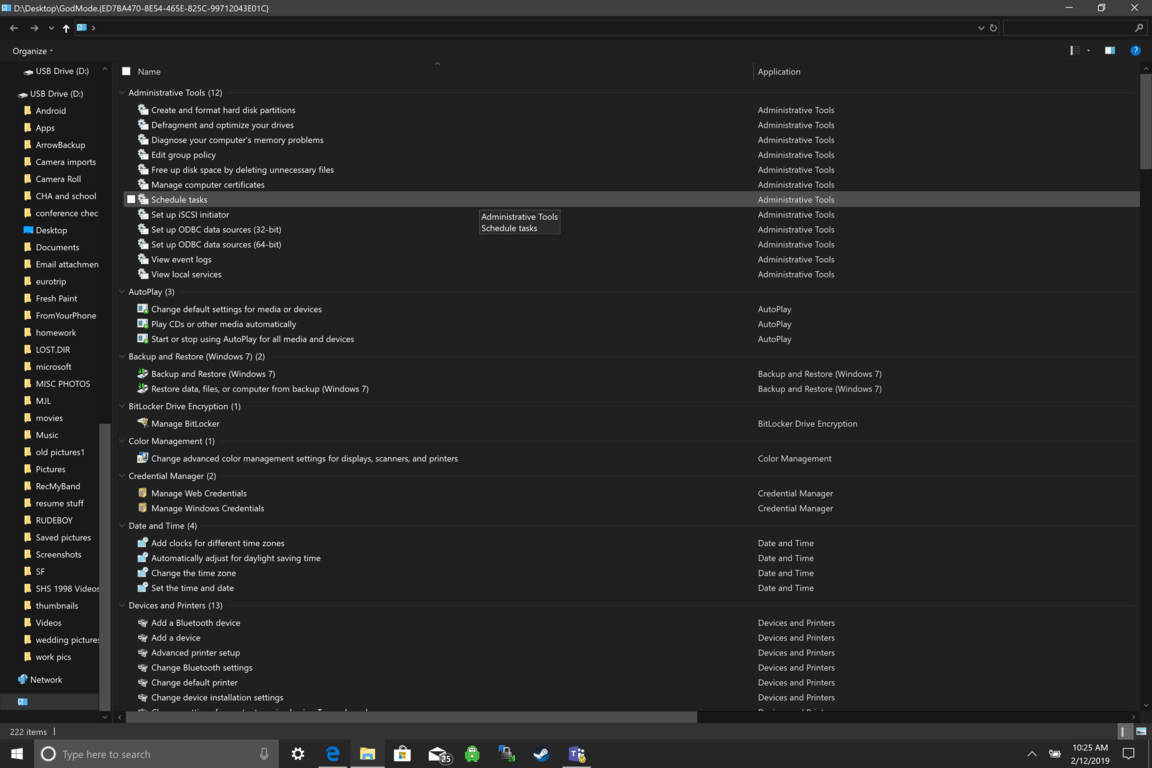
Like in Windows 10, Windows 11 will also support God mode to be enabled and used. For those readers that do know what God mode is, let me explain it in simple terms. God mode is the icon on the desktop that once clicked will open and let you adjust every option in the control panel and some hidden features for Windows inside one application. There are a lot of advantages to having this one-click fast access to features, especially if you are a power user. Luckily creating such an awesome icon and enabling God mode is very easy to accomplish, all you have to do is:
  1. Create a new folder where you want to have the God mode icon
  2. Rename folder exactly: {ED7BA470-8E54-465E-825C-99712043E01C}
  3. Enjoy God mode
As you can see creating and accessing all settings at your fingertips is much easier than most people think. Enjoy your ultimate access to Windows 11 features and if you wish you can drag and drop sections from it into the desktop or anywhere for easy access to that specific topic.
Read More
1 2 3 162
Logo
Copyright © 2022, ErrorTools. All Rights Reserved
Trademarks: Microsoft Windows logos are registered trademarks of Microsoft. Disclaimer: ErrorTools.com is not affiliated with Microsoft, nor claim direct affiliation.
The information on this page is provided for information purposes only.
DMCA.com Protection Status