OneDrive thumbnails are not showing

A lot of users prefer to use Microsoft OneDrive when it comes down to cloud storage as it does not only come with the seal of approval from Microsoft but it’s also primarily good and better compared to other cloud storage services. However, that doesn’t mean that OneDrive isn’t without any issues. For one, you might encounter an issue where the OneDrive thumbnails do not show in File Explorer in Windows 10. If you are currently experiencing this problem, read on as this post will help you fix it.

As you know, you can add OneDrive to your Windows 10 computer and have all the files locally synchronize to the cloud and so on. This means that whatever is available in the cloud will be seen on your computer. It is smooth and definitely saves you a lot of time which is why a lot of users prefer to use it. So if you suddenly not see any thumbnails in OneDrive, then that would be a problem.

You are actually not the only one having this problem as there are other users who reported getting the same issue recently about the picture thumbnails that no longer show up in the OneDrive folders in the File Explorer. At the time of writing, it isn’t clear yet what the cause of the issue really is. Even so, there are still potential fixes you can check out to resolve it, and the sooner you do it, the better as this can be a major problem. To get started, refer to the instructions given below.

Option 1 – Try to disable Files on Demand

The first thing you can do to fix the problem is to disable the Files on Demand. This is what you have to do to get things under control.

  • First, right-click on the OneDrive icon located in the taskbar and go-to of OneDrive.
  • After that, click on More and Settings. This will open a new window where you have to click on the Settings tab and uncheck the “Files on Demand” service.
  • Once done, restart your computer and check if you can now see the thumbnails in the OneDrive folder. However, if it didn’t work, then proceed to the next given option below.

Option 2 – Try to change the icon view

The next thing you can do to fix the problem is to change the icon view. It is possible that the problem might have something to do with the size of the icons than anything else. So you have to change the icon view and to do that, follow these steps:

  • First, open Control Panel in Windows 10.
  • Next, in the search box, type “folder” and then click on the File Explorer Options.
  • From there, click on the View tab and uncheck the “Always show icons” option, and make sure that showing thumbnails is active.
  • Now go back to Control Panel and type “system” in the search box. This will open a new window where you have to select the “View advanced system settings” option.
  • Then under the Performance section, click on Settings and click on the option that allows you to show the thumbnails instead of icons.
If you like to learn and find out more about various Windows errors, and how to repair them go to our vast archive or use search to find articles that will explain and help you in solving your issue.
However, if you prefer to do things fast and with automatization then we are proposing to use an automated solution for your issues. The application that we are recommending is Advanced System Repair Pro
Advanced System Repair utilizes multiple tools all in one to give you a quick, simple, reliable, and very thorough diagnosis of your PC. It brings you all the tools you need in one program to clean, fix, protect, optimize and boost your PC!
1-Click Maintenance
All the tools to make it simple and easy! It's like having a professional technician at the click of a mouse.

Junk Cleaner
Keeping your computer free from unnecessary clutter also helps make your computer last longer. Like any other machine, if you keep it clean and take care of it, it will serve you better for longer!

Optimize background apps
Optimize applications background activity with the built-in Application Optimizer feature.

Disk Defrag
With a simple 1-click, Advanced System Repair speeds up your PC by assembling fragmented files on your machine and organizing them more efficiently.

Malware Removal
Finds and removes all types of harmful malware including trojans, worms, bots, adware, spyware, PUPs, and more!

Privacy Cleaner
The all-in-one privacy suite to Clean Your Tracks & Protect Your Privacy! Make your computer safe, secure, and more efficient!

System Tweak/Optimizer
ASR will analyze your complete system and settings to adjust your PC to function at its maximum performance.

Registry Cleaner
Over time, as you install and uninstall applications, the registry can become cluttered with old entries and broken settings which can result in program crashes, and annoying messages and slow the computer down.
Visit our Advanced System Repair Pro Download page to inform yourself about all the benefits of this software and get a free trial copy of it.
advanced system repair pro

Advanced System Repair Pro

One-click automated PC repair solution
ASR logo
With Advanced System Repair Pro you can easily
Replace damaged files
Restore performance
Free disk space
Remove Malware
Protects WEB browser
Remove Viruses
Stop PC freezing
DOWNLOAD
Privacy Policy | Terms of Use | Uinstall
Advanced System Repair Pro is compatible with all versions of Microsoft Windows including Windows 11

Share this article:

You might also like

Runtime Error How to Fix

A runtime error is commonly an error that's created after the PC is operating software and encounters a problem of some form. For instance, a runtime error like run-time error code 7 reveals an "out of memory" dilemma.

Solution

Restoro box imageError Cause

Run-time errors are normally brought on by clashes with TSR (Terminate and Stay Resident) applications or additional operating applications, software problems, storage problems, or pc viruses.

Troubleshooting a Run-time Error

First, enter the run-time error signal into a search engine to see what info you will get about the precise runtime issue you are receiving. Next, end - job all running applications and TSRs to make sure these aren't the origin of the issue. You can certainly do so by obtaining the job manager by striking Control Alt Delete.

In case your issue is regularly occurring with a unique program, go to that system programmer's site and obtain any upgrades and patches. If unavailable, try uninstalling the application involved and reinstalling it.

In the event the issue is occurring with the os, you may consider reinstalling it although it is a huge commitment. A much better idea would be to try a fix for both Windows XP or Windows 2,000. It is possible to fix and scan files by typing : sfc / scannow, heading to the Begin switch, Run, and then pushing enter. Make certain to put an area between sfc and the reduce.

You might have an equipment or storage dilemma if these measures have not resolved your run-time errors. If that is the situation, contact the support of the application under consideration for potential support accompanied by the pc or motherboard manufacturer.

Many run-time problems can be solved by upgrading the application that's creating the problem. This is only because the programmer's frequently releasing patches and improvements for their applications as insects are found and repaired.

Storage problems may frequently be fixed by rebooting the pc. Consider a reboot a short-term repair. Rebooting clears the memory but in case your COMPUTER does not have adequate memory for your applications you're operating, or sufficient hard-drive space you'll immediately run out of memory again. Something less than this sum may cause memory issues since the computer's swap file isn't in a position to expand in dimension as required.

To assess the quantity of free area, available My Computer and right-click on the HDD, generally the D: drive. Select Attributes in the menu and see the disc's ability. Perform the disk clean-up function by following prompts and pressing the Disk Clean-up button, if the room is reduced.

You may be getting run-time errors, in case your storage chip is really failing. Eliminating and changing the awful memory chip will solve the difficulty. If you're encountering other runtime-related errors, like an install runtime issue, try cleaning away the portions of the registry with Total System Care.

Read More
How to Fix Windows 10 Upgrade Compare Exchange128 Error Message

Compare Exchange128 error – What is it

Some Windows 7 and Windows 8.1 users reported experiencing a Compare Exchange128 error when trying to upgrade to Windows 10. The error reads, “You can’t install Windows 10 because your processor doesn’t support CompareExchange128”. In order to upgrade to Windows 10 (64-bit), the CMPXCHG16B instruction must be present. If you receive this error, this mostly means that your CPU doesn’t have the CMPXCHG16B instruction.

Solution

Restoro box imageError Causes

The CompareExchange128 error normally occurs due to two possible reasons:

  • CPU lacks CMPXCHG16b Instruction
  • Old & Outdated BIOS – Even if your CPU has the CMPXCHG16b instruction, the CompareExchange128 issue can still occur if you have an older BIOS.

Further Information and Manual Repair

One main requirement to upgrade to Windows 10 is for your CPU to have the CMPXCHG16b instruction. You also need the right BIOS version to guarantee a smooth installation. See below on how to manually fix this issue.

NOTE: If you don’t feel confident using the manual methods listed below, it’s highly advisable to get help from an expert technician. If you don’t know someone, you can also use an automated tool to fix this.

Before performing any fixes, try to determine first if the cause of the error is due to your CPU lacking the CMPXCHG16b instruction. You can use a CPU Info tool that provides complete details about your processor, memory, and motherboard. If you’re looking for more in-depth information, you might also try command-line utilities. But, the safest and easiest way to check this is by simply searching online. Try using the search query: <CPU Model> CMPXCHG16b

Method 1 – Update your BIOS

This method will download the latest BIOS from your motherboard’s manufacturer. This makes sure your CPU has the CMPXCHG16b instruction needed to complete the Windows 10 64-bit installation. To update your computer’s BIOS, complete the following steps:

  1. Determine first the current BIOS you have on your computer. Open System Information Windows app and type msinfo32 in the search bar. The BIOS version will appear under the processor speed. Record it somewhere.
  1. Go to the support page of your motherboard’s manufacturer. Find if there’s any update on the BIOS that you’re currently using. If you find one, download the BIOS update file available. Make sure that you’re looking into the right model and you download all the necessary documentation. Otherwise, the BIOS update might not work.
  1. Update your BIOS. Most BIOS update steps are straightforward. Just make sure to follow the steps provided.

Method 2 – Install Windows 10 32-bit version

If updating the BIOS doesn’t work, what you can do is install a 32-bit version of Windows 10 instead of the 64-bit version. Here’s how to do this:

  1. Download and install the 32-bit version of Windows you currently have. If you have a Windows 7 64-bit version, get the 32-bit version of Windows 7. The same goes for Windows 8.1. When you do this, you might want to back up your files first. Remember that installing the 32-bit version works like other installations, and could delete some of your files.
  1. After installing the 32-bit version, go to Updates and install all the necessary updates. This includes upgrading to Windows 10 if you’re asked to.
  1. When you installed the Windows 10 upgrade, you’ll now have the Windows 10, 32-bit version installed. This will be the version activated on Microsoft servers. Despite this, the activated version stored is only applicable to your computer’s hardware, not the version of Windows 10.
  1. Download Windows 10, 64-bit version.
  1. Prepare an empty DVD or USB flash drive. Use Creation Media software then click the Create Installation Media for Another PC option.
  1. Install the 64-bit Windows 10 version you downloaded from Step 4. Make sure not to put anything when you’re asked to input the serial number.
  1. Once the installation is complete, you’ll have the 64-bit version of Windows 10.

Method 3 – Buy a new processor/motherboard

If the above two methods don’t work, there’s a great chance that this error occurs because of an outdated processor/motherboard. Your next possible solution is to buy an updated model that’s fully compatible with 64-bit Windows 10.

Method 4 – Download an automated tool

If all else fails, you might want to consider using this powerful automated tool to quickly fix the problem and any other computer-related issues.

Read More
Fix Windows Update Error 0x80070652
If you encounter a Windows Update error with an error code 0x80070652 and an error message saying, “ERROR_INSTALL_ALREADY_RUNNING”, then it indicates that there was a previous Windows Update that was not installed successfully. This kind of Windows Update error typically happens when it gets stuck and so to resolve it, here are some suggestions that might help.

Option 1 – Restart your computer and try installing the Updates again

You can restart your computer and then try installing the updates once again. There are instances when a simple restart resolves Windows Update errors. Thus, after you restart your computer, check for updates once again and see if you’re still getting the error or not.

Option 2 – Try running the Windows Update troubleshooter

You might also want to run the Windows Update Troubleshooter as it could also help in fixing Windows Update error code 0x80070652. To run it, go to Settings and then select Troubleshoot from the options. From there, click on Windows Update and then click the “Run the troubleshooter” button. After that, follow the next on-screen instructions and you should be good to go.

Option 3 – Try downloading the Windows Update that failed

If the Windows Update that has failed is not a feature update and only a cumulative update, you can download the Windows Update and install it manually. But first, you need to find out which update has failed, and to do so, refer to the following steps:
  • Go to Settings and from there go to Update and Security > View Update History.
  • Next, check which particular update has failed. Note that Updates that have failed to install will be displayed under the Status column which has a label of “Failed”.
  • After that, go to the Microsoft Download Center and look for that update using its KB number and once you find it, download and then install it manually.
Note: You can also use the Microsoft Update Catalog, a service from Microsoft that provides a list of software updates that can be distributed over a corporate network. With the help of this service, it can be easier for you to find Microsoft software updates, drivers as well as fixes.

Option 4 – Try to restart the Background Intelligent Transfer Service

The Background Intelligent Transfer Service or BITS is a part of the Windows Update service and is the one that manages the background download of Windows Update, as well as scans for new updates and so on. And if Windows Update is experiencing some problems, you can try restarting BITS but make sure that you have admin privileges to do so.
  • Tap the Win + R keys to open the Run dialog box.
  • Next, type “services.msc” in the field and hit Enter to open Windows Services.
  • From the list of Services, look for the Background Intelligent Transfer Service and double-click on it to open Properties.
  • After that, you need to set the Startup type to “Automatic (Delayed Start) and click on Apply.
  • Now click the Stop button to stop BITS and then click the Start button to restart the service.
  • Click OK to save the changes made and then restart your PC.

Option 5 – Try to update Windows after a couple of minutes or an hour

There are times when the issue is from Microsoft’s end. It could be that there’s some issue with Microsoft’s server so it would be better if you give it a couple of minutes or an hour or so before trying to run Windows Update again.
Read More
Repair Windows 10 Error 0xC1900101, 0x4000D

Error Code 0xC1900101, 0x4000D - What Is It?

Error Code 0xC1900101, 0x4000D is not very common among the many error codes emerging when updating to Windows 10. It is specific to Windows 7 users who try to upgrade to Windows 10 system.

This error hinders Windows 7 users to install the Windows 10 update. Once the update is launched, the process will go smoothly until a certain percentage (normally upon hitting 70% or more) and then it gets stuck. The user will then see a notification stating: “The installation failed in the SECOND_BOOT phase with an error during MIGRATE_DATA operation.”

You’ll be able to get past the error after a while. The error message will disappear and continue with the configuration process. But, not for long as it will reoccur at around 90% of installation with another error message saying: “The installation failed in the SECOND_BOOT phase with an error during PRE_OOBE operation.”

Solution

Restoro box imageError Causes

You’re most likely to encounter Error Code 0xC1900101 – 0x4000D when you upgrade to Windows 10 using a USB drive. There are several reasons why this update-related error happens such as wrong update, incompatibility with an antivirus program, or incompatibilities with some software.

Further Information and Manual Repair

In attempting to fix error code-related problems, it is best to do manual repair methods. Employing repair methods manually can help users pinpoint the root causes of the issues they are encountering and apply permanent solutions to fix the problem.

While every Windows user can do most manual repair methods, there are certain cases where help from a Windows expert is needed. If you’re not confident in employing the manual repair methods yourself, you can always consider seeking help from a professional Windows technician who is equipped with enough knowledge to address any issues you are facing or you can just simply use a powerful automated tool.

In fixing Error Code 0xC1900101 – 0x4000D, you can try doing any of the following manual repair methods:

Method One: Disable Background Applications

Error Code 0xC1900101-0x4000D probably occurs when there are programs running in the background of the system as you are in the process of updating. On that note, you must ensure that any programs running in the background must be disabled through Task Manager.

  1. Press Ctrl+Alt+Del then choose Task Manager.
  2. Right-click on all background applications then chooses End Task to close the apps.

NOTE: If there are any processes you are unfamiliar with, you can always right-click that process then “search online.” Be careful not to end “Windows process” tasks under the “Type” column as it might cause further problems.

  1. Restart your device then proceed to Windows 10 system upgrading.

Method Two: Uninstall Anti-Malware Tools

Anti-malware tools normally trigger problems since they consist of files that are possibly incompatible with some software. If Error Code 0xc1900101-0x4000d is caused by incompatibility with an antivirus program, follow the following steps:

  1. Open the Control Panel then choose System and Security.
  2. Select Windows Solution Center.
  3. Click Security to locate your antivirus.
  4. Once you’ve located your antivirus, click on it then choose
  5. Restart your device then check if it eliminates the problem.

Method Three: Install System Updates

  1. Click on the Start menu then select System and Security – Windows Updates.
  2. Choose Check for updates.
  3. If there are any required updates detected by the system, select them all then choose Install Updates.
  4. Restart your device.

Method Four: Check System For Any Incompatibilities

In doing this method, you need to use the System Readiness tool.

  1. Download System Update Readiness Tool for Windows 7 for x64-based Systems (KB947821).
  2. Once the download is finished, open Windows 6.1-KB947821-v34-x64.msu
  3. Run the program to check for any incompatibilities in your system.

NOTE: The process might take a while depending on the speed of your device.

  1. If there are no results found, you can now try updating again to Windows 10. However, if there are any issues found, you need to have them fixed first.

Method Five: Download A Powerful Automated Tool

Can’t seem to put up with the long and technical manual repair process? You can still fix this error by downloading and installing a powerful automated tool that will surely get the job done in a jiffy!

Read More
Where can you get computer viruses & malware
From their infant stages to modern days, computer viruses were always kind of here. From simple ones that were annoying with playing speaker sounds and throwing messages on screen to more malicious ones capable of deleting and encrypting files. In today's modern world it is very important to protect yourself, modern viruses are not a joke anymore and they are aimed to create serious damage to computer systems. Where can you get computer viruses & malwareThey can encrypt files in order to make you pay for a decrypter, they can straight up delete files or even cause some hardware damage. Like mentioned before protecting yourself is important, but protecting does not mean only having antivirus software installed, information, where are common places in which they lurk and could be picked up, is also very important. That is why we are exploring in this article the most common place where you can pick viruses or other malware.

Downloading Programs

Programs that contain the downloadable files are the commonest source of malware such as freeware, worms, and other executable files. Whether you download an image editing software, a music file, or an e-book, it is important to ensure the reliability of the source of the media. Unknown, new, or less popular sources should be avoided.

Pirated or Cracked Software

Are you aware of software cracking? Well, every time you open cracked software, your antivirus software might flag it as malware as the cracks consist of malicious scripts. Always say “No” to cracks as they can inject malicious script into your PC.

Email Attachments

Anyone can send you an email attachment whether you know them or not. Clicking on unknown links or attachments can harm your device. Think twice before clicking anything and make sure that file type is not ‘.exe’.

Internet

One of the easiest ways to get a virus on your device is through the Internet. Make sure to check the URL before accessing any website. For a secured URL always look for ‘HTTPS in it. For example, when you click videos published on social media websites, they may require you to install a particular type of plug-in to watch that video. But in reality, these plug-ins might be malicious software that can steal your sensitive information.

Booting Data from Unknown CDs

Malicious software can get into your device through an unknown CD. A good practice to be safe from malicious infection is to remove CD when your device is not working at all. Your system could reboot the CD if it is not removed before switching off the computer.

Bluetooth

Bluetooth transfers can also infect your system, so it is crucial to know what type of media file is being sent to your computer whenever a transfer takes place. An effective armor would be to allow Bluetooth connectivity with only known devices and activate it only when required.

Unpatched Software

Often overlooked, unpatched software is also a leading source of virus infection. Security holes in software are exploited by attackers and are unknown to software makers until the attackers release them in the form of zero-day attacks. It is therefore recommended to install software updates as soon as they are available on your PC.
Read More
IW Unicorn and Scorpion PC Chair cockpits
Recently on errortools.com, we were talking about Cooler Master’s Orb X gaming chair that is an absolute beast and an amazing product. One downside of Orb X is its price. IW product line is somewhat competing with Orb X with a much more affordable price aiming to probably take customer base with lower income but offering them a great experience as well. The first thing you will notice is a different design and somewhat feeling of cheaper quality if you compare it to Orb X but that is quite reasonable considering the chair itself is around 3.5 times cheaper than Orb X which really puts it in range of everyone can get it. But does a much cheaper price means low quality? Let’s explore.

IW Unicorn

IW unicorn
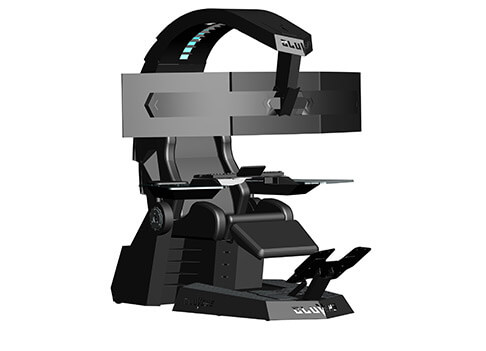
The 2021 CLUVENS BRAND newly issued model UNICORN has fully electrical tilting capabilities to 160 degrees, Reading light-two LED & RGB illumination lighting, manual open/close keyboard tray, and armrests. This model is suitable for home and office, and also gaming computer work environments. It offers functions that enable the user to experience unprecedented comfort and quasi total immersion through strategically positioned 1-3 monitors, audio systems, and accessories. The result is a complete computer office, ergonomically optimized, with a minimal footprint that improves overall performance and productivity and health and comfort. Sitting on a chair can help a lot for relieving health problems like lower back pain, herniated discs, sciatica, and neck pain and also enhance performance and viewing effects.

More Luxury and More comfortable:

Equipped with Luxury feeling reclining Gaming chair made with high-density Mold Shaping Foam and superior quality PU leather with very comfortable texture, electrical recline to 128 degrees, and more to 160 degrees for the flat position for the user.

More High-End Setting and more High-tech:

Manual push for open / close of big sized (87x34cm) Self-Balancing Keyboard tray, adjustable with 20cm distance range with Electrical control for the height of roof arm & monitors. Electrical control for reclining Zero Gravity position or even flat position, Manual adjusted Feet pedal for a more comfortable position for feet. Using a High-Quality PU leather Gaming chair that has Heat/Massage functions with it! The IW-Unicorn monitor mounts allow the use of a single monitor up to Ultra-wide 49” or 43” in size or triple monitor setups up to 3 x 29” other monitors configurations are available upon request. (VESA standard)

IW Scorpion

IW scorpion
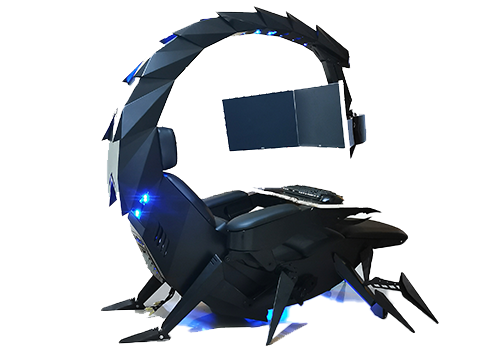
Scorpion is basically a premium version of Unicorn with being able to hold more weight, having cup holders on the armrest, etc. The look is also similar with Scorpion being more sinister-looking but overall Steel frame and chair are the same.

Conclusion

Sadly I have not personally experienced neither of these products including Orb X but from all information I have found and looked over, I would say these products are not trying to compete with each other. Although Products are similar in nature, Orb X is aimed at hi end-users focusing on privacy and robustness while IW is filling the gap of users that would like an advanced chair but are not willing or ready to shell hi amount of money for it offering advanced chairs with advanced features in somewhat affordable price.
Read More
Intel to reveal roadmap during July 26 webcast
intel graphicsIntel announced that Pat Gelsinger (CEO) and Dr. Ann Kelleher  (technology Department head) will discuss Intel’s process and packaging innovations on an upcoming webcast that will happen on July 26th. The spokesman will talk and provide a deeper look at the process and packaging roadmaps for Intel. As we know Intel is planning to expand its production capabilities, outsource some of its technologies and offer foundry services to other chip design companies. The strategy will also include a shift to a 7nm process and Intel’s effort to set itself again as leader of CPU performance by 2024. There is also a chance that we will hear exact plans for Intel in the next three or four years. Intel didn't reveal much else about what Gelsinger and Kelleher plan to discuss during the webcast. The event will be streamed on July 26 at 2 pm PT via the Intel Newsroom; it will also be available to watch on-demand after the stream ends.
Read More
How to see your Wi-Fi password in Windows 11
Each time you connect to a Wi-Fi network your PC saves that network password. If for any reason you need to see this password or passwords there are ways you can do it and we are here to show you how. Wi-Fi passwordHello and welcome to error tools where we aim to help you with all of your Windows problems and issues, where we offer our insight on various topics and sometimes go offroad and write something crazy. This time we will offer you a way on how to easily and quickly see how can you find out your memorized Wi-Fi password.

Find your W-Fi password

  1. Make sure that you are connected to the Wi-Fi network you wish to find out the password of
  2. Open Windows Settings app by pressing ⊞ WINDOWS + I
  3. On the left side choose Network & Internet and click on it
  4. Click on Advanced Network Settings
  5. Inside Advanced Network Settings go to Related Settings
  6. Select More Network Adapted Options
  7. Right-click on your adapter and select Status
  8. Click on Wireless Properties
  9. Click on the Security tab
  10. Click on enable on Show Character box beneath Network Security key to reveal Wi-Fi password
Read More
A fast Guide to Fixing 2GB filesize Error

A fast Guide to Fixing 2GB filesize Error

What exactly is the 2GB filesize Error?

The PST file could be around 2 gigabytes if you are using MS Outlook 2002 or any earlier versions for your own personal Folders. The 2GB filesize malfunction occurs when your PST memory both reaches or exceeds this limit. The 2GB size problem code is, in addition, referred to as an outsize PST file error. When this error happens you may be unable to deliver or receive e-mails via your Outlook account. Moreover, you'll likewise not be able to add any new data or even view your important calendar items, notes, and saved drafts. MS-Outlook shows several types of problem codes which indicate the 2GB file size dilemma. Listed below are some of the messages that can be displayed on your monitor:-
  • The file could not be added to the folder. The action could not be completed.
  • Task 'Microsoft Exchange Server - Receiving' reported error (0x8004060C): 'Unknown Error 0x8004060C'
  • Can't copy the item
  • Errors have been detected in the file xxxx.pst. Quit all mail-enabled applications.
  • Task 'Microsoft Exchange Server' reported error (0x00040820):'Errors in background synchronization. In most cases, further information is available in a synchronization log in the Deleted Items folder.'
  • xxxx.pst cannot be accessed - 0x80040116

Solution

Restoro box imageError Causes

The simple explanation for this malfunction is that you have maxed out the two gigabytes account limit. This happens in case you continue downloading fresh data and saving files and the old emails in your Outlook account. Over time, the space becomes limited and along with it the 2 GB file limit error. This error also presents a critical danger of data loss which is a possibility in your Outlook account, which hinders you as well from fully utilizing your email account. For regular Outlook customers, who utilize this program for practically all email communication within as well as outside the office, this error is annoying and frustrating as it causes a great deal of annoyance as well as decreases their performance and productivity.

What exactly are the Symptoms?

Below are a few signs that will help you recognize the 2GB file-size error:
  • Inability to fill and open the OST and PST files
  • Error messages pop-ups
  • Failure to send emails
  • Failure to make or edit new contacts
  • Inability to synchronize the file

Further Information and Manual Repair

It is desirable to fix this error code right away especially if this is the preferred strategy to carry out communication in your office. Fix it immediately or else you might not receive e-mails that are important from your colleagues. There are 3 ways to solve this issue.

Method 1

One is to remove the old e-mails and connections and replace them with new ones. This may not be the best option for you in case you don't wish to lose emails and your old contacts.

Method 2

The second alternative would be to install a fresh version of MS-Outlook like 2010. The file-size limits of OST and PST files in these editions are larger than in ms-outlook 2002. On the other hand, this is a good idea for the long run but may not be the best idea for today as you will not have the ability to recover your previous e-mails and contacts that are outdated.

Method 3

The third and maybe the method that is best to resolve the 2GB file size limit error while ensuring the restoration of your old e-mails and contacts as well as increasing the limit to 4GB, is Restoro program's installation. Here may be the best recovery program on the market. It is really easy to use, safe, exceptionally functional, secure, and especially can resolve this issue. Technical expertise isn't needed by you to perform your way around this device.

All you should do is:

Click here to download and install the Restoro repair tool on your computer. In your MS Outlook account, you can restore all your data in just a couple of clicks. Talking of data recovery, this software can also help you recover all those other e-mails before the PST malfunction happened, or that you may have deleted. So, if you have deleted any significant email that you want to recover, this will undoubtedly be of use for you. By installing it on your system you can double your Outlook account's quality to twice as much as the standard size.
Read More
Windows computer shuts down instead of Sleep
As you know the Windows 10 operating system is has a lot of features and some of them are related to turning off your computer in different ways in order to save power at different levels. These particular features are Shut down, Restart, Hibernate, and Sleep. However, there are times when you might encounter some issues when using any of the aforementioned features. One of these issues is when your computer shuts down instead of going to Sleep. This issue could be caused by several factors including a bug related to the Intel Management Engine Interface or IMEI driver as well as any misconfiguration in the power settings of the BIOS or UEFI. If your computer is going through this problem, read on as this post will guide you in fixing it. There are several potential fixes you can try to fix the problem. You can try to check the Sleep Advanced Settings or run the built-in Power troubleshooter or run the Power Efficiency Diagnostic Report. In addition, you can also try to troubleshoot the problem in a Clean Boot State or reset or update the BIOS.

Option 1 – Check the Sleep Advanced Settings

  • Click on the Windows key and type “control panel” in the field and select the related search result.
  • Next, select the Security and Maintenance option and click on the Power Options.
  • After that, you have to select the Change Plan Settings but keep in mind that this option is barely readable so you need to read each option carefully.
  • Now click on the Change advanced power settings button and a new window will appear.
  • Then look for the “Sleep” option and expand it. Make sure that the “Allow hybrid sleep” option is on.
  • Reboot your computer and check if your computer now functions properly. If it still didn’t work, you may have to reverse the changes you’ve made.

Option 2 – Try to run the Power troubleshooter

The next thing you can do is to run the Power troubleshooter. To do so, follow these steps:
  • Go to Settings and navigate to Update & Security > Troubleshoot.
  • After that, look for the “Power” option from the given list of built-in troubleshooters and click on it.
  • Next, click on the “Run the troubleshooter” button to run the Power troubleshooter.
  • Once the troubleshooter is done identifying the problems, follow the next on-screen instructions to resolve the problem.

Option 3 – Troubleshoot Sleep Mode issue in a Clean Boot State

The issue with Sleep Mode might be caused by some third-party programs installed on your computer. This program might be the one that puts your computer to sleep and so to isolate this possibility, you have to put your PC in a Clean Boot State using the steps below.
  • Log onto your PC as an administrator.
  • Type in MSConfig in the Start Search to open the System Configuration utility.
  • From there, go to the General tab and click “Selective startup”.
  • Clear the “Load Startup items” check box and make sure that the “Load System Services” and “Use Original boot configuration” options are checked.
  • Next, click the Services tab and select the “Hide All Microsoft Services” check box.
  • Click Disable all.
  • Click on Apply/OK and restart your PC. (This will put your PC into a Clean Boot State. And configure Windows to use the usual startup, just simply undo the changes.)
  • After that, try to put your computer to sleep again.

Option 4 – Try to run the Power Efficiency Diagnostics Report

You could also try to run the Power Efficiency Diagnostics Report to fix the problem. This tool is helpful and will help you analyze the status of the battery but note that this can be quite overwhelming especially if you’re not well-versed in this matter.

Option 5 – Try to update the BIOS

Updating the BIOS can help you fix the ATTEMPTED_WRITE_TO_READONLY_MEMORY BSOD error but as you know, BIOS is a sensitive part of a computer. Even though it is a software component, the functioning of the hardware depends on it largely. Thus, you must be careful when modifying something in the BIOS. So if you don’t know much about it, it’s best if you skip on this option and try the other ones instead. However, if you are well-versed in navigating the BIOS, then follow the steps below.
  • Tap the Win + R keys to open the Run dialog box.
  • Next, type “msinfo32” in the field and press Enter to open System Information.
  • From there, you should find a search field on the bottom where you have to search for the BIOS version and then press Enter.
  • After that, you should see the developer and version of the BIOS installed on your PC.
  • Go to your manufacturer’s website and then download the latest version of BIOS on your computer.
  • If you are using a laptop, make sure that you keep it plugged in until you have updated the BIOS.
  • Now double click on the downloaded file and install the new BIOS version on your computer.
  • Now restart your computer to apply the changes made.
Note: If updating the BIOS didn’t help, you might want to consider resetting it instead.
Read More
1 2 3 162
Logo
Copyright © 2022, ErrorTools. All Rights Reserved
Trademarks: Microsoft Windows logos are registered trademarks of Microsoft. Disclaimer: ErrorTools.com is not affiliated with Microsoft, nor claim direct affiliation.
The information on this page is provided for information purposes only.
DMCA.com Protection Status