Cortana Web Preview is not working in Windows

Recently, a lot of users experience issues after the Windows 10 v1903 upgrade and one of them is that the Cortana Web Preview is not functioning like it’s supposed to. Even though Microsoft has already replaced the unified search where you no longer have to use Cortana, it is still undeniably useful and is packed with some great features, one of which is the Web view.

Each time you type a search query, it will open a web view where you can see the results using Bing. However, some users reported experiencing some issue wherein the web view does not show anything and appears to be broken and users have to click on the Open in Browser link. Thus, if you are one of the users who experience the same problem, then this post is for you – it will guide you on what you can do if the web preview in Cortana is not working on your Windows 10 device.

To fix the Web Preview issue in Cortana, you can try to restart Cortana or reset it using the Windows Settings app or change the Search filter level. You could also try to run the Windows Store App troubleshooter or re-register or reinstall Cortana. For more details refer to the options provided below.

Option 1 – Try to restart the process of Cortana

There are times when the running process of Cortana might encounter an error and breaks a particular component of the whole service so the first thing you can do is to restart Cortana’s process in the Task Manager.

  • Tap the Ctrl + Shift + Esc keys to open the Task Manager.
  • Next, go to the Processes tab and look for Cortana’s entry.
  • Once you find it, right-click on it and select the End task option.
  • Afterward, open Cortana again and see if it fixes the web view problem or not.

Option 2 – Try changing the search filter level

The next thing you can do to fix the Web View is to change the search filter level. All you have to do is go to Settings > Search and change filter level and from there, modify the search filter level and then see if it fixes the problem.

Option 3 – Run the Windows Store App troubleshooter

The Windows 10 Store Apps Troubleshooter will help you in fixing the Web Preview problem in Cortana. This is a great built-in tool from Microsoft that helps users fix any app issues. To use the Windows Store Apps Troubleshooter, follow the steps below.

  • Tap Win + I keys again to open the Windows Settings panel.
  • Go to Update & Security and then go to Troubleshoot.
  • Under the Troubleshoot section, on your left-hand side, scroll down to find Window Store Apps.
  • Then click on the Run the troubleshooter option and follow the on-screen instructions and then see if it fixes the problem.

Option 4 – Try to reset Cortana via Settings

  • Launch the Windows 10 Settings app and go to Apps > Apps & Features.
  • Next, look for the entry of Cortana on the right-side panel and select it.
  • After that, select the Advanced options and then select the Terminate button under the Terminate section.
  • Once done, click on the Reset button under the Reset section.
  • Restart your PC.
  • After your computer boots, launch Cortana again and check.

Option 5 – Try to re-register and reinstall Cortana

If none of the options given above works, you must consider reinstalling Cortana.

  • First, right-click on the Start button and click on the Windows Powershell (Admin) option from the list.
  • Next, type the following command and hit Enter to execute it:

Set-ExecutionPolicy Unrestricted

  • After that, execute this second command to reinstall Cortana:

Get-AppXPackage -AllUsers | Foreach {Add-AppxPackage -DisableDevelopmentMode -Register "$($_.InstallLocation)AppXManifest.xml"}

  • Restart your computer and check if the Web Preview in Cortana is now working.
If you like to learn and find out more about various Windows errors, and how to repair them go to our vast archive or use search to find articles that will explain and help you in solving your issue.
However, if you prefer to do things fast and with automatization then we are proposing to use an automated solution for your issues. The application that we are recommending is Advanced System Repair Pro
Advanced System Repair utilizes multiple tools all in one to give you a quick, simple, reliable, and very thorough diagnosis of your PC. It brings you all the tools you need in one program to clean, fix, protect, optimize and boost your PC!
1-Click Maintenance
All the tools to make it simple and easy! It's like having a professional technician at the click of a mouse.

Junk Cleaner
Keeping your computer free from unnecessary clutter also helps make your computer last longer. Like any other machine, if you keep it clean and take care of it, it will serve you better for longer!

Optimize background apps
Optimize applications background activity with the built-in Application Optimizer feature.

Disk Defrag
With a simple 1-click, Advanced System Repair speeds up your PC by assembling fragmented files on your machine and organizing them more efficiently.

Malware Removal
Finds and removes all types of harmful malware including trojans, worms, bots, adware, spyware, PUPs, and more!

Privacy Cleaner
The all-in-one privacy suite to Clean Your Tracks & Protect Your Privacy! Make your computer safe, secure, and more efficient!

System Tweak/Optimizer
ASR will analyze your complete system and settings to adjust your PC to function at its maximum performance.

Registry Cleaner
Over time, as you install and uninstall applications, the registry can become cluttered with old entries and broken settings which can result in program crashes, and annoying messages and slow the computer down.
Visit our Advanced System Repair Pro Download page to inform yourself about all the benefits of this software and get a free trial copy of it.
advanced system repair pro

Advanced System Repair Pro

One-click automated PC repair solution
ASR logo
With Advanced System Repair Pro you can easily
Replace damaged files
Restore performance
Free disk space
Remove Malware
Protects WEB browser
Remove Viruses
Stop PC freezing
DOWNLOAD
Privacy Policy | Terms of Use | Uinstall
Advanced System Repair Pro is compatible with all versions of Microsoft Windows including Windows 11

Share this article:

You might also like

Fix Slow download speeds for MS Store
As you know, Microsoft Store is the ultimate source of applications for Windows 10 devices and it’s turning to be the hub for various applications. In fact, aside from applications, it has also become a source for movies, books, TV and even buying hardware directly from Microsoft and many more. Although downloading goes smoothly most of the time, depending on your internet connection, there are also times when you might experience slow download speeds while downloading apps and other things in the Microsoft Store. There are several factors that could be causing this kind of issue. It can be due to the Microsoft Store app itself or it could be enforced speed limiter on the application or it could be due to a corrupted Microsoft Store cache, or it could be due to the Windows Update service running in the background, and so on. To fix this problem, you can try to reset the Microsoft Store cache, or set the bandwidth limit for downloads, or try to re-register the Microsoft Store app via Windows PowerShell. Before you proceed with the troubleshooting options provided below, make sure that your internet connection is stable enough to download apps and games. You also have to check if there is an update or a massive download in progress. Once you have these things covered, follow the given options below.

Option 1 – Try to reset the Microsoft Store cache

Just like browsers, Microsoft Store also caches as you view apps and games so it is most likely that the cache is no longer valid and must be removed. To do so, follow the steps below.
  • Right-click on the start button and click on Command Prompt (administrator).
  • Next, type in the command, “exe” and tap Enter. Once you do, the command will clear the cache for the Windows Store app.
  • Now restart your PC and afterward, try opening Microsoft Store again and then try to install your app or update your computer again.

Option 2 – Try to set the bandwidth limit for downloads

  • Tap the Win + I key combination to open the Windows Settings app.
  • After that, navigate to Update & security > Windows Update.
  • From there, select the Advanced options located on the right-side panel.
  • Next, select Delivery Optimization and check the box for “Limit how much bandwidth is used for downloading updates in the background under the Download settings section and then set the slider to 100%.

Option 3 – Try to re-register the Microsoft Store app via Windows PowerShell

  • Tap the Win + X key combination or right-click on the Start button and click on the Windows PowerShell (Admin) option.
  • If a User Account Control or UAC prompt appears, just click on Yes to proceed and open the Windows PowerShell window.
  • Next, type in or copy-paste the following command to re-register the Microsoft Store app and tap Enter:
powershell -ExecutionPolicy Unrestricted Add-AppxPackage -DisableDevelopmentMode -Register $Env:SystemRootWinStoreAppxManifest.xml
  • Wait for the process to be completed and then restart your computer.
Read More
How to Fix the Error Code 3

Repair Error Code 3

Error Code 3 - What is it?

Error code 3 is a type of PC windows error that can occur on any Windows version including Windows XP, Vista, Windows 7, or 8. This error code means that the system cannot find the path specified. The error 3 messages are displayed in the following format: “Error_ Path_Not_Found” or it may sometimes be displayed with the value 3 in this format:  (0x80070003: Error_Path_Not_Found)

Solution

Restoro box imageError Causes

The error code 3 indicates poor PC maintenance. It is a critical sign of an unstable system. The causes of this error code are:
  • Missing or broken system files
  • Registry issues
This error code poses serious system threats and should be resolved immediately before the damage is done. If you don’t address this error timely, your PC may be exposed to risks like system failure and crash. And this may lead to valuable data loss.

Further Information and Manual Repair

To resolve this error on your system, you don’t have to hire a technician or be technically sound yourself. What you simply need to do is clean the registry. Here are 2 ways to clean the registry:

1. Manually by Launching Registry Editor

First, launch the Windows registry editor by clicking the start button and selecting run. In the text box type, 'Regedit' and press enter and click OK. Before you make changes to the registry, make sure you create a backup of your existing registry. This is advisable because if you accidentally lose important data during the cleaning process you can also recover the lost data. Once you create a backup, now get started with the cleaning process. Expand HKEY_CURRENT_USER" key, then click on the software key and look for applications that you think could have corrupted the registry. Now delete them. After that, remove the unwanted start-up items, by accessing this link:  My Computer HKEY_LOCAL_MACHINE SOFTWARE Microsoft Windows Current Version. Now click on the run tab and delete invalid entries/ values. This process may be time-consuming and for some, it may be slightly technical to identify unwanted start-up items.

2. Download Restoro Registry Cleaner

Another way to clean and repair the registry is to download Restoro. This is an innovative and a highly-functional registry cleaner. It is embedded with an intuitive algorithm that detects all the registry issues instantly and removes them right away in just a few simple clicks. It removes all the unnecessary and obsolete files, repairs the registry, and fixes the damaged dll and system files. It has a user-friendly interface and simple navigation which makes it easy for all levels of users to work around it. This software is compatible with all Windows versions. Besides functioning as a registry cleaner, Restoro also functions as an antivirus and a system optimizer. It scans and removes all kinds of malicious software and simultaneously boosts the speed of your PC. Click here to download Restoro and resolve error 3 “Entry_Path_Not_Found” on your PC now!
Read More
Bluetooth Headset in Windows gets disconnected
Many Windows 10 users use a Bluetooth headset as these kinds of Audio devices, as you know, lack wires since wires tend to get entangled and break which could get quite inconvenient. This is why using a wireless headphone is more preferable since it’s much simpler, however, using a wireless headphone also means it comes with a charging requirement and if it fails to charge, there is no music or audio or anything that you need a Bluetooth headphone for. However, wireless headphones are also susceptible to problems as you might encounter some problems when connecting your wireless headphone to your Windows 10 computer. One of these problems include when you try to get sound from the wireless device but nothing happened. This indicates that the Bluetooth headphone is disconnected in some way for some unknown reason even if you’ve already plugged it in. Thus, if you encounter this scenario, then there are several options you need to check out to fix the problem. To start troubleshooting the problem, here are the options you need to use as a reference.

Option 1 – Try turning off the device and turning it back on

The first thing you can do to resolve the problem is to turn off your wireless audio device and wait for a couple of seconds before you turn it back on. In most cases, this should fix the problem. In fact, you can also try to unpair and pair the Bluetooth audio device and see if it fixes the problem or not.

Option 2 – Try to set the headphone as the default device manually

There are times when you plug a headphone, it does not toggle the default audio device. Thus, to fix this issue, you have to set the default audio device to the headphones manually. To do that, follow these steps:
  • First, right-click on the volume icon located on the system tray.
  • Next, select the Open sound settings option to open the Sound section in the Windows 10 Settings app.
  • After that, go to the Output section and select Headphones for the “Choose your output device” option. This should fix the problem for you.

Option 3 – Try running the Bluetooth Troubleshooter

As you know, Windows 10 has various troubleshooters with user-friendly interfaces where you can utilize them to fix issues in your PC. And since you’re dealing with some Bluetooth problem, you have to run the built-in Bluetooth Troubleshooter. To do this, follow these steps:
  • Open the Windows 10 Settings.
  • Then go to Update & Security > Troubleshoot.
  • You should find the option for Bluetooth on your right-hand side – click on it then click on the “Run the troubleshooter” option.
  • Now follow the next screen options.

Option 4 – Try to update or reinstall the Bluetooth driver

The issue might have something to do with the Bluetooth drivers. It could be that it is outdated and needs to be updated or that you recently updated it and since then you have trouble in removing the Bluetooth devices and so to fix the issue, you can update, roll back or uninstall the Bluetooth drivers. How? Follow the steps below.
  • Tap the Win + X keys to open the Device Manager.
  • Next, look for the Bluetooth device and right-click on it.
  • Select the option “Update driver”.
  • After that, a new popup window will appear. In there, select the option, “Search automatically for updated driver software”.
Note: Checking the update may take a few minutes so you’ll have to wait until it finishes. If it is able to find an update, you must install it. And if you want to reinstall the Bluetooth driver, just select the “Uninstall driver” option and follow the next on-screen instructions that follow.
Read More
Keyboard folder shortcut in Windows 11
If you are visiting a single folder many times during the day it might be beneficial to place its shortcut on the desktop for easy access. But did you know that you can also set a keyboard shortcut for that same folder shortcut making it available simply by clicking desired key combination? keyboard shortcutIn order to make a keyboard shortcut for the desired folder know that it is available only when you have a shortcut of the desired folder, it cannot be done on the folder itself, only on its shortcut. Now folder shortcut does not need to reside on desktop, you can place it anywhere you like, but it must be a shortcut. So the first step is of course to make a shortcut of the folder that you wish to have access via keyboard key combination and place it where you wish. Once you have done this step, right-click on it and choose properties. Inside properties at the top click on the Shortcut tab and then inside Shortcut Key, press the key combination that you wish to associate with this folder. Confirm with OK and start using fast folder access with your desired key combination.
Read More
Win 11 update brings one click browser change
After a lot of backlash about choosing the default Windows browser, Microsoft has officially backed up and brought back a one-click browser change into Windows 11. default browser inside windows 11
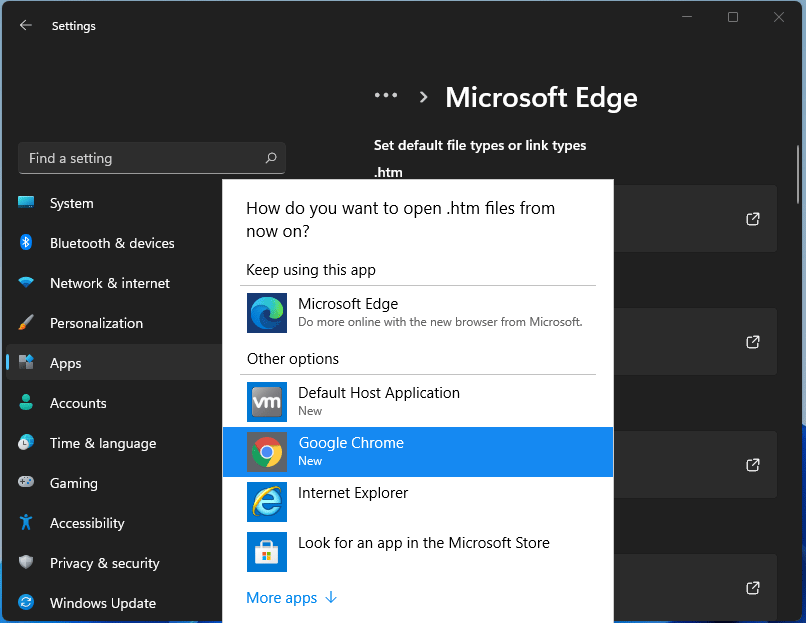
For anyone who is not aware, when Windows 11 was released if you wanted to switch to another browser you had to go into the settings app and choose the default browser for different types of file extensions like HTML, HTM, PDF for opening on the web, etc. Of course, this was completely unnecessary and it was not well received by users. So after some time, Microsoft backpedaled to standard one click, choose your default browser solution that existed in the previous version of Windows OS. Altho sometimes Microsoft knows how to irritate its users base, it is good to know that they can also listen and fix things that are required.
Read More
Fix We couldn’t install some updates
If you encounter the “We couldn’t install some updates because the PC was turned off” while trying to run Windows Update on your Windows 10 computer, then read on as this post will give you a couple of suggestions you can use as a reference to fix this error. Make sure to follow the options given below carefully.

Option 1 – Perform basic computer troubleshooting

If you get the “We couldn’t install some updates because the PC was turned off” error on your laptop, then it’s recommended that you connect your laptop to a power source and then try clicking the Update button again. In addition, you also have to make sure that your computer stays awake until the Windows Update process is completed. This will ensure that your computer does not go into an idle state and interfere with the process.

Option 2 – Try deleting the files from the SoftwareDistribution folder and resetting the Catroot2 folder

The downloaded Windows Updates are placed in a folder called “SoftwareDistribution”. The files downloaded in this folder are automatically deleted once the installation is completed. However, if the files are not clean up or if the installation is still pending, you can delete all the files in this folder after you pause the Windows Update service. For complete instructions, refer to the steps below.
  • Open the WinX Menu.
  • From there, open Command Prompt as admin.
  • Then type in the following command – don’t forget to hit Enter right after typing each one of them.
net stop wuauserv net start cryptSvc net start bits net start msiserver
  • After entering these commands, it will stop the Windows Update Service, Background Intelligent Transfer Service (BITS), Cryptographic and the MSI Installer
  • Next, go to the C:/Windows/SoftwareDistribution folder and get rid of all the folders and files thereby tapping the Ctrl + A keys to select them all and then click on Delete. Note that if the files are in use, you won’t be able to delete them.
After resetting the SoftwareDistribution folder, you need to reset the Catroot2 folder to restart the services you just stopped. To do that, follow these steps:
  • Type each one of the following commands.
net start wuauserv net start cryptSvc net start bits net start msiserver
  • After that, exit Command Prompt and restart your computer and then try to run Windows Update once more.

Option 3 – Try restarting the Windows Update Services

  • Open the Services Manager.
  • From there, make sure that you set the following services and Startup types:
    • Background Intelligent Transfer Service: Manual
    • Cryptographic Service: Automatic
    • Windows Update Service: Manual (Triggered)

Option 4 – Try to run the Windows Update Troubleshooter

Running the built-in Windows Update troubleshooter could also help you resolve the “We couldn’t install some updates because the PC was turned off” error. To run it, go to Settings and then select Troubleshoot from the options. From there, click on Windows Update and then click the “Run the troubleshooter” button. After that, follow the next on-screen instructions and you should be good to go.

Option 5 – Try to install the Windows Updates manually

As mentioned, the error might be because Windows missed installing a particular update which is why you are not able to proceed with the current update. So to resolve the issue, you need to install the update that wasn’t installed by downloading it from the Microsoft Update Catalog website. You also have to make sure that you didn’t turn off the Windows update or have it delayed.

Option 6 – Run Microsoft’s online troubleshooter

Running Microsoft’s online troubleshooter might also help you fix the Windows update error. This online troubleshooter is known to help in fixing Windows Update errors, it scans your computer for issues that might be causing the problem and then fixes them automatically.
Read More
Checking network requirements taking too long
If your Windows 10 computer is having problems connecting to a wireless network and it takes too long to respond and only keeps on displaying the “Checking network requirements”, then you’ve come to the right place as this place will walk you through fixing the problem. There are two things that can happen when your computer connects to a wireless network. Windows can either connect to the wireless network successfully or return an error message that says, “Cannot connect to the network. However, if none of these things happened, and it only remains at the “Checking network requirements” message, then it could be due to obsolete or incompatible drivers in your computer, particularly the network adapter drivers. To fix this problem, you can try to update or reinstall these drivers, reset the TCP/IP, or run the Network Adapter troubleshooter, as well as reset the Network. For more information, refer to the given options below.

Option 1 – Update the Network Adapter drivers

The first thing you can do to resolve the problem is to update the Network Adapter drivers by following these steps:
  • Tap the Win + R keys to launch the Run window and then type in the “devmgmt.msc” command and hit Enter to open the Device Manager window.
  • Under the Device Manager, you will see a list of drivers. From there, look for the Network Adapters and expand them.
  • Look for the Broadcom Network Adapter and right-click on it, as well as other network adapters that have an exclamation icon, and update them all.
  • Restart your PC and see if it helped in fixing the problem.
Note: If updating the network drivers didn’t help in fixing the problem, you can also try to uninstall the very same drivers and restart your Windows 10 PC. After that, the system itself will reinstall the drivers you just uninstalled. Alternatively, you can also download and install the drivers from the manufacturer’s website directly. To reinstall the network adapter drivers, refer to these steps:
  • Open the Devices Manager from the Win X Menu.
  • Then locate the device drivers and right-click on them to open the Properties.
  • After that, switch to the Driver tab and click on the Uninstall Device button.
  • Follow the screen option to completely uninstall it.
  • Finally, restart your computer. It will just reinstall the device drivers automatically.

Option 2 – Try to reset the TCP/IP

As you know, the TCP/IP or the Internet Protocol is the most important thing if you want to use the internet on your computer. That’s why if it ends up getting corrupted, you need to reset the TCP/IP to fix the problem. To reset TCP/IP, refer to these steps:
  • In the Windows start the search, type “command prompt” and right-click on Command Prompt from the search results.
  • Then select the “Run as administrator” option to open Command Prompt with admin privileges.
  • After that, execute this command: netsh int ip reset resettcpip.txt
  • Once it’s done, exit Command Prompt and restart your computer and then check if the error is now fixed.

Option 3 – Run the Network Adapter troubleshooter

To run the Network Troubleshooter, refer to these steps:
  • Open the Search bar on your computer and type in “troubleshoot” to open the Troubleshoot settings.
  • Next, scroll down and select the “Network Adapter” option from the right pane.
  • Then click on the Run Troubleshooter” button.
  • After that, your computer will check for any possible errors and will pinpoint the root cause of the problem if possible.
  • Restart your computer.

Option 4 – Try to perform Network Reset

You can also try to perform a Network Reset to resolve the problem. This will reset the entire network configuration including your IP address. To perform Network Reset, follow these steps:
  • Tap the Win + I keys to open Settings.
  • From there, go to the Network and Internet section.
  • Next, scroll down and look for “Network Reset” under the status pane.
  • After that, click on Network Reset and then on Reset now to start resetting the network configuration. Once done, check if it is able to fix the error or not.
Read More
How to hide taskbar inside Windows 11
windows 11 taskbarWindows 11 has brought some bad reviews for its inability to change the taskbar location to the screen. Luckily we can still hide it if needed. In order to hide the taskbar from the screen follow these simple instructions:
  1. Right-click the taskbar itself and select “Taskbar Settings” in the tiny menu that pops up or open Windows Settings and navigate to Personalization > Taskbar
  2. Click on Taskbar Behaviors
  3. Check the box next to Automatically hide the Taskbar
  4. Close settings
As soon as you click on the box to hide the taskbar Windows 11 will apply your settings and hide the taskbar, you will get one line at the very bottom of the screen indicating that the taskbar is still present, just hidden. When you reach the bottom of your screen with the mouse it will pop up and be visible again, just like in all Windows so far.
Read More
DuckDuckGo for better privacy
Many of us are taking the google search engine for granted and it is no true that it has crawled in almost every spore of our digital lives but if we wanted a little more privacy? Do we have options or we are destined to use google and send our information to this company. What if we really wanted that our searches are well safe, secure, and private? We could try other search engines like BING but since BING belongs to Microsoft we would exchange only one company for another without making any progress in the privacy battle. Enter DuckDuckGo. DuckDuckGo is a privacy-focused search engine that’s been online since 2008. Find websites, maps, videos, news, and more without tracking your searches and serving you targetted ads. It took DUckDuckGo as you can tell sometimes to gain ground and to be recognized but finally, it got the attention it deserves. Its big breakthrough happened in September of 2014 when Apple offered it as a default search engine in Safari and since it has gained more and more ground. It seems people care about their privacy after all. Since then DuckDuckGo has been gaining ground and all the major browsers have integrated it as an option for a default search engine. In this article, we will show you how to switch to DuckDuckGo and set it as your preferred search engine in all major browsers.
  1. Google Chrome

    Launch Chrome and click on the three dots in the upper right. Choose settings. Choose Search engine in the list on the left of the screen. Click on the drop-down box next to Search engine used in the address bar and choose DuckDuckGo.
  2. Mozilla Firefox

    Launch Firefox, click on the three lines hamburger menu icon in the top-right corner of the window. Click on Preferences. Click on Search in the menu to the left of the screen. Under Default Search Engine, click the drop-down box and choose DuckDuckGo.
  3. Microsoft Edge

    Click on the three dots menu button in the top-right corner of the window Then select Settings. Click on Privacy, Search and Services in the menu that appears on the left Scroll down to the Services menu and choose Address bar and search. Click the dropdown menu next to Search engine used in the address bar and choose DuckDuckGo.
  4. Apple Safari

    Click Safari in the menu bar at the top of the screen Then click Preferences. You can also use the Command+, shortcut to quickly bring up Safari’s Preferences. Click on the Search tab, then choose DuckDuckGo under the Search engine drop-down box.
  5. Opera

    Click on the Settings cog button in the sidebar on the left of the screen. Under Basic settings scroll down until you see Search engine and a drop-down box. Select DuckDuckGo from the list.
Read More
Using 😁 and other emoji in Windows
Did you know you can use emoji in file names inside Windows 10? It is no secret that emojis are basically everywhere and Microsoft has seen this and integrated them into Windows itself, so you can name files using emojis or combine them with text. Placing emojis in file names or in the text is extremely easy, all you have to do is press ⊞ WINDOWS + . and the emoji dialog will open from where you can find which emoji you would like to use. And that's it, you just used emoji for the file naming.

!!!NOTE!!!

In theory, some applications may not like these emojis if they don’t support Unicode characters. However, modern applications are designed to work with a broad set of languages that should properly support emojis. For example, the classic Windows Command Prompt can’t see emoji characters in file names properly, but both PowerShell and Microsoft’s new Windows Terminal can display them properly. If you do run into a problem, you can always open File Explorer and rename the affected files and folders to remove the emoji characters. You can then use those files in applications that don’t properly support emoji file names.
Read More
1 2 3 162
Logo
Copyright © 2022, ErrorTools. All Rights Reserved
Trademarks: Microsoft Windows logos are registered trademarks of Microsoft. Disclaimer: ErrorTools.com is not affiliated with Microsoft, nor claim direct affiliation.
The information on this page is provided for information purposes only.
DMCA.com Protection Status