Turn off or on Mobile Hotspot remotely

In case you don’t know, new support has been added by Microsoft to Windows 10 that now allows users to turn off or on the Mobile Hotspot remotely. The Mobile Hotspot feature, known earlier as “Virtual Networks”, was first introduced with the initial release of Windows 10. With this new feature to remotely turn on or off the Mobile Hotspot in Windows 10, users can just use the Bluetooth on their mobile phones to turn off or on the Mobile Hotspot even when their Windows 10 computers are out of their reach.

To turn off or on the Mobile Hotspot feature in your Windows 10 computer remotely, there are two options you can try. First, you can do it using the Windows 10 settings app or using the Registry Editor. To get started, refer to the following options.

Option 1 – Turn off or on the Mobile Hotspot remotely via Windows 10 Settings app

  • First, you need to open the Windows 10 Settings app and from there go to Network & Internet and then go to the Mobile Hotspot section.
  • After that, scroll down to the “Turn on remotely” section.
  • Once done, make sure that the toggle button is set to ON and that the Bluetooth of both devices is turned on and paired as well. This should enable the feature to turn on or off the mobile hotspot remotely.

Option 2 – Turn off or on the Mobile Hotspot remotely via Registry Editor

Before you get started with the second option, make sure that you create a System Restore point first. Once done, proceed to the following steps:

  • Tap the Win + R keys to open the Run dialog box and type “Regedit” in the field and then hit Enter to open the Registry Editor.
  • Next, navigate to this registry path: ComputerHKEY_LOCAL_MACHINESOFTWAREMicrosoftWcmSvcTethering
  • From there, look for the DWORD named “RemoteStartupDisabled” and set its Value data to be “0”. This will enable the feature that will allow you to remotely turn on or off the mobile hotspot in your Windows 10 computer. To disable it, just set its Value data to “1”.
If you like to learn and find out more about various Windows errors, and how to repair them go to our vast archive or use search to find articles that will explain and help you in solving your issue.
However, if you prefer to do things fast and with automatization then we are proposing to use an automated solution for your issues. The application that we are recommending is Advanced System Repair Pro
Advanced System Repair utilizes multiple tools all in one to give you a quick, simple, reliable, and very thorough diagnosis of your PC. It brings you all the tools you need in one program to clean, fix, protect, optimize and boost your PC!
1-Click Maintenance
All the tools to make it simple and easy! It's like having a professional technician at the click of a mouse.

Junk Cleaner
Keeping your computer free from unnecessary clutter also helps make your computer last longer. Like any other machine, if you keep it clean and take care of it, it will serve you better for longer!

Optimize background apps
Optimize applications background activity with the built-in Application Optimizer feature.

Disk Defrag
With a simple 1-click, Advanced System Repair speeds up your PC by assembling fragmented files on your machine and organizing them more efficiently.

Malware Removal
Finds and removes all types of harmful malware including trojans, worms, bots, adware, spyware, PUPs, and more!

Privacy Cleaner
The all-in-one privacy suite to Clean Your Tracks & Protect Your Privacy! Make your computer safe, secure, and more efficient!

System Tweak/Optimizer
ASR will analyze your complete system and settings to adjust your PC to function at its maximum performance.

Registry Cleaner
Over time, as you install and uninstall applications, the registry can become cluttered with old entries and broken settings which can result in program crashes, and annoying messages and slow the computer down.
Visit our Advanced System Repair Pro Download page to inform yourself about all the benefits of this software and get a free trial copy of it.
advanced system repair pro

Advanced System Repair Pro

One-click automated PC repair solution
ASR logo
With Advanced System Repair Pro you can easily
Replace damaged files
Restore performance
Free disk space
Remove Malware
Protects WEB browser
Remove Viruses
Stop PC freezing
DOWNLOAD
Privacy Policy | Terms of Use | Uinstall
Advanced System Repair Pro is compatible with all versions of Microsoft Windows including Windows 11

Share this article:

You might also like

Fix Windows Cannot Find a System Image
If you have encountered the “Windows Cannot Find a System Image on This Computer” error while you are trying to restore a system image, then read on as this post will guide you in resolving this problem. A system image is basically a backup of your whole data in the system. For instance, it can be the backup data of your hard disk or the whole hard disk itself, or one of the volumes. This is really useful in some cases like when you are not able to get back into your system for some reason or when your system has been corrupted. In such cases, you can utilize this feature and get going safe and sound. However, not all things go the way as expected like when you make a system image of a drive for instance, or use that backup to restore data and you suddenly encounter the “Windows Cannot Find a System Image on This Computer” error. This kind of error occurs due to a number of reasons but worry not for your data is safe and you can fix this error easily. This error is most likely triggered by changing the name of the “WindowsImageBackup” folder. Renaming this folder will certainly be an issue since it is the one that stores all your data. Aside from renaming the WindowsImageBackup folder, renaming the sub-folders can also cause this error which means that renaming the sub-folders of the WindowsImageBackup folder can trigger the error. To fix this error, here are some suggestions that might help:

Option 1 – Try putting the WindowsImageBackup folder in the Root directory

Windows will have issues finding the WindowsImageBackup folder if it isn’t in the root directory of the drive so if it is not there, the “Windows Cannot Find a System Image on This Computer” error will pop up. When a folder is in a root directory, it means that it shouldn’t be stored within a folder but in the main directory instead.  Thus, you need to put the WindowsImageBackup folder in the root directory to fix the error.

Option 2 – Don’t add any sub-folders in the WindowsImageBackup folder

Another cause of the error is when you add sub-folders in the WindowsImage Backup folder. Adding any sub-folders in this folder will only trigger the error so you should leave the folder as it is and you must not make any modifications to it. So if you have added sub-folders in it, make sure to remove them right away.

Option 3 – Make sure that there is one system image per USB drive

The error can also appear if you’ve stored multiple images inside a single USB drive as it could confuse Windows and will trigger the “Windows Cannot Find a System Image on This Computer” error. Note that storing system images of different volumes of your hard disk in a single USB will prevent you from restoring your data.

Option 4 – Try renaming the System Image folder

If you’ve just changed the name of the System Image folder after you store it on a USB stick or other external device, then it’s no wonder why you’re getting the “Windows Cannot Find a System Image on This Computer” error. Windows search for the default name, “WindowsImage Backup” folder when restoring your data so if it is not able to find it, it throws up this error instead. To fix the error, you need to change the folder back to its default name which is “WindowsImageBackup”.

Option 5 – Check the WindowsImageBackup sub-folders

As mentioned earlier, renaming sub-folders in the WindowsImageBackup folder can trigger the error so if you have renamed sub-folders in this folder, you need to change them back to their default names so that you can restore your data peacefully.
Read More
Fix Intel Wireless AC 9560 errorcode 10 in W11
Error code 10, device manager code occurs when Bluetooth or Wi-Fi cannot be enabled. Inside device manager beside device would be yellow exclamation sign and if you go into device properties status would be: This device cannot start. Intel Wireless AC 9560Following are proven solutions that will resolve the issue and provide you with a working device.

Reboot PC, check for switch

This simple solution can usually work in most cases, first thing is to check if by any chance hardware switch for Wi-Fi or Bluetooth is OFF (laptops have a small switch that can turn the device On or OFF), then if you do not have a switch or you made sure it is ON, reboot your system.

Run Network Adapter Troubleshooter

If previous simple step solutions have not proven to be effective run Network Adapter Troubleshooter
  1. Press WINDOWS + I to open settings
  2. Go to System > Troubleshoot > Other troubleshooters
  3. Inside Find Network Adapter
  4. Click on Run to start the troubleshooters

Disable and then re-enable Adapter

If the previous solution has not fixed the issue try disabling the adapter and then re-enabling it back.

Update network adapter

Go to the intel website and download the latest driver package. After the download is finished install the latest driver.

Turn ON the WLAN AutoConfig service

  1. Press Windows key + R to invoke the Run dialog.
  2. In the Run dialog box, type services.MSC and hit Enter to open Services.
  3. In the Services window, scroll and locate the WLAN AutoConfig service.
  4. Double-click on the entry to edit its properties.
  5. In the properties window, click the drop-down on the Startup type and select Automatic.
  6. Next, make sure the Service status is started and running.
  7. Click Apply > OK to save changes.
  8. Exit Services console.
  9. Restart PC.
Read More
A Quick Guide to Fixing the Error 0x800ccc7d
[vc_row][vc_column][vc_column_text]

Troubleshooting Error 0x800ccc7d

0x800ccc7d - What is it?

0x800ccc7d is an SSL (Secure Sockets Layer) error message code that occurs in applications like Microsoft Outlook or Outlook Express. The error message is displayed as: ‘ unknown error 0x800ccc7d- secure sockets layer ’. Many offices use Microsoft Outlook for email communication and sending instant messages within the office. This is a highly functional application that enables users to interact with peers efficiently, manage contacts, journals, and reminders. However, the error 0x800ccc7d may hamper your ability to send and receive emails efficiently. Therefore it is advisable to repair it right away.

Solution

Restoro box imageError Causes

The error 0x800ccc7d is triggered by the following causes:
  • Damaged profile in Outlook
  • Incorrect email account settings
  • The Outlook installation is corrupt and damaged. This usually happens due to issues in hard disk storage.
  • The outgoing SMTP server does not support secure connections

Further Information and Manual Repair

If you come across 0800ccc7d error code while using Microsoft Outlook or Outlook Express, then don’t you worry! This problem can be easily resolved. In fact, it is so easy to repair that you can do it by yourself even if you are not a technical expert. Here are some ways to fix the 0800ccc7d SSL Outlook error:

Solution 1: Use Scanpst.exe

You may not know this but Microsoft offers an inbuilt Outlook Repair tool. This tool is technically known as Scanpst.exe. This tool is useful when you need to repair Basic header corruption. However, it may not be the best choice if the problem is big and complex.

Solution 2: Reset Your Outlook Settings

Sometimes this error message may occur when the STMP server requires authentication or does not recognize the senders' email addresses. In this scenario, you should check your Outlook settings to make sure that your STMP username and server are correct. For this follow this procedure:
  • Go to the Tools menu and then click on Accounts
  • Now click on your email account then check its properties
  • Click general and make sure that your email address is created in your account’s control panel. If not, then edit and create.
  • Next, click servers and see if the box next to the option that says My server requires authentication is checked or not. If not, then check it to resolve the error.

Solution 3: Disable any Anti-Virus

Another alternative to resolve this error is to disable any Anti-virus or Firewall you have installed on your PC. Once you disable it then try sending or receiving the email again. This usually works.

Solution 4: Download 0x800ccc7d Repair Tool

The fourth solution available to resolve this issue is by downloading the 0x800ccc7d repair tool. Though it is similar to Microsoft Outlook built-in scanpst.exe tool, but as compared to it the 0x800ccc7d repair tool is a highly functional tool. There are many 0x800ccc7d repair tools available but we recommend you to Restoro. This tool is a third-party tool that can deal, scan, and fix 0x800cc7d error in no time. What makes this repair tool an excellent choice is that it can repair all broken PST files and emails, recover Outlook items, retrieve deleted files, recover password-protected data, split files to recover oversize PST files, and more. To access and install the 0x800ccc7d repair tool all you need to do is download it here and install it on your PC. Now run it to scan errors. Once the errors are scanned, hit the repair tab to resolve. So, next time when you experience the error 0x800ccc7d, try using these solutions to fix the problem right away![/vc_column_text][/vc_column][/vc_row]
Read More
An Easy Guide to Fixing Error Code 12

An Easy Guide to Fixing Error Code 12

Error Code 12 - What is it?

Error code 12 is a typical Device Manager error code. It usually pops on the computer screen when the computer experiences device driver problems or system resource conflicts.

Error code 12 is mostly displayed on the computer screen in the following format:

‘This device cannot find enough free resources that it can use. If you want to use this device, you will need to disable one of the other devices on this system.’

Solution

driverfix boxError Causes

The error code 12 occurs when 2 devices installed on your PC are accidentally assigned the same I/O (input/output) ports or the same direct memory access channel.

This assignment is known to be made either by BIOS (Basic Input/output system) or by the operating system. It can sometimes be assigned by a combination of the two. Also, code 12 can also appear on your monitor screen if the BIOS didn’t allocate enough resources to the device.

Although this error code is not fatal, it is nonetheless advisable to fix it immediately to avoid inconvenience and hassle. This error is most likely to lower and hamper the performance of your system.

Further Information and Manual Repair

Here are some of the easiest and most effective do-it-yourself methods to resolve error code 12 on your PC. To perform these fixes, you don’t have to be technically sound or a computer programmer for that matter. Simply follow the steps to fix the problem right away.

Method 1 - Use the Troubleshooting Wizard to identify the Conflict

To repair error code 12, simply go to the start menu and type Device Manager in the search box. Now go to the Device Properties dialog box. After that click on the ‘General Tab’ and now access Troubleshoot to start the Troubleshooting Wizard.

The Wizard will ask you some questions and provide you a solution accordingly. Follow the instructions and resolution steps provided by the troubleshooting wizard to repair error code 12 on your PC.

Method 2 - Disable the Device to Resolve

By disabling the problematic device in the Device Manager, Windows will ignore that piece of hardware. Once disabled, Windows will then no longer assign system resources to that device and no driver/software will be able to use that device.

To disable, go to the Device Properties in the Device Manager and then click the Driver tab. Click disable located at the bottom of the window. Then you will be prompted with a message stating ‘Disabling this device will cause it to stop functioning. Do you wish to disable it?’ Click yes to continue and then click OK to save changes.

Method 3 - Restore Your PC to its Previous State

Another method to resolve error code 12 is to restore your PC to its previous state when it was working properly.

For this, it is important to backup all your data first to avoid data loss issues that are likely to occur during this process. Creating backups manually can be a time-consuming and tedious task. To save time and quicken the process, it is best to install a program like DriverFIX.

DriverFIX is a user-friendly and intuitive device driver management software that helps backup all your data automatically and efficiently, while simultaneously restores your PC back to its previous state before you encountered problems.

Click here to download DriverFIX on your system to resolve error code 12

Read More
How to Fix UNEXPECTED_KERNEL_MODE_TRAP error
It is a fact that Blue Screen of Death errors can give you a headache for you will have a hard time fixing it as it is one of the most difficult errors you can encounter on your Windows computer. One of these BSOD errors is the UNEXPECTED KERNEL MODE TRAP error. If you receive this kind of error then it means that the operating system was not able to catch a trap or an exception generated by the CPU. This BSOD error has an error code 0x00000007F and indicates that the Intel CPU generated a trap that the kernel failed to catch. One of the most likely causes is hardware failure due to faulty memory. Aside from this cause, you also have to track down other probable causes for this problem like corrupted system files, incompatible drivers or programs, faulty hardware, and even dusty components, and so on. To fix the UNEXPECTED KERNEL MODE TRAP BSOD error, here are some suggestions that might help.

Option 1 – Uninstall the programs you installed recently

Chances are, some programs that you just installed might be the one that’s causing the BSOD error. Thus, you need to uninstall the program to resolve the problem.
  • In the search box, type in “control” and then click on Control Panel (desktop app) among the search results.
  • After that, select Programs and Features from the list which will give you a list of all the programs installed on your computer.
  • From there, look for the concerned program and select it and then uninstall it.
Note: If you have downloaded the app from the Windows Store, you can simply right-click on it from the application list and then uninstall it. In addition, you might also want to check the hardware components of your computer that might not support the operating system itself. You can disconnect all the external devices like USB drives, scanners, printers, etc., and then reboot your PC. After that, add the devices again one after the other and check if the BSOD error is now fixed or not. Moreover, you can also perform a clean boot to make things easier for you.
  • Log onto your PC as an administrator.
  • Type in MSConfig in the Start Search to open the System Configuration utility.
  • From there, go to the General tab and click “Selective startup”.
  • Clear the “Load Startup items” checkbox and make sure that the “Load System Services” and “Use Original boot configuration” options are checked.
  • Next, click the Services tab and select the “Hide All Microsoft Services” checkbox.
  • Click Disable all.
  • Click on Apply/OK and restart your PC. (This will put your PC into a Clean Boot State. And configure Windows to use the usual startup, just simply undo the changes.)

Option 2 – Update your device drivers

  • Tap the Win + R keys to launch Run.
  • Type in devmgmt.msc into the box and tap Enter or click OK to open the Device Manager.
  • After that, a list of device drivers will be displayed. Look for the device driver you and then select either “Update driver” or “Uninstall device”. And if you find any “Unknown device”, you need to update it as well.
  • Select the “Search automatically for updated driver software” option and then follow the instructions to complete the process.
  • If you have chosen to uninstall the driver, follow the screen options to complete the process and then restart your PC.
  • Connect the device and Scan for hardware changes – you can see this option under Device Manager > Action.

Option 3 – Use the Blue Screen Troubleshooter

The Blue Screen troubleshooter is a built-in tool in Windows 10 that helps users in fixing BSOD errors like UNEXPECTED KERNEL MODE TRAP. It can be found on the Settings Troubleshooters page. To use it, refer to these steps:
  • Tap the Win + I keys to open the Settings panel.
  • Then go to Update & Security > Troubleshoot.
  • From there, look for the option called “Blue Screen” on your right-hand side and then click the “Run the troubleshooter” button to run the Blue Screen Troubleshooter and then follow the next on-screen options. Note that you might have to boot your PC into Safe Mode.

Option 4 – Run the Windows Memory Diagnostic tool

You can use the Memory Diagnostic tool in Windows to check RAM. Before you use this tool, make sure you save all your important work.
  • Tap the Win + R keys to open the Run dialog box.
  • Next, type in “mdsched.exe” in the field and hit Enter to open Memory Diagnostic.
  • After that, the Windows Memory Diagnostic will give out two options such as:
  1. Restart now and check for problems (recommended)
  2. Check for problems the next time I start my computer
  • Select any of the given options. After that, your computer will restart and check for memory-based issues upon the restart. If there are any issues, it will automatically them.

Option 5 – Disable Memory caching in the BIOS

You can also disable memory caching in the BIOS to fix the UNEXPECTED KERNEL MODE TRAP error.
  • Open the BIOS Setup screen.
  • Next, go to Advanced > Cache Memory and then disable it.
  • Tap the F10 key to save the changes made and restart your computer.

Option 6 – Run System File Checker

  • Tap Win + R to launch Run.
  • Type in cmd in the field and tap Enter.
  • After opening Command Prompt, type in sfc /scannow
  • Restart your computer once the scan is completed.

Option 7 – Clean your hardware components for dust

Cleaning your computer’s hardware components for dust might also help in resolving the UNEXPECTED KERNEL MODE TRAP error. Make sure to use a soft cloth in cleaning the hardware as well as a small blower. Moreover, ensure that you do not damage any parts with moisture or cause harm to any circuits while you’re at it.
Read More
Disable WEB camera with PowerShell in Windows
Windows PowerShell is a powerful tool inside the Windows environment often overlooked by typical users which is a great mistake since it can offer a large array of functionality and usability and if used well can offer a unique working experience. Today we will be using PowerShell to turn the WEB camera off so it can not be accessed, completely disabling it for use. You might want to do this for security reasons or just want to learn few new things. Whatever your reason might be, I am welcoming you to this tutorial and please do keep reading.

Finding device ID

In order to disable the WEB camera first thing we need to do is to find a matching device ID. We will find this value inside the device manager, so press ⊞ WINDOWS + X to open the secret menu. keyboard with windows and x markedIn the menu choose device manager and click on it. Windows menu device manager
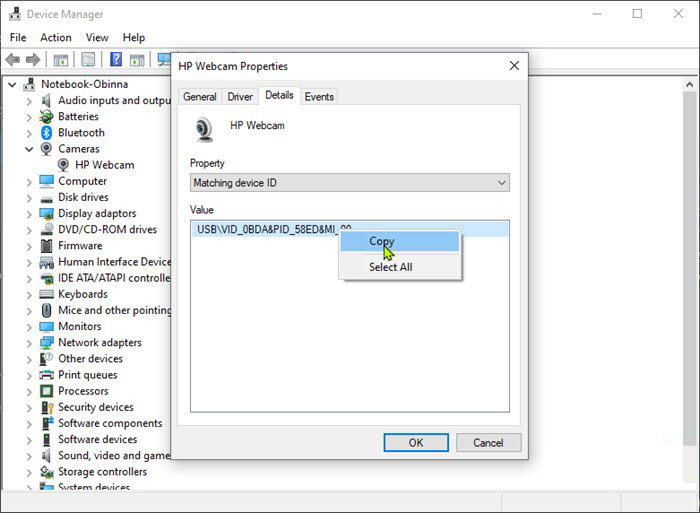
When the device manager opens, expand the Imaging devices or Cameras section. Right-click Integrated Camera or the primary webcam, and click Properties. Go to the Details tab. Under the Property section, click to select Matching device ID from the drop-down. Right-click the value and select Copy camera device managerThe next step is to download and install Windows Driver Kit (WDK)

PowerShell script

Create and run a PowerShell script with the following parameters/values to disable the camera. Substitute the <FOLDER> placeholder with the actual name of the folder where your copy of Devcon is residing
$id = (Get-CimInstance Win32_PnPEntity |

where caption -match '<PRIMARY CAMERA>').pnpDeviceID

$ppid = "{0}{1}" -f '@',$id

Set-Location c:\<FOLDER>

Devcon status $ppid

Devcon disable $ppid

Devcon status $ppid
To enable the camera device, run the command below in PowerShell:
devcon enable $ppid
Read More
Chrome does not save passwords
Recently, a number of users reported that their Google Chrome browser does not remember any accounts, login sessions, as well as passwords. So if you are one of the users who experience the same problem, then you’ve come to the right place as this post will guide you on what you can do your Chrome browser does not save passwords, remember accounts and login sessions in Windows 10. This issue in Chrome could be caused by a lot of factors. It is possible that there is a setting in Chrome that prevents the browser from saving any data. It is also possible that the Google Chrome profile or the Cache folder for Chrome has become corrupted. Moreover, a third-party antivirus program could also be blocking the browser’s functionality in saving data. Whatever the cause is here are some suggestions you could follow that will help you fix the problem but before you do that, you can try to update your Chrome browser to its latest version first. If it didn’t work, then proceed to the given options below.

Option 1 – Try to clear browser cache

  • Open your Google Chrome browser.
  • After that, tap the Ctrl + H keys. Doing so will open a new panel that allows you to delete the browsing history and other data in your browser.
  • Now select every checkbox that you see and click on the Clear data button.
  • Then restart your Chrome browser and check if you can now complete the download again.

Option 2 – Try to delete the cache files for Google Chrome

The next thing you can do is to delete Chrome’s cache files or its store information which helps it in loading cached webpages faster when you pull them up. However, if it turns out that the cache files are corrupted, then it’s no wonder why Chrome is unable to save passwords. To fix this, you can try to delete the cache files for Google Chrome webpages and you can do it by following these steps:
  • First, open Google Chrome.
  • Next, open this address in Chrome – chrome://settings/clearBrowserData
  • After that, go to the Advanced tab and select all time as well as the first four options.
  • Now click on the Clear data option and then restart the Chrome browser once the cache has been cleared.

Option 3 – Try allowing Google Chrome to keep local data

If the option to keep local data is disabled in Google Chrome’s settings, it won’t be able to store local data in the browser. Thus, you need to enable it by following these steps:
  • Open Chrome and enter this address – chrome://settings/clearBrowserData
  • After that, drag the toggle button off for the “Keep local data only until you quit your browser” option.
  • Once done, restart Google Chrome and check it fixed the problem or not.

Option 4 – Try to enable the setting that offers to save password

As you know, a lot of websites offers users a choice to save a password and you can also do the same with the Chrome browser. You just have to enable this particular setting by going to the address, chrome://settings/passwords. From there, drag the toggle button for the setting Offer to save passwords, off.

Option 5 – Try to create a new profile for Chrome

If your user profile in Google Chrome ends up getting corrupted, it is most likely the reason why Chrome is unable to save passwords. Thus, you need to create a new user profile. How? Follow the steps below.
  • First, click on the account icon located at the top-right corner of the profile.
  • Next, go to the Manage People section and select Add Person > Add.
  • After that, enter the details to add the new account and then restart Chrome.

Option 6 – Reset Chrome

Resetting Chrome can also help you fix the problem. This means that you will be restoring its default settings, disabling all the extensions, add-ons and themes. Aside from that, the content settings will be reset as well and the cookies, cache, and site data will also be deleted. To reset Chrome, here’s what you have to do:
  • Open Google Chrome, then tap the Alt + F keys.
  • After that, click on Settings.
  • Next, scroll down until you see the Advanced option, once you see it, click on it.
  • After clicking the Advanced option, go to the “Restore and clean up option and click on the “Restore settings to their original defaults” option to reset Google Chrome.
  • Now restart Google Chrome.

Option 7 – Try to clean reinstall Chrome

There are instances when programs leave files behind after you’ve uninstalled them and the same thing can happen to Chrome so before you reinstall Chrome, you have to make sure that you have deleted the User Data folder. To do so, refer to the following steps:
  • Hit the Win + R keys to open the Run dialog box.
  • Next, type “%LOCALAPPDATA%GoogleChromeUser Data” in the field and hit Enter to open the User Data folder.
  • From there, rename the default folder and name it something else, e.g. “Default.old”.
  • After that, install Google Chrome again and check if the issue is now fixed.
Read More
Fix Windows Update Error 0x80070103
This post will guide you in fixing the error 0x80070103 when installing Windows Update. According to users who encountered this problem, Windows Update (WU) fails to install several different updates. This kind of Windows Update error is can mostly be seen in the Windows Update screen inside the update reports although it is also known to occur when a user attempts to install a peripheral driver – only if the Windows Update offers to update the driver through a prompt and when you click Yes. There are several possible causes for this error, it could be that Windows Update is trying to install a particular driver for the second time already which happens when it gets confused by an additional piece of identical hardware like the graphics adapter. Aside from that, the Windows Update might have already installed the driver which is known to occur with unsuitable versions of the already installed driver. In addition, the error could also be due to a third-party program interference like a security program or a utility program that is using the same driver and conflicts with the Windows Update. Here are some suggestions that might help in fixing the Windows Update error 0x80070103.

Option 1 – Install the updates in a Clean Boot State

You might want to try putting your computer in a Clean Boot state and then install Windows Updates again without any trouble. During this state, you can start the system with a minimum number of drivers and startup programs that will surely help you in isolating the root cause of the issue.
  • Log onto your PC as an administrator.
  • Type in MSConfig in the Start Search to open the System Configuration utility.
  • From there, go to the General tab and click “Selective startup”.
  • Clear the “Load Startup items” check box and make sure that the “Load System Services” and “Use Original boot configuration” options are checked.
  • Next, click the Services tab and select the “Hide All Microsoft Services” check box.
  • Click Disable all.
  • Click on Apply/OK and restart your PC. (This will put your PC into a Clean Boot State. And configure Windows to use the usual startup, just simply undo the changes.)
  • After that, try to install the Windows Updates or upgrade again.

Option 2 – Try installing the failing driver without using Windows Update

If installing the updates in a clean boot state didn’t help, you can try a manual approach to yield much better results using the Device Manager or by downloading the driver from the manufacturer’s website manually.
  • Tap the Win + R keys to launch Run.
  • Type in msc into the box and tap Enter or click OK to open the Device Manager.
  • After that, a list of device drivers will be displayed. Look for the device driver you and then select either “Update driver” or “Uninstall device”. And if you find any “Unknown device”, you need to update it as well.
  • Select the “Search automatically for updated driver software” option and then follow the instructions to complete the process.
  • If you have chosen to uninstall the driver, follow the screen options to complete the process and then restart your PC.
Note: You also have the option to go directly to the website of your device driver manufacturer and go to the section called Drivers then check if there’s a new available update – if there is, download and install it.

Option 3 – Try to run the Windows Update Troubleshooter

You might also want to run the built-in Windows Update Troubleshooter in Windows that could help you in resolving the Windows Update error 0x80070103. All you have to do is go to Settings > Update& security > Troubleshoot > Windows Update. From there, click on the Run the troubleshooter button and follow the next one-screen instructions that appear. After that, restart your computer and check if the error is now fixed or not by trying to install the update once again.
Read More
Fix Installer encountered an error 0x800f0905

Are you trying to update your Windows 11 OS and are receiving a 0x800f0905 error? Do not sweat and do not worry we have a couple of solutions that you can try in order to fix this issue. How this error is tied to various things like misconfigured settings, corrupt system files, and more there is no way to present one simple solution that will solve everything in one click.

error 0x800f0905
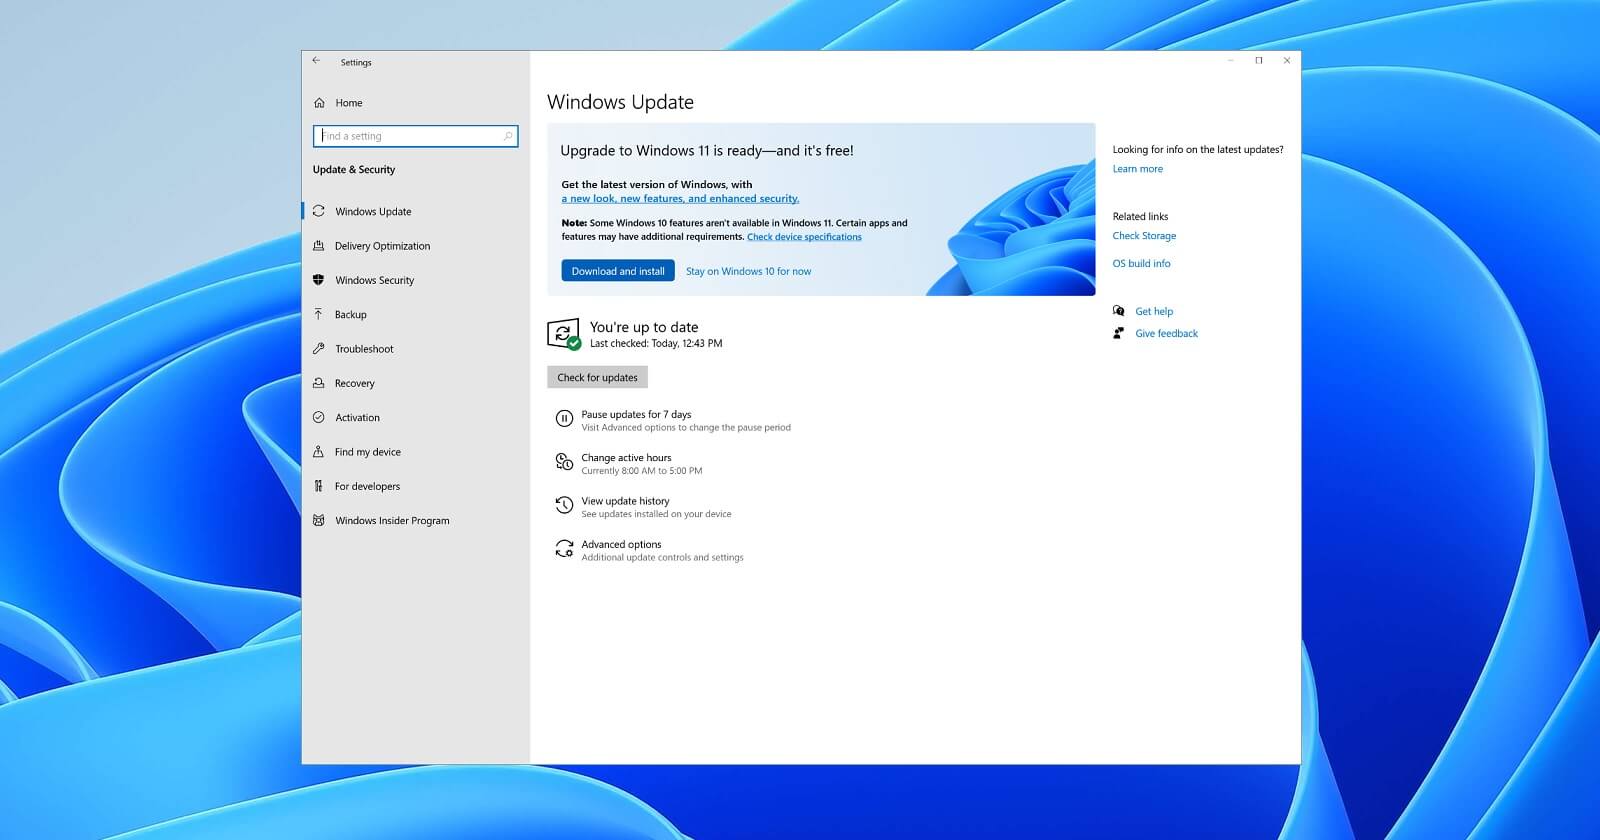
Therefore we are presenting a couple of solutions that will fix your issue, it is advisable to follow them as presented since they will go from the most common to the more complex one.

Run the troubleshooter

The most common fix and one that will actually repair things most of the time is simply running the Windows Update troubleshooter.

  1. Press ⊞ WINDOWS + I to open the Settings app
  2. Click on System on the left
  3. Click on Troubleshoot in the right part
  4. Click on Other Troubleshooters
  5. Find the Windows Update section and click on Run
  6. Let troubleshooter finish

Reset Windows update components

If the previous solution did not work we will need to do things manually. Follow the steps as presented in order to reset Windows update components.

  1. Press ⊞ WINDOWS + S to open search
  2. Type in Terminal
  3. Select Run as administrator
  4. Click on Yes on the User account control (UAC) pop up
  5. Press CTRL + SHIFT + 2 to open Command prompt
  6. Inside command prompt type each line of a command followed by ENTER after each line:
    net stop bits
    net stop wuauserv
    Del “%ALLUSERSPROFILE%Application DataMicrosoftNetworkDownloaderqmgr*.dat”
    Ren %Systemroot%\SoftwareDistribution\DataStore DataStore.bak
    Ren %Systemroot%\SoftwareDistribution\Download Download.bak
    Ren %Systemroot%\System32\catroot2 catroot2.bak
    exe sdset bits D:(A;;CCLCSWRPWPDTLOCRRC;;;SY)(A;;CCDCLCSWRPWPDTLOCRSDRCWDWO;;;BA)(A;;CCLCSWLOCRRC;;;AU)(A;;CCLCSWRPWPDTLOCRRC;;;PU)
    sc.exe sdset wuauserv D:(A;;CCLCSWRPWPDTLOCRRC;;;SY)(A;;CCDCLCSWRPWPDTLOCRSDRCWDWO;;;BA)(A;;CCLCSWLOCRRC;;;AU)(A;;CCLCSWRPWPDTLOCRRC;;;PU)
    cd /d %windir%\system32
    regsvr32.exe atl.dll
    regsvr32.exe urlmon.dll
    regsvr32.exe mshtml.dll
    regsvr32.exe shdocvw.dll
    regsvr32.exe browseui.dll
    regsvr32.exe jscript.dll
    regsvr32.exe vbscript.dll
    regsvr32.exe scrrun.dll
    regsvr32.exe msxml.dll
    regsvr32.exe msxml3.dll
    regsvr32.exe msxml6.dll
    regsvr32.exe actxprxy.dll
    regsvr32.exe softpub.dll
    regsvr32.exe wintrust.dll
    regsvr32.exe dssenh.dll
    regsvr32.exe rsaenh.dll
    regsvr32.exe gpkcsp.dll
    regsvr32.exe sccbase.dll
    regsvr32.exe slbcsp.dll
    regsvr32.exe cryptdlg.dll
    regsvr32.exe oleaut32.dll
    regsvr32.exe ole32.dll
    regsvr32.exe shell32.dll
    regsvr32.exe initpki.dll
    regsvr32.exe wuapi.dll
    regsvr32.exe wuaueng.dll
    regsvr32.exe wuaueng1.dll
    regsvr32.exe wucltui.dll
    regsvr32.exe wups.dll
    regsvr32.exe wups2.dll
    regsvr32.exe wuweb.dll
    regsvr32.exe qmgr.dll
    regsvr32.exe qmgrprxy.dll
    regsvr32.exe wucltux.dll
    regsvr32.exe muweb.dll
    regsvr32.exe wuwebv.dll
    netsh winsock reset
    net start bits
    net start wuauserv

Well, that was a lot of typing or copy and pasting line by line followed by ENTER after each one but hopefully, your issue is solved. These provided solutions fixed most users' issues with this error but if for some reason this is not the case for you, move to the next step.

Run the SFC scan

If you are still having 0x800f0905 error after previous attempts do the following:

  1. Press ⊞ WINDOWS + S to open search
  2. Type in Terminal
  3. Select Run as administrator
  4. Click on Yes on the User account control (UAC) pop up
  5. Press CTRL + SHIFT + 2 to open Command prompt
  6. Type in sfc /scannow and press ENTER
  7. Wait for the scan to finish
  8. Reboot the computer

Perform a system restore

If for any reason previous solutions have not provided you with the solution we will try to fix the issue by performing system restore.

  1. Press ⊞ WINDOWS + S to open search
  2. In the text box type in Create a restore point
  3. Click on the closest match in search results, should be Create a restore point
  4. Click on System Restore or on Next if there are no points created
  5. Choose to restore a point from the list and click on next
  6. Review settings and click on Finish
  7. Wait for the process to finish and for the computer to restart

Manually install update

If for any reason Windows still cannot install the update, try installing it manually.

  1. Go to Windows 11 update history and find the Knowledge base (KB) number for the latest version
  2. Go to the official Microsoft Update Catalog
  3. Paste the KB number in the search box and press ENTER
  4. Click on DOWNLOAD
  5. Double click on the downloaded file to launch the installer
  6. Follow on-screen instructions and install the update

Perform Windows 11 reset

If nothing worked, reset your Windows 11 to its factory settings to fully repair and reset the whole operating system.

Read More
GoForFiles Removal Guide

GoforFiles is a Potentially Unwanted Program that allegedly allows users to easily search for files, movies, apps, and other useful things on the internet. In our testing, this program on further inspection does not work, it only displays an error for every search query. To top this off this program comes bundled up with other programs which could be malicious or unwanted. This program adds startup links into windows, allowing it and its bundled programs to launch every time Windows is restarted or launched. A task scheduled is also made, that lets the launch of the program at different random times during the day. Many anti-virus applications have marked this program and its bundled counterparts as Potentially Unwanted Programs, and it is highly recommended to remove these programs from your computer.

About Potentially Unwanted Programs

Exactly what is a Potentially Unwanted Program (PUP)?

People have encountered it – you download free software, you then discover some unwanted applications on your computer system, or discover a strange toolbar has been included with your browser. You didn’t have them installed, so how did they appear? These unwanted applications, which are called Potentially Unwanted Programs, or PUP in short, usually tag along as a software bundle when downloading the application and could cause serious problems for computer users. PUP does not involve malware in the traditional sense. What normally makes a PUP different from malicious software is the fact that when you download one, you’re doing it with your consent – although in most cases unintentionally and reluctantly. But, there is no doubt that PUPs remain bad news for computer users as they can be incredibly damaging to the PC in many ways. How do unwanted programs affect you? Unwanted programs come in many forms. More commonly, they will be found in adware bundlers which are known to utilize aggressive and misleading advertising. The majority of bundlers install many adware applications from a number of vendors, each of which features its own EULA policy. Safebytes Anti-malware completely removes this threat and safeguards your PC against PUP or malware infection. PUPS also appear in the form of undesirable toolbars or internet browser plug-ins. Not just they needlessly use up space on your screen, toolbars can also manipulate search results, track your web browsing activities, decrease your internet browser’s performance, and slow down your web connection to a crawl. They could seem harmless but PUPs are generally spyware. They may include dialers, keyloggers, and also other software built inside them that could monitor you or send out your sensitive information to 3rd parties. Because of this unwanted program, your application may freeze, your security protections can get disabled that could leave your computer susceptible, your system could get ruined, and this list goes on and on.

Tips for preventing PUPs

• Study cautiously prior to agreeing to the license agreement as it could have a clause about PUPs. • Always opt for the custom if you are given an option between Recommended and Custom Installations – never click Next, Next, Next thoughtlessly. • Install an advert blocker/pop-up blocker; Deploy anti-malware products such as Safebytes Anti-malware. These software programs will establish a wall between the computer and online criminals. • Be alert when you download and install freeware, open-source software, or shareware. Avoid downloading and installing browser extensions and applications you are not knowledgeable about. • Always download software from reliable sources like official sites as opposed to untrustworthy sharing space. Avoid torrents and peer-to-peer clients.

Can't Install Safebytes Anti-malware because of a Virus? Try This!

Malware could potentially cause all sorts of damage after they invade your system, from stealing your private details to erasing files on your PC. Some malware sits in between the computer and your internet connection and blocks some or all internet sites that you really want to visit. It might also prevent you from the installation of anything on your machine, especially an anti-virus program. If you’re reading this now, you’ve probably realized that a malware infection is a reason for your blocked internet traffic. So what to do when you want to download and install antivirus software like Safebytes? Do as instructed below to get rid of malware through alternative methods.

Boot your PC in Safe Mode

In Safe Mode, you can actually change Windows settings, un-install or install some applications, and remove hard-to-delete viruses. In the event, the virus is set to load automatically when the computer boots, switching to this mode could prevent it from doing so. To get into Safe Mode or Safe Mode with Networking, press F8 while the system is starting up or run MSConfig and find the “Safe Boot” options under the “Boot” tab. Once you are in safe mode, you can attempt to install your antivirus program without the hindrance of the malicious software. Right after installation, run the malware scanner to remove standard infections.

Switch over to an alternative internet browser

Malicious program code might exploit vulnerabilities on a particular browser and block access to all anti-malware software websites. If you appear to have a trojan attached to Internet Explorer, then switch over to a different web browser with built-in safety features, such as Firefox or Chrome, to download your favorite antivirus program – Safebytes.

Make a bootable USB antivirus drive

Another option is to save and operate an antivirus program entirely from a USB drive. To run anti-virus using a USB drive, follow these simple measures: 1) Make use of another virus-free PC to download Safebytes Anti-Malware. 2) Connect the flash drive to a USB port on the clean computer. 3) Run the setup program by double-clicking the executable file of the downloaded software, with a .exe file extension. 4) Choose the USB stick as the location for saving the software file. Follow the on-screen instructions to finish the installation process. 5) Now, plug the USB drive into the infected system. 6) Double-click the EXE file to run the Safebytes program from the thumb drive. 7) Run Full System Scan to identify and get rid of all kinds of malware.

Protect your PC from Malware With SafeBytes Security Suite

To protect your computer or laptop from various internet-based threats, it is very important to install an anti-malware application on your laptop. However, with so many antimalware companies out there, nowadays it is actually tough to decide which one you should obtain for your personal computer. A few of them are excellent, some are decent, and some will destroy your PC themselves! You must be careful not to choose the wrong product, especially if you buy premium software. Among few good applications, SafeBytes Anti-Malware is the highly recommended software program for the security-conscious end user. Safebytes is one of the well-established PC solutions firms, which offer this comprehensive anti-malware application. Using its outstanding protection system, this utility will instantly detect and remove the majority of the security threats, including browser hijackers, viruses, adware, ransomware, trojans, worms, and PUPs. SafeBytes anti-malware takes computer protection to a whole new level with its advanced features. Let’s look into a few of them below: Optimum AntiMalware Protection: With a critically acclaimed anti-malware engine, SafeBytes offers multilayered protection which is intended to catch and eliminate threats that are hidden deep in your computer’s operating system. Real-time Threat Response: SafeBytes provides round-the-clock protection for your computer limiting malware intrusions in real-time. It will continuously monitor your computer for hacker activity and also gives users advanced firewall protection. Web Protection: Safebytes allots all sites a unique safety score that helps you to get an idea of whether the webpage you’re about to visit is safe to view or known to be a phishing site. Faster Scanning: SafeBytes Anti-Malware has got a multi-thread scan algorithm that works up to 5x faster than any other antivirus software. Light-weight: SafeBytes is a lightweight and user-friendly antivirus and antimalware solution. Since it uses minimal computer resources, this software leaves the computer power exactly where it belongs to: with you actually. 24/7 Online Support: Support service is readily available for 24 x 7 x 365 days via email and chats to answer your concerns. SafeBytes has created an excellent anti-malware solution to help you conquer the latest computer threats and virus attacks. You now may understand that this tool does more than just scan and delete threats on your PC. You’ll get the best all-around protection for the money you spend on SafeBytes AntiMalware subscription, there is no doubt about it.

Technical Details and Manual Removal (Advanced Users)

If you wish to carry out the removal of GoforFiles manually instead of using an automated software tool, you can follow these simple steps: Go to the Windows Control Panel, click on the “Add/Remove Programs” and there, select the offending application to uninstall. In cases of suspicious versions of web browser plug-ins, you can easily get rid of it through your web browser’s extension manager. It is also highly recommended to factory reset your web browser to its default state to fix corrupt settings. In order to ensure the complete removal, manually check your hard disk and registry for all of the following and eliminate or reset the values as needed. But bear in mind, this can be a complicated task and only computer experts can perform it safely. Also, certain malware is capable of replicating itself or preventing deletion. You’re urged to do this process in Windows Safe Mode.
Files: %ProgramFiles%GoForFiles.comGoForFiles.com.exe %UserProfile%DesktopGoForFiles.com.lnk %UserProfile%StartMenuGoForFiles.comGoForFiles.com.lnk %UserProfile%StartMenuGoForFiles.comHelp.lnk %UserProfile%StartMenuGoForFiles.comRegistration.Lnk %UserProfile%ApplicationDataMicrosoftInternetExplorerQuickLaunchGoForFiles.com.lnk Registry: HKEY_CURRENT_USERSoftware376694984709702142491016734454 HKEY_CURRENT_USERSoftwareMicrosoftWindowsCurrentVersionRun376694984709702142491016734454
Read More
1 2 3 162
Logo
Copyright © 2022, ErrorTools. All Rights Reserved
Trademarks: Microsoft Windows logos are registered trademarks of Microsoft. Disclaimer: ErrorTools.com is not affiliated with Microsoft, nor claim direct affiliation.
The information on this page is provided for information purposes only.
DMCA.com Protection Status