Turn off or on Mobile Hotspot remotely

In case you don’t know, new support has been added by Microsoft to Windows 10 that now allows users to turn off or on the Mobile Hotspot remotely. The Mobile Hotspot feature, known earlier as “Virtual Networks”, was first introduced with the initial release of Windows 10. With this new feature to remotely turn on or off the Mobile Hotspot in Windows 10, users can just use the Bluetooth on their mobile phones to turn off or on the Mobile Hotspot even when their Windows 10 computers are out of their reach.

To turn off or on the Mobile Hotspot feature in your Windows 10 computer remotely, there are two options you can try. First, you can do it using the Windows 10 settings app or using the Registry Editor. To get started, refer to the following options.

Option 1 – Turn off or on the Mobile Hotspot remotely via Windows 10 Settings app

  • First, you need to open the Windows 10 Settings app and from there go to Network & Internet and then go to the Mobile Hotspot section.
  • After that, scroll down to the “Turn on remotely” section.
  • Once done, make sure that the toggle button is set to ON and that the Bluetooth of both devices is turned on and paired as well. This should enable the feature to turn on or off the mobile hotspot remotely.

Option 2 – Turn off or on the Mobile Hotspot remotely via Registry Editor

Before you get started with the second option, make sure that you create a System Restore point first. Once done, proceed to the following steps:

  • Tap the Win + R keys to open the Run dialog box and type “Regedit” in the field and then hit Enter to open the Registry Editor.
  • Next, navigate to this registry path: ComputerHKEY_LOCAL_MACHINESOFTWAREMicrosoftWcmSvcTethering
  • From there, look for the DWORD named “RemoteStartupDisabled” and set its Value data to be “0”. This will enable the feature that will allow you to remotely turn on or off the mobile hotspot in your Windows 10 computer. To disable it, just set its Value data to “1”.
If you like to learn and find out more about various Windows errors, and how to repair them go to our vast archive or use search to find articles that will explain and help you in solving your issue.
However, if you prefer to do things fast and with automatization then we are proposing to use an automated solution for your issues. The application that we are recommending is Advanced System Repair Pro
Advanced System Repair utilizes multiple tools all in one to give you a quick, simple, reliable, and very thorough diagnosis of your PC. It brings you all the tools you need in one program to clean, fix, protect, optimize and boost your PC!
1-Click Maintenance
All the tools to make it simple and easy! It's like having a professional technician at the click of a mouse.

Junk Cleaner
Keeping your computer free from unnecessary clutter also helps make your computer last longer. Like any other machine, if you keep it clean and take care of it, it will serve you better for longer!

Optimize background apps
Optimize applications background activity with the built-in Application Optimizer feature.

Disk Defrag
With a simple 1-click, Advanced System Repair speeds up your PC by assembling fragmented files on your machine and organizing them more efficiently.

Malware Removal
Finds and removes all types of harmful malware including trojans, worms, bots, adware, spyware, PUPs, and more!

Privacy Cleaner
The all-in-one privacy suite to Clean Your Tracks & Protect Your Privacy! Make your computer safe, secure, and more efficient!

System Tweak/Optimizer
ASR will analyze your complete system and settings to adjust your PC to function at its maximum performance.

Registry Cleaner
Over time, as you install and uninstall applications, the registry can become cluttered with old entries and broken settings which can result in program crashes, and annoying messages and slow the computer down.
Visit our Advanced System Repair Pro Download page to inform yourself about all the benefits of this software and get a free trial copy of it.
advanced system repair pro

Advanced System Repair Pro

One-click automated PC repair solution
ASR logo
With Advanced System Repair Pro you can easily
Replace damaged files
Restore performance
Free disk space
Remove Malware
Protects WEB browser
Remove Viruses
Stop PC freezing
DOWNLOAD
Privacy Policy | Terms of Use | Uinstall
Advanced System Repair Pro is compatible with all versions of Microsoft Windows including Windows 11

Share this article:

You might also like

Repair Windows 10 Error Code 0xC1900200, 0x20008

Repair Windows 10 Error Code 0xC1900200, 0x20008

Code 0xC1900200, 0x20008, What is it?

Error Code 0xC1900200, 0x20008 (Code 0xC1900202 – 0x20008)  is an error that occurs when you attempt to upgrade to Microsoft Windows 10, but the minimum requirements have not been met by your computer. You will therefore be unable to upgrade to Microsoft Windows 10 until your computer is updated or upgraded to meet those requirements. Common symptoms include:
  • When attempting to upgrade a dialog box with Code 0xC1900200 – 0x20008 (Code 0xC1900202 – 0x20008) is displayed.
  • Your computer is unable to begin the Microsoft Windows 10 upgrade process.

Solution

Restoro box imageError Causes

Error Code 0xC1900200 – 0x20008 (Code 0xC1900202 – 0x20008)  occurs when you are unable to begin the Microsoft Windows 10 upgrade because your computer does not meet the minimum requirements to run Microsoft Windows 10.
  • You are unable to begin the upgrade because your computer does not meet the required system or hardware specifications.
  • You are not running the correct version of Microsoft Windows to be able to begin the upgrade.
  • You are not running the latest updated version of Microsoft Windows 7 SP1 or Microsoft Windows 8.1. Error Code 0xC1900200 – 0x20008 (Code 0xC1900202 – 0x20008) as stated, simply means your computer does not meet the requirements to update and does not indicate a permanent problem or inability to continue to use your computer. This error only means that you will not be able to upgrade to Microsoft Windows 10 until your computer is made to meet these requirements.

Further Information and Manual Repair

There are several solutions that the user can complete at home that should fix the problem resulting in a manifestation of Error Code 0xC1900200 – 0x20008 (Code 0xC1900202 – 0x20008). Below are several options that should resolve this error.

Method 1:

Verify what version of Microsoft Windows you are currently running, older, outdated, or no longer supported versions of Microsoft Windows are not able to upgrade to Microsoft Windows 10. If you are not running one of the following versions you will have to update before being able to upgrade.
  • The most current version of Microsoft Windows 7 SP1
  • The most current version of Microsoft Windows 8.1

Method 2:

Your computer's system specifications do not meet the requirements to be able to upgrade to and run Microsoft Windows 10. To check your system specifications do the following.
  • Click on the start button in the bottom left corner, then locate the control panel on the menu, click on it to open.
  • Once it opens, locate system and security on the menu and click to open, click on system and this will show you your amount of RAM and processor speed.
  • Find device manager on the left-hand side click this then select display adapter, and it will show you your current video card.
  • Click on the start button again, then click on the computer in the menu, this will show you your hard drive size, and available space.
If you have the option available you can simply run the get Microsoft Windows 10 app to check compatibility. Once you have your system specs make sure they meet or exceed the following.
  • 1 GHz or higher processor or SoC
  • 1 gig of RAM for 32 bit and 2 gigs of RAM for 64 bit
  • 16 GB available hard drive space for 32 bit, 20 GB for 64 bit
  • Minimum of DirectX9 that has 1.0 WDDM
  • At least an 800x600 display
If your computer does not meet these minimum requirements, upgrade the components necessary to meet them. If you do not possess the technical expertise required to accomplish this yourself or do not feel comfortable doing so, download and install a powerful automated tool to get the job done.

Method 3:

Your computer might not meet the aforementioned requirements to make an upgrade because of insufficient hard drive space or resources. Learn how to create space on your computer.

Method 4:

Many people hold on to and use the same computer for a very long time. It is possible that your computer cannot be upgraded to meet the requirements, or that the cost to do so would be so high that a new computer would be cheaper. If that is the case, your only option may be to replace your computer.
Read More
Fix mfewfpk.sys, Epfwwfp.sys Errors in Windows
If you suddenly encounter a Blue Screen error that points out to either the mfewfpk.sys and epfwwfp.sys files, then this post might help. Both of these files are created by third-party software. The mfewfpk.sys file is created by the McAfee security software while the epfwwfp.sys is created by the ESET Antivirus. These files are residual files and sometimes it blocks upgrading Windows 10. Aside from blocking Windows 10 upgrade/update, these files can also cause a Blue Screen error after an upgrade which leaves your Windows 10 computer useless. When you get a Blue Screen error caused by any of these files, you will see an accompanying error message that states, “DRIVER IRQL NOT LESS OR EQUAL”. To fix this Blue Screen error, you can check out the suggestions laid out below but before you do that, you need to create a System Restore point first as it can help you undo any unwanted changes. In addition, make sure to also boot your computer into Safe Mode with Networking before you troubleshoot.

Option 1 – Try to remove the epfwwfp.sys file

You can try to remove the epfwwfp.sys file using Command Prompt. To do so, refer to the following steps:
  • Right-click on the Start button and click on Command Prompt (Admin) from the menu to open Command Prompt with admin privileges.
  • Next, type the following command and hit Enter to delete the epfwwfp.sys file:
DEL /F /S /Q /A “%systemroot%System32driversepfwwfp.sys”
  • After the scan is completed, restart your computer and see if it fixed the Blue Screen error.
Note: You can also use the ESET AV Remover tool to uninstall Eset security software to remove the epfwwfp.sys file.

Option 2 – Try to remove the mfewfpk.sys file

The same with the first option, you can remove the mfewfpk.sys file using CMD.
  • First, right-click on the Start button and click on Command Prompt (Admin) from the menu to open Command Prompt with admin privileges.
  • After, type the following command and hit Enter to delete the epfwwfp.sys file:
DEL /F /S /Q /A “%systemroot%System32driversmfewfpk.sys”
  • Once the scan is completed, restart your computer and see if it fixed the Stop error.

Note: You also have the option to remove the mfewfpk.sys file using McAfee Product Removal tool to uninstall the McAfee security software. All you have to do is download the McAfee Product Removal tool and run it and then follow the onscreen instructions to install it. Once it is installed, click on Next. After you select the radio button to agree to the terms of use, click on Next once again. Finally, restart your computer and check if it is able to resolve the problem or not.

Option 3 – Run the Blue Screen Troubleshooter

Troubleshooting Blue Screen of Death errors wouldn’t be complete without the Blue Screen troubleshooter. As you know, it is a built-in tool in Windows 10 that helps users in fixing BSOD errors. It can be found on the Settings Troubleshooters page. To use it, refer to these steps:
  • Tap the Win + I keys to open the Settings panel.
  • Then go to Update & Security > Troubleshoot.
  • From there, look for the option called “Blue Screen” on your right-hand side and then click the “Run the troubleshooter” button to run the Blue Screen Troubleshooter and then follow the next on-screen options. Note that you might have to boot your PC into Safe Mode.

Option 4 – Try running the DISM tool

You can try running the Deployment Imaging and Servicing Management or DISM tool to fix the Blue Screen error. Using this built-in tool, you have various options such as the “/ScanHealth”, “/CheckHealth”, and “/RestoreHealth”.
  • Open the Command Prompt with admin privileges.
  • Then type in the following commands and make sure to hit Enter right after you type each one of them:
    • Dism /Online /Cleanup-Image /CheckHealth
    • Dism /Online /Cleanup-Image /ScanHealth
    • exe /Online /Cleanup-image /Restorehealth
  • Do not close the window if the process takes a while as it will probably take a few minutes to finish.
Read More
Razer Iskur gaming chair for healthy gaming
Razer Iskur
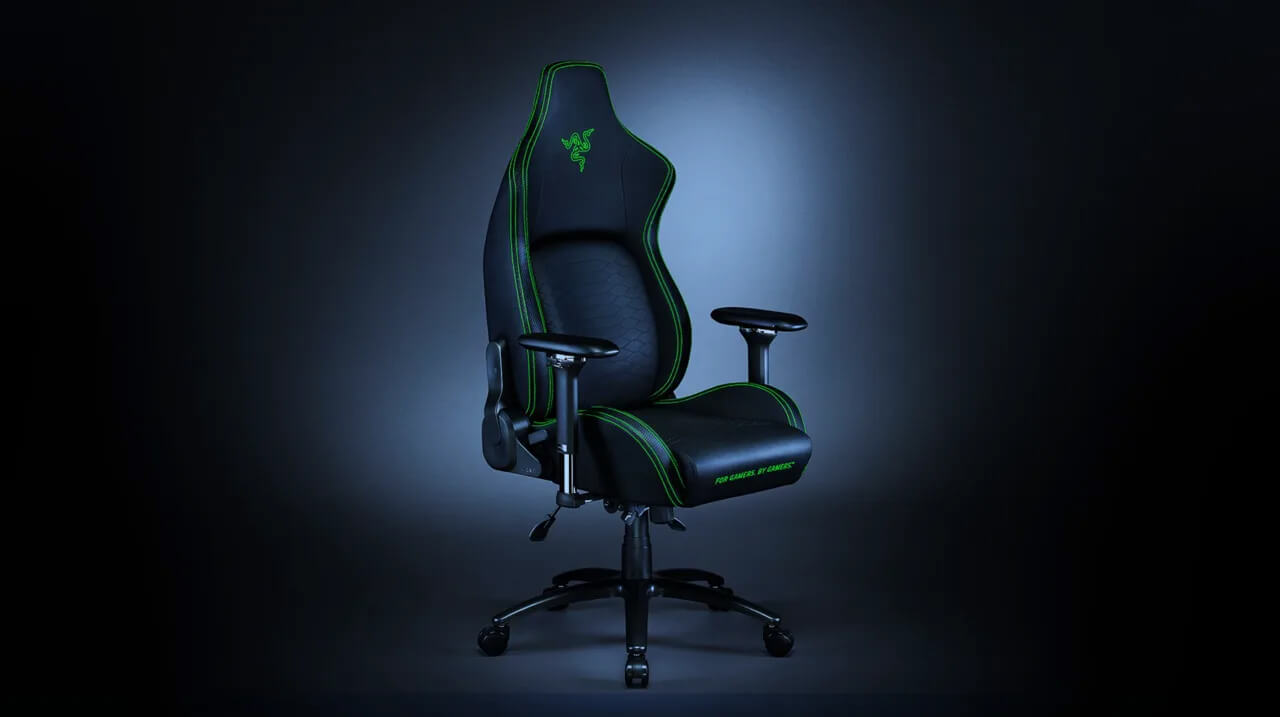
It seems that last few days we were riding some Razer bandwagon but rest assured that we are not sponsored by them in any way, truth is that simply they come up with some interesting accessories which I believe are worth covering. Gaming Chair itself comes in two colors, fully black and green black combination and it is not really an entry-level chair if we are talking about price. The chair itself is around 600USD depending on the distributor and considering that price range it is placed in more top cream of gaming chairs but it is worth every dime.

Iskur Specifications

Iskur is made of a steel frame with a reinforced plywood lumbar support frame for added weight tolerance. Frame and lumbar support are surrounded with memory foam and all of that is wrapped in cotton and polyester layer which is again wrapped in multi-layer synthetic leather making the chair very durable for long hours of daily use. The chair also comes with a memory foam head cushion which is detachable and removable if you do not wish to use it. On the Razer website among specifications, it stands that the chair is best suited for persons from 5’6” – 6’2” (170 – 190cm) height and up to 299lbs (136kg).

Features

The chair has, of course, height adjustment as any gaming chair and surprisingly it has great control for the armrest. The armrest can be adjusted in 4 different ways: up & down, left & right, forward & backward, and inward & outward. The backrest can be also tilted up to 26 degrees angle. All of these features are great and good but there is one more feature that really makes this chair stand out from rest and it is Lumbar support. Iskur has an adjustable lumbar support system on the lower part of the backrest. With your lumbar support secured, you can then make the necessary tweaks to optimize the rest of your posture using the Razer Iskur’s adjustable height, backrest, and armrests.

Conclusion

Razer Iskur is neither cheapest nor perhaps the best gaming chair you can buy, but it is a really good one. It is well manufactured and made to feel and look like a premium product that actually it is.
Read More
How to Fix REGISTRY_ERROR in Windows
As you know, you can encounter Blue Screen errors at any given point after your computer boots up and can just reboot it randomly which results in loss of unsaved work. One of these Blue Screen errors is the “REGISTRY_ERROR”. This kind of Stop error has a bug check value of 0x00000051 which indicates your computer’s registry has encountered a severe error. There could be a number of causes for this error but at the time of writing, it is quite difficult to narrow them down to one component. If you face this kind of Blue Screen error, worry not as this post will guide you in fixing it. As mentioned, this error indicates that there is something wrong with the registry, particularly an I/O error while it tried to read one of its files. This may be caused by hardware issues or file system corruption. It could also be due to failure in a refresh operation which is only used by the security system and only when resource limits are encountered. To fix the Registry_Error Blue Screen, you can try to use the CHKDSK utility or the System File Checker, or the DISM tool or run the Blue Screen troubleshooter. You may also try to reset your computer or repair Windows by using installation media.

Option 1 – Run the Check Disk utility

The first thing you can do to fix the REGISTRY_ERROR Blue Screen error is to run the Check Disk utility. How? Follow these steps:
  • In the Windows Search box, type “command prompt” and from the search results, right-click on Command Prompt and select “Run as administrator”.
  • After opening Command Prompt, type this command and tap Enter: chkdsk <Drive Letter>: /f /r /x /b
  • The command you entered will start to check for errors and fix them automatically. Else, it will throw an error message saying, “Chkdsk cannot run because the volume is in use by another process. Would you like the schedule this volume to be checked the next time the system restarts? (Y/N)”.
  • Tap the Y key to schedule Disk Check the next time your computer restarts.

Option 2 – Run the Blue Screen Troubleshooter

The Blue Screen troubleshooter is a built-in tool in Windows 10 that helps users in fixing BSOD errors like REGISTRY_ERROR. It can be found in the Settings Troubleshooters page. To use it, refer to these steps:
  • Tap the Win + I keys to open the Settings panel.
  • Then go to Update & Security > Troubleshoot.
  • From there, look for the option called “Blue Screen” on your right-hand side and then click the “Run the troubleshooter” button to run the Blue Screen Troubleshooter and then follow the next on-screen options. Note that you might have to boot your PC into Safe Mode.

Option 3 – Run System File Checker

  • Open Command Prompt with admin privileges.
  • After that, execute this command: sfc /scannow
  • Once the scan is completed, restart your computer and then check if the REGISTRY_ERROR is now fixed.

Option 4 – Run the DISM tool

You can try running the Deployment Imaging and Servicing Management or DISM tool to fix the REGISTRY_ERROR Blue Screen error. Using this built-in tool, you have various options such as the “/ScanHealth”, “/CheckHealth”, and “/RestoreHealth”.
  • Open the Command Prompt with admin privileges.
  • Then type in the following commands and make sure to hit Enter right after you type each one of them:
    • Dism /Online /Cleanup-Image /CheckHealth
    • Dism /Online /Cleanup-Image /ScanHealth
    • exe /Online /Cleanup-image /Restorehealth
  • Do not close the window if the process takes a while as it will probably take a few minutes to finish. Once it’s done, restart your computer.

Option 5 – Reset your computer

  • Tap the Win key or click on the Start button located in the Taskbar.
  • Then click on the Power button at the bottom right portion of the screen.
  • Next, press and hold the Shift key on your keyboard and then click on Restart. This will restart your Pc into the Advanced Startup options.
Note: Once you have access to the Advanced Startup options, you have to go to the setting which allows you to Reset your Windows 10 PC. All you have to do is select Troubleshoot > Reset this PC to reach the following screen Afterward, select either the “Keep my files” option and then proceed to the next on-screen instructions that follow to reset your Windows 10 computer without losing your files.

Option 6 – Try to perform repair install by creating a Windows 10 installation media

  • Click this link and then click the Download Tool Now button.
  • Next, click the “Use the tool to create installation media (USB flash drive, DVD, or ISO file)…” option and follow the next given instructions on the screen.
  • Now select the ISO file option in step 5.
  • After that, you should now have an ISO file.
  • Next, go to the location where you’ve downloaded the ISO file.
  • Then right-click on the Windows 10 ISO file and select the Open with option and then select File Explorer.
  • Now click on “setup.exe” and follow the next instructions that appear on the screen. When asked, you have to select either Nothing (clean install) or Keep personal files only option. Take note that you must not select the “Keep personal files, apps, and Windows settings”.
Read More
Website isn’t responding to connection
If there are any third-party add-ons or proxy settings that interfere with your Windows 10 computer’s internet connection, then you will most likely encounter a problem where you see an error message saying, “Website is online but isn’t responding to connection attempts” when you try to run the Network Adapter troubleshooter. Like pointed out, this kind of error can be caused by some proxy settings that prevent the connection. On the other hand, it could also be caused by some third-party add-ons. To fix this error, read on as this post will guide you on what you can do to fix it. You can try to turn off the proxy settings or disable the add-ons on your browser. You can also try resetting both the TCP/IP and DNS as well as reset the network. For more details, refer to the options provided below.

Option 1 – Try to turn off the proxy settings

There are some users who reported that they’ve fixed the problem after they’ve disabled the use of a proxy server using the built-in way. Follow the steps below to disable the proxy server.
  • Tap the Win + R keys to open the Run dialog box.
  • Then type “inetcpl.cpl” in the field and hit Enter to pull up the Internet Properties.
  • After that, go to the Connections tab and select the LAN settings.
  • From there. Uncheck the “Use a Proxy Server” option for your LAN and then make sure that the “Automatically detect settings” option is checked.
  • Now click the OK and the Apply buttons.
  • Restart your PC.
Note: If you are using a third-party proxy service, you have to disable it.

Option 2 – Try disabling the add-ons or browser extensions

The next thing you can do to fix the problem is to disable any extensions or add-ons on your browser. For instance, if you are using Chrome, here’s what you have to do:
  • Open Chrome and press Alt + F keys.
  • Go to More tools and click Extensions to look for any suspicious browser extensions or toolbars.
  • Click the Recycle bin and select Remove.
  • Restart Chrome and press Alt + F keys again.
  • Proceed to On Startup and mark Open a specific page or set of pages.
  • To check if the browser hijacker is still active, click Set pages, if it is active, overwrite the URL.

Option 3 – Try to update the Network Adapter Driver

Follow the steps below to update your Network Adapter Driver:
  • Tap the Win + R keys to launch the Run window and then type in the “MSC” command and hit Enter to open the Device Manager window.
  • From there, expand the list of all the network drives and update each one of them.
Note: If updating the network drivers didn’t help in fixing the problem, you can also try to uninstall the very same drivers and restart your Windows 10 PC. After that, the system itself will reinstall the drivers you just uninstalled. Alternatively, you can also download and install the drivers from the manufacturer’s website directly.

Option 4 – Try to reset the TCP/IP and the DNS cache

As you know, the TCP/IP or the Internet Protocol is the most important thing if you want to use the internet on your computer. That’s why if it ends up getting corrupted, you need to reset the TCP/IP to fix the problem. To reset TCP/IP, refer to these steps:
  • In the Windows start to search, type “command prompt” and right-click on Command Prompt from the search results.
  • Then select the “Run as administrator” option to open Command Prompt with admin privileges.
  • After that, execute this command: netsh int ip reset resettcpip.txt
  • Next, execute this second command: ipconfig /flushdns
  • Once it’s done, exit Command Prompt and restart your computer and then check if the error is now fixed.

Option 5 – Try to reset the Network

You can also try to perform a Network Reset to resolve the problem. This will reset the entire network configuration including your IP address. To perform Network Reset, follow these steps:
  • Tap the Win + I keys to open Settings.
  • From there, go to the Network and Internet section.
  • Next, scroll down and look for “Network Reset” under the status pane.
  • After that, click on Network Reset and then on Reset now to start resetting the network configuration. Once done, check if it is able to fix the error or not.
Read More
Cannot save media from Microsoft Photos
The Microsoft Photos app is a useful tool that allows users to view, edit, as well as create videos on their Windows 10 computers. Although it works just fine most of the time, there are some instances when you might encounter some issues when using it. One of these issues is when you cannot save media from the Photos app after you’ve edited an image. This is most likely related to a permission issue. However, according to some users, they got the error where the edited media file can’t be saved. When you encounter this kind of error, you will see the following error in your Photos app:
“It looks like you don’t have permission to save changes to this file. Try saving a copy instead.”
There are several options you can explore to resolve this error. You can try updating the Microsoft Photos app or verify the ownership of the destination folder. You can also re-register and reinstall the app. For more detailed instructions, make use of the options provided below.

Option 1 – Try to update the Microsoft Photos app

The first thing you can do to fix the problem is to update the Microsoft Photos app.
  • Open the Microsoft Store and click on the three horizontal dots for the menu located on the top right portion of the window to see the options.
  • Next, select Downloads and updates and then click the Get updates button in the top right. This will install any pending updates for all the apps including the Microsoft Photos app using the Microsoft Store.

Option 2 – Try to verify the ownership of the destination folder

The next thing you can do to fix the error is to verify the ownership of the folder because chances are, the location where you’re trying to save the file might not have enough permissions to read and write the file to the disk. Thus, you need to take ownership of the folder by following these steps:
  • Type “command prompt” in the Windows Search bar and then right-click on the relevant search result and select “Run as administrator”.
  • After that, if a User Account Control or UAC prompt appears, just click on Yes to proceed.
  • Next, type and enter this command: TAKEOWN /F <path>
  • Note that the <path> is the location of the folder or file in File Explorer.
  • Now type and enter this second command: ICACLS <path> /grant administrators:F
  • Finally, once the command has been executed, restart your computer and then see if you can now access the folder or file.

Option 3 – Try resetting the Photos app

If the first option of restarting the background process of the Photos app didn’t work for you, you can try to reset the Photos app so that it will use the default factory settings. Note that this option works when you are experiencing this issue after making a couple of changes in the Photos app.
  • To get started in resetting the Photos app, open the Windows 10 Settings.
  • Then go to Apps > Apps & features.
  • After that, scroll down until you see the Photos app option – click on it and open its Advanced options.
  • From there, you will see the Reset button, click on it and click and then click on it once more to confirm.
Note: The process may take a couple of minutes to complete. Once it’s done, open the pictures again using the Photos app.

Option 4 – Try reinstalling the Photos app

If none of the first two options given above worked, then you might want to consider reinstalling the Photos app. Unlike what most users think, it isn’t really that hard reinstalling preinstalled apps as you have the Windows PowerShell for that. To use this program in reinstalling the Photos app, follow these steps:
  • Open the Windows PowerShell program with admin privileges and key in the following command:
Set-ExecutionPolicy Unrestricted
  • After that, execute this second command to re-register and reinstall the Microsoft Photos app.
Get-AppXPackage -AllUsers | Foreach {Add-AppxPackage -DisableDevelopmentMode -Register "$($_.InstallLocation)AppXManifest.xml"}
Note: In the command given, do not forget to replace the “PackageFullName” with the actual package name for the Photos app. After executing the command, it will uninstall the Photos app from your computer so you need to install it again from the Windows Store by simply looking for it. Once you found it, just click on install to start the installation process.
Read More
Fix 0x800f0982, PSFX E MATCHING COMPONENT
If you encounter an error saying, “0x800f0982 – PSFX_E_MATCHING_COMPONENT_NOT_FOUND”, when you try to install a Windows 10 cumulative update, then you’ve come to the right place as this post will help you sort this problem out. According to the reports, computers with Asian language packs installed are the ones that are mostly affected by this error. In fact, the same error code was also found with two KB4493509, KB4495667 and KB4501835. These cumulative updates are released as part of Patch Tuesday. However, it appears that it brought on issues. Thus, to fix the error, you can try to uninstall and reinstall any language packs you’ve added recently. You can also try to uninstall older KB updates or delay Windows Update, as well as reset Windows 10.

Option 1 – Try to uninstall and reinstall the language packs you’ve recently added

If you have installed a language pack recently, you have to uninstall it, restart your computer, and then reinstall it.
  • Go to the Settings app and select Time & Language.
  • Next, click on the Language option and select the language you have to uninstall.
  • After selecting the language, it will enable two-button namely the Options and Remove buttons.
  • Click on the Remove button and then reboot your PC.
  • Once your computer has restarted, install the language pack again.

Option 2 – Try to uninstall the KB updates

Microsoft has actually offered a solution, an odd one which is to install the April 2019 cumulative update. You have to uninstall the older KB4495667 and KB4501835 update from your Windows 10 computer. And after you’ve uninstalled them, click on the Update button and then install the April 2019 cumulative update.
  • Go to Settings and select Update and Security > Windows Update.
  • From there, click on the “View update history” option and then click on the “Uninstall Updates” option.
  • This will open a new window that contains the list of installed Windows Updates.
  • Now right click on the Windows Update you wish to uninstall and click Uninstall.
  • Once you’ve uninstalled the update, click the Update button and install the April 2019 cumulative update.

Option 3 – Try to delay Windows Update

If you have not installed the Windows 10 cumulative update KB4493509 yet and the Asian language is a must for you, then you have to delay or pause the Windows Update for at least a couple of days.

Option 4 – Reset your computer

  • Tap the Win key or click on the Start button located in the Taskbar.
  • Then click on the Power button at the bottom right portion of the screen.
  • Next, press and hold the Shift key on your keyboard and then click on Restart. This will restart your Pc into the Advanced Startup options.
Note: Once you have access to the Advanced Startup options, you have to go to the setting which allows you to Reset your Windows 10 PC. All you have to do is select Troubleshoot > Reset this PC to reach the following screen
  • Afterward, select either the “Keep my files” option and then proceed to the next on-screen instructions that follow to reset your Windows 10 computer without losing your files.
Read More
Expand right-click menu in Windows 11
Windows 11 brought with it a simplified right-click menu that has limited options. If you would like to bring the old Windows 10 right-click menu you will have to do some registry tweaking but it is doable. right click menuSince this requires registry tweak, please follow given solution step by step
  1. Press Start and type RegEdit
  2. Click on Registry Editor
  3. Inside registry editor find next key: Computer\H_KEY_CURRENT_USER\SOFTWARE\CLASSES\CLSID\
  4. Right click in the right part of editor window and select New > Key
  5. Type in as a name: {86ca1aa0-34aa-4e8b-a509-50c905bae2a2}
  6. Right click on {86ca1aa0-34aa-4e8b-a509-50c905bae2a2} key and select New > Key again to create new key inside this one
  7. Name inside key InprocServer32
  8. Double click the “(Default)” key in InprocServer32 to open it
  9. When the Default key opens close it without making any changes by clicking on OK. This will make its value property Blank instead of value not set
  10. Close Registry Editor
  11. Restart your PC
Once the system is up if the followed solution is applied you will now have an old school menu once right-click is used.
Read More
Resize icons on desktop quickly in Windows 10
Resize icons on desktop in Windows 10 in a matter of seconds! Hello everyone and welcome to today's quick tip. If you have ever been dissatisfied with icon size on your desktop and any of the default sizes like small, medium large, etc have not been appropriate know that there is a quick way to resize icons on your desktop in between sizes. All that you have to do in order to use this built-in feature is: Press and hold CTRL and scroll with the mouse. That's it! Find your appropriate size for icons and enjoy. icons on desktop
Read More
Fix GDI32.DLL error in Windows 10
The GDI32.DLL is a DLL (Dynamic Link Library) file that was developed by Microsoft. It is an essential file of the Windows OS as it contains instructions and information for exe files to follow. These DLL files also use to store the various procedures and codes for the Windows programs. It is considered an essential component of Windows because it ensures that all the programs on Windows are operating properly. So, if the gdi32.dll not found on your computer, then it can negatively impact your computer and the associated programs. Though DLL files used to be so efficient and convenient, they are extremely vulnerable to errors and issues.
  1. Perform SFC scan

    Press ⊞ WINDOWS + X to open the Windows menu keyboard with windows and x marked From the menu choose command prompt (admin) Windows menu command prompt adminIn command prompt type sfc /scannow and press ENTER Leave the computer for the operation to be completed and Reboot your computer
  2. Run DISM

    Press ⊞ WINDOWS + X to open the Windows menu keyboard with windows and x markedFrom the menu choose command prompt (admin) Windows menu command prompt adminin command prompt type: DISM.exe /Online /Cleanup-image /Restorehealth and press ENTER wait for the process to be finished and Reboot your computer
  3. Update device driver

    Go to your manufacturer's website and update drivers for your components with the latest versions.
  4. Update Windows

    If you have an update ready for Windows, update it and see if this will remove the error
  5. Scan computer for malware

    Perform a full PC scan for malware to see if this is causing issues with the GDI32.DLL error.
  6. Download file

    One solution is to download a file from the official site and place it in the corresponding folder.
  7. Perform System restore

    Rollback system restore before the issue happened and your Windows will be working as intended
Read More
1 2 3 162
Logo
Copyright © 2022, ErrorTools. All Rights Reserved
Trademarks: Microsoft Windows logos are registered trademarks of Microsoft. Disclaimer: ErrorTools.com is not affiliated with Microsoft, nor claim direct affiliation.
The information on this page is provided for information purposes only.
DMCA.com Protection Status