A Guide to Fixing STOP 0x00000000 Error Code

Troubleshoot Stop 0x00000000 Error

STOP 0x00000000 Error Code - What is it?

Stop 0x00000000 error code is a type of a Stop error popularly known as a blue screen of death error code. This is a critical error.

It can pop up while loading or using the Windows program on your PC. When this error occurs, the computer screen turns blue and you, the user, get locked out of the program. Furthermore, it can also result in sudden system shut down or system freeze.

If not fixed timely, the error may start to pop up more and more frequently which then may lead to complete system corruption and system crash.

Solution

Restoro box imageError Causes

The two most common causes for the STOP 0x00000000 error code are:

  • Malware infection
  • Registry corruption

This is a fatal system error and must be resolved immediately. Delay may lead to system crashes and data loss. And recovering lost data is not easy.

Further Information and Manual Repair

Though this is a fatal error the good news is that it is easy to resolve. To repair the STOP 0x00000000 error on your system, here are some methods that you can try:

Method 1 - Use System Restore to Bring Your Computer Back to its Previous State

To resolve this error on your system, try using the System Restore tool. Use this tool to bring your computer back to its previous state. The Windows System Restore utility is one of the most valuable recovery tools.

To use it, simply type System Restore in the search box. Once you find it, click on it and select a restore point to bring your PC back to its normal state. To activate changes, reboot the PC.

Method 2 - Scan for Viruses

If the underlying cause of the Stop 0x00000000 error code is related to malware infection, then you must download a powerful antivirus to resolve it. Run it to scan your entire PC.

Make sure you remove all types of malware including adware, spyware, viruses, and Trojan. Once your PC is malware-free, the error will be fixed in no time.

Method 3 - Clean and Repair the Registry

The registry is an important part of the PC. It stores practically all the activities you perform on your system.

It saves all the files including both important and unnecessary files such as junk files, cookies, internet history, bad and invalid entries. If these obsolete and unnecessary files are not deleted frequently and keep on accumulating it takes up all the registry space and corrupts it.

This results in registry errors like runtime and BSoD errors and sometimes may also lead to disk fragmentation.

To resolve it is advisable to repair the registry. This can be done manually but that will take too much time and also require technical expertise. However, another way to resolve it is to download Restoro.

This is a user-friendly PC Fixer with a powerful registry cleaner. It removes all obsolete and unnecessary files, cleans the registry and repairs the damaged files, thereby removing the error right away.

Click here to download Restoro and resolve Stop 0x00000000 today!

If you like to learn and find out more about various Windows errors, and how to repair them go to our vast archive or use search to find articles that will explain and help you in solving your issue.
However, if you prefer to do things fast and with automatization then we are proposing to use an automated solution for your issues. The application that we are recommending is Advanced System Repair Pro
Advanced System Repair utilizes multiple tools all in one to give you a quick, simple, reliable, and very thorough diagnosis of your PC. It brings you all the tools you need in one program to clean, fix, protect, optimize and boost your PC!
1-Click Maintenance
All the tools to make it simple and easy! It's like having a professional technician at the click of a mouse.

Junk Cleaner
Keeping your computer free from unnecessary clutter also helps make your computer last longer. Like any other machine, if you keep it clean and take care of it, it will serve you better for longer!

Optimize background apps
Optimize applications background activity with the built-in Application Optimizer feature.

Disk Defrag
With a simple 1-click, Advanced System Repair speeds up your PC by assembling fragmented files on your machine and organizing them more efficiently.

Malware Removal
Finds and removes all types of harmful malware including trojans, worms, bots, adware, spyware, PUPs, and more!

Privacy Cleaner
The all-in-one privacy suite to Clean Your Tracks & Protect Your Privacy! Make your computer safe, secure, and more efficient!

System Tweak/Optimizer
ASR will analyze your complete system and settings to adjust your PC to function at its maximum performance.

Registry Cleaner
Over time, as you install and uninstall applications, the registry can become cluttered with old entries and broken settings which can result in program crashes, and annoying messages and slow the computer down.
Visit our Advanced System Repair Pro Download page to inform yourself about all the benefits of this software and get a free trial copy of it.
advanced system repair pro

Advanced System Repair Pro

One-click automated PC repair solution
ASR logo
With Advanced System Repair Pro you can easily
Replace damaged files
Restore performance
Free disk space
Remove Malware
Protects WEB browser
Remove Viruses
Stop PC freezing
DOWNLOAD
Privacy Policy | Terms of Use | Uinstall
Advanced System Repair Pro is compatible with all versions of Microsoft Windows including Windows 11

Share this article:

You might also like

Instagram posts available now on computer
Instagram posting has been reserved for mobile phones for a very long time but in October 2021 that privilege has come to an end. Instagram added the long-awaited ability to post to Instagram from the website. You get nearly all of the same filters and editing tools that you can find in the iPhone and Android app, too. Instagram logoIn order to post via computer on your Instagram account all you need is a browser. The first step, of course, is to go to instagram.com and login into your account, if you do not have an account, you can make one for free. Next, click on the + icon in the upper right corner. Create a new post screen will open, in this screen click on the Select from computer blue button on the bottom. The file manager will open, choose your desired photo and confirm. After that, you will be presented will an adjustment screen for a photo, here you can crop the photo, zoom in, adjust the aspect ratio, or if you wish add more photos to create a slide show. Once you are done will all of these adjustments, click on Next in the upper right. From there you will be taken into a filter screen where you can apply one of many filters or if you want, you can adjust brightness, contrast, saturation, temperature, etc. just like in the application on your phone. Once you have the desired result, again click on Next in the upper right part of the screen. Lastly, you will be given an option to write a caption for the photo if you wish and add a location. Once this step is finished you can post the feed by clicking on share in the upper right part. That is all to it, just like in a mobile application you can now use your computer for Instagram posting.
Read More
Completely Remove MixGames from Your Windows PC

mixGames is an Extension for Google Chrome that adds “Games:” functions to Google Chrome. In our testing, this function did not work and only redirects you back to the extension page. There are two variations of mixGames: mixGames Search, which changes the Chrome homepage to one managed by their own advertising-driven search; and mixGames Start, which changes the homepage in Chrome. These extensions utilize Searchalo to change search engine functions from the default or user-set preferences to Yahoo, injecting additional advertising. Due to the browser function modifications, mixGames is classified as potentially unwanted and is flagged for detection and optional removal by some Antivirus programs.

About Browser Hijackers

Browser hijacking is a common type of online fraud where your web browser configuration settings are altered to allow it to do things you do not intend. They are created to disrupt web browser programs for a variety of reasons. These are typically used to force hits to predetermined sites, manipulating web traffic to generate ad revenue. Nevertheless, it isn’t that innocent. Your internet safety is jeopardized and it is also extremely annoying. What’s more, hijackers can make the entire infected system fragile – other dangerous malware and viruses would use these opportunities to get into your system very easily.

Indications of browser hijack

There are various symptoms that could indicate a browser hijacking: 1. the browser’s home page is modified 2. new bookmarks pointing to pornographic websites are added to your favorite pages 3. the main web browser settings are modified and unwanted or unsafe resources are added to the trusted websites listing 4. you’re getting new toolbars you have never noticed before 5. your browser will display constant pop-up windows 6. your internet browser starts running sluggishly or exhibits frequent errors 7. you cannot go to certain sites like home pages of antivirus software.

Exactly how browser hijacker finds its way onto your computer

Browser hijackers infect computers by numerous means, including through a file-share, a drive-by download, or an infected e-mail attachment. Many internet browser hijackings come from add-on programs, i.e., browser helper objects (BHO), toolbars, or plug-ins added to web browsers to give them extra capabilities. A browser hijacker can be installed as a part of freeware, demoware, shareware, and fake programs. A good example of a well-known browser hijacker is the latest Chinese malicious software known as “Fireball”, which has infected 250 million computer systems globally. It works as a hijacker but can be turned into a full-functioning malware downloader later on. Browser hijacking can cause severe privacy problems and even identity theft, disrupt your web browsing experience by taking command over outbound traffic, substantially slows down your personal computer by depleting a lot of resources, and result in system instability at the same time.

How you can fix a browser hijack

Some hijackers can be easily removed by uninstalling the free software they were included with or by eliminating any extension you’ve recently added to your browser. But, the majority of hijacking codes aren’t easy to remove manually, since they go deeper into your operating system. Besides, browser hijackers can modify the Windows registry therefore it can be quite hard to restore all of the values manually, especially if you’re not a very tech-savvy individual.

How To Install Safebytes Anti-Malware On An Infected PC

All malware is bad and the consequences of the damage will vary according to the specific kind of malware. Certain malware types modify web browser settings by including a proxy server or change the computer’s DNS settings. In such cases, you will be unable to visit certain or all internet sites, and therefore unable to download or install the required security software to remove the infection. If you are reading this, you may have affected by a virus that stops you from downloading a computer security application like Safebytes Anti-Malware. Do as instructed below to remove malware by alternate methods.

Get rid of viruses in Safe Mode

In Safe Mode, you could modify Windows settings, uninstall or install some applications, and remove hard-to-delete viruses. In the event the malware is blocking internet access and affecting your computer, running it in Safe Mode allows you to download anti-malware and run a diagnostic scan while limiting possible damage. To get into Safe Mode or Safe Mode with Networking, press the F8 key while the PC is starting up or run MSConfig and find the “Safe Boot” options in the “Boot” tab. Once you are in Safe Mode, you can try to download and install your antivirus software program without the hindrance of the malware. Following installation, run the malware scanner to get rid of standard infections.

Switch over to an alternative browser

Some malware only targets specific internet browsers. If this sounds like your situation, make use of another internet browser as it could circumvent the computer virus. The ideal way to avoid this issue is to pick a web browser that is well known for its security features. Firefox contains built-in Malware and Phishing Protection to keep you secure online.

Create a portable USB antivirus for removing malware

Another option would be to make a portable antivirus program on your USB flash drive. Do these simple steps to clean up your affected computer using a portable antivirus. 1) On a clean computer, download and install Safebytes Anti-Malware. 2) Plug the USB drive into the uninfected computer. 3) Double-click the executable file to open the installation wizard. 4) Choose the drive letter of the pen drive as the location when the wizard asks you where you want to install the antivirus. Follow activation instructions. 5) Transfer the flash drive from the clean PC to the infected PC. 6) Double-click the EXE file to run the Safebytes program from the pen drive. 7) Run Full System Scan to detect and get rid of all types of malware.

Protect Your Computer & Privacy With SafeBytes Anti-Malware

These days, an anti-malware tool can protect your computer from different kinds of online threats. But how do choose the best one among several malware protection software that’s available on the market? You may be aware, there are lots of anti-malware companies and tools for you to consider. Some are well worth your money, but most aren’t. You have to be very careful not to choose the wrong application, especially if you purchase a paid software. Among few good applications, SafeBytes Anti-Malware is the highly recommended program for the security-conscious user. SafeBytes anti-malware is a powerful, very effective protection software intended to assist users of all levels of IT literacy in identifying and removing harmful threats out of their personal computers. Using its outstanding protection system, this software will quickly detect and remove the majority of the security threats, which include browser hijackers, viruses, adware, ransomware, PUPs, and trojans. SafeBytes anti-malware takes PC protection to a whole new level with its enhanced features. The following are some of the best ones: World-class AntiMalware Protection: Using its enhanced and sophisticated algorithm, this malware removal tool can identify and eliminate the malware threats hiding in your computer effectively. Active Protection: SafeBytes delivers complete and real-time security for your PC. It’ll constantly monitor your pc for hacker activity and also provides users with superior firewall protection. Website Filtering: Through its unique safety rating, SafeBytes alerts you whether a site is safe or not to visit it. This will assure that you’re always certain of your online safety when browsing the web. Faster Scan: This tool has one of the fastest and most efficient virus scanning engines in the industry. The scans are very accurate and take a short amount of time to complete. Low Memory/CPU Usage: SafeBytes is really lightweight software. It consumes an extremely small amount of processing power as it works in the background therefore you will not see any computer performance problems. 24/7 Assistance: You can get totally free 24/7 technical support from their computer experts on any product queries or computer security issues.

Technical Details and Manual Removal (Advanced Users)

If you do not wish to use malware removal software and like to remove mixGames manually, you may accomplish this by going to the Windows Add/Remove Programs menu in the control panel and removing the offending program; in cases of browser extensions, you could uninstall it by going to the browser’s Add-on/Extension manager. It is also suggested to factory reset your browser settings to their default state. Lastly, examine your hard disk for all of the following and clean your Windows registry manually to remove leftover application entries following an uninstallation. But bear in mind, this is a complicated task and only computer experts can perform it safely. In addition, certain malware is capable of replicating or preventing deletion. Completing this task in Safe Mode is recommended.
Registry: HKEY_CURRENT_USERSoftwareMicrosoftInternet ExplorerMain Default_Page_URL HKEY_LOCAL_MachineSoftwareClassesmixGame HKEY_CURRENT_USERSoftwareMicrosoftWindowsCurrentVersionRun .exe HKCUSoftwareMicrosoftWindowsCurrentVersionInternet Settingsrandom HKEY_LOCAL_MACHINESOFTWAREMicrosoftWindowsCurrentVersionrunrandom HKEY_CURRENT_USERSoftwareMicrosoftWindowsCurrentVersionInternet Settings CertificateRevocation = ’0
Read More
Schedule restart update on Windows 11
windows 11 schedule update
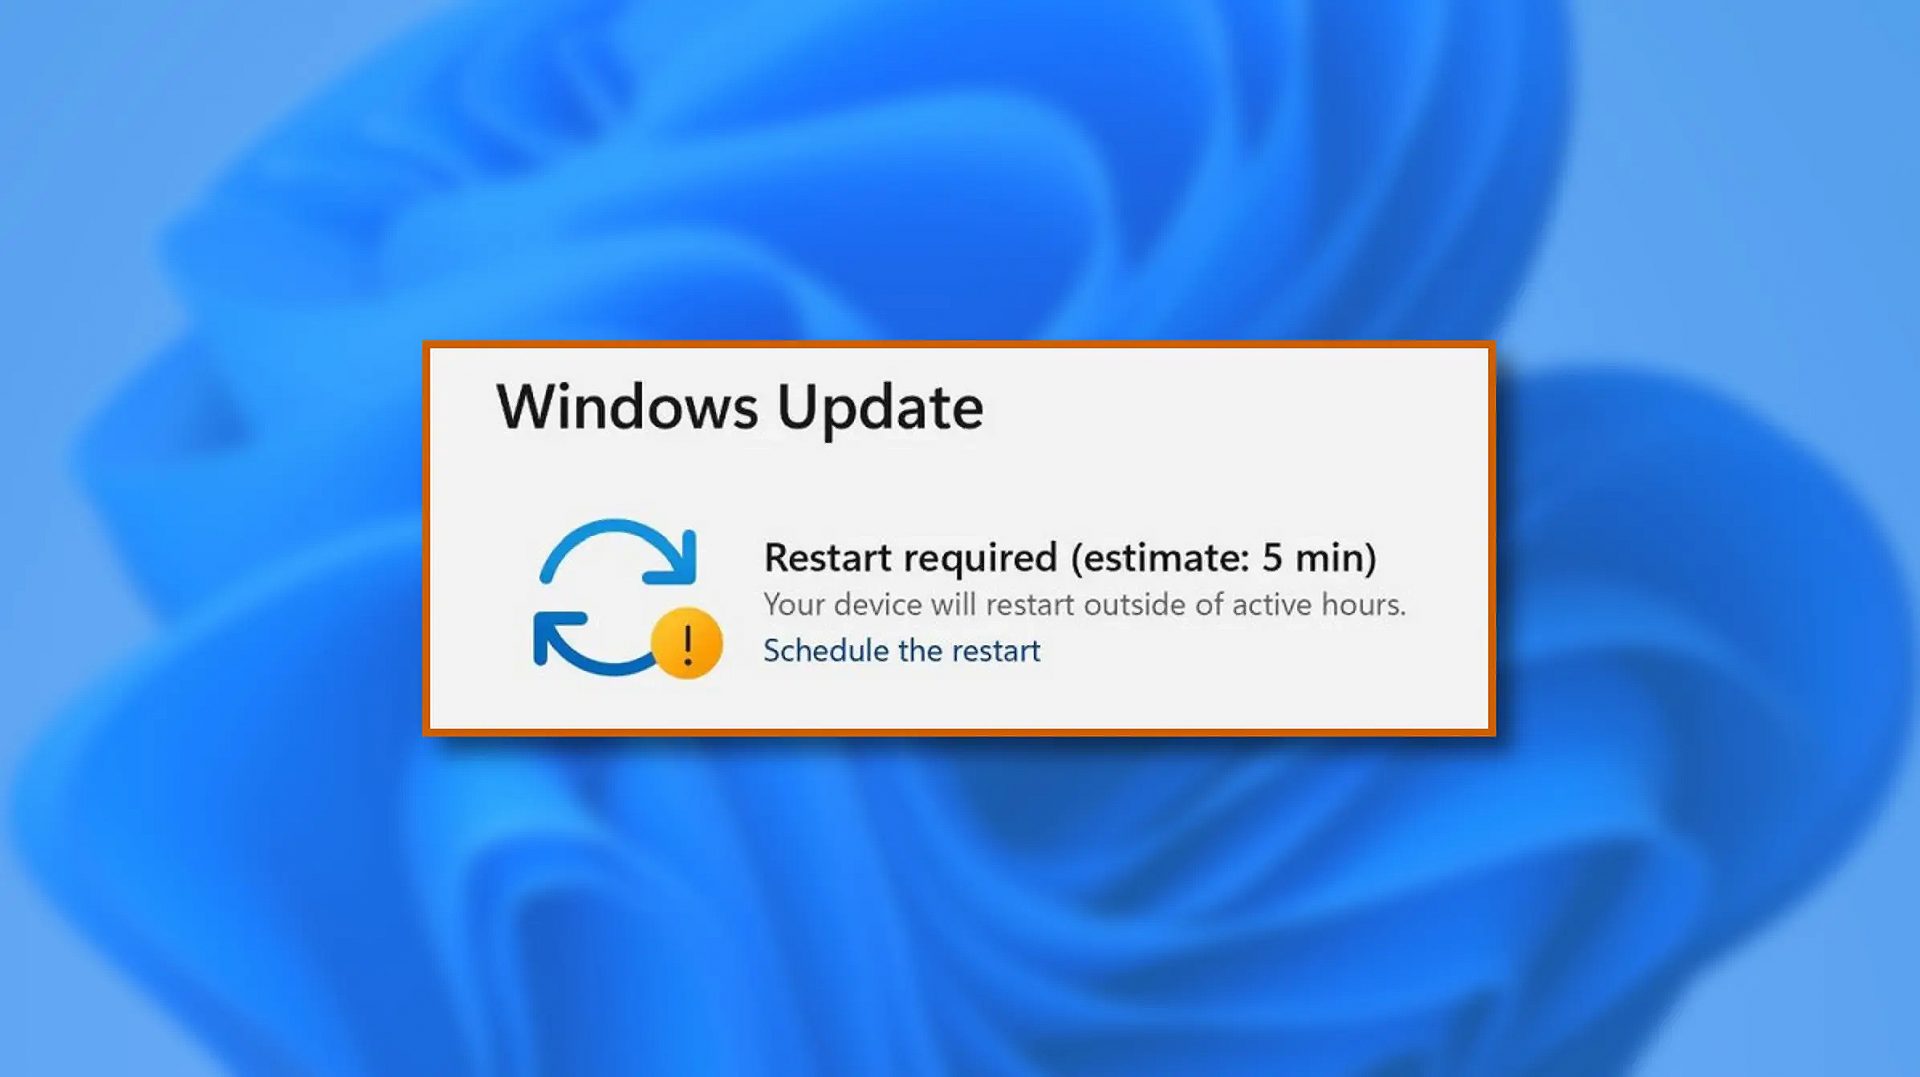
When Windows 11 update is available but you do not wish to restart right away because you are in the middle of using a computer, you can schedule a restart for up to 7 days. It is very easy and we will show you how to do it.
  1. Press ⊞ WINDOWS + I to open settings
  2. Click on Windows Update
  3. At the top, under the Restart required to click on Schedule the Restart
  4. Click the switch under Schedule a Time to turn it ON
  5. Use the Pick a Time and Pick a Day menu to set time and day when you want to update
  6. Go back to one screen and visually confirm that the date is set
  7. Close the settings
The scheduled restart will be confirmed in a message on the Windows Update page.
Read More
Best Browsers in 2021 with browser description
In today's digital life, when we access the internet daily, browsers are essential almost as our operating system, after all, we do access all of the internet data via them, and having a good, reliable, and personal browser tailored for our needs can make all the difference in the world. In today's article, we will introduce you to the five greatest browsers of today, we will point their advantages and disadvantages and why should you pick one or another. As with each piece of software, there is not an ultimate browser, better than anything else and we will not favor anyone on this list, the decision which you should use is solely up to you, we are here to provide you with an objective opinion on each one. All of this being said, let's begin with the countdown in no particular order.
  1. Mozilla firefox.

    firefox browser If you consider yourself a power user or you value your privacy then firefox is the browser for you. It is open source and is packed with great features like reporting when your email has been used for a known data breach, it stops annoying pop-up notifications, stops browser fingerprinting, and many more. Firefox is also a cross-platform browser making it a great choice if you want to transfer and use your data across multiple devices with one account. The downside of firefox however is its speed, this browser is the slowest on this list, I guess features and advantages took their tool in the speed department, but if that is not a concern for you and you feel like the positives outweigh some slower speed, grab it here.
  2. Google Chrome

    chrome browser Chrome browser has been a game-changer when it was released and even today some of its features are still great and needed. It is packed with some great features like tab freezing, for example, it is cross-platform meaning that also as firefox you can change data between browsers on different devices. it is a very expandable browser with tons of extensions and its speed performance is very very good. The downside of Chrome are two things sadly, one of them is its hunger for RAM, the browser takes a big chunk of RAM once it is active and on some older computer with limited RAM it performs slowly, another is telemetry which its sending, in other words, other browsers don’t come with the lingering fear that Google’s just a little bit too involved in all of our lives. But if downsides do not trouble you and you have a decent amount of RAM in your system chrome might be the best solution for you, grab it here and check it out.
  3. Microsoft Edge

    edge browser Or should I say Microsoft edge 2.0 since this new Edge is completely recoded and rethought, a completely new browser based on chromium. The first version of the edge was an inhouse attempt from Microsoft and it was a disaster, I guess the lesson was learned, and this new edge we have today is a great Browser, it is lightning fast and packed with some great features with one among them standing out I just love, that is the ability to save web pages as applications and truth to be told you have to try this in order to see al great advantages it offers. A very interesting feature is that edge itself wins the speed race from all of the 5 contestants here which is a great surprise. Of course, the downside of annoying Microsoft pushing it to be your default is, well it's Microsoft, as chrome is tied to Google so is edge tied to Microsoft, and the same dreaded feeling that big MS is watching you. If however, you do not concern yourself with these kinds of things, since it is already part of Windows 10, give it a spin and try it, I am sure you will at least love its blazing speed.
  4. Vivaldi

    vivaldi browser A new kid on the block, relatively unknown Browser Vivaldi offers some great customizable features no other one on this list offers, a very unique and down to each detail customization option, you can literally tweak each and every aspect of this browser making it best customizable and personal browser ever. How it is also based o chromium, every chrome extension works in it naturally. It is very good in speed and constantly updated and developed. The downside, well if you are anything like me, you could spend ages trying to customize it, ages, it has tons of features, and making it really feel and tick as you want can consume a really lot of time. If this thing does not bother you at all, grab Vivaldi here.
  5. Opera

    opera browser Last but not least, we have another relic of the old browser age, the Opera browser. Packed with great security and great in-house features like a built-in VPN, built-in ad blocker, built-in crypto wallet, etc this browser seems like a swiss army knife. Opera is full of features and it shows once you start using it. The downside of opera is that its look and feel are specifically tailored to a certain type of user and not everyone will find that appealing or attractive, add some great but hidden and hard to come by features and it may go unnoticed. However, I think you should really give it a go since it definitely deserves more attention than it gets. Grab it here and check it out.
That's it, 5 great browsers to look up, I hope that you have enjoyed the read and I hope to see you again here for more articles. If you would like to read more helpful articles and tips about various software and hardware visit errortools.com daily.
Read More
Fix System Interrupts high CPU usage
System Interrupts are operating system processes that function as an alert system for the CPU. So whenever a scenario needs the attention of the CPU, it alerts the CPU about it. In turn, the CPU suspends what it is doing, saves it, and then takes care of that important job and once that job is completed, it resumes back to what it was doing. This indicates that although System Interrupts appears as a process, it’s actually not. As a matter of fact, it is like a manager that reports to the CPU about all interrupts that happen on a hardware level, e.g. hardware interrupts. And if there are lots of interrupts, this means that there might be various errors occurring on a hardware level. As a result, it may take a lot of system resources. And if you consider disabling System Interrupts, stop right there as your computer will almost become useless without it. So if you see System Interrupts consuming high CPU usage in your Windows 10 computer, you can fix it without having to disable it and cause more problems. If System Interrupts takes up more than 5 to 10% of CPU, then you definitely have a problem. This could be happening due to some hardware or driver issue. The first thing you can do is to try rebooting your computer once and see if the issue comes back or not. High CPU usage of System Interrupts is a huge backlog for the CPU and it stays in the loop. If a simple system restart didn’t fix this issue, here are some suggestions you can try.

Option 1 – Try to update the hardware drivers

As stated, the problem might have something to do with hardware drivers so you can try to update these drivers and see if it works.
  • Reboot your computer into Safe Mode with networking support.
  • Tap the Win + R keys on your keyboard to open the Run dialog box.
  • After that, type “devmgmt.msc” in the field and hit Enter or click OK to open the Device Manager.
  • After opening the Device Manager, update all the outdated Hardware drivers on your computer.
  • Next, right-click on all the driver entries that are appropriately labeled, and then click the Update driver option.
  • Now restart your PC and check if the BSOD error is fixed or not.
Note: On the other hand, if a recent update has caused the System Interrupts high CPU usage, then you might want to roll back your hardware drivers to their previous versions. You can check with the Windows Update History to check out any recent updates as well as the previous ones.

Option 2 – Try to disconnect and reconnect all hardware and cables

A lot of users reported that they were able to fix the problem by disconnecting and reconnecting cables and hardware like scanners, printers, cameras can help in fixing the problem. In addition, you can also boot your computer in a Clean Boot State so that you can find the problematic hardware by hit and trial method. Refer to the steps below to do so:
  • Log onto your PC as an administrator.
  • Type in MSConfig in the Start Search to open the System Configuration utility.
  • From there, go to the General tab and click “Selective startup”.
  • Clear the “Load Startup items” check box and make sure that the “Load System Services” and “Use Original boot configuration” options are checked.
  • Next, click the Services tab and select the “Hide All Microsoft Services” check box.
  • Click Disable all.
  • Click on Apply/OK and restart your PC. (This will put your PC into a Clean Boot State. And configure Windows to use the usual startup, just simply undo the changes.)

Option 3 – Try to enable or disable Hardware

If you do not want to remove hardware, you can just disable them using the Device Manager. Note that this can also be applied to the internal hardware.
  • Tap the Win + X + M keys to open the Device Manager.
  • Next, navigate to the device you want to disable.
  • Then right-click on it and choose to disable the device.
Note: Make sure that you disable one device at a time and then give it a couple of minutes and check if there are any changes in the CPU usage to pinpoint the hardware. And if there is no change, you need to enable the device you’ve just disabled and then proceed to disable the next hardware device. If there are changes, then it’s probably the culprit. Just keep in mind that you must no disable any device that is needed to keep your system up and running.

Option 4 – Try to update the BIOS/UEFI

Updating the BIOS/UEFI can help you fix the high CPU usage of System Interrupts but as you know, BIOS is a sensitive part of a computer. Even though it is a software component, the functioning of the hardware depends on it largely. Thus, you must be careful when modifying something in the BIOS. So if you don’t know much about it, it’s best if you skip on this option and try the other ones instead. However, if you are well-versed in navigating the BIOS, then follow the steps below.
  • Tap the Win + R keys to open the Run dialog box.
  • Next, type “msinfo32” in the field and press Enter to open System Information.
  • From there, you should find a search field on the bottom where you have to search for the BIOS version and then press Enter.
  • After that, you should see the developer and version of the BIOS installed on your PC.
  • Go to your manufacturer’s website and then download the latest version of BIOS on your computer.
  • If you are using a laptop, make sure that you keep it plugged in until you have updated the BIOS.
  • Now double click on the downloaded file and install the new BIOS version on your computer.
  • Restart your computer to apply the changes made.

Option 5 – Run the Hardware and Devices Troubleshooter or the Performance Troubleshooter

Hardware and Devices Troubleshooter:
  • The first thing you need to do is click on Start and then on the gear-like icon to pull up the window for Settings.
  • After opening Settings, look for the Update and Security option and select it.
  • From there, go to the Troubleshoot option located on the left-hand side of the list.
  • Next, select Hardware and Devices from the list and open the Troubleshooter and run it. Once it is doing its job, wait for it to complete the process and then restart the system.
  • After the system restarts, check if the problem’s now fixed. If not, refer to the next option given below.
Performance Troubleshooter:
  • Tap the Win + R keys to open the Run dialog box.
  • Type “exe /id PerformanceDiagnostic” in the field and hit Enter to open the Performance troubleshooter.
  • Then click on Next to get started. Wait until the process is completed.
Read More
The best Antivirus software of 2021
We have often talked about the security of your computer, we have been giving you tips and tried to explain how to best protect your computer from various attacks and malicious software. Today we will be talking about antivirus applications. antivirusAntivirus software has become the kind of a must-have in every computer in this day and age. When you think about it, our systems are connected to the internet most of the time if not always, and therefore kind placed in from the line of various cyber-attacks. Here antivirus software comes into focus, especially because it has evolved long from just a simple virus removal tool to full security suites. We will be going through the best of these applications in order to present both their good and bad sides and hope that we will help you in picking the right one for you. Remember, picking either one of the presented solutions is way better than not having one at all. The list is made from best down in our opinion so number one is highly recommended.

List of Best antivirus applications of 2021

  1. BitDefender

    In our opinion the best overall security protection suite for this age and time. Bitdefender has cemented itself as number one a few years back and it holds that status even today. It has top-of-the-game virus protection, an incredible amount of features, safepay banking online protection and it is amazingly cheap. Its downside we could say is that it can be annoying sometimes, especially if you set it to maximum protection and paranoid mode. In this case, it will often ask what to do and how to behave leading to minor annoyances.
  2. Norton antivirus

    Norton antivirus is well known to older computer users, this package has been around a long time and it is our pick for closest one to challenge top place because of its packed features. The number of features it has are really stunning and it comes also with great and maybe best-browsing protection of all candidates. It also has a backup tool bundled with it but the reason why it is in the second place is that it is taxing to the system and can have a real impact on computer performance. Great protection is important, but so it is working on it without slowdowns.
  3. Kaspersky

    Another one of the old antivirus software on the list. Kaspersky Lab was once top tier antivirus software but it dropped down due to its high prices, later they have changed their pricing to be more in trend with other rival companies but many have switched to something else. Today it still packs one of the best antivirus engines with fast and configurable scans. It also has very impressive anti-ransomware features but sadly most of the things it just simply does for you leaving you to fully trust it since you cannot really configure much. It is not in step with new technologies and it is lacking some features like support for the Chrome browser that places it lower in our ranking.
  4. Trend Micro antivirus

    The biggest sell point for this antivirus application is probably its ease of use and user-friendliness. It also packs a great antivirus engine and impressive anti-ransomware performance but sadly it comes with very limited configurability and somewhat lack of features comparing it with the top three entries. Never the less a very user-friendly application that you can configure without knowing any kind of tech talk, everything is laid out in simple English.
  5. Avira

    Perhaps best known for its free version, Avira has a premium one that is well better worth than the free version. Strong suites of this software are mostly aimed at the internet with its great anti-phishing and web protection along with a low price for all of its features. Sadly in the domain of virus protection, there are some reports from independent websites that its antivirus engine is not so great, it will offer you moderate protection but not the best.
  6. Webroot Secure Anywhere

    If you are on the lookout for software that has a great virus database and plenty of features but is also incredibly light weighted and fast then look no further, Webroot Secure Anywhere is an application for you, incredibly fast and incredibly small is a great solution for older machines. It keeps all of its databases up in the cloud and this feature among its great advantages is also its greatest disadvantage since if you are out of the internet you will not be able to have the latest virus definitions available to you making this tool very situational.
  7. Avast

    Avast has many great protection features and it is very highly configurable. The firewall comes also in its premium edition and it offers great virus protection including a file shredder and awesome WI-FI inspector for an extra layer of security. This package would be higher on the list if it was not for its lack of WEB protection and its tool on the system resources.
  8. Sophos home antivirus

    Lack of features and somewhat strange user interface are downsides of this software but on its positive side it has good antivirus engine and its user interface is very friendly. Where it shines though is in its price, for one affordable price you get protection for 10 devices making this option a great choice for anyone wanting to protect more devices or just use a single license for the whole family.
  9. ESET antivirus

    Greatly configurable antivirus software with tons of options and very light on system resources makes ESET one of the best out there. Virus engine and database is also top tier but some testing labs have reported that protection offering is not really what it is advertised and if we talk about its strong suite of a great many options and configurations it is at the same moment its downside since it is not very friendly to novice and beginner users.
  10. McAfee antivirus

    McAfee antivirus comes in its package with unlimited VPN service and if we take look at the top tier pricing plan it is a great investment. Sadly for its entry-level price, it covers only a single device and it was reported that it packs little outdated virus engine if we compare it with its rivals. Nevertheless, it still offers good virus protection and if you take into account the VPN that comes with it, it can find its users.

Conclusion

No matter which antivirus you choose you will not go wrong, after all any protection is way better than none.
Read More
Fix 0xc000014C Boot Configuration Data error
If you receive the error code 0xc000014C while you boot up your computer, then this post might be of help. This kind of error usually points to the Registry of your computer that might be corrupted. As a result, the operating system was not able to read the BCD file and throws the 0xc000014C error. The error code 0xc000014C is triggered when your computer encounters an error in the first booting sector. You might receive any of these error messages:
“Info: An error occurred while attempting to read the boot configuration data.” with File: as “BootBCD” “File: Windowssystem32configsystem Info: Windows failed to load because the system registry file is missing or is corrupt” “Info: The Boot Configuration Data for your PC is missing or contains errors.”
To fix the error code 0xc000014C when booting your computer, you can check out the suggestions provided below.

Option 1 – Try running System Restore in Advanced Startup Options

Since you probably can’t boot into your Windows 10 computer, you can try to run System Restore again in the Advanced Startup Options.
  • Boot your computer into the Advanced Startup Options screen.
  • From there, you will see some options to troubleshoot when you can’t log in to Windows in the usual way.
  • Now select Troubleshoot > Advanced Options > Command Prompt.
  • After that, type “rstrui” and hit Enter to execute the command which will start the System Restore process.

Option 2 – Try to rebuild the BCD files

You can also try rebuilding the BCD files to resolve error 0xc000014C for corrupted Boot Configuration Data
  • You can start by booting into the installation environment for Windows 10 from an installation media.
  • After that, click on Repair your computer and on the blue screen, select Troubleshoot and then select the Advanced options menu.
  • From there, select Command Prompt and once you open it, enter each one of the commands given below by sequence.
    • bootrec /FixMbr
    • bootrec /FixBoot
    • bootrec /ScanOS
    • bootrec /RebuildBcd
  • Once you’re done executing the commands given above, type “exit” to close the Command Prompt window and then restart your computer and see if it fixed error code 0xc000014c.

Option 3 – Try restoring the default and uncorrupt Registry Values

This option is a bit tricky as you have to be sure about what you are doing here. However, if you are not sure, you might want to seek out a technician to fix the problem for you. But if you can handle it, then carefully follow the steps below.
  • You have to first physically remove the hard drive of the computer that’s not booting up. You can refer to it as Hard drive 1 and Computer 1, respectively.
  • After that, you need to have another computer which you can refer to as Computer 2, and refer to its hard drive as Hard drive 2. Make sure that this second computer is working properly.
  • Next, you have to attach Hard drive 1 to Computer 2 with the Hard drive 2 attached as well.
  • After that, boot Computer 2 from Hard drive 2 where Hard drive 1 will act as the second storage unit.
  • Then navigate to the following location in the System Partition of the Hard drive 2.
C:/Windows/System32/config/RegBack
  • From there, you have to replace all the files. Once you’re done, shut down your computer and then take out the Hard drive 1 from Computer 2 and put it back to Computer 1 as the only hard drive.
  • Now boot your computer normally and check if the problem is fixed.
Read More
How to Fix File System Error 2147219196
If you receive an error message saying, “File System Error 2147219196” when trying to open a picture, access a file or when moving a folder on your Windows 10 computer then read on as this post will help you resolve this error. According to experts, this error started to appear right after the Windows Update v1803 was released. Users who installed the new Windows version faced the same dilemma. This error might be caused by a corrupted disk or it could be due to some broken Windows components or due to file system encryptions. Before you troubleshoot the problem, make sure that you are logged in as an administrator.

Option 1 – Update Windows

The first thing you can do to Resolve File System Error -2147219196 is to update Windows. Since Microsoft is already aware of this issue, they might have already released a fix for this in one of their new updates so make sure to check for any available updates on your computer and have it installed right away.
  • Tap Win + S to open Search then type “update” in the field and from the search results that appear, click on Windows Update.
  • After that, it will open Windows Update under Settings and from there click the Check for Updates button and let Windows check for any available updates.
  • And if there are any updates available, download and install them on your Windows 10 computer.
  • Restart your PC and check if the error is now fixed or not.

Option 2 – Run CHKDSK to check your disk for errors

When it comes to some issues concerning the hard drive or removable devices, there is a utility in Windows that might help which is called “chkdsk”. This error check utility can help with several issues in the system including File System Error -2147219196.
  • Tap the Win + S keys to open the Search box.
  • Then type “command prompt” in the field and from the search results that appear, right-click on Command Prompt and select “Run as administrator”.
  • After opening an elevated command prompt, copy and paste the following command and hit Enter:
chkdsk /r /f
  • Now if you are prompted to run CHKDSK after your reboot your PC, just tap Y and reboot your PC.
  • If CHKDSK is not able to find any errors, tap the Win + E keys and navigate the access window. From there, right-click on the concerned drive and click on Properties.
  • After opening Properties, click on the tab Tools and then click on the “Check” button under the Error-checking section.
  • Wait until the process is completed and then restart your computer.
  • Once your computer has restarted, try accessing the file and check if the error persists.

Option 3 – Disable the File System Encryption

File System Encryption allows you to encrypt drives to protect them from being accessed from another computer. This is the standard practice in various organizations in order to protect their data. However, there are times when the file encryption system caused issues for users in accessing files and throws the File System Error -2147219196 instead which is why you need to temporarily disable it to access your file. To do so, follow the steps below.
  • Tap the Win + R keys to open the Run dialog box.
  • Then type “control” in the field to open Control Panel.
  • From there, navigate to Security and select the BitLocker Drive Encryption option from the list.
  • After that, make sure that all your drives are not encrypted and if any of them are encrypted, turn off encryption by selecting Turn off BitLocker.
  • Reboot your computer for the changes to take effect.

Option 4 – Run SFC scan

  • Tap Win + R to launch Run.
  • Type in cmd in the field and tap Enter.
  • After opening Command Prompt, type in sfc /scannow
  • Restart your computer once the scan is completed.
Read More
DDR5 what we know so far about it
DDR5 memory module
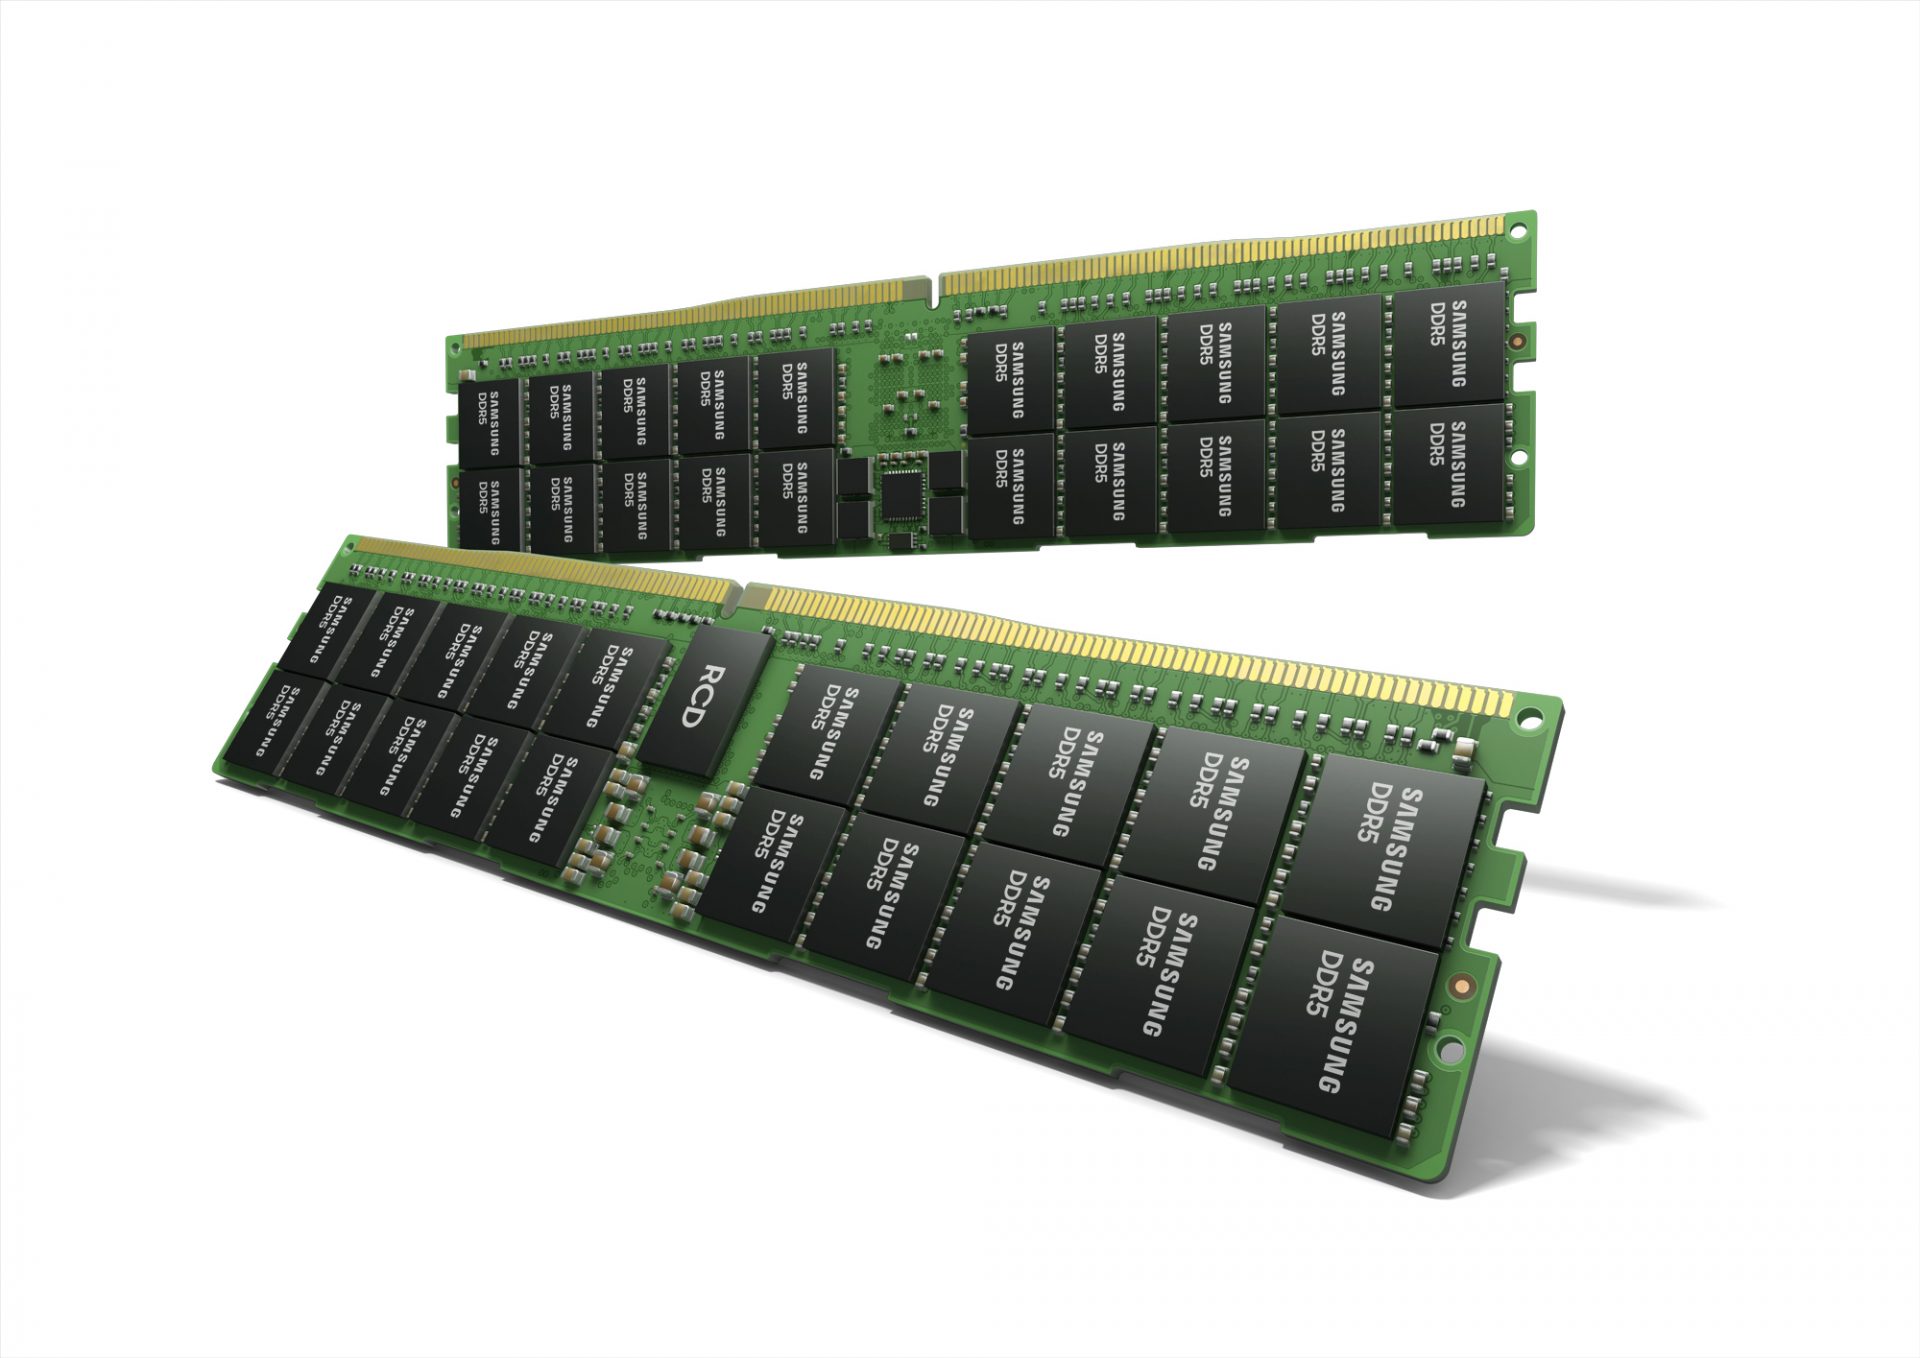
Next-generation of RAM, DDR5 supposed to hit shelves around late summer or fall in 2021if everything goes as planned. Its goal is to increase speed and efficiency, wants to pack more memory in a single stick, and have better power management.

Hardware requirements for DDR5

Using the latest memory technology will require other hardware to follow certain standards and the first ones that will need to follow are CPUs and Motherboards. Intel is already prepared with its Alder Lake CPUs that suppose to come out also later this year. AMD on other hand has not stated anything at the time of this writing but it is a bet that their next generation that will come in 2022 will have full support. It is speculated that bot companies and their respective CPUs will have both support for DDR4 and DDR5. A story about motherboards is a little different. Motherboards will support DDR4 or DDR5 memory banks, not both, so make sure that your motherboard will support the memory you plan on getting.

Capacity of memory

The goal and aim for the DDR5 memory stick are to reach a whopping 126GB per stack. This will be done by using a dual in-line module or DIMM enabling larger capacity. That being said, the first modules that we will see are more likely to be 16GB as standard and 8GB as low entry ones.

Power consumption of DDR5 memory

The standard voltage that DDR4 operates under is 1.2V. DDR5 wants to lower this to 1.1V without sacrificing speed. Voltage regulation on modules themselves will be now integrated on memory banks instead of leaving that to motherboards which will help to detect memory errors directly on the memory bank.

Speed of memory

The most common speed of DD4 memory banks is 2,666MHz, more expansive ones go from 3,600 to 4,000MHz. DD5 aims to raise this bar to 4,800MHz and offers greater speed.

Should you get it right away?

Hardware is ever-evolving, we have PCIe 3.0 to PCIe 4.0, and taking into account that sometimes the newest tech can cause some unexpected behavior it is always the best strategy to wait for a little. Price for the newest tech has also been in its heist just when it is released and seeing how DDR5 will benefit mostly servers mostly since even today memory, processors, and other available equipment can tackle all daily tasks.
Read More
Get a Custom URL for Your YouTube Channel
Having a youtube channel nowadays is quite an easy task, you just need to create a free google account and there you go, you can start uploading videos to your YouTube channel. All you need in today's world is some applications for manipulating video material, creation of titles and graphics, some charisma and ideas for content and you could be a well-known YouTuber. For some guidance on software needed for this kind of creativity, we urge you to check our article about open source free software alternatives to paying ones here. So now that we have technicality out of way there is one more prerequisite that is needed in order for you to have your unique custom URL for your channel.
  • The channel must be at least 30 days old.
  • The channel must have a profile picture and a banner image.
  • The channel must have at least 100 subscribers.
You need to fulfill all three prerequisites in order to change your typical URL to something nicer and personal like youtube.com/myGREATchannel So if you have everything needed let's get that custom URL for your channel.
  1. Sign in to your YouTube channel
  2. On the top-right corner of the YouTube window, click on your profile picture.
  3. From the drop-down menu, select YouTube Studio.
  4. From the list on the right side of the YouTube Studio page, select Customization.
  5. Under Channel customization, select Basic info.
  6. Under Channel URL, click on Set a custom URL for your channel.
  7. Your custom URL will appear in the box below. You can change it as you desire.
  8. Click on the Publish button on the top-right corner of the window to set your custom URL.

WORD OF WARNING:

Once the custom URL is set, it can neither be changed nor transferred to someone else so make sure that channel name is really something that you want for the long run.
Read More
1 2 3 162
Logo
Copyright © 2022, ErrorTools. All Rights Reserved
Trademarks: Microsoft Windows logos are registered trademarks of Microsoft. Disclaimer: ErrorTools.com is not affiliated with Microsoft, nor claim direct affiliation.
The information on this page is provided for information purposes only.
DMCA.com Protection Status