Setting up Logitech C922 in Windows 10

Being a streamer altho popular is a very demanding call, there is a lot of technical knowledge involved and one of this knowledge is setting your web camera equipment. On the internet, you can find how to install certain devices and register them in Windows but with little to no information on how to set everything for streaming. In this article, we will try to address as many of this as we can so you can start using your camera right away.

Features of the Logitech C922 Pro Stream Webcam

In the package of your Logitech C922 Pro Stream Webcam, you should have the camera itself with a USB hookup, tripod, and user manual. Tripod, of course, is meant to stabilize the camera for recording using high zoom values so visual shaking of the picture is eliminated.

The camera itself captures natural light without any distortion in full HD and if placed on top of the monitor it can accommodate the field of view to capture two people. Also when in a low-light room, autofocus will correct light and it will sharpen an image in order to compensate for lack of light. The camera also features a dual microphone for clarity of sound.

Assembling the Logitech C922 Webcam

Of course, the first thing when the camera is unpacked is to assemble it. Basically, there are two ways for the camera to be assembled:

  1. On top of monitor and
  2. On tripod

The next section will cover both assemblings

Mounting camera on the monitor:

The Logitech C922 Pro Stream Webcam can be used to capture up-close images or video from the top of any computer monitor or TV.

To set up your Logitech C922 Webcam on top of a monitor or TV:

  • Completely extend the mounting stand until it reaches the top width of your monitor or TV
  • Turn the bottom piece of the mounting stand, so it matches the angle of the back of your monitor or TV
  • Place the mounting stand on top of your monitor or TV and tighten the bars until they’re flush with each surface
  • Pivot the webcam up, down, or to the sides to center the camera angle

After you have securely mounted the C922 to your monitor or TV, it’s ready to be plugged in and used with any recording application on your computer.

Mounting camera on the tripod

You can set up your Logitech C922 Pro Stream Webcam to record a 78-degree view of a room for presentations or live streams by attaching it to the tripod.

To set up your Logitech C922 Webcam with a tripod:

  • Unfold and extend the legs of your tripod
  • Place the webcam on top of the tripod, aligning the swivel bolt with the webcam mounting hole
  • Swivel the bolt by turning a small knob on the tripod

Once you have assembled your Logitech C922 Pro Stream Webcam on your tripod, plug it into your computer and load up your favorite recording application.

How can you use your Logitech C922 Pro Stream Camera?

Altho this camera is designed and built to be used in a live stream environment it can also be used to record video offline to a file. In this next segment, we will explore further applications in which the camera is meant to be used.

Live video

The Logitech C922 Pro Stream Webcam allows content creators to share content in high definition with thousands of viewers in real-time. Stream full 1080p at 30 frames per second and 720p at 60 frames per second live on platforms such as Twitch or YouTube.

  • Stream video games or entertainment in real-time
  • Create live presentations for work, customers, or followers
  • Discuss matters of interest in live talk shows or podcasts
  • Video call family or friends on Skype, Facetime, or Google Hangouts
  • Capture crystal-clear, 78-degree video with the Logitech C922 autofocus lens. With two microphones attached on each end, you can stream any live video with little to no audio drops.

Offline recordings

The Logitech C922 Pro Stream Webcam can be used with desktop recording software to create professional videos or snapshots. After you’ve finished recording, you can edit specific spots in the video and add custom presentation details.

  • Product demonstrations and tutorials
  • Educational or promotional presentations
  • Video game or entertainment videos
  • Personal vlogs
  • Talk shows or podcasts
  • Desktop or laptop technical walkthroughs
  • Complete offline recording in high definition at 1080p. Use QuickTime Player (Mac) or Microsoft Camera App (Windows) to take photos or record videos offline.

Setting up Logitech C922 Pro Stream Camera using XSplit Broadcaster

XSplit Broadcaster offers live stream support for several platforms, which include Facebook Live, YouTube Live, and Twitch. After you hook up your webcam and create profiles for each platform, you can begin a live stream with XSplit Broadcaster.

Twitch Streaming

  • Enable Two-Factor Authentication on Twitch: Navigate to the settings of your profile and the Security and Privacy tab. Before you can start broadcasting with XSplit, you must set up Two-Factor Authentication.
  • Set Up Twitch Streaming Profile in XSplit: In XSplit Broadcaster, navigate to Broadcast > Set up a new output > Twitch. Select an account to authorize with XSplit and proceed.
  • XSplit automatically chooses a resolution to record based on target server connection quality.
  • A settings window opens before you complete the setup, which allows you to customize the server and video recording options. Once you have completed the setup, your Twitch profile is set up in XSplit. You can begin a stream by navigating back to Broadcast and clicking on the new Twitch profile.

YouTube Streaming

  • Enable YouTube Streaming Live: Click on your YouTube profile picture to open a dropdown and click on YouTube Studio Beta.
  • On the left side of the page, navigate to Other features and click on Live events in the dropdown.
  • Click on Enable live streaming to set up live streaming for your YouTube profile.
  • Set Up YouTube Streaming Profile in XSplit: In XSplit Broadcaster, navigate to Broadcast > Set up a new output > YouTube. Select an account to authorize with XSplit and proceed.
  • Once YouTube Live Properties window pops up, click Authorize to connect your Google account. You can also change any settings as needed before you begin a live stream. Once you’re ready to broadcast live with XSplit, navigate back to Broadcast and click your new YouTube Live profile.

Facebook Live Streaming

  • Set Up Facebook Live Streaming Profile in XSplit: In XSplit Broadcaster, navigate to Broadcast > Set up a new output > Facebook Live.
  • A prompt opens in XSplit to log in to your Facebook profile.
  • Log in and set up permissions and posting options as you’d like them to appear whenever you stream live on Facebook. After you’ve completed the permission process, your Facebook Live profile is ready to use in XSplit. You can navigate anytime back to Broadcast and select your new Facebook Live profile in XSplit to begin a live stream.

Using OBS with Logitech C922 Pro Stream Webcam

OBS live streaming application offers high-quality audio and video performance and video capturing in real-time. This application offers full control over every detail and it is a very good choice for both cases.

Setting up Logitech C922 with OBS

  • Add Logitech C922 as a Capture Device: Click the + under the Sources section. Once you are in the drop-menu, select Video Capture Device.
  • When this menu pops up, click Create New and hit OK.
  • From the Device bar, you can select your Logitech C922 as a default Video Capture Device. Set any configurations up how you want them and click OK before exiting.
  • Changing Resolution or Frames Per Second: With OBS open, click on Settings in the bottom-right portion of the screen and then on the Video tab on the next page. Here you can set up the screen resolution, downscale filter, and frames per second defaults for all videos recorded with OBS. Click Apply before exiting.
  • After you’ve finished applying the initial settings, you can begin recording or streaming in the bottom right-hand corner of the main menu.
If you like to learn and find out more about various Windows errors, and how to repair them go to our vast archive or use search to find articles that will explain and help you in solving your issue.
However, if you prefer to do things fast and with automatization then we are proposing to use an automated solution for your issues. The application that we are recommending is Advanced System Repair Pro
Advanced System Repair utilizes multiple tools all in one to give you a quick, simple, reliable, and very thorough diagnosis of your PC. It brings you all the tools you need in one program to clean, fix, protect, optimize and boost your PC!
1-Click Maintenance
All the tools to make it simple and easy! It's like having a professional technician at the click of a mouse.

Junk Cleaner
Keeping your computer free from unnecessary clutter also helps make your computer last longer. Like any other machine, if you keep it clean and take care of it, it will serve you better for longer!

Optimize background apps
Optimize applications background activity with the built-in Application Optimizer feature.

Disk Defrag
With a simple 1-click, Advanced System Repair speeds up your PC by assembling fragmented files on your machine and organizing them more efficiently.

Malware Removal
Finds and removes all types of harmful malware including trojans, worms, bots, adware, spyware, PUPs, and more!

Privacy Cleaner
The all-in-one privacy suite to Clean Your Tracks & Protect Your Privacy! Make your computer safe, secure, and more efficient!

System Tweak/Optimizer
ASR will analyze your complete system and settings to adjust your PC to function at its maximum performance.

Registry Cleaner
Over time, as you install and uninstall applications, the registry can become cluttered with old entries and broken settings which can result in program crashes, and annoying messages and slow the computer down.
Visit our Advanced System Repair Pro Download page to inform yourself about all the benefits of this software and get a free trial copy of it.
advanced system repair pro

Advanced System Repair Pro

One-click automated PC repair solution
ASR logo
With Advanced System Repair Pro you can easily
Replace damaged files
Restore performance
Free disk space
Remove Malware
Protects WEB browser
Remove Viruses
Stop PC freezing
DOWNLOAD
Privacy Policy | Terms of Use | Uinstall
Advanced System Repair Pro is compatible with all versions of Microsoft Windows including Windows 11

Share this article:

You might also like

Identify resource hogging applications
Resource hogging is a term when one single application or few of them are taking all system resources for themself causing extreme slow down in the computer and nonresponsiveness. It can be a very frustrating and time-consuming experience and it can cost you money if you can not finish work on time due to this effect. I believe that everyone has experienced at least one slowdown in their IT carrier because of resource-hogging applications and most users do not know how to deal with this. We are here to help you with this issue. Just to be aware that this method shown here is not a method to miraculously speed up your PC or anything similar, this is to be able to detect and recover from extreme slowdowns. Hardware components are still very important and if you can upgrade your computer if it is outdated, please do it because new applications will require a more modern system, and not any kind of tips and tricks will save you from outdated hardware.

Identifying resource hogging app

Now when we got that out of the way let's talk about slowdowns, it is no secret that sometimes an application has bugs and memory leaks that can cause this kind of behavior, and sometimes the application simply takes up too much memory for any other application to work normally. The most simple and straightforward way is to bring up a Windows task manager and inspect running applications and services. You can bring task manager by the key combination of CTRL + SHIFT + ESC If the system is in deep memory deficit you will have to wait for the task manager to open and show itself on-screen. Once opened, click on more details if that view is not opened by default. Once the view expands you will see all running applications with how much RAM memory have they taken and how much CPU they are using.

What to do with app?

Now you are presented with a choice on what to do with the problematic application. If you press the end task button on the bottom right, Windows will kill the application and its processes but any unsaved work inside the application will be lost and unrecoverable in most cases. Or you can try to remove smaller applications running to free up more memory and CPU in order for the computer to catch up. Any choice you make is up to you, but be very careful not to kill Windows essential service by mistake, that will cause immediate system instability with high chances of a system crash.
Read More
How to Fix Win32kbase.sys BSOD error
There is various Blue Screen of Death errors that you can encounter as you use your Windows 10 computer and some of these Stop errors have something to do with the win32kbase.sys file. This post will guide you in fixing the BSOD errors related to the win32kbase.sys file.
  • A problem has been detected and Windows has been shut down to prevent damage to your computer. The problem seems to be caused by the following file: Win32kbase.sys.
  • Your PC ran into a problem and needs to restart. If you would like to know more, you can search online later for this error: win32kbase.sys.
  • SYSTEM_SERVICE_EXCEPTION (win32kbase.sys)
  • STOP 0x0000000A: IRQL_NOT_LESS_EQUAL – win32kbase.sys
  • STOP 0x0000001E:
KMODE_EXCEPTION_NOT_HANDLED – win32kbase.sys
  • STOP 0×00000050:
PAGE_FAULT_IN_NONPAGED_AREA – win32kbase.sys
The win32kbase.sys file is a Windows operating system Base Win32 Kernel Driver file located in the System32 folder so if it ends up getting corrupted or if it went missing, your computer will throw up Blue Screen error. To fix BSOD errors that have something to do with the win32kbase.sys file, here are some possible fixes that could help. Worry not for these possible fixes are not complicated.

Option 1 – Run the Check Disk or CHDSK utility

One of the first things you can try to resolve the win32kbase.sys Blue Screen error is running the CHKDSK utility. If your hard drive has issues with integrity, the update will really fail as the system will think that it’s not healthy and that’s where the CHKDSK utility comes in. The CHKDSK utility repairs hard drive errors that might be causing the problem.
  • Open Command Prompt with admin privileges.
  • After opening Command Prompt, execute the following command and hit Enter:
chkdsk /f C:
  • Wait for the process to be completed and then restart your computer.

Option 2 – Run SFC or System File Checker scan

System File Checker or SFC is a built-in command utility that helps in restoring corrupted files as well as missing files. It replaces bad and corrupted system files to good system files. To run the SFC command, follow the steps given below.
  • Tap Win + R to launch Run.
  • Type in cmd in the field and tap Enter.
  • After opening Command Prompt, type in sfc /scannow
The command will start a system scan which will take a few whiles before it finishes. Once it’s done, you could get the following results:
  1. Windows Resource Protection did not find any integrity violations.
  2. Windows Resource Protection found corrupt files and successfully repaired them.
  3. Windows Resource Protection found corrupt files but was unable to fix some of them.
 Restart your PC.

Option 3 – Try to run the DISM commands

You might want to repair potentially corrupted files in your system as having them could also trigger the win32kbase.sys Blue Screen error. To repair these corrupted system files, you can run the DISM commands:
  • Tap the Win + X keys and click on the “Command Prompt (Admin)” option.
  • After that, input each one of the commands listed below sequentially to execute them:
    • Dism /Online /Cleanup-Image /CheckHealth
    • Dism /Online /Cleanup-Image /ScanHealth
    • Dism /Online /Cleanup-Image /RestoreHealth
  • Once you’ve executed the commands given above, restart your computer and check if the dxgkrnl.sys Blue Screen error is now fixed.

Option 4 – Try to run the Blue Screen Troubleshooter

As you know, the Blue Screen troubleshooter is a built-in tool in Windows 10 that helps users in fixing Blue Screen errors related to the win32kbase.sys file. It can be found in the Settings Troubleshooters page. To use it, refer to these steps:
  • Tap the Win + I keys to open the Settings panel.
  • Then go to Update & Security > Troubleshoot.
  • From there, look for the option called “Blue Screen” on your right-hand side and then click the “Run the troubleshooter” button to run the Blue Screen Troubleshooter and then follow the next on-screen options. Note that you might have to boot your PC into Safe Mode.
Read More
BuzzDock Removal Guide

What is BuzzDock?

Buzzdock is a browser extension. Buzzdock will be automatically enabled on IE and Chrome following installation, and you may begin using Buzzdock with no further action required. If you elect to optimize Buzzdock performance, the settings preferences of your browser may be adjusted after installation. This browser extension changes your default search provider to Buzzdock.com custom search. It displays additional unwanted ads, banners & sponsored links on web pages that you visit, and it hijacks your browser home page. This browser extension has been flagged as malware by many anti-virus scanning programs.

About Browser Hijackers

Browser hijackers (sometimes called hijackware) are a type of malicious software that modifies web browser configuration settings without the user’s knowledge or consent. These hijacks are rising at an alarming rate worldwide, and it could be actually nefarious and sometimes dangerous too. They’re created to interfere with web browser programs for many different reasons. In most cases, hijackers are made for the benefit of online hackers often through income generation from forced ad clicks and site visits. Nonetheless, it’s not that harmless. Your online safety is jeopardized and it is extremely irritating. They not only screw up your browsers, but browser hijackers can even modify the computer registry, leaving your PC susceptible to other attacks.

Symptoms of browser hijacker malware

There are several signs that indicate the web browser is hijacked: 1. the home page of your browser is changed unexpectedly 2. you find new unwanted bookmarks or favorites added, typically directed to ad-filled or porn sites 3. The default search page of your web browser is changed 4. you see unsolicited new toolbars added 5. you notice a lot of pop-ups on your computer screen 6. your web browser gets slow, buggy crashes frequently 7. you are prohibited access to specific web pages, including the site of an anti-malware software firm like SafeBytes. Exactly how browser hijacker finds its way onto your computer system Browser hijackers infect computer systems in numerous ways, including through a file-share, a drive-by download, or an infected email. They are usually included with toolbars, BHO, add-ons, plug-ins, or browser extensions. Browser hijackers sneak to your computer along with free software downloads also that you unknowingly install alongside the original. Some of the most well-known hijackers are BuzzDock, Babylon Toolbar, Conduit Search, Sweet Page, OneWebSearch, and CoolWebSearch. Browser hijacking can cause severe privacy problems and even identity theft, affect your web browsing experience by taking command over outbound traffic, substantially slows down your computer by consuming lots of resources, and result in system instability as well.

The best ways to get rid of browser hijackers

Certain browser hijacking can be quite easily corrected by discovering and removing the corresponding malware application from your control panel. However, most hijackers are hard to remove manually. No matter how much you try to get rid of it, it may keep returning over and over again. You should consider doing manual fixes only if you’re a tech-savvy person because there are potential risks associated with fiddling around with the system registry and HOSTS file. Browser hijackers could be effectively removed by installing and running anti-malware software on the affected PC. Safebytes Anti-Malware can counter relentless browser hijackers and provide you proactive computer protection against all kinds of malware. Together with anti-malware, a system optimizer program, similar to Safebytes Anti-Malware, can help you correct registry errors, remove unwanted toolbars, secure online privacy, and enhance overall system performance.

Find Out How to Get rid of Malware that is Blocking Websites or Preventing Downloads

Malware could cause all sorts of damage when they invade your computer, starting from stealing your personal information to erasing files on your PC. Some malware sits in between the computer and the internet connection and blocks a few or all internet sites which you want to visit. It might also block you from adding anything to your system, especially anti-malware applications. So what should you do when malicious software prevents you from downloading or installing Safebytes Anti-Malware? There are a few fixes you can attempt to get around with this problem.

Boot Windows in Safe Mode

The Windows OS includes a special mode called “Safe Mode” where only the minimum required programs and services are loaded. In the event, the malicious software is set to load automatically when the computer starts, shifting to this mode may well prevent it from doing so. To get into Safe Mode or Safe Mode with Networking, press the F8 key while the computer is booting up or run MSCONFIG and find the “Safe Boot” options in the “Boot” tab. After you restart the PC into Safe Mode with Networking, you could download, install, as well as update anti-malware software from there. Right after installation, run the malware scanner to eliminate standard infections.

Use an alternate internet browser to download the anti-malware application

Malicious program code might exploit vulnerabilities in a specific browser and block access to all antivirus software sites. In case you suspect that your Internet Explorer has been hijacked by malware or otherwise compromised by online hackers, the best plan of action would be to switch to an alternate internet browser like Mozilla Firefox, Google Chrome, or Apple Safari to download your favorite computer security program – Safebytes Anti-Malware.

Create a portable USB antivirus for removing malware

Another way is to download and transfer an anti-malware program from a clean PC to run a scan on the affected computer. Adopt these measures to run the antivirus on the affected computer. 1) Download Safebytes Anti-Malware or Windows Defender Offline onto a clean computer. 2) Plug the Thumb drive into the uninfected computer. 3) Double-click the executable file to run the installation wizard. 4) Pick a USB flash drive as the location when the wizard asks you where you intend to install the software. Follow the directions to finish the installation process. 5) Transfer the thumb drive from the uninfected computer to the infected PC. 6) Run the Safebytes Anti-malware directly from the pen drive by double-clicking the icon. 7) Run Full System Scan to identify and clean-up up all types of malware.

A Look at the Best AntiMalware Program

If you’re looking to download an anti-malware application for your PC, there are various tools out there to consider however, you just cannot trust blindly anyone, irrespective of whether it is free or paid software. Some of them are excellent, some are ok types, and some will harm your PC themselves! You need to pick a tool that has gained a good reputation and detects not just computer viruses but other types of malware as well. Amongst few good programs, SafeBytes Anti-Malware is the highly recommended program for the security-conscious individual. SafeBytes anti-malware is a trustworthy tool that not only secures your PC completely but is also quite user-friendly for people of all skill levels. This software could easily detect, remove, and protect your computer from the latest malware threats including spyware, adware, trojan horses, ransomware, worms, PUPs, along with other possibly damaging software programs. There are numerous great features you will get with this security product. The following are some of the great features included in the software. Robust Anti-malware Protection: With its advanced and sophisticated algorithm, this malware removal tool can find and eliminate the malware threats hiding within your PC effectively. Live Protection: SafeBytes gives real-time active monitoring and protection against all known computer viruses and malware. This software will continuously monitor your PC for any suspicious activity and updates itself regularly to keep current with the constantly changing threat landscape. Website Filtering: Safebytes assigns all websites a unique safety score that helps you to get an idea of whether the webpage you are going to visit is safe to view or known to be a phishing site. Low CPU and Memory Usage: SafeBytes is really a lightweight application. It consumes an extremely small amount of processing power as it runs in the background so you’re free to use your Windows-based PC the way you really want. 24/7 Online Tech Support: For any technical issues or product support, you could get 24/7 expert assistance through chat and email. To sum it up, SafeBytes Anti-Malware offers great protection combined with an acceptable low system resources usage with both great malware detection and prevention. You now may understand that this particular software does more than just scan and delete threats from your PC. For optimum protection and the best value for your money, you can’t get better than SafeBytes Anti-Malware.

Technical Details and Manual Removal (Advanced Users)

If you wish to manually remove BuzzDock without the use of an automated tool, it may be possible to do so by removing the program from the Windows Add/Remove Programs menu, or in cases of browser extensions, going to the browsers AddOn/Extension manager and removing it. You will likely also want to reset your browser. To ensure the complete removal, manually check your hard drive and registry for all of the following and remove or reset the values accordingly. Please note that this is for advanced users only and may be difficult, with incorrect file removal causing additional PC errors. In addition, some malware is capable of replicating or preventing deletion. Doing this in Safe Mode is advised. The following files, folders, and registry entries are created or modified by BuzzDock
Files: File at $COMMONPROGRAMSBuzzdockBuzzdock Support Site.lnk. File at $COMMONPROGRAMSBuzzdockBuzzdock.lnk. File at $COMMONPROGRAMSBuzzdockUninstall.lnk. File at $PROGRAMFileSBuzzdockBuzzdock Support.url. File at $PROGRAMFileSBuzzdockBuzzdock.ico. File at $PROGRAMFileSBuzzdockBuzzdock.url. File at $PROGRAMFileSBuzzdockBuzzdockIEClient.dll. File at $PROGRAMFileSBuzzdockUninstall.url. Directory at $COMMONPROGRAMSBuzzdock. Directory at $LOCALAPPDATAGoogleChromeUser DataDefaultExtensionsejaodgecffaefnnoggjpogblnlpejkma.1.5_0. Directory at $LOCALAPPDATAGoogleChromeUser DataDefaultExtensionsejaodgecffaefnnoggjpogblnlpejkma. Directory at $PROGRAMFileSBuzzdock. Registry: A key in HKEY_CLASSES_ROOT named BuzzdockIEClient.Api.1 A key in HKEY_CLASSES_ROOT named BuzzdockIEClient.Api A key in HKEY_CLASSES_ROOT named BuzzdockIEClient.Layers.1 A key in HKEY_CLASSES_ROOT named BuzzdockIEClient.Layers Key 220EB34E-DC2B-4B04-AD40-A1C7C31731F2 at HKEY_LOCAL_MACHINESOFTWAREMicrosoftWindowsCurrentVersionUninstall. Key 435D09AA-DDE4-4B40-9129-08F025ECA349 at HKEY_CLASSES_ROOTCLSID. Key 435D09AA-DDE4-4B40-9129-08F025ECA349 at HKEY_LOCAL_MACHINESOFTWAREMicrosoftWindowsCurrentVersionExplorerBrowser Helper Objects. Key 4A3DEECA-A579-44BC-BCF3-167F4B9E8E4C at HKEY_CLASSES_ROOTCLSID. Key 83C58580-EC6E-48CD-9521-B95874483BEB at HKEY_CLASSES_ROOTCLSID. Key BE3A76AC-F071-4C7F-9B7A-D974B4F52DCA at HKEY_CLASSES_ROOTAppID. Key C8C107B2-28C2-472D-9BD4-6A25776841D1 at HKEY_CLASSES_ROOTTypeLib. Key BuzzdockIEClient.DLL at HKEY_CLASSES_ROOTAppID. Key ejaodgecffaefnnoggjpogblnlpejkma at HKEY_LOCAL_MACHINESOFTWAREGoogleChromeExtensions.
Read More
How to Turn On or Off Tailored Experiences
In this post, you will be guided on how you can turn on or turn off the Tailored Experiences feature in Windows 10 using three methods – via Settings, Registry Editor, and Group Policy Editor. The Tailored Experiences feature in Windows 10 helps Microsoft in delivering recommendations about Microsoft Products. The diagnostic data that comes with it allows Microsoft to know about its consumers’ experiences as well as collect feedback. To simply put it, tailored experiences are personalized tips, ads, and recommendations that enhance Microsoft products and services for consumer needs. And when you enable this feature, Windows will collect information from your browser, apps, features, and many more. After collecting information, it will offer contents that are tailored based on the data gathered on the lock screen of your computer, Windows tips, and other related functions. On the other hand, the diagnostic data is the one that allows Microsoft to get feedback from the customer. So if you’ve noticed some prompts when you use Windows that ask you about the experience, that’s actually a part of the diagnostic data. A lot of users find this feature useful. However, there are also skeptical ones that don’t share the same sentiments. If you are one of the skeptical ones, you actually have the option to turn this feature off if you do not want Microsoft to show ads, recommendations, and so on. It is also recommended that you enable the Diagnostic Data collection as you can choose to delete any collected data, as well as control the feedback frequency from Automatic to Once a day, or once a week, or to never. As mentioned, there are three methods you can choose from to either turn on or turn off Tailored Experiences. You can do it via Settings, Registry Editor, and the Group Policy Editor. To get started, follow the options provided below.

Option 1 – via Settings

To turn on or off Tailored Experiences using Settings, refer to these steps:
  • Go to Settings and here, click on Privacy.
  • Next, go to Diagnostic and Feedback.
  • From there, toggle off the control under the Tailored experiences option to turn it off or toggle it on, if you want to turn it on.

Option 2 – via Registry Editor

To turn on or off Tailored Experiences via Registry Editor, follow the steps below.
  • Tap the Win + R keys to open the Run dialog box and type “Regedit” in the field and then tap Enter to open the Registry Editor.
  • Next, navigate to this registry path: HKEY_CURRENT_USERSoftwareMicrosoftWindowsCurrentVersionPrivacy
  • After that, look for the DWORD named “TailoredExperiencesWithDiagnosticDataEnabled” and change its value to 0 if you want to turn it off or 1 if you want to turn it on.

Option 3 – via Group Policy Editor

To turn on or off Tailored Experiences using the Group Policy Editor, here’s what you have to do:
  • Tap the Win + R keys to open the Run prompt and type “gpedit.msc” in the field and hit Enter to open the Group Policy Editor.
  • Next, navigate to this policy setting: User ConfigurationAdminstrative TemplatesWindows ComponentsCloud Content
  • Here, double click on the “Do not use diagnostic data for tailored experiences” option and select Enabled. Once you do that, you will see the following description:
“This policy setting lets you prevent Windows from using diagnostic data to provide tailored experiences to the user. If you enable this policy setting, Windows will not use diagnostic data from this device (this data may include browser, app, and feature usage, depending on the “diagnostic data” setting value) to customize the content shown on the lock screen, Windows tips, Microsoft consumer features, and other related features. If these features are enabled, users will still see recommendations, tips, and offers, but they may be less relevant. If you disable or do not configure this policy setting, Microsoft will use diagnostic data to provide personalized recommendations, tips, and offers to tailor Windows for the user’s needs and make it work better for them. This setting does not control Cortana tailored experiences, since there are separate policies to configure it.”
Read More
Quick Workarounds to Repair Error 126
[vc_row][vc_column][vc_column_text]

Fix Error 126

What Is Error 126?

Error 126 is a very commonly occurring error that is often the result of damaged system files of Windows. They usually occur during the installation of some Windows program or application. When Error 126 is generated, it terminates the installation process almost instantly. It is important to take corrective measures immediately to ensure that no such problems are encountered again in the future.

Solution

Restoro box imageError Causes

There are a variety of conditions that may trigger Error 126. These conditions are listed below as follows.
  • Corruption of the service-related DLL file
  • Missing or damage service-related DLL file
  • Corrupt, damaged, or Misconfigured system files
  • Improper hardware or application installations or uninstallations
  • Existence of viruses, malware, adware, or spyware in the system
  • Corrupt or incorrect registry entries in the system files
When any of the above-listed conditions occur, the corrupt system files will go to the improper links or missing information. Eventually, the problems with the files will keep the applications or programs from responding in the usual manner. Whatever are the reasons for error generation, it is of utmost importance that the error is removed to ensure smooth functioning of the system.

Further Information and Manual Repair

There are many different ways this error can be rectified. However, the two most effective solutions are listed below as follows.
  • This solution is for the advanced user. Turn on the system and log on to it as the Administrator. Now click on the Start button. Now click on All programs -> Accessories -> System Tools. Here you will come across the option for System Restore. Click on it. A new window will appear. Select 'restore my computer to an earlier time' point. Now clock on Next. A list of restore points will now appear in front of you. Choose the latest restore point you come across from this list and click on ‘Next’. In the next window that opens, click on ‘Next’ again. This is the confirmation window. Once the restoration finishes, restart your computer.
  • This solution is for novice users. Download an Error 126 repair utility program. Install it on your system. Now use it to scan your system for error. Find out if there is any option to fix/repair error. When you come across it, click on it as soon as the scan is complete. Restart your computer. Your system is now free of Error 126.
[/vc_column_text][/vc_column][/vc_row]
Read More
Fix 0x800F0825 update error in Windows 10
Windows updates have become a regular occurrence in our digital lives. They are frequent and have become quite necessary. Most of the time they bring us quality content like fixed security, resolved bugs, and even new features but from time to time update itself can be not downloaded properly or it can have some issues when installing. Windows Update Error 0x800F0825 is one of these update errors that will be reported seemingly after applying the update. Altho annoying error it is nothing system breaking and can be easily resolved. Hello and welcome everyone, today we will provide you with solutions on how to resolve error 0x800F0825 when trying to complete a Windows update.

Run Windows troubleshooter

Built-in Windows troubleshooter can help a lot in resolving these issues and we will try it as a first solution because of its simplicity and ease of use.
  • Click on START
  • Click on settings Windows 10 Start menu with marked settings icon
  • Navigate to Update & Security > Troubleshoot > Additional Troubleshooter > Windows Update
  • Click on Run the troubleshooter
  • Follow onscreen instructions and let the troubleshooter try to solve the issue

Clear contents of SoftwareDistribution & Catroot2 folders

Altho SoftwareDistribution and Catroot2 folders are essential for the update process it can happen that badly downloaded updates or similar corruption can be stored there and thus producing this error.
  • Open file explorer and locate these two folders, go inside and delete content inside them
  • Try updating again to see if corruption inside folders was the issue.

Update manually

If the previous two solutions have not produced a result and the error is still present then go to the official Microsoft Update Catalog and download the update manually The catalog is here. Search for updates from the Windows Update Catalog In the Search box, type your search terms. You can carry out a full-text search, using a keyword, KB article, MSRC bulletin, driver manufacturer, driver model, driver version, product, and a classification. Select the appropriate version of Windows. Search or click on Advanced Search if you want to refine your search. A list will be displayed. Select the updates that you want to download. Click Add for each selection to add it to the download basket.
  • Download the updates. You may be asked to install an Active-X download control to be able to download files from this site
  • Double-click on the downloaded updates to install them
Administrators can download updates from the Microsoft Download Center or the Windows Update Catalog to deploy to multiple computers If you are running Windows Server Update Services (WSUS) 3.0, System Center Essentials (SCE), or System Center Configuration Manager (SCCM) you can import updates directly into these applications. Security updates, critical updates, service packs, update rollups, definition updates, and critical drivers can be configured to synchronize with your server automatically. You can still import these updates into your application by using Microsoft Update Catalog; however, depending on how you configure WSUS, SCE, and SCCM, you may not need to import the updates.

Disable system protection

In some rare cases, antivirus or firewall could interfere with both downloads and execution of certain files. If each previous solution failed disable temporarily your security software and try executing the update again.
Read More
Steam Deck, a modern PC handheld console
steam deck
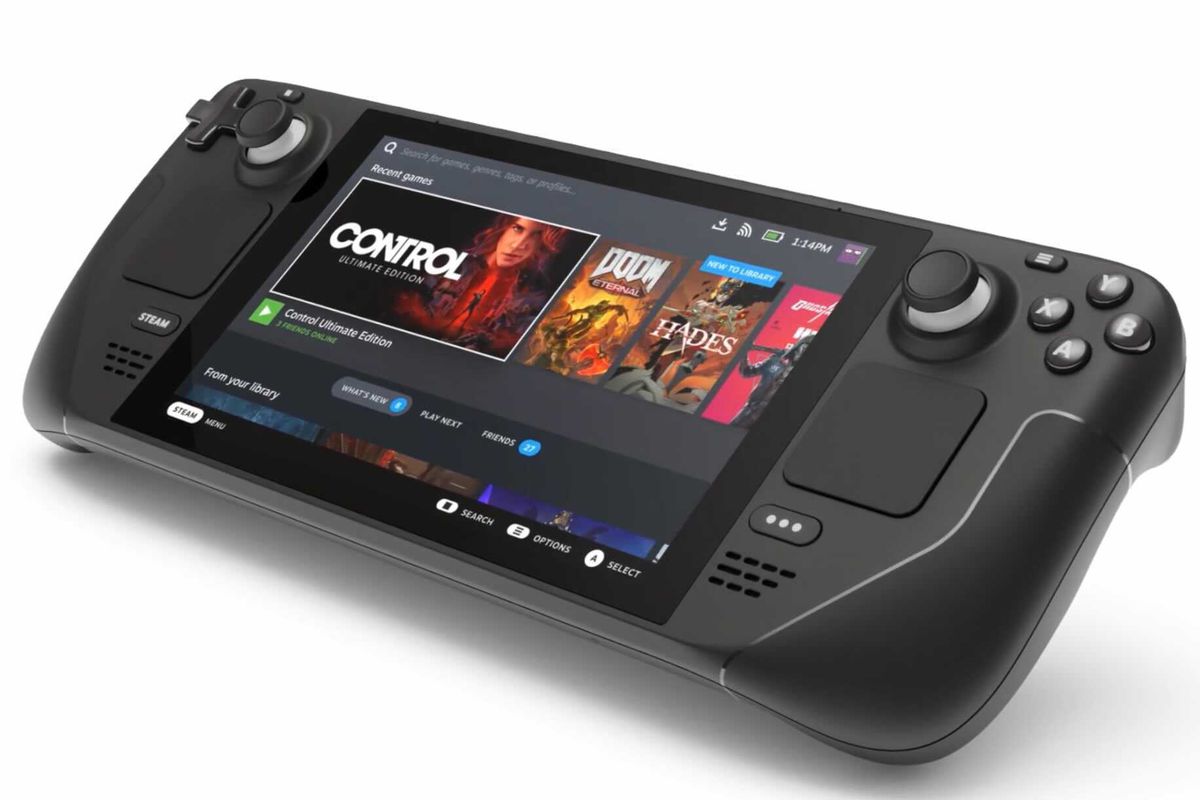
Valve has announced the first gaming PC handheld console: Steam Deck. At its core, Stead Deck is just a portable, small PC in little casing. It uses AMD Zen 2 CPU and RDNA 2 GPU architecture, has 16GB of RAM, Wi-Fi, and Bluetooth. It is a portable device with both a touchpad and joystick packing a seven-inch screen with a resolution of 1280x800 (16:10 aspect ratio). The screen has an ambient light sensor for automatic light adjustments same as your modern mobile device. Stating to Valve battery will hold up from two to eight hours depending on the activity of the user and what exactly he is doing. The handheld comes also with a carrying case.

Steam Deck operating system and software

Out of the box, Steam Dock comes with the latest Valve’s version of SteamOS 3. Just for comparing, the steam box was coming SteamOS 2, so this new Linux-based OS is aimed to provide better performance and better compatibility. Naturally, all Linux games in your Steam library will work right out of the box but Valve has something called PROTON inside OS, it is emulation software based on Wine that will supposedly let you play all of your Library games on a given OS. One big thing to mention here is that this is PC after all meaning that if you do not like having SteamOS on it you can install Windows instead and so far as we know it will support Windows 11. Now with Windows 11, you will be able to play all of your Steam games and run any kind of Windows software on it including EPIC store, battle.net, and others.

Cost and release date

The initial release date is set for December 2021 and today on July 16th Valve is opening you can reserve your copy if you want to pre-purchase. Follow this link if you want to reserve your copy. Reserve your Steam Deck device The price of the device will depend on the memory capacity which you would like to have. Please note that each of the 3 offered devices will have the same hardware, the only difference will be in memory available, and the most expensive version will also have anti-glare screen, everything else is identical. 64GB model will be $399, 256GB model will have the price of $529 and largest one with whooping 512GB will be $649

Conclusion

Valve ventures into the digital hardware domain again but it is unsure will they make it this time. Both Steam machine and their controller were in long run failed and later unsupported products so perhaps some customer caution is advised. Although having a handheld PC is tempting I would advise seeing how the overall market will accept this contraption before throwing money into it.
Read More
How to Fix Error Code 0xc00007b in Windows 10

Error Code 0xc00007b – What is it?

Error code 0xc00007b usually manifests itself via the inability to start an application properly. It can occur when users attempt to run a game or other programs on their computer. In such a case, the application will not start and a message box will pop up stating that error code 0xc00007b has occurred. The error code is likely to occur when users attempt to run a program in the incorrect or inappropriate bit. For instance, if you try to load a 32bit location with a 64bit location.

Solution

Restoro box imageError Causes

Error code 0xc00007b affects various versions of the Windows operating system, including Windows 7, 8, 8.1, and Windows 10. In the case of error code 0xc00007b for Windows 10, the error may be caused by issues related to software you’ve installed on your machine. This may cause software conflict resulting in the need to install programs like DirectX. Left unchecked, error code 0xc00007b could incite other error codes in Windows 10, such as error code 0xc004f034.

Further Information and Manual Repair

To repair error code 0xc00007b for Windows 10 devices, users will need to implement at least one manual repair procedure. Manual repair methods are effective in combating these issues as they can address the issues causing the error in the first place, thus fixing the problem.

The manual repair procedures for fixing error code 0xc00007b are very straightforward and can be implemented with little technical knowledge. However, you may need to contact a Windows repair technician if you have difficulty fixing the error code after completing the manual repair methods listed below.

Method One: Install Microsoft DirectX

Microsoft DirectX is an application usually included in the Microsoft operating system. It enables users to access high-speed gaming and multimedia on their PC. The latest version of this Windows technology is available on Microsoft’s official site.

Visit the Microsoft website and search for DirectX End-User Runtime Web Installer. Once you have located the latest version of the program, select the preferred language you would like DirectX to run in, and then click download. Run the program, then be sure to reboot your computer.

Note that this solution should only be applied if you are having issues running or displaying a gaming or multimedia application. Once you’ve correctly installed the latest version of DirectX, it should be able to fix underlying issues that may be causing error code 0xc00007b to occur. If you are still unable to run applications after completing this manual repair procedure, however, you will need to apply another method to fix error code 0xc00007b for Windows 10.

Method Two: Install Latest Version of .NET Framework

.NET Framework, a framework developed by Microsoft, provides solutions for users who may be having problems with applications. To download the latest version of the .NET framework, follow the steps listed below.

  • Step one: Open your favorite web browser
  • Step two: Enter www.microsoft.com/net
  • Step three: Click Downloads
  • Step four: Select the latest version of the .NET Framework by clicking the framework at the top of the list. (Currently, the latest version is .NET Framework 4.6.2.)
  • Step five: Select preferred language, then download
  • Step six: Run software.

To ensure you successfully download the latest version of the .NET Framework, verify your computer is properly connected to the Internet while downloading the software. Also, follow the instructions provided on the Microsoft website.

After completing the download process, reboot your computer then check if you have successfully resolved error code 0xc00007b for Windows 10. If this manual repair method is successful, you will be able to access your gaming and multimedia programs. Otherwise, the error code message box will reoccur, stating that the application error code is present on your device. Apply the next manual repair procedure to correct the error code if this reoccurs.

Method Three: Install Windows Updates

In certain instances, application error codes like error code 0xc00007b affect PC users who fail to install the most current Windows updates on their device. That is why it’s important to check your system and ensure you have installed all the latest updates.

The updates, if any are available, will automatically be installed on your PC once you access Windows Update in Settings. Reboot your computer then check if you are able to run programs that previously would not open due to error code 0xc00007b. If problems persist resulting in the reoccurrence of the error code, reinstall the applications you are unable to open or get help from a Windows repair technician.

Method Four: Download an Automated Tool

If you wish to always have at your disposal a utility tool to fix these Windows 8 and other related issues when they do arise, download and install a powerful automated tool.

Read More
Setting default applications in Windows 11
Setting default applications in Windows 11
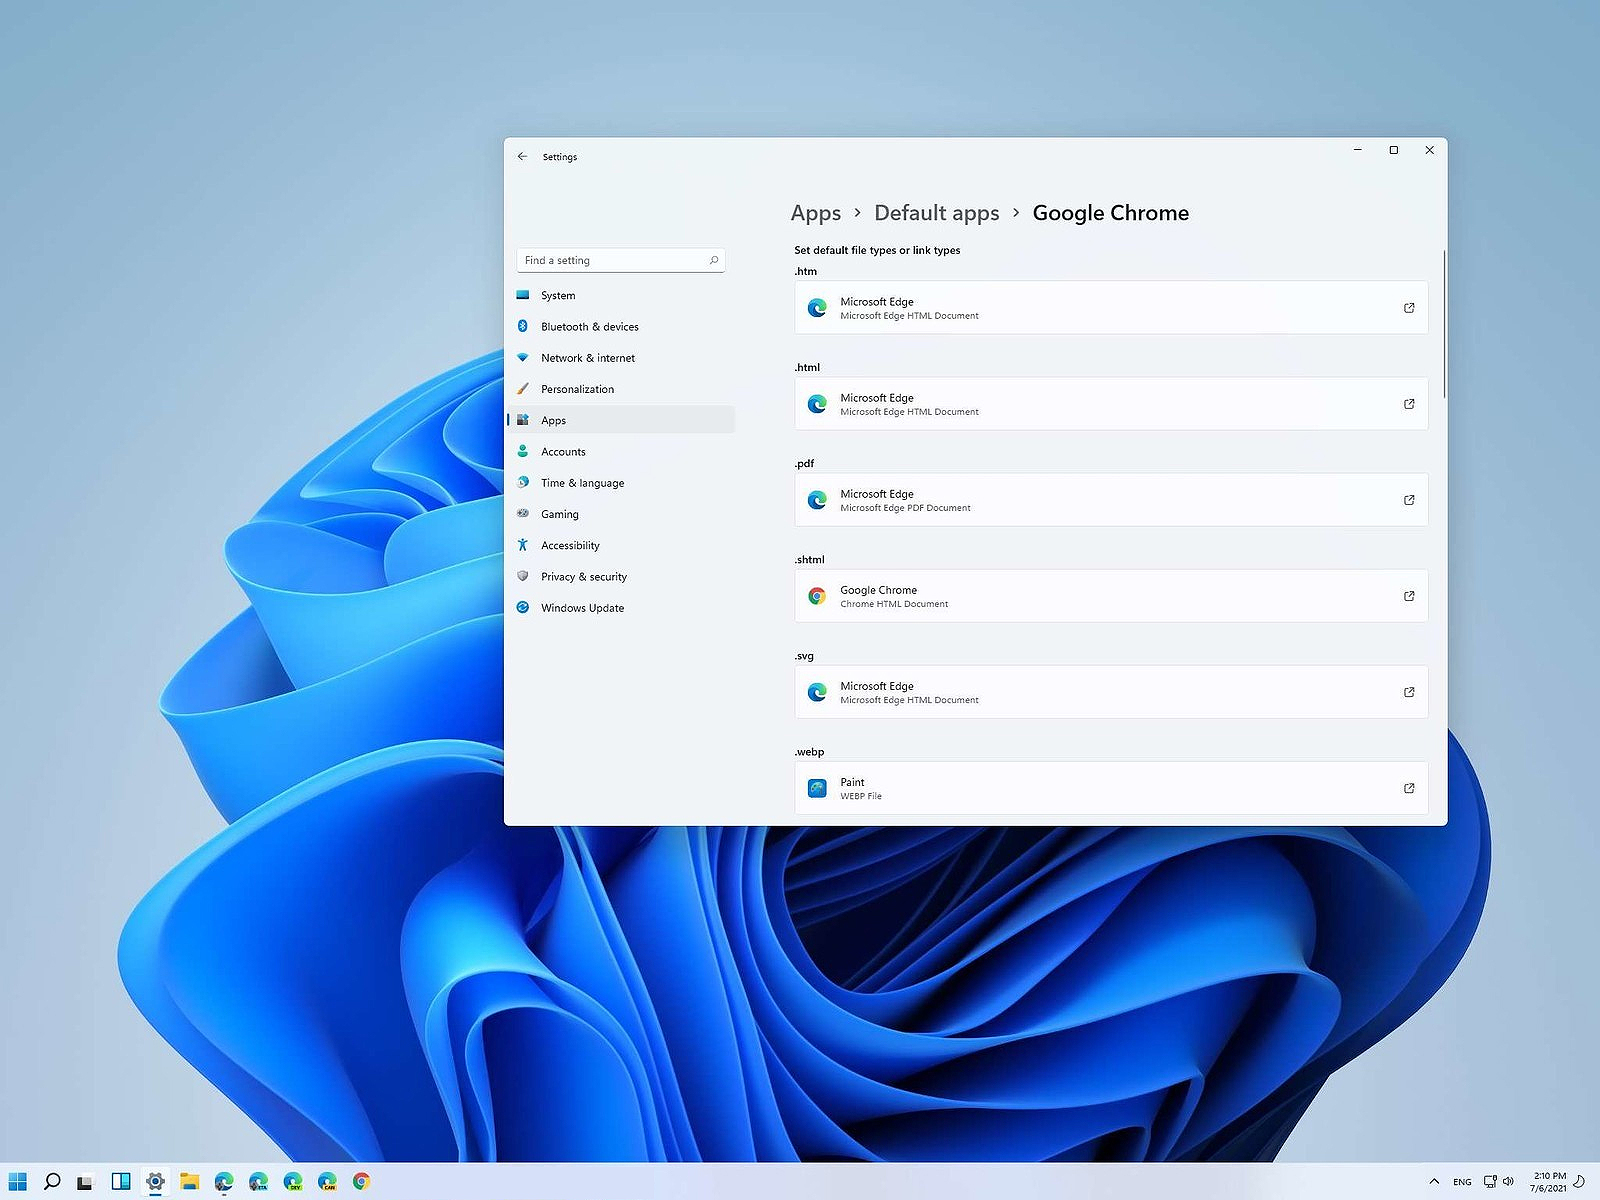
Same as in previous Windows versions, Windows 11 will also use certain applications as default ones for opening certain file types and file extensions. And yes, same as in previous versions it will come preconfigured for certain file types and associated applications like for example photos for pictures. Of course, users usually have their own favorite applications for certain file types and much more prefer to open them inside the application of their choice instead of the default one. We can change the default application like in previous Windows versions but this time there are two ways and overall more control of this process. Windows 11 has settings for choosing default file type applications and default file extension applications giving you more control of this process.

The opening setting for apps

Whatever you wish to change default application or default extension application you will need to open settings for default application. Follow steps to quickly go into it.
  1. Press ⊞ WINDOWS + I to open settings
  2. Select Apps on left
  3. On the right part select Default Apps
Now you are in settings for choosing default applications

Choosing default application by file type extension

This is considering by Microsoft as a typical way to set default applications inside Windows 11. Once you are inside the settings app there is a box labeled Enter a file type or link type. Inside the search box, type in file extension that you wish to associate the application with like .JPG, .TXT, or other. If the file extension is not associated with any application you will be presented with a Choose a Default button, if however, the file extension is already associated with the app, you will need to click on the app box itself. In any case, a pop-up will appear and ask How do you want to open YOUR FILE EXTENSION files from now on? Choose Application from the list of presented ones and click on OK.

Choosing default file type

Another method is to select the default application by file type selecting application for it. In the settings screen, under the search box, you will have a list of installed applications. Choose the application that you would like to associate a file type with and click on it. On the next details screen scroll down and select the file type that you want to associate with the selected application and click on OK.

Other/third method

There is also the third method for choosing the default application for file type but it includes some surfing on your hard drive and it can be more time-consuming for first-time settings. But it is fairly quick when you need to only use it once on some new file type (for example you have a new application installed and want to switch just one file type extension to that application). Locate the file that you want to associate with the application and right-click on it. Select Open With from the menu and then Choose Another App. Pop up will appear, select the application that you would like to use, and check the box beside Always use this app to open CHOOSEN EXTENSION files followed by clicking on the OK button.
Read More
Wallpapers by MyWay (wallpapers.myway.com) removal Guide

Wallpapers by MyWay is a browser hijacker, also known as Wallpaper Homepage adware. It was developed by Mindspark Interactive Network, Inc and it is widely promoted on the Internet as a genuine search engine powered by Google with an ability to customize homepage background and add some quick access links. This hijacker can be found in the most popular web browsers including Mozilla Firefox, Google Chrome, and IE. Generally Wallpaper by MyWay hijacker appears on the user’s computer without the user being fully aware of its modification.

While installed users will experience additional ads showing up in their search results, as well as sponsored content and pop-up ads. This extension has been flagged by several anti-virus scanners and it is recommended to remove it from your computer.

About Browser Hijackers

Browser hijack is a very common type of online fraud where your web browser settings are altered to allow it to do things you never intend. Browser hijacker malware is designed for many different reasons. These are generally used to force visitors to predetermined sites, manipulating web traffic to generate ad revenue. Nevertheless, it’s not that harmless. Your internet safety is jeopardized and it is also really irritating. Additionally, hijackers can make the entire infected system fragile – other harmful malware and viruses would take hold of these opportunities to get into your system very easily.

Signs of browser hijacker infection

Symptoms that your browser is hi-jacked include: 1. you see unauthorized modifications to your web browser’s home-page 2. you find yourself regularly directed to a different site than the one you meant 3. the default web engine and the default browser settings is modified 4. find new toolbars which you did not add 5. you notice lots of pop-up ads on your computer screen 6. your internet browser has instability issues or displays frequent errors 7. you’re blocked to access those sites of anti-malware solution providers.

Exactly how browser hijacker finds its way onto your computer

Browser hijackers can enter a computer by some means or other, for instance via file sharing, downloads, and e-mail also. Many internet browser hijackings come from add-on programs, i.e., browser helper objects (BHO), toolbars, or plug-ins added to web browsers to provide them additional functionality. A browser hijacker can be installed as a part of freeware, shareware, demoware and fake programs. An example of some popular browser hijackers includes Babylon, Anyprotect, Conduit, DefaultTab, SweetPage, RocketTab, and Delta Search, however, the names are often changing. Browser hijackers could record user keystrokes to collect potentially valuable information that leads to privacy issues, cause instability on systems, significantly disrupt user’s browsing experience, and finally slow down the system to a point where it will become unusable.

Browser hijacker removal methods

Certain types of browser hijackers can be quickly removed from your computer by deleting malicious programs or any other recently installed shareware. However, the majority of hijacking codes are certainly not easy to get rid of manually, as they go deeper into the operating system. Furthermore, manual removals require in-depth system knowledge and therefore can be a very difficult job for novices. Installing and running anti-malware programs on the affected computer can automatically delete browser hijackers and other malicious programs. One of the top tools for repairing browser hijacker infections is SafeBytes Anti-Malware. It helps you get rid of any pre-existing malicious software on your computer and gives you real-time monitoring and protection against new threats. Use a system optimizer (such as Total System Care) along with your anti-malware to fix various registry issues, remove computer vulnerabilities, and improve your computer overall performance.

How To Get Remove Malware That Is Preventing Antivirus Installation?

All malware is detrimental and the consequences of the damage will vary according to the specific type of malicious software. Some malware goes to great lengths to stop you from downloading or installing anything on your computer, especially anti-virus software programs. If you are reading this article, you may have infected by a virus that stops you from downloading a security software such as Safebytes Antimalware on your PC. Refer to the instructions below to remove malware in alternative ways.

Use Safe Mode to fix the issue

If the malware is set to run at Windows start-up, then booting in safe mode should avoid it. Only the minimum required applications and services are loaded when you boot your laptop or computer into Safe Mode. To launch your Windows XP, Vista, or 7 computers in Safe Mode with Networking, follow the instructions below. 1) After switching on the computer, press the F8 key before the Windows splash screen starts to load. This would conjure up the Advanced Boot Options menu. 2) Select Safe Mode with Networking with arrow keys and hit ENTER. 3) When this mode loads, you should have an internet connection. Now, make use of your web browser normally and navigate to https://safebytes.com/products/anti-malware/ to download and install Safebytes Anti-Malware. 4) After installation, do a complete scan and allow the program to remove the threats it discovers.

Switch to some other internet browser

Malicious code might exploit vulnerabilities in a specific internet browser and block access to all anti-malware software websites. When you suspect that your Internet Explorer happens to be hijacked by a trojan or otherwise compromised by online hackers, the most effective course of action would be to switch over to a different internet browser such as Google Chrome, Mozilla Firefox, or Apple Safari to download your chosen computer security software – Safebytes Anti-Malware.

Install anti-malware on a flash drive

Here’s another solution which is creating a portable USB anti-malware software package that can scan your computer for malware without needing installation. Adopt these measures to employ a flash drive to fix your corrupted PC. 1) On a clean PC, download and install Safebytes Anti-Malware. 2) Plug in the pen drive into the uninfected computer. 3) Run the setup program by double-clicking the executable file of the downloaded software, with a .exe file format. 4) Choose the flash drive as the destination for saving the software file. Follow the activation instructions. 5) Now, transfer the thumb drive to the infected computer. 6) Double-click the antivirus software EXE file on the thumb drive. 7) Click on the “Scan Now” button to start the malware scan.

How SafeBytes Anti-Malware Keep your Machine Virus Free

If you are looking to download an anti-malware application for your computer, there are plenty of tools on the market to consider but you just cannot trust blindly anyone, no matter whether it is a free or paid program. A few of them do a good job in eliminating threats while many will ruin your computer themselves. You must select one that is dependable, practical, and has a good reputation for its malware source protection. When considering commercial anti-malware application options, many people select well-known brands, like SafeBytes, and they are quite happy with it. SafeBytes is a powerful, real-time antivirus application that is designed to assist everyday computer user in safeguarding their PC from malicious threats. With its most advanced virus detection and repair technology, this software will help you protect your personal computer against infections caused by different types of malware and other internet threats, including adware, spyware, viruses, worms, trojans, keyloggers, ransomware, and potentially unwanted program (PUPs).

There are lots of wonderful features you’ll get with this security product. Some of them are listed as below:

Robust Anti-malware Protection: Using its advanced and sophisticated algorithm, this malware elimination tool can detect and remove the malware threats hiding within your computer system effectively. Active Protection: SafeBytes gives you round-the-clock protection for your PC limiting malware attacks in real-time. It will check your personal computer for suspicious activity at all times and safeguards your PC from unauthorized access. Fast Scan: This computer software has one of the fastest and most efficient virus scanning engines in the industry. The scans are very accurate and take a short amount of time to complete. Web Protection: Safebytes allots all sites a unique safety score that helps you to have an idea of whether the website you’re about to visit is safe to view or known to be a phishing site. Light-weight: SafeBytes gives complete protection from online threats at a fraction of the CPU load due to its enhanced detection engine and algorithms. 24/7 Customer Service: Expert technicians are at your disposal 24/7! They will quickly resolve any technical issues you may be experiencing with your security software. To conclude, SafeBytes Anti-Malware is really great for securing your PC against all kinds of malware threats. Malware problems will become a thing of the past once you put this software program to use. So if you’re looking for the best anti-malware subscription for your Windows-based PC, we highly recommend SafeBytes Anti-Malware software

Technical Details and Manual Removal (Advanced Users)

If you’d like to manually remove Wallpapers by MyWay without using an automated tool, it may be possible to do so by removing the application from the Microsoft Windows Add/Remove Programs menu, or in cases of web browser extensions, going to the browsers AddOn/Extension manager and removing it. You will probably also want to reset your internet browser to its default configuration settings. If you opt to manually delete the system files and registry entries, use the following checklist to make sure you know exactly what files to remove before performing any actions. Please keep in mind that this is for professional users only and might be difficult, with wrong file removal leading to additional system errors. In addition, some malware is capable of replicating or preventing deletion. Carrying out this malware-removal process in Safe Mode is recommended.
Files: %UserProfile%\Local Settings\Application Data\WallpapersMyWayTooltab %LOCALAPPDATA%\WallpapersMyWayTooltab %LOCALAPPDATA%\Google\Chrome\User Data\Default\Extensions\glhahjphgpghoefihgllamaapanabkmp %UserProfile%\Local Settings\Application Data\Google\Chrome\User Data\Default\Extensions\glhahjphgpghoefihgllamaapanabkmp Registry: HKEY_CURRENT_USER\Software\WallpapersMyWay
Read More
1 2 3 162
Logo
Copyright © 2022, ErrorTools. All Rights Reserved
Trademarks: Microsoft Windows logos are registered trademarks of Microsoft. Disclaimer: ErrorTools.com is not affiliated with Microsoft, nor claim direct affiliation.
The information on this page is provided for information purposes only.
DMCA.com Protection Status