Setting Standard Desktop icons on Windows 11

Strangely enough, Windows 11 does not feature any typical icon on its desktop when installed. No My PC, no Recycle Bin, nothing, just plain and clean wallpaper. Personally, I like this clean look and feel but of course, there are a lot of users that are used to have some system-related icons on their desktop for easy access.

windows 11 desktop iconsDo not sweat, we will turn them back on with ease. The best part is that you can choose which one would you like. So let’s dive right into it and get the icons back for the old Windows feel and look.

Showing selected Icons desktop

  1. Right-click on Desktop and select Personalize
  2. Select Themes from the list of personalization items
  3. Inside themes scroll down and click on Desktop Icon Settings
  4. Desktop Icon Settings will open and inside it, place checkmarks beside icons that you would like to appear on the desktop and click OK
  5. Close settings

As always settings and choices will be automatically applied and icons will appear right away on the desktop.

If you like to learn and find out more about various Windows errors, and how to repair them go to our vast archive or use search to find articles that will explain and help you in solving your issue.
However, if you prefer to do things fast and with automatization then we are proposing to use an automated solution for your issues. The application that we are recommending is Advanced System Repair Pro
Advanced System Repair utilizes multiple tools all in one to give you a quick, simple, reliable, and very thorough diagnosis of your PC. It brings you all the tools you need in one program to clean, fix, protect, optimize and boost your PC!
1-Click Maintenance
All the tools to make it simple and easy! It's like having a professional technician at the click of a mouse.

Junk Cleaner
Keeping your computer free from unnecessary clutter also helps make your computer last longer. Like any other machine, if you keep it clean and take care of it, it will serve you better for longer!

Optimize background apps
Optimize applications background activity with the built-in Application Optimizer feature.

Disk Defrag
With a simple 1-click, Advanced System Repair speeds up your PC by assembling fragmented files on your machine and organizing them more efficiently.

Malware Removal
Finds and removes all types of harmful malware including trojans, worms, bots, adware, spyware, PUPs, and more!

Privacy Cleaner
The all-in-one privacy suite to Clean Your Tracks & Protect Your Privacy! Make your computer safe, secure, and more efficient!

System Tweak/Optimizer
ASR will analyze your complete system and settings to adjust your PC to function at its maximum performance.

Registry Cleaner
Over time, as you install and uninstall applications, the registry can become cluttered with old entries and broken settings which can result in program crashes, and annoying messages and slow the computer down.
Visit our Advanced System Repair Pro Download page to inform yourself about all the benefits of this software and get a free trial copy of it.
advanced system repair pro

Advanced System Repair Pro

One-click automated PC repair solution
ASR logo
With Advanced System Repair Pro you can easily
Replace damaged files
Restore performance
Free disk space
Remove Malware
Protects WEB browser
Remove Viruses
Stop PC freezing
DOWNLOAD
Privacy Policy | Terms of Use | Uinstall
Advanced System Repair Pro is compatible with all versions of Microsoft Windows including Windows 11

Share this article:

You might also like

Computer makes a beeping noise when you turn it on
Recently, a few users reported that they were unable to turn on their computers for some reason and at the same time their computers Computer makes a beeping noise couple of times or continuously whenever they try to turn them on. The sounds the computers are making can be quite annoying and it also signifies that there is something wrong with them. The problem might have something to do with the hardware inside of the computer system rather than Windows 10 itself. As you know, a computer is designed to deliver audible error sounds every time some part of the hardware is not properly working. For instance, if you hear a single beep, this indicates that your GPU is having some issues and if you’re hearing two beeps, it indicates that your RAM is not working properly, whereas three beeps that repeat after a pause when you turn on your computer means that there is something wrong with the system memory. On the other hand, if your computer is beeping continuously, this means that the problem lies with the processor. To fix this issue, here are some suggestions that might help but before you proceed, make sure that you know how to manage your computer’s hardware, if not, better have some expert do it for you.

Option 1 – Try checking the RAM

One of the basic things you can do in this kind of case is to check the RAM. Prepare some screwdrivers and dig into your PC and then look for the RAM slots and ensure that they are attached firmly. There are times when moving around your computer daily can cause certain components in your computer to become loose. Worst case scenario is that the RAM might be broken so really have to replace it.

Option 2 – Try checking the graphics card

After digging into your computer, check the graphics card and give it some good cleaning. As you know, you have to remove certain components like the graphics card regularly and clean them to help increase their lifespan and avoid errors in a startup. And if it turns out that the graphics card is broken, you have to replace it with a new one to fix the problem.

Option 3 – Try checking the processor

The processor is the brain of every computer so if it ends up not working, everything else is useless. Thus, you need to check it to see if it’s firmly attached and see if it needs some cleaning of dust and other debris. After that, try turning on your computer again. If it doesn’t work, then you might have to take your system to a technician to resolve the problem for you.
Read More
Firewall is preventing or blocking connections
As you know, the Windows Firewall is designed not just to protect your computer from viruses and malware, and other security threats but it’s also designed to block any program from accessing the internet. Users are given the option to block both inbound and outbound traffic for any apps on their computers. However, this kind of option can often lead to not being able to access the internet. In such cases, when you try to run the Windows Firewall Troubleshooter or the Windows Network Diagnostic troubleshooter, it will throw an error message that says, “Windows Firewall is preventing connections to your computer. The Windows Firewall rule HSS DNS Leak Rule may be blocking your connection”. If you are in this kind of scenario, then you’ve come to the right place as this post will guide you on how exactly you can fix this error. When you encounter this kind of error, there are several options you can check out to fix it. You can try to allow an app or feature through the Windows Firewall or uncheck the HSS DNS leak rule in both private and public. For more details, refer to the suggestions provided below.

Option 1 – Try to allow an app or feature through Windows Firewall

The first thing you can do to get rid of the error is to allow a feature or app through the Windows Firewall. To do this, follow these steps:
  • Open the Windows Defender Security Center.
  • From there, select the Firewall and Network Protection option.
  • Next, click on the “Allow an app through firewall” option and then click on the “Change Settings” button and make sure that you have administrative privileges.
  • After that, select the app or feature you want to allow through the Firewall from the menu. You also have the option to manually add the app by using the “Add an App” option.
  • Then select the between the type of network an app can access such as:
    • Private Network will allow the app to connect to the internet only at home or work.
    • Public Network will allow the app to connect to the internet from anywhere, including Public WiFi hotspots.
  • Once done, restart your computer and see if it fixed the error or not.

Option 2 – Try to uncheck the HSS DNS leak rule in both private and public

The next thing you can do to fix the error is to uncheck the HSS DNS leak rule in both private and public. You can do this by following these steps:
  • Open the Windows Defender Security Center.
  • From there, select the Firewall and Network Protection option.
  • After that, click on the “Allow an app through firewall” option and then click on the “Change Settings” button and make sure that you have administrative privileges.
  • Next, scroll down until you see the HSS DNS leak rule in both private and public option and then uncheck it.
  • Now restart your computer and check if the error is now gone.
Read More
How to Fix msrtn32.exe error or high CPU usage
If your Windows 10 computer slows down, the first thing you can do is to check the status of the resource usage in the Task Manager. In such cases, it shoots up to even 1000% which causes the system to either hang or freeze since some programs are using a major chunk of system resources. And this is the case with msrtn32.exe. Msrtn32.exe is a malicious file that may try to steal your digital currency. It can get installed on your computer when you install a browser plugin or extension that can modify the default settings of browsers, the content of web pages, search results, as well as display tons of intrusive ads. So if you see msrtn32.exe under the Processes tab of the Task Manager If you see msrtn32.exe under the Processes tab of your Task Manager, refer to the suggestions given below to get rid of it and restore your computer’s normal function. Before you proceed, take note that this executable file is found in the following location:
C:/Program Files(x86)msrtn32

Option 1 – Delete the folder where msrtn32.exe is located

The first thing you can do is to go to C:/Program Files(x86)/msrtn32. From there, look for the malicious executable file and delete its folder. If you are not able to delete the folder, make sure that you’re logged in as administrator and then try again.

Option 2 – Try scanning your computer using Windows Defender

Since you are dealing with a malicious file, if you weren’t able to delete the folder where the file is located, you can scan your computer using the built-in Windows Defender program and then eliminate the malicious file. Follow the steps below to do so:
  • Tap the Win + I keys to open Update & Security.
  • Then click on the Windows Security option and open Windows Defender Security Center.
  • Next, click on Virus & threat protection > Run a new advanced scan.
  • Now make sure that Full Scan is selected from the menu and then click the Scan Now button to get started.
Read More
Delete last 15 min of browsing history on phone
google browsing 15min history delete
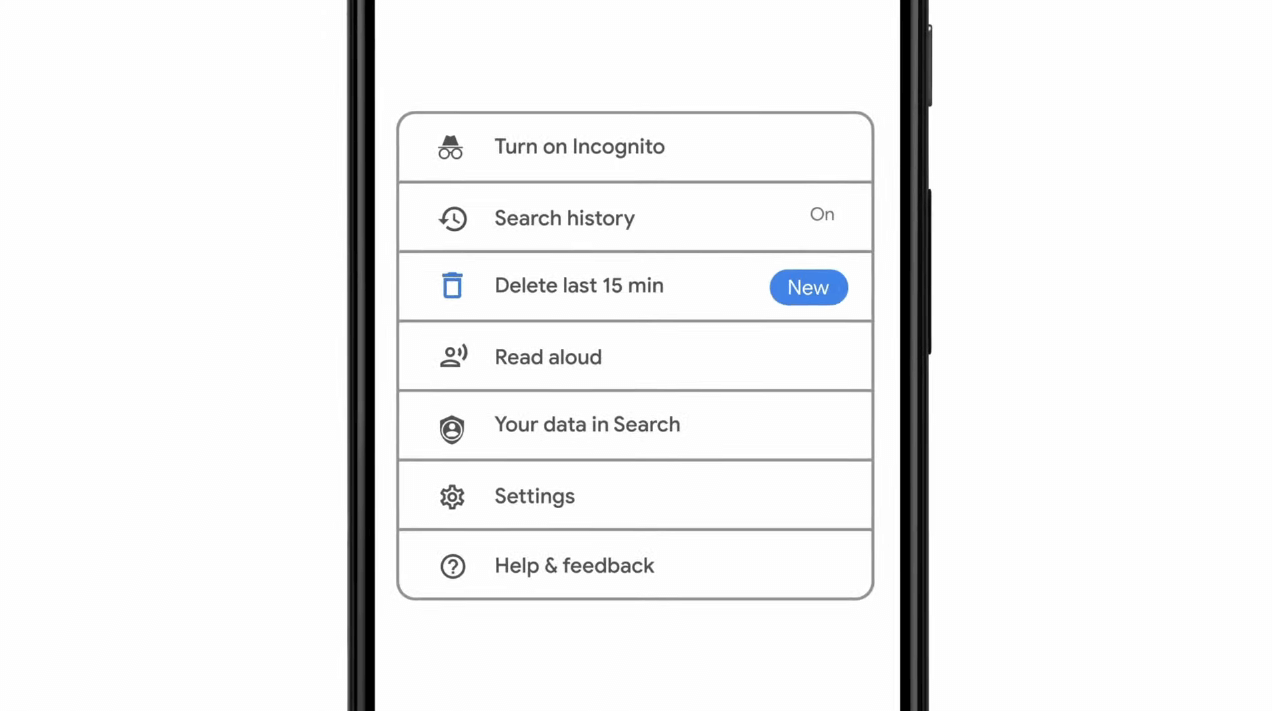
As previously announced by Google feature to quickly delete the last 15min of browsing history via one button is rolling out now. For now, only Apple users will be available to use this feature but the Android update is scheduled for later this year, a strange move by Google but it is what it is. For anyone who is unfamiliar with this feature, basically, Google wants a quick way to remove the last 15min of browsing history as a supposedly stated request to make deleting browsing history much easier. Google came up with this idea so you can keep the previous history intact but remove just 15min time frame, no additional explanation was given on why 15 but I presume it is some round number that came up as the middle one with research, read telemetry info. Using quick delete requires being signed into Search with a Google account. Users can access the option by simply tapping on the avatar icon to access the settings then choosing "Delete last 15 minutes."
Read More
Star Wars movies & series, chronological order
Besides Star Trek, Star Wars was one of my favorite movie franchises, as a kid, it was the first movie I have seen in Theatre and over the years I have rewatched and reached each entry in the franchise. It has significantly grown over the years, sometimes for worse, sometimes for better but what it always did is explored and expanded lore, characters and brought stories interesting and original enough. The Series has always been original and innovative enough with interesting characters and locations and it managed to capture the imagination of many viewers around the globe. If you or someone else is watching the franchise for the first time it is recommended actually to watch everything how it was released because of some information that is spoiled in prequels that could spoil some interesting revelations later. But if you have already watched everything and would like to follow the story from the beginning to end we are presenting you with the list of all TV series and movies in tar Wars canon in their chronological order so you can enjoy some good character developments and see the whole story unfold how it was meant to be. In the following list, as told, we are including TV series (both released and currently in production) in the Star Wars canon.

Chronological order of Star Wars franchise:

Star Wars: The Acolyte Acolyte is upcoming TV series exploring times in the old republic and the rise of the dark side within Star Wars Episode I: The Phantom Menace The first movie entry in the franchise introducing some key characters who will go through various adventures yet to come Star Wars Episode II: Attack of the Clones Continuation of story and deepening of the plot laid out in the previous movie Star Wars: The Clone Wars Animated TV series exploring war in more detail, set in the period between episodes 2 and 3, before series there is clone wars full length animated movie titles simply as Star wars clone wars serving as a pilot to series. Star Wars Episode III: Revenge of the Sith Last movie in so-called prequel trilogy finishing some stories and finalizing some character arcs Star Wars: The Bad Batch Upcoming animated series Bad batch will focus on few troopers find their way in changing the galaxy Solo: A Star Wars Story Story of everyone loved Han Solo character, this origin story will introduce you to some key characters in the later entry of series Obi-Wan Kenobi Upcoming series that will focus on everyone's favorite JEDI master Obi-Wan Star Wars Rebels Animated series exploring first sparks of forming rebel alliance against dreaded empire Andor Upcoming series set five years before the events of Rogue One, the series follows rebel spy Cassian Andor during the formative years of the Rebellion. Star Wars Rogue One Full feature movie setting up events for episode 4 Star Wars Episode IV: A New Hope First Star Wars movie, little outdated today with special effects but with a strong story and introducing some new characters which will become main icons of franchise Star Wars Episode V: The Empire Strikes Back Arguably the best movie in the whole series, leaning more to serious note and darker than previous entries. Besides Episode 3 this is the most serious and dark movie of the series. Star Wars Episode VI: Return of the Jedi Last movie entry in the so-called original trilogy, finishing some stories and wrapping up one era. Star Wars The Mandalorian Set after episode 6 show focuses on a Mandalorian bounty hunter character following his adventures in the galaxy. The Book of Boba Fett Upcoming Mandalorian spin-off TV series focusing on Bobba Fet, one of most loved bounty hunter characters in the Star Wars universe Ahsoka Star Wars: Ahsoka is an upcoming live-action television limited series exploring the character of Ashoka Tano first seen in Clone Wars Rangers of the New Republic Set within the timeline of The Mandalorian, Rangers of the New Republic is a new upcoming live-action series. Star Wars: Resistance Animated series exploring resistance against first-order setting up events to be followed in the newest trilogy of movies. Star Wars Episode VII: The Force Awakens First full feature movie set in the post-empire era introducing new characters and bringing back some fan favorites. Star Wars Episode VIII: The Last Jedi The second movie in the last order trilogy, continuing stories of previously establishes characters Star Wars Episode IX: The Rise of Skywalker Last entry in new order trilogy of movies, finishing some open stories and concluding arcs for characters previously introduced in Force Awakens. That's it, chronological order of canon TV shows and movies of the Star Wars franchise. We are sure there will be more movies and shows in the future and someday we will revisit this list to include them as well. Until then, may the force be with you. If you would like to read more helpful articles and tips about various software and hardware visit errortools.com daily.
Read More
Cannot save media from Microsoft Photos
The Microsoft Photos app is a useful tool that allows users to view, edit, as well as create videos on their Windows 10 computers. Although it works just fine most of the time, there are some instances when you might encounter some issues when using it. One of these issues is when you cannot save media from the Photos app after you’ve edited an image. This is most likely related to a permission issue. However, according to some users, they got the error where the edited media file can’t be saved. When you encounter this kind of error, you will see the following error in your Photos app:
“It looks like you don’t have permission to save changes to this file. Try saving a copy instead.”
There are several options you can explore to resolve this error. You can try updating the Microsoft Photos app or verify the ownership of the destination folder. You can also re-register and reinstall the app. For more detailed instructions, make use of the options provided below.

Option 1 – Try to update the Microsoft Photos app

The first thing you can do to fix the problem is to update the Microsoft Photos app.
  • Open the Microsoft Store and click on the three horizontal dots for the menu located on the top right portion of the window to see the options.
  • Next, select Downloads and updates and then click the Get updates button in the top right. This will install any pending updates for all the apps including the Microsoft Photos app using the Microsoft Store.

Option 2 – Try to verify the ownership of the destination folder

The next thing you can do to fix the error is to verify the ownership of the folder because chances are, the location where you’re trying to save the file might not have enough permissions to read and write the file to the disk. Thus, you need to take ownership of the folder by following these steps:
  • Type “command prompt” in the Windows Search bar and then right-click on the relevant search result and select “Run as administrator”.
  • After that, if a User Account Control or UAC prompt appears, just click on Yes to proceed.
  • Next, type and enter this command: TAKEOWN /F <path>
  • Note that the <path> is the location of the folder or file in File Explorer.
  • Now type and enter this second command: ICACLS <path> /grant administrators:F
  • Finally, once the command has been executed, restart your computer and then see if you can now access the folder or file.

Option 3 – Try resetting the Photos app

If the first option of restarting the background process of the Photos app didn’t work for you, you can try to reset the Photos app so that it will use the default factory settings. Note that this option works when you are experiencing this issue after making a couple of changes in the Photos app.
  • To get started in resetting the Photos app, open the Windows 10 Settings.
  • Then go to Apps > Apps & features.
  • After that, scroll down until you see the Photos app option – click on it and open its Advanced options.
  • From there, you will see the Reset button, click on it and click and then click on it once more to confirm.
Note: The process may take a couple of minutes to complete. Once it’s done, open the pictures again using the Photos app.

Option 4 – Try reinstalling the Photos app

If none of the first two options given above worked, then you might want to consider reinstalling the Photos app. Unlike what most users think, it isn’t really that hard reinstalling preinstalled apps as you have the Windows PowerShell for that. To use this program in reinstalling the Photos app, follow these steps:
  • Open the Windows PowerShell program with admin privileges and key in the following command:
Set-ExecutionPolicy Unrestricted
  • After that, execute this second command to re-register and reinstall the Microsoft Photos app.
Get-AppXPackage -AllUsers | Foreach {Add-AppxPackage -DisableDevelopmentMode -Register "$($_.InstallLocation)AppXManifest.xml"}
Note: In the command given, do not forget to replace the “PackageFullName” with the actual package name for the Photos app. After executing the command, it will uninstall the Photos app from your computer so you need to install it again from the Windows Store by simply looking for it. Once you found it, just click on install to start the installation process.
Read More
Fix oobesettings error inside Windows 11
oobesettings
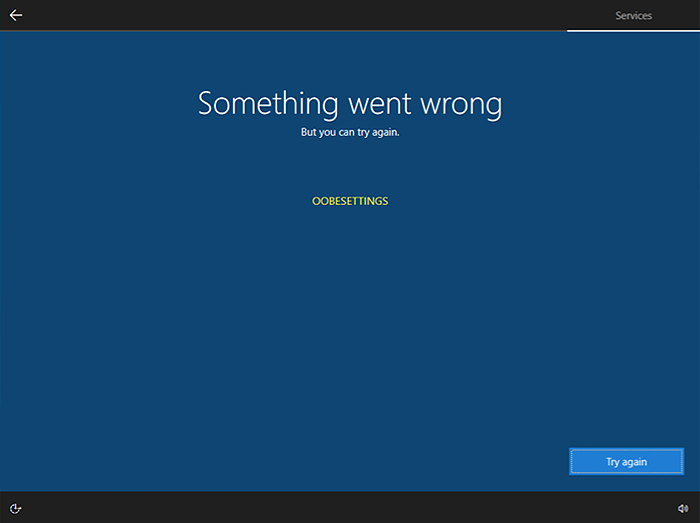
Oobesttings error is the blue screen of death error caused by some faulty settings inside the Windows registry. The good news is that this is not a hard error to fix and if by any chance you are one of the unfortunate people getting this dreaded annoying error, please do keep reading because we have several things that you can do in order to eliminate this issue from your computer.

Reboot your system

This is the easiest and straightforward solution and can work sometimes since if the system has not been properly rebooted in a while memory could be filled with various processes and it can trigger oobesettings error. A simple restart of the system can solve the issue by decluttering files and emptying memory.

Scan and repair with SFC

If rebooting the system was not helpful and sadly you still receive an error then let's scan and repair system files by using Windows built-in tool SFC. In order to use this, we will have to run the command prompt in elevated administrator mode. Follow instructions closely. First click on the search icon on the taskbar and type in CMD The command prompt will show as a search result, on the right side click on Run as administrator. Once it opens type in following command: sfc /scannow and press ENTER Wait for the process to finish completely and restart your device after.

Repair the system registry

If the SFC scan has not repaired the issue then we will move to the next solution that involves repairing the system registry itself. Please note that you need to follow step-by-step for provided instructions since playing with the system registry can cause some serious issues if not done properly and can even render the system unstable. That being said, let's begin: Press ⊞ WINDOWS + R to open Windows run dialog Type inside regedit and press ENTER Inside registry editor locate the following key: HKEY_LOCAL_MACHINE/SYSTEM/CurrentControlSet/Control/Session Manager/ Memory Management. and click on it to see properties Inside the properties right-click on CommitLimit value and choose delete. Confirm with yes. Close registry editor and reboot your computer.

Reset Windows 11

If even clearing key inside the registry editor has not helped next step would be to reset the system itself. Press ⊞ WINDOWS + I to open Windows settings and click on System on the left. Inside on the right part click on Recovery In recovery click on the button next to Reset this PC that says Reset PC Choose between keep my files and remove everything (a better option is remove everything, but be sure that you have all your files on a separate drive backed up) Choose between Cloud Download or Local reinstall. Click on next to confirm choices and after that on Reset to start the reset process. Follow onscreen instructions until it is fully done.
Read More
Diablo 3 lost connection to the game server
Diablo has changed how action RPG games are made and has placed homework for many developers. Diablo 3 is 3rd continuation in the series and to the joy of many players worldwide it has brought some interesting things in the genre like teaming up with other friends to slay demon hordes together introducing much needed multiplayer element. Sadly sometimes we get the error that Diablo 3 can not connect or that the connection to the game server has been lost. Keep reading and try provided solutions as they are presented to fix this issue and continue gaming.
Read More
Fix Bad Image Error Status 0xc000012f
When you run a program in Windows 10, error 0xc000012f may pop up, mentioning that the files and binaries you’re trying to run are corrupted. Error 0xc000012f means Bad Image, denoting that the program’s executable or one of the supporting modules is corrupt. Or there is probably a DLL mismatch. This error usually manifests itself after a windows update or after installation of some application, in order to fix it follow the steps below:
  1. Perform SFC scan

    Press ⊞ WINDOWS + X to open the Windows menu keyboard with windows and x markedFrom the menu choose command prompt (admin) Windows menu command prompt adminIn command prompt type sfc /scannow and press ENTER Leave the computer for the operation to be completed and Reboot your computer
  2. Run DISM

    Press ⊞ WINDOWS + X to open the Windows menu keyboard with windows and x markedFrom the menu choose command prompt (admin) Windows menu command prompt adminin command prompt type: DISM.exe /Online /Cleanup-image /Restorehealth and press ENTER wait for the process to be finished and Reboot your computer
  3. Reinstall application

    If this error has been popping up after the application install remove the installed application and install it again. There is the possibility that the application installer has by accident corrupted some files, reinstalling it might fix the issue.
  4. Uninstall Windows update

    In some cases, Windows update can introduce this issue, go to Windows updates, into advanced options, and uninstall the latest update to see if this will fix the error.
  5. Install Visual C++ Redistributable

    Go to the official Microsoft website and download C++ redistributable package and install it
  6. Install new windows update

    If there is a new Windows update install, there is a chance that in the last update something went wrong and it is very likely that it was fixed in the last one.
Read More
Choosing default browser in Windows 11
Default applications in previous Windows versions were a pretty straightforward process. The user went to the settings application and picked for each category which application he would like to choose from the list of installed ones. In Windows 11 things are little changed. In this article, we will show you how to choose the default internet browser inside Windows 11, and sadly it is a more tedious task than in previous versions.

windows 11 default browser
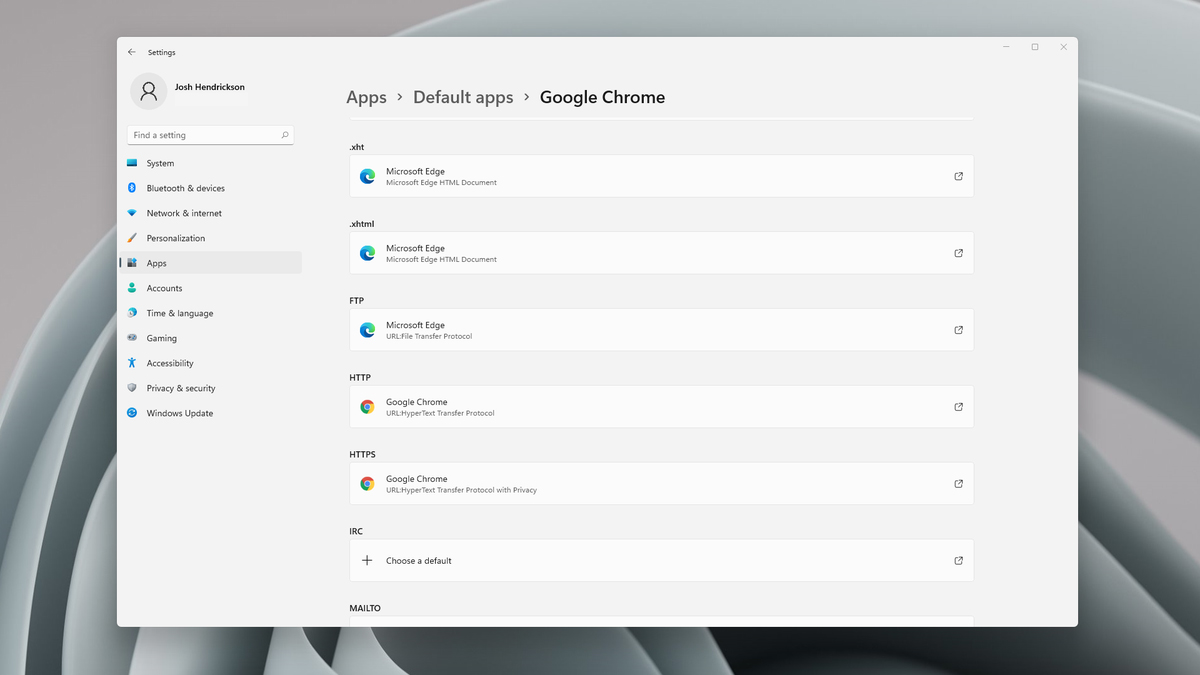
Choosing default browser in settings

As in previous versions of the Windows operating system you will need to use the settings application in order to change your default Internet browser. Previously, in Windows 10, a variety of general categories like email, web browser, and photo viewer were all listed under the Default Apps section of the Settings panel. It was easy to click on one of those categories and click on the option you like best from the small pop-up suggestion window. In the Windows 11 Insider Build, you’ll see a gauche list of an individual file or link types that you’ll need to specify your preferred browser for. The types include: HTM, HTML, PDF, SHTML, SVG, WEBP, SHT, FTP, HTTP, and HTTPS. There are additional optional types you can specify your preferred browser for as well. The issue here is in order to use a single browser which most users do you will have to go through each file type and set your preferred one. I am really not sure why this was introduced or why it has to be this way, all I can do is hope that in the final release of Windows 11 this feature will be rolled back as it used to be and that you could set your default browser in just one simple click.
Read More
1 2 3 162
Logo
Copyright © 2022, ErrorTools. All Rights Reserved
Trademarks: Microsoft Windows logos are registered trademarks of Microsoft. Disclaimer: ErrorTools.com is not affiliated with Microsoft, nor claim direct affiliation.
The information on this page is provided for information purposes only.
DMCA.com Protection Status