If you are trying to update your Windows 10 computer but encounter the Windows update error 0x80244019 instead, read on as this post will help provide you some possible fixes to resolve the problem. This kind of Windows Update error is usually caused by your Windows Update settings or the Windows Update components. Many users who encountered this error reported that the update fails with the said error which keeps them from enjoying the latest features that the Windows Update brings.
In such cases, some of the common culprits for this Windows Update error are the Windows Update settings, Windows Update configuration, third-party antivirus programs, and so on. To resolve this error, you can check out the options provided below.
Option 1 – Restart your computer and try installing the Updates again
You can restart your computer and then try installing the updates once again. There are instances when a simple restart resolves Windows Update errors. Aside from that, it would also be better if you make sure that your internet connection is working and that it’s stable. And so after you restart your computer, check for updates once again and see if you’re still getting the error or not.
Option 2 – Try to change the Windows Update settings
You might also want to try tweaking the Windows Update settings. This will prevent other Microsoft products from being updated and besides, you can always turn the option back on afterward. To change Windows Update settings, follow these steps:
- Tap the Win + I keys to open Settings.
- Next, go to Updates and Security and click on the Advanced Options.
- From there, turn off the “Get me updates for other Microsoft products when I update Windows” option.
Option 3 – Run the Windows Update Troubleshooter
Running the built-in Windows Update troubleshooter is one of the things you can first check out as it is known to automatically resolve any Windows Update errors like error code 0x80244019. To run it, Refer to these steps:
- Tap the Win + I keys to open Settings.
- From there, click Update and Security and go to the Troubleshoot section.
- Next, select Windows Update and click the “Run the troubleshooter” button and wait until it’s finished, and then try to run Windows Update again.
Option 4 – Try to disable the third-party antivirus program
Disabling the antivirus program or any security software installed in your computer is always a good idea you can try when the Windows Update process does not go smoothly. There are times when you encounter Windows Update errors like 0x80244019 due to interference of third party antivirus programs. So before you try updating your computer again, make sure to disable the antivirus or security program and once the Windows Update is done, don’t forget to enable the antivirus program back again.
Option 5 – Try to manually install the Windows Updates
Windows Update Error 0x80244019 might be due to a Windows Update that has failed. So if it is not a feature update and only a cumulative update, you can download the Windows Update and install it manually. But first, you need to find out which update has failed, and to do so, refer to the following steps:
- Go to Settings and from there go to Update and Security > View Update History.
- Next, check which particular update has failed. Note that Updates that have failed to install will be displayed under the Status column which has a label of “Failed”.
- After that, go to the Microsoft Download Center and look for that update using its KB number and once you find it, download and then install it manually.
Note: You can also use the Microsoft Update Catalog, a service from Microsoft that provides a list of software updates that can be distributed over a corporate network. With the help of this service, it can be easier for you to find Microsoft software updates, drivers as well as fixes.
Option 6 – Restart some Windows Update services
The first thing you have to do is to restart Windows Update-related services. Refer to the steps below to do so.
- Open the WinX Menu.
- From there, open Command Prompt as admin.
- Then type in the following command – don’t forget to hit Enter right after typing each one of them.
net stop wuauserv
net stop bits
- After entering these commands, it will stop the Windows Update Service and the Background Intelligent Transfer Service.
- Next, go to the C:/Windows/SoftwareDistribution folder and get rid of all the folders and files thereby tapping the Ctrl + A keys to select them all and then click on Delete. Note that if the files are in use, you won’t be able to delete them.
- Once all the contents in the Software Distribution folder are deleted, restart your PC and then go back to Command Prompt and input the following commands again.
net start wuauserv
net start bits
Since the folder has already been flushed, it will be populated afresh the instant your restart your computer and open Windows Update. Now try to update your computer again and see if the error is fixed or not.
 Once the menu appears, click on Command Prompt (admin)
 Once the command prompt with administrator privileges comes on-screen type in it following string:
 This command will force Windows to show all devices in the device manager including old ones that are not used anymore, but since their drivers are still installed, devices will show up.

 Right-click on the device and click on uninstall device to remove it completely from your system.
 Please always be careful when removing devices so you do not remove the device which is being used by mistake and always double-check that you are removing something that you used to have on your system. This method will show all hidden devices even ones that are hidden but crucial to the system working properly.
 As more and more people get into insider preview of upcoming Windows 11 we will see more and more different takes and opinions on it.
Generally speaking, the first wave was quite positive when it was previewed but how time is passing more and more limitations and frustration comes to the surface.
Some of the limitation that is inside it, which have been confirmed by Microsoft itself includes features missing that we had in Windows 10 like moving the application to the taskbar in order to pin it, moving the file in the taskbar to open it in default application and some big annoyances like Windows opening widgets always in Edge no matter what is your default browser. Not being able to move the taskbar from the bottom is also one of many illogical things.
There is not really a point in these missing features since they were working fine in Windows 10 and many users liked them since they could customize Windows more to their liking, now with this new look at limitations it reminds me personally much of apple macOS and I will be honest, I am not a big fan of that kind of thinking.
If I wanted that kind of OS I would have gotten myself a MAC, not custom build PC, but hey, Linux is always a free alternative, and how Microsoft itself is pushing limitations and in my opinion bad design choices along with awful system requirements that might just be a case for a lot of users.
I am really not sure what is logic behind these moves and I am sure they have their reasons but this time it seems that their take on the new OS is not resonating well with the overall user population, well at least what I have heard so far. Things of course can still be changed and made for the better and I would rather see release postponed and issues addressed than getting more system hogging and limited new OS that at its current state looks like reskinned Windows 10 with limitations.
As more and more people get into insider preview of upcoming Windows 11 we will see more and more different takes and opinions on it.
Generally speaking, the first wave was quite positive when it was previewed but how time is passing more and more limitations and frustration comes to the surface.
Some of the limitation that is inside it, which have been confirmed by Microsoft itself includes features missing that we had in Windows 10 like moving the application to the taskbar in order to pin it, moving the file in the taskbar to open it in default application and some big annoyances like Windows opening widgets always in Edge no matter what is your default browser. Not being able to move the taskbar from the bottom is also one of many illogical things.
There is not really a point in these missing features since they were working fine in Windows 10 and many users liked them since they could customize Windows more to their liking, now with this new look at limitations it reminds me personally much of apple macOS and I will be honest, I am not a big fan of that kind of thinking.
If I wanted that kind of OS I would have gotten myself a MAC, not custom build PC, but hey, Linux is always a free alternative, and how Microsoft itself is pushing limitations and in my opinion bad design choices along with awful system requirements that might just be a case for a lot of users.
I am really not sure what is logic behind these moves and I am sure they have their reasons but this time it seems that their take on the new OS is not resonating well with the overall user population, well at least what I have heard so far. Things of course can still be changed and made for the better and I would rather see release postponed and issues addressed than getting more system hogging and limited new OS that at its current state looks like reskinned Windows 10 with limitations. 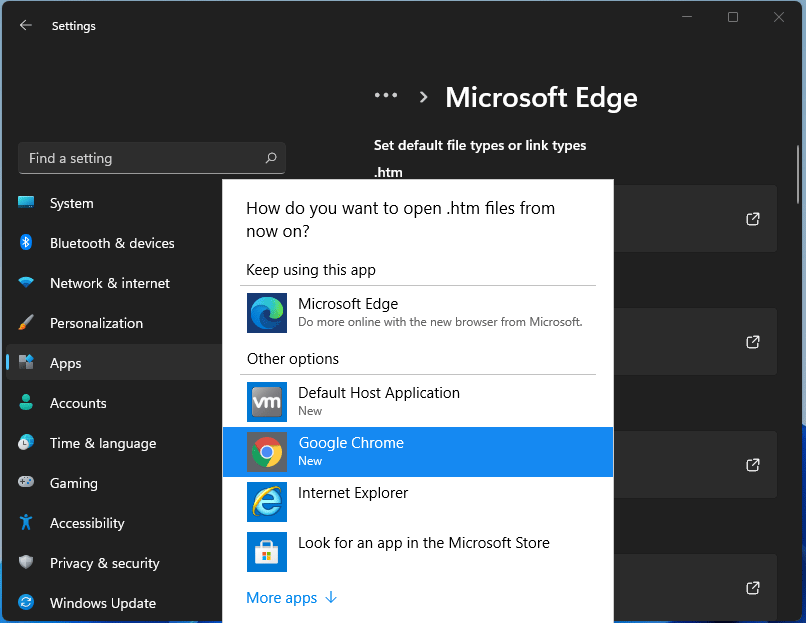 For anyone who is not aware, when Windows 11 was released if you wanted to switch to another browser you had to go into the settings app and choose the default browser for different types of file extensions like HTML, HTM, PDF for opening on the web, etc. Of course, this was completely unnecessary and it was not well received by users. So after some time, Microsoft backpedaled to standard one click, choose your default browser solution that existed in the previous version of Windows OS.
Altho sometimes Microsoft knows how to irritate its users base, it is good to know that they can also listen and fix things that are required.
For anyone who is not aware, when Windows 11 was released if you wanted to switch to another browser you had to go into the settings app and choose the default browser for different types of file extensions like HTML, HTM, PDF for opening on the web, etc. Of course, this was completely unnecessary and it was not well received by users. So after some time, Microsoft backpedaled to standard one click, choose your default browser solution that existed in the previous version of Windows OS.
Altho sometimes Microsoft knows how to irritate its users base, it is good to know that they can also listen and fix things that are required.  Therefore we are presenting a couple of solutions that will fix your issue, it is advisable to follow them as presented since they will go from the most common to the more complex one.
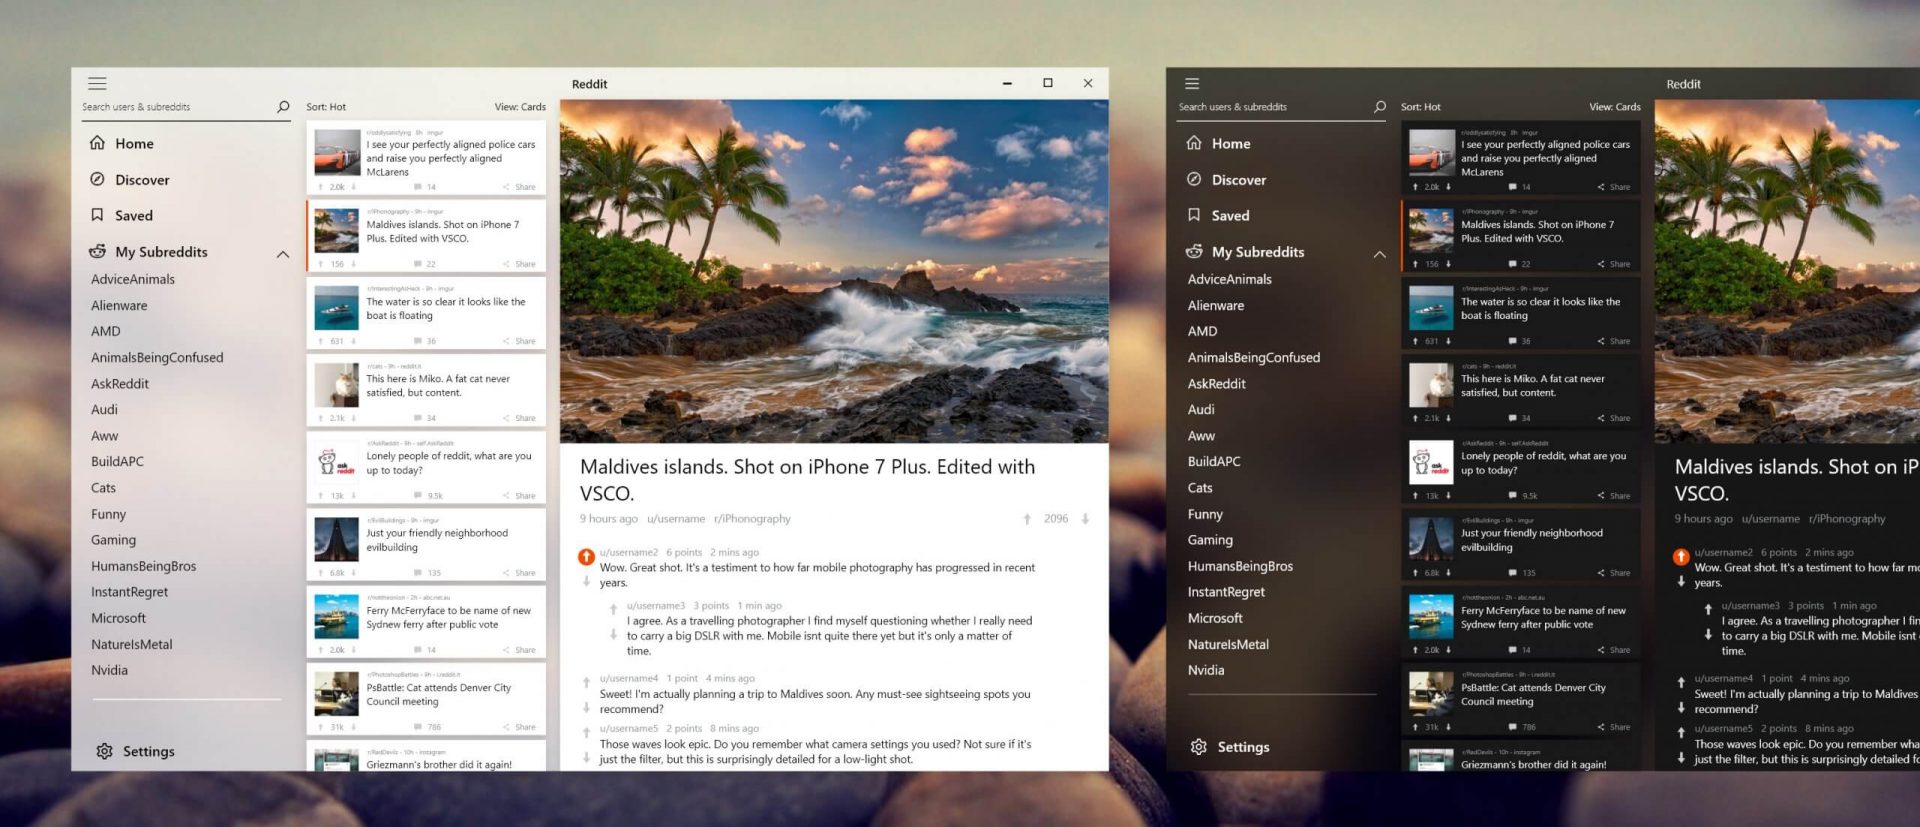 Reddit is one of the most popular websites in the world and how Microsoft is opening doors to everyone in its new store Reddit took a logical step and made a Progressive web application and placed it in it.
Being a Progressive web app makes it more familiar and feels like a home experience using it for a lot of Reddit users.
Reddit itself has a large community and active topics discussions all the time about anything. Bringing it to Windows as an application is, in my opinion, a great move since as an application it is independent, more light-weighted, and offering some other advantages specifically tied to being a standalone windows application.
Everyone familiar with and using the Reddit website will feel right at home in this app and you can start using it right away.
Reddit is one of the most popular websites in the world and how Microsoft is opening doors to everyone in its new store Reddit took a logical step and made a Progressive web application and placed it in it.
Being a Progressive web app makes it more familiar and feels like a home experience using it for a lot of Reddit users.
Reddit itself has a large community and active topics discussions all the time about anything. Bringing it to Windows as an application is, in my opinion, a great move since as an application it is independent, more light-weighted, and offering some other advantages specifically tied to being a standalone windows application.
Everyone familiar with and using the Reddit website will feel right at home in this app and you can start using it right away.  I going to admit right here that I am a big fan of Cooler Master PC cases, I like them and they are always one of the things that I consider when building a new PC, overall I like their ideas and quality so personal for me it was quite a surprise to see that they are one that is making a new generation gaming chair.
Now truth to be told Orb X is not your typical gaming chair as you can clearly see from the pictures. The chair itself will come in two colors: white or black and RGB lighting looks to be prominently featured throughout.
I going to admit right here that I am a big fan of Cooler Master PC cases, I like them and they are always one of the things that I consider when building a new PC, overall I like their ideas and quality so personal for me it was quite a surprise to see that they are one that is making a new generation gaming chair.
Now truth to be told Orb X is not your typical gaming chair as you can clearly see from the pictures. The chair itself will come in two colors: white or black and RGB lighting looks to be prominently featured throughout.
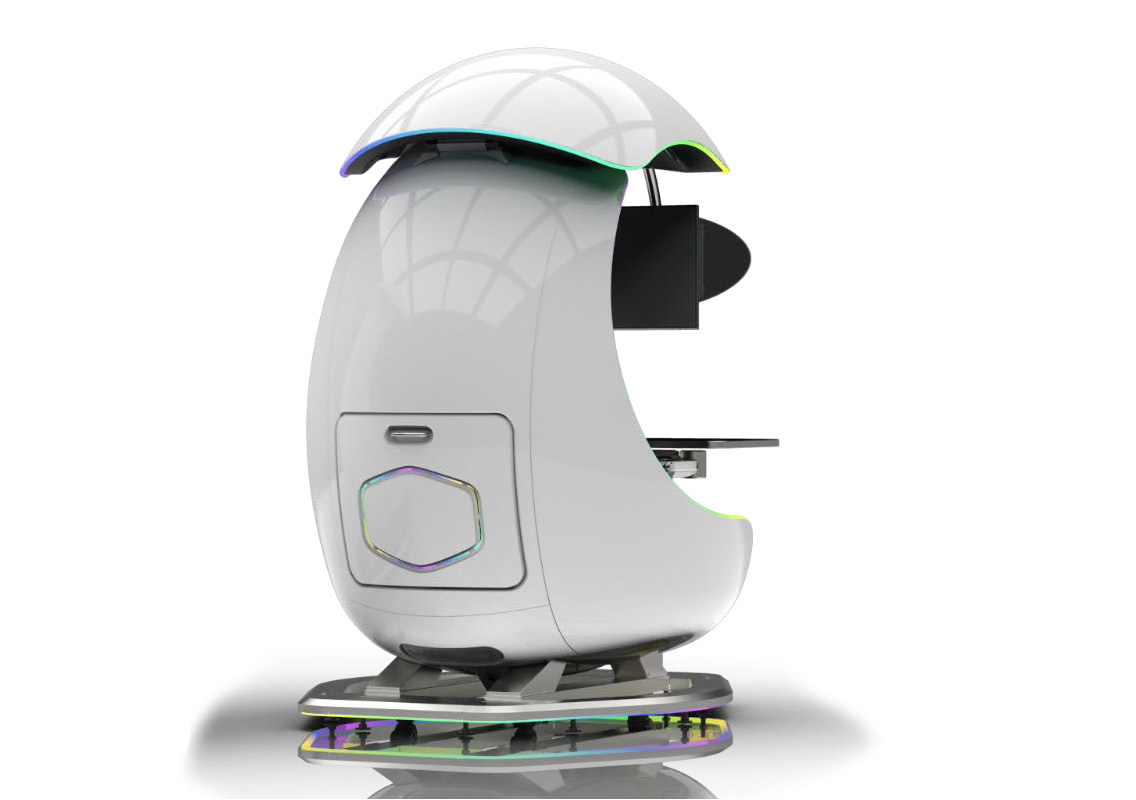 The chair itself is advertised as both meant and aimed for professional and gaming crowds but I believe the gaming crowd is in general more interested in this hardware piece.
Hardware is enclosed in a fully motorized shuttle dome which aims to maximize your privacy, it supports a single 49inch display or three 27inch monitors along with surround speakers if you do not wish to use headphones.
The chair itself is advertised as both meant and aimed for professional and gaming crowds but I believe the gaming crowd is in general more interested in this hardware piece.
Hardware is enclosed in a fully motorized shuttle dome which aims to maximize your privacy, it supports a single 49inch display or three 27inch monitors along with surround speakers if you do not wish to use headphones.
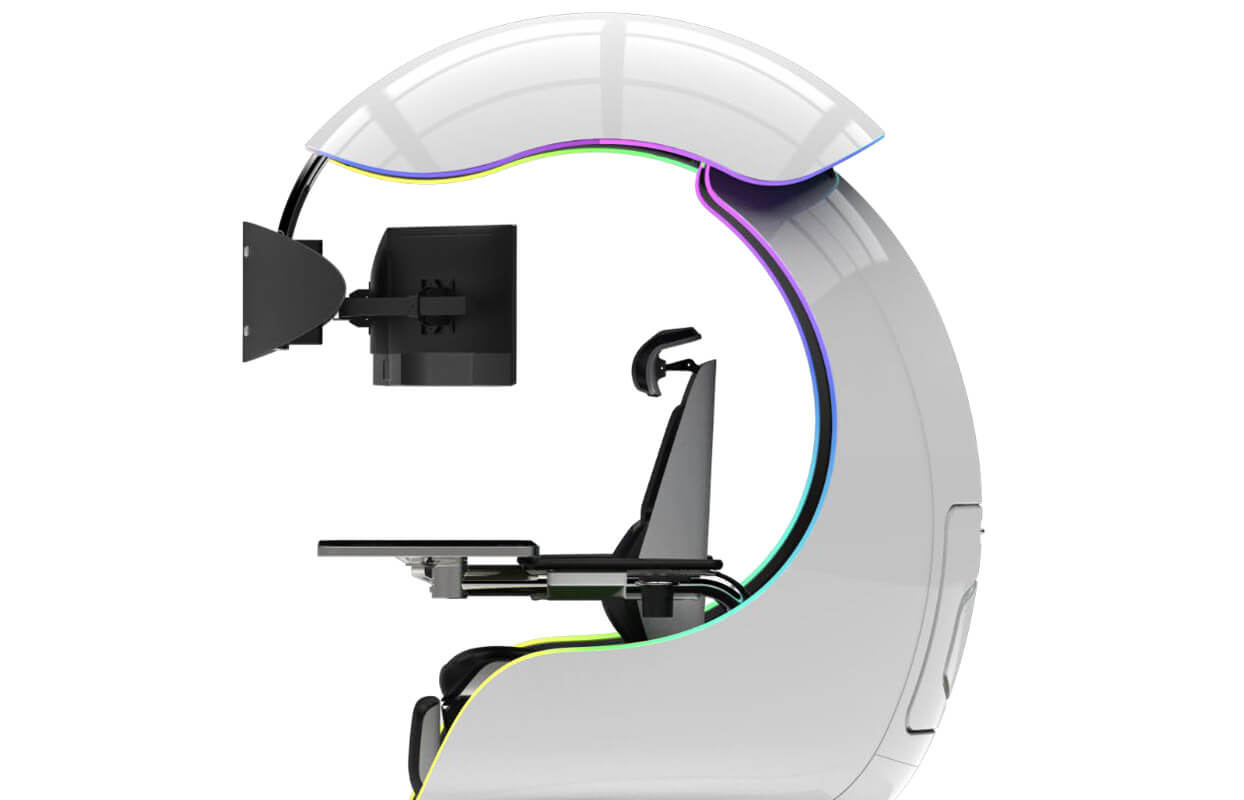 It offers an adjustable headrest, lumbar support, and footrest so you can spend some time in it and be comfortable. Controls on the chair itself allow you to raise or lower the dome for easier getting in and out of it.
Orb X also has a compartment in its backside, it folds out and has a sliding tray designed to hold your PC or console. Everything is enclosed so wiring is not the issue.
Overall Orb X seems really like the computer chair of the future, Cooler Master expects to release the Orb X by December 2021, priced around $12,000-$14,000.
It offers an adjustable headrest, lumbar support, and footrest so you can spend some time in it and be comfortable. Controls on the chair itself allow you to raise or lower the dome for easier getting in and out of it.
Orb X also has a compartment in its backside, it folds out and has a sliding tray designed to hold your PC or console. Everything is enclosed so wiring is not the issue.
Overall Orb X seems really like the computer chair of the future, Cooler Master expects to release the Orb X by December 2021, priced around $12,000-$14,000.  As in previous Windows 10, inside Windows 11 also when you press the ALT + TAB key combination you will get a preview of all running applications along with all Browser tabs so you can go through them and pick the one you want to switch to.
Alto, I personally am a big fan of alt-tabbing, I must admit that I am not a big fan of having multiple browsers tabs on screen when I do press key combo. Luckily there is a very easy way to turn this feature off.
Turning browsers tabs thumbnails off
As in previous Windows 10, inside Windows 11 also when you press the ALT + TAB key combination you will get a preview of all running applications along with all Browser tabs so you can go through them and pick the one you want to switch to.
Alto, I personally am a big fan of alt-tabbing, I must admit that I am not a big fan of having multiple browsers tabs on screen when I do press key combo. Luckily there is a very easy way to turn this feature off.
Turning browsers tabs thumbnails off