Prompted For A Product Key On Windows 10 - How to Fix It

Prompted For A Product Key – What Is It?

Some Windows 7 or Windows 8/8.1 users are having a hard time upgrading to Windows 10 as they are being prompted for a product key. By default, the Windows 10 operating system does not require a product key and users should not be prompted for one, given you upgraded your computer from an activated Windows 7 or Windows 8/8.1 license or from the Windows 10 Preview build. However, there are some users encountering this problem and there are several reasons for this.

Solution

Restoro box imageError Causes

There are a few reasons why some users are being prompted for a product key when upgrading to Windows 10:

  • Windows 7 or Windows 8/8.1 license is not activated.
  • You’re upgrading to Windows 10 final release from a preview build.
  • There are broken operating system files.
  • Activation servers get overwhelmed due to the high volume of upgrades.
  • The Windows 10 copy you downloaded does not correspond with the current Windows system you are upgrading from.

Further Information and Manual Repair

Before you can fix this problem, you need to know why you’re being prompted for a product key. Some things you should know about Windows 10 product key activation are the following:

  • You cannot activate Windows 10 using your Windows 7 or Windows 8/8.1 product key. Windows 10 has a unique product key.
  • Error codes such as 0x8007232b, 0XC004E003, 0x8007007B, or 0x8007000D might pop up during system upgrade especially when the activation servers get overwhelmed with the high volume of upgrades.
  • You don’t really need to know your Windows 10 product key.

Now, if ever you’re prompted for a product key when you’re upgrading to Windows 10, you can apply the following methods:

Method One: Give It A Few Days

If you’ve been prompted for a product key upon upgrading to Windows 10, you should click on the “Do this later” option. Wait for a few days then Windows 10 will get activated automatically.

Method Two: Download A Copy of Windows 10 Corresponding Your Current System

One of the reasons Windows users are being prompted for a product key when upgrading to Windows 10 is that they have downloaded a wrong edition of Windows 10 and do not correspond with your current system.

  • Users of Home Basic, Home Premium, Windows 7 Starter, Windows 8.0 Core, and Windows 8.1 Core should download Windows 10 Home ISO.
  • Users of Windows 7 Ultimate, Windows 7 Professional, Windows 8.0 Pro, and Windows 8.1 Pro should download Windows 10 Pro ISO.

NOTE: Users of Windows 7 Enterprise, Windows 8.0 Enterprise, and Windows 8.1 Enterprise are not eligible for the free upgrade offer.

Method Three: Ensure Windows Is Activated

If your Windows 7 or Windows 8/8.1 is not genuine or activated, you will get prompted for a product key. You need to make sure first your current system is activated.

  1. Click on Start then right-click Computer. For Windows 8 and up users, you can simply press on Windows key + X then select Choose Properties.
  2. When the Properties window appears, check if the Windows you’re running is activated.

Method Three: Reset License Status

  1. Press on Windows key + X.
  2. Select Command Prompt (Admin).
  3. Once the command prompt window appears, type vbs –rearm then press Enter.
  4. Exit Command Prompt then restart your PC.
  5. Input the product key by following the instructions given.

Method Four: Force Activation

  1. Press on Windows key + X
  2. Select Command Prompt (Admin).
  3. Once the command prompt window appears, type vbs –ato then press Enter.
  4. Exit Command Prompt then restart your PC.

Method Five: Run System File Checker

Another thing you can try doing is to run the system file checker utility to scan if there are any broken operating system files. In doing so, you’ll be able to detect problems that might be preventing the product activation of your Windows 10 upgrade.

Method Six: Contact Microsoft Activation Center

If in case you’ve exhausted all your resources and you are still being prompted for a product key when upgrading to Windows 10, you can try contacting the Microsoft Activation Center for further details. Check here for the appropriate telephone numbers to contact.

Method Seven: Download An Automated Tool

If you still experience the error after doing the methods above, you might want to try a powerful and trusted automated tool to fix the job.

If you like to learn and find out more about various Windows errors, and how to repair them go to our vast archive or use search to find articles that will explain and help you in solving your issue.
However, if you prefer to do things fast and with automatization then we are proposing to use an automated solution for your issues. The application that we are recommending is Advanced System Repair Pro
Advanced System Repair utilizes multiple tools all in one to give you a quick, simple, reliable, and very thorough diagnosis of your PC. It brings you all the tools you need in one program to clean, fix, protect, optimize and boost your PC!
1-Click Maintenance
All the tools to make it simple and easy! It's like having a professional technician at the click of a mouse.

Junk Cleaner
Keeping your computer free from unnecessary clutter also helps make your computer last longer. Like any other machine, if you keep it clean and take care of it, it will serve you better for longer!

Optimize background apps
Optimize applications background activity with the built-in Application Optimizer feature.

Disk Defrag
With a simple 1-click, Advanced System Repair speeds up your PC by assembling fragmented files on your machine and organizing them more efficiently.

Malware Removal
Finds and removes all types of harmful malware including trojans, worms, bots, adware, spyware, PUPs, and more!

Privacy Cleaner
The all-in-one privacy suite to Clean Your Tracks & Protect Your Privacy! Make your computer safe, secure, and more efficient!

System Tweak/Optimizer
ASR will analyze your complete system and settings to adjust your PC to function at its maximum performance.

Registry Cleaner
Over time, as you install and uninstall applications, the registry can become cluttered with old entries and broken settings which can result in program crashes, and annoying messages and slow the computer down.
Visit our Advanced System Repair Pro Download page to inform yourself about all the benefits of this software and get a free trial copy of it.
advanced system repair pro

Advanced System Repair Pro

One-click automated PC repair solution
ASR logo
With Advanced System Repair Pro you can easily
Replace damaged files
Restore performance
Free disk space
Remove Malware
Protects WEB browser
Remove Viruses
Stop PC freezing
DOWNLOAD
Privacy Policy | Terms of Use | Uinstall
Advanced System Repair Pro is compatible with all versions of Microsoft Windows including Windows 11

Share this article:

You might also like

Fix Dism.exe error 1392 in Windows 10
Dism.exe error 1392 is usually displayed whenever a file or directory is corrupted, and unreadable. The location specified in the error message states that some temporary files are corrupt. Since the files are only temporary, you could delete the mentioned file in the error message and check if the issue persists. The error is caused by missing system files or broken corrupt data, which should be fixed as soon as possible. Taking action should prevent further hardware and app damage, as this can lead to system crashes, data loss, or hardware failure in most cases.
  1. Temporarily disable the antivirus program

    Antivirus applications are well known that they can detect certain things as false positives and quarantine them or cut their system access, to make sure that this is not the case in this situation, disable your antivirus and try the operation again.
  2. Perform an SFC scan

    Press ⊞ WINDOWS + X to open the windows menu Click on Command prompt (admin) In the command prompt window type: sfc /scannnow and press ENTER Wait for the operation to complete Reboot
  3. Run Check disk to check and fix disk errors

    Press ⊞ WINDOWS + X to open the windows menu Click on Command prompt (admin) In the command prompt window type: chkdsk /f c: where c: is hard drive with issue and press ENTER
  4. Scan your computer for malware

    Malware and other malicious software can be a problem for this type of behavior, run your security's software scan on the whole system and remove any found malware.
  5. Perform a system restore

    If anything else failed run system restore and bring Windows back to a date when everything was working fine.
Read More
Fix “Diskpart failed to clear disk attributes”
If you encounter the “Diskpart failed to clear disk attributes” error when you try to change the read-only state of a storage device using the Diskpart application and the request is denied, worry not for this post will give you a couple of fixes to resolve the problem. As you know, Diskpart is used for resolving read-only storage devices by changing their attribute via the command line. So if it is not able to change the attribute of the storage device, then you will most likely encounter an error such as this one. This kind of error is not uncommon and as long as there are no damaged physical attributes, you can resolve it right away. There are tons of reasons why you’re getting this error while using Diskpart, it could be that the storage device has a physical write-protected switch or the disk is hidden or has bad sectors. It could also be because the storage drive might be in RAW format or that you are running the Diskpart application without admin privileges. Whatever the cause may be, here are some options you can try to fix the problem but before you proceed, make sure that you log on to your PC as an administrator.

Option 1 – Check if there is a physical switch on the storage device

There are some USB devices and SD card readers that have a write-protected physical switch that disables all the writable options on the storage device and so if it is turned on, Diskpart won’t be able to change the disk attribute to writable. To check, simply look for the physical switch on both sides of the device and once you found it, make sure that it is toggled off and then plug the storage device back in then try running Diskpart once again.

Option 2 – Modify the WriteProtected key in the Registry Editor

Before you proceed, you have to create a System Restore Point first.
  • Tap the Win + R keys to open Run and type “Regedit” in the field and hit Enter to open the Registry Editor.
  • Next, navigate to the following path:
HKEY_LOCAL_MACHINESYSTEMCurrentControlSetControlStorageDevicePolicies
  • After that, look for the “WriteProtect” registry entry which is located on the left side of the window, and then double click on it.
  • Change its value to “0” and click OK to save the changes made and exit the Registry Editor.

Option 3 – Run CHKDSK to check the drive for errors

When it comes to some issues concerning the hard drive or removable devices, there is a utility in Windows that might help which is called “chkdsk”. This error check utility can help with several issues in the system including the “Diskpart failed to clear disk attributes” error.
  • Tap the Win + S keys to open the Search box.
  • Then type “command prompt” in the field and from the search results that appear, right-click on Command Prompt and select “Run as administrator”.
  • After opening an elevated command prompt, copy and paste the following command and hit Enter:
CHKDSK [volume [[path] filename]] [/F] [/V] [/R] [/X] [/C] [: size]]
Note: In the command given above, “[/F]” will try to fix the system errors while “[/R]” will be the one to fix the bad sectors.
  • Now if you are prompted to run CHKDSK after your reboot your PC, just tap Y and reboot your PC.
  • If CHKDSK is not able to find any errors, tap the Win + E keys and navigate the access window. From there, right-click on the concerned drive and click on Properties.
  • After opening Properties, click on the tab Tools and then click on the “Check” button under the Error-checking section.
  • Wait until the process is completed and then restart your computer.

Option 4 – Clear the attributes on RAW

  • Tap the Win + S keys then type “diskpart” in the field.
  • Click the Diskpart application and if a User Account Control dialog box pops up, click Yes to proceed.
  • After opening an elevated Command Prompt, type in the commands listed below and make sure to tap Enter right after you key in one command after the other.
    • list volume
    • select volume ‘n’ (In this command, you have to replace ‘n’ with the volume number of the drive)
    • format fs=fat32 quick (In this command you also have the flexibility to change the format to ‘ntfs’ or ‘exfat’)
  • After executing the commands given, unplug the removable storage device and wait for a couple of seconds and then plug it back in.
  • Now try any normal write operations and see if the error no longer appears.

Option 5 – Try checking the hardware components

On the other hand, it is also possible that the issue has something to do with a hardware problem and so you need to check the hardware components on your computer to determine that.
Read More
How to Fix Error Code 0xc0000142

What is Error 0xc0000142?

Error 0xc0000142 can occur in any of the Windows versions and usually occurs when an application fails to properly initialize.

This error can be critical for a computer as it signifies that the system is unstable. Error 0xc0000142 can cause slow performance in a PC, system freeze, startup and shutdown issues, blue screen and errors in installation.

Solution

Restoro box imageError Causes

Windows/Application Error 0xc0000142 can occur because of a number of reasons.

When a computer is an overload with data, or when system files get broken or missing, this error can occur and will result in startup and shutdown issues as well as the blue screen. Another reason, and one which is quite common, is improper computer maintenance.

This will cause a PC to perform slow, system freezes, and installation errors. This error displays ‘failed to initialize’ on either a Windows error box or the blue screen of death.

Further Information and Manual Repair

Error 0xc0000142 can occur at any time, but there are many ways to resolve it. For instance:

1) Clean the Registry

A corrupted registry is one of the major reasons why this error occurs. The registry is used by Windows to store information and settings on the computer, which is why it has a large database.

This database contains emails, wallpapers, saved passwords and much more in ‘file path references’. These allow Windows to run the common files in your system. A registry cleaner can fix any errors in the registry database.

2) Malware Scan

Viruses can cause certain applications to not function properly. Hence, download a strong antivirus and run a deep scan on your system and remove any potential infections and spyware.

3) Reinstall Applications

Non-critical applications in a computer are those that are installed by the user. If error 0xc0000142 displays in any of your installed programs, then you should reinstall these programs. Often applications have damaged or corrupted files which can slow them down. To resolve this, follow these steps:

  • From Start, click on Control Panel
  • Go to Add/Remove Programs and uninstall the programs
  • Restart your PC and reinstall the program

The third step is not recommended in case the error is caused by cmd.exe

4) Repair Windows

If the error is still on display despite following the previous steps, then you can repair Windows. This process allows Windows to retain all your data and information by simply replacing the program files and settings with fresh ones. This can stop error 0xc0000142 by allowing the programs access to use necessary files smoothly and effectively.

If you cannot resolve the error in any of these steps, then there is another way to do so if you have a computer that runs the Microsoft Internet Security and Acceleration (ISA) Server 2000. Follow these steps in order to resolve it:

  • Make sure that in Program Files and Microsoft ISA Server, a Clients folder exists. The ISA Server service will run on this folder
  • Confirm that Administrators and SYSTEM have Full Control assigned in the Program Files/Microsoft ISA Server/Clients folder
  • Confirm that Msplat.txt file is in the Clients folder. You can copy this file from other ISA Server computers if it is missing
  • If the Clients folder is damaged or is missing, or if you can’t copy the Msplat.tct file from another ISA Server computer, then reinstall the ISA Server 2000
Read More
There is no internet when WIFI is connected
If your WIFI signal is strong but you can not connect to the internet then keep reading in order to find out why this happens and what can you do to fix it. One very important thing to know and understand is that WIFI and the internet are two different things and that they altho connected and working together are basically 2 things. WIFI is a name for a group of technologies that are using radio vawes to connect to the router in order to access the internet. The Internet itself is series of computers all connected in LAN. Think of WIFI like some invisible cable that connects your computer to the router. When we put things into perspective this way it becomes clear that we can indeed have a strong WIFI signal and that we are connected to the router but the router itself is not connected to the internet. So basically troubleshooting an internet connection is troubleshooting the router itself. The most common approach is to reset the router, turn it off, then back on, check cables, etc. But be sure that if your WIFI signal is strong and you can not access the internet it is a router issue.
Read More
Power Calibration Error or Medium Speed Error when burning CD/DVD
If you are one of the few users who is still burning CDs and DVDs, you might have come across an error that says, “Medium Speed Error” or “Power Calibration Error”. There are several factors that could cause this error but it’s most likely that the CD/DVD burner wasn’t able to determine the Optimum Power Calibration rate properly. So what is Optimum Power Calibration rate? It is a test that runs before the burning process to regulate the optimal laser power needed to complete the job. And if this process malfunctions, obviously, you won’t be able to burn the content on your CD or DVD. There are also cases when the Power Calibration error pops up for some small issues that have nothing to do with the regulation of laser power. Here are some quick fixes you can try to resolve the Power Calibration error when burning a CD or DVD.

Option 1 – Make sure you’re using good quality CD or DVD

A lot of burning issues stem down to the purchase of low CDs or DVDs to make sure that what you are using has good quality for it is not always a good idea to purchase cheap products as cheap products could also mean cheap quality.

Option 2 – Try burning at lower speeds

If you’re certain the problem is not with the CD or DVD you are using then you can try burning again, this time at lower speeds. There are instances when doing things quickly can end in a disaster such as the “Medium Speed Error” or “Power Calibration Error” you’re getting.  To fix the problem, you have to burn at a slower speed and just take the time to wait until the burning process is done.

Option 3 – Try updating your burning software

It’s always a good idea to check if the burning software you’re using requires an update especially if it’s throwing up “Medium Speed Error” or “Power Calibration Error”. Thus, you need to update your burning software right away and then try to burn your CD or DVD once the update has been completed.

Option 4 – Try cleaning the disk drive

You might want to consider cleaning the disk drive using several tools in the market that is designed to clean the disk drive. These tools work on removing dust particles from the lens which helps a lot in the burning quality. Aside from that, it also helps in reducing errors like “Medium Speed Error” or “Power Calibration Error”. So give this option a try as it might time for a disk drive cleanup.

Option 5 – Try to disable the IMAPI

If none of the options given above worked, you might want to disable the IMAPI or Image Mastering Applications Programming Interface. How? Refer to the steps below.
  • Open Control Panel by simply clicking the Start button and then typing “control panel” in the field.
  • Control Panel should pop up in the search results. Once you found it, click it to open it.
  • Next, select System Security > Administrative Tools and then click Services.
  • After that, you’ll have to search for the “IMAPI CD-Burning COM Service” option.
  • Then right-click on it and select Properties.
  • From there, switch the Startup Type from “Enabled” to “Disabled”.
  • Now click on Apply and then restart your PC.
Read More
How to Fix Windows 10 Update Error Code 80004002

How to Fix Windows 10 Update Error Code 80004002

Error Code 80004002 - What is it?

Error code 80004002 will be encountered when there are absent registry keys. These missing registry keys will hinder an update process when initiated. However, this error code can be averted once the user makes a reinstall of the Windows Update Client. The steps will be highlighted throughout the article.

Solution

Restoro box imageError Causes

Error code 80004002 might occur for various valid reasons. In cases of installing programs, a user might mistakenly install a new program over another, that was not properly (completely) uninstalled. This could cause a stack-up of registry keys and error messages. Additionally, error code 80004002 might be a consequence of malware, viruses, and adware.

Further Information and Manual Repair

If left unchecked, error code 80004002 could amount to system freezes and crashes, slow computer performance, error codes upon installation, and even blue screen errors. To fix this error code, you might want to attempt one or all the methods below. This is due to the fact that the problem might stem from various reasons.

Method 1: Safe Mode

Ensure to boot your computer in safe mode. This is to ensure that you are properly able to troubleshoot Windows update error code 80004002. To load your computer in safe mode, turn on the computer, press F8 before it fully loads to the ‘sign in’ screen.

Method 2: Update Outdated Drivers

One of the many reasons why you’ll encounter error code 80004002 is in light of the fact that your drivers might have been outdated. To check if your driver is outdated, Right click on the Start menu, select the Device Manager option. From there, you’ll be able to tell which device(s) is corrupted and needs updating.

Method 3: Reinstall Windows Update Client

To perform this process, follow the steps below:
  1. Locate “My Computer” or “This PC” on your device.
  2. Select the “Properties” option.
  3. Under the System option, determine whether your System type is 64-bit or 32-bit version of Windows.
  4. Use the links below to install the Windows Update client:

Click for 32-bit Operating System

Click for 64-bit Operating System

  1. After installation, search for Windows Update from the Search option.
  2. Select the Check for Updates option.
  3. Once any updates are found, hit Install Updates.

Method 4: Use An Automated Tool

If you wish to always have at your disposal a utility tool to fix these Windows 10 and other related issues when they do arise, download and install a powerful automated tool.
Read More
How to Fix the EhRecvr.exe Error on Your PC

Repair EhRecvr.exe Error

EhRecvr.exe Error Code - What is it?

EhRecvr.exe is an executable file located in a subfolder of C:\Windows (usually C:\WINDOWS). An executable file is denoted by the filename extension .exe. You should only run executable files from the publisher you trust because .exe files are prone to errors. Executable files can potentially change your computer settings and harm your computer.  These files can easily get corrupted. Similarly, when the EhRecvr.exe fails to run on the computer and gets corrupt, you experience an EhRecvr.exe error on your system. This error code may pop up while playing games on the PC or using any other program. EhRecvr.exe error may be displayed in any one of the following formats:
  • “ehRecvr.exe cannot be found."
  • “There was a problem starting [path]ehRecvr.exe. The specified module could not be found."
  • "Runtime Error. ehRecvr.exe pure virtual function call."
  • "This program can't start because ehRecvr.exe is missing from your computer."
  • "Unable to launch the software located at path: [path]ehRecvr.exe"
  • "This application requires the file ehRecvr.exe, which was not found on this system."
  • "ehRecvr.exe is missing."
  • "Access Violation File [path]ehRecvr.exe"

Solution

Restoro box imageError Causes

There are plenty of reasons why this error may occur these include:
  • EhRecvr.exe file is mistakenly deleted
  • EhRecvr.exe file is corrupted and damaged
  • Viral/Malware infection
  • Bad registry entries
  • Outdated drivers
Though this error code is not fatal but nonetheless it is advisable to fix it immediately because EhRecvr.exe error not just hampers your ability to run and access different programs on your system but it also triggers issues like viral infection and registry problems which if not resolved can put your big at greater risk like system failure, freeze, and crash.

Further Information and Manual Repair

To resolve the EhRecvr.exe error on your system, you don’t have to hire a professional and spend hundreds of dollars in repair. Here are the best and easy DIY methods that you can try to fix this error. To work around these methods you don’t need to be a technical whiz. Let’s get started:

Method 1 - Restore EhRecvr.exe from Recycle Bin

In the case of EhRecvr.exe file deletion, it is advisable to check the recycle bin. Search through the bin for the file. If you find it, then simply restore it, if not then if you have access to the internet, then download it from a trusted website.

Method 2 - Reinstall the Associated Software That Uses EhRecvr.exe File

If you receive this error when you want to use certain software on your PC, then try reinstalling that software again on your PC. This will be very helpful to obtain the EhRecvr.exe file that is not provided by Microsoft. To re-install, first, uninstall the program. Go to Add/Program in the control panel and find the program and then uninstall it. Once uninstalled, simply follow the same steps but this time round install the software. This will hopefully help resolve the EhRecvr.exe error code.

Method 3 - Update Drivers for Hardware Devices

Sometimes the error may pop up due to outdated drivers. If this is the cause then the best way to resolve the issue would be to update the driver. Use the wizard within the Device Manager to update the outdated drivers.

Method 4 - Scan for Viruses

Viruses and malware can disguise as executable files. These usually enter your PC through downloads from unreliable websites and phishing emails. In such an event, it is recommended to install a powerful antivirus. Scan your entire PC and remove all viruses to repair the issue.

Method  5 - Clean and Repair the Registry

Another method is to clean and repair the registry. If you don’t clean the registry regularly it may get accumulated with obsolete files and get corrupt. This may generate EhRecvr.exe error codes. To resolve, simply download Restoro. This is a user-friendly PC Fixer with a powerful registry cleaner. It scans for all registry errors, wipes out all the invalid entries and obsolete files and repairs corrupted DLL and .exe files in minutes. Click here to download Restoro and resolve the EhRecvr.exe error now!
Read More
Razer new table concept looks futuristic
The new razer modular table looks like something that came out from Star Trek. Project Sophia is a desk but, it is a special kind of desk. It comes with modules that attach themselves underneath the table itself for customization purposes so each user can somewhat create a layout on the table itself as he or she desires. The table itself comes packed with intel CPU and Nvidia GPU but it is said that this component and PC parts will overall be easily upgraded to different ones as users desires. razer sophia
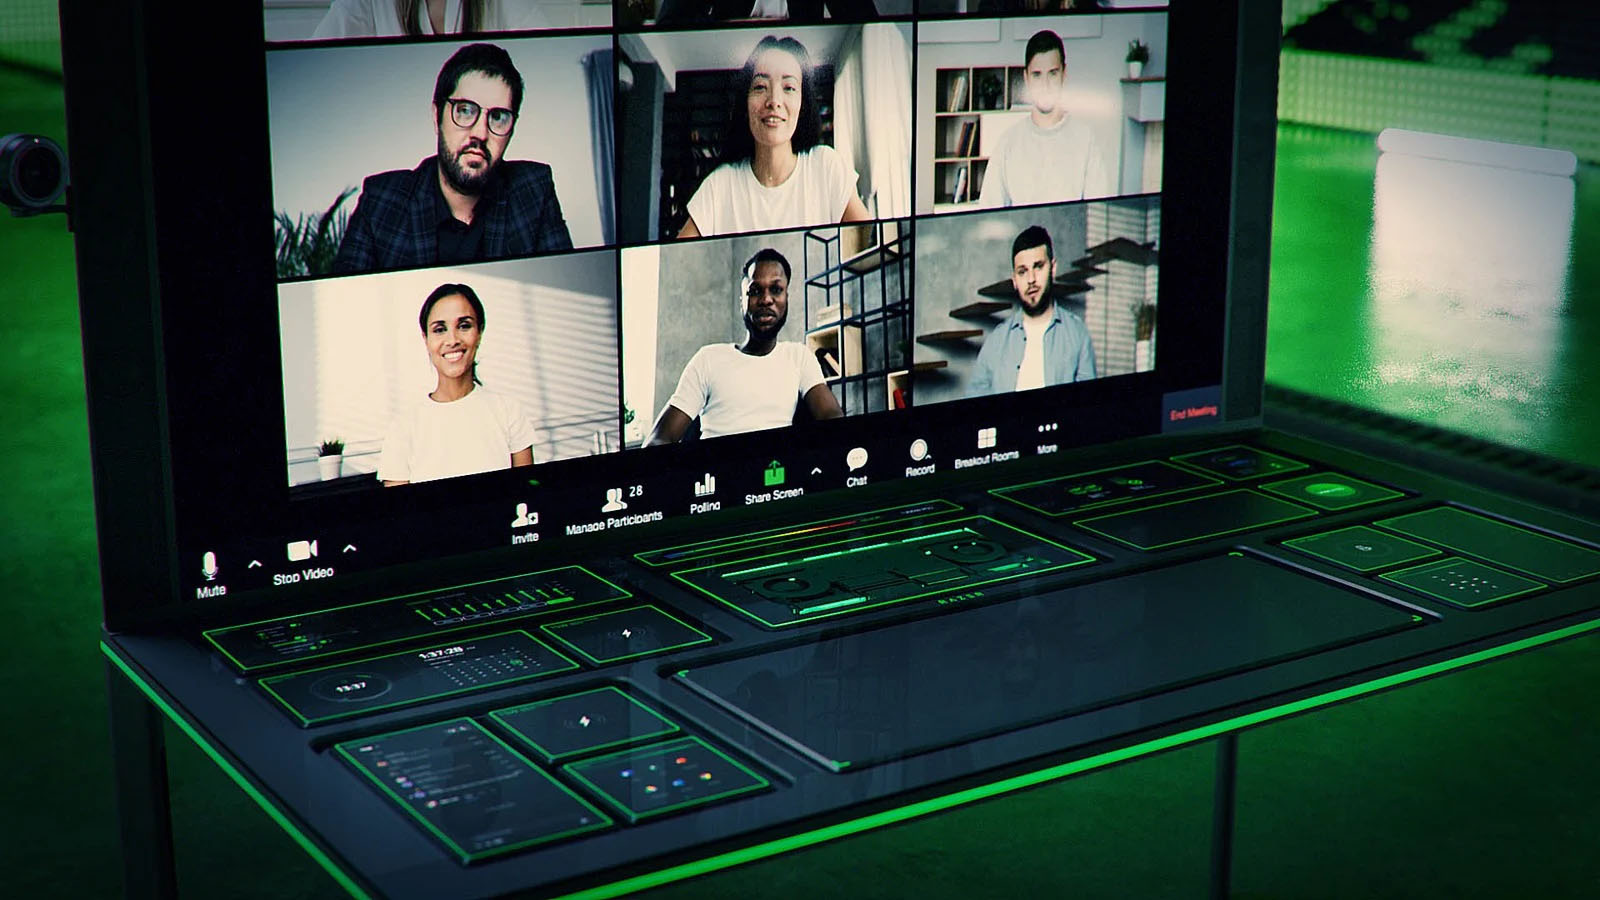
The table itself looks very basic and it comes with a very large OLED screen between two different sizes depending on your table choice. You can choose between 65” or 77” screen sizes and OLED is mounted on the table itself so you cannot move it or adjust the angle of it that I somewhat find annoying but that comes from th4e fact I am used to adjusting my screens, but for this large screen maybe you do not need to adjust its rotation in order to get best viewing angle. Modules themselves will offer some on-the-fly information and quick settings for the PC itself while being modular in a sense they could be mounted in different positions on the table itself providing some customization and order to suit users needs. Modules, for now, are: THX Spatial Surround Sound Controls, system monitoring, programmable hotkey module, Thunderbolt™ Powered eGPU, RAID Controller, Network Performance Module, 15W Wireless Charger, Thunderbolt™ 4 Hub, Media Controls. Of course table, itself will have Razer chroma RGB on its surface and Razer says it will have a total of 13 different modules available on launch for a true level of personalization.

Conclusion

Is this Razer table something that you really need or just another expensive toy? Personally, I would not mind this table at all but I would choose modules for work, not gaming. Having some things like media controls or RAID controllers all the time at your fingertips is a great time saver and productivity asset. Razer also advertises some modules and setup already for streamers, creators, or team members and has some according modules like touch screen digitizer with stylus and similar.
Read More
Fix Printer driver issue in Windows
The printer can stop working for many various reasons, some of them are however tied to the printer driver itself. In this guide, we will address issues and provide you with advice on how to get your printer back in working order in no time. All of that being said let us fix your Printer driver issue.
  1. Check to see if the printer is plugged and that it has toner or colors and paper in the tray

    The simplest solutions are the best ones, and most of the time simplest issues are overlooked. To eliminate any basic issues check the printer cable does it has paper in the tray and check the status of toner or colors in it.
  2. Check if Windows troubleshooter will resolve the issue

    Bring up settings and choose devices, under devices click on printers and scanners. On the far right top, you have a link to start the troubleshooter, click on it. Windows built-in tools could resolve issues and fix them for you. If by any chance Windows is not able to find or resolve issues move to the next step.
  3. Check if the Device Manager is reporting an error and update the driver

    If the hardware is functioning properly then the issue might be in Windows not detecting device or driver malfunction. In any case, the Device Manager will be the one who will report this problem. In order to check to see if the driver is properly working press ⊞ WINDOWS + X to open the hidden start menu. keyboard with windows and x marked Once it opens, click on Device Manager to open it, If you have a driver device error inside Windows, you should see it immediately when entering the Device Manager, it will have a yellow exclamation mark beside it. Right-click on it and choose update driver.
  4. Reinstall driver

    If driver update failed or you already have the latest drivers, reinstalling them could fix the issue since drivers might have corrupted during installation of some update or application. Follow steps from point 3 to get to the driver in Device Manager, then right-click on it but instead of update choose to uninstall. Reboot Windows once the driver is uninstalled and Windows will install a new one automatically. If you do not want to update drivers automatically install the latest driver for your device, then reboot.
  5. Check Windows update

    Check to see if the latest Windows update is installed, update your Windows if needed
  6. Fix driver issue with DRIVERFIX

    If everything else fails, get DRIVERFIX, a premium solution for your PC issues, and fix driver errors.
Read More
Printer not activated, error code 30
If your printer has been working just fine and you suddenly get an error message saying, Printer not activated, error code 30”, then something is definitely wrong and it’s not good especially if you have lots of things to do. Worry not, as this post will help you resolve the printer issue. Simply follow each one of the given options below carefully.

Option 1 – Try running the Printer Troubleshooter

The first thing you can to resolve the printer issue is running the Printer Troubleshooter. This built-in troubleshooter can detect and automatically fix the problem for you. To use it, follow these steps:
  • Tap the Win + R keys to open the Run dialog box.
  • Next, type “msdt.exe /id PrinterDiagnostic” in the field and click OK or hit Enter to open the Printer Troubleshooter.
  • Then click the Next button and follow the next on-screen instructions to fix the issue with the printer.

Option 2 – Check if the concerned printer is set as the default one

It could be that the printer you are trying to use is not set as the default printer. This is mostly the case so to fix the issue, you need to set the concerned printer as default. To do that, follow the steps below.
  • Tap the Win + I keys to open the Settings app.
  • After opening Settings, select Devices from the menu and then click the Printers and scanners option.
  • From there, look for the printer you are using among the list of options. After you find it, click on it and select the Manage option.
  • Now click on the “Set as Default” option to set the printer as default.

Option 3 – Try updating the driver for USB Composite Device

The problem with your printer might also be caused by the USB Composite Device. It could be that the USB Composite Device is acting up. Thus, you need to remove and reinstall it. How? Follow the steps below.
  • First, click the Start button and type “device manager”.
  • Then click on the “Device Manager” from the search results to open it.
  • From there, look for the USB Composite Device option and right-click on it, and select the Update Driver from the options.
  • Restart your PC and then click the “Search automatically for updated driver software” option.
  • Now uninstall and remove the printer driver software and reinstall it then refresh.

Option 4 – Try updating all the drivers for your Printer

  • Tap the Win + R keys to launch Run.
  • Type in devmgmt.msc into the box and tap Enter or click OK to open the Device Manager.
  • After that, a list of device drivers will be displayed. Look for Print queues from the list of drivers displayed and click on it to see all the Printer drivers.
  • Next, right-click on each one of the drivers and select “Update driver” to update the driver. Do it for all the Printer drivers
  • After that, select the “Search automatically for updated driver software” option and then follow the instructions to complete the process.
  • Restart your PC and try printing a document again and see if the “Printer not activated, error code -30” no longer pops up.
Note: You also have the option to go directly to the website of your printer manufacturer and check if there’s a new update – if there is, download it.
Read More
1 2 3 162
Logo
Copyright © 2022, ErrorTools. All Rights Reserved
Trademarks: Microsoft Windows logos are registered trademarks of Microsoft. Disclaimer: ErrorTools.com is not affiliated with Microsoft, nor claim direct affiliation.
The information on this page is provided for information purposes only.
DMCA.com Protection Status