Photo viewer on clean Windows 10 instalation

Windows photo viewer was a popular photo viewing application integrated into Windows 7, 8, and 8.1 but in Windows 10 it has been replaced with photos, Microsoft's new application aimed at photo viewing on your desktop. Now if any one of you wonders why should be bringing the old application back to Windows 10 since we have an alternative one, the answer would be resources and speed. The old photo viewer application is lightweight, fast, and reliable, opening the same photo in both photo viewer and in new photos shows us that Microsofts new viewer application takes even three times more RAM, and it's visibly slower in loading times for pictures.

Since I am a person who prefers speed and functionality over fancy looks I would be very glad to have the option to bring back a photo viewer. If you have by any chance Windows 10 as an upgrade, bringing back photo viewer is easy as 1,2,3. you just need to open settings and go to default apps, under photo viewer you should see your current default viewing application, probably photos, click on it to see options and choose photo viewer and exit the Settings menu, and you're done.

Sadly if Windows 10 has been installed clean on the system and not as upgrade things are a little bit more complicated but do not worry, stay with us, keep reading and you will get there.

Activating photo viewer

How technically photo viewer is still in the system but not used we will have to make it available again and this we will do by adding some lines in the Windows registry, that being said, open a notepad and paste the following code as it is in it.


Windows Registry Editor Version 5.00

[HKEY_CLASSES_ROOT\jpegfile\shell\open\DropTarget]
"Clsid"="{FFE2A43C-56B9-4bf5-9A79-CC6D4285608A}"

[HKEY_CLASSES_ROOT\pngfile\shell\open\DropTarget]
"Clsid"="{FFE2A43C-56B9-4bf5-9A79-CC6D4285608A}"

[HKEY_CLASSES_ROOT\Applications\photoviewer.dll\shell\open]
"MuiVerb"="@photoviewer.dll,-3043"

[HKEY_CLASSES_ROOT\Applications\photoviewer.dll\shell\open\command]
@=hex(2):25,00,53,00,79,00,73,00,74,00,65,00,6d,00,52,00,6f,00,6f,00,74,00,25,\
00,5c,00,53,00,79,00,73,00,74,00,65,00,6d,00,33,00,32,00,5c,00,72,00,75,00,\
6e,00,64,00,6c,00,6c,00,33,00,32,00,2e,00,65,00,78,00,65,00,20,00,22,00,25,\
00,50,00,72,00,6f,00,67,00,72,00,61,00,6d,00,46,00,69,00,6c,00,65,00,73,00,\
25,00,5c,00,57,00,69,00,6e,00,64,00,6f,00,77,00,73,00,20,00,50,00,68,00,6f,\
00,74,00,6f,00,20,00,56,00,69,00,65,00,77,00,65,00,72,00,5c,00,50,00,68,00,\
6f,00,74,00,6f,00,56,00,69,00,65,00,77,00,65,00,72,00,2e,00,64,00,6c,00,6c,\
00,22,00,2c,00,20,00,49,00,6d,00,61,00,67,00,65,00,56,00,69,00,65,00,77,00,\
5f,00,46,00,75,00,6c,00,6c,00,73,00,63,00,72,00,65,00,65,00,6e,00,20,00,25,\
00,31,00,00,00

[HKEY_CLASSES_ROOT\Applications\photoviewer.dll\shell\open\DropTarget]
"Clsid"="{FFE2A43C-56B9-4bf5-9A79-CC6D4285608A}"

[HKEY_CLASSES_ROOT\PhotoViewer.FileAssoc.Bitmap]
"ImageOptionFlags"=dword:00000001
"FriendlyTypeName"=hex(2):40,00,25,00,50,00,72,00,6f,00,67,00,72,00,61,00,6d,\
00,46,00,69,00,6c,00,65,00,73,00,25,00,5c,00,57,00,69,00,6e,00,64,00,6f,00,\
77,00,73,00,20,00,50,00,68,00,6f,00,74,00,6f,00,20,00,56,00,69,00,65,00,77,\
00,65,00,72,00,5c,00,50,00,68,00,6f,00,74,00,6f,00,56,00,69,00,65,00,77,00,\
65,00,72,00,2e,00,64,00,6c,00,6c,00,2c,00,2d,00,33,00,30,00,35,00,36,00,00,\
00

[HKEY_CLASSES_ROOT\PhotoViewer.FileAssoc.Bitmap\DefaultIcon]
@="%SystemRoot%\\System32\\imageres.dll,-70"

[HKEY_CLASSES_ROOT\PhotoViewer.FileAssoc.Bitmap\shell\open\command]
@=hex(2):25,00,53,00,79,00,73,00,74,00,65,00,6d,00,52,00,6f,00,6f,00,74,00,25,\
00,5c,00,53,00,79,00,73,00,74,00,65,00,6d,00,33,00,32,00,5c,00,72,00,75,00,\
6e,00,64,00,6c,00,6c,00,33,00,32,00,2e,00,65,00,78,00,65,00,20,00,22,00,25,\
00,50,00,72,00,6f,00,67,00,72,00,61,00,6d,00,46,00,69,00,6c,00,65,00,73,00,\
25,00,5c,00,57,00,69,00,6e,00,64,00,6f,00,77,00,73,00,20,00,50,00,68,00,6f,\
00,74,00,6f,00,20,00,56,00,69,00,65,00,77,00,65,00,72,00,5c,00,50,00,68,00,\
6f,00,74,00,6f,00,56,00,69,00,65,00,77,00,65,00,72,00,2e,00,64,00,6c,00,6c,\
00,22,00,2c,00,20,00,49,00,6d,00,61,00,67,00,65,00,56,00,69,00,65,00,77,00,\
5f,00,46,00,75,00,6c,00,6c,00,73,00,63,00,72,00,65,00,65,00,6e,00,20,00,25,\
00,31,00,00,00

[HKEY_CLASSES_ROOT\PhotoViewer.FileAssoc.Bitmap\shell\open\DropTarget]
"Clsid"="{FFE2A43C-56B9-4bf5-9A79-CC6D4285608A}"

[HKEY_CLASSES_ROOT\Applications\photoviewer.dll\shell\print]
"NeverDefault"=""

[HKEY_CLASSES_ROOT\Applications\photoviewer.dll\shell\print\command]
@=hex(2):25,00,53,00,79,00,73,00,74,00,65,00,6d,00,52,00,6f,00,6f,00,74,00,25,\
00,5c,00,53,00,79,00,73,00,74,00,65,00,6d,00,33,00,32,00,5c,00,72,00,75,00,\
6e,00,64,00,6c,00,6c,00,33,00,32,00,2e,00,65,00,78,00,65,00,20,00,22,00,25,\
00,50,00,72,00,6f,00,67,00,72,00,61,00,6d,00,46,00,69,00,6c,00,65,00,73,00,\
25,00,5c,00,57,00,69,00,6e,00,64,00,6f,00,77,00,73,00,20,00,50,00,68,00,6f,\
00,74,00,6f,00,20,00,56,00,69,00,65,00,77,00,65,00,72,00,5c,00,50,00,68,00,\
6f,00,74,00,6f,00,56,00,69,00,65,00,77,00,65,00,72,00,2e,00,64,00,6c,00,6c,\
00,22,00,2c,00,20,00,49,00,6d,00,61,00,67,00,65,00,56,00,69,00,65,00,77,00,\
5f,00,46,00,75,00,6c,00,6c,00,73,00,63,00,72,00,65,00,65,00,6e,00,20,00,25,\
00,31,00,00,00

[HKEY_CLASSES_ROOT\Applications\photoviewer.dll\shell\print\DropTarget]
"Clsid"="{60fd46de-f830-4894-a628-6fa81bc0190d}"

[HKEY_CLASSES_ROOT\PhotoViewer.FileAssoc.JFIF]
"EditFlags"=dword:00010000
"ImageOptionFlags"=dword:00000001
"FriendlyTypeName"=hex(2):40,00,25,00,50,00,72,00,6f,00,67,00,72,00,61,00,6d,\
00,46,00,69,00,6c,00,65,00,73,00,25,00,5c,00,57,00,69,00,6e,00,64,00,6f,00,\
77,00,73,00,20,00,50,00,68,00,6f,00,74,00,6f,00,20,00,56,00,69,00,65,00,77,\
00,65,00,72,00,5c,00,50,00,68,00,6f,00,74,00,6f,00,56,00,69,00,65,00,77,00,\
65,00,72,00,2e,00,64,00,6c,00,6c,00,2c,00,2d,00,33,00,30,00,35,00,35,00,00,\
00

[HKEY_CLASSES_ROOT\PhotoViewer.FileAssoc.JFIF\DefaultIcon]
@="%SystemRoot%\\System32\\imageres.dll,-72"

[HKEY_CLASSES_ROOT\PhotoViewer.FileAssoc.JFIF\shell\open]
"MuiVerb"=hex(2):40,00,25,00,50,00,72,00,6f,00,67,00,72,00,61,00,6d,00,46,00,\
69,00,6c,00,65,00,73,00,25,00,5c,00,57,00,69,00,6e,00,64,00,6f,00,77,00,73,\
00,20,00,50,00,68,00,6f,00,74,00,6f,00,20,00,56,00,69,00,65,00,77,00,65,00,\
72,00,5c,00,70,00,68,00,6f,00,74,00,6f,00,76,00,69,00,65,00,77,00,65,00,72,\
00,2e,00,64,00,6c,00,6c,00,2c,00,2d,00,33,00,30,00,34,00,33,00,00,00

[HKEY_CLASSES_ROOT\PhotoViewer.FileAssoc.JFIF\shell\open\command]
@=hex(2):25,00,53,00,79,00,73,00,74,00,65,00,6d,00,52,00,6f,00,6f,00,74,00,25,\
00,5c,00,53,00,79,00,73,00,74,00,65,00,6d,00,33,00,32,00,5c,00,72,00,75,00,\
6e,00,64,00,6c,00,6c,00,33,00,32,00,2e,00,65,00,78,00,65,00,20,00,22,00,25,\
00,50,00,72,00,6f,00,67,00,72,00,61,00,6d,00,46,00,69,00,6c,00,65,00,73,00,\
25,00,5c,00,57,00,69,00,6e,00,64,00,6f,00,77,00,73,00,20,00,50,00,68,00,6f,\
00,74,00,6f,00,20,00,56,00,69,00,65,00,77,00,65,00,72,00,5c,00,50,00,68,00,\
6f,00,74,00,6f,00,56,00,69,00,65,00,77,00,65,00,72,00,2e,00,64,00,6c,00,6c,\
00,22,00,2c,00,20,00,49,00,6d,00,61,00,67,00,65,00,56,00,69,00,65,00,77,00,\
5f,00,46,00,75,00,6c,00,6c,00,73,00,63,00,72,00,65,00,65,00,6e,00,20,00,25,\
00,31,00,00,00

[HKEY_CLASSES_ROOT\PhotoViewer.FileAssoc.JFIF\shell\open\DropTarget]
"Clsid"="{FFE2A43C-56B9-4bf5-9A79-CC6D4285608A}"

[HKEY_CLASSES_ROOT\PhotoViewer.FileAssoc.Jpeg]
"EditFlags"=dword:00010000
"ImageOptionFlags"=dword:00000001
"FriendlyTypeName"=hex(2):40,00,25,00,50,00,72,00,6f,00,67,00,72,00,61,00,6d,\
00,46,00,69,00,6c,00,65,00,73,00,25,00,5c,00,57,00,69,00,6e,00,64,00,6f,00,\
77,00,73,00,20,00,50,00,68,00,6f,00,74,00,6f,00,20,00,56,00,69,00,65,00,77,\
00,65,00,72,00,5c,00,50,00,68,00,6f,00,74,00,6f,00,56,00,69,00,65,00,77,00,\
65,00,72,00,2e,00,64,00,6c,00,6c,00,2c,00,2d,00,33,00,30,00,35,00,35,00,00,\
00

[HKEY_CLASSES_ROOT\PhotoViewer.FileAssoc.Jpeg\DefaultIcon]
@="%SystemRoot%\\System32\\imageres.dll,-72"

[HKEY_CLASSES_ROOT\PhotoViewer.FileAssoc.Jpeg\shell\open]
"MuiVerb"=hex(2):40,00,25,00,50,00,72,00,6f,00,67,00,72,00,61,00,6d,00,46,00,\
69,00,6c,00,65,00,73,00,25,00,5c,00,57,00,69,00,6e,00,64,00,6f,00,77,00,73,\
00,20,00,50,00,68,00,6f,00,74,00,6f,00,20,00,56,00,69,00,65,00,77,00,65,00,\
72,00,5c,00,70,00,68,00,6f,00,74,00,6f,00,76,00,69,00,65,00,77,00,65,00,72,\
00,2e,00,64,00,6c,00,6c,00,2c,00,2d,00,33,00,30,00,34,00,33,00,00,00

[HKEY_CLASSES_ROOT\PhotoViewer.FileAssoc.Jpeg\shell\open\command]
@=hex(2):25,00,53,00,79,00,73,00,74,00,65,00,6d,00,52,00,6f,00,6f,00,74,00,25,\
00,5c,00,53,00,79,00,73,00,74,00,65,00,6d,00,33,00,32,00,5c,00,72,00,75,00,\
6e,00,64,00,6c,00,6c,00,33,00,32,00,2e,00,65,00,78,00,65,00,20,00,22,00,25,\
00,50,00,72,00,6f,00,67,00,72,00,61,00,6d,00,46,00,69,00,6c,00,65,00,73,00,\
25,00,5c,00,57,00,69,00,6e,00,64,00,6f,00,77,00,73,00,20,00,50,00,68,00,6f,\
00,74,00,6f,00,20,00,56,00,69,00,65,00,77,00,65,00,72,00,5c,00,50,00,68,00,\
6f,00,74,00,6f,00,56,00,69,00,65,00,77,00,65,00,72,00,2e,00,64,00,6c,00,6c,\
00,22,00,2c,00,20,00,49,00,6d,00,61,00,67,00,65,00,56,00,69,00,65,00,77,00,\
5f,00,46,00,75,00,6c,00,6c,00,73,00,63,00,72,00,65,00,65,00,6e,00,20,00,25,\
00,31,00,00,00

[HKEY_CLASSES_ROOT\PhotoViewer.FileAssoc.Jpeg\shell\open\DropTarget]
"Clsid"="{FFE2A43C-56B9-4bf5-9A79-CC6D4285608A}"

[HKEY_CLASSES_ROOT\PhotoViewer.FileAssoc.Gif]
"ImageOptionFlags"=dword:00000001
"FriendlyTypeName"=hex(2):40,00,25,00,50,00,72,00,6f,00,67,00,72,00,61,00,6d,\
00,46,00,69,00,6c,00,65,00,73,00,25,00,5c,00,57,00,69,00,6e,00,64,00,6f,00,\
77,00,73,00,20,00,50,00,68,00,6f,00,74,00,6f,00,20,00,56,00,69,00,65,00,77,\
00,65,00,72,00,5c,00,50,00,68,00,6f,00,74,00,6f,00,56,00,69,00,65,00,77,00,\
65,00,72,00,2e,00,64,00,6c,00,6c,00,2c,00,2d,00,33,00,30,00,35,00,37,00,00,\
00

[HKEY_CLASSES_ROOT\PhotoViewer.FileAssoc.Gif\DefaultIcon]
@="%SystemRoot%\\System32\\imageres.dll,-83"

[HKEY_CLASSES_ROOT\PhotoViewer.FileAssoc.Gif\shell\open\command]
@=hex(2):25,00,53,00,79,00,73,00,74,00,65,00,6d,00,52,00,6f,00,6f,00,74,00,25,\
00,5c,00,53,00,79,00,73,00,74,00,65,00,6d,00,33,00,32,00,5c,00,72,00,75,00,\
6e,00,64,00,6c,00,6c,00,33,00,32,00,2e,00,65,00,78,00,65,00,20,00,22,00,25,\
00,50,00,72,00,6f,00,67,00,72,00,61,00,6d,00,46,00,69,00,6c,00,65,00,73,00,\
25,00,5c,00,57,00,69,00,6e,00,64,00,6f,00,77,00,73,00,20,00,50,00,68,00,6f,\
00,74,00,6f,00,20,00,56,00,69,00,65,00,77,00,65,00,72,00,5c,00,50,00,68,00,\
6f,00,74,00,6f,00,56,00,69,00,65,00,77,00,65,00,72,00,2e,00,64,00,6c,00,6c,\
00,22,00,2c,00,20,00,49,00,6d,00,61,00,67,00,65,00,56,00,69,00,65,00,77,00,\
5f,00,46,00,75,00,6c,00,6c,00,73,00,63,00,72,00,65,00,65,00,6e,00,20,00,25,\
00,31,00,00,00

[HKEY_CLASSES_ROOT\PhotoViewer.FileAssoc.Gif\shell\open\DropTarget]
"Clsid"="{FFE2A43C-56B9-4bf5-9A79-CC6D4285608A}"

[HKEY_CLASSES_ROOT\PhotoViewer.FileAssoc.Png]
"ImageOptionFlags"=dword:00000001
"FriendlyTypeName"=hex(2):40,00,25,00,50,00,72,00,6f,00,67,00,72,00,61,00,6d,\
00,46,00,69,00,6c,00,65,00,73,00,25,00,5c,00,57,00,69,00,6e,00,64,00,6f,00,\
77,00,73,00,20,00,50,00,68,00,6f,00,74,00,6f,00,20,00,56,00,69,00,65,00,77,\
00,65,00,72,00,5c,00,50,00,68,00,6f,00,74,00,6f,00,56,00,69,00,65,00,77,00,\
65,00,72,00,2e,00,64,00,6c,00,6c,00,2c,00,2d,00,33,00,30,00,35,00,37,00,00,\
00

[HKEY_CLASSES_ROOT\PhotoViewer.FileAssoc.Png\DefaultIcon]
@="%SystemRoot%\\System32\\imageres.dll,-71"

[HKEY_CLASSES_ROOT\PhotoViewer.FileAssoc.Png\shell\open\command]
@=hex(2):25,00,53,00,79,00,73,00,74,00,65,00,6d,00,52,00,6f,00,6f,00,74,00,25,\
00,5c,00,53,00,79,00,73,00,74,00,65,00,6d,00,33,00,32,00,5c,00,72,00,75,00,\
6e,00,64,00,6c,00,6c,00,33,00,32,00,2e,00,65,00,78,00,65,00,20,00,22,00,25,\
00,50,00,72,00,6f,00,67,00,72,00,61,00,6d,00,46,00,69,00,6c,00,65,00,73,00,\
25,00,5c,00,57,00,69,00,6e,00,64,00,6f,00,77,00,73,00,20,00,50,00,68,00,6f,\
00,74,00,6f,00,20,00,56,00,69,00,65,00,77,00,65,00,72,00,5c,00,50,00,68,00,\
6f,00,74,00,6f,00,56,00,69,00,65,00,77,00,65,00,72,00,2e,00,64,00,6c,00,6c,\
00,22,00,2c,00,20,00,49,00,6d,00,61,00,67,00,65,00,56,00,69,00,65,00,77,00,\
5f,00,46,00,75,00,6c,00,6c,00,73,00,63,00,72,00,65,00,65,00,6e,00,20,00,25,\
00,31,00,00,00

[HKEY_CLASSES_ROOT\PhotoViewer.FileAssoc.Png\shell\open\DropTarget]
"Clsid"="{FFE2A43C-56B9-4bf5-9A79-CC6D4285608A}"

[HKEY_CLASSES_ROOT\PhotoViewer.FileAssoc.Wdp]
"EditFlags"=dword:00010000
"ImageOptionFlags"=dword:00000001

[HKEY_CLASSES_ROOT\PhotoViewer.FileAssoc.Wdp\DefaultIcon]
@="%SystemRoot%\\System32\\wmphoto.dll,-400"

[HKEY_CLASSES_ROOT\PhotoViewer.FileAssoc.Wdp\shell\open]
"MuiVerb"=hex(2):40,00,25,00,50,00,72,00,6f,00,67,00,72,00,61,00,6d,00,46,00,\
69,00,6c,00,65,00,73,00,25,00,5c,00,57,00,69,00,6e,00,64,00,6f,00,77,00,73,\
00,20,00,50,00,68,00,6f,00,74,00,6f,00,20,00,56,00,69,00,65,00,77,00,65,00,\
72,00,5c,00,70,00,68,00,6f,00,74,00,6f,00,76,00,69,00,65,00,77,00,65,00,72,\
00,2e,00,64,00,6c,00,6c,00,2c,00,2d,00,33,00,30,00,34,00,33,00,00,00

[HKEY_CLASSES_ROOT\PhotoViewer.FileAssoc.Wdp\shell\open\command]
@=hex(2):25,00,53,00,79,00,73,00,74,00,65,00,6d,00,52,00,6f,00,6f,00,74,00,25,\
00,5c,00,53,00,79,00,73,00,74,00,65,00,6d,00,33,00,32,00,5c,00,72,00,75,00,\
6e,00,64,00,6c,00,6c,00,33,00,32,00,2e,00,65,00,78,00,65,00,20,00,22,00,25,\
00,50,00,72,00,6f,00,67,00,72,00,61,00,6d,00,46,00,69,00,6c,00,65,00,73,00,\
25,00,5c,00,57,00,69,00,6e,00,64,00,6f,00,77,00,73,00,20,00,50,00,68,00,6f,\
00,74,00,6f,00,20,00,56,00,69,00,65,00,77,00,65,00,72,00,5c,00,50,00,68,00,\
6f,00,74,00,6f,00,56,00,69,00,65,00,77,00,65,00,72,00,2e,00,64,00,6c,00,6c,\
00,22,00,2c,00,20,00,49,00,6d,00,61,00,67,00,65,00,56,00,69,00,65,00,77,00,\
5f,00,46,00,75,00,6c,00,6c,00,73,00,63,00,72,00,65,00,65,00,6e,00,20,00,25,\
00,31,00,00,00

[HKEY_CLASSES_ROOT\PhotoViewer.FileAssoc.Wdp\shell\open\DropTarget]
"Clsid"="{FFE2A43C-56B9-4bf5-9A79-CC6D4285608A}"

[HKEY_CLASSES_ROOT\SystemFileAssociations\image\shell\Image Preview\command]
@=hex(2):25,00,53,00,79,00,73,00,74,00,65,00,6d,00,52,00,6f,00,6f,00,74,00,25,\
00,5c,00,53,00,79,00,73,00,74,00,65,00,6d,00,33,00,32,00,5c,00,72,00,75,00,\
6e,00,64,00,6c,00,6c,00,33,00,32,00,2e,00,65,00,78,00,65,00,20,00,22,00,25,\
00,50,00,72,00,6f,00,67,00,72,00,61,00,6d,00,46,00,69,00,6c,00,65,00,73,00,\
25,00,5c,00,57,00,69,00,6e,00,64,00,6f,00,77,00,73,00,20,00,50,00,68,00,6f,\
00,74,00,6f,00,20,00,56,00,69,00,65,00,77,00,65,00,72,00,5c,00,50,00,68,00,\
6f,00,74,00,6f,00,56,00,69,00,65,00,77,00,65,00,72,00,2e,00,64,00,6c,00,6c,\
00,22,00,2c,00,20,00,49,00,6d,00,61,00,67,00,65,00,56,00,69,00,65,00,77,00,\
5f,00,46,00,75,00,6c,00,6c,00,73,00,63,00,72,00,65,00,65,00,6e,00,20,00,25,\
00,31,00,00,00

[HKEY_CLASSES_ROOT\SystemFileAssociations\image\shell\Image Preview\DropTarget]
"{FFE2A43C-56B9-4bf5-9A79-CC6D4285608A}"=""

[HKEY_LOCAL_MACHINE\SOFTWARE\Microsoft\Windows Photo Viewer\Capabilities]
"ApplicationDescription"="@%ProgramFiles%\\Windows Photo Viewer\\photoviewer.dll,-3069"
"ApplicationName"="@%ProgramFiles%\\Windows Photo Viewer\\photoviewer.dll,-3009"

[HKEY_LOCAL_MACHINE\SOFTWARE\Microsoft\Windows Photo Viewer\Capabilities\FileAssociations]
".cr2"="PhotoViewer.FileAssoc.Tiff"
".jpg"="PhotoViewer.FileAssoc.Jpeg"
".wdp"="PhotoViewer.FileAssoc.Wdp"
".jfif"="PhotoViewer.FileAssoc.JFIF"
".dib"="PhotoViewer.FileAssoc.Bitmap"
".png"="PhotoViewer.FileAssoc.Png"
".jxr"="PhotoViewer.FileAssoc.Wdp"
".bmp"="PhotoViewer.FileAssoc.Bitmap"
".jpe"="PhotoViewer.FileAssoc.Jpeg"
".jpeg"="PhotoViewer.FileAssoc.Jpeg"
".gif"="PhotoViewer.FileAssoc.Gif"
".tif"="PhotoViewer.FileAssoc.Tiff"
".tiff"="PhotoViewer.FileAssoc.Tiff"


Yup, that is a lot of keys and settings but you are almost done. Once you have pasted text into your new notepad document save it but as .REG, you can name it however you want but it has to be .REG extension.

Once the file is saved double click on it to merge it into the Windows registry. You might need to turn off UAC for this operation (check our tutorial on this topic) and accept warning messages but once it is done you should now have an old photo viewer as a choice for your default viewing application.

All you have to do now is to go to settings and go to default apps, under photo viewer you should see your current default viewing application, probably photos, click on it to see options and choose photo viewer and exit the Settings menu, and you're done.

If you like to learn and find out more about various Windows errors, and how to repair them go to our vast archive or use search to find articles that will explain and help you in solving your issue.
However, if you prefer to do things fast and with automatization then we are proposing to use an automated solution for your issues. The application that we are recommending is Advanced System Repair Pro
Advanced System Repair utilizes multiple tools all in one to give you a quick, simple, reliable, and very thorough diagnosis of your PC. It brings you all the tools you need in one program to clean, fix, protect, optimize and boost your PC!
1-Click Maintenance
All the tools to make it simple and easy! It's like having a professional technician at the click of a mouse.

Junk Cleaner
Keeping your computer free from unnecessary clutter also helps make your computer last longer. Like any other machine, if you keep it clean and take care of it, it will serve you better for longer!

Optimize background apps
Optimize applications background activity with the built-in Application Optimizer feature.

Disk Defrag
With a simple 1-click, Advanced System Repair speeds up your PC by assembling fragmented files on your machine and organizing them more efficiently.

Malware Removal
Finds and removes all types of harmful malware including trojans, worms, bots, adware, spyware, PUPs, and more!

Privacy Cleaner
The all-in-one privacy suite to Clean Your Tracks & Protect Your Privacy! Make your computer safe, secure, and more efficient!

System Tweak/Optimizer
ASR will analyze your complete system and settings to adjust your PC to function at its maximum performance.

Registry Cleaner
Over time, as you install and uninstall applications, the registry can become cluttered with old entries and broken settings which can result in program crashes, and annoying messages and slow the computer down.
Visit our Advanced System Repair Pro Download page to inform yourself about all the benefits of this software and get a free trial copy of it.
advanced system repair pro

Advanced System Repair Pro

One-click automated PC repair solution
ASR logo
With Advanced System Repair Pro you can easily
Replace damaged files
Restore performance
Free disk space
Remove Malware
Protects WEB browser
Remove Viruses
Stop PC freezing
DOWNLOAD
Privacy Policy | Terms of Use | Uinstall
Advanced System Repair Pro is compatible with all versions of Microsoft Windows including Windows 11

Share this article:

You might also like

How to Fix ‘Your Computer is Low on Memory’ Error

‘Your Computer is Low on Memory’ Error Repair

Your Computer is Low on Memory, What is it?

Low on Memory is a Windows PC memory leak error. You may come across it out of the blue however, there are various underlying reasons for this PC error. It is like a warning sign that indicates memory/RAM issues on your system. The ‘Your Computer is Low on Memory’ error means that your PC does not have enough memory space for all the activities you are trying to perform. Due to this error, your Windows and programs can also stop working. If this error is not fixed timely it can lead to serious PC threats like valuable data loss and hard disk corruption. Along with this memory error, you may also come to experience other types of signs including PC poor performance, speed issues, out-of-memory notifications, and display problems.

Solution

Restoro box imageError Causes

The ultimate and the underlying cause of low memory error is data overload in the RAM which triggers registry issues. To understand this better, here is a comprehensive explanation. The computer has 2 types of memory, RAM (Random Access Memory) and virtual memory. All programs and activities that you do on your computer are saved by the registry in the RAM. This includes obsolete and unnecessary files too like junk files, cookies, internet history, temporary files, invalid registry entries, and bad registry keys. Due to poor PC maintenance practices, these files accumulate in the RAM, thereby overloading it. Also, all programs on the PC use RAM to run. So, when there isn’t enough RAM for the program you are trying to run on your system, Windows temporarily moves information that would normally be stored in RAM to a file called a paging file which is also referred to as the virtual memory. By moving the information to and from the paging file- the virtual memory, Windows temporarily frees up enough RAM for programs to run smoothly. However, when you start running more programs than the RAM installed on your PC can support, low memory errors begin to occur. It triggers that the computer is out of RAM and is also low on virtual memory.

Further Information and Manual Repair

PC users should know that this is a critical error therefore it is advisable to fix it immediately before the damage sets in. Here are some of the best solutions that you can try to resolve Your computer is low on memory and similar memory leak errors on your system.

1. Run Few Programs at a Time

This is a temporary solution to prevent low memory problems.  By running a few programs at one time you can easily keep this memory error away from popping on your computer screen. However, this can cause you inconvenience if you run several programs together to perform different tasks simultaneously.

2. Increase the Virtual Memory Size

Though Windows automatically attempts to augment the virtual memory size the first time you experience ‘low on memory issues; however this again is a temporary way out of this problem. But if you are looking for a solution that can resolve these memory issues for a long time, then you can try manually increasing your PC’s memory size. Increase it up to a maximum size this is by the way determined by the amount of RAM installed on your system. Nonetheless, the drawback of this solution is that increasing the paging file size can reduce your PC performance. It can make your programs run more slowly.

3. Install More RAM

Another solution to resolve low on memory issues is to install more RAM. To do this first check your system properties to see the size of the RAM already installed on your PC. To do this press the Windows key+ Pause/Break key this will open system properties. If the RAM size is lower than 2 GB then you need to install more RAM. But if it is more then you should look for two things one check the piece of software that is causing the problem and secondly you need to clean the registry and remove the unnecessary files from your RAM and hard disk. This would free up space dramatically and resolve the low memory issue right away.

4. Download and Run Restoro, Registry Cleaner on your System

To clean the registry and wipe out unnecessary and obsolete files overloading your RAM and disk space, you should download Restoro. Restoro is a next-generation and highly functional error cleaner. By running this error cleaner on your system, you can easily scan for junk stored in your RAM and hard disk and remove it in seconds, clearing up ample disk space. This will resolve all your PC memory-related issues. Furthermore, it repairs the damaged files and restores the registry too. It spares you from the hassle of installing more RAM or virtual memory. Since this PC repair tool also functions as a system optimizer, it simultaneously boosts the speed of your system thus resolving speed issues too, all in one go. Restoro is a bug-free and efficient tool. It has a user-friendly interface making it easy for all levels of users to operate and run it on their systems. Furthermore, it is compatible with all Windows versions including Windows 7, 8, XP,  Vista & 10. Click here to download Restoro to resolve Low on Memory issues on your PC in seconds!
Read More
How to Fix Error Code 22

How to Fix Error Code 22

Error Code 22 - What is it?

Code 22 is a type of Device Manager Error code. Device manager errors are reported by the drivers causing the problem. It indicates that the devices are disabled in the Device Manager. This error code is displayed in the following format:
This device is disabled. (Code 22)
It looks like a very simple matter to enable a device from the Device Manager interface but if the device fails to load then there are likely greater underlying problems with the drivers. Drivers allow hardware devices to communicate with other hardware devices and the operating system. Drivers contain instructions and operating procedures for devices. Without a driver, a hardware device will not function and may not even appear in the Device Manager.

Solution

driverfix boxError Causes

Common causes of error code 22 are:
  • Device is disabled
  • Driver is outdated
  • The driver is missing or corrupt
  • The previous attempt to update the driver failed
  • Device is damaged
  • The device is not configured as the default device
This means that though the error code 22 typically indicates that the device reporting the error is disabled but other causes can also be associated with the error occurrence.

Further Information and Manual Repair

Here are some of the best and easy do-it-yourself methods to resolve error 22 on your PC. Try these methods to repair the issue.

Method 1

If the error code 22 is triggered due to a disabled device, then all you need to do to resolve the issue is enable the device. To enable the disabled device, follow these steps. Simply go to the start menu and type Device Manager in the search bar. Now click on the Device Manager and then click Actions. After you Click Actions, double click Enable Device. The Enable Device Wizard will pop up. Follow all the prompts from the Enable Device Wizard. This will hopefully resolve the issue.

Method 2

If method 1 doesn’t work then this means the problem is deeper than you think.  The problem can be triggered by the missing, corrupted, or outdated driver for the device reporting the error. In such a situation it is advisable to reinstall the driver for the device. To do this first uninstall the driver for the device reporting error code 22 then reinstall the driver.
  • For this simply click the Start menu, go to the control panel and then click Performance and Maintenance, and then System.
  • In the new window, you will then see a tab called Hardware and the Device Manager.
  • Double click on the device whose driver you need to uninstall.
  • Click on the properties window with a tab marked driver. Then click on the driver you want to uninstall.
To activate changes reboot your PC. Now reinstall the latest and updated version of the driver uninstalled using the Plug and Play feature.

Method 3

Sometimes devices can also get damaged due to registry issues. In such an event, install Restoro. It is a PC Fixer deployed with a registry cleaner. The registry cleaner wipes out all the unnecessary and obsolete files damaging the registry and repairs them in a few minutes. Click here to download Restoro.
Read More
Fix Windows Update error 0x80096004
Recently, a lot of users reported to Microsoft about getting an error code 0x80096004 while trying to update their Windows 10 computers. This kind of Windows Update error occurs during the initial download and verification process. It also affects the Windows features (FODs) and when you encounter this error, you will also see this error code, “TRUST_E_CERT_SIGNATURE”. This error code indicates that the signature of the certificate could not be confirmed. This is caused by a broken certificate store or a corrupt copy of the Windows operating system is installed. Here’s the complete error message:
“There were some problems installing updates, but we’ll try again later. If you keep seeing this and want to search the web or contact support for information, this may help: (0x80096004).”
To fix Windows Update error 0x80096004, you can check out the options provided below.

Option 1 – Delete the contents in the Software Distribution folder and Catroot2 folder

  • Open the WinX Menu.
  • From there, open Command Prompt as admin.
  • Then type in the following command – don’t forget to hit Enter right after typing each one of them.
net stop wuauserv net start cryptSvc net start bits net start msiserver
  • After entering these commands, it will stop the Windows Update Service, Background Intelligent Transfer Service (BITS), Cryptographic, and the MSI Installer
  • Next, go to the C:/Windows/SoftwareDistribution folder and get rid of all the folders and files thereby tapping the Ctrl + A keys to select them all and then click on Delete. Note that if the files are in use, you won’t be able to delete them.
After resetting the SoftwareDistribution folder, you need to reset the Catroot2 folder to restart the services you just stopped. To do that, follow these steps:
  • Type each one of the following commands.
net start wuauserv net start cryptSvc net start bits net start msiserver
  • After that, exit Command Prompt and restart your computer, and then try to run Windows Update once more.

Option 2 – Run the Windows Update Troubleshooter

Running the built-in Windows Update troubleshooter is one of the things you can first check out as it is known to automatically resolve any Windows Update errors like error code 0x80096004. To run it, Refer to these steps:
  • Tap the Win + I keys to open Settings.
  • From there, click Update and Security and go to the Troubleshoot section.
  • Next, select Windows Update and click the “Run the troubleshooter” button and wait until it’s finished, and then try to run Windows Update again.

Option 3 – Try to temporarily disable anti-virus and Windows Defender Firewall

As mentioned, the error could be due to the antivirus program or the Windows Defender Firewall installed on your computer. Thus, disabling them or any security software installed in your computer is always a good idea you can try when you’re not able to access the shared drive on your computer. There are times when you encounter problems like Error Code 0x80096004 due to interference of antivirus or security programs. Thus, you have to disable both your antivirus program and Windows Defender Firewall for the meantime and check if it fixes the error or not.

Option 4 – Try to replace the DLL file with a trusted source

You can also try to replace the crypt32.dll file as it could help in fixing the Windows Update error. Just make sure that you get one from a trusted source.
  • First, you need to get the new DLL file from another computer with preferably the same file version number.
  • After that, you need to boot your PC into Safe Mode and navigate to the paths listed below and then replace the file using a USB drive or other external storage devices.
    • x86: This PC > C:/Windows/System32
    • x64: This PC > C:/Windows/SysWOW64
  • Next, type “cmd” in the Cortana search box and right-click on Command Prompt, and select “Run as administrator” to open it with administrator privileges.
  • Now type the “regsvr32 crypt32.dll” command and hit Enter.
  • Restart your PC and check if the error is now fixed.

Option 5 – Try downloading and installing the Windows Updates manually

Error Code 0x80096004 might be due to a Windows Update that has failed. So if it is not a feature update and only a cumulative update, you can download the Windows Update and install it manually. But first, you need to find out which update has failed, and to do so, refer to the following steps:
  • Go to Settings and from there go to Update and Security > View Update History.
  • Next, check which particular update has failed. Note that Updates that have failed to install will be displayed under the Status column which has a label of “Failed”.
  • After that, go to the Microsoft Download Center and look for that update using its KB number and once you find it, download and then install it manually.
Note: You can also use the Microsoft Update Catalog, a service from Microsoft that provides a list of software updates that can be distributed over a corporate network. With the help of this service, it can be easier for you to find Microsoft software updates, drivers as well as fixes.

Option 6– Run System File Checker or SFC scan

System File Checker or SFC is a built-in command utility that helps in restoring corrupted files as well as missing files. It replaces bad and corrupted system files to good system files. To run the SFC command, follow the steps given below.
  • Tap Win + R to launch Run.
  • Type in cmd in the field and tap Enter.
  • After opening Command Prompt, type in sfc /scannow
The command will start a system scan which will take a few whiles before it finishes. Once it’s done, you could get the following results:
  1. Windows Resource Protection did not find any integrity violations.
  2. Windows Resource Protection found corrupt files and successfully repaired them.
  3. Windows Resource Protection found corrupt files but was unable to fix some of them.
 Reboot your PC.

Option 7 – Try to run the Windows Update Service in a Clean Boot State

There are some instances that some conflicting programs installed in your computer might be the one that’s causing Windows Update error. To identify which program is causing the problem, you need to put your computer in a Clean Boot State. To do so, follow the steps below.
  • Log onto your PC as an administrator.
  • Type in MSConfig in the Start Search to open the System Configuration utility.
  • From there, go to the General tab and click “Selective startup”.
  • Clear the “Load Startup items” check box and make sure that the “Load System Services” and “Use Original boot configuration” options are checked.
  • Next, click the Services tab and select the “Hide All Microsoft Services” check box.
  • Click Disable all.
  • Click on Apply/OK and restart your PC. (This will put your PC into a Clean Boot State. And configure Windows to use the usual startup, just simply undo the changes.)
  • Now try to run the Windows Update Service again and see if Windows Update error 0x80096004 is now gone.
Read More
Removing old drivers from Windows 10
So you have just got home from that new computer store with your fancy and all-new mouse, screen, keyboard, etc. You plugged in your new component, Windows detected it, installed drivers for it and it is working like a charm. A few months later down the road and the computer starts little by little to slow down. Plug and play is a great concept, and automatic detection is even greater but how time passes old unused stuff piles in your hard drive and in Windows itself thus slowing down your computer and taxing it more and more as new components and software are added. Old drivers from old components sadly are not removed from Windows itself and over some larger period of time they can pile up and slow down your daily operations on the computer or even cause some problems in it. This guide will teach you how to manually remove old unused device drivers from your Windows so it is fresh and like new again.

Making old devices visible

In order for us to remove old drivers, the first thing we must do is make them visible in our device manager, old drivers are hidden and will not show up, we must make this happen. We do this by pressing WINDOWS + X keys on your keyboard to bring up a hidden menu in Windows. keyboard with windows and x markedOnce the menu appears, click on Command Prompt (admin) Windows menu command prompt adminOnce the command prompt with administrator privileges comes on-screen type in it following string: The device manager will open, go to view > snow hidden devices in order to show unused devices. device manager show hidden devices

Removing old device

Open any category and if there is a device that was once used and still has its drivers in the system it will be shown as faded out. device manager hidden device shownRight-click on the device and click on uninstall device to remove it completely from your system. device manager uninstall device driverPlease always be careful when removing devices so you do not remove the device which is being used by mistake and always double-check that you are removing something that you used to have on your system. This method will show all hidden devices even ones that are hidden but crucial to the system working properly.
Read More
IW Unicorn and Scorpion PC Chair cockpits
Recently on errortools.com, we were talking about Cooler Master’s Orb X gaming chair that is an absolute beast and an amazing product. One downside of Orb X is its price. IW product line is somewhat competing with Orb X with a much more affordable price aiming to probably take customer base with lower income but offering them a great experience as well. The first thing you will notice is a different design and somewhat feeling of cheaper quality if you compare it to Orb X but that is quite reasonable considering the chair itself is around 3.5 times cheaper than Orb X which really puts it in range of everyone can get it. But does a much cheaper price means low quality? Let’s explore.

IW Unicorn

IW unicorn
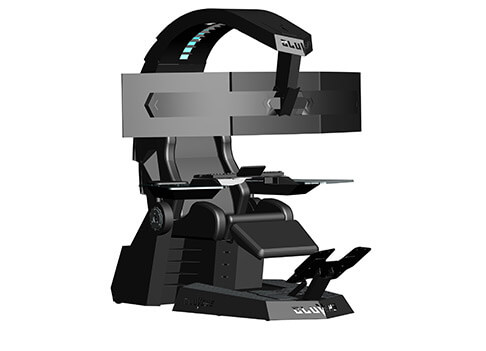
The 2021 CLUVENS BRAND newly issued model UNICORN has fully electrical tilting capabilities to 160 degrees, Reading light-two LED & RGB illumination lighting, manual open/close keyboard tray, and armrests. This model is suitable for home and office, and also gaming computer work environments. It offers functions that enable the user to experience unprecedented comfort and quasi total immersion through strategically positioned 1-3 monitors, audio systems, and accessories. The result is a complete computer office, ergonomically optimized, with a minimal footprint that improves overall performance and productivity and health and comfort. Sitting on a chair can help a lot for relieving health problems like lower back pain, herniated discs, sciatica, and neck pain and also enhance performance and viewing effects.

More Luxury and More comfortable:

Equipped with Luxury feeling reclining Gaming chair made with high-density Mold Shaping Foam and superior quality PU leather with very comfortable texture, electrical recline to 128 degrees, and more to 160 degrees for the flat position for the user.

More High-End Setting and more High-tech:

Manual push for open / close of big sized (87x34cm) Self-Balancing Keyboard tray, adjustable with 20cm distance range with Electrical control for the height of roof arm & monitors. Electrical control for reclining Zero Gravity position or even flat position, Manual adjusted Feet pedal for a more comfortable position for feet. Using a High-Quality PU leather Gaming chair that has Heat/Massage functions with it! The IW-Unicorn monitor mounts allow the use of a single monitor up to Ultra-wide 49” or 43” in size or triple monitor setups up to 3 x 29” other monitors configurations are available upon request. (VESA standard)

IW Scorpion

IW scorpion
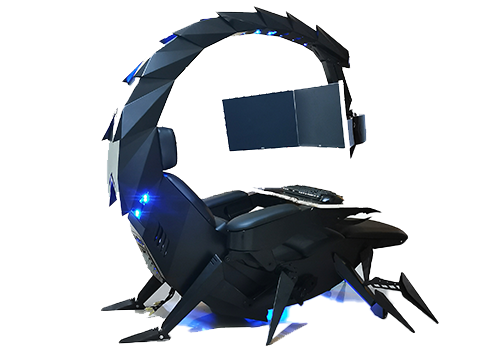
Scorpion is basically a premium version of Unicorn with being able to hold more weight, having cup holders on the armrest, etc. The look is also similar with Scorpion being more sinister-looking but overall Steel frame and chair are the same.

Conclusion

Sadly I have not personally experienced neither of these products including Orb X but from all information I have found and looked over, I would say these products are not trying to compete with each other. Although Products are similar in nature, Orb X is aimed at hi end-users focusing on privacy and robustness while IW is filling the gap of users that would like an advanced chair but are not willing or ready to shell hi amount of money for it offering advanced chairs with advanced features in somewhat affordable price.
Read More
Samsung Odyssey Neo G9 monitor review
samsung Odyssey Neo G9Odyssey Neo G9 is a successor to Odyssey G9 curved gaming monitor and it is aimed again at the gaming community with its specifications but of course, it can be used for work as well. Gapping at a stunning $2500 USD price it is not really a cheap piece of hardware so it is normal to see what do you get for this kind of price and do features justify it, so let’s dive in.

Size and resolution

The first thing that you can notice about the screen is that it is big and curved, 49 inches big which is pretty big, and with it, I believe you can forget about using 2 or 3 screens because this single one will cover everything you need really. Going as far as 5120 X 1440 resolution is the strange definition, basically, this is 5K which is kind of nice but I do not see the advantage. Sure it is larger than 4K, but for the price of $2500 I expected an 8K monstrosity so if the resolution is not the main price justification then what is? Let’s move on and find out.

Odyssey tech specs

The monitor comes with HDR and 240Hz refresh rate which is very nice and coupled with 1ms pixel response time, adaptive sync, and Variable Refresh Rate you get pretty good other tech specs. All of this is very nice but the monitor's strongest selling point is Mini Led tech. Mini Led is a next-gen tech currently found only in high-end TVs. With this technology, monitors can produce truer blacks sort of speak thanks to a greater number of dimming zones. Odyssey Neo G9 is rated at 2000 nits in the brightness values and local dimming zones go to stunning 2048. It comes also with Quantum HDR that supports 10+, Freesync, and G-Sync capability. In connection, the department monitor comes with a single display 1.4 port and two HDMI 2.1 ports. It also includes a headphone jack along with two USB 3.0 ports.

Conclusion

While the resolution of the monitor is nothing impressive for the given price, its size and the rest of the tech specs surely are. Now I will not lie, the price is still a little too high but if you could afford it easily I think you should.
Read More
Network License NotAvailable15.570.0 Autodesk
If when trying to start Autodesk applications you receive a Network license not available error then please keep on reading, this guide is for you:

Causes of the error:

  • The license on the License Server is invalid.
  • The port for Autodesk Network License Manager is blocked.
  • The client computer is configured with incorrect license server information.
  • The license request is timing out on the client's computer before the license is obtained.

Solutions for the error:


Verify that the Autodesk License Server is setup with the correct license file.

To set up a license server for Windows, perform the following:

  1. Download and install the Network License Manager for Windows:
  2. Open LMTools and access the System Settings tab. Make a note of the "hostname" and "ethernet address" of the license server.
  3. Generate a Network License File in Autodesk Account.
  4. On the Service/License tab, select Configuration Using Services and LMTOOLS ignores license file path environment variables.
  5. On the Config Services tab, enter a name for the new service in the Service Name field.
  6. Fill the following fields, using the Browse buttons:
    • Path to the lmgrd.exe - Navigate to this file: C:\Autodesk\Network License Manager.
    • Path to the License file - Navigate to the new Autodesk.lic file, typically placed in: C:\Autodesk\Network License Manager\Licenses.
    • Path to the Debug Log file: C:\Autodesk\Network License Manager.
    • If no file is present, create a TXT file in Notepad and rename it “Debug.log.”
  7. Make sure the "Start Server at Power Up" and the "Use Services" boxes are checked. Then click Save Services.
  8. On the Start/Stop/Reread tab, click Start Server.
  9. On the Server Status tab, click Perform Status Enquiry.
  10. Licenses should display as active.

How to set up the Autodesk Network License Manager on a Mac.

Note: The Autodesk License Server Manager (version 11.16.2.0) is supported only on the following Mac operating systems:
  • Apple macOS High Sierra 10.13
  • Apple macOS Sierra 10.12
  • Apple Mac OS X El Capitan 10.11
  1. Download Autodesk Network License Manager version 11.16.2.0 for Mac
    • ​​Download the nlm11.16.2.0_ipv4_ipv6_mac_universal.tar.gz file to the Desktop.
  2. To install the Autodesk Network License Manager:
    • Double click on nlm11.16.2.0_ipv4_ipv6_mac_universal.tar.gz to unpack the installer package.
    • After unpacking nlm11.16.2.0_ipv4_ipv6_mac_universal.pkg, will be /Downloads/adlm/FLEXnet folder.
    • Double click on nlm11.16.2.0_ipv4_ipv6_mac_universal.pkg to start installation and follow the installation wizard.
    • The license server will be installed in /usr/local/flexnetserver/ directory.
  3. Change permissions for /usr/local/flexnetserver/ directory to 777
  • Open Terminal (located in /Applications/Utilities/Terminal) and enter the following command:
sudo chmod -R 777 /usr/local/flexnetserver
  • Note: Administrator password may be asked. While typing no characters are shown, just type out the password and hit return key.
  • Note: To start the license server only with elevated permissions (using sudo command), change permissions to 755 instead of 777.
  1. Create /usr/local/flexnetserver/licenses directory for network license file location
sudo mkdir /usr/local/flexnetserver/licenses
  1. Find the license server Host Name and Host ID.
  2. Generate the Network License File in the Autodesk Account
    • Once the license file is generated, make sure it has a .lic extension (e.g. adsk_license.lic) and is in a plain text format and place it in /usr/local/flexnetserver/licenses directory
Note: In this article we will refer to  adsk_license.lic as network license file name. Feel free to change the actual name of the license file, but make sure to reflect the new name when using the commands below.
  1. Create a debug.log file in the /usr/local/flexnetserver/ directory using the following command:
touch debug.log
  1. To start the Network License Server use the following command:
/usr/local/flexnetserver/lmgrd -c /usr/local/flexnetserver/licenses/adsk_license.lic -l /usr/local/flexnetserver/debug.log
Note: If folder permissions for  /usr/local/flexnetserver/ are set to  775, then use sudo command to start the server. For example:
sudo /usr/local/flexnetserver/lmgrd -c /usr/local/flexnetserver/licenses/adsk_license.lic -l /usr/local/flexnetserver/debug.log
  1. To obtain license server status enquiry:
/usr/local/flexnetserver/lmutil lmstat -a -c /usr/local/flexnetserver/licenses/adsk_license.lic
  1. To stop the license server:
/usr/local/flexnetserver/lmutil lmdown -q -force
  • A​​lternatively, run ps command to obtain process ids for lmgrd and adskflex and then kill those processes:
ps -ax | grep lmgrd
ps -ax | grep adskflex
kill -9
  • (provide process ids obtained by previous commands individually)

How to set up the Autodesk Network License Manager on Linux.

Note: The Autodesk License Manager (11.16.2.0) is supported only on the following Linux distros:
  • Red Hat® Enterprise Linux® 7
  • Red Hat Enterprise Linux 6
  • SUSE Linux Enterprise 12
  • SUSE Linux Enterprise 11
To configure the license manager use the following steps:
  1. Download Autodesk Network License Manager v. 11.16.2 for Linux from this link
    • ​​Download the nlm11.16.2.0_ipv4_ipv6_linux64.tar.gz file to your desktop.
  2. To install the Autodesk Network License Manager run following command as root.
    • tar –zxvf nlm11.16.2.0_ipv4_ipv6_linux64.tar.gz
    • rpm -vhi nlm11.16.2.0_ipv4_ipv6_linux64.rpm
    • The license server will be installed in /opt/flexnetserver/ directory.
  3. Find the license server Host Name and Host ID
  • To obtain the license server system hostid run the following command
/opt/flexnetserver/lmutil lmhostid From the command output note the hostid in quotes, if the system has two active NIC cards, select the first MAC address. lmutil - Copyright (c) 1989-2018 Flexera. All Rights Reserved. The FlexNet host ID of this machine is "000c297949e0"
  • To obtain the license server system hostname run the following command
/opt/flexnetserver/lmutil lmhostid hostname From the command output note the hostname of the license server. mutil - Copyright (c) 1989-2018 Flexera. All Rights Reserved. The FlexNet host ID of this machine is "HOSTNAME=Centos7.localdomain"
  1. Generate your Network License File in Autodesk Account
    • Once the license file is generated, make sure it has .lic extension (e.g. adsk_license.lic) and place it in /opt/flexnetserver/licenses directory.  If the directory doesn't exits, create it with this command: sudo mkdir /opt/flexnetserver/licenses
Note: in this article we will refer by adsk_license.lic your network license file name.
  1. To start the Network License Server
    • /opt/flexnetserver/lmgrd -c /opt/flexnetserver/licenses/adsk_license.lic -l /opt/flexnetserver/server_log.log
  2. To obtain license server status enquiry
    • /opt/flexnetserver/lmutil lmstat -a -c /opt/flexnetserver/licenses/adsk_license.lic
  3. To stop your license server service
    • /opt/flexnetserver/lmutil lmdown -q -force
    • alternatively you can also run ps command to obtain process ids for lmgrd and adskflex and then kill those processes
      • ps -aw | grep lmgrd
      • ps -aw | grep adskflex
      • kill -9 (provide process ids obtained by previous commands individually)
  4. To start the license server automatically after the system reboot
    • Open /etc/rc.d/rc.local script as root and enter license server start up command in it.
touch /var/lock/subsys/local /opt/flexnetserver/lmgrd -c /opt/flexnetserver/licenses/adsk_license.lic -l /opt/flexnetserver/server_log.logNote: To ensure that the script will be executed during boot, run following command as root. chmod +x /etc/rc.d/rc.local
  1. Make sure that all necessary ports are open:
  • lmgrd.exe needs ports 27000 to 27009.
  • adskflex.exe needs port 2080.
Note: Errors may occur if the network license file is corrupt or in the case of a combined network license it has incorrectly combined licenses. To learn more about combining licenses, see Combining License Files for Multiple Autodesk Products. Use the License File Parser to verify that the license contains the appropriate products and FLEXnet feature codes and does not display an error

Verify that TCP ports (2080, 27000-27009) used by Autodesk Network License Manager are not blocked by Firewall.

The FLEXlm® based version uses the following incoming ports:
  • TCP ports 2080 (for the adskflex vendor daemon)
  • TCP ports 27000 to 27009 (for the lmgrd master daemon, which uses the first open port in the range)
Note: If these port addresses are restricted by a router or firewall software, users on the remote side of the router will not have access to licenses controlled by the Network License Manager.

Verify that the client computer is configured with the correct license server name or IP.

Windows:

Clear license server information from the system registry.

  1. Type regedit in the Windows Search box and hit Enter key.
  2. Select the following registry key
  • [HKEY_CURRENT_USER\SOFTWARE\FLEXlm License Manager]
  1. As the key is selected, in right panel ADSKFLEX_LICENSE_FILE will be visible.
  2. Right click on the key and delete it.

Specify the license server in ADSKFLEX_LICENSE_FILE system variable 

  1. Go to Start > Control Panel > System and Security > System.
  2. Select Advanced system settings.
  3. On the System Properties dialog, click Environment Variables.
  4. Under System Variables, click New.
  5. Enter ADSKFLEX_LICENSE_FILE for the variable name and 2080@SERVER_NAME _OR _IP for the variable value.
Note: the license server information most often is recorded in LICPATH.lic file and can be verified there too.  ADSKFLEX_LICENSE_FILE system variable supersedes LICPATH.lic.  Thus, setting the system variable is preferable when this error is seen.

If the license server is on a VPN or a remote network set the FLEXLM_TIMEOUT environment variable:

  1. Go to Start > Control Panel > System and Security > System.
  2. Select Advanced system settings.
  3. On the System Properties dialog, click Environment Variables.
  4. Under System Variables, click New.
  5. Enter FLEXLM_TIMEOUT for the variable name and 5000000 for the variable value.
  6. Click OK to save the setting.
Note: if needed the variable value can be increased to 10000000.

Mac/Linux:

Specify the Autodesk Network License server information in $HOME/.flexlmrc file.

Use a text editor to create a flexlmrc.txt file and save it in Plain text format (In TextEdit on Mac: Format - Make Plain Text) on desktop. The file content should look like this, except with the name or IP address of the license server.
  • ADSKFLEX_LICENSE_FILE=@SERVER_NAME _OR _IP
If the license server is on the same machine as the Autodesk software, use localhost as the license server name.  Thus, the content of flexlmrc file could look like this:
  • ADSKFLEX_LICENSE_FILE=@localhost
Note: On firewall restricted network or when accessing the license server via VPN, need to include TCP port/s (usually 27000 or 2080) into Autodesk License Server service as follows: ADSKFLEX_LICENSE_FILE=2080@SERVER_NAME _OR _IP

Once flexlmrc file is created move it to user's $HOME folder as follows:

  1. Open a Terminal window
  2. Type open ~ (Mac) or nautilus ~ (Linux) to open $HOME folder
  3. Drag and drop flexlmrc.txt file from Desktop to the home folder.
  4. To make the file a configuration file, rename it to .flexlmrc (please note . [DOT] in front of the file name) by running the following command:
  • mv flexlmrc.txt .flexlmrc (Mac)
  • mv flexlmrc .flexlmrc (Linux)

Verify that the license server information registered with the product is correct (versions 2020 and later only)

In versions 2020 and later, the license server information is registered with the AdskLicensing service running locally on the workstation. When changing to a new license server, the old server information may still be registered with AdskLicensing and result in the error above, if this is not appropriately updated. See the below steps to solve this:
  1. Click the Start menu and type cmd.
  2. Right-click on the Command prompt and choose "Run As Administrator."
  3. In the Command prompt, run the following command, followed by ENTER:

"C:\Program Files (x86)\Common Files\Autodesk Shared\AdskLicensing\Current\helper\AdskLicensingInstHelper.exe" change -pk PRODKEY -pv VER.0.0.F -lm "" -ls "" -lt""

Note:

  • Replace PRODKEY with the product key correspondent to your product(s). See Look Up Product Keys for the full list.
  • Replace VER with the version you are using. E.g. 2020 for AutoCAD 2020.
  • Repeat this step for each software you need to reset.
  1. Open Registry Editor (Start > type regedit > ENTER).
  2. Navigate to HKEY_CURRENT_USER\Software\FLEXlm License Manager.
  3. On the right-side, verify of the ADSKFLEX_LICENSE_FILE key exists. If yes, remove it (right-click > Delete).
  4. Run the software again.
  5. Select Multi-user in the Let's Get Started screen.
  6. Follow the steps to connect to your license server.
Read More
Fix Power surge on the USB port
USB ports, just like any other ports, also comes with a power rating. The default power output of a standard USB port is 0.5 amperes and if you notice, mobile phones charge slowly on USB ports which explains why. There are times when Windows may throw an error or warning that says, “Power surge on the USB port”. This kind of error occurs when a connected device tried to draw more power and the error comes as a part of that notification so when you select it, it will say,
“A USB device has malfunctioned and exceeded the power limits of its hub port. You should disconnect the device”.
To easily fix the problem, you can try to disconnect the device and click on Reset and if you click on Close, the port will not work until you unplug it and then restart your computer. On the other hand, if disconnecting the device did not resolve the problem, you can try running the Hardware & USB troubleshooter or use a USB hub. You can also try to reinstall, uninstall or roll back the USB drivers or run the OEM diagnostics. For more information, refer to each one of the potential fixes provided below.

Option 1 – Try to run the Hardware & USB troubleshooter

  • The first thing you need to do is click on Start and then on the gear-like icon to pull up the window for Settings.
  • After opening Settings, look for the Update and Security option and select it.
  • From there, go to the Troubleshoot option located on the left-hand side of the list.
  • Next, select Hardware and Devices from the list and open the Troubleshooter and run it. Once it is doing its job, wait for it to complete the process and then restart the system.
  • After the system restarts, check if the problem’s now fixed. If not, refer to the next option given below.
Note: You could also try to run the USB troubleshooter as it could also resolve the problem.

Option 2 – Try to use a USB hub

If you’ve encountered the error on a specific device, then it is possible that the device requires more voltage. To fix this error, you can try to use the same device on another computer and if you still got the same error, you might want to use a USB hub that comes with its power source. USB hubs come with high-speed charging ports that should be able to supply the power needed for the device.

Option 3 – Update, rollback or reinstall the Universal Serial Bus Controller driver

If updating the drivers of the device did not fix the “The device is not ready” error, you can try to update, rollback, or reinstall the Universal Serial Bus Controller drivers instead of using the Device Manager. Refer to the following steps:
  • First, click the Start button and type “device manager”.
  • Then click on the “Device Manager” from the search results to open it.
  • From there, look for the “Universal Serial Bus controllers” option and then right-click on each one of the USB drivers and select the Update Driver from the menu.
Note: If it is a regular USB drive, then it will be listed as a USB Mass Storage Device but if you have a USB 3.0 device, then look for a USB 3.0 Extensible Host Controller.
  • Restart your PC and then click the “Search automatically for updated driver software” option.
Note: If updating the USB Controller drivers didn’t work, you can try to reinstall them instead.

Option 4 – Try running OEM Diagnostics if you have any

If the laptop or desktop computer you are using is a branded one, OEMs usually include software to diagnose issues in the computer like the USB port error. So if you have this software, try to run it for diagnosis and use any given suggestions to fix the error.
Read More
How to Fix Error 12031

Repair Error 12031

Error 12031 - What is it?

Error 12031 indicates that the connection with the server has been reset or is not properly connected. In other words, it signifies that the File Transfer Protocol which is the standard network protocol that is used to transfer files from one host to another over the internet is either reset or not working properly. For example, if you are using a wireless adapter, then you may experience this error code when the adapter loses its association with the access point. The error code is often displayed in the following format:
  • "ERROR_INTERNET_CONNECTION_RESET"
  • "Cannot Connect to the FTP Server"

Solution

Restoro box imageError Causes

Though the error 12031 is largely caused by poor internet connection and failure to obtain files from the FTP server, however, sometimes the error may be caused by invalid registry entries and outdated drivers. Furthermore, it may also be a Firewall issue.

Further Information and Manual Repair

To resolve this issue on your system, we have listed down the best and easy DIY solutions. These solutions are simple to perform and do not require any kind of technical expertise or knowledge. Just follow the steps and you will be able to resolve it in a couple of minutes.

Solution 1: Disable Firewall

If you are unable to connect to the server and you encounter the error code 12031 on your system, then to resolve this issue, disable the Firewall on your PC.

Solution 2: Reset IE (Internet Explorer) Settings

This error is typically experienced by IE7 users.  If you can’t access some websites in Internet Explorer and you come across a 12031 error code, then try resetting your IE settings. To do this, open Internet Explorer, click on tools, and then click on Internet Options. Now go to the advanced tab and select Use Passive FTP. After checking the box, exit and then try accessing those sites that were not accessible before. If after modifying IE settings you are able to access the sites without any error message display, then this means the error is resolved. Nonetheless, if the error still persists, then the error could be generated due to invalid registry entries.

Solution3: Download and Run Restoro

To remove invalid registry entries from your system and resolve the 12031 error immediately, it is advisable to download and run Restoro. This is a new, cutting-edge, and multi-functional PC repair tool integrated with multiple utilities like a powerful registry cleaner, an antivirus, and a system optimizer. The registry cleaning utility scans your PC for all registry errors. It wipes out unnecessary files, bad and invalid registry entries, repairs damaged files, and restores the registry thereby resolving the 12031 error on your PC. This error tool has a user-friendly interface and simple navigations. It is easy to use and compatible with all Windows versions. In addition to this, you can also use it to scan for malicious software and remove malware. It also functions as a system optimizer and boosts your computer’s speed dramatically. Click here to download Restoro on your PC and resolve error 12031 right away!
Read More
Fix Windows Updates and MS Store, 0x80240438
If you were trying to update your Windows 10 computer and failed due to Error Code 0x80240438, then you’ve come to the right place as this post will give you a couple of suggestions you can check out to resolve this error. You can encounter Error Code 0x80240438 not just in Windows Updates but also in Microsoft Store. This is due to the fact that the delivery mechanism for both Windows Updates and Microsoft Store is common and interdependent. This is why a lot of Windows Update and Microsoft Store error codes are similar. And so fixing them won’t be that hard as well since most methods are basically the same. When you encounter this kind of error in Windows Update or Microsoft Store, you will see the following error message on your screen:
“There were some problems installing updates, but we’ll try again later. If you keep seeing this and want to search the web or contact support for information, this may help – (0x80240438).”
To resolve Error Code 0x80240438, here are some potential fixes you need to check out:

Option 1 – Try to run the Windows Update Troubleshooter

The Windows 10 Store Apps Troubleshooter will help you in fixing the Error Code 0x80240438. This is a great built-in tool from Microsoft that helps users fix any app installation issues. So this is worth a try to solve the problem. This built-in tool also helps you fix the Windows 10 Store if it isn’t working. To use the Windows Store Troubleshooter, follow the steps below.
  • Tap Win + I keys again to open the Windows Settings panel.
  • Go to Update & Security and then go to Troubleshoot.
  • Under the Troubleshoot section, on your left-hand side, scroll down to find Windows Update and then click on Run the troubleshooter option and follow the on-screen instructions and then see if it fixes the problem.

Option 2 – Try to temporarily disable anti-virus and Windows Defender Firewall

As mentioned, the error could be due to the antivirus program or the Windows Defender Firewall installed on your computer. Thus, disabling them or any security software installed in your computer is always a good idea you can try when you’re not able to access the shared drive on your computer. There are times when you encounter problems like Error Code 0x80240438 due to interference of antivirus or security programs. Thus, you have to disable both your antivirus program and Windows Defender Firewall for the meantime and check if it fixes the error or not.

Option 3 – Disable the Proxy server

You can also try to disable the Proxy server for your LAN to fix Error Code 0x80240438 especially if your computer was attacked by some malware or adware recently. In such cases, there is a chance that the malware or adware has changed your network settings in order to generate intrusive advertisements. Thus, you have to disable the proxy server and you can do that by following these steps:
  • Tap the Win + R keys to open the Run dialog box.
  • Then type “inetcpl.cpl” in the field and hit Enter to pull up the Internet Properties.
  • After that, go to the Connections tab and select the LAN settings.
  • From there. Uncheck the “Use a Proxy Server” option for your LAN and then make sure that the “Automatically detect settings” option is checked.
  • Now click the OK and the Apply buttons.
  • Restart your PC.
Note: If you are using a third-party proxy service, you have to disable it.

Option 4 – Try modifying the “Remove access to use all the Windows Update features” Policy

  • Start by tapping the Win + R key combination to open the Run utility.
  • Then type “gpedit.msc” in the field and tap Enter to open the Group Policy Editor.
  • Once you’ve pulled up the Group Policy Editor, navigate to this setting: User Configuration > Administrative Templates > Windows Components > Windows Update
  • Next, double click on the “Remove access to use all the Windows Update features” policy and set its radio button to “Not Configured”. As you can see, this policy setting has the following description:
“This setting allows you to remove access to Windows Update. If you enable this setting, all Windows Update features are removed. This includes blocking access to the Windows Update Web site at http://windowsupdate.microsoft.com, from the Windows Update hyperlink on the Start menu, and also on the Tools menu in Internet Explorer. Windows automatic updating is also disabled; you will neither be notified about nor will you receive critical updates from Windows Update. This setting also prevents Device Manager from automatically installing driver updates from the Windows Update Web site.”
If you enable this policy setting, you can configure one of the following notification options:
  • 0 = Do not show any notifications: This setting will remove all access to Windows Update features, and no notifications will be shown.
  • 1 = Show restart required notifications – This setting will show notifications about restarts that are required to complete an installation.
  • Now you need to exit the Group Policy Editor and restart your computer for the changes to take effect.

Option 5 – Try resetting the Windows Update folders

Resetting the Windows Update folders can also help in fixing the error in both Windows Update and Microsoft Store. All you have to do is delete the contents in both the SoftwareDistribution folder and reset the Catroot2 folder as well.

Option 6 – Try downloading and installing the Windows Updates manually

Error Code 0x80240438 might be due to a Windows Update that has failed. So if it is not a feature update and only a cumulative update, you can download the Windows Update and install it manually. But first, you need to find out which update has failed, and to do so, refer to the following steps:
  • Go to Settings and from there go to Update and Security > View Update History.
  • Next, check which particular update has failed. Note that Updates that have failed to install will be displayed under the Status column which has a label of “Failed”.
  • After that, go to the Microsoft Download Center and look for that update using its KB number and once you find it, download and then install it manually.
Note: You can also use the Microsoft Update Catalog, a service from Microsoft that provides a list of software updates that can be distributed over a corporate network. With the help of this service, it can be easier for you to find Microsoft software updates, drivers as well as fixes.
Read More
1 2 3 162
Logo
Copyright © 2022, ErrorTools. All Rights Reserved
Trademarks: Microsoft Windows logos are registered trademarks of Microsoft. Disclaimer: ErrorTools.com is not affiliated with Microsoft, nor claim direct affiliation.
The information on this page is provided for information purposes only.
DMCA.com Protection Status