New Windows 11 update 22000.65

The first major update for Windows 11, 22000.65 has brought some bug fixes and some new features. The previous update was just a bunch of small fixes but this time Microsoft has brought much more with this one.

Windows 11 updateBug and security fixes:

  • Patch for the PrintNightmare vulnerability.
  • Taskbar icons not displaying after you rotate the screen back and forth.
  • Date and time not following format settings.
  • Contrast issues with File Explorer title bar
  • Search dropping the first keystroke when you press the Windows key and type
  • Blurry windows in ALT + Tab

Besides bug and security fixed newest update has also brought us some functional changes:

  • The start menu can no longer be moved from center
  • A search box appears at the top of the Start menu.
  • Taskbar appears on secondary monitors.
  • The refresh option appears on the jump list when you right-click the desktop. It was on the "Show more options" list before.
  • New look for certain dialog boxes such as "battery low" or "display change"
  • New snap layouts for portrait mode screens.
  • Option to troubleshoot sound problems when you right-click the volume icon.
  • Power mode settings on Power & battery settings menu.
  • Right-clicking .ps1 files offers a "Run with PowerShell" option.
  • New GIFs in the emoji panel in China

Honestly, I really like a search box on top of the start menu but really dislike the option to move it to left, I am sure that there are a lot of users who would feel more like at home if they could still move and set Windows to function and work how they want.

It is very strange to me that Windows 10 was made to be so user-focused and been able to be user specific and Windows 1 takes most of these things away. I am not sure why Microsoft is going this way but I cannot really see how moving the taskbar on left is a programming issue or why it is wrong for example.

If you like to learn and find out more about various Windows errors, and how to repair them go to our vast archive or use search to find articles that will explain and help you in solving your issue.
However, if you prefer to do things fast and with automatization then we are proposing to use an automated solution for your issues. The application that we are recommending is Advanced System Repair Pro
Advanced System Repair utilizes multiple tools all in one to give you a quick, simple, reliable, and very thorough diagnosis of your PC. It brings you all the tools you need in one program to clean, fix, protect, optimize and boost your PC!
1-Click Maintenance
All the tools to make it simple and easy! It's like having a professional technician at the click of a mouse.

Junk Cleaner
Keeping your computer free from unnecessary clutter also helps make your computer last longer. Like any other machine, if you keep it clean and take care of it, it will serve you better for longer!

Optimize background apps
Optimize applications background activity with the built-in Application Optimizer feature.

Disk Defrag
With a simple 1-click, Advanced System Repair speeds up your PC by assembling fragmented files on your machine and organizing them more efficiently.

Malware Removal
Finds and removes all types of harmful malware including trojans, worms, bots, adware, spyware, PUPs, and more!

Privacy Cleaner
The all-in-one privacy suite to Clean Your Tracks & Protect Your Privacy! Make your computer safe, secure, and more efficient!

System Tweak/Optimizer
ASR will analyze your complete system and settings to adjust your PC to function at its maximum performance.

Registry Cleaner
Over time, as you install and uninstall applications, the registry can become cluttered with old entries and broken settings which can result in program crashes, and annoying messages and slow the computer down.
Visit our Advanced System Repair Pro Download page to inform yourself about all the benefits of this software and get a free trial copy of it.
advanced system repair pro

Advanced System Repair Pro

One-click automated PC repair solution
ASR logo
With Advanced System Repair Pro you can easily
Replace damaged files
Restore performance
Free disk space
Remove Malware
Protects WEB browser
Remove Viruses
Stop PC freezing
DOWNLOAD
Privacy Policy | Terms of Use | Uinstall
Advanced System Repair Pro is compatible with all versions of Microsoft Windows including Windows 11

Share this article:

You might also like

KFConsole enters the console competition
Yes, you read that right, KFC is making a console partnered with Cooler Master. Bizzare at it sounds, it is even more bizarre that the console is designed to keep your food warm!!! You can pull out the drawer from the console out on its top and place some food there in order to keep it warm. kfconsole drawer
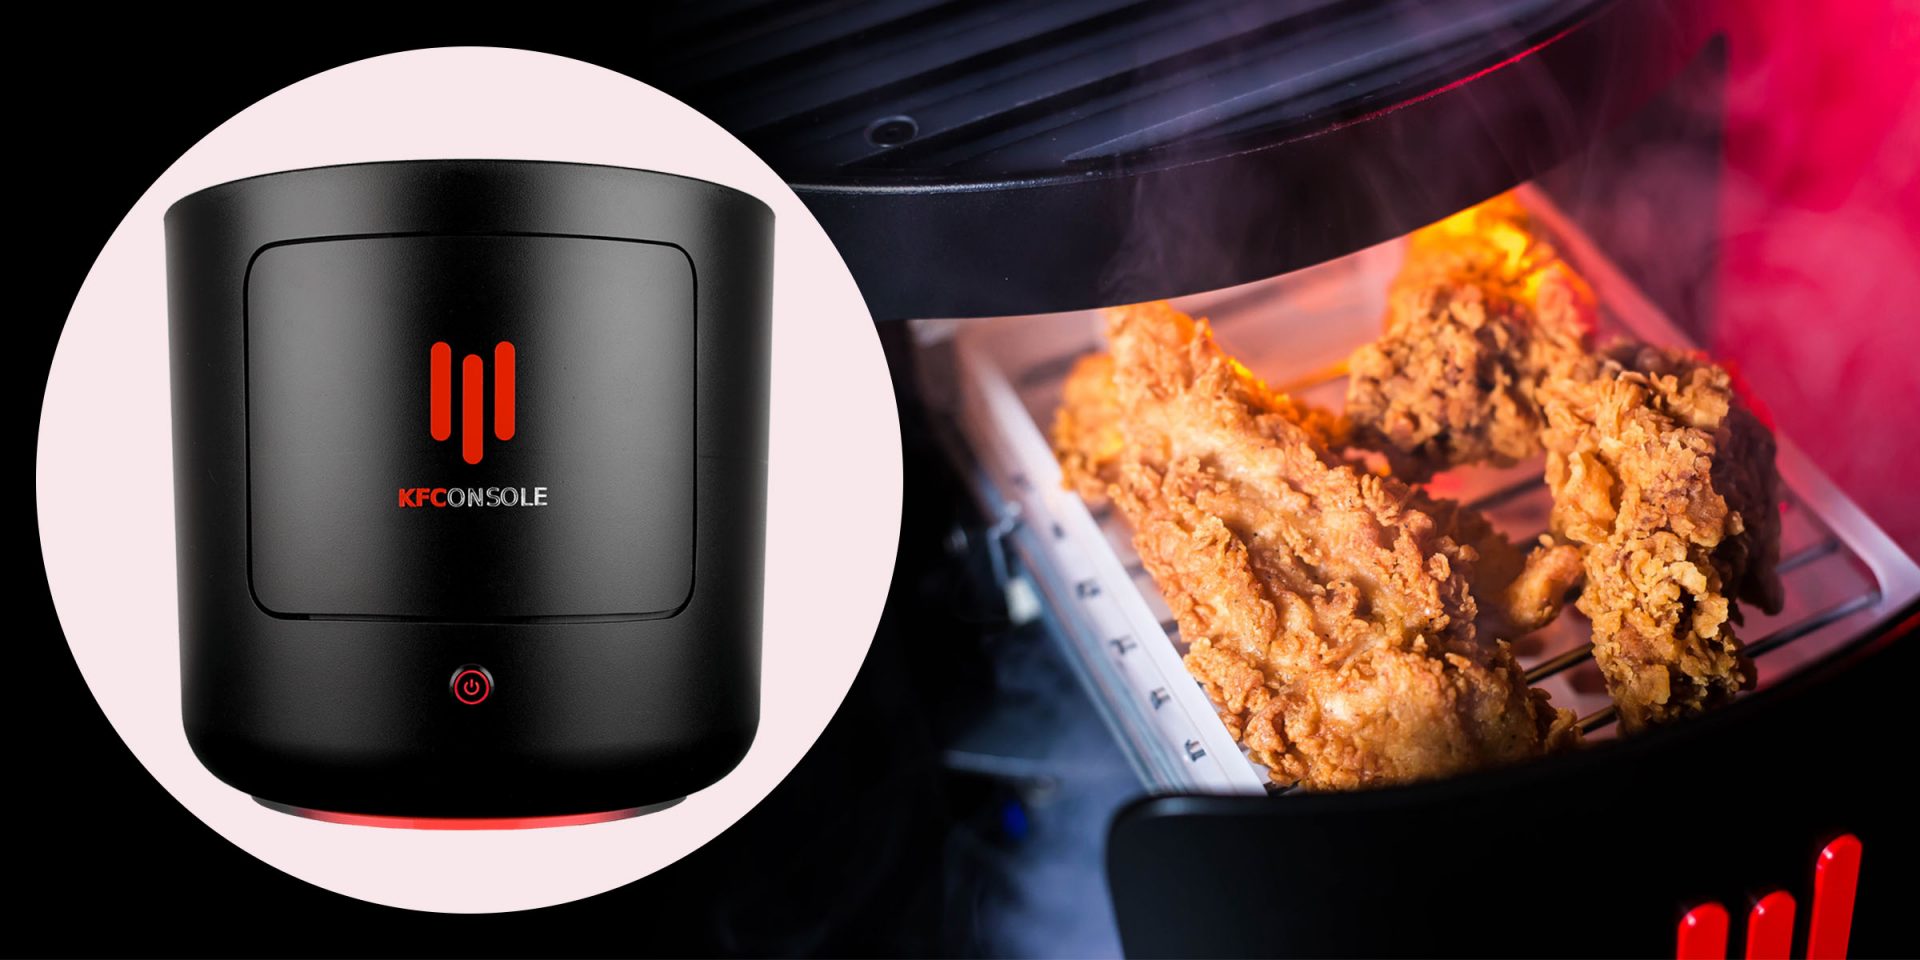
The console itself is coming in cylindrical shape powered by Intel CPU and ASUS GPU of the unknown chipset. It has Seagate Baraccuda 1TB SSD and it is VR-ready. The console will have raytracing and will be 4K ready.
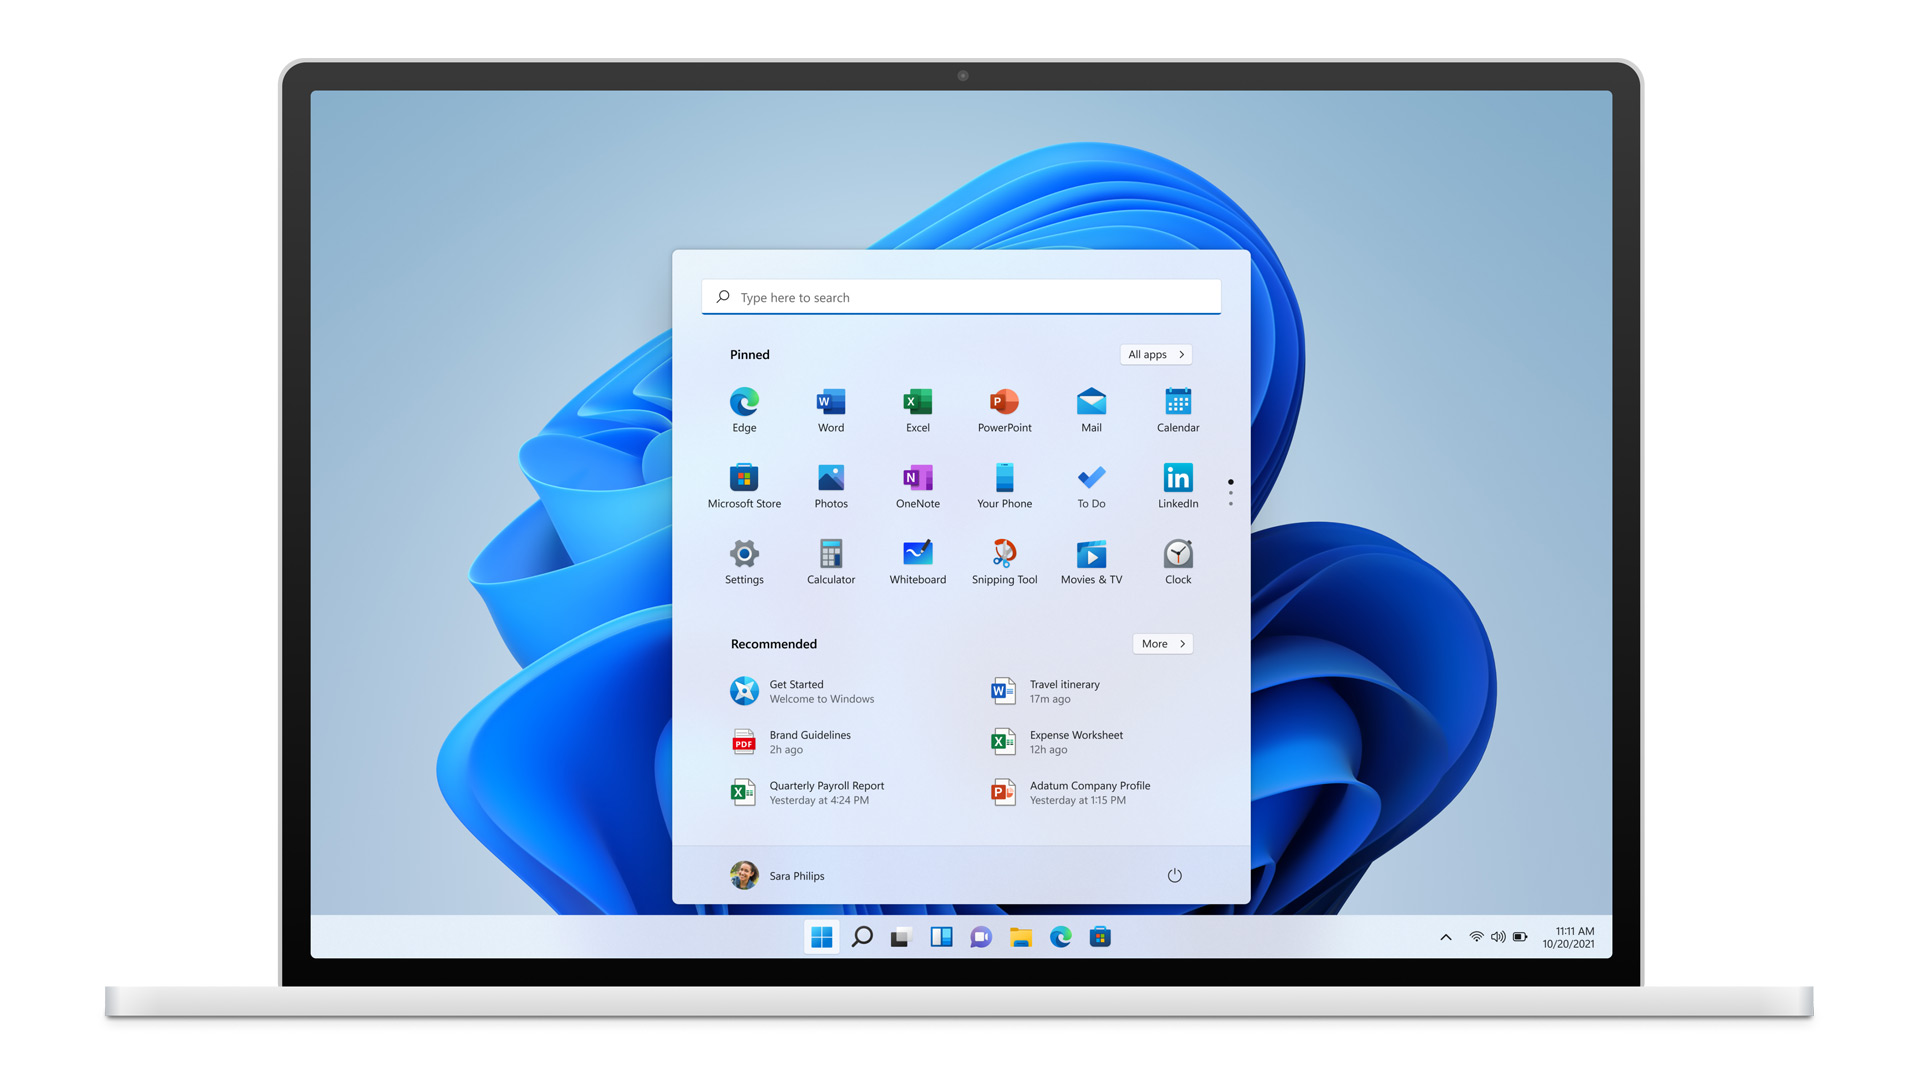
My thoughts

Well, my thoughts are somewhat strange, on one side I am not really sold on food heating gimmicks and without specific hardware specifications, it is difficult to say how much power the console will have. Price is also not leaked so that is also a stumbling stone for making an informed opinion. I am a little puzzled and concerned about this whole heating food thing because personally, I can see 2 issues: Console overheating and fat dripping on inside hardware, I am sure they have somehow eliminated this but I would be very interested to see how.
Read More
Fix 0x80070079: The semaphore timeout ...
This post will guide you on how you can fix the Error 0x80070079. This kind of error mostly occurs during the transfer of files across the networks. It could be caused by several factors which include the incorrect configuration of drivers or the network, as well as deadlock state or the server is loaded with a lot of tasks and if any location is not available. This error could also appear when you try to create a System Image or copy or move files on your computer. Here’s the full context of the error message:
“Error 0x80070079: The semaphore timeout period has expired.”
To fix this error, you can try to run the three built-in Network-related troubleshooters or update or reinstall the network adapter drivers or perform a network reset. For more details, follow the options laid out below.

Option 1 – Try to run the three built-in Network-related troubleshooters

The first thing you could do to fix the problem is to run any of the three built-in troubleshooters related to Networks such as Incoming Connections, Network Adapter, and Shared Folders troubleshooters. To access them, just open the Windows Settings app, and go to Update & security > Troubleshoot. From there, run any or each one of the aforementioned troubleshooters.

Option 2 – Update the Network Adapter drivers

You might also want to update the Network Adapter drivers by following these steps:
  • Tap the Win + R keys to launch the Run window and then type in the “MSC” command and hit Enter to open the Device Manager window.
  • Under the Device Manager, you will see a list of drivers. From there, look for the Network Adapters and expand them.
  • Then right-click on each one of the Network drivers and update them all.
  • Restart your PC and see if it helped in fixing the BSOD error.
Note: If updating the network drivers didn’t help in fixing the “Windows could not find a driver for your network adapter” error, you can also try to uninstall the very same drivers and restart your Windows 10 PC. After that, the system itself will reinstall the drivers you just uninstalled. Alternatively, you can also download and install the drivers from the manufacturer’s website directly. To reinstall the network adapter driver, refer to these steps:
  • Open the Devices Manager from the Win X Menu.
  • Then locate the device drivers and right-click on them to open the Properties.
  • After that, switch to the Driver tab and click on the Uninstall Device button.
  • Follow the screen option to completely uninstall it.
  • Finally, restart your computer. It will just reinstall the device drivers automatically.

Option 3 – Perform a Network Reset

Network Reset is a feature in Windows 10 that will help you reinstall the Network adapters as well as reset the Networking Components back to their original settings.
  • Open the Start Menu and click on the Settings icon.
  • Next, click on the Status link on the left side where you should see the status of your Network. Aside from that, you should also see a link that will let you open the Network Troubleshooter – click on that link to expand Network Troubleshooter.
  • Under Network Troubleshooter, select the link for “Network reset”.
  • After you click on Network reset, it should redirect you to the following page. From there, click on the Reset now button.
Read More
Repair Windows 10 Error Code C19000101 - 2000B

Error Code C19000101 - 2000B on Windows 10– What is it?

Error Code C19000101 - 2000B is a Blue Screen of Death (BSOD) error encountered by Windows users in an attempt to upgrade their operating system from Windows 7 or Windows 8/8.1 to Windows 10. The system upgrade does not successfully finish and when the installation is resurrected, it fails then reverts back to the original operating system. More and more Windows users come across this error that may have been triggered by a few reasons to be discussed in this article.

Solution

Restoro box imageError Causes

Microsoft users can experience the BSOD error C19000101-2000B due to the following reasons:

  • There’s an incompatibility with the drivers
  • Antivirus software

Further Information and Manual Repair

In fixing error code C19000101-2000B, you can try doing it manually. Manual repair methods can offer users solutions effectively and efficiently, having to address the root causes and issues in relation to a number of Windows error codes. If properly implemented, these manual repair methods can help Windows users resolve problems at hand immediately. However, there are cases where the help of a Windows professional is necessary. In such instances, it would be best to consult a certified Windows expert or you can also try using a powerful automated tool whenever needed.

To be able to fix error code C19000101-2000B, implement the first method used in resolving error code 0xc000021a, then you can proceed with this first method:

Method One: Perform Clean-Boot

  1. Prior to performing an upgrade, you need to disable your antivirus. Or, better yet, uninstall it.
  2. Ensure that your PC name is simple without hyphens, periods, or dashes.
  3. Restart your device several times, then try again.
  4. Disable all USB devices such as a smart card reader.
  5. If you are using a SCSI hard disk, be sure to have the drivers ready and available for a storage device like a thumb drive to be connected. While on the Windows 10 setup, select the Custom Advanced Option then use the Load Driver command to load the right driver for the SCSI drive. If the setup still fails, try switching to an IDE-based hard disk.
  6. Launch a clean boot, restart your device, then try again.
  7. If you are upgrading to Windows 10 using the .ISO file, make sure to disconnect from your internet connection during setup. If your device is connected by Wi-Fi or through LAN, you need to disable both before attempting to run a  system upgrade again.
  8. Switch to a local account if you are connected to a domain.
  9. Ensure that all external devices such as USB keys, external hard drives, gaming controllers, or printers are not attached to your device.

If you are upgrading to Windows 10 using Windows Update, you can perform a manual repair using the next method.

Method Two: Upgrading Via Windows Update

  1. Make sure to disconnect from the Wi-Fi or LAN once the download reaches 100% before you proceed with the system upgrade.
  2. Press Windows + X to open the command prompt window as an administrator.
  3. Stop the Windows Update service, BITS, MSI Installer, and Cryptographic by inputting the following commands one by one, hitting Enter after every command:

Net stop wuauserv

Net stop bits Net stop msiserver Net stop cryptSvc
  1. Restart both Software Distribution and Catroot2 folders. You can do this by typing Ren C: WindowsSoftwareDistribution SoftwareDistribution.old and Ren C: WindowsSystem32catroot2 Catroot2.old in the command prompt to change the names of both Software Distribution and Catroot2 files.
  2. Restart the Windows Update service, BITS, MSI Installer, and Cryptographic by inputting the following commands one by one, hitting Enter after every command:

Net start wuauserv

Net start bits Net start msiserver Net start cryptSvc
  1. Exit the command prompt then restart your device. You can now try to proceed with the system upgrade again.

Method Three: Disable or Uninstall Antivirus

  1. If you opt to just disable your antivirus, you just have to right-click on the antivirus’ icon from your toolbar then choose Disable.
  2. Press Ctrl + Alt + Del to open the Task Manager.
  3. Check if all the files or services linking to your antivirus are turned off.
  4. If you choose to uninstall your antivirus (which is recommended), open Control Panel.
  5. Once the Control Panel window is open, select Programs then Uninstall a Program.
  6. Look for your antivirus on the list, right-click it then choose Uninstall.
Read More
Windows computer doesn’t recognize second GPU
A lot of Windows users, use a second GPU for their computer systems, especially gamers above the dedicated graphics card. The operating system is set such that the dedicated high-end graphics card is set to default but there are times when the system does not recognize or detect the second graphics card. Even though every computer system comes with an integrated graphics card, for the most part, it is insufficient for graphics-intensive games and software which is why if you have an extra dedicated graphics card and your computer does not seem to detect or recognize it, then this post is for you. It could be that the dedicated graphics card has failed or it could also be an issue with the drivers and so on. Follow the suggested options below to resolve the problem.

Option 1 – Update your Graphics drivers

  • First, boot your computer into Safe Mode.
  • After that, tap the Win + R keys to launch Run.
  • Type in msc into the box and tap Enter or click OK to open the Device Manager.
  • After that, a list of device drivers will be displayed. From there, look for the Display Adapters and click on them.
  • After that, right-click on each entry under the Display Adapters and select the “Uninstall Device” option from the menu.
  • Now restart your computer.
  • After restarting your computer, go to the Settings app and Check for Updates in the Windows Update section.
Note: You also have the option to go directly to the website of your graphics card manufacturers like NVIDIA, Intel, or AMD and go to the section called Drivers then check if there’s a new available update – if there is, download and install it.

Option 2 – Update the BIOS

Take note that you have to be careful when modifying something in the BIOS. So if you don’t know much about it, it’s best if you skip on this option and try the other ones instead. However, if you are well-versed in navigating the BIOS, then follow the steps below.
  • Tap the Win + R keys to open the Run dialog box.
  • Next, type “msinfo32” in the field and press Enter to open System Information.
  • From there, you should find a search field on the bottom where you have to search for the BIOS version and then press Enter.
  • After that, you should see the developer and version of the BIOS installed on your PC.
  • Go to your manufacturer’s website and then download the latest version of BIOS on your computer.
  • If you are using a laptop, make sure that you keep it plugged in until you have updated the BIOS.
  • Now double click on the downloaded file and install the new BIOS version on your computer.
  • Now restart your computer to apply the changes made.

Option 3 – Try changing the GPU settings

  • Right-click on any empty space on your Desktop and select Graphics Properties. Note that the Graphics Properties screen depends on the graphics drivers installed on your computer and are system-specific as they may be different for other systems but they aren’t hard to find.
  • After that, make sure that the dedicated Graphics card is selected as Default under the Select Display drop-down.
  • If the Graphics card isn’t set as Default, set it and click Apply and Exit.

Option 4 – Try disabling the driver for the integrated Graphics card

  • Tap the Win + R keys to open the Run dialog box.
  • Next, type “devmgmt.msc” in the field and hit Enter to open the Device Manager.
  • From there, expand the list of Display Adapters and then right-click and select Disable device for the Integrated Graphics card. However, if the dedicated Graphics card fails, the display won’t work so you need to restart the system and enable it.
Read More
Fix Error 30053-4 or 30053-39, language pack
As you know, the Office Language Packs need to be installed right after installing Office. It also has to be on the correct version of Office so if any of these conditions are not met, you will most likely get error codes 30053-4 or 30053-39 when you install a language pack in Microsoft Office. If you are currently facing this error, read on as this post will help you fix the problem. Here’s the full context of the error message:
“Something went wrong, Sorry, installation cannot continue because no compatible office products are detected.”
When you have to work on two different languages, that’s where the language packs come in handy. You might have to work on one language but when it comes to proofreading or help, you need another language. Note that some language accessory packs offer partial localization which is why some parts of the Office might show the default language. If you are using Office 365 or Office 2019, 2016, 2013, or 2010, you need to go to the language accessory pack page from office.com and select your language. Once you see the download link, click on it to start downloading the pack. It includes the display in the chosen language, proofing tools for the selected language, as well as the Help in the selected language. Once the installation is complete, follow each one of the given options below to configure the language accessory pack properly.

Option 1 – Select Editing and Proofing language

  • You need to open any Office program and navigate to File > Options > Language.
  • From there, you need to make sure that the language you want to use is in the list under the Choose Editing Languages section.
  • After that, you can add or remove the language that Office uses for editing and proofing tools.

Option 2 – Configure the Display and Help languages

In this option, you can change the default display and help languages for all the Office applications so whatever you choose will be used for all the buttons, menus, and support of all the programs. After you select the language, restart all the Office applications to apply the changes made successfully. On the other hand, if you are using Office volume license versions, note that only an administrator account can install this if you are using the Volume License version of Microsoft Office 2016. You have to download the ISO image of the language packs, language interface packs, and the proofing tools from the VLSC or Volume Licensing Service Center. This process can be quite complicated so you might have to go to the docs.microsoft.com page to be guided accordingly. After you installed everything correctly, the error code 30053-4 or 30053-39 should now be fixed.
Read More
NVIDIA Control Panel is not opening
Users who constantly use graphic-intensive applications like games or any video-rendering software need to control how their graphics card is used. There are some who always toggle their Graphic Quality settings to get the Frames Per Second or FPS up. While some tend to adjust the size, orientation, scaling, and other display settings in order to use their PCs in a more efficient way or to simply work better. And in all of that, that’s where the NVIDIA Graphics Card comes into the picture. Take note that this software only works on PCs which has NVIDIA Graphics Card attached to them. Thus, if you use another Graphics Card then this post is not for you, otherwise, proceed reading to know what you can do if the NVIDIA Control Panel is not opening on your Windows 10 PC. Here are a couple of things you can try if the NVIDIA Control Panel is not opening, not responding, or not working:
  • Restart the process of the NVIDIA Control Panel
  • Restart the NVIDIA Display Driver Service
  • Update your NVIDIA Display Drivers
For more details, refer to the instructions provided below.

Option 1: Restart the process of the NVIDIA Control Panel.

  • Tap the Ctrl + Shift + Esc keys to open the Task Manager.
  • After opening the Task Manager, look for the process named NVIDIA Control Panel Application.
  • Once you found it, expand it and right-click on the NVIDIA Control Panel sub-process, and click on End Task.
  • Now try opening the NVIDIA Control Panel from the Start Menu and see if it now works fine or not.

Option 2: Restart the NVIDIA Display Driver Service

  • Tap the Win + R keys to open the Run dialog box.
  • Then type “services.msc” in the field and hit Enter to open the Windows Services Manager.
  • After opening the Services window, you will see a list of services. From there, look for services named “NVIDIA Display Container LS” and double click on it to open its Properties.
  • Now make sure that the service is Started. If it isn’t, you need to start it, otherwise, you need to Stop it and Start It again. You also have to make sure that the Startup Type is set to Automatic.
  • Do the same for the NVIDIA LocalSystem Container service.
  • Restart your computer and check if the problem’s fixed.

Option 3: Try updating the drivers from the official site of NVIDIA

If both the first and second given options didn’t work, you can also try updating the drivers from the official NVIDIA website. And in case you don’t know the type of Nvidia graphics card that your computer is on, follow the steps below:
  • Tap the Win + R keys to open the Run dialog box.
  • Next type in “dxdiag” in the field and click OK or hit Enter to open the DirectX Diagnostic Tool.
  • From there, you can see what type of Nvidia graphics card that your system is on.
  • Take note of your graphics card information and then look for the best drivers for your operating system. Once you’ve downloaded and installed the file, restart your PC.
Read More
How to Fix Hal.dll Error Code

Repair the Hal.dll Error

Hal.dll Error - What is it?

Hal.dll error is a type of dynamic link library error that is common in Windows. Hal.dll is the critical file in all Windows installations and the error occurs when this file cannot be correctly loaded. Hal is the abbreviation for ‘Hardware Abstraction Layer’. Communication between Windows and different PC hardware is facilitated with this file. The error causes inconvenience and hampers your ability to use the hardware. The error message is displayed in either one of the following formats:
  • "Windows could not start because the following file is missing or corrupt: C:Windowssystem32hal.dll. Please re-install a copy of the above file."
  • "Cannot find WindowsSystem32hal.dll"
  • "C:WindowsSystem32Hal.dll missing or corrupt: Please re-install a copy of the above file."

Solution

Restoro box imageError Causes

Hal.dll error occurs due to multiple reasons. These include:
  • BIOS are not configured properly
  • Damaged hard drive
  • Hal.dll file is missing, damaged, or corrupt
  • Viral Infection

Further Information and Manual Repair

To fix and resolve the Hal.dll error code on your system, you don’t always have to hire a professional technician for the job. Though Hal.dll error is critical but easy to resolve, here are some solutions that you can try to fix it right away even if you don’t have any technical expertise.

1) Restart Your PC

Sometimes this can be a temporary error, so try restarting your PC. If the error is resolved then that’s great. However, if it still persists, then try other solutions.

2) Change the Boot Order

The underlying cause for the Hal.dll error is often not properly configured BIOS; if this is the cause, simply change the boot order of the bootable devices like your hard drive. The BIOS setup utility is used to change boot order settings. This can be done by restarting your PC. Once you restart, press F2 to enter the setup. Now go to SATA operation and change RAID AHCI to RAID ATA. Save changes and then exit. By doing so, you will be able to re-configure the BIOS and resolve the error.

3) Use BOOTMGR

Another way to resolve is to update the volume boot code to use BOOTMGR. To do this, access advanced startup options, open the command prompt and type bootsect command and then press Enter. Run the command and then you’ll get the following message: C: (\?Volume{37a450c8-2331-11e0-9019-806e6f6e6963}) Successfully updated NTFS filesystem bootcode. Bootcode was successfully updated on all targeted volumes. After that close the command prompt. This is most likely to resolve the error.

4) Repair Registry With Restoro.

In case the error is still not fixed, then this means that the problem is bigger than you thought. It may be due to hard drive failure, viral infection, or sometimes because of hal.dll file corruption. In the event of these error causes, it is recommended to download Restoro. Restoro is an advanced, next-generation, and multi-functional PC repair tool embedded with numerous utilities like a registry cleaner, an antivirus, and a system optimizer. The registry cleaner utility:
  • Scans for all registry issues
  • Wipes out the unnecessary files saved in the hard drive like the junk files, cookies, internet history, and temporary files
  • Cleans the disk
  • Repairs damaged and corrupt files
  • Restores the registry
The antivirus utility scans and removes all malicious software from your PC including viruses, Trojans, malware, adware, and spyware. Simultaneously, it also boosts the speed of your system. It is safe and efficient PC repair software. It has simple navigation and a user-friendly interface. Whether you are using Windows 7, 8 or Vista, it is compatible with all. It can also be used on Windows XP. Click here to download Restoro and resolve the Hal.dll error today!
Read More
How to remove Nectar Toolbar from your Windows PC

Nectar Toolbar is a Browser addon for Internet Explorer developed by AIMIA Coalition Loyalty. This addon changed your default search provider to Yahoo UK. While installed, you might see additional unwanted ads and sponsored links injected in the search results.

From the Author: We all search the web every day for information from handy how-to’s, must know news about shopping. So wouldn’t it be great if you could collect extra Nectar points just for doing something you do already? Like to shop online? Nectar Search will also tell you when you’re on a shopping website (like Argos, Debenhams, Next, Play.com, and Apple) where you can collect points too.

Several anti-virus scanners have marked this addon as a Browser Hijacker and are therefore not recommended to keep on your computer.

About Browser Hijackers

Browser hijacking means a malicious program code has power over and modified the settings of your browser, without your permission. Browser hijackers could do more than just changing home pages. In general, hijackers are developed for the benefit of online hackers often through income generation that comes from forced ad mouse clicks and website visits. Nonetheless, it isn’t that harmless. Your web safety is compromised and it is also really annoying. In a much worst case, your browser could be hijacked to download malicious software that will do a great deal of damage to your computer.

Key symptoms that your browser has been hijacked

When your browser is hi-jacked, the following can happen: you notice unauthorized changes to your internet browser’s homepage; you observe new unwanted favorites or bookmarks added, usually directed to advertisement-filled or porn websites; the default browser configurations have been changed and/or your default web engine is altered; unwanted new toolbars are added to your internet browser; you might notice numerous pop-up adverts on your computer screen; your browser has instability issues or exhibits frequent errors; You can’t access particular websites, especially anti-malware websites.

Exactly how they invade computers

A browser hijacker can be installed on your computer or laptop when you go to an infected site, click on an e-mail attachment, or download something from a file-sharing site. Many internet browser hijackings originate from add-on programs, i.e., browser helper objects (BHO), toolbars, or plug-ins added to browsers to provide them additional features. Other times you might have accidentally accepted a browser hijacker as part of a software bundle (generally freeware or shareware). Popular examples of browser hijackers include CoolWebSearch, Conduit, OneWebSearch, Coupon Server, RocketTab, Delta Search, Searchult.com, and Snap.do. Browser hijacking can bring about serious privacy problems and even identity theft, affect your web browsing experience by taking control over outgoing traffic, drastically slows down your computer or laptop by depleting lots of resources, and lead to system instability also.

Browser hijacker removal methods

Some browser hijacking can be easily stopped by identifying and eliminating the corresponding malware software from your control panel. However, most hijackers are quite tenacious and require specialized applications to get rid of them. Moreover, browser hijackers could modify the Windows registry so it can be extremely tough to fix manually, particularly when you are not a tech-savvy person. Browser hijackers can be effectively removed by installing and running an anti-malware application on the affected computer. To get rid of any browser hijacker out of your computer, you could download this particular top-notch malware removal application – SafeBytes Anti-Malware. Together with anti-malware, a PC optimizer software, similar to Total System Care, could help you correct Windows registry errors, remove unwanted toolbars, secure your internet privacy, and stabilize programs installed on your computer.

Find Out How To Install Safebytes Anti-Malware On An Infected Computer system

All malware is bad and the consequences of the damage will vary based on the specific type of malicious software. Certain malware goes to great lengths to stop you from downloading or installing anything on your computer system, particularly anti-virus programs. If you are reading this, you probably have infected by a virus that stops you from installing a security program like Safebytes Anti-Malware. Follow the instructions below to remove malware through alternative methods.

Install in Safe Mode with Networking

Safe Mode is a unique, simplified version of Windows where just essential services are loaded to counteract malware and other problematic programs from loading. In case the malicious software is set to load immediately when the PC boots, switching to this mode could prevent it from doing so. To boot into Safe Mode, hit “F8” key on the keyboard right before Windows logo screen appears; Or right after normal Windows boot up, run MSCONFIG, look over Safe Boot under Boot tab, and then click Apply. Once you are in Safe Mode, you can try to install your anti-malware application without the hindrance of the malware. After installation, run the malware scanner to eliminate standard infections.

Download the anti-malware program in a different internet browser

Some malware only targets particular internet browsers. If this is your case, employ another browser as it might circumvent the computer virus. In case you suspect that your Internet Explorer happens to be hijacked by a computer virus or otherwise compromised by online hackers, the most effective course of action is to switch over to a different web browser such as Mozilla Firefox, Google Chrome, or Apple Safari to download your favorite security application – Safebytes Anti-Malware.

Make a bootable USB anti-virus drive

Another solution is to save and run an anti-malware software program entirely from a Thumb drive. To run antivirus from a thumb drive, follow these simple steps: 1) On a clean computer, install Safebytes Anti-Malware. 2) Plug the USB drive into the clean computer. 3) Double-click the Setup icon of the anti-malware software to run the Installation Wizard. 4) Select the drive letter of the pen drive as the location when the wizard asks you where you would like to install the anti-virus. Follow the onscreen instructions to finish the installation. 5) Now, insert the USB drive into the corrupted PC. 6) Run the Safebytes Anti-malware directly from the pen drive by double-clicking the icon. 7) Simply click “Scan Now” to run a complete scan on the affected computer for malware.

SafeBytes Anti-Malware Features

To protect your laptop or computer from various internet-based threats, it’s important to install anti-malware software on your personal computer. However, with countless numbers antimalware companies out there, these days it is hard to decide which one you should buy for your laptop. Some of them do a great job in eliminating malware threats while some will damage your PC by themselves. You must be careful not to pick the wrong product, especially if you buy a paid application. On the list of strongly recommended software by industry leaders is SafeBytes Anti-Malware, the most dependable program for Microsoft Windows. SafeBytes anti-malware is a trustworthy tool that not only secures your PC permanently but is also quite user-friendly for people of all skill levels. Once you’ve got installed this application, SafeByte's sophisticated protection system will ensure that no viruses or malware can seep through your PC.

SafeBytes anti-malware provides an array of enhanced features that sets it aside from all others. Some of them are listed as below:

Real-Time Protection: SafeBytes gives you round-the-clock protection for your PC limiting malware intrusions in real-time. This utility will constantly monitor your computer for suspicious activity and updates itself continuously to keep abreast of the constantly changing threat landscape. Most effective AntiMalware Protection: Built on a greatly acclaimed anti-virus engine, this malware removal application can find and get rid of numerous stubborn malware threats such as browser hijackers, potentially unwanted programs, and ransomware that other common anti-virus applications will miss. Website Filtering: Safebytes allots all websites a unique safety score that helps you to have an idea of whether the webpage you’re just about to visit is safe to browse or known to be a phishing site. Fast Multi-threaded Scanning: Safebytes Anti-Malware, with its advanced scanning engine, offers extremely fast scanning which can promptly target any active online threat. Low CPU/Memory Usage: SafeBytes is well known for its low influence on processing power and great detection rate of various threats. It operates silently and efficiently in the background so you’re free to utilize your PC at full power all of the time. 24/7 Customer Service: For any technical concerns or product assistance, you could get 24/7 professional assistance through chat and email. Put simply, SafeBytes has created a meaningful anti-malware solution that is aimed to protect you against all manner of malware. You now may understand that this particular software does more than just scan and eliminate threats from your PC. So if you’re searching for the absolute best malware removal application out there, and when you don’t mind shelling out a few bucks for it, opt for SafeBytes Anti-Malware.

Technical Details and Manual Removal (Advanced Users)

To eliminate Nectar Toolbar manually, go to the Add or Remove programs list in the Windows Control Panel and choose the program you want to remove. For browser extensions, go to your web browser’s Addon/Extension manager and select the add-on you want to remove or disable. You’ll probably also want to reset your internet browser to its default settings. Finally, check your hard disk for all of the following and clean your computer registry manually to get rid of leftover application entries after uninstallation. But bear in mind, this can be a tough task and only computer professionals can perform safely. In addition, certain malicious programs have the capability to defend against its removal. Completing this task in Safe Mode is suggested.
Files: C:\Program Files (x86)\Nectar Toolbar C:\Program Files (x86)\Nectar Toolbar\tbunsg7A.tmp\AimiaPoints.png C:\Program Files (x86)\Nectar Toolbar\tbunsg7A.tmp\AimiaPointsAct.png C:\Program Files (x86)\Nectar Toolbar\tbunsg7A.tmp\AimiaToolbar.css C:\Program Files (x86)\Nectar Toolbar\tbunsg7A.tmp\ArrowDown.png C:\Program Files (x86)\Nectar Toolbar\tbunsg7A.tmp\ArrowRight.png C:\Program Files (x86)\Nectar Toolbar\tbunsg7A.tmp\ArrowUp.png C:\Program Files (x86)\Nectar Toolbar\tbunsg7A.tmp\arrow_refresh.png C:\Program Files (x86)\Nectar Toolbar\tbunsg7A.tmp\background.html C:\Program Files (x86)\Nectar Toolbar\tbunsg7A.tmp\background.js C:\Program Files (x86)\Nectar Toolbar\tbunsg7A.tmp\basis.xml C:\Program Files (x86)\Nectar Toolbar\tbunsg7A.tmp\BrowserTweak.css C:\Program Files (x86)\Nectar Toolbar\tbunsg7A.tmp\btn-background-grey.png C:\Program Files (x86)\Nectar Toolbar\tbunsg7A.tmp\CanCollect.png C:\Program Files (x86)\Nectar Toolbar\tbunsg7A.tmp\CanCollectAct.png C:\Program Files (x86)\Nectar Toolbar\tbunsg7A.tmp\closeIcon.png C:\Program Files (x86)\Nectar Toolbar\tbunsg7A.tmp\cog.png C:\Program Files (x86)\Nectar Toolbar\tbunsg7A.tmp\Collecting.png C:\Program Files (x86)\Nectar Toolbar\tbunsg7A.tmp\CollectingAct.png C:\Program Files (x86)\Nectar Toolbar\tbunsg7A.tmp\computer_delete.png C:\Program Files (x86)\Nectar Toolbar\tbunsg7A.tmp\eShopsMenu.html C:\Program Files (x86)\Nectar Toolbar\tbunsg7A.tmp\eShopsMenu.js C:\Program Files (x86)\Nectar Toolbar\tbunsg7A.tmp\help.png C:\Program Files (x86)\Nectar Toolbar\tbunsg7A.tmp\HelpMenu.html C:\Program Files (x86)\Nectar Toolbar\tbunsg7A.tmp\HelpMenu.js C:\Program Files (x86)\Nectar Toolbar\tbunsg7A.tmp\icon-128.png C:\Program Files (x86)\Nectar Toolbar\tbunsg7A.tmp\icon-16.png C:\Program Files (x86)\Nectar Toolbar\tbunsg7A.tmp\icon-48.png C:\Program Files (x86)\Nectar Toolbar\tbunsg7A.tmp\icons.bmp C:\Program Files (x86)\Nectar Toolbar\tbunsg7A.tmp\icons.png C:\Program Files (x86)\Nectar Toolbar\tbunsg7A.tmp\ie7vista.png C:\Program Files (x86)\Nectar Toolbar\tbunsg7A.tmp\ie7xp.png C:\Program Files (x86)\Nectar Toolbar\tbunsg7A.tmp\ie8bg.png C:\Program Files (x86)\Nectar Toolbar\tbunsg7A.tmp\IE8GuardWorkaround.exe C:\Program Files (x86)\Nectar Toolbar\tbunsg7A.tmp\info.txt C:\Program Files (x86)\Nectar Toolbar\tbunsg7A.tmp\InstIcon.ico C:\Program Files (x86)\Nectar Toolbar\tbunsg7A.tmp\jquery-1.7.2.min.js C:\Program Files (x86)\Nectar Toolbar\tbunsg7A.tmp\jquery.placeholder.min.js C:\Program Files (x86)\Nectar Toolbar\tbunsg7A.tmp\JSON.js C:\Program Files (x86)\Nectar Toolbar\tbunsg7A.tmp\main.js C:\Program Files (x86)\Nectar Toolbar\tbunsg7A.tmp\menu.js C:\Program Files (x86)\Nectar Toolbar\tbunsg7A.tmp\nectar-icon-32×32.png C:\Program Files (x86)\Nectar Toolbar\tbunsg7A.tmp\PIE.htc C:\Program Files (x86)\Nectar Toolbar\tbunsg7A.tmp\PIE.js C:\Program Files (x86)\Nectar Toolbar\tbunsg7A.tmp\SearchHist.html C:\Program Files (x86)\Nectar Toolbar\tbunsg7A.tmp\SearchHist.js C:\Program Files (x86)\Nectar Toolbar\tbunsg7A.tmp\search_glass.png C:\Program Files (x86)\Nectar Toolbar\tbunsg7A.tmp\separator.png C:\Program Files (x86)\Nectar Toolbar\tbunsg7A.tmp\separator_arrows.png C:\Program Files (x86)\Nectar Toolbar\tbunsg7A.tmp\TbCommonUtils.dll C:\Program Files (x86)\Nectar Toolbar\tbunsg7A.tmp\tbcore3.dll C:\Program Files (x86)\Nectar Toolbar\tbunsg7A.tmp\TbHelper2.exe C:\Program Files (x86)\Nectar Toolbar\tbunsg7A.tmp\tbhelperU.dll C:\Program Files (x86)\Nectar Toolbar\tbunsg7A.tmp\uninstall.exe C:\Program Files (x86)\Nectar Toolbar\tbunsg7A.tmp\UninstIcon.ico C:\Program Files (x86)\Nectar Toolbar\tbunsg7A.tmp\update.exe C:\Program Files (x86)\Nectar Toolbar\tbunsg7A.tmp\version.txt C:\Program Files (x86)\Nectar Toolbar\tbunsg7A.tmp\Yahoo.ico C:\Program Files (x86)\Nectar Toolbar\tbunsg7A.tmp\yahoo.png C:\Program Files (x86)\Nectar Toolbar\tbunsg7A.tmp\your_logo.png Registry: HKEY_CURRENT_USER\Software376694984709702142491016734454 HKEY_CURRENT_USER\Software\Microsoft\Windows\CurrentVersion\Run 13376694984709702142491016734454
Read More
How to Install SafeBytes Anti-Malware Software When Malware Blocks or Prevents the Process
All malware is detrimental and the magnitude of the damage will vary greatly depending on the type of infection. Some malware variants modify internet browser settings by adding a proxy server or modify the PC's DNS settings. When this happens, you'll be unable to visit certain or all the sites, and therefore not able to download or install the required security software to clear out the computer malware. If you’re reading this article, chances are, you’re stuck with a virus infection that is preventing you from downloading and/or installing the Safebytes Anti-Malware program on your computer. Refer to the instructions below to remove malware through alternate methods.

Method 1: Install Anti-Malware in Safe Mode with Networking

If the malware is set to load automatically when Microsoft Windows starts, entering safe mode may block the attempt. Since only the minimal applications and services start-up in safe mode, there are rarely any reasons for conflicts to happen. You will need to do the following to remove malware in Safe mode.
  • 1) Tap the F8 key continuously as soon as your computer boots, however, before the large Windows logo or black screen with white texts come up. This would invoke the Advanced Boot Options menu.
  • 2) Choose Safe Mode with Networking using arrow keys and press Enter.
  • 3) When you are into this mode, you will have access to the internet once again. Now, utilize your web browser normally and download Safebytes Anti-Malware.
  • 4) After installation, do a complete scan and allow the software to get rid of the threats it detects.

Method 2: Utilize An Alternate Internet Browser to Download Anti-Malware Software

Malicious program code may exploit vulnerabilities in a specific web browser and block access to all antivirus software sites. If you suspect that your Internet Explorer has been hijacked by computer malware or otherwise compromised by cybercriminals, the most effective plan of action is to switch to an alternate web browser such as Chrome, Firefox, or Safari to download your chosen security program - Safebytes Anti-Malware.

Download SafeBytes Anti-Malware for Malware Removal

Method 3: Install and Run Anti-Malware From a USB Drive

To effectively remove the malware, you might want to approach the problem of installing an antivirus software program on the affected computer from a different angle. Adopt these measures to employ a flash drive to fix your infected computer.
  • 1) Use another malware-free PC to download Safebytes Anti-Malware.
  • 2) Plug the thumb drive into the uninfected computer.
  • 3) Double click on the executable file to open the installation wizard.
  • 4) Choose the drive letter of the USB drive as the place when the wizard asks you exactly where you would like to install the anti-virus. Follow activation instructions.
  • 5) Now, transfer the thumb drive to the infected computer.
  • 6) Double-click the antivirus program EXE file on the USB flash drive.
  • 7) Click on the “Scan Now” button to start the malware scan.
If no other method of downloading and installing the antivirus software works, then you've no other option than to hit the last resort: a full Windows reinstallation, the only approach known to have a 100% rate of success at virus removal.
Read More
How to Fix Windows 10 Error Code 0x8024001e

How to Fix Windows 10 Error Code 0x8024001e

Error Code 0x8024001e - What is it?

Error Code 0x8024001e is most commonly associated with the installation of apps from the Windows store, although versions of the error have been present in multiple versions of the Windows operating system. At its most basic level, the error says that a program has not been installed, even after the installation wizard has run through to completion.

Common symptoms include:

  • Inability to open or run apps downloaded from the Windows store
  • The error message reads, “Something happened and this app couldn’t be installed. Please try again.”

The solutions to Error Code 0x8024001e are somewhat complex, so it is a good idea to get in touch with a computer repair professional if you do not feel confident in your ability to follow the steps below to complete. However, most users should be able to follow the steps below and achieve the desired results.

Solution

Restoro box imageError Causes

There are a couple of different causes that can lead to the appearance of Error Code 0x8024001e. In some cases, extraneous data left in the app cache can cause the problem. In other cases, particular processes may need to be manually reset to clear the problem. Last, but not least, unresolved updates may lead to Error Code 0x8024001e causing issues with downloaded and installed apps from the Windows Store.

Further Information and Manual Repair

There are three primary methods to address the appearance of Error Code 0x8024001e. These should work for all users, regardless of the specific cause for their machine. The methods below do require some advanced skills in computing, so be sure to contact a Windows repair technician if you have trouble following the instructions below.

Here are the top ways to repair Error Code 0x8024001e on Windows 10:

Method One:  Clear the App Cache and Use Power User Options

In many cases, simply clearing your app cache can resolve the errors that pop up when you are downloading, installing, or updating any apps that have come from the Windows store. This method may not perfectly resolve the problem every time, but it is a step that should always be done before any others.

Next, open up the Power User options by pressing both the Windows key and the X key at the same time. Choose “Command Prompt (Admin)” from the options that appear. Then type in the commands into the prompt, one at a time:

  • net stop wuauserv
  • cd/windows
  • rename SoftwareDistribution SoftwareDistribution.bck
  • net start wuauserv

Restart your computer after these changes have been made so that all changes can take effect. You may be able to access the desired programs and apps after this is complete.

Method Two:  Run Your Registry Repair Tools

Sometimes, the best way to repair Error Code 0x8024001e is to simply open up the Window Registry tools and run the repair process. This will scan your registry for any errant entries, corrupted entries, or missing entries, repairing them automatically as the device is able to do. This process may take some time to complete, so plan accordingly.

After this process is complete, it is always a good idea to restart your computer to apply any changes that have been made. Reattempt to install or run the program in question one this is done.

Method Three:  Run Windows Updates as Necessary

Last, open up the Windows Update tools to check to see if any of your programs need to be updated or if your operating system needs to be updated. Install each of the updates, restarting your computer after the entire process has been completed so that they can fully take effect on your machine. You should be able to run the programs that had caused problems once this is complete.

It is important to keep up-to-date on your system and program updates to avoid future errors in installations and downloads from the Windows store.

In most cases, using the steps above should allow you to use the apps that you’ve downloaded from the Windows store without Error Code 0x8024001e popping back up. If the problem persists or if you have not been able to follow the steps listed above to remedy the error, it is a good idea to contact a qualified professional who is experienced in working with Windows 10 errors.

Method Four: Use An Automated Tool

If you wish to always have at your disposal a utility tool to fix these Windows 10 and other related issues when they do arise, download and install a powerful automated tool.
Read More
1 2 3 162
Logo
Copyright © 2022, ErrorTools. All Rights Reserved
Trademarks: Microsoft Windows logos are registered trademarks of Microsoft. Disclaimer: ErrorTools.com is not affiliated with Microsoft, nor claim direct affiliation.
The information on this page is provided for information purposes only.
DMCA.com Protection Status