New Microsoft Windows 11 store

When Microsoft held Windows 11 presentation it took special time to present the upcoming new Windows 11 store as kind of a big deal.

It was openly stated that with new Windows we will get a new store with a different attitude and new look.
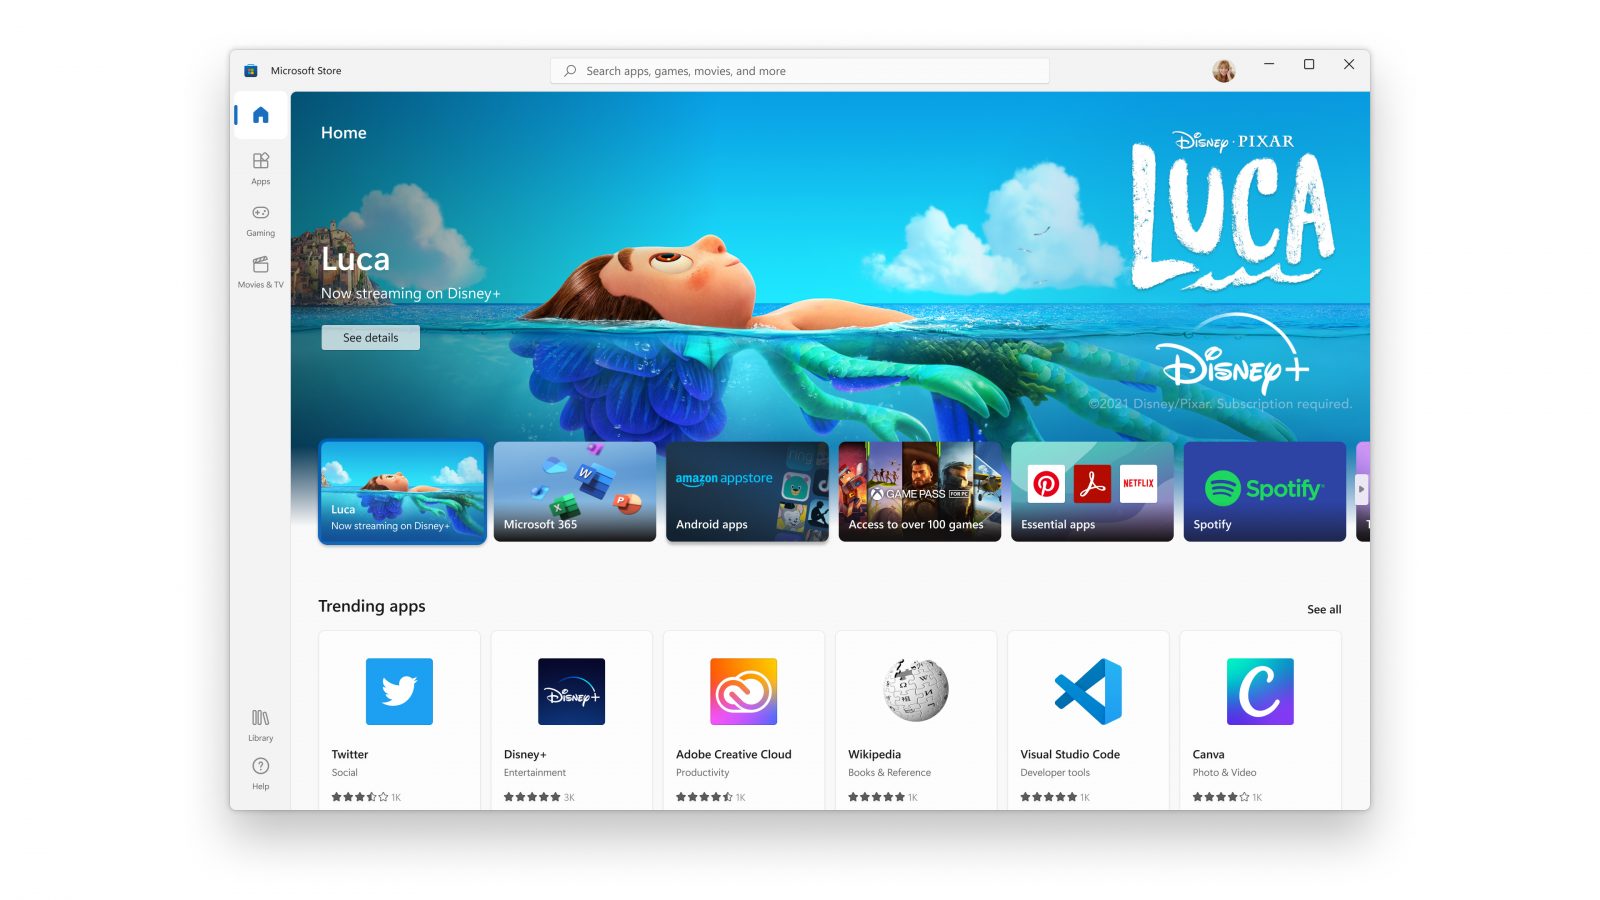
microsoft storeNew Microsoft store

Microsoft has stated that both customer and developer feedback over time has contributed to their redesign and rethinking of the store itself.

They want to be sure that policies for developers are more straightforward and clear so more developers will decide to bring their product to Windows. As for customers, they want more safety and more security so they feel protected when making a purchase.

The new store will come in Windows 11 but also in Windows 10 as well via update.

Stories and collections

Introducing the new store will be curated stories. Microsoft believes that stores should be focused on user experience so stories from customers themselves will play a big role here. They are rich editorial content to keep you informed about the best apps and inspire you to achieve more with your device.

This approach to information is aimed at bringing unknown applications to users via presenting them in a professional manner.

Android apps in the store

As stated in Windows 11 unveiling and presentation, Android apps will work inside Windows 11. Microsoft has teamed up with Amazon to bring you Android apps directly inside Windows via the new Microsoft store.

Pop up store from within a browser

When you are surfing on a certain webpage and want to save and install the application from there, a new pop-up store window will show allowing you to install the app directly.

Microsoft has not said will this feature work outside their Edge browser so we will have to wait and see about that.

Support for multiple types of applications

Since now developers were tied to certain formats if they wanted to publish their application in any kind of environment. Microsoft wants to bridge this.

Windows developers can publish any kind of app, regardless of app framework and packaging technology – such as Win32, .NET, UWP, Xamarin, Electron, React Native, Java, and even Progressive Web Apps.

For Progressive Web Apps Microsoft has made open-source tool PWABuilder 3.

Flexibility and choice of commerce platform

Starting July 28, app developers will also have an option to bring their own or a third-party commerce platform in their apps, and if they do so they don’t need to pay Microsoft any fee. They can keep 100% of their revenue.

If you like to learn and find out more about various Windows errors, and how to repair them go to our vast archive or use search to find articles that will explain and help you in solving your issue.
However, if you prefer to do things fast and with automatization then we are proposing to use an automated solution for your issues. The application that we are recommending is Advanced System Repair Pro
Advanced System Repair utilizes multiple tools all in one to give you a quick, simple, reliable, and very thorough diagnosis of your PC. It brings you all the tools you need in one program to clean, fix, protect, optimize and boost your PC!
1-Click Maintenance
All the tools to make it simple and easy! It's like having a professional technician at the click of a mouse.

Junk Cleaner
Keeping your computer free from unnecessary clutter also helps make your computer last longer. Like any other machine, if you keep it clean and take care of it, it will serve you better for longer!

Optimize background apps
Optimize applications background activity with the built-in Application Optimizer feature.

Disk Defrag
With a simple 1-click, Advanced System Repair speeds up your PC by assembling fragmented files on your machine and organizing them more efficiently.

Malware Removal
Finds and removes all types of harmful malware including trojans, worms, bots, adware, spyware, PUPs, and more!

Privacy Cleaner
The all-in-one privacy suite to Clean Your Tracks & Protect Your Privacy! Make your computer safe, secure, and more efficient!

System Tweak/Optimizer
ASR will analyze your complete system and settings to adjust your PC to function at its maximum performance.

Registry Cleaner
Over time, as you install and uninstall applications, the registry can become cluttered with old entries and broken settings which can result in program crashes, and annoying messages and slow the computer down.
Visit our Advanced System Repair Pro Download page to inform yourself about all the benefits of this software and get a free trial copy of it.
advanced system repair pro

Advanced System Repair Pro

One-click automated PC repair solution
ASR logo
With Advanced System Repair Pro you can easily
Replace damaged files
Restore performance
Free disk space
Remove Malware
Protects WEB browser
Remove Viruses
Stop PC freezing
DOWNLOAD
Privacy Policy | Terms of Use | Uinstall
Advanced System Repair Pro is compatible with all versions of Microsoft Windows including Windows 11

Share this article:

You might also like

An Easy Guide to Resolving Error 1032

Fixing Error 1032

Error 1032 - What is it?

If you are an iPhone or an iPad user and you sometimes open your email Yahoo Mail account on your phone, then you will most likely experience the MF Message Error Domain: Error 1032. This error may occur when you access your mail account. The MF Message Error Domain: Error 1032 may prevent you from composing new emails and even stop the inbox from loading.

Solution

Restoro box imageError Causes

The error 1032 can be triggered due to multiple reasons such as:
  • Overloaded History
  • Problems with the account log-in credentials
  • Outdated Yahoo Mail app
  • Authentication issues

Further Information and Manual Repair

To fix this issue on your iPhone or iPad, here are some methods you can try:

Method 1 - Delink and Re-setup Yahoo Email Account

If the error code 1032 occurs due to problems with the account log-in credentials, then try re-setting up your Yahoo email account. To do this, go to tap settings mail, contacts, and calendar, then remove your email account. Now repeat the process and provide valid log-in credentials to re-setup your Yahoo email account.

Method 2 - Update Yahoo Mail App

Another reason can be the outdated Yahoo Mail App. If this is the cause, then simply update it to the latest version. To do this, simply download the latest version from the iTunes store and run it. This will hopefully resolve the issue.

Method 3 - Manage App Connections to Resolve Authentication issues

If the error 1032 occurs due to authentication issues then there are possibilities of conflicts between account security settings. The best way to resolve the error in such a situation is to learn how to manage app connections. Here’s how it’s done: Use your desktop computer to sign in to your Yahoo account. Now click the menu icon and select account info. Enter your account password and sign in again. Now click manage apps and website connections under Sign-in and security section. A list of all authorized mobile devices and applications will be displayed to you. Remove any existing entries appearing for mobile devices. After this, try logging into your Yahoo account from your iPhone or iPad. You will not receive the error.

Method 4 - Clear History

When the cause of the issue is overloaded history, then the best way to go about it is clearing the clutter in the history. Also clear cache and cookies. The cache is the location where temporary files are saved for speeding up the file retrieval process. But sometimes it can get corrupt and the iOS may fail to retrieve data from corrupt cache contents. To clear history and cache, simply tap Settings, Safari, and then clear history, cookies, and data. The process may take some time depending on the cache file size.
Read More
Fix Setup has failed Error in Windows
If you encounter the “Setup has failed to determine supported install choices” error when trying to downgrade or upgrade your Windows 10 computer, this signifies that there are some compatibility issues with the installation process and that Windows was not able to either downgrade or upgrade to another version. Usually, this error occurs when you are using the built-in options in Windows 10 upgrade or downgrade to another version of Windows. This option is mostly used as it keeps the user settings as well as data intact. Thus, you need to keep in mind a lot of parameters before you proceed with the installation because if there is any conflict in the process, you certainly won’t be able to downgrade or upgrade your Windows computer. To resolve the issue, here are some suggestions that might help.

Option 1 – Try running in Compatibility mode

This is the first thing you can try to resolve the issue instead of going right ahead on making a bootable device. So if you are downgrading Windows, you can try to run the installer in the compatibility mode for that specific Windows version.
  • Look for the setup file.
  • Once you find it, right-click on it and select Properties from the context menu.
  • After that, go to the Compatibility tab and mark the checkbox for “Run this program in compatibility mode for:” and from the drop-down list, select either Windows 7 or Windows 8.
  • You also have to check the “Run as administrator” option.
  • Now click the Apply button and then click OK to save the changes made and check if it has resolved the issue or not.

Option 2 – Option 2 – Try troubleshooting compatibility

This option is almost the same as the first one except it is an alternative way of fixing the “Setup has failed to determine supported install choices” error in case the first one didn’t work. In this option, you will troubleshoot the compatibility issue.
  • Look for the setup file.
  • Then right-click on it and select the “Troubleshoot compatibility” from the context menu.
  • After that, click on the “Try recommended setting” option. Once the process is done, the error message should be gone.

Option 3 – Try to use the setup file instead of an image

If you are running the Windows ISO image for the installation, you can try running the setup file instead. This is because when you try to install Windows from an image file directly, it has to be loaded into a virtual CD drive first, and then from there, further operations are carried out. And so, you can just bypass this mechanism to avoid getting the “Setup has failed to determine supported install choices” error.
  • First, you need to extract the disk file to an accessible location.
  • After that, go to Sources > Setup.exe.
  • Now run the setup file to upgrade or downgrade the Windows version. Just make sure that you do run the setup file as an administrator.

Option 4 – Try to do the upgrade or downgrade in a Clean Boot state

Putting your PC in a Clean Boot state can also help when you want to upgrade or downgrade your version of Windows without any trouble because, during this state, you can start the system with a minimum number of drivers and startup programs that will surely help you in isolating the root cause of the issue.
  • Log onto your PC as an administrator.
  • Type in MSConfig in the Start Search to open the System Configuration utility.
  • From there, go to the General tab and click “Selective startup”.
  • Clear the “Load Startup items” checkbox and make sure that the “Load System Services” and “Use Original boot configuration” options are checked.
  • Next, click the Services tab and select the “Hide All Microsoft Services” checkbox.
  • Click Disable all.
  • Click on Apply/OK and restart your PC. (This will put your PC into a Clean Boot State. And configure Windows to use the usual startup, just simply undo the changes.)
  • After that, try to install the Windows Updates or upgrade again.

Option 5 – Try to use the Media Creation tool

The Media Creation tool in Windows allows you to use the ISO installation file to make a bootable device that you can use to install Windows on your PC. Note that this is kind of different from the usual installation process as it could erase your computer’s current settings and data on the primary drive. Thus, before you proceed, you need to backup all your data into some removable drive and then use the Media Creation Tool to make a bootable drive.
  • After making the bootable drive, you need to plug it into your computer and then reboot.
  • Next, tap the F10 or Esc key to open the boot options.
  • Now set the boot priority of the removable drive the highest. Once the setup comes forth, follow the next onscreen instructions and install Windows without any problems.
Read More
Easily repair Server is not accessible
There are a lot of users who use their Windows 10 PCs to create and access data on their servers using their network. However, some of them reported getting an error saying that the server is not accessible. Here’s the full content of the error message:
“\server is not accessible. You might not have permission to use this network resource. Contact the administrator of this server to find out if you have access permissions. Logon Failure: The target account name is incorrect.”
If you are among the users who experience the same issue, read on as this post will help you resolve this error when accessing your server. But before you start troubleshooting the problem, you might want to perform System Restore, especially if tend to create one. To use System Restore, here’s what you have to do:
  • Tap the Win + R keys to open the Run dialog box.
  • After that, type in “sysdm.cpl” in the field and tap Enter.
  • Next, go to the System Protection tab then click the System Restore button. This will open a new window where you have to select your preferred System Restore point.
  • After that, follow the on-screen instructions to finish the process and then restart your computer and check if the problem is fixed or not.
If System Restore didn’t help in fixing the ACPI.sys Blue Screen error now’s the time for you to make use of the potential fixes laid out below.

Option 1 – Try rebooting your router

The first thing you can try to do to fix the error is to simply restart your router. All you need to do is reboot the router from its Admin panel or you can also turn it off manually and turn it back on after a couple of seconds so that it can completely reboot. Once you’re done, try accessing your server again and see if the error is now fixed.

Option 2 – Try checking the status of the Workstation Service

You might want to check the status of the Workstation Service as the error might have something to do with it.
  • Tap the Win + R keys on your keyboard to launch the Run utility.
  • Then type “services.msc” in the field and click OK or hit Enter to open the Windows Services Manager.
  • After opening the Services Manager, you will see a list of all the services on your computer and from there, locate the Workstation Service.
  • Double click on the Workstation Service to open its Properties.
  • Next, Stop the Service and Start it again or you can also right-click on it and select Restart and then make sure that its Startup type is set to Automatic.
  • Now restart your computer and check if the error is fixed.

Option 3 – Try to change the File Sharing Connections setting

You can also try to change the File Sharing connections setting. All you have to do is go to Control Panel > Network and sharing center > Advanced sharing settings > File sharing connections. From there, you need to select “Enable file sharing for devices that use 40 or 56-bit encryption and check if it helps in fixing the problem. If not, undo the changes you’ve made and proceed to the next given option.

Option 4 – Try checking the Network Configuration

Checking the Network Configuration can also help you fix the error. Refer to the steps below to do so:
  • Right-click on the Wi-Fi connection or on the Ethernet connection icon located in the system tray.
  • Then select open Network and Internet Settings and then click on the “Change Adapter Options”.
  • After that, a new window will appear and from there, select the network connection that connects your computer to your network – this can either be a Wi-Fi connection or Ethernet connection.
  • Right-click on that connection and select Properties where you will see a list of items.
  • Select the Internet Protocol Version 4 or Internet Protocol Version 6 from those items according to your system requirement.
  • Then click on the Properties button.
  • Check if everything is now configured as to how it is supposed to be and then check if the error is resolved.

Option 5 – Try to reset Winsock, TCP/IP & Flush DNS

You might also want to try resetting Winsock, TCP/IP, and flushing DNS might help you resolve errors. To do so, follow these steps:
  • Right-click on the Start button and click on Command Prompt (administrator) so you can pull up an elevated Command Prompt.
  • After that, execute each one of the commands listed below. And after you typed in one after the other, you have to hit Enter.
  1. netsh winsock reset – type in this command to reset Winsock
  2. netsh int ip reset resettcpip.txt – type in this command to reset TCP/IP
  3. ipconfig /flushdns – type in this command to flush the DNS cache
  • Next, restart your PC and check if the problem’s fixed.

Option 6 – Run the Network Adapter Troubleshooter

  • Open the Search bar on your computer and type in “troubleshoot” to open the Troubleshoot settings.
  • Next, scroll down and select the “Network Adapter” option from the right pane.
  • Then click on the Run Troubleshooter” button.
  • After that, your computer will check for any possible errors and will pinpoint the root cause of the problem if possible.
Read More
New focus sessions in Windows 11
focus session
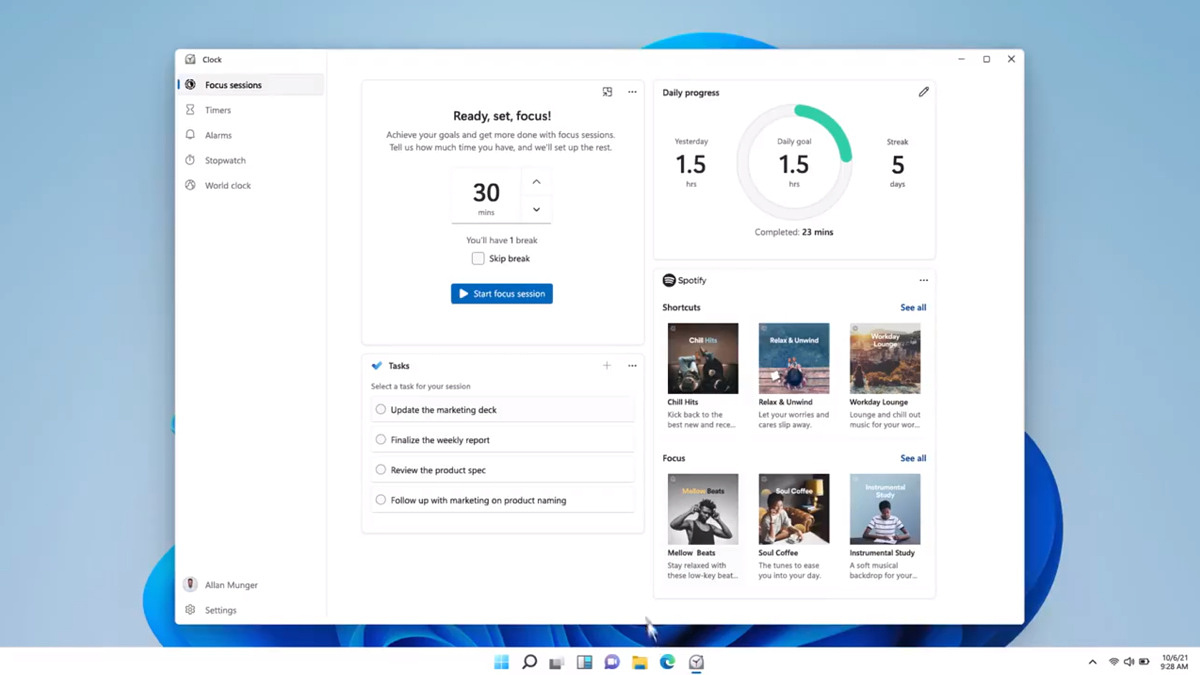
Windows and Devices chief Panos Panay has revealed new focus sessions feature that will be in Windows 11 on his Twitter account today. He himself is referring to it as a game-changer especially with Spotify integration.

So what is a focus session?

From the video clip provided on Twitter, we can see that focus session users will be able to choose a specific task from the previously made task list, choose songs that will play in the background while the task is active, and set a timer for the chosen task with breaks. Maybe the best comparison and explanation would be a desktop google calendar task with music, basically, that’s it. A neat and good organizer inside your Windows 11 operating system. I think that this is generally a good idea and for sure it will find its audience.
Read More
How to Fix the Error Code 0X80070005

Repair Error Code 0X80070005

What is Error 0X80070005?

Error 0x8007005 is a typical Windows Error Code. This error occurs during installation or Windows update. The error 0x8007005 is prompted as an ‘Access Denied’ message. It is typically generated when you either lack file or registry permission to perform the installation.

Solution

Restoro box imageError Causes

Narrowing down the ultimate reason for the error 0x8007005 can be difficult because there are multiple causes for this error occurrence. However, some of the common causes include:
  • Administrative issues
  • Viral Infection
To perform a successful Windows update, it is vital to resolve this error on your system. Furthermore, you must also hurry in fixing this issue on your PC especially if the underlying cause of this error is malware or viruses. Malware can damage your PC badly. It can expose your computer to serious threats like privacy issues, data breaches, cyber crimes and identity thefts.

Further Information and Manual Repair

To fix the error 0x8007005 on your PC, you don’t have to hire a professional and pay hundreds of dollars. In fact, you can resolve it all by yourself even if you are not technically sound. Here are some easy DIY methods for you to try: Solution 1: The error may occur if you don’t have administrator’s permission and there are many user accounts to access the PC. The easiest way to fix the error and perform a successful Windows update is to log on from the administrators account. Once you log on as the administrator, then try installing the updates again. Solution 2: Sometimes the file and registry permissions may get changed by malware. Therefore, to fix the error, it is advisable to download an antivirus and perform an entire PC scan. The antivirus will help remove all sorts of viruses infecting your system and fix the issue. However, please note anti-viruses are known for slowing down PC performance so you might have to compromise on your system’s speed once to install this software.

Solution 3: Download Restoro.

Downloading Restoro is perhaps the best and the fastest way to resolve error 0x8007005 without compromising on your PC’s speed. Plus this software also resolves all registry issues too. Restoro is an advanced and multi-functional PC Fixer. It is deployed with powerful utilities including an antivirus that detects and removes all kinds of malicious software including viruses, Trojans, spyware and malware. To ensure your PC speed is not affected, it also features a system optimizer. The system optimizer boosts the speed of your PC significantly.

Other Restoro Features

In addition to this, it also includes a registry cleaner. The registry cleaner simultaneously detects all registry-related issues and resolves them instantly. It cleans the registry, fixes the damaged files, and restores the registry back to normal. It is safe, bug-free, and efficient. You can install it on any Windows version. It has a user-friendly interface and simple navigation making it easy for all levels of users to operate. Click here to download Restoro on your PC and resolve error 0x8007005 now!
Read More
How to fix Windows 10 Store Error 0x801901F7

How to fix Windows 10 Store Error 0x801901F7

Error Code 0x801901F7 – What is it?

Error code 0x801901F7, also known as “The Server Stumbled” error because it shows a message saying “The Server Stumbled. We all have bad days” is associated with Windows Store. Server Stumbled Error 0x801901F7 is an error related to the MS server. The error occurs due to damaged registry files, malware, virus, and corrupted data. You should fix this error to prevent a system crash or a BSOD error. There are some things you can do to fix it. These are not so complex. So, anyone can try these methods to fix error 0x801901F7. Common Symptoms for error 0x801901F7:
  • Problems with Windows startup
  • System becomes very slow or the system freezes
  • Blue screen of death appears
  • Windows fails to start some process due to Stop error code 0x801901f7

Solution

Restoro box imageError Causes

  • This error is generally caused by corrupt registry files.
  • Virus infection can cause this problem.
  • Outdated driver, missing .DLL files may also cause this error.
  • Microsoft server overload may cause this problem as well.
  • Incorrect configuration may cause this problem.

Further Information and Manual Repair

To fix error 0x801901f7, there are four methods listed below. Some might work for you and some might not. Please try all of them to fix this error.

Method 1:

Basic method to fix error code 0x801901F7: Resetting Windows Store Cache Most of the time clearing or resetting the cache helps. It doesn't always work, but you should try this first before moving on to some advanced methods which are mentioned below. To reset the Windows Store cache please follow the simple steps below
  • Open RUN by searching or pressing "Windows Key + R"
  • Type "wsreset.exe" and press Enter or click on OK.
  • Windows Store will open automatically along with a command prompt.
  • This will reset Windows Store and you might see it loading as it should.
This method might work but if it fails to solve Error 0x801901F7 then follow the method below.

Method 2:

Advanced method of fixing error code 0x801901F7: Deleting Windows Store database file. By using this method, you will be deleting the database file for Windows Store. This file is located on your C drive or the drive where you installed your Operating System. Follow the steps below.
  1. Navigate to C:WindowsSoftwareDistributionDataStoreDataStore.edb.
  2. Delete DataStore.edb file from there.
  3. Now Open Windows Store and see if you still get error code 0x801901F7.
The Datastore.edb file that you deleted will be automatically created once you perform Step 3 which is launching Windows Store. If you still cannot get this error away then Close Windows Store and Reboot your PC then Launch Windows Store Again.

Method 3:

Modifying Windows update properties: Perform the steps below only if the above-mentioned methods fail. You will be tweaking a few things in the Windows update to see if it helps.
  1. Open Task Manager by right-clicking on Taskbar, then click on Task Manager.
  2. Go to Services Tab. Click on Open Services at the very bottom of the Window.
  3. Now a new window will pop up. Scroll down & find "Windows Update" from the list.
  4. Double click on Windows update to open up its Properties.
  5. Now from the Startup Type drop-down list, select Automatic. Click on Apply, Start, and then Ok.
Now you need to perform just one more step. Reset Windows Store again (Refer to method 1 for Steps). This should fix your Windows Store error that shows The Server Stumbled with 0x801901F7 Error Code.

Method 4: 

If the error is due to a problem with a driver, then follow the method below to uninstall the current driver:
  1. Open the Run command and type “sysdm.cpl” in the text box.
  2. Click Enter.
  3. Open the Hardware tab on the system properties dialog box.
  4. Then press on Device Manager.
  5. Double press on Device type and then press on the hardware device that is reporting error code 0x801901F7.
  6. Go to the Driver tab and press on Uninstall button to uninstall the device driver completely.
  7. Now, install the new driver on your computer.
  8. Restart your computer.
  9. Run virus scan of your PC
  10. Try using a different USB port.
If you do not possess the technical expertise required to accomplish this yourself or do not feel comfortable doing so, download and install a powerful automated tool to get the job done.
Read More
Fixing the No Audio Output Device is Installed
If you suddenly encountered an error that says, “No Audio Output Device is installed” on your Windows 10 computer, worry not for this post will guide you on how exactly you can fix the problem. There are several possible reasons why this error pops up. It could be due to a recent Windows 10 update you’ve installed, or it could be due to a corrupted or outdated audio driver, and so on. There are several potential solutions to this error. You can try running the built-in Audio Playing troubleshooter or update or uninstall the Audio driver. You could also try to update the Intel Smart Sound Technology Audio Control driver, as well as contact support for your laptop or computer. For more details, refer to each one of the provided options below.

Option 1 – Try to run the Playing Audio Troubleshooter

Since the Windows 10 operating system has the Playing Audio Troubleshooter, you can use this troubleshooter to try and fix the problem with the “No Audio Output Device is installed” error. You can access this tool in the Control Panel or in the Taskbar Search and even on the Troubleshooters page of Windows 10. Run this troubleshooter and see if it can fix the issue or not.

Option 2 – Try to update the Audio driver

If the error has something to do with software, chances are it might be related to the audio driver – it could be that the newest version of your Windows 10 does not work well with the old version of the driver. This is why you have to update your audio driver to the newest available version.
  • Tap the Win + R keys to open the Run dialog box and then type in MSC and tap Enter or click OK to open the Device Manager.
  • Expand the section of the Sound, video, and Game Controllers.
  • And then from the drop-down menu, select the Update Driver option and follow the on-screen instructions to install the latest version of the driver.
  • Then also click on the option, “Search automatically for updated driver software.
  • Restart your PC after the installation.
Note: If updating the Audio driver didn’t work, you can go to the website of your PC manufacturer and look for the support section where you can download the drivers for your computer. You just need to take note of your PC’s correct model and model number so you can find the appropriate driver.

Option 3 – Try removing and reinstalling the sound card

If option 1 didn’t work, you can also try to remove and reinstall the sound card of your computer to fix the high-pitched sound coming from your computer’s speakers.
  • To get started, tap on the Windows key + R to pull up the Run box.
  • Next, type in “MSC” in the box to open the Device Manager.
  • After opening the Device Manager, go to the “Sound, video, and game controllers” option then right-click on the sound card.
  • Finally, click on Uninstall and tick the box with a label that says, “Delete the driver software for this device” and close the Device Manager.
  • Restart your computer and check if the problem’s fixed or not.
Note: After you restart your computer, the system should reinstall the speaker automatically. But if it does not reinstall, you can follow the aforementioned steps again to go to the Device Manager. From there, go back to “Sound, video, and Game Controllers” and right-click on the sound card. After that, enabling the sound card and restart your computer once more. That should fix the problem.

Option 4 – Try updating the Intel Smart Sound Technology Audio Control driver

If the three options given above didn’t fix the error, you might want to try updating the Intel Smart Sound Technology Audio Control driver. To do so, follow these steps:
  • Tap the Win + X keys and select the Device Manager option from the menu.
  • Next, scroll down and click on the System Devices option and select the “Intel Smart Sound Technology Audio Control” option.
  • Then right-click on it and select the “Update driver” option.
  • After a couple of seconds, the wizard will look for an available driver and will automatically update it.
  • Restart your computer and see if the error is now fixed.
Read More
How to Turn off Advertising ID in Windows
In case you don’t know, Microsoft hooks up every machine that is running Windows 10 with an Advertising ID which helps them in providing Windows 10 users with relevant ads. These ads are delivered to users in the Action Center, Start Menu as well as the ads inside the UWP Applications. What makes these advertisements relevant is that they keep track of your browsing trends, likes and dislikes, with the help of the Advertising ID. However, if you are not fond of advertisements and you do not want this feature of Microsoft to track your usage, worry not for you actually have the option to disable targeted ads on your Windows 10 computer by turning off the Advertising ID. And you can do that during Windows 10 Setup or using the Group Policy Editor. For more details, refer to the instructions provided below for each one of the methods.

Option 1 – Turn off Advertising ID during Windows 10 setup

If you are about to install Windows 10, then during the installation process, your computer boots into the Install and Configure Windows 10 screen with Cortana that assist you during the setup. Once you reach the last page which is “Choose privacy settings for your device”, you will see the Advertising ID of your computer. Under the Advertising ID, you have to disable or toggle off the “Apps can use advertising ID to provide more personalized advertising in accordance with the privacy policy of the app provider” option. After you disable it, click on the Accept button to proceed with the installation. After that, the copy of your Windows 10 you are using will have the Advertising ID disabled by default.

Option 2 – Turn off Advertising ID via Group Policy Editor

  • First, tap the Win + R keys to launch the Run utility.
  • Then, type “gpedit.msc” in the field and click OK or tap Enter to open the Group Policy Editor.
  • Next, navigate to this group policy setting: Computer Configuration > Administrative Templates > System > User Profiles
  • Now double click on the “Turn off the advertising ID” option and set the radio button to Enabled. Once you do, you will see the following description on your screen:
“This policy setting turns off the advertising ID, preventing apps from using the ID for experiences across apps. If you enable this policy setting, the advertising ID is turned off. Apps can’t use the ID for experiences across apps. If you disable or do not configure this policy setting, users can control whether apps can use the advertising ID for experiences across apps.” Note that setting the radio button to Enabled or Not Configured will turn off the data collection of the Advertising ID.
  • Finally, exit the Group Policy Editor and then restart your computer to apply the changes made successfully.
Read More
Fix GWXUX has stopped working in Windows
If your Windows 10 computer is downloading or installing updates but suddenly an error pops up saying, “GWXUX has stopped working”, read on as this post will show you what you can do to resolve the problem. GWXUX is a process responsible for downloading and installing Windows updates and is installed on your computer via Windows Updates. That particular update is known as “KB3035583”. Through this process, the “Get Windows 10” pop-ups are installed and initiated by Microsoft. This process is also capable of checking the compatibility of your PC to run Windows 10 as well as preparing it for installation. However, this process might also result in excessive usage of Disk and sometimes, CPU. So in this post, you will be guided on how you can fix the issue with the GWXUX. Follow the instructions given below carefully.

Option 1 – Disable GWXUX in the Task Scheduler

You will have to disable the gwxux.exe process to run from the Task Scheduler. Thus, you need to follow the steps below to do so.
  • Open the Cortana Search box and then type “task scheduler” in the field.
  • Then click on Task Scheduler from the related search results that appear to open it.
  • After opening the Task Scheduler, navigate to Microsoft > Windows > Setup > gwx on the left panel from the Task Scheduler Library.
  • Once you select the GWX folder, you will see two tasks that are listed under that folder. Select both of these tasks and permanently disable them.
  • Restart your computer to apply the changes made and check if the issue is now fixed or not.

Option 2 – Uninstall the KB3035583 Windows Update

  • To uninstall the KB3035583 Windows Update, you need to go to Control Panel, and for you to do that, type “control panel” in the Cortana Search box.
  • After that, click on Control Panel from the related search results given.
  • Once Control Panel is pulled up, search for “View Installed Updates” in the search field from the top right part of the window.
  • Next, click on a link labeled, “View Installed Updates” under the Programs and Features menu.
  • After clicking the link, you will see the list of all the installed updates in your computer from the Windows Updates.
  • Now look for an update named “KB3035583” and select it.
  • You should notice the Uninstall button located at the top portion of the sub-menu ribbon as you can see on the snippet below. Click on that button to uninstall the KB3035583 Windows Update.
  • After uninstalling the update, make sure to restart your computer to apply the changes made.

Option 3 – Try using the System File Checker

System File Checker or SFC is a built-in command utility that helps in restoring corrupted files as well as missing files. It replaces bad and corrupted system files with good system files that might be causing the error 0x80200056. To run the SFC command, follow the steps given below.
  • Tap Win + R to launch Run.
  • Type in cmd in the field and tap Enter.
  • After opening Command Prompt, type in sfc /scannow
The command will start a system scan which will take a few whiles before it finishes. Once it’s done, you could get the following results:
  1. Windows Resource Protection did not find any integrity violations.
  2. Windows Resource Protection found corrupt files and successfully repaired them.
  3. Windows Resource Protection found corrupt files but was unable to fix some of them.
After running the System File Checker, restart your computer and check if the error with the GWXUX.exe file is now fixed or not.
Read More
Remove recommended icons from the start menu
windows 11 start menu
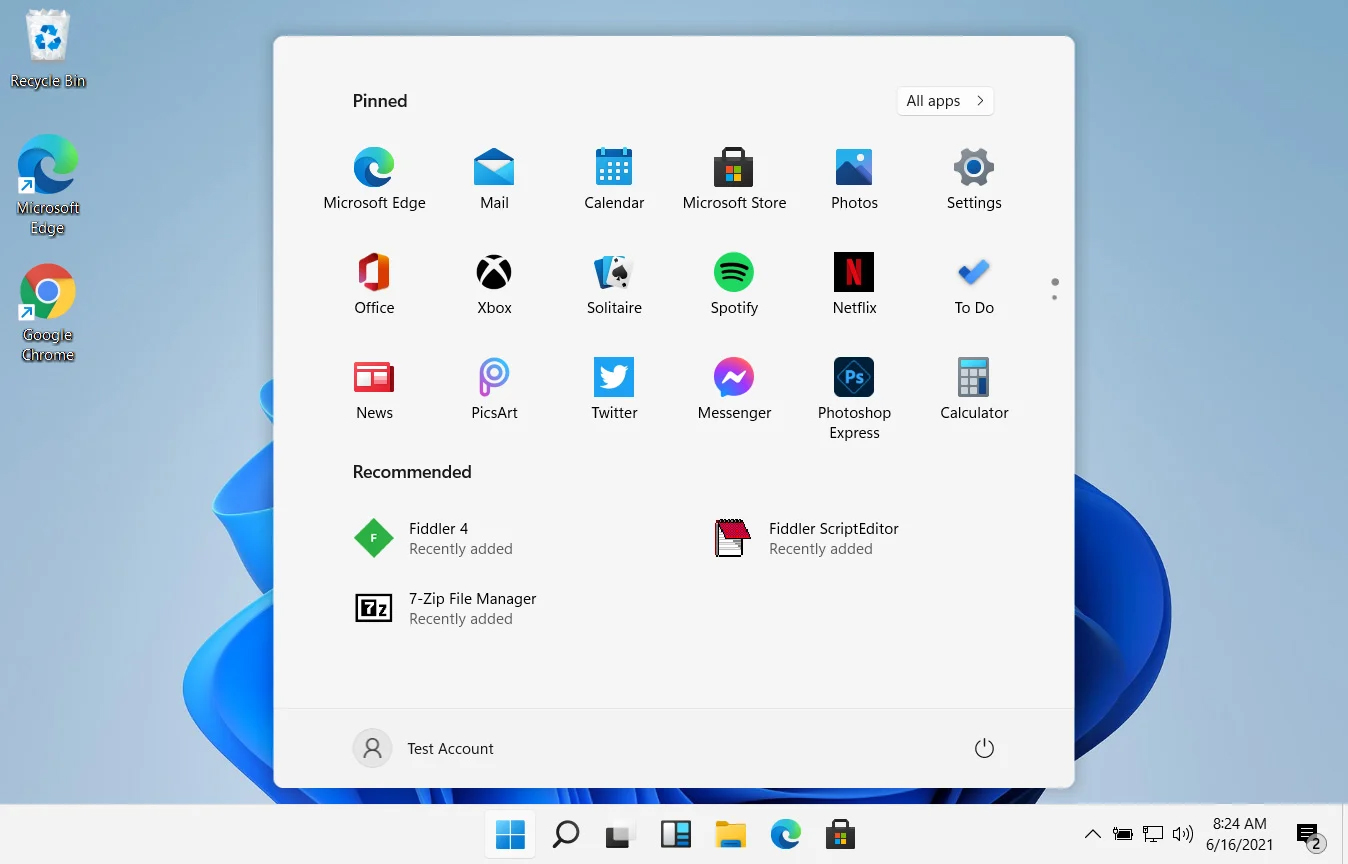
In Windows 11 by default inside the Start menu, there is recommended section that contains recently opened folders, documents, and files. If you do not wish this section and do not want recent items in your Start menu there is an easy way to turn it off.
  1. Press ⊞ WINDOWS + I to open settings
  2. Click on Personalization
  3. On the right side scroll down and click on Start
  4. Click on the switch beside Show recently opened items in Start, Jump lists, and File Explorer
  5. Close settings
Settings will be automatically applied and there will be no more recommended items inside your Start menu to create clutter, it will be nice and clean.
Read More
1 2 3 162
Logo
Copyright © 2022, ErrorTools. All Rights Reserved
Trademarks: Microsoft Windows logos are registered trademarks of Microsoft. Disclaimer: ErrorTools.com is not affiliated with Microsoft, nor claim direct affiliation.
The information on this page is provided for information purposes only.
DMCA.com Protection Status