New focus sessions in Windows 11

focus session
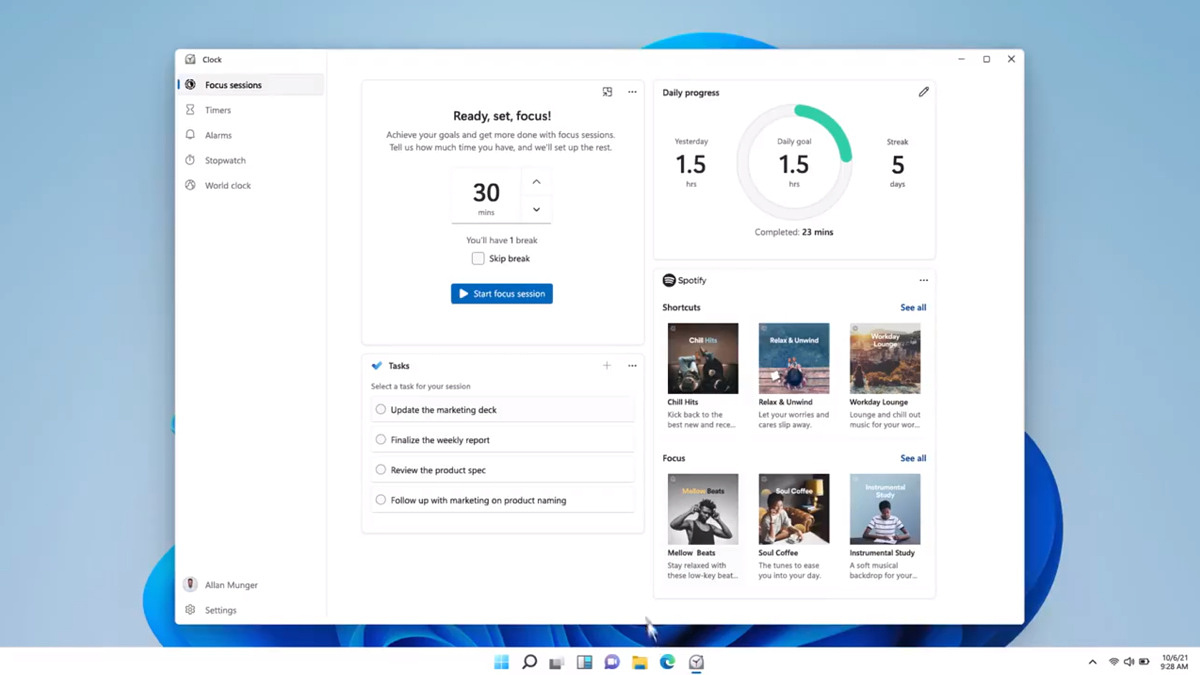
Windows and Devices chief Panos Panay has revealed new focus sessions feature that will be in Windows 11 on his Twitter account today. He himself is referring to it as a game-changer especially with Spotify integration.

So what is a focus session?

From the video clip provided on Twitter, we can see that focus session users will be able to choose a specific task from the previously made task list, choose songs that will play in the background while the task is active, and set a timer for the chosen task with breaks.

Maybe the best comparison and explanation would be a desktop google calendar task with music, basically, that’s it. A neat and good organizer inside your Windows 11 operating system. I think that this is generally a good idea and for sure it will find its audience.

If you like to learn and find out more about various Windows errors, and how to repair them go to our vast archive or use search to find articles that will explain and help you in solving your issue.
However, if you prefer to do things fast and with automatization then we are proposing to use an automated solution for your issues. The application that we are recommending is Advanced System Repair Pro
Advanced System Repair utilizes multiple tools all in one to give you a quick, simple, reliable, and very thorough diagnosis of your PC. It brings you all the tools you need in one program to clean, fix, protect, optimize and boost your PC!
1-Click Maintenance
All the tools to make it simple and easy! It's like having a professional technician at the click of a mouse.

Junk Cleaner
Keeping your computer free from unnecessary clutter also helps make your computer last longer. Like any other machine, if you keep it clean and take care of it, it will serve you better for longer!

Optimize background apps
Optimize applications background activity with the built-in Application Optimizer feature.

Disk Defrag
With a simple 1-click, Advanced System Repair speeds up your PC by assembling fragmented files on your machine and organizing them more efficiently.

Malware Removal
Finds and removes all types of harmful malware including trojans, worms, bots, adware, spyware, PUPs, and more!

Privacy Cleaner
The all-in-one privacy suite to Clean Your Tracks & Protect Your Privacy! Make your computer safe, secure, and more efficient!

System Tweak/Optimizer
ASR will analyze your complete system and settings to adjust your PC to function at its maximum performance.

Registry Cleaner
Over time, as you install and uninstall applications, the registry can become cluttered with old entries and broken settings which can result in program crashes, and annoying messages and slow the computer down.
Visit our Advanced System Repair Pro Download page to inform yourself about all the benefits of this software and get a free trial copy of it.
advanced system repair pro

Advanced System Repair Pro

One-click automated PC repair solution
ASR logo
With Advanced System Repair Pro you can easily
Replace damaged files
Restore performance
Free disk space
Remove Malware
Protects WEB browser
Remove Viruses
Stop PC freezing
DOWNLOAD
Privacy Policy | Terms of Use | Uinstall
Advanced System Repair Pro is compatible with all versions of Microsoft Windows including Windows 11

Share this article:

You might also like

New Windows vulnerability discovered
The latest security vulnerability was discovered inside both Windows 10 and Windows 11 letting any user access admin privileges inside the operating system. This can, of course, be used by a potential attacker to get full control of the system. The problem lies in Microsoft's security rules assigned to the Windows Registry and the Security Account Manager. Both for some reason have reduced restrictions allowing any local user to fully access the files without administrator privileges. The problem is even more amplified if we think about Security Account Manager which includes all account data including the passwords of all users using the same PC. This can provide a potential attacker with all information and let them log on into the administrator account for full control. Microsoft is aware of the matter and is tracking it with code CVE-2021-36934, and includes a complete workaround for the issue, which includes restricting access to  %windir%\system32\config and deleting any restore points or Shadow volumes that were created before that point until the hole is plugged with an official security patch.
Read More
A Guide to Fixing Error 0x8007007e on Windows 10

Error Code 0x8007007e – What is it?

Error code 0x8007007e often occurs when users attempt to use Windows Update but are unable to access updates or webpages. To resolve this issue, you will need to use tools that detect and correct corrupted files as this is usually the main reason for the error.

Solution

Restoro box imageError Causes

Once this error code is encountered, it's a clear indication that your Operating System has malfunctioned. This could be a consequence of an incorrect or failed installation of software. The software might leave invalid entries in the Windows registry. Improper shut down of your system and a malware attack are also causes of error code 0x8007007e. Additionally, someone with little or no technical knowledge might have deleted a system file by accident. Missing system files can also equate to other error codes such as registry error code 19.

You may not always be able to prevent issues from affecting your computer, but proper measures can be taken to limit your risk of experiencing problems like error code 0x8007007e. See the following suggestions below:

  • Ensure proper system maintenance by regularly using your automated tool. This will ensure your system is in good shape and error-free. It will also clean your system regularly leading to a boost in PC performance
  • Keep antivirus software up-to-date. Antivirus software if crucial for the proper functioning of your computer. Keeping your antivirus updated is one of the best ways you can avoid problems with your PC.

Further Information and Manual Repair

Method One: System File Checker

System File Checker is a Windows tool that allows users to check their system for corrupt or bad system files. The utility scans for corrupt files and repairs them as well as files that may have gone missing.

Depending on the type of Windows operating system on your computer, you may need to follow varying instructions. However, note that Windows operating systems including Windows 10 and Windows 8 or 8.1 and Windows Vista all provide access to System File Checker via Command Prompt.

Once you run System File Checker, the tool should be able to repair and replace corrupted files. However, in cases where the repair process does not take place, you can attempt a manual repair by replacing the corrupt file the tool identifies with a good file. The process may require technical knowledge of Command Prompt so consider help from a Windows repair technician or consider contacting Windows for instructions based on your computer’s operating system.

Method Two: Run System Restore Tool

The System Recovery Options menu in Windows contains many tools which can enable users to resolve serious errors. In the case of Error Code 0x8007007e, one of the best tools in this menu is System Restore.

When an error occurs which inhibits users from accessing key functions on their system, System Restore enables the user to restores the computer to an earlier period without causing harm to files, photos, or documents.

However, once you run this tool, you will only be able to access files available within the period to which your computer is restored. For this reason, carefully consider which period is best suited to your purposes. Also, ensure you restore the system to a time when error code 0x8007007e was not present on your machine.

If System Restore does not resolve the error, you may undo the restoration changes. Ensure you have sufficient free space on your machine hard disk before you proceed (300 MB at least for hard drives above 500MB or at least 50 MB for smaller sized disks).

Method Three: Download Automated Software

When it comes to resolving error codes, it can often be a frustrating and tricky venture, especially when you are attempting to fix the problem manually. The Internet is awash with bits and pieces of instruction, some misleading at best with uncertain success rates.

But what if there was a one-stop-shop or better yet a tool that offered solutions for error codes including 0x8007007e?  Download a powerful automated tool that offers easy and effective, user-friendly solutions for users with varying error code problems.

Read More
Fix 0xd00000e5, 0x8007139f, 0x80090030 PIN
The quickest and easiest way to log into your computer is when you use the PIN feature in Windows 10. Even though it is a bit slower compared to biometric logins such as Fingerprint and Iris scanning that comes under Windows Hello, the PIN feature is definitely less complicated. However, just like any other module of the software, it is also prone to some errors. In this post, you will be guided in fixing several PIN errors such as 0xd00000e5, 0x8007139f, and 0x8009003. These errors could be caused at different points in time like when you change or create a PIN or when you log into your computer. To fix the 0xd00000e5, 0x8007139f and 0x8009003 PIN errors, there are various solutions you can try. You may empty the contents of the NGC folder or remove and change the PIN or the password. You could also use the Group Policy Editor or reset the ACLs in the NGC folder as well as run built-in tools like System File Checker and the DISM tool.

Option 1 – Take ownership of the NGC folder and delete its contents

  • Boot your computer first into Safe Mode.
  • Next, you need to take ownership of the Ngc folder first and you can do that using Command Prompt.
  • Type “command prompt” in the Windows Search bar and then right-click on the relevant search result and select “Run as administrator”.
  • After that, if a User Account Control or UAC prompt appears, just click on Yes to proceed.
  • Next, type and enter this command: TAKEOWN /F C:WindowsServiceProfilesLocalServiceAppDataLocalMicrosoftNgc
  • Note that the <path> is the location of the folder or file in File Explorer.
  • Now type and enter this second command: ICACLS C:WindowsServiceProfilesLocalServiceAppDataLocalMicrosoftNgc /grant administrators:F
  • Finally, once the command has been executed, restart your computer.
  • Once your computer has restarted, delete all the contents in the Ngc folder and check if the error is now fixed.

Option 2 – Try to remove and change the PIN or password

The 0xd00000e5, 0x8007139f, and 0x8009003 PIN errors could be caused by some conflicting issues with the PIN or password you have set for the User Account of your computer. Thus, you have to remove or change the PIN or password to fix these PIN errors.
  • Remove the PIN by going to Settings > Accounts > Sign-in options.
  • From there, go to the PIN section and click on the Remove button.
  • You will be asked to verify your account to proceed in removing the PIN, enter your credentials.
  • Restart your computer and then set up a new PIN.
  • Once you’re done, restart your computer and check if the error is gone now.

Option 3 – Try to use the Group Policy Editor

  • Tap the Win + R keys to open the Run utility and type “gpedit.msc” in the field and tap Enter to open the Group Policy Editor.
  • Next, navigate to this policy setting: Computer Configuration > Administrative Templates > System > Logon
  • After that, double click on the “Turn on convenience PIN Sign-in” option located on the right-side panel.
  • Then set its radio button to Enabled. You will see the following description when you do so:
“This policy setting allows you to control whether a domain user can sign in using a convenience PIN. If you enable this policy setting, a domain user can set up and sign in with a convenience PIN. If you disable or don’t configure this policy setting, a domain user can’t set up and use a convenience PIN. Note: The user’s domain password will be cached in the system vault when using this feature. To configure Windows Hello for Business, use the Administrative Template policies under Windows Hello for Business.”
  • After setting the radio button to Enabled, it will turn on the Logins in your computer using the PIN.
  • Close the Group Policy Editor and restart your computer for the changes to take effect.

Option 4 – Try to reset the ACLs in the Ngc folder

  • Type “command prompt” in the Windows Search bar and then right-click on the relevant search result and select “Run as administrator”.
  • After opening Command Prompt with admin privileges, execute this command: C:/Windows/Service/Profiles/Local/Service/AppData/Local/MicrosoftNgc /T /Q /C /RESET
  • The command you entered will start checking for errors and fix them automatically.

Option 5 – Run the System File Checker scan and the DISM tool

System File Checker:

  • Tap Win + R to launch Run.
  • Type in cmd in the field and tap Enter.
  • After opening Command Prompt, type in sfc /scannow
The command will start a system scan which will take a few whiles before it finishes. Once it’s done, you could get the following results:
  1. Windows Resource Protection did not find any integrity violations.
  2. Windows Resource Protection found corrupt files and successfully repaired them.
  3. Windows Resource Protection found corrupt files but was unable to fix some of them.
  • Now restart your computer.

DISM tool:

  • Open Command Prompt.
  • Then type in the following commands and make sure to hit Enter right after you type each one of them:
    • Dism /Online /Cleanup-Image /CheckHealth
    • Dism /Online /Cleanup-Image /ScanHealth
    • Dism /Online /Cleanup-image /Restorehealth
  • After that, wait until the process is finished and do not close the window as the process will probably take a couple of minutes.
  • Once it’s done, restart your computer.
Read More
Motitags Browser Hijacker Removal Guide

The Motitags toolbar browser add-on was created by Mindspark Inc. and is compatible with Internet Explorer and Mozilla Firefox. It claims to enhance users’ Internet browsing experience by enabling smileys within popular email clients such as Gmail, Yahoo!, AOL, and Outlook Live. While such added functionality may seem useful, Internet users should be aware that this browser plugin is categorized as a Browser Hijacker due to its behavior.

When installed this extension changes your default search engine, the home page, and new tab to MyWay.com, and while installed it gathers user browsing data and sends it back to Mindspark servers. This data is later used to inject additional unwanted ads into the user’s browser search results.

About Browser Hijackers

Browser hijacking is actually a type of unwanted software program, often a web browser add-on or extension, which then causes modifications in the web browser’s settings. Browser hijacker malware is developed for a number of reasons. These are generally used to force hits to a specific website, manipulating web traffic to generate ad revenue. It could seem harmless, but the majority of these websites aren’t legitimate and could pose a serious threat to your online safety. In a much worst case, your internet browser could be hi-jacked to open up your computer to a host of additional computer infections.

How one can identify a browser hijack

There are several signs of browser hijacking. Here are a few of them: the home page of your browser is changed unexpectedly; you get re-directed to websites you never intended to visit; the essential web browser settings are altered and unwanted or unsafe resources are added to the trusted websites list; discover new toolbars that you didn’t add; endless pop-up adverts show up and/or your web browser popup blocker is disabled; your browser gets sluggish, buggy, crashes frequently; you can’t navigate to certain internet pages, for example, security software related websites.

So how does a browser hijacker infect a computer?

Browser hijackers infect computers via malicious email attachments, downloaded infected files, or by going to infected sites. Many internet browser hijackings come from add-on software, i.e., toolbars, browser helper objects (BHO), or plug-ins added to browsers to provide them extra capabilities. Browser hijackers sneak into your pc in addition to free software application downloads that you unwittingly install along with the original. An example of some infamous browser hijacker includes Babylon, Anyprotect, Conduit, SweetPage, DefaultTab, RocketTab, and Delta Search, but the names are often changing. Browser hijacking can bring about severe privacy problems and also identity theft, affect your browsing experience by taking control over outgoing traffic, drastically slows down your PC by consuming lots of resources, and result in system instability also.

Getting rid of browser hijackers

Some browser hijacking could be easily stopped by discovering and eliminating the corresponding malware program through your control panel. But, most browser hijackers are difficult to eliminate manually. No matter how much you try to eliminate it, it can return over and over. Rookie PC users should not try for the manual form of removal, since it needs thorough computer knowledge to perform fixes on the system registry and HOSTS file. Professionals always recommend users to remove any malware including browser hijacker with an automatic removal tool, which is easier, safer, and quicker than the manual removal technique. Safebytes Anti-Malware has a state-of-the-art anti-malware engine that will help you stop browser hijacking in the first place, and clean up any existing issues.

What To Do If You Cannot Download Safebytes Anti-Malware?

Malware could potentially cause all sorts of damage once they invade your computer, starting from stealing your private details to erasing data files on your computer system. Some malware sits in between your computer and your internet connection and blocks some or all sites that you would like to visit. It might also prevent you from installing anything on your PC, particularly anti-virus programs. If you’re reading this, you probably have infected by malware that prevents you from downloading a computer security program such as Safebytes Antimalware on your PC. There are a few options you could try to get around with this particular obstacle.

Install in Safe Mode

If the malware is set to load automatically when Windows starts, entering Safe Mode could block this attempt. Only minimal required programs and services are loaded whenever you start your personal computer in Safe Mode. To start your Windows XP, Vista, or 7 computers in Safe Mode with Networking, please do as instructed below. 1) At power on/start-up, press the F8 key in 1-second intervals. This would conjure up the Advanced Boot Options menu. 2) Choose Safe Mode with Networking with arrow keys and press Enter. 3) When you are into this mode, you will have online access again. Now, get the virus removal application you want by using the web browser. To install the program, follow the directions within the setup wizard. 4) Right after the software is installed, allow the scan run to eliminate viruses and other threats automatically.

Use an alternate web browser to download security software

Malicious code could exploit vulnerabilities on a particular internet browser and block access to all anti-virus software sites. The most effective way to avoid this issue is to choose a web browser that is renowned for its security features. Firefox contains built-in Malware and Phishing Protection to keep you safe online.

Install security software on a USB drive

To effectively eliminate the malware, you need to approach the problem of installing an anti-virus software program on the infected PC from a different angle. Follow these steps to run the antivirus on the affected computer. 1) Download Safebytes Anti-Malware or Microsoft Windows Defender Offline onto a virus-free computer system. 2) Plug the pen drive into the uninfected computer. 3) Double click on the downloaded file to open the installation wizard. 4) Choose the USB stick as the destination for saving the software file. Follow the instructions on the screen to finish up the installation process. 5) Disconnect the flash drive. You may now use this portable anti-malware on the infected computer. 6) Double-click the anti-malware program EXE file on the USB flash drive. 7) Run Full System Scan to detect and get rid of all sorts of malware.

Benefits and Features of SafeBytes Security Suite

To protect your laptop or computer from many different internet-based threats, it is very important to install an anti-malware program on your PC. However, with so many anti-malware companies in the marketplace, nowadays it’s difficult to decide which one you should obtain for your laptop. A few are very good ones, some are ok types, and some are simply just fake anti-malware applications that could damage your computer themselves! When looking for an anti-malware program, pick one which gives reliable, efficient, and total protection against all known viruses and malware. One of the highly recommended software by industry analysts is SafeBytes Anti-Malware, a popular security application for Microsoft Windows. Safebytes is one of the well-established computer solutions companies, which provide this complete anti-malware software. Using its cutting-edge technology, this application can assist you to eliminate multiples types of malware such as viruses, PUPs, trojans, worms, ransomware, adware, and browser hijackers.

SafeBytes possesses a variety of wonderful features that can help you protect your laptop or computer from malware attack and damage. Below are some typical features found in this application:

World-class AntiMalware Protection: Built upon a greatly acclaimed anti-virus engine, this malware removal application can find and remove numerous stubborn malware threats like browser hijackers, PUPs, and ransomware that other typical anti-virus applications will miss. Real-time Threat Response: SafeBytes gives complete and real-time security for your computer. They’re extremely effective in screening and getting rid of numerous threats since they’re regularly improved with the latest updates and alerts. “Fast Scan” Features: Safebytes Anti-Malware, using its enhanced scanning engine, provides ultra-fast scanning which can quickly target any active online threat. Website Filtering: Through its unique safety ranking, SafeBytes notifies you whether a site is safe or not to visit it. This will ensure that you’re always certain of your online safety when browsing the internet. Light-weight: The program is lightweight and can run silently in the background, and will not have an effect on your PC efficiency. 24/7 Premium Support: SafeBytes provides you with 24/7 technical support, automatic maintenance, and software upgrades for the best user experience. Simply put, SafeBytes has developed a meaningful anti-malware solution that is aimed to protect you against various malware. Malware issues can become a thing of the past when you put this tool to use. So if you’re seeking the very best malware removal application out there, and when you don’t mind shelling out a few bucks for it, go for SafeBytes Anti-Malware.

Technical Details and Manual Removal (Advanced Users)

If you wish to manually remove Motitags without using an automated tool, it may be possible to do so by removing the application from the Windows Add/Remove Programs menu, or in cases of browser extensions, going to the browsers AddOn/Extension manager and removing it. Additionally, it is advised to factory reset your web browser to its default state to fix corrupt settings. Finally, check your hard drive for all of the following and clean your computer registry manually to get rid of leftover application entries after uninstalls. Please remember that only advanced users should try to manually edit the system files simply because removing any single vital registry entry leads to a serious issue or even a PC crash. Moreover, certain malicious programs have the capability to defend against its removal. Carrying out this in Safe Mode is recommended.
Folders: C:\Program Files\Motitags_94 C:\Program Files\Motitags_94EI C:\Users\(username)\AppData\Local\Motitags_94 C:\Users\(username)\AppData\LocalLow\Motitags_94 C:\Users\(username)\AppData\LocalLow\Motitags_94EI C:\Users\(username)\AppData\Roaming\Mozilla\Firefox\Profiles\g75s8p2u.default\extensionsffxtbr-bs@Motitags_94.com C:\Users\(username)\AppData\Roaming\Mozilla\Firefox\Profiles\g75s8p2u.default\extensionsffxtbr@Motitags_94.com C:\Users\(username)\AppData\Roaming\Mozilla\Firefox\Profiles\g75s8p2u.default\Motitags_94 Files: Search and Delete: 94auxstb.dll 94auxstb64.dll 94bar.dll 94barsvc.exe 94bprtct.dll 94brmon.exe 94brmon64.exe 94brstub.dll 94brstub64.dll 94datact.dll 94dlghk.dll 94dlghk64.dll 94feedmg.dll 94highin.exe 94hkstub.dll 94htmlmu.dll 94httpct.dll 94idle.dll 94ieovr.dll 94medint.exe 94mlbtn.dll 94Plugin.dll 94radio.dll 94regfft.dll 94reghk.dll 94regiet.dll 94script.dll 94skin.dll 94skplay.exe 94SrcAs.dll 94SrchMn.exe 94srchmr.dll 94tpinst.dll AppIntegrator64.exe AppIntegratorStub64.dll BOOTSTRAP.JS chromeffxtbr.jar CHROME.MANIFEST CREXT.DLL CrExtP94.exe DPNMNGR.DLL EXEMANAGER.DLL FF-NativeMessagingDispatcher.dll Hpg64.dll INSTALL.RDF installKeys.js LOGO.BMP NP94Stub.dll T8EPMSUP.DLL T8EXTEX.DLL T8EXTPEX.DLL T8HTML.DLL T8RES.DLL T8TICKER.DLL UNIFIEDLOGGING.DLL VERIFY.DLL 94EIPlug.dll 94EZSETP.dll NP94EISb.dll Registry: Key HKLM\SOFTWARE\Microsoft\Windows\CurrentVersion\Run Value: Motitags_94 Browser Plugin Loader Data: 94brmon.exe Key HKLM\SOFTWARE\Microsoft\Windows\CurrentVersion\Run Value: Motitags Search Scope Monitor Data: C:\PROGRA~1\MOTITA~2\bar.binsrchmn.exe” /m=2 /w /h Key HKLM\SOFTWARE\Microsoft\Windows\CurrentVersion\Run Value: Motitags Home Page Guard 32 bit Data: C:\PROGRA~1\MOTITA~2\bar.bin\AppIntegrator.exe Key HKLM\SOFTWARE\Microsoft\Windows\CurrentVersion\Run Value: Motitags EPM Support Data: C:\PROGRA~1\MOTITA~2\bar.binmedint.exe” T8EPMSUP.DLL,S Key HKCU\Software\AppDataLow\Software\Motitags_94 Key HKLM\SOFTWARE\Motitags_94 Key HKLM\SOFTWARE\MozillaPlugins\@Motitags_94.com/Plugin Key HKLM\SOFTWARE\Microsoft\Windows\CurrentVersion\Uninstall\Motitags_94bar Uninstall Firefox Key HKLM\SOFTWARE\Microsoft\Windows\CurrentVersion\Explorer\Browser Helper Objects\6df8a038-1b03-41eb-a92b-0e82de08ee4a Key HKLM\SOFTWARE\Microsoft\Windows\CurrentVersion\Explorer\Browser Helper Objects\598f4e85-2ee6-43a8-bf43-c75c82b925fe Key HKLM\SOFTWARE\Classes\Motitags_94.ToolbarProtector.1 Key HKLM\SOFTWARE\Classes\Motitags_94.ToolbarProtector Key HKLM\SOFTWARE\Classes\Motitags_94.ThirdPartyInstaller.1 Key HKLM\SOFTWARE\Classes\Motitags_94.ThirdPartyInstaller Key HKLM\SOFTWARE\Classes\Motitags_94.SettingsPlugin.1 Key HKLM\SOFTWARE\Classes\Motitags_94.SettingsPlugin Key HKLM\SOFTWARE\Classes\Motitags_94.ScriptButton.1 Key HKLM\SOFTWARE\Classes\Motitags_94.ScriptButton Key HKLM\SOFTWARE\Classes\Motitags_94.RadioSettings.1 Key HKLM\SOFTWARE\Classes\Motitags_94.RadioSettings Key HKLM\SOFTWARE\Classes\Motitags_94.Radio.1 Key HKLM\SOFTWARE\Classes\Motitags_94.Radio Key HKLM\SOFTWARE\Classes\Motitags_94.PseudoTransparentPlugin.1 Key HKLM\SOFTWARE\Classes\Motitags_94.PseudoTransparentPlugin Key HKLM\SOFTWARE\Classes\Motitags_94.MultipleButton.1 Key HKLM\SOFTWARE\Classes\Motitags_94.MultipleButton Key HKLM\SOFTWARE\Classes\Motitags_94.HTMLPanel.1 Key HKLM\SOFTWARE\Classes\Motitags_94.HTMLPanel Key HKLM\SOFTWARE\Classes\Motitags_94.HTMLMenu.1 Key HKLM\SOFTWARE\Classes\Motitags_94.HTMLMenu Key HKLM\SOFTWARE\Classes\Motitags_94.FeedManager.1 Key HKLM\SOFTWARE\Classes\Motitags_94.FeedManager
Read More
Best VR headsets in 2021 so far
Virtual Reality is slowly becoming standard in gaming. More and more affordable headsets are coming out lowering entry prices and making them affordable for all. But in a sea of new VR headsets, it is important to at least purchase a decent one that will perform nicely and hopefully last longer. Therefore in today’s article, we will address some of the best options currently available on the market,

Oculus Quest 2

occulus quest 2 VR
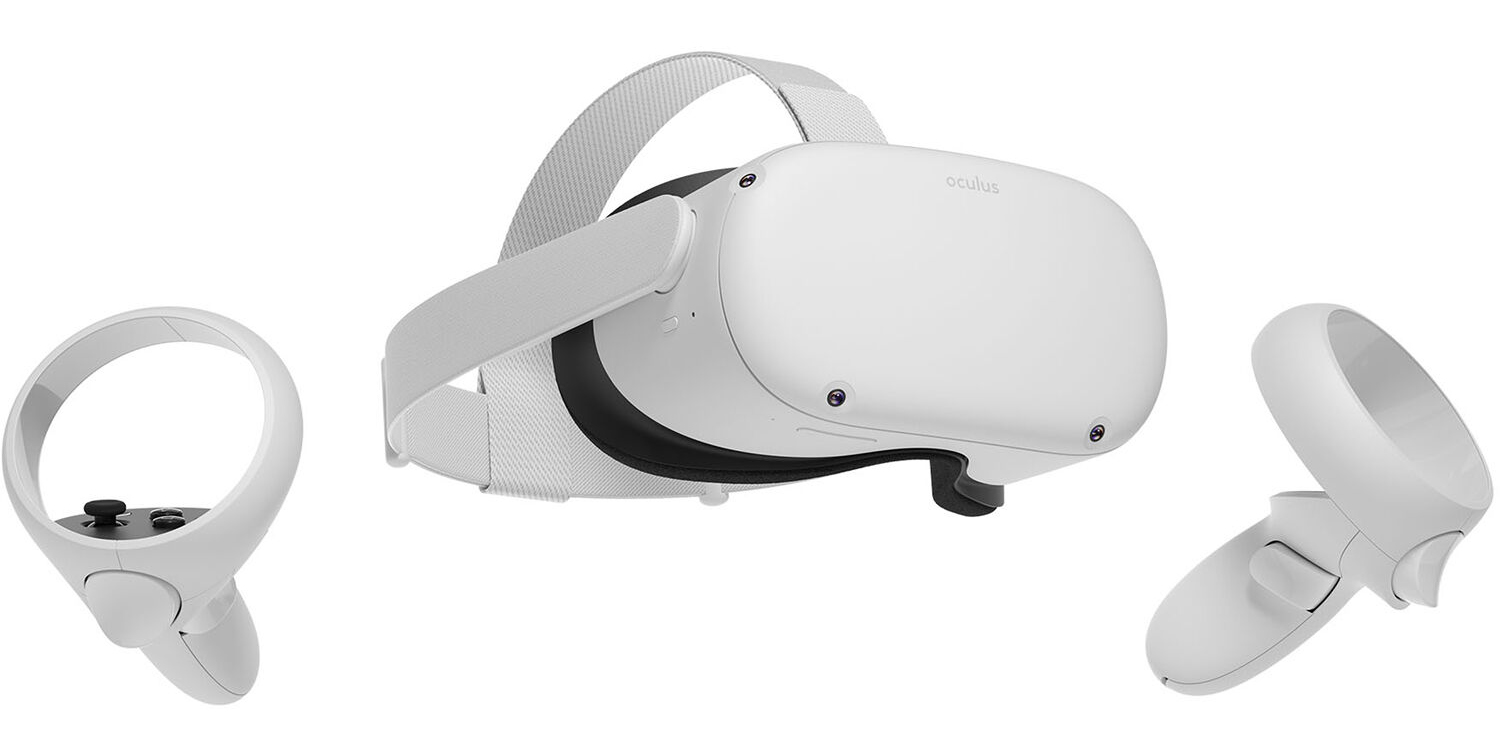
With its Rift model, Oculus set itself as a big player in VR. Now the company is slowly bowing out of the dedicated, tethered VR headset with its latest Quest 2 designed to primarily be a standalone headset. In case you do not know, tethered headset means that the headset itself is connected to your PC and is using its power to drive your VR experience. Now technical specifications of Quest 2 are pretty OK and it can drive stuff pretty decently and if you want you can purchase the dedicated cable to connect it to your PC for the full experience of games requiring more capable hardware. Oculus Quest 2 is the cheapest headset on this list and with its stable performance, is highly recommended.

Valve Index VR

valve index vr
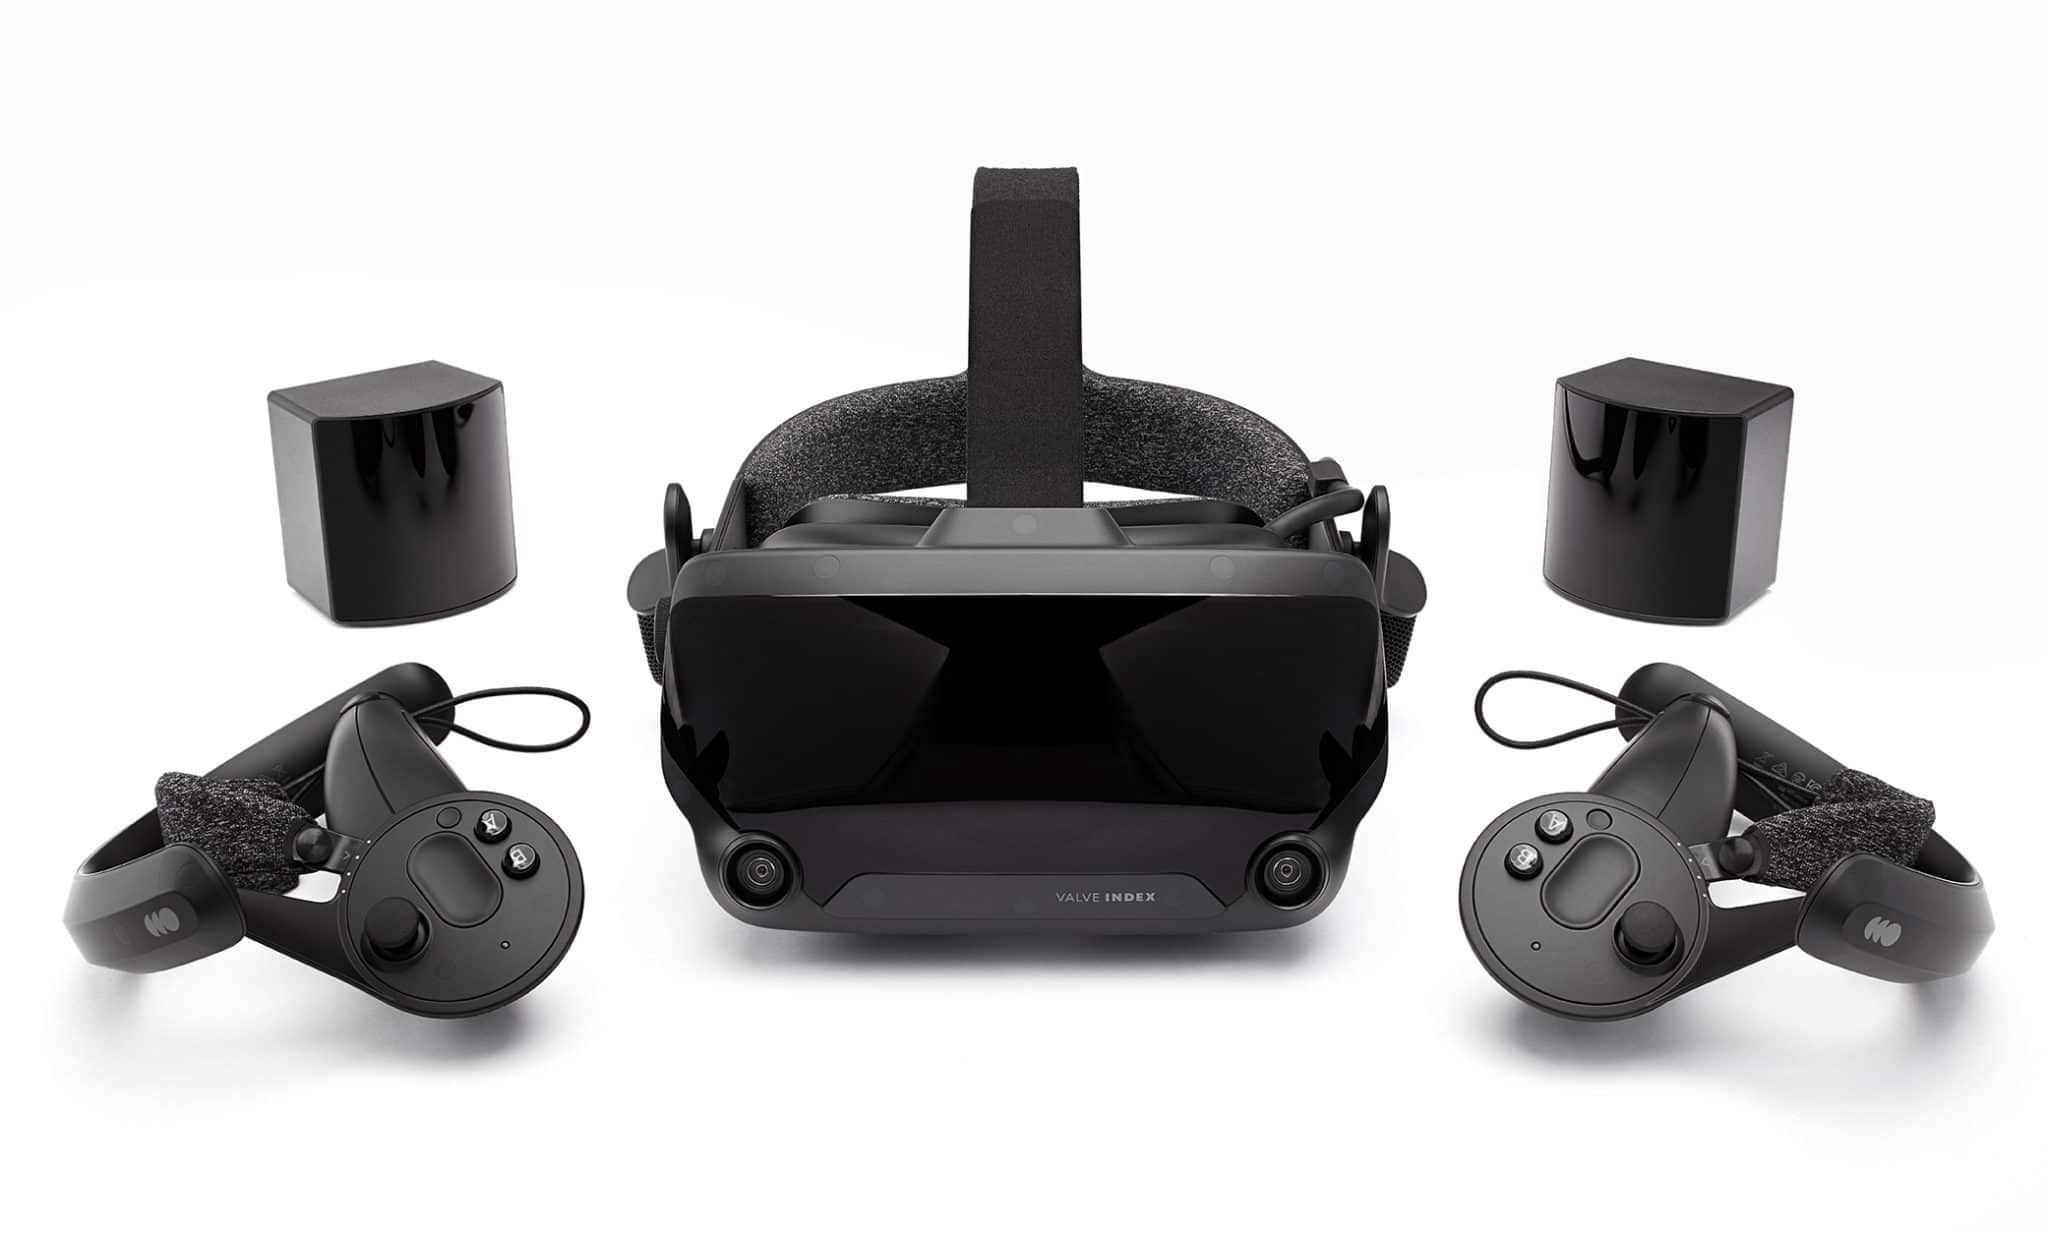
Although the headset itself is nothing revolutionary or special its controllers are. They can track individual finger movements, making games (that take advantage of them) much more immersive than the standard trigger grips on other controllers. The Index's higher refresh rate makes for smoother action, as well, which is another nice bonus. If you already have an HTC Vive or Vive Cosmos Elite, and their base stations (not the regular Cosmos), you can buy only the controllers.

Sony PlayStation VR

playstation vr
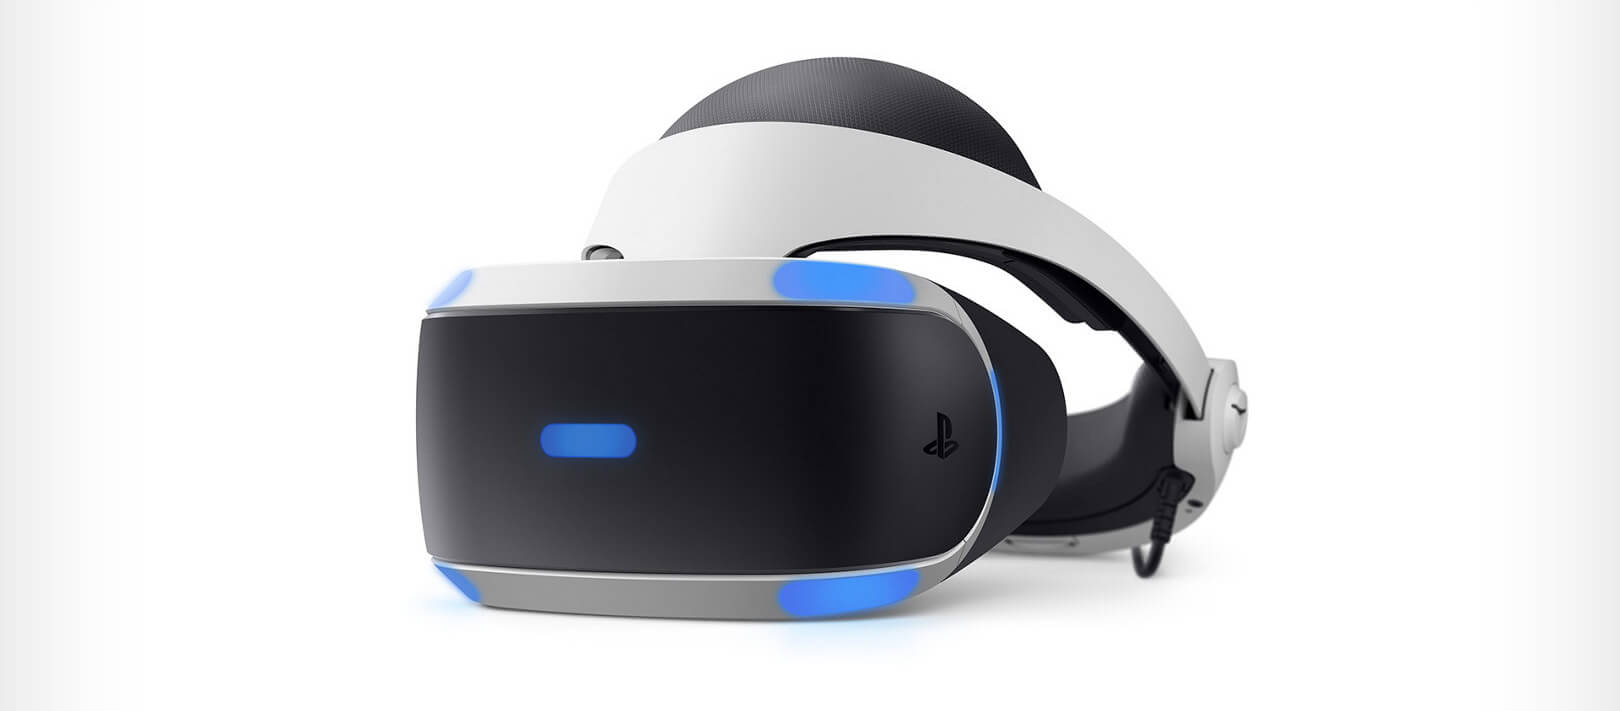
The PlayStation VR is compelling thanks to Sony backing its development, plus the PlayStation 4's affordability and availability compared with gaming PCs. All you need is the headset, a PlayStation 4, and a PlayStation Camera (now included with most PlayStation VR bundles). Not really the best of the bunch but still one of the top ones for console gaming. Sony is working on a new PlayStation VR system for the PlayStation 5, with redesigned controllers. The new headset hasn't been revealed yet, but the company has released a preview of the new controllers.

HP Reverb G2 VR

HP Reverb G2
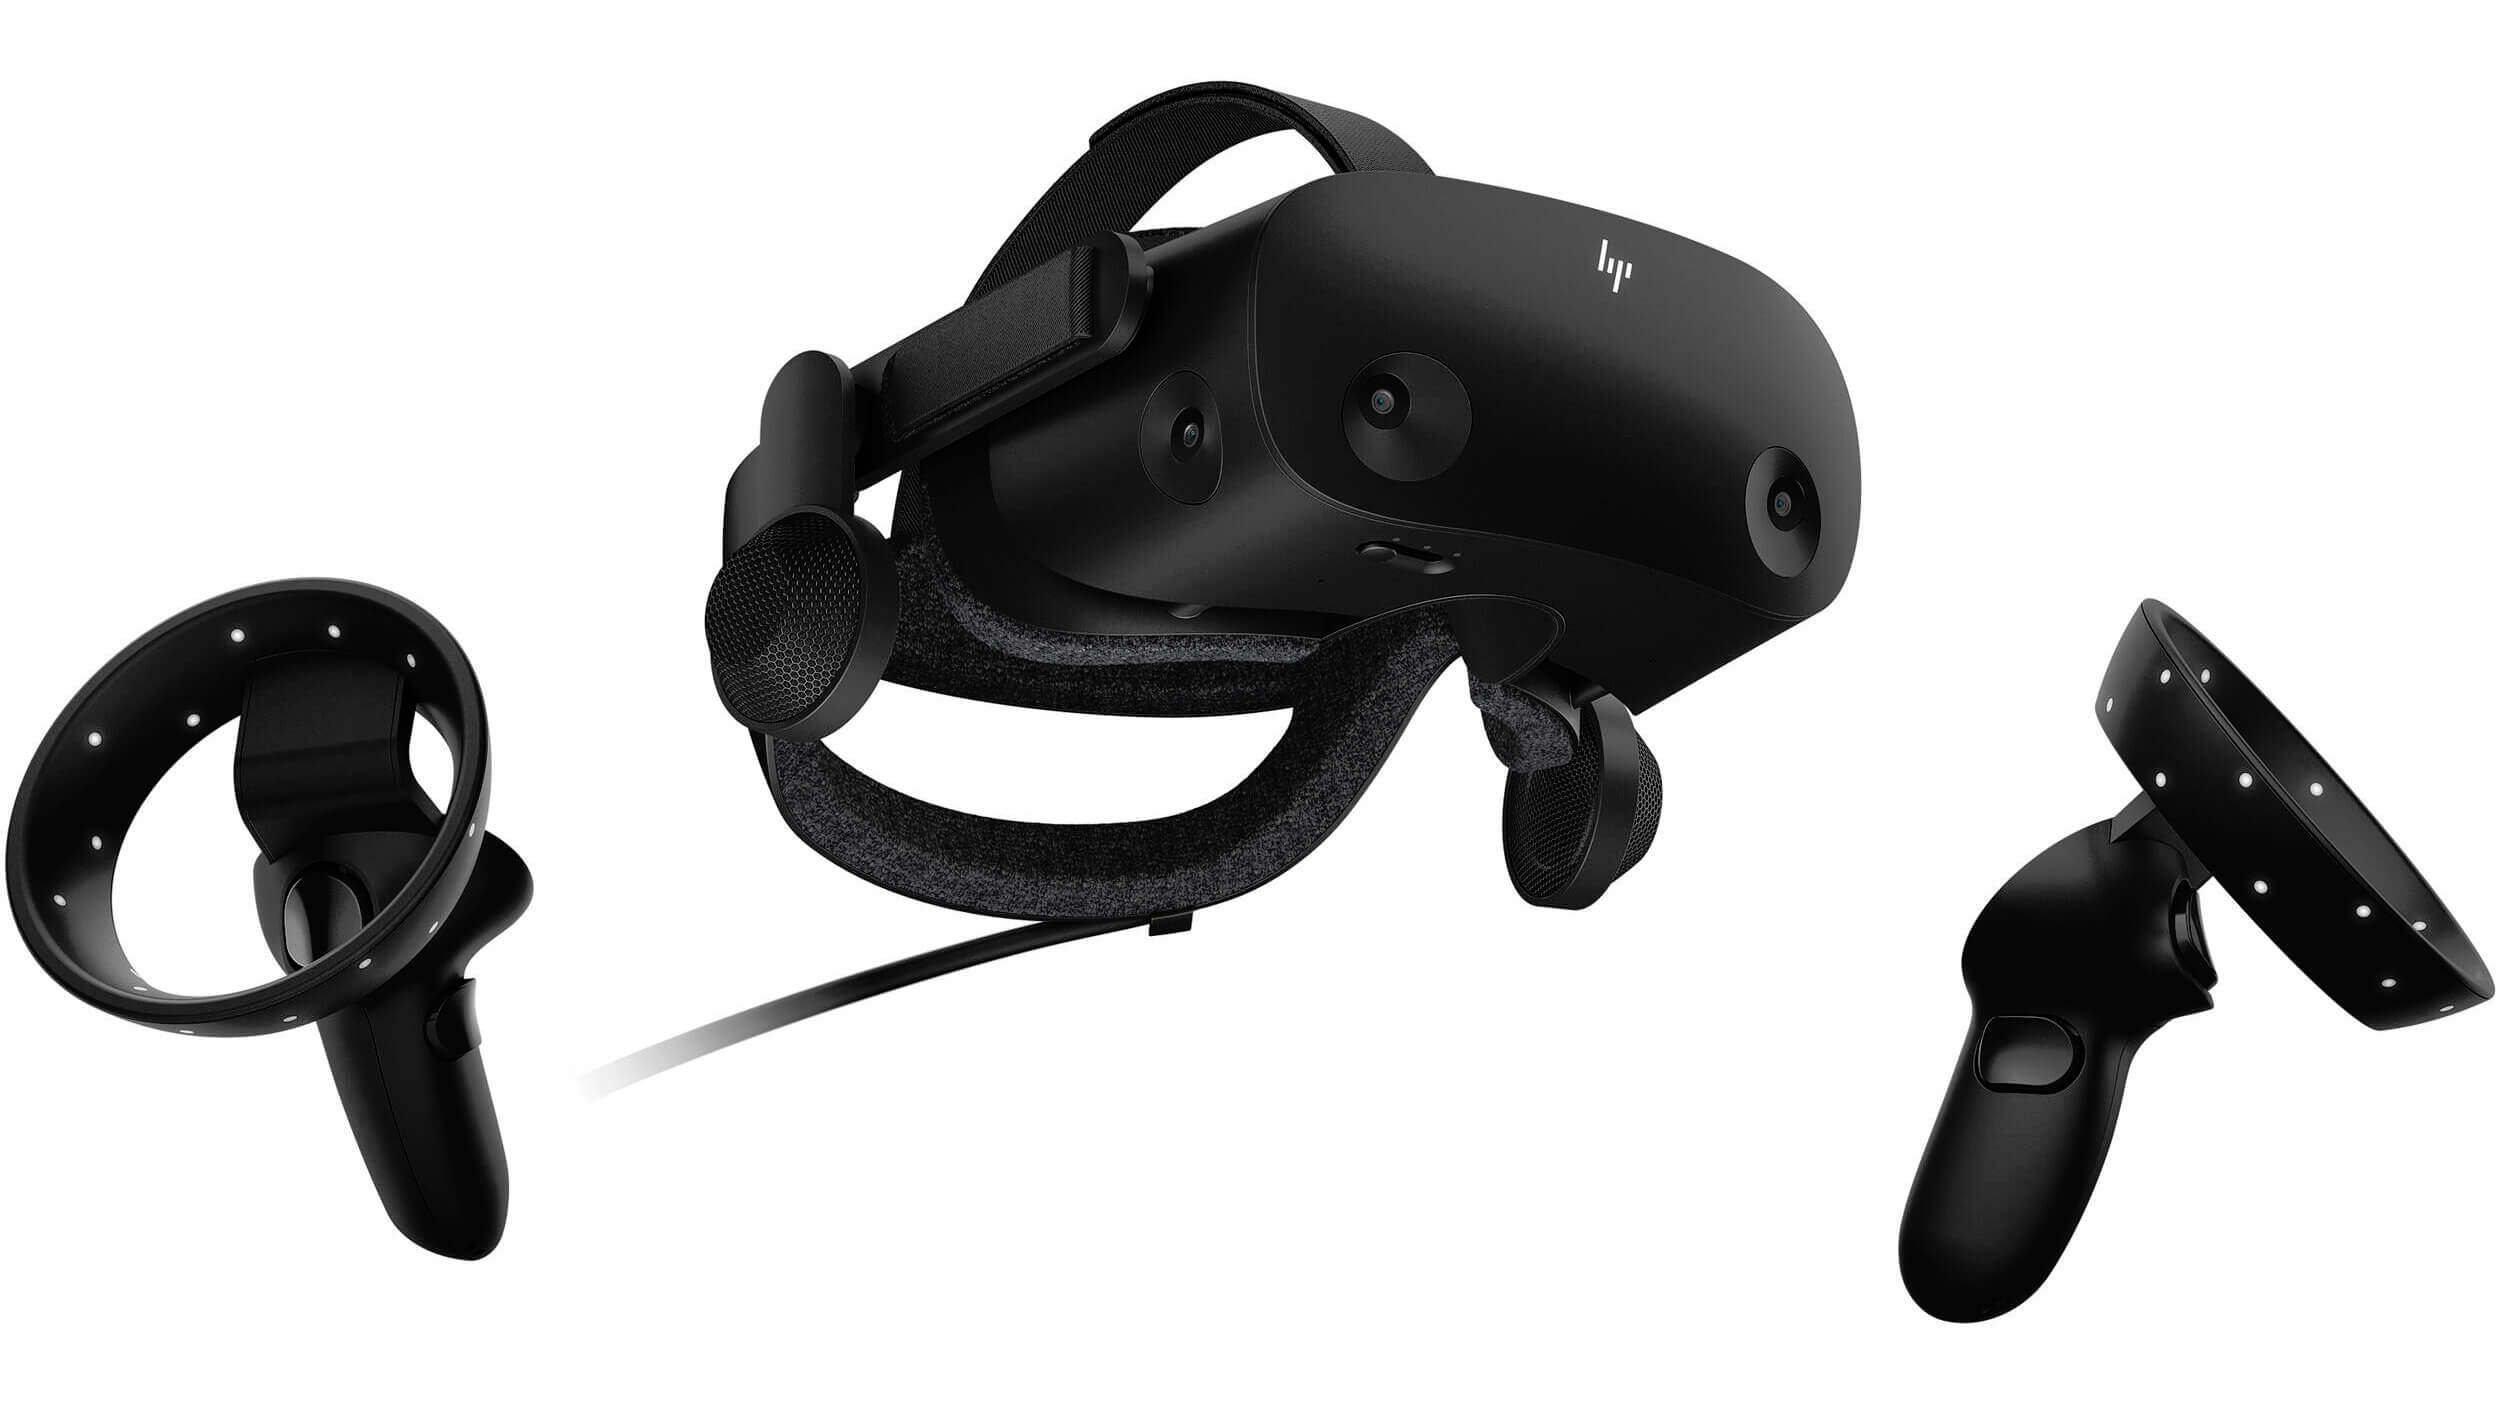
HP headset is one which you get if you want the best image quality in VR headset, sadly controllers did not follow the same quality of headset itself. But this is still a pretty decent headset overall and worth the purchase.

HTC Vive Cosmos

HTC Vive Cosmos
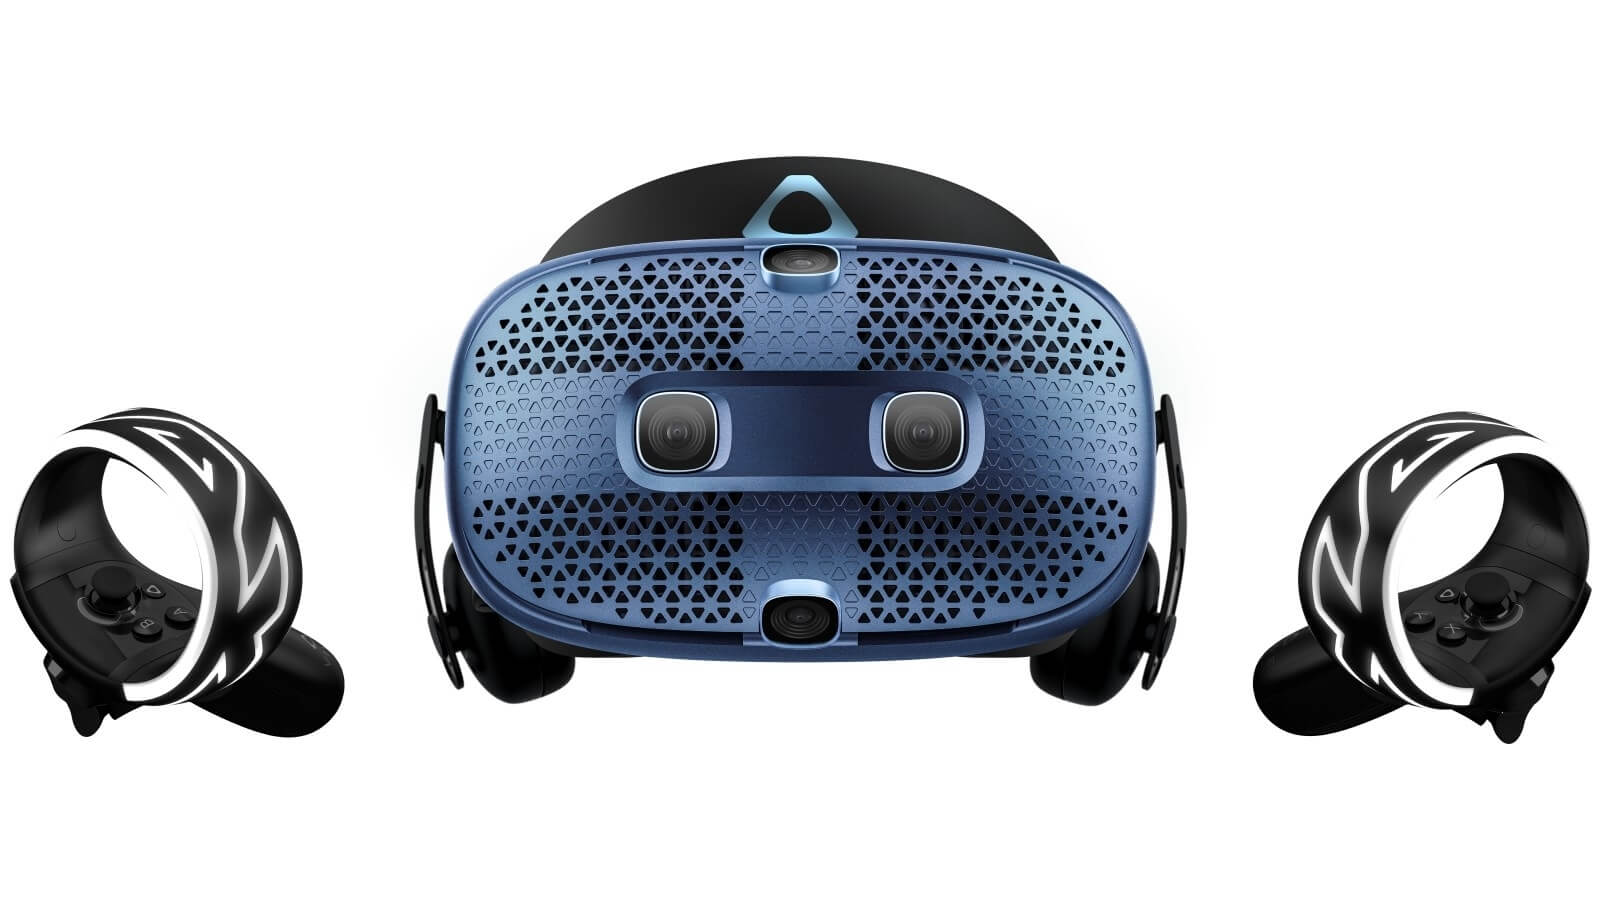
HTC's Vive Cosmos is the upgraded version of the Vive. It features a higher resolution and replaces the external base stations with outward-facing cameras for motion tracking. It's a comprehensive package for whole-room VR. HTC recently released the Vive Pro 2, a high-end VR headset targeting both enterprise users and consumers. This new headset features a 2,448-by-2,448 resolution display for each eye, making it the highest-resolution headset currently available. It's also more expensive than the Cosmos Elite. Sadly one thing that is bringing this headset down is the price.
Read More
Enable Windows Sandbox on Windows
One of the most common ways cybercriminals use to inject suspicious code into devices is by tricking users into installing a malicious program on a targeted device. Oblivious users are vulnerable to such tricks, which is why Microsoft has been working hard in the background to address this issue. Recently, Microsoft announced the availability of a sandboxed version of Windows 10 that runs inside Windows 10 in order to isolate suspected software to run inside it and protect the system from potential threats. This Windows Sandbox feature is a new feature that keeps your computer secure. It is a virtual disposable environment that you can enable. So if suspect any software of being malicious, you can run this software in an environment and ensure that it won’t interfere with any normal processes and would not jeopardize files on your computer. To simply put it, “Windows Sandbox is a new lightweight desktop environment tailored for safely running applications in isolation”. So if the Sandbox is closed, all the residual files, software, and other data are deleted permanently. To enable Windows Sandbox, refer to the instructions provided below. Step 1: You have to make sure that you are running either Windows 10 Enterprise Editions or Windows 10 Pro and that your computer is running build 18305 or newer. Step 2: After that, you have to enable Virtualization to let another instance of Windows 10 running in Sandbox mode. Step 3: Next, search for Windows Features on and off in the search box and then select the appropriate entry. Step 4: From the list, go to the mini window and check the Windows Sandbox and then click on OK. Step 5: Afterwards, in the Cortana Search box, search for “Windows Sandbox” and select the related entry to run it in an elevated window. Step 6: Then from your main computer (host), copy the executable file and paste it inside the Windows Sandbox environment. Step 7: Now run the executable file in the Sandbox environment and use it as you normally do. Step 8: Once you’re done, close the Windows Sandbox application and as mentioned, every data regarding the executable file and the temporary environment will be deleted. Step 9: And for the sake of safety, ensure that there are no modifications made to the host because of the executions in the Sandbox environment. You have the option to contact Microsoft for feedback related to Windows Sandbox. You can use the traditional Feedback Hub if you have any suggestions or any issues. Just fill in the appropriate details and select Windows Sandbox for the feature category under the Security and Privacy section. And if you have any issues related to the execution of and within Windows Sandbox, simply choose “Recreate my problem” then select Start capture to reproduce the issue, and once you’re done, select Stop capture.
Read More
What is and how to Remove Shortcut Virus
Shortcut virus is an easily spreadable and annoying combination of Worm and Trojan that hides all of your files and folders and then replaces them with shortcuts that look identical to replaced files and folders. Shortcut virusOnce disguised it will wait patiently for a user's click and once that happens it will replicate itself and further infect the system. This rapid spread can lead to stolen personal data, some system hick-ups, and other system-related issues. This malware mainly affects physical file transfer devices like for example and most USB drives, hard drives, and SD memory cards and it can easily transfer itself to the computer. The advantage of this shortcut virus comparing it to others is that it is mostly undetected by a vast variety of antivirus software. So running just anti-virus software maybe not be enough to remove it from your system. Luckily for all unfortunate users that have caught this annoyance, it can be easily removed fully manually in a short time.

How to Remove Virus from USB and other removable media

Firstly plugin USB, SD, or removable drive. The infection will transfer to your computer when the infected drive is plugged in so before we go to clean the computer itself, clean each removable drive that you have. Also know that infection will spread from computers into removable devices as well if it is not cleaned. Open the File Explorer and remember under which letter is removable drive registered. Open Command prompt but with administrator privileges and go to infected rive by typing its letter followed with “:” (for example D:) and press ENTER Once you have successfully gone to infected drive type in command prompt: Attrib -s -r -h /s /d *.* This will unlock all original files back into removable storage, next copy all files to your computer, and format the removable drive. Once the format is complete, unplug the removable device. Continue to clean all devices with the same method.

How to Permanently Remove a Shortcut Virus from Your PC

Now once we have cleaned all removable devices it is time to fully clean the PC Firstly open the task manager ( CTRL + SHIFT + ESC ), in the process tab find wscript.exe or wscript.vbs, right-click on it (or both if present), and select End Task. Now close the task manager and press Start. Inside start typing in registry editor to search for it and once found open it. Find the following key inside the registry editor: HKEY_CURRENT_USER/Software/Microsoft/Windows/CurrentVersion/Run In the right panel, look for any strange-looking key names, such as odwcamszas, WXCKYz, OUzzckky, etc. For each one, run a Google search to see if it's related to shortcut viruses. If any returns a positive match, right-click on them and select Delete. !!! Accidentally deleting an important key can cause Windows to become unstable, so double-check everything !!!. Close the Registry Editor Now press ⊞ WINDOWS + R to open the run dialog and type in it Msconfig followed by ENTER. Once the System Configuration window opens go to the Startup tab. In the Startup tab, look for any strange-looking .EXE or .VBS programs, select each one and click Disable. Close the Window. Once again open the run dialog and type inside %TEMP% and press ENTER in order to open the Windows temp folder. Inside this folder delete everything. Next in the File explorer go to C:\Users\[username]\AppData\Roaming\Microsoft\Windows\Start Menu\Programs\Startup Look for any strange-looking .EXE or .VBS files and delete them.
Read More
Fix Windows Upgrade Error 0x800F081E – 0x20003
If you are trying to run Windows Upgrade on your Windows 10 computer but suddenly interrupted by the error 0x800F081E – 0x20003, worry not for this post will guide you on how you can fix this Windows Upgrade error. This particular Windows Upgrade error is a Windows status code for CBS_E_NOT_APPLICABLE which indicates that some of the update requirements are missing or the files that are installed are already of a higher version compared to the ones that are still pending. In most cases, this error occurs when you try to upgrade to earlier versions of the Windows 10 N edition to a later version. Here’s the full content of the error message:
“0x800f081E-0x20003, The installation failed in the SECOND_BOOT phase with an error during BOOT operation”
In case you don’t know, Microsoft distributes special “N” editions of Windows in Europe and the “KN” editions in Korea. These editions are the same as the standard editions of Windows except that they do not have the Windows Media Player as well as the multimedia playback features. Thus, when the Windows Upgrade fails with the error code and error message and it doesn’t provide much information as to why the update couldn’t be installed, there is something you can do about it to fix the error. Since Windows uses generic error codes and so if you see the error code 0x800f081e, you have to check the error log first. For more details, follow the instructions laid out below. Step_1: You need to navigate to C:$WINDOWS.~BTSourcesPanther and from there look for the text file named “setuperr.log” and open it with a text viewer/editor program like Notepad. Step_2: After opening the setuperr.log file, you should see content that’s similar to this:
C:WINDOWSSoftwareDistributionDownload80b2677d6e15a2a206625bb25a7124feamd64_Microsoft-Windows-MediaPlayer-Package~~AMD64~~10.0.17134.1. Error: 0x800F081E 2019-09-10 20:26:57, Error SP Operation failed: Add [1] package C:WINDOWSSoftwareDistributionDownload80b2677d6e15a2a206625bb25a7124feamd64_Microsoft-Windows-MediaPlayer-Package~~AMD64~~10.0.17134.1. Error: 0x800F081E[gle=0x000000b7]
Note: From the content above, it is clear that the Windows Upgrade failed due to complete due to the Windows Media Player. It could be that the log file may contain other error messages and other error codes and if you see the error code 0x800f081e from the list, then you need to uninstall the Media Feature Pack. Step_3: You have to uninstall the Media Feature Pack.
  • Tap the Win + R keys to launch the Run dialog box and type “optionalfeatures.exe” in the field and hit Enter to open the Windows Features wizard.
  • Next, you need to wait until the list of Windows Features populates and then click on the + sign to collapse the folder of the Media Features.
  • After that, uncheck the “Windows Media Player” option from the Media Features folder.
  • Now click on the Yes and OK buttons to save the changes made and then close the Windows Features dialog box.
  • Restart your computer and boot, try to run the Windows Upgrade process again, and check if the error is fixed or not.
Note: If the installation has been successfully completed, you have to go back to the Windows Features and enable the Windows Media Player again. And if you are using the Windows 10 N Edition, then you can just download and install the latest version of the Media Feature Pack for your Windows 10 N edition. On the other hand, running the built-in Windows Update troubleshooter could also help you resolve any Windows Update-related problems, including the error 0x800F081E – 0x20003. To run it, go to Settings and then select Troubleshoot from the options. From there, click on Windows Update and then click the “Run the troubleshooter” button.
Read More
How To Speed Up PC Startup
[vc_row][vc_column][vc_column_text]

Boost PC Bootup

Hello and welcome to How To Speed Up PC Startup where we will explore how to make your PC boot-up system faster. When your computer gets older, you'll see a decrease in your PC's load time. This can be very annoying and frustrating, especially if you're not accustomed to exercising patience. Your computer's boot time does not need to be sluggish, even if it's old. While there are reasons why your computer is acting up and giving you the 'slow' sign, there are ways that you can optimize how fast your PC starts up at the beginning. Once you start speeding things up, you’ll never look back!

Start With your BIOS

You may need to tweak your PC’s start-up menu. Since the majority of issues encountered on your PC might not be related to the software running in the back end, you can focus on your computer's hardware. The ideal way to speed up your PC startup is to access your computer's BIOS when booting up. This can be accessed by holding the DEL key or whichever button is used to tap into your BIOS. You can change where your computer boots from. You can opt to put your hard disk right at the top which would elude searching for CDs and other storage media devices when your PC starts up.

Tweak Startup Programs

There are many programs that execute when your computer starts up. These programs normally run in the back end. Most times back-end programs are unnecessary and do not contribute to the productivity or performance of your computer when in use. Instead of allowing these programs to execute when your PC boots up, why not disable them?  By deactivating these programs, you'll be reducing the amount of CPU usage which will accelerate your PC performance. Additionally, there are some installed programs that you never use. Instead of leaving these programs to occupy needed space on your computer system, you can uninstall these to create more room on your computer. This actually increases your PC startup speed.

Put Malware on a Leash

Malware and spyware can cause problems for your start-up. A slow computer is an indication that your computer is plagued by malware. This affects your computer's boot time and whether or not it'll startup as quickly as you intend it to. If your computer gives you the 'virus alert', you need to download an antivirus program that will be able to eradicate all virus threats. Be mindful of where you download antivirus programs since many of them are viruses or have viruses attached to them. Some viruses are tough on your computer. This means that if an antivirus works for your best friend, it may not work for you. Since malware differs in functions and the havoc they cause, it's best to know what you're up against by doing research.

Clean Your Registry

You should also clean out your registry. The fewer unused registry keys you have lying around on your computer, the faster your computer will go. Getting a good registry cleaner from a clean source can help tremendously, but be careful; registry cleaners have the potential to be very dangerous so make sure you backup everything on your computer and only download registry cleaners from a reliable source. By implementing the above tips, you'll see quick improvements when using your computer. On the other hand, if your computer is going through some system-related issues that have to get fixed, there is a one-click solution known as Restoro you could check out to resolve them. This program is a useful tool that could repair corrupted registries and optimize your PC’s overall performance. Aside from that, it also cleans out your computer for any junk or corrupted files that help you eliminate any unwanted files from your system. This is basically a solution that’s within your grasp with just a click. It’s easy to use as it is user-friendly. For a complete set of instructions in downloading and using it, refer to the steps below Perform a full system scan using Restoro. To do so, follow the instructions below.
  1. Download and install Restoro from the official site.
  2. Once the installation process is completed, run Restoro to perform a full system scan. restoro application screen
  3. After the scan is completed click the “Start Repair” button. restoro application screen
[/vc_column_text][/vc_column][/vc_row]
Read More
Best Browsers in 2021 with browser description
In today's digital life, when we access the internet daily, browsers are essential almost as our operating system, after all, we do access all of the internet data via them, and having a good, reliable, and personal browser tailored for our needs can make all the difference in the world. In today's article, we will introduce you to the five greatest browsers of today, we will point their advantages and disadvantages and why should you pick one or another. As with each piece of software, there is not an ultimate browser, better than anything else and we will not favor anyone on this list, the decision which you should use is solely up to you, we are here to provide you with an objective opinion on each one. All of this being said, let's begin with the countdown in no particular order.
  1. Mozilla firefox.

    firefox browser If you consider yourself a power user or you value your privacy then firefox is the browser for you. It is open source and is packed with great features like reporting when your email has been used for a known data breach, it stops annoying pop-up notifications, stops browser fingerprinting, and many more. Firefox is also a cross-platform browser making it a great choice if you want to transfer and use your data across multiple devices with one account. The downside of firefox however is its speed, this browser is the slowest on this list, I guess features and advantages took their tool in the speed department, but if that is not a concern for you and you feel like the positives outweigh some slower speed, grab it here.
  2. Google Chrome

    chrome browser Chrome browser has been a game-changer when it was released and even today some of its features are still great and needed. It is packed with some great features like tab freezing, for example, it is cross-platform meaning that also as firefox you can change data between browsers on different devices. it is a very expandable browser with tons of extensions and its speed performance is very very good. The downside of Chrome are two things sadly, one of them is its hunger for RAM, the browser takes a big chunk of RAM once it is active and on some older computer with limited RAM it performs slowly, another is telemetry which its sending, in other words, other browsers don’t come with the lingering fear that Google’s just a little bit too involved in all of our lives. But if downsides do not trouble you and you have a decent amount of RAM in your system chrome might be the best solution for you, grab it here and check it out.
  3. Microsoft Edge

    edge browser Or should I say Microsoft edge 2.0 since this new Edge is completely recoded and rethought, a completely new browser based on chromium. The first version of the edge was an inhouse attempt from Microsoft and it was a disaster, I guess the lesson was learned, and this new edge we have today is a great Browser, it is lightning fast and packed with some great features with one among them standing out I just love, that is the ability to save web pages as applications and truth to be told you have to try this in order to see al great advantages it offers. A very interesting feature is that edge itself wins the speed race from all of the 5 contestants here which is a great surprise. Of course, the downside of annoying Microsoft pushing it to be your default is, well it's Microsoft, as chrome is tied to Google so is edge tied to Microsoft, and the same dreaded feeling that big MS is watching you. If however, you do not concern yourself with these kinds of things, since it is already part of Windows 10, give it a spin and try it, I am sure you will at least love its blazing speed.
  4. Vivaldi

    vivaldi browser A new kid on the block, relatively unknown Browser Vivaldi offers some great customizable features no other one on this list offers, a very unique and down to each detail customization option, you can literally tweak each and every aspect of this browser making it best customizable and personal browser ever. How it is also based o chromium, every chrome extension works in it naturally. It is very good in speed and constantly updated and developed. The downside, well if you are anything like me, you could spend ages trying to customize it, ages, it has tons of features, and making it really feel and tick as you want can consume a really lot of time. If this thing does not bother you at all, grab Vivaldi here.
  5. Opera

    opera browser Last but not least, we have another relic of the old browser age, the Opera browser. Packed with great security and great in-house features like a built-in VPN, built-in ad blocker, built-in crypto wallet, etc this browser seems like a swiss army knife. Opera is full of features and it shows once you start using it. The downside of opera is that its look and feel are specifically tailored to a certain type of user and not everyone will find that appealing or attractive, add some great but hidden and hard to come by features and it may go unnoticed. However, I think you should really give it a go since it definitely deserves more attention than it gets. Grab it here and check it out.
That's it, 5 great browsers to look up, I hope that you have enjoyed the read and I hope to see you again here for more articles. If you would like to read more helpful articles and tips about various software and hardware visit errortools.com daily.
Read More
1 2 3 162
Logo
Copyright © 2022, ErrorTools. All Rights Reserved
Trademarks: Microsoft Windows logos are registered trademarks of Microsoft. Disclaimer: ErrorTools.com is not affiliated with Microsoft, nor claim direct affiliation.
The information on this page is provided for information purposes only.
DMCA.com Protection Status