Hello and welcome to another great tutorial from errortools.com. Today we will be making Windows START menu full screen.
First introduced in Windows 8.1, the start menu has been shifted from full screen to gadget like in Windows 10 but if you prefer to have it over the entire screen with all of its glory and large icons you can do so and we will be happy to show you how.
Press ⊞ WINDOWS and choose settings.
![]() From the settings screen, choose Personalization.
From the settings screen, choose Personalization.
 Under personalization options click on START.
 And then on the right part click on the button under Use Start full screen to turn it ON
 That's it, your start menu is now full screen.

GoodShopLanding is a browser extension for Google Chrome, Mozilla Firefox, and Safari. This extension offers the latest coupons from a range of variety stores. While this may seem useful, this extension only offers coupons from sponsored stores, not all coupons available, so the only coupons that you will get are from the Extensions Ad network. You may see additional new tabs opening randomly while browsing the internet, these tabs are opened by GoodShopLanding and usually contain last-minute store deals.
As it is often distributed via potentially unwanted advertising, and impacts browser performance in a way that many users do not want, it is classified as a Browser Hijacker and thus flagged for optional removal. From the Author:Shop online? Here’s your free automatic coupon finder, Gumdrop. Never miss a coupon again Gumdrop automatically applies the best coupons for you at checkout. Get the best deals anywhere With over 500,000 coupons, Gumdrop finds deals for thousands of stores, including Amazon, Expedia, and Papa John’s.
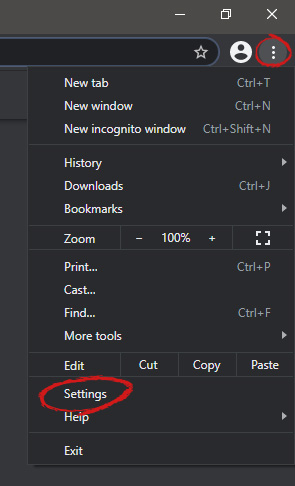 When you are in settings, on the left side move toward the bottom until you run into a tab that says On Startup and click on it. On right, a new section will open, click on Open a specific page or set of pages.
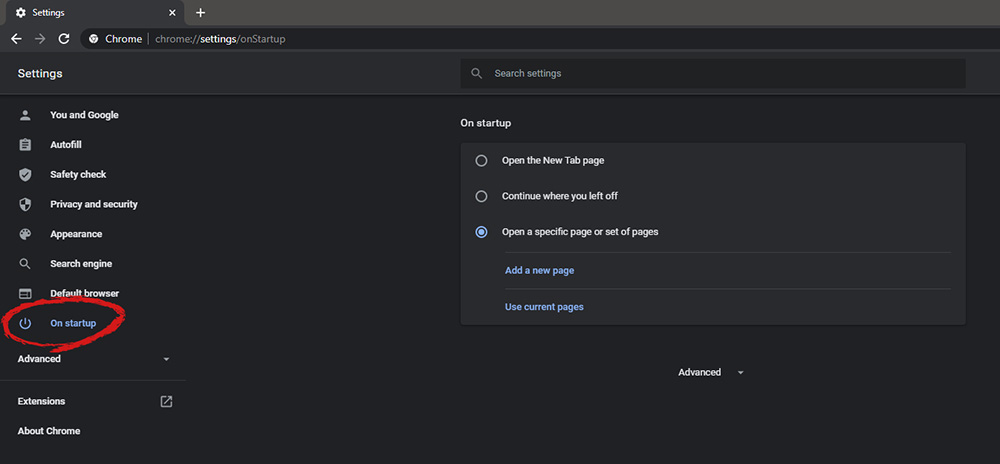 You will be presented with the option to add a new page by typing its URL or getting it from bookmarks or using a specific opened one. You can repeat this process until you have added all pages that you wish to be automatically opened once Chrome is opened for the first time.
 The World of Superhero movies has gone through some interesting variations, from good ones to bad ones, from big-budget ones to small ventures, even from large well-known characters to niche ones.
No matter what you think of some of them no one would disagree that since the release of Iron Man and starting Marvel cinematic universe superheroes movies exploded in popularity.
Following the Superhero craze, let’s see what is coming up in comic books transferred to big screens with their release dates.
The World of Superhero movies has gone through some interesting variations, from good ones to bad ones, from big-budget ones to small ventures, even from large well-known characters to niche ones.
No matter what you think of some of them no one would disagree that since the release of Iron Man and starting Marvel cinematic universe superheroes movies exploded in popularity.
Following the Superhero craze, let’s see what is coming up in comic books transferred to big screens with their release dates.
Error Code 0x80072ee7 is an error code that is most commonly associated with Windows 10 and the use of the Windows Store. Several things can cause this error, which has been present as an error message in Windows 10 and all the way back through Windows 8.
Common symptoms include:
Fortunately, there are several simple methods that can be used to attempt to resolve Error Code 0x80072ee7 on your Windows machine. These methods don’t require advanced computer knowledge or familiarity with high-level tools, so the average user should be able to complete them without help. However, if you feel like you need assistance in resolving Error Code 0x80072ee7, always contact a qualified Windows repair technician who can assist you.
 Error Causes
There are four basic things that can cause Error Code 0x80072ee7 to appear on a Windows device. The first is that the connection to the Internet is limited in some manner, either due to a system or equipment error. Secondly, some parts of the update components could be missing. Next, an error within the DNS can be a cause. Finally, having any kind of compatibility errors on the machine (for example, between the antivirus software that you run and the Windows Update tool) can lead to the appearance of Error Code 0x80072ee7.
There are a few different methods that you can try in order to resolve the appearance of Error Code 0x80072ee7 on your Windows machine. These are fairly simple to complete, but if you do not feel confident in your ability to carry them out successfully, you may want to get in touch with a qualified computer repair technician to help you.
Here are the best methods to employ as you seek to resolve Error Code 0x80072ee7 on your Windows device:
Make sure that you are able to connect to the Internet by visiting several common sites like Google in order to ensure that your issue is not related to your Internet service provider or the equipment that you are using to access the Internet.
If you believe that your DNS connection may be the problem, you can change the specific DNS that you are using to one that is provided by Google. This can resolve any conflicts that may occur because of the IP address detected on your device. In order to do this, simply follow these steps:
Once these steps are complete, you can reattempt to connect to the Windows Store. You may need to restart your computer before connecting.
Microsoft has created a great tool that can automatically scan your computer for a number of common errors and attempt to fix them as they are encountered. This can be downloaded directly from the Windows site and can be used to try to fix not only Error Code 0x80072ee7 but also many other error messages that may pop up on your computer.
After you have run the Fix It tool, it is always a good idea to restart your computer to allow any changes that have been made to fully take effect.
If you wish to always have at your disposal a utility tool to fix these Windows 10 and other related issues when they do arise, download and install a powerful automated tool.
cd "folder location address"Step 5: After that, enter the following script to disable the security questions:
Update-AllUsersQAOnce you’ve completed the steps above, the Security Questions should be disabled and you will be notified with a message stating that the feature has been disabled. On the other hand, if you have a change of heart and you want to enable the Security Questions back, here are some steps you need to take: Step 1: First, open the PowerShell window as admin. Step 2: Next, run the same script with one more parameter such as:
Update-AllUsersQA -answer SecretAnswerStep 3: And that’s about it. Do not forget to replace the Secret Answer with your preferred one and once you’re done, it will be set as the answer for all the Security Questions. Step 4: Now all that’s left to do is go to the Settings app to change the answer to the questions and you should be good to go.
Some Windows 7 and Windows 8.1 users reported experiencing a Compare Exchange128 error when trying to upgrade to Windows 10. The error reads, “You can’t install Windows 10 because your processor doesn’t support CompareExchange128”. In order to upgrade to Windows 10 (64-bit), the CMPXCHG16B instruction must be present. If you receive this error, this mostly means that your CPU doesn’t have the CMPXCHG16B instruction.
Error CausesThe CompareExchange128 error normally occurs due to two possible reasons:
One main requirement to upgrade to Windows 10 is for your CPU to have the CMPXCHG16b instruction. You also need the right BIOS version to guarantee a smooth installation. See below on how to manually fix this issue.
NOTE: If you don’t feel confident using the manual methods listed below, it’s highly advisable to get help from an expert technician. If you don’t know someone, you can also use an automated tool to fix this.
Before performing any fixes, try to determine first if the cause of the error is due to your CPU lacking the CMPXCHG16b instruction. You can use a CPU Info tool that provides complete details about your processor, memory, and motherboard. If you’re looking for more in-depth information, you might also try command-line utilities. But, the safest and easiest way to check this is by simply searching online. Try using the search query: <CPU Model> CMPXCHG16b
This method will download the latest BIOS from your motherboard’s manufacturer. This makes sure your CPU has the CMPXCHG16b instruction needed to complete the Windows 10 64-bit installation. To update your computer’s BIOS, complete the following steps:
If updating the BIOS doesn’t work, what you can do is install a 32-bit version of Windows 10 instead of the 64-bit version. Here’s how to do this:
If the above two methods don’t work, there’s a great chance that this error occurs because of an outdated processor/motherboard. Your next possible solution is to buy an updated model that’s fully compatible with 64-bit Windows 10.
If all else fails, you might want to consider using this powerful automated tool to quickly fix the problem and any other computer-related issues.

