How to Set up and Use a Ram Drive in Windows

RAM drive is basically a hard drive made of your RAM memory. Altho this kind of drive can not and is not available to save any data when the computer is shut down its advantage is lightning fast speed since the application is installed in RAM itself, it is loading from there and executing from there.

Creating this kind of drive which will use your RAM memory, well part of it can not be done natively in Windows, you will need some kind of application for this task. Luckily there is a free open source application for this kind of task.

ImDisk, you can download the application here.

ImDisk Toolkit is an application for managing virtual drives. It also includes a utility that allows the creation of RAM drives.

Download the application and install it, make sure that you select all components on the installation selection screen. After installation is finished double click on icon labeled RamDisk Configuration.

Once the application is running adjust the disk size in the box at the top of the window for your RAM drive. Click “OK” at the bottom of the window. This will create your RAM drive, which is just a virtual disk that’s assigned to your computer’s RAM. The process happens transparently, so there’s nothing you need to do. If you get a warning about shutdown settings, click on the “Shutdown Settings” button. Then unlock the settings pane with your administrator password. Finally, uncheck the checkbox next to “Turn on fast startup (recommended)” and click “Save Changes” at the bottom of the window. Your RAM drive is now ready for use.

Fast Startup speeds up the process of turning on your computer by saving a system state between completely off and hibernation to your hard drive. This happens when the computer writes the contents of your RAM to a stable hard drive. As you may guess, this could mess with your RAM drive’s ability to preserve and track its data. With Fast Startup off, boots may take slightly longer, but it’s doubtful that you’ll notice much.

Disabling a fast startup will satisfy the warning window, but let’s consider why. This will also allow ImDisk to save your RAM drive’s data to an image file when you shut down your computer. If you don’t, the contents of your RAM drive will be erased completely every time, with no saved image storage.

It would also disable the RAM drive’s ability to load the previous content. Basically, the drive would act much more like RAM and much less like a disk. Depending on your use case, that may be disappointing or unusable.

You can access and use it just like any normal hard drive. It shows up in Windows’s file explorer just like any other drive. However, a Ram drive is exponentially faster than traditional types of storage. And we mean exponentially. Whereas an SSD might offer 300 to 500 MB when reading from the disk, a RAM drive can offer more than 5000 MB, even on mediocre memory sticks.

If you like to learn and find out more about various Windows errors, and how to repair them go to our vast archive or use search to find articles that will explain and help you in solving your issue.
However, if you prefer to do things fast and with automatization then we are proposing to use an automated solution for your issues. The application that we are recommending is Advanced System Repair Pro
Advanced System Repair utilizes multiple tools all in one to give you a quick, simple, reliable, and very thorough diagnosis of your PC. It brings you all the tools you need in one program to clean, fix, protect, optimize and boost your PC!
1-Click Maintenance
All the tools to make it simple and easy! It's like having a professional technician at the click of a mouse.

Junk Cleaner
Keeping your computer free from unnecessary clutter also helps make your computer last longer. Like any other machine, if you keep it clean and take care of it, it will serve you better for longer!

Optimize background apps
Optimize applications background activity with the built-in Application Optimizer feature.

Disk Defrag
With a simple 1-click, Advanced System Repair speeds up your PC by assembling fragmented files on your machine and organizing them more efficiently.

Malware Removal
Finds and removes all types of harmful malware including trojans, worms, bots, adware, spyware, PUPs, and more!

Privacy Cleaner
The all-in-one privacy suite to Clean Your Tracks & Protect Your Privacy! Make your computer safe, secure, and more efficient!

System Tweak/Optimizer
ASR will analyze your complete system and settings to adjust your PC to function at its maximum performance.

Registry Cleaner
Over time, as you install and uninstall applications, the registry can become cluttered with old entries and broken settings which can result in program crashes, and annoying messages and slow the computer down.
Visit our Advanced System Repair Pro Download page to inform yourself about all the benefits of this software and get a free trial copy of it.
advanced system repair pro

Advanced System Repair Pro

One-click automated PC repair solution
ASR logo
With Advanced System Repair Pro you can easily
Replace damaged files
Restore performance
Free disk space
Remove Malware
Protects WEB browser
Remove Viruses
Stop PC freezing
DOWNLOAD
Privacy Policy | Terms of Use | Uinstall
Advanced System Repair Pro is compatible with all versions of Microsoft Windows including Windows 11

Share this article:

You might also like

Dangerous GriftHorse Trojan found on Android
There has been recently discovered in the field of malware targeting Android devices. Affecting more than 10 million users of Android phones, the malware GriftHorse is doing its attacks via phishing and premium services scams. A lot of applications have been discovered that are hosts for this malware and many of them are inside the Google store and available for download. GriftHorse
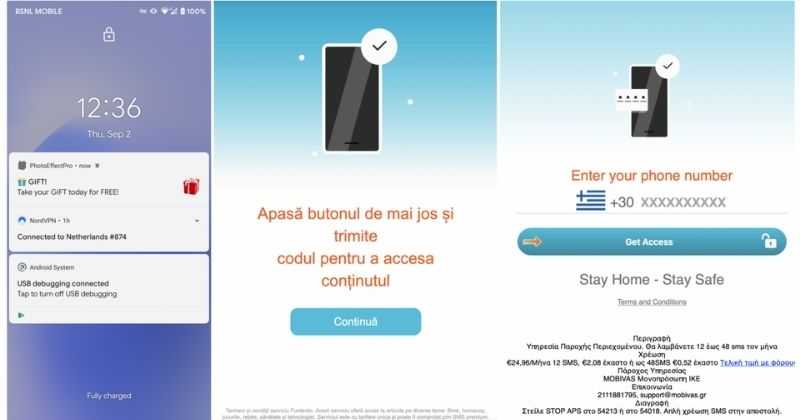
According to Zimperium zLabs, this malware that was recently detected has been doing its scams and attacks even in November of 2020 and has thus far accumulated hundreds of thousands of dollars in its scam. On the surface it looks very harmless, asking for typical permissions like internet access, calls, and other related needed functions, and then it waits. After few months the real attack happens when users get charged with premium service they never subscribed to in the first place.

List of Infected Applications that Carry GriftHorse Trojan

Zimperium zLabs listed out some of the apps with this malware. Users are advised to avoid installing them.
  •     Amazing Video Editor
  •     Bag X-Ray 100% Scanner
  •     Bus – Metrolis 2021
  •     Call Recoder Pro
  •     Call Blocker-Spam Call Blocker
  •     Cinema Hall: Free HD Movies
  •     Coupons & Gifts: InstaShop
  •     GPS Phone Tracker – Family Locator
  •     Fingerprint Changer
  •     Fitness Point
  •     Free Calls WorldWide
  •     Geospot: GPS Location Tracker
  •     GPS Phone Tracker – Family Locator
  •     Handy Translator Pro
  •     Horoscope : Fortune
  •     iCare – Find Location
  •     iConnected Tracker
  •     Instant Speech Translation
  •     Lifeel – scan and test
  •     My Chat Translator
  •     My Locator Plus
  •     Plant Camera Identifier
  •     Racers Car Driver
  •     Safe Lock
  •     Screen Mirroring TV Cast
  •     Slime Simulator
  •     Smart Spot Locator
These are only some of the many infected apps available on the internet. Zimperium zLabs also warned that GriftHorse Trojan exists in over 70 countries worldwide. The infected app quickly changes the language and displays content depending on the user’s IP address.
Read More
How to turn the game mode off in Windows 11
Among other things and innovations, Windows 11 brings to the table is the game mode. The game mode is a system designed to release some resources and optimize your system when Windows 11 detects that you are playing games. It also turns off automatic updates while the game is active. game mode in Windows 11
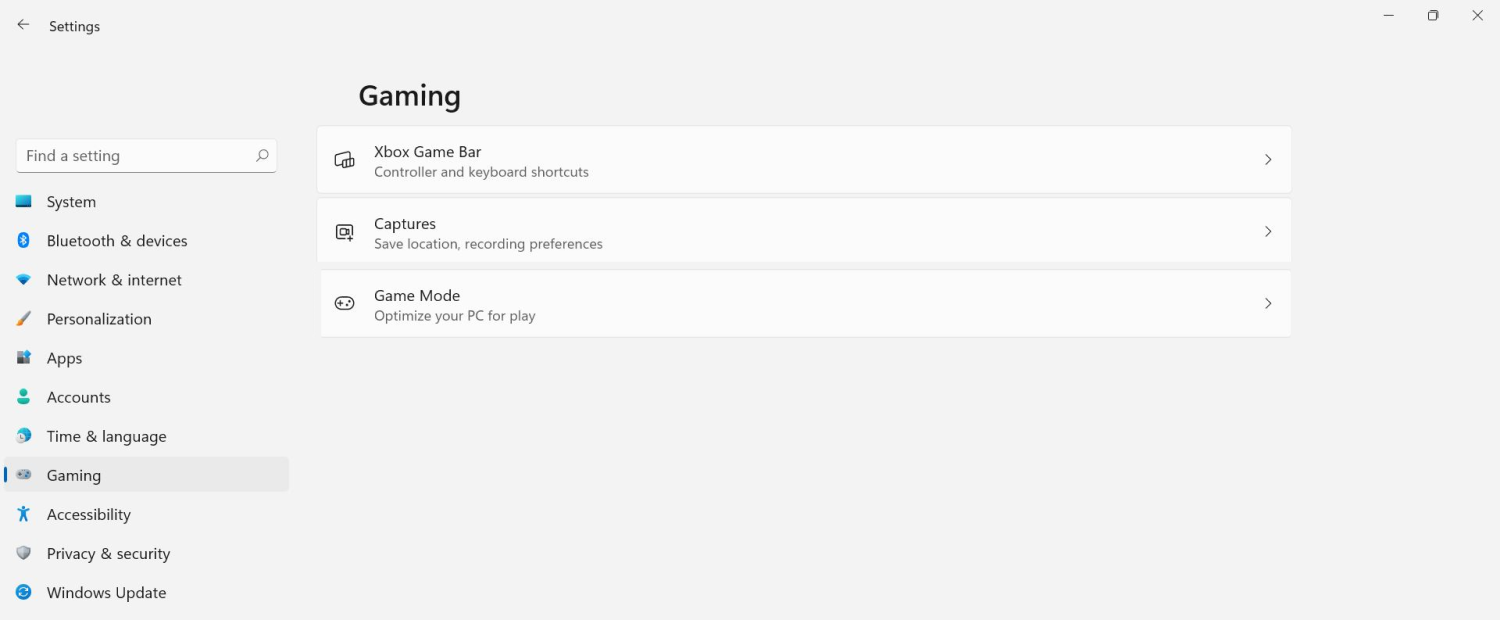
The game mode is active at all times and usually, everything works great but in some instances, it can sadly cause some performance issues. If you are one of these unlucky people where game mode is not working as supposed to do, don’t panic, we have a quick guide for you on how to turn it off.
  1. Press ⊞ WINDOWS + I to open settings
  2. Inside click on Gaming
  3. Select Game mode
  4. Click switch beside Game mode to turn it off
  5. Close settings
Everything will be automatically saved and applied and you should not have any issues from now on. If for any reason you wish to turn game mode back ON, just follow the same steps and turn the switch to ON.
Read More
How to Repair Bad_Pool_Header Error

Fix Bad_Pool_Header Error

Bad_Pool_Header Error - What is it?

Bad_Pool_Header is one of the types of BSOD (Blue Screen of Death) error codes. This error triggers a problem with Windows memory allocation. When this error message occurs, the screen turns blue and locks the user out of the application running on the system. The computer shuts down or restarts.

Solution

Restoro box imageError Causes

There is no one particular cause for the occurrence of the Bad_Pool_Header error code. It may appear on your system due to multiple reasons such as:
  • Device driver issues
  • Cluttered disk
  • Disk writing issues
  • Faulty memory hardware
Driver issues and disk writing issues occur when your try to update new driver versions. During this process, users often forget to remove the files of the uninstalled version from the registry. And due to the presence of the uninstalled driver files in the registry updating and disk writing becomes an uphill task which leads to the Bad_Pool_Header display on the computer screen. The main database of your system is the registry so you need to keep it clean to avoid disk cluttering. The hard disk clutters because the registry saves all the activities that you perform in your system. It saves junk files, internet history, invalid entries, and other unnecessary files. This occupies a lot of your disk space thus resulting in disk cluttering and faulty memory hardware issues triggering the Bad_Pool_Header. Ignoring the Bad_Pool_Header error is not wise. It is advisable to repair the Bad_Pool_Header right away as it can lead to serious threats like system failure and data loss.

Further Information and Manual Repair

The easiest, time and money-saving way to resolve the Bad_Pool_Header error on your system is to install Restoro. This is a high and multi-functional repair tool that features a powerful inbuilt registry cleaner, anti-virus, and a system optimizer. This tool is the one-stop solution for all your PC-related errors including the Bad_Pool_Header blue screen of death error. Whether it’s a driver issue, faulty memory, or cluttered disk, all the causes triggering the Bad_Pool_Header error code fall under the registry which is why it is recommended to install Restoro. Its innovative and powerful registry cleaner scans detect and repair all the errors related to the registry in one go including the Bad_Pool_Header errors. With this helper, you can easily remove all the unnecessary files cluttering your hard disk and damaging your registry. It wipes out the clutter in seconds and frees up disk space.

Why Should You Clean The Registry?

Sometimes the registry also gets cluttered by malicious software like viruses, spyware, and malware. These may also take up your disk space and prevent you to perform disk writing successfully and also corrupt the registry. The privacy error finding utility embedded in Restoro helps you scan for such malicious software on your system and removes them immediately. It lends the software anti-virus properties. When it comes to using repair tools, many users who are not technically sound often worried. They think it may be difficult to operate. If you think the same way, let us tell you that Restoro is very easy to use. It is integrated with a high-functional yet user-friendly interface complemented by simple navigation.

Restoro Special Features

This makes it simple for all levels of users to operate it regardless of whether they are technically adept or not. Restoro is compatible with all Windows versions. You can download it with ease and run it for scans on any Windows version you have installed on your system. To get started, all you have to do is:
  • Click here to install Restoro.
  • Once the installation is complete now run it to scan for errors like the Bad_Pool_Header
  • After that simply click on the ‘repair’ button to resolve
Read More
Restore, Minimize and Close are not working
Recently, a number of users reported not being able to use the Restore, Minimize and Close buttons on their Windows 10 computers. This kind of issue can be quite annoying as you won’t be able to use your computer properly, especially when you navigate between programs and windows. In such cases, the buttons on the right side of the title bar won’t respond to any inputs which could be caused by a number of factors such as different input modes, corrupted system files, and many more. If you are one of the users who are currently facing this problem, worry not for this post will guide you on what you can do to resolve it. There are several potential fixes you can check out to fix the issue. You can try to check if Tablet Mode is enabled and if it is, you have to disable it. You could also boot your computer in a Clean Boot State to check if a third-party program is the one that’s causing the problem. In addition, you could also reinstall the program where you experience the problem or run built-in utilities like System File Checker and DISM tool.

Option 1 – Make sure that you are not in Tablet Mode

Since Windows 10 is designed to work on both desktop and mobile devices, it could be that your computer has slipped into Tablet Mode which explains why you’re not seeing the Taskbar. To check if your computer is really in Tablet Mode, follow these steps:
  • Go to the Start menu and select Settings.
  • Next, select the System setting and from the left pane select the Tablet Mode.
  • From there, make sure that the buttons next to the options given below are set to the off position:
    • Hide app icons on the taskbar in tablet mode
    • Automatically hide the taskbar in tablet mode

Option 2 – Put your computer in a Clean Boot State

As pointed out, it is possible that some third-party program or service is the one that’s behind the problem. To isolate this possibility and to identify the culprit, you have to put your computer into a Clean Boot State. To do so, follow the steps below.
  • Log onto your PC as an administrator.
  • Type in MSConfig in the Start Search to open the System Configuration utility.
  • From there, go to the General tab and click “Selective startup”.
  • Clear the “Load Startup items” check box and make sure that the “Load System Services” and “Use Original boot configuration” options are checked.
  • Next, click the Services tab and select the “Hide All Microsoft Services” check box.
  • Click Disable all.
  • Click on Apply/OK and restart your PC. (This will put your PC into a Clean Boot State. And configure Windows to use the usual startup, just simply undo the changes.)
  • Once your computer is in a Clean Boot State, try to open the program where the problem occurred.

Option 3 – Try reinstalling the program

If the first two options didn’t work, then you might want to consider uninstalling the program and then install it back with its latest version. This should resolve the problem.

Option 4 – Try to run System File Checker

System File Checker or SFC is a built-in command utility that helps in restoring corrupted files as well as missing files. It replaces bad and corrupted system files to good system files that might be the cause why the Restore, Minimize and Close buttons don’t work. To run the SFC command, follow the steps given below.
  • Type “cmd” in the Start search and then right-click on the appropriate search result.
  • Next, select “Run as administrator” to open Command Prompt with admin privileges.
  • After opening Command Prompt, type in sfc /scannow
The command will start a system scan which will take a few whiles before it finishes. Once it’s done, you could get the following results:
  1. Windows Resource Protection did not find any integrity violations.
  2. Windows Resource Protection found corrupt files and successfully repaired them.
  3. Windows Resource Protection found corrupt files but was unable to fix some of them.
  • Now restart your computer and see if the problem is fixed or not.

Option 5 – Run the DISM tool

You can try running the Deployment Imaging and Servicing Management or DISM tool to fix the problem. Using this built-in tool, you have various options such as the “/ScanHealth”, “/CheckHealth”, and “/RestoreHealth”.
  • Open the Command Prompt with admin privileges.
  • Then type in the following commands and make sure to hit Enter right after you type each one of them:
    • Dism /Online /Cleanup-Image /CheckHealth
    • Dism /Online /Cleanup-Image /ScanHealth
    • exe /Online /Cleanup-image /Restorehealth
  • Do not close the window if the process takes a while as it will probably take a few minutes to finish. Once it’s done, restart your computer.
Read More
Install Remote Server Administration Tools
RSAT or Remote Server Administration Tools for Windows 10 is a collection of programs for IT experts. It helps in managing Servers from a Windows 10 PC and starting with the Windows 10 v1809 or the October 2018 update, users have to install the Remote Server Administration Tools for Windows 10 as Features on Demand or as Optional Features. The program includes the Microsoft Management Console or MMC snap-ins, Server Manager, consoles, Windows PowerShell cmdlets, and providers as well as command-line tools for managing roles and features that run on the Windows Server. So if you have updated your Windows 10 pc to v1809 or later then the RSAT tool has to be installed as a set of Features on Demand right from Windows 10. You can install RSAT Tools on Windows 10 Enterprise or Windows 10 Professional and once you install it, make sure that you do not install RSAT tools from the Microsoft Download page directly. Step 1: Open Settings and then go to Apps > Apps & Features. Step 2: Next, click on Manage Optional Features. Step 3: After that, click on Add a Feature which will load all the optional features one can install. Step 4: Now scroll to find the listing of all 18 RSAT tools and depending on what you need, click and install them. Step 5: Then go back to where you should see the progress of the installation. Click on the Manage Optional Features page to check the status. Note: If you are well-versed with the command line or automation, you can also install Remote Server Administration Tools for Windows 10 via DISM /add-capability. And when you install anything via Features on Demand, they stay across Windows 10 version upgrades. On the other hand, if you feel that you don’t need a particular RSAT feature, you have the option to uninstall it using the Manage Option Features. However, bear in mind that some tools depend on one another which means that if you uninstall anything that has a dependency, it will only fail that’s why you need to be careful.

To uninstall an RSAT feature, here’s what you have to do:

Step 1: Go to Settings > Apps > Manage Optional Features. Step 2: After that, look for the list of installed feature that appears before this. Step 3: Now select the feature you want to uninstall and go back. If you have some system-related issues that need to get fixed, there is a one-click solution known as [product-name] you could check out to resolve them. This program is a useful and efficient tool that could repair corrupted registries and optimize your PC’s overall performance. Aside from that, it also cleans out your computer for any junk or corrupted files that help you eliminate any unwanted files from your system. This is basically a solution that’s within your grasp with just a click. It’s easy to use as it is user-friendly. For the complete set of instructions in downloading and using it, refer to the steps below.
Read More
Fix Windows Update Error 0x800F081F – 0x20003
If you are trying to upgrade your computer but encounter the Windows Update Error 0x800F081F – 0x20003 instead, then read on as this post will guide you in fixing this Windows Update error. This kind of error is commonly encountered when upgrading your copy of Windows 10 and is caused by errors with various developer-related settings that are being enabled in the system. When you encounter Windows Update Error 0x800F081F – 0x20003, you will see either of these error messages:
“We couldn’t install Windows 10. The installation failed in the SAFE_OS phase with an error during INSTALL_UPDATES operation: Error 0x800F081F”  “The installation failed in the Safe_OS phase with an error during apply_image operation: Error: 0x800f081f – 0x20003”
To fix this kind of Windows Update error, you need not use external programs but you can try to disable the Developer Mode, run the Windows Update troubleshooter or restart all the Windows Update-related services and components. For more details, refer to the options provided below.

Option 1 – Try to disable Developer Mode

You might have to disable Developer Mode to fix the Windows Update Error 0x800F081F – 0x20003. How? Refer to these steps:
  • Tap the Win + I keys on your keyboard to open the Settings app.
  • Next, go to Update & Security > For Developers.
  • From there, select the toggle for Sideload apps or Microsoft Store apps located on the right-side panel.
  • If you get any prompt, just click on Yes.
  • After that, navigate to Apps > Apps & features and then click on Optional features on the right-side panel.
  • Then scroll down to locate the Windows Developer Mode entry and select it and click on Uninstall.
  • Once you’re done uninstalling the Windows Developer Mode component, close the Settings app and restart your computer to apply the changes made.

Option 2 – Try to run the Windows Update Troubleshooter

You should also try to run the built-in Windows Update troubleshooter as it could help you resolve the Windows Update Error 0x800F081F – 0x20003. To run it, go to Settings and then select Troubleshoot from the options. From there, click on Windows Update and then click the “Run the troubleshooter” button. After that, follow the next on-screen instructions and you should be good to go.

Option 3 – Try restarting various Windows Update-related services and components

  • Tap the Win + X key combination and select Command Prompt (Admin) to open Command Prompt with admin privileges.
  • After opening Command Prompt, copy and paste each one of the commands listed below one by one and tap Enter right after you enter each command.
    • net stop wuauserv
    • net stop bits
    • net stop appidsvc
    • ren %systemroot%SoftwareDistribution SoftwareDistribution.bak
    • ren %systemroot%system32catroot2 catroot2.bak
  • Once you’ve entered all the commands given above, they will stop all the Windows Update services that are running on your computer as well as clear the SoftwareDistribution folder, and reset the Catroot2 folder. Now you have to start all these Windows Update services you’ve just stopped by executing the following commands:
    • net start wuauserv
    • net start bits
    • net start appidsvc
    • net start cryptsvc
  • After that, restart your computer and try to run the setup again, and see if the error is now fixed.
Read More
Installing Windows 11 on Raspberry Pi 4
A lot of controversies and mixed emotions have come from statements about Windows 11 minimum system requirements, especially ones linked to TPM. Naturally, each time some software company giant announces how things are must have there are people who go out and prove them wrong. This time Raspberry Pi community was one which demonstrated that not only Raspberry Pi does not have a TPM module, it can run the full desktop version of Windows 11

Windows 11 on Raspberry Pi 4
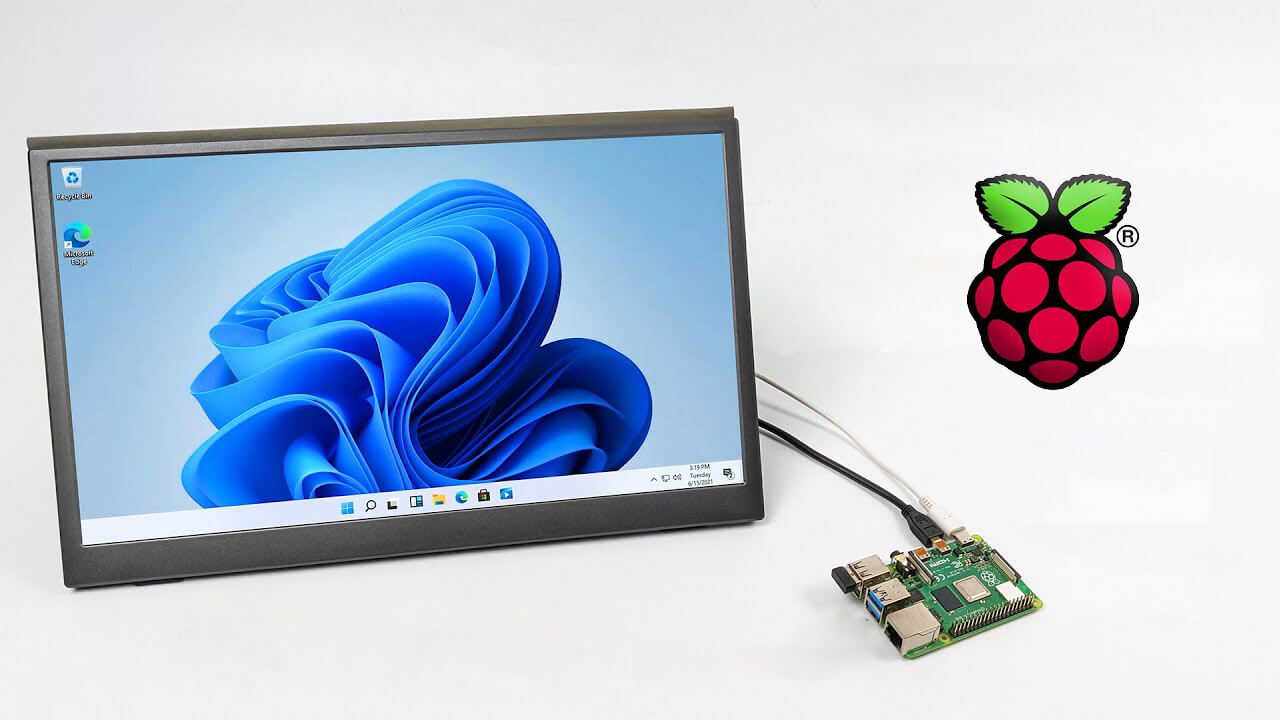
Raspberry Pi 4 and things you need for Windows 11 installation

In order to actually install Windows 11 on your Pi, there are certain things that you will need. Check out the below list and prepare everything.
  • Raspberry Pi 4 4GB or 8GB
  • A 32GB or larger SSD via a USB 3 caddy. Best for performance or 16GB or larger microSD card
  • USB boot enabled, see below.
  • A micro SD card with the latest Raspberry Pi OS
  • Windows 10 PC
  • USB to Ethernet or WiFi dongle
  • Bluetooth dongle (if you want Bluetooth)
  • Keyboard, mouse, HDMI, and power for your Raspberry Pi

Configuring Pi to boot from SSD

In order to boot from SSD be sure that firmware and bootloader are up to date on the latest version and upgrade if needed. Be aware that this firmware update can only be performed using the official Raspberry Pi OS. Also if you are eager and want to use a standard microSSD card instead of an SSD to run Windows 11 feel free to skip this entire section.
  1. Boot from microSSD with the latest Raspberry Pi OS on it.
  2. Update firmware and OS using the terminal by typing sudo apt update sudo apt full-upgrade sudo rpi-update
  3. Reboot your Pi
  4. Install the latest version of bootloader again using the terminal with the command sudo rpi-eeprom-update -d – a
  5. Reboot Pi
  6. Launch raspi-config on your Pi via terminal with sudo raspi-config
  7. Select option 3 (Boot options – Configure options for start-up) from boot options
  8. Select Boot ROM version and press ENTER
  9. Select latest and then OK
  10. Select NO when prompted to reset boot ROM to defaults on the latest version boot ROM selected screen. Press OK
  11. Select Boot order and press ENTER
  12. Select USB Boot and click on OK and remove microSD card from Pi
  13. Select Finish and click on NO when prompted to reboot

Creating Windows 11 installation image for Pi 4

In order to install Windows 11 on our Pi, we must create an installation image, follow the steps below explaining the process.
  1. Go to https://uupdump.net/
  2. Search for Windows 11 Arm
  3. Select the latest build for arm64
  4. Select Language on which you would like installer and Windows
  5. Pick Windows edition you would like
  6. Set download method to Download and convert to ISO and click on Create download package
  7. Extract downloaded content into win11 folder and go into it
  8. Double click on uup_download_windows.cmd
  9. On the security warning screen click on More info and then on Run anyway
  10. Wait for the process to finish completely
  11. Once the process is finished, press 0 to close the prompt

Installing image on microSSD or SSD

If previous steps of instruction were follower precisely you now have an ISO image that can be installed onto microSSD or SSD
  1. Connect SSD or insert microSSD card into your PC
  2. Go to https://www.worproject.ml/downloads
  3. Download Windows on Raspberry imager and extract it into the win11 folder
  4. Open Imager and allow it to make changes to your computer, set your language, and click on next
  5. Select storage drive where you would like to install Windows
  6. Set device type and click on next
  7. Select our Windows 11 ISO image we created and click on next
  8. On the drivers screen select Use the latest driver package available on the server
  9. On UEFI firmware select screen choose Use the latest firmware available on the server
  10. On configuration screen click on next
  11. Check your setting on the installation overview and if everything is ok click on install
  12. Wait for the whole process to be finished
  13. Once the process is completed, close Windows on Raspberry imager, take out SSD or microSSD card from PC and connect it on your Pi along with Pi peripherals.

Setting Windows 11 on Pi

In order to actually use Windows 11 on our Raspberry Pi we now have to set up the Windows 11 install using the standard post-installation setup sequence.
  1. Power up Pi and press ESC when prompted
  2. Go to Device manager and press ENTER
  3. Select Raspberry Pi Configuration
  4. Select Advanced configuration
  5. Set Limit RAM to 3GB to a disabled state, press F10 to save, and ESC to exit.
  6. Select Display configuration
  7. Set the resolution to desired option and press ENTER, F10 to save, and ESC to exit
  8. Go to CPU configuration
  9. Check if the CPU clock is set to default, if not set it
  10. Press ESC to go back all the way to the main menu
  11. Select Continue to exit BIOS and boot your Raspberry Pi with Windows 11 on it
And there you have it, fully working Windows 11 OS on Raspberry Pi despite what Microsoft says Note that due to lack of some drivers performance can be less than optimal, for example, full HD videos will not work since there are no compatible graphic drivers for Pi and some other stuff like Wi-Fi will also cause some issues but overall Windows 11 is working pretty well.
Read More
How to Fix Sndvol32.exe Error

Troubleshoot Sndvol32.exe Error

What Is Sndvol32.exe Error?

Sndvol32.exe is actually an important part of the Windows operating system. Responsible for managing the sound-card volume and running programs properly, the problem occurs when error messages appear. The user will be unable to listen to music on the system. Usually, Windows XP users encounter the Sndvol32.exe error.

Solution

Restoro box imageError Causes

Sndvol32.exe error can be caused by any one or several of the reasons listed below.
  • Accidental deletion of the DLL file from the system
  • Damage to the DLL file due to spyware or virus infection
  • Improper removal of software
  • Unintentional overwriting on the DLL file by a mismatched version
  • Obsolete hardware drivers
  • Several obsolete/invalid registry entries
  • Corrupt registry entries
Regardless of what triggers the Sndvol32.exe error, it is of utmost importance to take immediate measures to fix the problem and to keep it from occurring again.

Further Information and Manual Repair

If you are looking for ways to fix this error manually, the Windows functionality of System Restore will come into play in this particular scenario. In case the error is caused by a damaged or corrupt file, performing System Restore is an ideal choice as it will allow you to not only get a fresh copy of the operating system, it will be possible for you to remove the error at the same time as well. The procedure for performing System Restore is outlined below as follows.
  • Click on the Start menu and type ‘System Restore’ in the search box.
  • When the icon for ‘System Restore’ appears, click on it.
  • Now type ‘Restore’ in the search box that appears on the start menu.
  • The window for the System Restore center will now appear.
  • Now you have two options. You can either opt for “Recommend Restore” which is the case where the system itself will choose a restore point for you or you can select “Choose a different restore point”. Users are advised to choose the latter option as it is more customizable.
  • Users can now select from a list of restore points that have been created before. If you observe closely, you will realize that one of the restore points is prior to the occurrence of the Sndvol32.exe error.
  • Click on the restore point. Once you have confirmed your selection, your system will restart and it will roll back to its previously selected restore point.
One recommendation is to perform the system restore in Windows Safe Mode. This is just to ensure that the System Restore is performed smoothly and any potential problems are kept at bay.
Read More
Razer Iskur gaming chair for healthy gaming
Razer Iskur
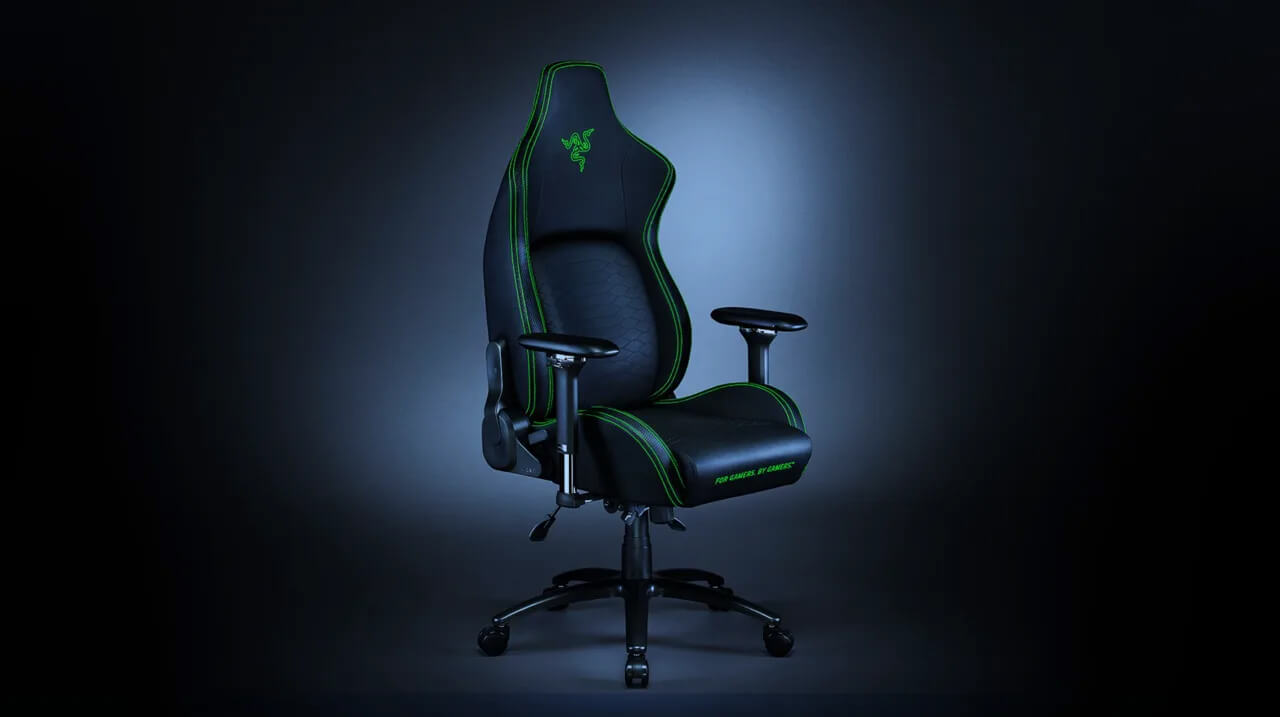
It seems that last few days we were riding some Razer bandwagon but rest assured that we are not sponsored by them in any way, truth is that simply they come up with some interesting accessories which I believe are worth covering. Gaming Chair itself comes in two colors, fully black and green black combination and it is not really an entry-level chair if we are talking about price. The chair itself is around 600USD depending on the distributor and considering that price range it is placed in more top cream of gaming chairs but it is worth every dime.

Iskur Specifications

Iskur is made of a steel frame with a reinforced plywood lumbar support frame for added weight tolerance. Frame and lumbar support are surrounded with memory foam and all of that is wrapped in cotton and polyester layer which is again wrapped in multi-layer synthetic leather making the chair very durable for long hours of daily use. The chair also comes with a memory foam head cushion which is detachable and removable if you do not wish to use it. On the Razer website among specifications, it stands that the chair is best suited for persons from 5’6” – 6’2” (170 – 190cm) height and up to 299lbs (136kg).

Features

The chair has, of course, height adjustment as any gaming chair and surprisingly it has great control for the armrest. The armrest can be adjusted in 4 different ways: up & down, left & right, forward & backward, and inward & outward. The backrest can be also tilted up to 26 degrees angle. All of these features are great and good but there is one more feature that really makes this chair stand out from rest and it is Lumbar support. Iskur has an adjustable lumbar support system on the lower part of the backrest. With your lumbar support secured, you can then make the necessary tweaks to optimize the rest of your posture using the Razer Iskur’s adjustable height, backrest, and armrests.

Conclusion

Razer Iskur is neither cheapest nor perhaps the best gaming chair you can buy, but it is a really good one. It is well manufactured and made to feel and look like a premium product that actually it is.
Read More
Windows 10 exploit using App installer
Scammers have decided to target Windows’s 10 App installer process in order to infect your computer and steal your data. windows 10 mail exploitAs in most usual online scams, everything starts with a strange email containing threats and other poorly written and composed speech. At the end of the given email, there would be a link claiming that you, of course, need to read it and follow instructions about the threat, if you click the link it will open a web page where you will have an innocent-looking PDF file with more information about the threat itself. If you click on a seemingly innocent PDF file it will summon Windows 10's AppInstaller.exe tool, kickstarting a download-and-run process that'll put you in a bad place very quickly. From there, you'll have to deal with the dangers of malware BazarBackdoor, including data and credential theft. This kind of scam is nothing new but the interesting thing here is that it uses App installer and by clicking on a link you are opening and giving permission for a malicious crook to use it. So, stay safe and do not click on any links from unknown emails no matter what.
Read More
1 2 3 162
Logo
Copyright © 2022, ErrorTools. All Rights Reserved
Trademarks: Microsoft Windows logos are registered trademarks of Microsoft. Disclaimer: ErrorTools.com is not affiliated with Microsoft, nor claim direct affiliation.
The information on this page is provided for information purposes only.
DMCA.com Protection Status