Animated background on desktop on Windows 10

Windows Vista had in it animated wallpapers on desktop but sadly how they were heavy on system resources Microsoft abandoned the idea. Moving forward a couple of years later we have Windows 10 but still, we do not have live animated wallpapers. Since I am the kind of person who does not want to wait on Microsoft and now it is time to bring animated wallpapers back I am going to make one all by myself and you are welcome to join the ride and do the same for you as well.

Enough talk, let's dive into how we can make animated wallpaper for our Windows 10.

Choosing the application

First, we will need some form of application which can we look at our animated wallpapers and since they are animations it means video, so we will need a video player and what better choice than a VLC player, an open-source light weighs all-format player.

Get a VLC player from here and install it.

Finding video source

The next thing is to of course have some looping video that we will use as background. There are many sites and ways to get seamless loop videos, I use this youtube channel for my backgrounds. Altho you can use any video footage you want it is recommended that it is not too long, that it is hi-resolution so we do not have pixels on-screen, and if you can, get it as seamless since we do not want to see stutter when the video is lopped from the beginning.

So hopefully you have desired video and VLC player installed.

Putting it all together

Copy the following code and paste it into your search bar in Windows to open the Startup folder, or navigate to the Startup folder yourself via file explorer if you know where it is.
%appdata%\Microsoft\Windows\Start Menu\Programs\Startup
Now, next thing is to copy and past the VLC shortcut into this folder so it is started when Windows is first time booted.

Right-click on the shortcut and in the edit field paste this:
"C:\Program Files\VideoLAN\VLC\vlc.exe" --video-wallpaper --qt-start-minimized --no-qt-fs-controller --repeat --no-video-title-show --qt-notification=0 "C:\videopath\filename.mp4"

where "C:\Program Files\VideoLAN\VLC\vlc.exe" is the path where VLC is installed, point this to where you have installed it

"C:\videopath\filename.mp4" is the path where you have your video that you wish to use as animated wallpaper. Please note also that in my case there is mp4 as an extension but it does not need to be mp4, just use any extension VLC can open and play.

Conclusion

And that's it, you have successfully made an animated background or live wallpaper on your Windows 10 computer. You can change your wallpaper anytime by editing shortcut and giving it a new path to a new video or simply overwrite the existing one with a new baring same name.

If you like to learn and find out more about various Windows errors, and how to repair them go to our vast archive or use search to find articles that will explain and help you in solving your issue.
However, if you prefer to do things fast and with automatization then we are proposing to use an automated solution for your issues. The application that we are recommending is Advanced System Repair Pro
Advanced System Repair utilizes multiple tools all in one to give you a quick, simple, reliable, and very thorough diagnosis of your PC. It brings you all the tools you need in one program to clean, fix, protect, optimize and boost your PC!
1-Click Maintenance
All the tools to make it simple and easy! It's like having a professional technician at the click of a mouse.

Junk Cleaner
Keeping your computer free from unnecessary clutter also helps make your computer last longer. Like any other machine, if you keep it clean and take care of it, it will serve you better for longer!

Optimize background apps
Optimize applications background activity with the built-in Application Optimizer feature.

Disk Defrag
With a simple 1-click, Advanced System Repair speeds up your PC by assembling fragmented files on your machine and organizing them more efficiently.

Malware Removal
Finds and removes all types of harmful malware including trojans, worms, bots, adware, spyware, PUPs, and more!

Privacy Cleaner
The all-in-one privacy suite to Clean Your Tracks & Protect Your Privacy! Make your computer safe, secure, and more efficient!

System Tweak/Optimizer
ASR will analyze your complete system and settings to adjust your PC to function at its maximum performance.

Registry Cleaner
Over time, as you install and uninstall applications, the registry can become cluttered with old entries and broken settings which can result in program crashes, and annoying messages and slow the computer down.
Visit our Advanced System Repair Pro Download page to inform yourself about all the benefits of this software and get a free trial copy of it.
advanced system repair pro

Advanced System Repair Pro

One-click automated PC repair solution
ASR logo
With Advanced System Repair Pro you can easily
Replace damaged files
Restore performance
Free disk space
Remove Malware
Protects WEB browser
Remove Viruses
Stop PC freezing
DOWNLOAD
Privacy Policy | Terms of Use | Uinstall
Advanced System Repair Pro is compatible with all versions of Microsoft Windows including Windows 11

Share this article:

You might also like

Identify resource hogging applications
Resource hogging is a term when one single application or few of them are taking all system resources for themself causing extreme slow down in the computer and nonresponsiveness. It can be a very frustrating and time-consuming experience and it can cost you money if you can not finish work on time due to this effect. I believe that everyone has experienced at least one slowdown in their IT carrier because of resource-hogging applications and most users do not know how to deal with this. We are here to help you with this issue. Just to be aware that this method shown here is not a method to miraculously speed up your PC or anything similar, this is to be able to detect and recover from extreme slowdowns. Hardware components are still very important and if you can upgrade your computer if it is outdated, please do it because new applications will require a more modern system, and not any kind of tips and tricks will save you from outdated hardware.

Identifying resource hogging app

Now when we got that out of the way let's talk about slowdowns, it is no secret that sometimes an application has bugs and memory leaks that can cause this kind of behavior, and sometimes the application simply takes up too much memory for any other application to work normally. The most simple and straightforward way is to bring up a Windows task manager and inspect running applications and services. You can bring task manager by the key combination of CTRL + SHIFT + ESC If the system is in deep memory deficit you will have to wait for the task manager to open and show itself on-screen. Once opened, click on more details if that view is not opened by default. Once the view expands you will see all running applications with how much RAM memory have they taken and how much CPU they are using.

What to do with app?

Now you are presented with a choice on what to do with the problematic application. If you press the end task button on the bottom right, Windows will kill the application and its processes but any unsaved work inside the application will be lost and unrecoverable in most cases. Or you can try to remove smaller applications running to free up more memory and CPU in order for the computer to catch up. Any choice you make is up to you, but be very careful not to kill Windows essential service by mistake, that will cause immediate system instability with high chances of a system crash.
Read More
Fixing “Could not find this item. This is no longer located in [Path]. Verify the item’s location and try again” Error in Windows 10
If you are trying to access a particular file on your Windows 10 computer either to open, rename or delete it, and you suddenly encounter an error stating, “Could not find this item. This is no longer located in [Path]. Verify the item’s location and try again”, read on for this post will help you out in resolving this issue. If you are able to find and view a file on your computer, you should have clear access to it. And since you are seeing an error message when you try to do something about this file, you are not able to do anything with the file. There are times when this error pops up with the files created by third-party services and that the file’s extension is not defined properly. On the other hand, there are also other obscure causes for this error. To fix it, here are some suggestions you can try.

Option 1 – Delete the file using Command Prompt

If you wish to delete the problematic file and weren’t to, you can use Command Prompt.
  • In the Start menu, type in “Command Prompt” to search for it or you could also click the search button right next to the Start menu and then right-click on the related result and select the option “Run as administrator”.
  • Once you’ve opened Command Prompt, copy and paste the command given below and tap Entre after you do so. You also have to make sure that you key in the correct path where the file is located as well as its name.
rd /s \?X:badfolderpath Note: In the command above, “X” is the placeholder letter so you must input the letter that corresponds to the drive’s letter where the file is located.
  • After that, you will see the “Operation completed successfully” message on your screen. If you don’t, check if you’ve really inputted the correct location of the file or its name.

Option 2 – Use a Command Prompt tweak to rename the file

If you don’t want to delete the file and only want to rename it, you can apply some tweaks using the Command Prompt. Make sure to follow the steps carefully.
  • In the Start menu, type in “Command Prompt” to search for it or you could also click the search button right next to the Start menu and then right-click on the related result and select the option “Run as administrator”.
  • After opening Command Prompt, type in “cd” followed by the path where the file is located with this format – “C:\Folder1\Folder2\Folder3”. However, you have to omit the problematic file this time. To put it simply, the last folder in the command must be the folder where the file is located.
  • After inputting the command, tap Enter on your keyboard and then use the set of commands given below. Note that each command is a new line so you need to tap Enter after copying each line.
    • DIR /A /X /P
    • RENAME (the current name of the problematic file) (a non-problematic name)
    • EXIT
Note: Make sure that you only input the current name and the new name separated by a space. You must not write the brackets in the command. If everything goes well, you will now be able to operate the file like you used to before.

Option 3 – Use Command Prompt to delete the file without any extension

This option applies to cases where the affected file does not have any viable extension which means that Windows does not really know what to do with it and it only displays the “Could not find this item. This is no longer located in [Path]. Verify the item’s location and try again” error message. It usually occurs with the files created by browser plugins that are mostly from Mozilla Firefox. To delete these kinds of files, here’s what you have to do:
  • Follow the first two steps from the previous option above so you can navigate to the location of the file accurately just be careful in inputting the folders.
  • Don’t forget to tap Enter right after each command and then use the next command below so you can delete the affected file which has no extension:
del *.*
  • After you’re done, open the File Explorer and then check if the file is now deleted or not.

Option 4 – Try using another workaround without using Command Prompt

This option is a lot like a workaround but it definitely gets the job done for you. It’s ideal for you if you do not want to deal with Command Prompt and only want to do everything in a graphical environment. To get started, follow the steps below.
  • Look for the affected file or folder on your PC using File Explorer. Once you found it, right-click on it and select the “Add to archive” option from the context menu.
  • Once the archiving options window pops up, look for the “Delete files after archiving” option and make sure that you select it then click OK to start archiving the folder or file. After that, you should now notice the file no longer exists.
  • After that, delete the archive file as well.
Read More
Enable or Disable the Reserved Storage
A lot of users complain about low storage space each time a Windows Feature update is released as well as to complain about not being able to download the updates, slow update experience, and many other complaints. The main issue is that many users do not have enough storage space available on their PCs. And now to make sure that none of the updates gets stuck because of low storage space, Microsoft presented the Reserved Storage feature which comes preinstalled with v1903 or those where v1903 was clean installed. This guide will be showing you how you can enable or disable the Reserved Storage in your Windows 10 computer. As you know, the Windows Update process should have enough space so that it can download, extract and apply the update on the computer. Usually, the size of the Reserved Storage is around 7GB which gives enough space for the update, temporary files, system caches, apps, and many more. And according to Microsoft, the size of the Reserved Storage space will vary from time to time and will depend on how you use your computer.

Explanation

The Reserved Storage space feature is enabled by default on devices that come preinstalled with the May 2019 update or after performing a clean installation of the Windows 10 OS. To check if your computer has this feature, you need to go to Settings > System > Storage and from there click on the “Show more categories” link and then click on the “System & reserved” option. However, if you can’t find the Reserved Storage from the list, then it’s probably because your computer has limited space on the hard disk or it is not a fresh or new install. On the other hand, if you have this feature but have no use for it and want to disable it instead, then read on as this post will also show you how it’s done.

Solution

Keep in mind that when you disable the Reserved Storage feature, chances are, you might be unable to enable it back so you need to make sure that it’s really what you want to do before you disable it permanently. So if you really want to disable Reserved Storage, you can do so using the Registry Editor. Before you proceed, you have to create a System Restore point first and then carry out the following steps.
  • Tap the Win + R keys to launch the Run utility and type “Regedit” in the field and then tap Enter to open the Registry Editor.
  • Next, navigate to this registry path: ComputerHKEY_LOCAL_MACHINESOFTWAREMicrosoftWindowsCurrentVersionReserveManager
  • From there, double click on the DWORD named “ShippedWithReserves” and set its value to “1”.
  • Once you’re done, restart your computer and see if the Reserved Storage feature is now gone.
On the other hand, if you want to reduce the Reserved Storage space, there are two ways you can do that. First, you can go to Settings > Apps > Apps & features > Manage optional features and from there, uninstall the optional features that you do not use. The second one is you have to go to Settings > Time & Language > Language and then uninstall the languages and their add-on which you don’t use. Note: The Reserved Storage feature is also used by system processes and apps to create temporary files and once the Reserved Storage space fills up, Windows 10 will delete them automatically. It is undeniable a useful feature so disabling it is not recommended but if you are running on low storage space and don’t have much choice, then you may disable it at your own risk.
Read More
login does not appear/password box not showing
As you know, Windows 10 offers its users tons of options to log in to their computers. This includes simple and easy methods like PIN and complex ones like the Windows Hello Face unlock. However, there are instances when you might face a situation where the login screen in Windows 10 does not appear at all. If you are currently facing this problem, worry not for this post will show you what you can do to fix this problem. There are actually two scenarios to this issue, you might encounter one where the login screen does not show up at all, while the second one is when the login screen shows up but there is no username or password box. There are several options you can check out to resolve the problem. You can try to run System Restore or try the combination of Ctrl + Alt + Delete keys. You could also try to enter a username and password to use the computer or disable Fast Startup or troubleshoot the problem in a Clean Boot State. You could also create a new User Account or run Fresh Start or run the Startup Repair. To get started, follow each one of the given options below.

Option 1 – Try using the Ctrl + Alt + Delete key combination

The first and simple thing you can do to fix the login screen is to tap the Ctrl + Alt + Delete keys and see if it makes the credentials appear or not. If not, proceed to the next given option.

Option 2 – Try running System Restore

If you aren’t able to boot into the desktop of your computer, you can run System Restore in the Advanced Startup Options by following these steps:
  • Boot your computer into the Advanced Startup Options screen.
  • From there, you will see some options to troubleshoot when you can’t log in to Windows in the usual way.
  • Now select Troubleshoot > Advanced Options > Command Prompt.
  • After that, type “rstrui” and hit Enter to execute the command which will start the System Restore process.
  • Once it’s done, restart your computer.

Option 3 – Try to turn off Fast Startup

  • Tap the Win + R keys to open the Run dialog box and type in “control” to open the Control Panel.
  • Next, click on the Hardware and Sound section and click on Power Options.
  • Afterward, select the “Choose what the power buttons do” option from the left side menu pane.
  • Now click on Change settings that are currently unavailable and uncheck the entry that says, “Turn on fast startup (Recommended).
  • Then click on Save Changes and restart your computer and see if it has fixed the problem or not.

Option 4 – Try troubleshooting the problem in a Clean Boot State

There are times when some conflicting programs installed in your computer might be the reason why there is an issue with the password box in the login screen of Windows 10. To identify which program is causing the problem, you need to put your computer in a Clean Boot State. To do so, follow the steps below.
  • Log onto your PC as an administrator.
  • Type in MSConfig in the Start Search to open the System Configuration utility.
  • From there, go to the General tab and click “Selective startup”.
  • Clear the “Load Startup items” check box and make sure that the “Load System Services” and “Use Original boot configuration” options are checked.
  • Next, click the Services tab and select the “Hide All Microsoft Services” check box.
  • Click Disable all.
  • Click on Apply/OK and restart your PC. (This will put your PC into a Clean Boot State. And configure Windows to use the usual startup, just simply undo the changes.)
  • From there, start to isolate the problem by checking which one of the programs you installed recently is the root cause of the problem.

Option 5 – Try to run Startup Repair

You might also want to run Startup Repair in fixing the issue with the login screen. To do so, follow the steps below.
  • You can start by creating and booting from a bootable Windows 10 USB Stick.
  • After that, click on Repair your computer located on the bottom left corner when you are on the initial Windows Startup screen.
  • Next, click on Troubleshoot, and then on the other screen, click the Startup Repair option.
  • Now select the operating system you want to repair. Once you do that, it will start to repair your operating system. Wait until the process is completed and then check if the problem’s now fixed.
Read More
How to Fix the Error Code 28

How to Fix the Error Code 28

Error Code 28- What is it?

The error code 28 is a driver error. This is one of the many device manager error codes. When this error occurs on your computer, the following message is displayed:

“The drivers for this device are not installed. (Code 28)”

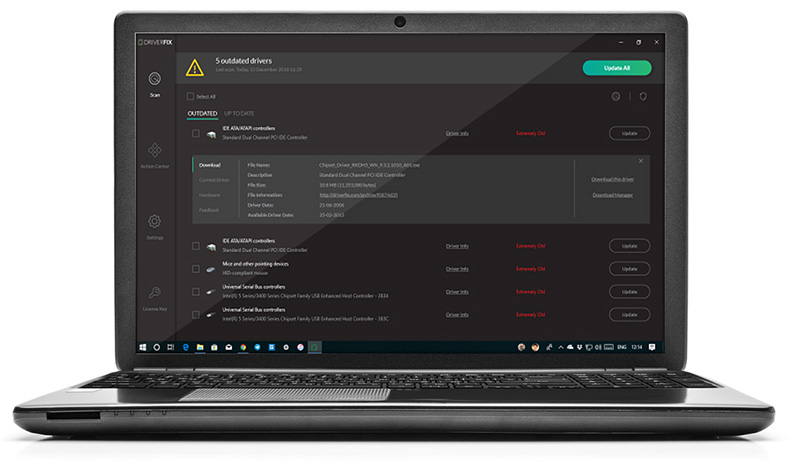
Another driver device error message you might encounter is error code 41. 

Error Causes

Error 28 occurs because of unsuccessful device driver installation. This usually happens when you try to update new drive versions on your system. It is advisable to repair this error right away as it can hamper your ability to use certain hardware. For example, if error 28 occurs due to the unsuccessful installation of the USB driver, then it if not fixed and resolved it may prevent you from using hardware devices. Unsuccessful driver installation means you either didn’t install it properly or your computer has registry issues. If it’s the registry then you must fix it without any delay because it can expose your PC to serious threats like system crash and failure. To avoid such inconvenience, repair it.

Further Information and Manual Repair

When it comes to repairing the error code 28, here’s what you can do: Simply go to the control panel and click on the Device Manager option:
  • In the details pane with the list of devices, locate the device for which you want to reinstall the driver software.
  • Double click on it to open the properties dialog box.
  • Now click on the driver tab and then click update driver.
After updating, try using that device again if it doesn’t work and shows the error code 28 on your computer screen then this means the underlying cause is the registry. Congratulations, you have just Fixed Error Code 28 In Windows 10 all by yourself. If you would like to read more helpful articles and tips about various software and hardware visit errortools.com daily. Now that’s how you fix Error Code 28 In Windows 10 on a computer. On the other hand, if your computer is going through some driver-related issues that have to get fixed, there is a one-click solution known as DRIVERFIX you could check out to resolve them. This program is a useful tool that could repair corrupted drivers and optimize your PC’s overall performance. This is basically a solution that’s within your grasp with just a click. It’s easy to use as it is user-friendly. For a complete set of instructions in downloading and using it, refer to the steps below Perform a full system scan using DRIVERFIX. To do so, follow the instructions below.
  1. Download and install DRIVERFIX. from the official site.
  2. Once the installation process is completed, run DRIVERFIX. to perform a full system scan. driverfix screenshot
  3. After the scan is completed click the “Update All” button. driverfix screenshot
Read More
Your account has been disabled error
If you are trying to log into your user account on your Windows 10 computer but encountered an error message instead that says, “Your account has been disabled, Please see your system administrator”, read on as this post will guide you on how you can fix this problem. In this kind of scenario, you won’t be able to access your data unless you have access to the administrator account. This problem could be caused by several problems. It is possible that malware has infected your computer and has changed some settings in your computer, especially if your system has been under a malware attack not too long ago. The malware could’ve changed the “Account is disabled” option. The only thing you can do to resolve this kind of problem is to log into your computer using another administrator account and then change the setting. However, if you don’t have a second administrator account, you can just enable the built-in hidden administrator account on your computer. You shouldn’t have any problem enabling the hidden administrator account as it is quite easy when you can log into your account. And in this post, you will be guided on how you can enable the hidden administrator account using the Registry Editor to fix the “Your account has been disabled, Please see your system administrator” error.

To get started, follow the instructions given below.

  1. First, you need to start your computer and ensure that you are on the error screen. From there, you will see the Power options located on the right-hand side.
  2. Click on the Power options and tap and hold the Shift key and then select Restart.
  3. After that, the Advanced Boot Options will appear and from there select Troubleshoot > Command Prompt.
  4. Next, you have to select your user account and enter the user account’s password to open Command Prompt.
  5. After opening Command Prompt, open your screen and type “Regedit” and then tap Enter on your keyboard.
  6. Now select the HKEY_LOCAL_MACHINE in the Registry Editor and go to File > Load Hive.
  7. Afterward, you have to open the Windows installation drive and go to the location – WindowsSystem32Config
  8. From there, you should find a file named “SAM” – select this file and click the Open button.
  9. Next, you have to enter a key name. You can just input whatever you prefer.
  10. Once done, navigate to this path: HKEY_LOCAL_MACHINEkey_nameSAMDomainsAccountUsers
  11. From this path, you will see a key named “000001F4” – select this key and double click on the “F” entry that you can find on the right-hand side of the screen.
  12. After that, look for the value data line labeled “0038” which should show 11 in the first column. You have to replace it with 10.
  13. Once done, click on the OK button and close the Registry Editor and the Command Prompt to restart your computer.
  14. Now once your computer has restarted, sign in to the Administrator account and open the Computer Management window. You can just search for it using the search bar in the Taskbar.
  15. After you open Computer Management, go to Local Users and Groups > Users – where you can find all the user accounts. Look for your deleted user account and right-click on it and select Properties and then unmark the checkbox that says “Account is disabled”. This should fix the problem.
Read More
Chrome browser downloads stuck at 100%
These days, Google Chrome is definitely one of the most used browsers in the browser. Google has almost created a nearly perfect product that rarely experiences problems. However, a lot of users have reported an issue where some files they’re downloading or their downloads in their Google Chrome browsers are stuck at 100%. So if you are one of these users, read on as this post will guide you on what you can do to resolve the problem. This kind of problem could be caused by several factors. It is possible that the file download process could be blocked by a third-party antivirus or it could be that the content-length header could be missing from the server. Aside from that, a Google Chrome extension could also be the culprit or it could be that the current installation of the browser could be corrupted. This kind of problem can get really annoying as the download process has already utilized system resources as well as take up your time. Thus, you need to fix the problem using several suggestions. You can try to clear the browser cache, disable the Chrome virus scan, whitelist the file on the third-party antivirus program, put your browser in Incognito mode and download the file again. On the other hand, you could also try to reset or reinstall the browser. For more details, follow the options provided below.

Option 1 – Try to clear browser cache and try downloading again

There are times when some data in the browser is conflicting with the loading of the website and triggers some problems like download getting stuck at 100%. And so you can try to clear your browser’s data. This might be a very basic solution but oftentimes it works in fixing this kind of error in Google Chrome. Follow the steps below to clear the data in your browser.
  • Open your Google Chrome browser.
  • After that, tap the Ctrl + H keys. Doing so will open a new panel that allows you to delete the browsing history and other data in your browser.
  • Now select every checkbox that you see and click on the Clear data button.
  • Then restart your Chrome browser and check if you can now complete the download again.

Option 2 – Try disabling Chrome virus scan

The next thing you can do to resolve the problem is to disable the Chrome virus scan. It is possible that the virus scan is the one that’s preventing the download to be completed, thus, try to disable it and see if it works.

Option 3 – Whitelist the file you’re downloading in your antivirus program

The download getting stuck might also be caused by your antivirus program which could be interfering it from running. To fix this, you have to whitelist dism.exe. How? Refer to these steps:
  • Open the Windows Defender Security Center from the system tray area.
  • Next, click the “Virus & threat protection” option and then open the “Virus and threat protection settings”.
  • After that, scroll down until you find the “Exclusions” and click on the “Add or remove exclusions” option.
  • Then click the plus button and select the type of exclusion you want to add and from the drop-down list, select Folder.
  • Next, navigate to this path and select the WinSxS folder: C:/Windows/WinSxS
  • When a User Account Control or UAC prompt, just click on Yes to proceed.

Option 4 – Try downloading the file in Incognito mode

There are certain browser extensions, especially those security programs, that prevent any suspicious files from being downloaded. So the easy way to fix the problem is to launch the Chrome browser in Incognito mode and then try to download the file again. Additionally, you might want to consider disabling the problematic extension.

Option 5 – Reset Chrome

Resetting Chrome can also help you fix the problem. This means that you will be restoring its default settings, disabling all the extensions, add-ons, and themes. Aside from that, the content settings will be reset as well and the cookies, cache, and site data will also be deleted. To reset Chrome, here’s what you have to do:
  • Open Google Chrome, then tap the Alt + F keys.
  • After that, click on Settings.
  • Next, scroll down until you see the Advanced option, once you see it, click on it.
  • After clicking the Advanced option, go to the “Restore and clean up option and click on the “Restore settings to their original defaults” option to reset Google Chrome.
  • Now restart Google Chrome.

Option 6 – Try to clean reinstall Chrome

There are instances when programs leave files behind after you’ve uninstalled them and the same thing can happen to Chrome so before you reinstall Chrome, you have to make sure that you have deleted the User Data folder. To do so, refer to the following steps:
  • Hit the Win + R keys to open the Run dialog box.
  • Next, type “%LOCALAPPDATA%GoogleChromeUser Data” in the field and hit Enter to open the User Data folder.
  • From there, rename the default folder and name it something else, e.g. “Default.old”.
  • After that, install Google Chrome again and check if the issue is now fixed.
Read More
Change system font in Windows 10
In previous versions of Windows changing the system, the font was a pretty straightforward process, but it seems Microsoft did not want this feature to keep for whatever reason and there is no option as of the time of the writing of this article to do it in standard options in Windows 10. But do not worry, you are still able to customize your Windows and choose which font would you like to see inside it in all of its dialogs. You can choose whichever font you desire, the only prerequisite is it to be installed on your system. This guide will require you to change values in the registry of Windows itself so please follow step-by-step instructions and always make a backup of the registry before changing it in order to prevent some permanent Windows issues. All of that being said, let's start.

Setting new font

First thing is to open notepad, in the notepad paste the next block of code:
Windows Registry Editor Version 5.00 [HKEY_LOCAL_MACHINE\SOFTWARE\Microsoft\Windows NT\CurrentVersion\Fonts] "Segoe UI (TrueType)"="" "Segoe UI Bold (TrueType)"="" "Segoe UI Bold Italic (TrueType)"="" "Segoe UI Italic (TrueType)"="" "Segoe UI Light (TrueType)"="" "Segoe UI Semibold (TrueType)"="" "Segoe UI Symbol (TrueType)"="" [HKEY_LOCAL_MACHINE\SOFTWARE\Microsoft\Windows NT\CurrentVersion\FontSubstitutes] "Segoe UI"="NEW_FONT"
Where in "Segoe UI"="NEW_FONT" instead of NEW_FONT you need to write the exact name of the font that you wish to use as a system font. Once you have replaced the default system font with your desired one, go to File and save as, from file type drop-down menu, choose all files and save this file as .REG type giving it whatever name you wish. When the file is saved, close notepad, right-click on the saved file and choose the merge option. Confirm with YES and click on OK. Reboot your system and your Windows will now use the font of your choice as its default system font.

Restoring default font

If you wish to return the old default system font as it was, follow the same steps but in your notepad paste this code:
Windows Registry Editor Version 5.00 [HKEY_LOCAL_MACHINE\SOFTWARE\Microsoft\Windows NT\CurrentVersion\Fonts] "Segoe UI (TrueType)"="segoeui.ttf" "Segoe UI Black (TrueType)"="seguibl.ttf" "Segoe UI Black Italic (TrueType)"="seguibli.ttf" "Segoe UI Bold (TrueType)"="segoeuib.ttf" "Segoe UI Bold Italic (TrueType)"="segoeuiz.ttf" "Segoe UI Emoji (TrueType)"="seguiemj.ttf" "Segoe UI Historic (TrueType)"="seguihis.ttf" "Segoe UI Italic (TrueType)"="segoeuii.ttf" "Segoe UI Light (TrueType)"="segoeuil.ttf" "Segoe UI Light Italic (TrueType)"="seguili.ttf" "Segoe UI Semibold (TrueType)"="seguisb.ttf" "Segoe UI Semibold Italic (TrueType)"="seguisbi.ttf" "Segoe UI Semilight (TrueType)"="segoeuisl.ttf" "Segoe UI Semilight Italic (TrueType)"="seguisli.ttf" "Segoe UI Symbol (TrueType)"="seguisym.ttf" "Segoe MDL2 Assets (TrueType)"="segmdl2.ttf" "Segoe Print (TrueType)"="segoepr.ttf" "Segoe Print Bold (TrueType)"="segoeprb.ttf" "Segoe Script (TrueType)"="segoesc.ttf" "Segoe Script Bold (TrueType)"="segoescb.ttf" [HKEY_LOCAL_MACHINE\SOFTWARE\Microsoft\Windows NT\CurrentVersion\FontSubstitutes] "Segoe UI"=-
Reboot your system and your Windows will now revert the font of your choice as its default system font.
Read More
Fixing the Java Error Code 1603 in Windows 10
You might have experienced a situation where you’re trying to install or update your Java application on your Windows 10 computer but were not able to do so for some reason. One of the problems you can encounter while updating or installing Java is Error Code 1603. There are two ways you can install Java – you have the option to choose where to get Java either from the online download or offline download. There are times when before you can install Java, you might have to disable the firewall first as it may interrupt the Java online installation. And while doing so, if you are getting the “Java Update or Install did not complete – Error Code 1603” error message, read on as this post will show you what you can do to fix it. At the time of writing, the exact cause of this error is still unknown. On the other hand, you must still check if you have fulfilled all the system requirements needed to install Java. You have to make sure that your Windows 10 PC has sufficient disk space available for the Java installation or update. In addition, you also have to make sure that you meet all the hardware requirements and you are using a popular web browser for the installation, and that you have administrative privileges for download and installation. To fix the “Java Update or Install did not complete – Error Code 1603” error, here are some suggestions you can try.

Option 1 – Restart your computer before you install the new Java package

You might have to restart your computer if you got the error code 1603 while installing Java through an offline download.
  • Restart your computer.
  • Next, download and install the offline installer of the Java package from the official site of Java and not some third-party source.
  • In the prompt box that appears while downloading the Java package, select the option Save in and save the package in your preferred folder.
  • After that, navigate to the saved, downloaded package on your computer and then double click on the file to begin the installation process.
After that, if it didn’t fix the problem and you’re still getting the error code 1603, follow the next given option below.

Option 2 – Uninstall the old versions of Java before you install the new package

  • Open the Control Panel.
  • After that, click on Programs and features.
  • Then select the old Java package and click on Uninstall.
  • Restart your computer and then try installing the new Java package again from its official site.

Option 3 – Disable the Java content in the browser you’re using via Java Control Panel and reinstall Java

  • Open the Control Panel again.
  • And then click on the Java icon to open the Java Control Panel.
  • Next, navigate to the Security tab and then uncheck the “Enable Java content in the browser” option.
  • Then click on Apply and then Ok to save the changes made.
  • Now install the new Java package again after you download it from its official website.
  • Once the installation is completed, re-enable the “Enable Java content in the browser” option in the Java Control Panel as it is essential especially if you are running Java content in your browser.
Read More
Fix Err Connection Timed Out issue in Chrome
If you are using Google Chrome browser in surfing the web, you might have experienced a situation where you’re trying to connect to a website but were unable to since Chrome failed to fetch the website to the browser and throws an error that says, This webpage is not available – Err Connection Timed Out. Aside from an issue with the network connection, there are also other reasons why this error suddenly shows up, read on to fix it. There are times when the Windows computer is responsible for this kind of issue. And it can happen not just to Google Chrome but to other browsers as well. To resolve this issue, here are some suggestions that might be of help.

Option 1 – Try checking the network cables and then restart your router and reconnect

The first thing you can do is to check if all the network cables are properly connected be it to your computer or to the router. And if your computer is connected via Wi-Fi, you need to restart your router once. And of course, you can always opt to forget the Wi-Fi details and then reconnect again just make sure that you know the password.

Option 2 – Check the Windows Host file

You can also try to cross-check the Windows Hosts file to find out if the website you are trying to open has been blocked because if it is, then it’s no wonder why you’re getting the ERR CONNECTION TIMED OUT error in Chrome. There are instances when some third-party application modifies the file and adds some websites to the blocklists. So if the website is indeed blocked, you need to remove it from the list.

Option 3 – Try removing Proxy

Removing the Proxy might also help you in fixing the ERR CONNECTION TIMED OUT error. Here’s how you can do it:
  • Tap the Win + R keys to open the Run dialog box.
  • Then type “inetcpl.cpl” in the field and hit Enter to pull up the Internet Properties.
  • After that, go to the Connections tab and select the LAN settings.
  • From there. Uncheck the “Use a Proxy Server” option for your LAN and then make sure that the “Automatically detect settings” option is checked.
  • Now click the OK and the Apply buttons.
  • Restart your PC.
Note: If you are using a third-party proxy service, you have to disable it.

Option 4 – Try to clear the browsing data of Google Chrome

If your browsing data in Chrome hasn’t been cleared for some time now then that might be the reason why you’re suddenly getting the ERR CONNECTION TIMED OUT error when you browse the web. To fix this error, you need to clear your web browsing data. Refer to the following steps to do so.
  • Tap the Ctrl + Shift + Delete buttons to go to the Clear browsing data section in Chrome.
  • Next, set the time range to “All time” and tick all the boxes and then click on the Clear data button.
  • After that, restart the Chrome browser and try to open the website you were trying to open earlier.

Option 5 – Flush the DNS and reset TCP/IP

You might also want to flush the DNS and reset TCP/IP as it could help in fixing the ERR CONNECTION TIMED OUT error. To do so, refer to these steps:
  • Click the Start button and type in “command prompt” in the field.
  • From the search results that appear, right-click on Command Prompt and select the “Run as administrator” option.
  • After opening Command Prompt, you have to type each one of the commands listed below. Just make sure that after you type each command, you hit Enter
    • ipconfig /release
    • ipconfig /all
    • ipconfig /flushdns
    • ipconfig /renew
    • netsh int ip set dns
    • netsh winsock reset
After you key in the commands listed above, the DNS cache will be flushed and the Winsock, as well as the TCP/IP, will reset.
  • Now restart your computer and open Google Chrome then try opening the website you were trying to open earlier.

Option 6 – Run the built-in Malware Scanner and Cleanup Tool in Chrome

In case you don’t know, there is actually a built-in malware scanner and cleanup tool in Chrome that helps you get rid of any unwanted ads, pop-ups, and even malware, as well as unusual startup pages, toolbars, and other things that could affect the performance of the browser.

Option 7 – Reset Chrome

Resetting Chrome can also help you get rid of the ERR CONNECTION TIMED OUT error. Resetting Chrome means restoring its default settings, disabling all the extensions, add-ons, and themes. Aside from that, the content settings will be reset as well and the cookies, cache, and site data will also be deleted. To reset Chrome, here’s what you have to do:
  • Open Google Chrome, then tap the Alt + F keys.
  • After that, click on Settings.
  • Next, scroll down until you see the Advanced option, once you see it, click on it.
  • After clicking the Advanced option, go to the “Restore and clean up the option and click on the “Restore settings to their original defaults” option to reset Google Chrome.
  • Now restart Google Chrome.
Read More
1 2 3 162
Logo
Copyright © 2022, ErrorTools. All Rights Reserved
Trademarks: Microsoft Windows logos are registered trademarks of Microsoft. Disclaimer: ErrorTools.com is not affiliated with Microsoft, nor claim direct affiliation.
The information on this page is provided for information purposes only.
DMCA.com Protection Status