Windows Update failed, error 0x80240034

If you got an error message saying, “Windows Update failed to install error 0x80240034” when trying to update your Windows 10 then it’s probably due to some update services that are failing at some point. In addition, you might also see Error constant WU_E_DOWNLOAD_FAILED with the description that “Update has failed to download”.

The Windows Update failed to install error 0x80240034 might be caused by some connection problem or there might be a duplicate update or that installation is not allowed and so on. And so to fix the problem, we’ve prepared some options that could help. Make sure to follow them accordingly but before you proceed, you need to verify if you have a stable internet connection.

Option 1 – Restart your computer and try installing the Updates again

Restarting your computer can also help in fixing the Windows Update failed to install error 0x80240034. There are cases where the issue resolves on its own as it could just be some simple network or PC error.

Option 2 – Try to disable your antivirus program

The Windows Update failed to install error 0x80240034 might be caused by the antivirus program installed in your computer which is why disabling the antivirus program or any security software installed in your computer is always a good idea you can try when the Windows Update process does not go smoothly. So before you try updating your computer again, make sure to disable the antivirus or security program and once the Windows Update is done, don’t forget to enable the antivirus program back again.

Option 3 – Clean up temporary and junk files

  • Open Setting > System > Storage from the WinX Menu.
  • From there, you will see a list of all the local and connected storage devices along with the details on the free space.
  • Now make sure that the Storage Sense feature is turned On then go find a link that says “Free Up Space” and click it to open.
  • After that, a screen which is the built-in program in Windows 10 will appear and will scan your computer for the following junk files so you can free up disk space:
  • Windows Upgrade Log Files
  • The system created Windows Error Reporting Files
  • Thumbnails
  • Temporary Internet Files
  • Previous Windows Installation Files
  • Delivery Optimisation Files
  • DirectX Shader Cache

Note: Once you’re done freeing up space on your drive, try to run the setup file again.

Option 4 – Run the Windows Update Troubleshooter

Running the built-in Windows Update troubleshooter is one of the things you can first check out as it is known to automatically resolve any Windows Update errors like error 0x80240034. To run it, go to Settings and then select Troubleshoot from the options. From there, click on Windows Update and then click the “Run the troubleshooter” button. After that, follow the next on-screen instructions and you should be good to go.

Option 5 – Delete Files from Software Distribution Folder & Catroot2 folders

The downloaded Windows Updates are placed in a folder called “SoftwareDistribution”. The files downloaded in this folder are automatically deleted once the installation is completed. However, if the files are not clean up or if the installation is still pending, you can delete all the files in this folder after you pause the Windows Update service. For complete instructions, refer to the steps below.

  • Open the WinX Menu.
  • From there, open Command Prompt as admin.
  • Then type in the following command – don’t forget to hit Enter right after typing each one of them.

net stop wuauserv

net start cryptSvc

net start bits

net start msiserver

  • After entering these commands, it will stop the Windows Update Service, Background Intelligent Transfer Service (BITS), Cryptographic, and the MSI Installer
  • Next, go to the C:/Windows/SoftwareDistribution folder and get rid of all the folders and files thereby tapping the Ctrl + A keys to select them all and then click on Delete. Note that if the files are in use, you won’t be able to delete them.

After resetting the SoftwareDistribution folder, you need to reset the Catroot2 folder to restart the services you just stopped. To do that, follow these steps:

  • Type each one of the following commands.

net start wuauserv

net start cryptSvc

net start bits

net start msiserver

  • After that, exit Command Prompt and restart your computer, and then try to run Windows Update once more.

Option 6 – Run the DISM tool

If the first five options didn’t work, then running the Deployment Imaging and Servicing Management tool might help as it can repair the Windows System Image as well as the Windows Component Store in Windows 10.

  • After you access the Advanced Startup options, select Command Prompt by using the arrow keys on your keyboard.
  • Next, type in this command: DISM /Online /Cleanup-Image /RestoreHealth
  • Do not close the window if the process takes a while as it will probably take a few minutes to finish.

Option 7 – Run System File Checker

Running the SFC scan or System File Checker might also help in fixing error 0x80240034.

  • Tap Win + R to launch Run.
  • Type in cmd in the field and tap Enter.
  • After opening Command Prompt, type in sfc /scannow and hit Enter.
  • Restart your PC.

Option 8 – Try to use the Media Creation tool

The Media Creation tool in Windows allows you to use the ISO installation file to make a bootable device that you can use to install Windows on your PC. Note that this is kind of different from the usual installation process as it could erase your computer’s current settings and data on the primary drive. Thus, before you proceed, you need to backup all your data into some removable drive and then use the Media Creation Tool to make a bootable drive.

  • After making the bootable drive, you need to plug it into your computer and then reboot.
  • Next, tap the F10 or Esc key to open the boot options.
  • Now set the boot priority of the removable drive the highest. Once the setup comes forth, follow the next onscreen instructions and install Windows without any problems.
If you like to learn and find out more about various Windows errors, and how to repair them go to our vast archive or use search to find articles that will explain and help you in solving your issue.
However, if you prefer to do things fast and with automatization then we are proposing to use an automated solution for your issues. The application that we are recommending is Advanced System Repair Pro
Advanced System Repair utilizes multiple tools all in one to give you a quick, simple, reliable, and very thorough diagnosis of your PC. It brings you all the tools you need in one program to clean, fix, protect, optimize and boost your PC!
1-Click Maintenance
All the tools to make it simple and easy! It's like having a professional technician at the click of a mouse.

Junk Cleaner
Keeping your computer free from unnecessary clutter also helps make your computer last longer. Like any other machine, if you keep it clean and take care of it, it will serve you better for longer!

Optimize background apps
Optimize applications background activity with the built-in Application Optimizer feature.

Disk Defrag
With a simple 1-click, Advanced System Repair speeds up your PC by assembling fragmented files on your machine and organizing them more efficiently.

Malware Removal
Finds and removes all types of harmful malware including trojans, worms, bots, adware, spyware, PUPs, and more!

Privacy Cleaner
The all-in-one privacy suite to Clean Your Tracks & Protect Your Privacy! Make your computer safe, secure, and more efficient!

System Tweak/Optimizer
ASR will analyze your complete system and settings to adjust your PC to function at its maximum performance.

Registry Cleaner
Over time, as you install and uninstall applications, the registry can become cluttered with old entries and broken settings which can result in program crashes, and annoying messages and slow the computer down.
Visit our Advanced System Repair Pro Download page to inform yourself about all the benefits of this software and get a free trial copy of it.
advanced system repair pro

Advanced System Repair Pro

One-click automated PC repair solution
ASR logo
With Advanced System Repair Pro you can easily
Replace damaged files
Restore performance
Free disk space
Remove Malware
Protects WEB browser
Remove Viruses
Stop PC freezing
DOWNLOAD
Privacy Policy | Terms of Use | Uinstall
Advanced System Repair Pro is compatible with all versions of Microsoft Windows including Windows 11

Share this article:

You might also like

All wallpapers of Windows 11
We have gathered and want to share with you all of the Windows 11 wallpapers if you would like to place them on your desktop now and now wait for the official W11 release. Hope that you will like some of them and I hope to see you again on errortools.com Download Windows 11 Wallpapers here!

And here is the preview of them

W11_32W11_31W11_30W11_29W11_28W11_27W11_26W11_25W11_24W11_23W11_22W11_21W11_20W11_19W11_18W11_17W11_16W11_15W11_14W11_13W11_12W11_11W11_10W11_09W11_08W11_07W11_06W11_05W11_04W11_03W11_02W11_01
Read More
Four Proven Methods to Fix The Rundll Error

How to Fix Rundll Error

Rundll Error - What is it?

Rundll Error, DLL is also known as Dynamic Link Library is a Window library that basically consists of instructions and codes used and shared by multiple programs installed on your system. It helps programs load and run smoothly. Rundll error is generated when the system fails to access DLL files thereby hampering your ability to successfully run your desired program.

Solution

Restoro box imageError Causes

The rundll error code is triggered due to multiple reasons such as:
  • DLL file affected by virus and malware
  • Poor program installation
  • Invalid Windows registry entries
It is advisable to fix the run.dll error immediately without any delay because this error exposes your PC to serious threats such as system crash, freeze, failure, data loss, and even privacy threats like cybercrime, data breaches, and identity thefts.

Further Information and Manual Repair

To resolve the rundll error on your system, here are some solutions that you can try:

Solution 1: Reboot your System

Sometimes rebooting your system can also resolve the issue. However, if it doesn’t then you need to try some other solution to fix it.

Solution 2: Identify the Program Triggering the Error

To fix rundll error, the first thing that you need to do is to identify the program generating this error and check it for validity. For this, simply analyze the rundll error dialog box. Let’s say you get the following run.dll error on your system Error loading
C:\WINDOWS\system32\usvdgpo.dll.
This error message indicates that the program ‘usvdgpo’ is causing the run.dll error on the system. Once the program is identified, the next step is to stop it manually. For this, you go to the start menu and click run, now type ‘services.msc’ in the dialog box, and press ‘Enter’. After that right-click the related process to your rundll error and then click the ‘Stop’ button to stop the program. Now close the window. Though this action will stop the process it will not remove the reference to the bogus items. To remove that you will have to remove the program from the Windows Registry. This can be done by typing ‘Regedit’ in the Run dialog box. This will open the registry editor. From the keys listed in the left panel, navigate to the following key: HKEY_LOCAL_MACHINE/Software/Microsoft/Windows/CurrentVersion/Run. Now right-click on this key and click delete and then simply close the windows registry and reboot your system. After this, you will then have to uninstall the program to completely eradicate the rundll error. To do this, go to the control panel, Add/remove programs, and right-click to uninstall the program causing the run.dll error on your system. Click yes to confirm your decision. Once the program is uninstalled, reinstall the program using the program CD to get yourself an error-free program. This procedure is tricky, time-consuming, and maybe slightly challenging for you especially if you are not a computer programmer.

Solution 3: Run an Antivirus

If the cause of the run.dll error is a malware attack then you need to download an antivirus and run it on your system. However, this may impact the speed of your PC. Antivirus is notorious for slowing down PC speed.

Solution 4: Download Restoro.

If you are not a computer programmer, then running Restoro is possibly the easiest way for you to resolve rundll errors on your system in seconds. Restoro is an innovative, cutting edge, and multi-functional feature-filled PC repair tool that can be used to repair all kinds of system-related errors including rundll errors. The registry cleaner utility cleans up the RAM by removing unnecessary and obsolete files like junk files, invalid registry entries, and files from the uninstalled programs. It resolves disk fragmentation issues, repairs dll files, and the registry. In just a few clicks you can easily repair the registry and remove malware thereby resolving rundll errors on your system. Operating Total System Care is quite simple. It has a user-friendly interface and easy navigation. It is safe, efficient, bug-free, and compatible with all Windows versions Click here to download Restoro and resolve ‘rundll errors’ and access/run programs on your system smoothly.
Read More
Disable Taskbar on the second display
If you have a dual monitor setup on your Windows 10 computer and you mostly use the second screen when you are presenting something, this makes the Taskbar completely unnecessary and is not really required. So if you are using your computer generally and do not want the taskbar on your second screen, read on as this post will guide you in disabling Taskbar on your second display. The good thing is, Windows comes with a built-in feature to disable Taskbar on your second screen or projector connected to your computer. In this post, you will be guided on how you can hide or disable the Taskbar from the second monitor in Windows 10. This post is coming in handy especially if you are using projectors or multiple displays. Refer to the steps given below to disable Taskbar on the second display in Windows 10. Step 1: Go to Settings and click on Taskbar from the left menu. Step 2: After that, scroll down to lo look for Multiple Displays. Step 3: Next, turn off the toggle labeled, “Show taskbar on all displays”. Note: After completing the steps given above, it will disable the Taskbar on all the secondary displays. Bear in mind that these settings will work only if you are running a second screen in Extended mode. Contrariwise, if you are in the Duplicate mode, this setting will not work but you can always set your Taskbar to Autohide so that it won’t be displayed.

On the other hand, if you are facing some issues in finding which screen is primary and which one is secondary, refer to these steps:

Step 1: Go to Settings and select System. Step 2: Next, from the left menu open Display. Step 3: From there, select the desired display and make it the primary one as required by your setup.
Read More
Fix ndis.sys failed BSOD error on Windows 10
NDIS or Network Driver Interface Specification is a programming interface for the network interface cards that aids in the proper functioning of a system driver in a computer network. The NDIS helps the computer system in order to communicate with other connected devices and hardware components on a computer network. In relation, the ndis.sys file is a critical system file developed by Microsoft for the Windows operating system. As you know, sys files or system files are important parts of the Windows operating system as well as a repository of system driver settings used by Windows to communicate with the connected hardware and devices. The ndis.sys files are stored mostly in a driver folder at C:/Windows/System32/drivers and as mentioned, these files are essential for the system to function properly. Although the presence of ndis.sys system file is not yet known to affect the normal functioning of the Windows OS, some of the Windows 10 users reported that they encountered ndis.sys blue screen errors on their PCs. Blue Screen of Death errors or Stop errors usually occurs when you open a program or a function. Moreover, it could also occur when the driver gets loaded during the system startup or during system shutdown. It isn’t yet clear what really causes the ndis.sys blue screen error. However, like other Stop errors, it may occur due to corrupted files, misconfigured device drivers, bad drivers, corrupted Windows Registry, missing or damaged system files, and malicious programs. Aside from the aforementioned reasons, the ndis.sys blue screen error might also occur if your hard disk is damaged and if the RAM is corrupted. In such cases, a lot of users usually disable the ndis.sys file. However, it won’t really resolve the issue since the file is required for the normal functioning of the operating system and even when you disable the file, it’s pretty useless as the file will start all over again. In addition, you might want to disable security programs or firewalls and antivirus programs in the meantime to check if these programs are the ones that are causing the error. And if you’ve determined that none of the security programs or firewalls and antivirus programs are to blame, refer to the options below that might help you resolve the DRIVER_IRQL_NOT_LESS_OR_EQUAL or ndis.sys Blue Screen of Death error.

Option 1 – Try to update or reinstall the PC device driver

The Ndis.sys Blue screen error can occur when the device driver in your computer is outdated or corrupted. Thus, you either have to update or reinstall it to fix the issue.
  • Tap the Win + R keys to launch Run.
  • Type in devmgmt.msc into the box and tap Enter or click OK to open the Device Manager.
  • After that, a list of device drivers will be displayed. If you see a red or yellow sign that shows up against the driver, right-click on the driver’s name and select “Update Driver Software” or “Uninstall”. And if you find any “Unknown device”, you need to update it as well.
  • Select the “Search automatically for updated driver software” option and then follow the instructions to complete the process.
  • Restart your PC.

Option 2 – Rollback your Network drivers

If you have updated the driver software as of late and you suddenly got this BSOD error, you might have to roll back the device driver – in other words, switch back to the previous working version. To do that, follow these steps:
  • Tap the Win + R keys to launch the Run window and then type in the “devmgmt.msc” command and hit Enter to open the Device Manager window.
  • Under the Device Manager, you will see a list of drivers. From there, look for the Network Adapters and expand it.
  • Next, select the driver entries that are labeled appropriately other than anything in the context of the WAN Miniport.
  • Then select each one of them and double-click to open a new mini window.
  • After that, make sure that you’re on the Driver tab and if you are not, just navigate to it then click the Roll Back Driver button to switch back to the previous version of your Network adapters.
  • Now restart your computer to successfully apply the changes made.

Option 3 – Try running the System File Checker

The SFC or System File Checker scan could detect and automatically repair damaged system files that could be causing the ndis.sys Blue Screen of Death error. SFC is a built-in command utility that helps in restoring corrupted files as well as missing files. It replaces bad and corrupted system files with good system files. To run the SFC command, follow the steps given below.
  • Tap Win + R to launch Run.
  • Type in cmd in the field and tap Enter.
  • After opening Command Prompt, type in sfc /scannow and hit Enter.
The command will start a system scan which will take a few whiles before it finishes. Once it’s done, you could get the following results:
  1. Windows Resource Protection did not find any integrity violations.
  2. Windows Resource Protection found corrupt files and successfully repaired them.
  3. Windows Resource Protection found corrupt files but was unable to fix some of them.

Option 4 – Try running the CHKDSK utility

Running the CHKDSK utility might also help you resolve the Netwtw04.sys failed BSOD error. If your hard drive has issues with integrity, the update will really fail as the system will think that it’s not healthy and that’s where the CHKDSK utility comes in. The CHKDSK utility repairs hard drive errors that might be causing the problem.
  • Open Command Prompt with admin privileges.
  • After opening Command Prompt, execute the following command and hit Enter:
chkdsk /f /r
  • Wait for the process to be completed and then restart your computer.

Option 5 – Run the DISM Tool

The DISM tool is another command-line tool in the Windows operating system that could help users fix various corrupted system files. To use it, follow these steps:
  • Open the Command Prompt as admin.
  • Then type in this command: DISM /Online /Cleanup-Image /RestoreHealth
  • The DISM command you entered will repair the corrupted system image. Do not close the window if the process takes a while as it will probably take a few minutes to finish.
  • Restart your PC.

Option 6 – Perform a System Restore

Performing a System Restore on your computer can also help you fix the ndis.sys Blue Screen of Death error. You can do this option either by booting into Safe Mode or in System Restore. If you are already in the Advanced Startup Options, just directly select System Restore and proceed with the next steps. And if you have just booted your PC into Safe Mode, refer to the steps below.
  • Tap the Win + R keys to open the Run dialog box.
  • After that, type in “sysdm.cpl” in the field and tap Enter.
  • Next, go to the System Protection tab then click the System Restore button. This will open a new window where you have to select your preferred System Restore point.
  • After that, follow the on-screen instructions to finish the process and then restart your computer and check if the problem is fixed or not.
Read More
Intel's open-source Clear Linux* Project
clear linux project
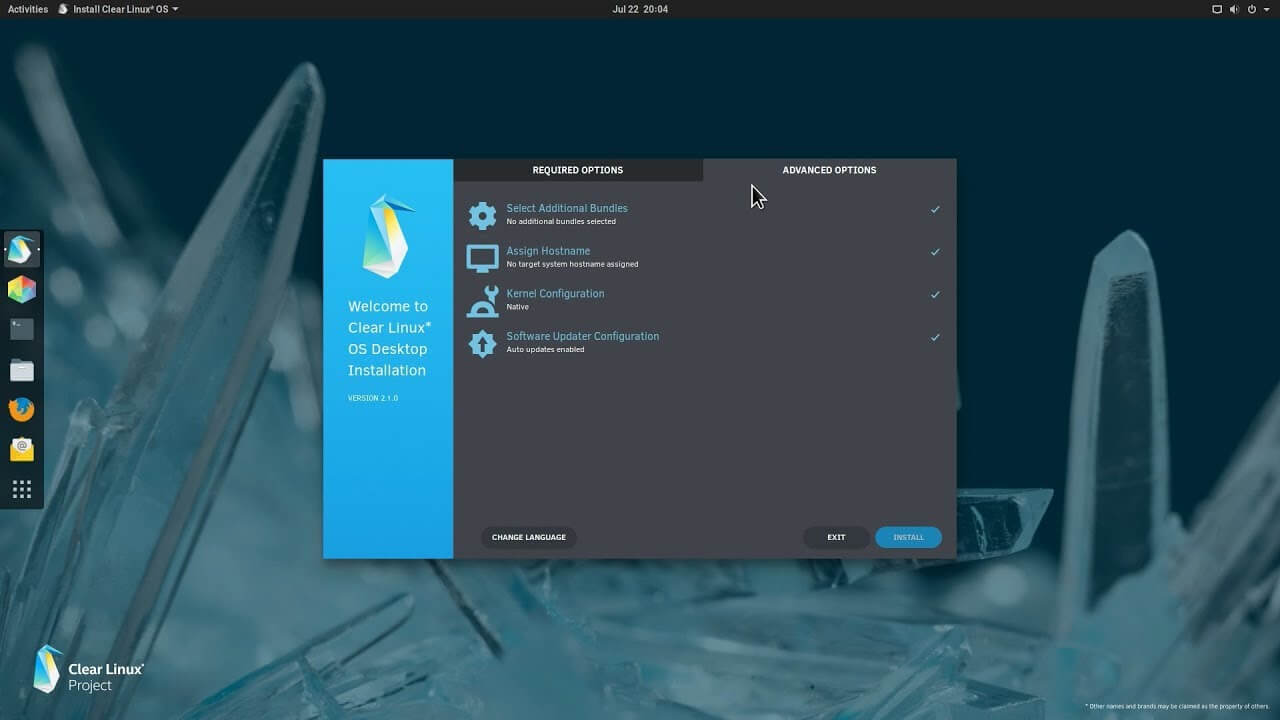
The Clear Linux Project creates an operating system and software stack that offers highly optimized performance, security, versatility, and manageability. Clearly optimized for Intel CPUs and based on GNOME it will offer you incredible speeds if you are on Intel CPU. The big news, though, is that Clear Linux sports the shiny new Gnome 40. This is a fresher Gnome than you'll find even on Ubuntu's more experimental 21.04 release. The only big names that let you test drive Gnome 40 are Fedora and Arch Linux.

Packages only when you need them

Installation of packages is used by Swupd, a Clear Linux* package management tool. It is easy to use and pretty straightforward.
  • "bundle-list" for showing what's installed
  • "bundle-info" for details on installed bundles (such as owned files via the "‑‑files" flag)
  • "search" for repository searching
  • "bundle-add" for installation
  • "bundle-remove" for uninstallation
The only problem here is the packages themselves. Clean Linux* has been imagined as a developer distro focusing mostly on well-development tolls. In intel’s words: “A Linux OS built for Linux developers”, so some things will be left out. Strangely enough some things as FFmpeg which if you want to have and blast some youtube videos while you work will have to complete manually by yourself.

Clear Linux* modular philosophy

Everything in Clear Linux* is based on a modular philosophy approach. There is no /etc/fstab file, the /boot directory is totally empty. Every partition to be mounted is enabled as a systemd "mount unit." Intel reaping the benefits of systemd's modular philosophy, where everything is a unit. If you know your way around systemd, intermediate-level configuration tasks should be straightforward. Any advanced configuration likely demands deep systemd knowledge.

Clear Linux* performance

As stated earlier this is Intel’s distro, optimized for Intel hardware meaning that Intel as the developer has every possible tool at its disposal to make use of hardware to its maximum potential and it shows. Distro almost leaves other ones two times in speed performance. So if you are looking for a distribution that will deliver you speed and it is aimed for developer Clear Linux* is for you.

Conclusion

Clear Linux* is a really interesting distro and seeing how Intel is adding new software packages on its official website it might have a bright future. But as always, be the judge for yourself and see if it can fit your needs. Go get it at: https://clearlinux.org/
Read More
Stopping automatic redirects in Browsers
As you know, the internet has changed the world immensely. Nowadays, JavaScript is pushing the modern web ahead. One of the things that make these experiences with the internet seamless and with less clutter is redirection. It is often used on web pages and there are times when a user is prompted about them and most of the time, we barely notice them. However, there are also instances when things can go wrong with redirects as they could become a loop that could mess things up. And since the browser takes a lot of system resources, redirection can result in a poor user experience. That’s why in this post, you will be guided on how you can stop these automatic redirects on browsers such as Microsoft Edge, Google Chrome, and Mozilla Firefox, on your Windows 10 computer. To get started, refer to each one of the options provided below to stop automatic redirects in Microsoft Edge, Google Chrome, and Mozilla Firefox.

Option 1 – Configure the browsers to stop pop-ups and deceptive contents

There are a lot of browsers with built-in settings that allow users to stop pop-ups and deceptive content. To configure these settings, refer to these steps:
  • Microsoft Edge:

    • Click on the three horizontal dots icon or the menu button.
    • Next, click on Settings and select Privacy & Security from the left side navigation.
    • After that, scroll down on the right-side panel and look for Block pop-ups and Windows Defender SmartScreen and then turn their toggle buttons to On.
  • Google Chrome:

    • Open Google Chrome and click on the three vertical dots icon for the menu located in the top right corner of the browser.
    • Next, click on Settings and scroll down until you see the Advanced option. Click on it to open the Advanced Settings.
    • Now scroll down until you reach the Privacy and Security section and look for the Safe browsing option and turn its toggle button to On.
  • Mozilla Firefox

    • Open Mozilla and click on the three horizontal lines icon for the menu button located in the top right corner of the browser and click on Options.
    • Next, go to the Settings section and click the Privacy & Security tab and scroll down and then click on Permissions.
    • From there, make sure that the Block pop-up windows checkbox is checked.
    • Finally, scroll down until you reach the Security section and make sure that the checkbox for the Block dangerous and deceptive content is checked.

Option 2 – Try to reset Winsock, TCP/IP & Flush DNS

To stop redirects, you can also reset Winsock and the TCP/IP as well as flush the DNS cache. To do so, follow these steps:
  • Right-click on the Start button and click on Command Prompt (administrator) so you can pull up an elevated Command Prompt.
  • After that, execute each one of the commands listed below. And after you typed in one after the other, you have to hit Enter.
  1. netsh winsock reset – type in this command to reset Winsock
  2. netsh int ip reset resettcpip.txt – type in this command to reset TCP/IP
  3. ipconfig /flushdns – type in this command to flush the DNS cache
  • Next, restart your PC and check if the problem’s fixed.

Option 3 – Edit your Hosts File

  • Tap the Win + R keys to open then type in %WinDir% and then click OK.
  • Go to System32/drivers/etc.
  • Open the host file using Notepad.
  • Delete all the suspicious entries.
  • After that, save the changes you’ve made and close the file.
Read More
Diablo 2 is trending after launch looking good
Finally, some good news for Blizzard entertainment after tons of bad stuff happening around it regarding lawsuits and people layoffs. Diablo 2 has become the most-watched game on Twitch after its official release and sold copies are on a satisfactory level. Diablo 2 resurrected
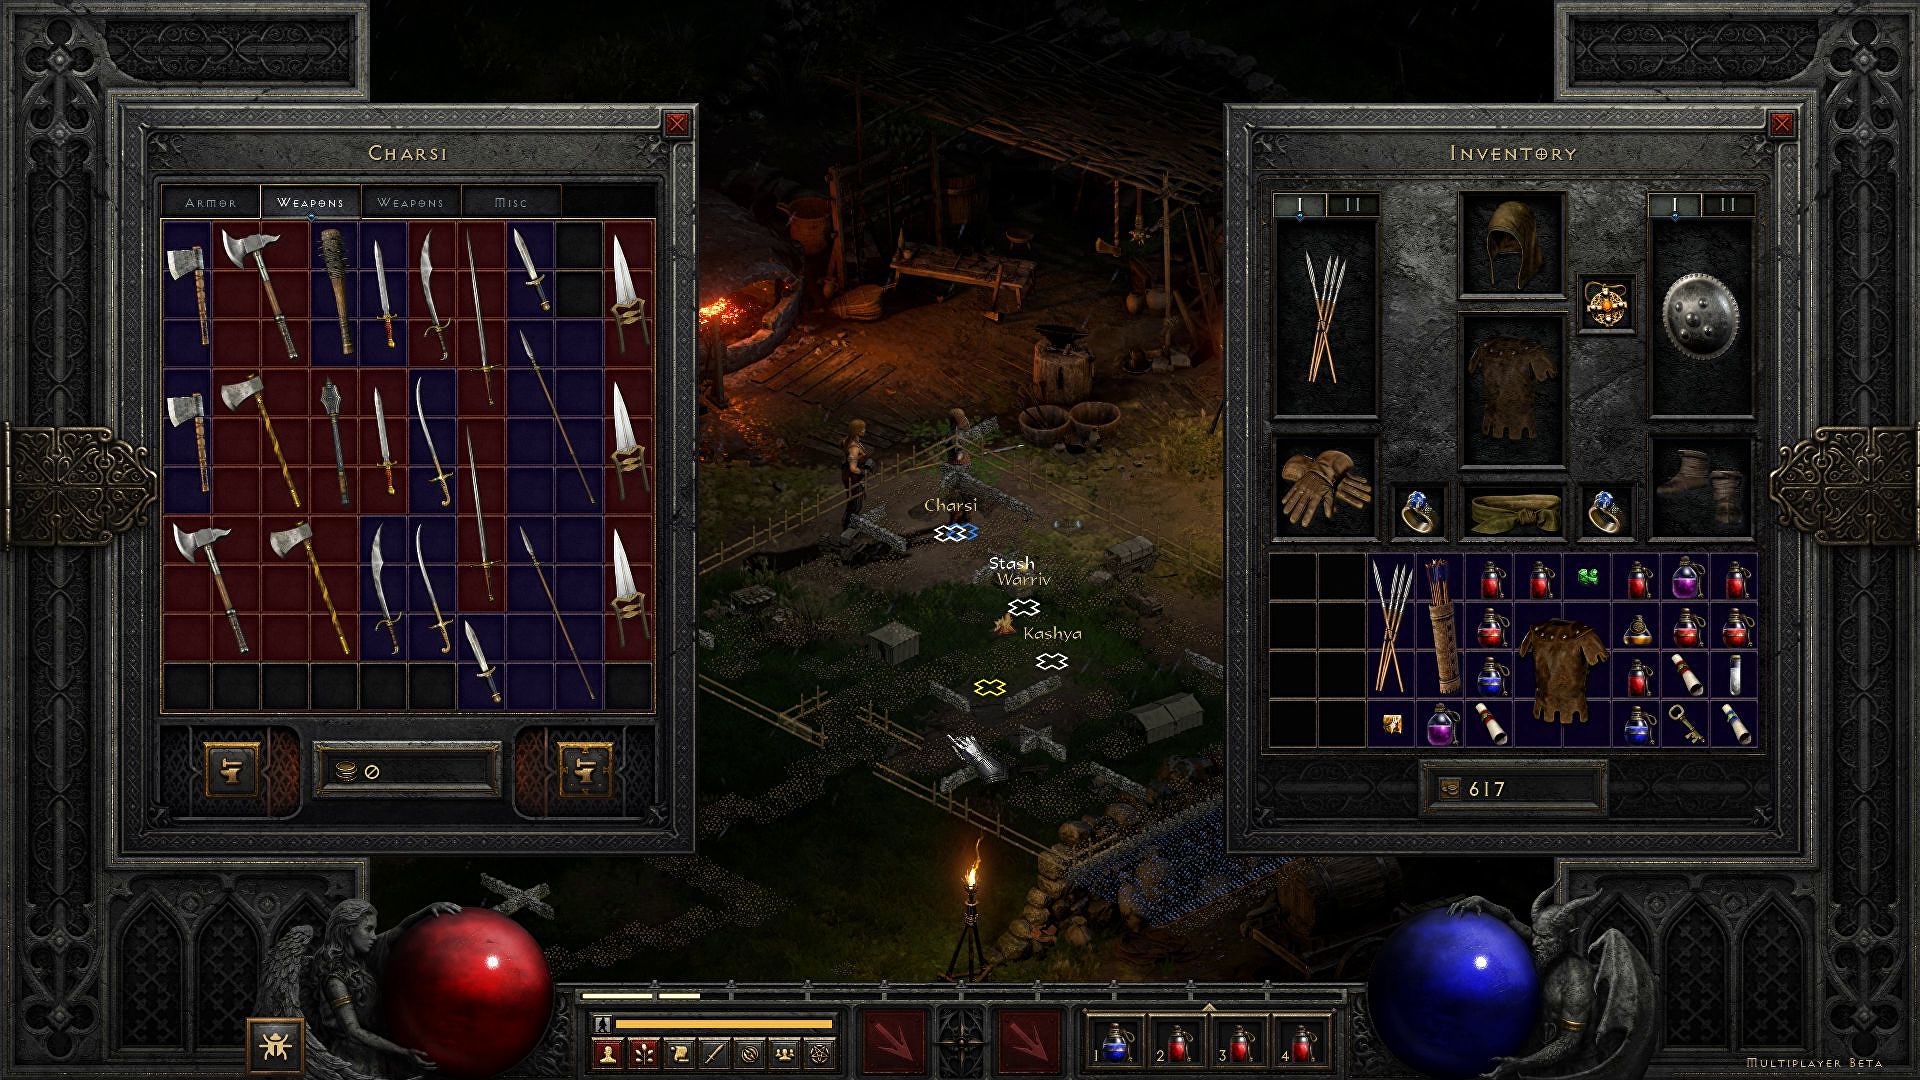
For people not familiar with recent events, the state of California has sued Blizzard for various things including discrimination and offensive behavior. Later Blizzard executives were caught shredding some evidence and things just started to go to worse from there. After much drama, many people believed that this is the end for Blizzard entertainment and that they would not be able to recover from this since the community has sided with California and Blizzard has received a large punch as many subscribed WOW players have left the game. Things are not so grim as they were looking as their Diablo 2 remake has made moderate success despite being released in these troubling times and there are rumors of Overwatch 2 planned release date as of the first quarter of 2022. overwatch 2
Read More
Stop the Hotspot from Turning off
As you know, Windows 10 is equipped with a Mobile Hotspot feature that allows users to share the existing internet connections to other devices over Wi-Fi. However, one of the downsides to this feature is that it does not stay on if there are no devices connected to it for over five minutes. In other words, if there are no devices connected to the mobile hotspot for five minutes, it will turn off automatically. Thus, if you want the mobile hotspot to stay turned on, then you’ve come to the right place as this post will walk you through how to stop the Mobile Hotspot from turning off in Windows 10. There are two scenarios tackled in this post wherein the Mobile Hotspot feature turns off automatically and where the hotspot disables when there is no internet connection. To remedy these scenarios, you can try turning off the power saving feature or use a PowerShell command to change the “PeerlessTimeoutEnabled” settings or increase the Mobile Hotspot idle timeout settings. You could also increase the timeout period when a cellular connection is not available or disable the Wi-Fi and network adapter power management options. For detailed instructions, refer to each one of the given options below.

Option 1 – Try turning off the power saving feature

The first solution you can check out is to turn off the power-saving feature. To do so, follow these steps:
  • Open the Settings app and go to Network & Internet and from there, click on the Mobile Hotspot option.
  • Next, toggle the “Share my Internet connection with other devices” option.
  • After that, toggle the “When no devices are connected, automatically turn off mobile hotspot” option.

Option 2 – Execute a command in PowerShell

The next option you can try to keep the mobile hotspot turned on is through a command in PowerShell. To get started, follow these steps:
  • Tap the Win + X keys and select the “Windows PowerShell (Admin)” option.
  • Next, execute the following command to make sure that the Mobile Hotspot stays on even when no devices are connected to it:
powershell -windowstyle hidden -command "Start-Process cmd -ArgumentList '/s,/c,net stop "icssvc" & REG ADD "HKLMSYSTEMCurrentControlSetServicesicssvcSettings" /V PeerlessTimeoutEnabled /T REG_DWORD /D 0 /F & net start "icssvc"' -Verb runAs"
  • After the command is executed, here is what the script is doing in the background:
    • It stops the Mobile Hotspot service (icssvc).
    • It navigates to this registry path (HKEY_LOCAL_MACHINESYSTEMCurrentControlSetServicesicssvcSettings) and creates a DWORD key named “PeerlessTimeoutEnabled” which has a value of 0.
  • It then restarts the Mobile Hotspot Service (icssvc).

Option 3 – Try increasing the Mobile Hotspot idle timeout settings

Another option you can try is to increase the idle timeout settings of the mobile hotspot. In case you don’t know, the default timeout when there’s no active connection is about five minutes. So if you don’t want to keep it on always but want to keep it on longer than five minutes, then this option is for you. All you have to do is change the same key (PeerlessTimeout) as mentioned above, at a different location. In fact, you can change it to a maximum of 120 minutes. To give this a try, follow these steps:
  • Tap the Win + R keys to open the Run dialog box and type “Regedit” in the field and then tap Enter to open the Registry Editor.
  • Next, navigate to this registry path: HKLMSystemControlSet001ServicesICSSVCSettingsPeerlessTimeout
  • From there, change its value to anywhere between 1 up to 120.
  • Once done, exit the Registry Editor and restart your computer.

Option 4 – Try increasing the timeout period when a cellular connection is not available

There are many times when you want to connect devices so it becomes part of the network. And as pointed out, the Mobile Hotspot turns off automatically when there is no internet or mobile data but when you use a registry setting, you can change any value between 1 and 60 inclusive.
  • Tap the Win + R keys to open the Run dialog box and type “Regedit” in the field and then tap Enter to open the Registry Editor.
  • Next, navigate to this registry path: HKLMSystemControlSet001ServicesICSSVCSettingsPublicConnectionTimeout
  • From there, set the value of the “Timeout” key between 1 and 60.
  • After that, close the Registry Editor and restart your PC.

Option 5 – Try to disable the Wi-Fi and Network adapter in Power Management options

As you know, the Wi-Fi adapter and the network devices have properties that will turn off when on battery and when it’s not used for a long time so you can try to disable these options.
  • Tap the Win + X + M keys to open the Device Manager.
  • Next, expand the list of Network devices and select the Wi-Fi adapter.
  • After that, go to the Power Management tab and make sure that anything related to power saving should be turned off. This will ensure that none of the network devices will turn off the Mobile Hotspot or trigger anything that will do that.
Read More
No usable free extent could be found
One of the most useful and efficient command-line disk management tools is the DISKPART utility. It can be used to manage, delete or create new hard drive partitions. However, despite its efficiency, there are still times it could face some errors like the “No usable free extent could be found”. You can encounter this error when you create a partition. This error could be due to insufficient disk space which is why it is not able to carry out the operation. It is also possible that the disk is not recognized by the system. And since there are only four recognized primary partitions, when you try creating a fifth one, you will get this error. In addition, this error could also occur if the disk has been partitioned using the MBR disk partitioning format. To fix the “No usable free extent could be found” error, here are some suggestions you can follow.

Option 1 – Free up disk space using Storage Sense

The error could be caused by insufficient disk space in your computer and so you need to free up disk space using Storage Sense to fix the problem.
  • Open Setting > System > Storage from the WinX Menu.
  • From there, you will see a list of all the local and connected storage devices along with the details on the free space. Make sure that Storage Sense is on.
  • Next, find a link that says “Free Up Space” and click it to open.
  • After that, a screen which is the built-in program in Windows 10 will appear and will scan your computer for the following junk files so you can free up disk space:
    • Windows Upgrade Log Files
    • The system created Windows Error Reporting Files
    • Thumbnails
    • Temporary Internet Files
    • Previous Windows Installation Files
    • Delivery Optimisation Files
    • DirectX Shader Cache
  • Choose the files you want to get rid of and then click on the remove files option. Note that you’ll have an idea of the total size as you select any of the junk files listed above.
  • Now go to the “Free Up Space Now” section and click the Clear Now button. This will get rid of all the temporary or junk files in your computer and should hopefully fix Error 1310.
Note: You can also run the Disk Cleanup tool to free up disk space.

Option 2 – Try to run DISKPART in Command Prompt with administrator permissions

The next thing you can do to resolve the error is to run the DISKPART utility with admin privileges.
  • In the Start Search, type “command prompt” and from the search results that appear, look for Command Prompt.
  • Once you found it, right-click on it and select the “Run as administrator” option.
  • After that, try to execute the Diskpart operation once again. Note that you also have to specify different size & offset values for the partitioning and then see if you still encounter the same error.

Option 3 – Try to execute the DISKPART clean command

The next thing you can try is to execute the clean command in DISKPART to fix any issues in the disk.
  • Open Command Prompt with admin privileges.
  • Then execute this command: diskpart
  • The command you entered will initiate the DISKPART utility. Now execute this second command to view all the disk connects or all the partitions on those disks formed: list disk
  • After that, you need to select one command depending on the list command you executed and then execute this third command: select disk #
  • The third command you just executed will select the disk or partition you want to select. Now execute this fourth command: clean
  • The command you entered will remove all the volumes or partitions formatting the disk in focus.
  • Once it’s done, try to carry out the DISKPART operation you were trying to execute.

Option 4 – Try to update the USB drivers

Outdated USB drivers can also be the reason why you’re getting the error. Thus, you must update them from time to time. You can install the latest version of the USB driver for your system. But you need to check the manufacturer’s website or guidelines to update the driver according to your system. If it happens that the drivers might not be compatible with the version of the system your laptop is using which is unlikely, you can run the driver software in Compatibility Mode in that kind of situation. To update your USB drivers, follow these steps:
  • Tap the Win + R keys to launch Run.
  • Type in devmgmt.msc into the box and tap Enter or click OK to open the Device Manager.
  • After that, look for the USB Serial Bus controllers from the list of device drivers displayed. If you see a red or yellow sign that shows up against the driver, right-click on the driver’s name and select “Update Driver Software”. And if you find any “Unknown device”, you need to update it as well.
  • Select the “Search automatically for updated driver software” option and then follow the instructions to complete the process.

Option 5 – Run the Hardware and Devices troubleshooter or the USB troubleshooter

You can find the Hardware and Devices troubleshooter under the Troubleshooters section of the Windows Settings panel on your Windows 10 PC. You can use this troubleshooter to fix common hardware and external device-related issues without exerting too much effort. If you don’t know where to find it, follow these steps:
  • Tap the Win + I keys to open the Windows Settings.
  • Next, navigate to Update & Security > Troubleshoot.
  • You should see the option for Hardware and Devices on your right-hand side where you can also find the “Rub the troubleshooter” button – click on it to get started.
  • Follow the next on-screen instructions to fix the basic issues of common hardware and external device.
Note: If you want to, you can also use the USB Troubleshooter to fix the problem just go back to the Troubleshoot page where you can find it.
Read More
Operation did not complete successfully
It is common knowledge that when you open a file that contains viruses, it will automatically infect the operating system. This is why most antivirus programs like Windows Defender won’t allow the opening of a file or execution of any associated program if they detected that the file or program could potentially harm the computer. In situations like this, you may get an error stating, “Operation did not complete successfully because the file contains a virus”. In addition, it is also possible that this error message can pop up even for known programs. To open the program or file that triggered the error, you will be given a couple of options in this post but make sure that the program or file is really safe to open and does not contain any virus. You can open the file or execute the program by disabling the Windows Defender or any antivirus program temporarily. You could also try to add an exclusion in your antivirus program or repair File Explorer or run the Disk Cleanup tool. For more details, refer to each one of the options provided below.

Option 1 – Try to temporarily disable the Windows Defender program

Although you could encounter this error with any antivirus program, it is more common in Windows Defender. Thus, you can try to disable it for a while when you open the file or execute the program. To do so, follow these steps:
  • First, click on the Start button and go to Settings > Update and Security > Windows Security.
  • Here, select the “Open Windows Security” option located in the right pane.
  • After that, click on the “Virus and threat protection” option.
  • Next, click on Manage settings under the Virus and threat protection settings.
  • Then turn off the switch for both Real-time protection and Cloud-delivered protection.
  • Now restart your computer and try to open the file or execute the program again and see if it works.
  • Note: Do not forget to enable the Real-time protection and Cloud-delivered protection back in Windows Defender.

Option 2 – Try adding an exclusion in the Windows Defender program

  • Open the Windows Defender Security Center from the system tray area.
  • Next, click the “Virus & threat protection” option and then open the “Virus and threat protection settings”.
  • After that, scroll down until you find the “Exclusions” and click on the “Add or remove exclusions” option.
  • Then click the plus button and select the type of exclusion you want to add and from the drop-down list, select Folder.
  • Next, navigate to the path where the file or program is located.
  • When a User Account Control or UAC prompt, just click on Yes to proceed.
  • Now try to run the program or file again and see if it worked. If it did, then make sure to turn on your antivirus. However, if it didn’t work, proceed to the next given options below.

Option 3 – Try to run a System File Checker scan

System File Checker or SFC is a built-in command utility that helps in restoring corrupted files as well as missing files. It replaces bad and corrupted system files with good system files that might be the cause why you’re getting the errors 0x8024a11a and 0x8024a112. To run the SFC command, follow the steps given below.
  • Type “cmd” in the Start search and then right-click on the appropriate search result.
  • Next, select “Run as administrator” to open Command Prompt with admin privileges.
  • After opening Command Prompt, type in sfc /scannow
The command will start a system scan which will take a few whiles before it finishes. Once it’s done, you could get the following results:
  1. Windows Resource Protection did not find any integrity violations.
  2. Windows Resource Protection found corrupt files and successfully repaired them.
  3. Windows Resource Protection found corrupt files but was unable to fix some of them.
 Now restart your computer and see if the problem is fixed or not.

Option 4 – Run the Disk Cleanup tool

You can also try using the Disk Cleanup tool. To use it, refer to these steps:
  • Tap the Win + R keys to open the Run dialog box and then type “cleanmgr” in the field and hit Enter to open the Disk Cleanup window.
  • After that, select the drive you want to clean.
  • Now click OK to clean the disk and restart your computer.
Read More
1 2 3 162
Logo
Copyright © 2022, ErrorTools. All Rights Reserved
Trademarks: Microsoft Windows logos are registered trademarks of Microsoft. Disclaimer: ErrorTools.com is not affiliated with Microsoft, nor claim direct affiliation.
The information on this page is provided for information purposes only.
DMCA.com Protection Status