Fix Windows Update Error 0x8007025D-0x2000C

Recently, a number of users reported getting an error code 0x8007025D-0x2000C while updating their Windows 10 computers using an ISO or the Media Creation tool. You will also see a detailed error message saying, “The installation failed in the SAFE_OS phase with an error during APPLY_IMAGE operation” together with the error code 0x8007025D-0x2000C.

This kind of issue usually occurs when there is some problem with the installation files and when Windows Update fails to apply upgrade using the Media Creation Tool or ISO. To resolve this issue, you can use the troubleshooting options given below as a reference.

Option 1 – Try recreating the Windows 10 installation USB

Recreating the Windows 10 installation USB might help in fixing the problem. You can use a USB drive to do so but make sure that it has a great read-write speed. Follow the steps below to recreate Windows 10 installation USB”

  • Click this link and then click the Download Tool Now button.
  • Next, click the “Use the tool to create installation media (USB flash drive, DVD, or ISO file)…” option and follow the next given instructions on the screen.
  • Now select the ISO file option in step 5.
  • After that, you should now have an ISO file.
  • Next, go to the location where you’ve downloaded the ISO file.
  • Then right-click on the Windows 10 ISO file and select the Open with option and then select File Explorer.
  • Now click on “setup.exe” and follow the next instructions that appear on the screen. When asked, you have to select either Nothing (clean install) or Keep personal files only option. Take note that you must not select the “Keep personal files, apps, and Windows settings since it doesn’t really work.

Option 2 – Try running the Windows Update troubleshooter

You might also want to run the Windows Update Troubleshooter as it could also help in fixing Windows Update error code 0x8007025D-0x2000C. To run it, go to Settings and then select Troubleshoot from the options. From there, click on Windows Update and then click the “Run the troubleshooter” button. After that, follow the next on-screen instructions and you should be good to go.

Option 3 – Update the BIOS

Take note that you have to be careful when modifying something in the BIOS. So if you don’t know much about it, it’s best if you skip on this option and try the other ones instead. However, if you are well-versed in navigating the BIOS, then follow the steps below.

  • Tap the Win + R keys to open the Run dialog box.
  • Next, type “msinfo32” in the field and press Enter to open System Information.
  • From there, you should find a search field on the bottom where you have to search for the BIOS version and then press Enter.
  • After that, you should see the developer and version of the BIOS installed on your PC.
  • Go to your manufacturer’s website and then download the latest version of BIOS on your computer.
  • If you are using a laptop, make sure that you keep it plugged in until you have updated the BIOS.
  • Now double click on the downloaded file and install the new BIOS version on your computer.
  • Now restart your computer to apply the changes made.

Option 4 – Try restarting the Background Intelligent Transfer Service

The Background Intelligent Transfer Service or BITS is a part of the Windows Update service and is the one that manages the background download of Windows Update, as well as scans for new updates and so on. And if Windows Update is experiencing some problems, you can try restarting BITS but make sure that you have admin privileges to do so.

  • Tap the Win + R keys to open the Run dialog box.
  • Next, type “services.msc” in the field and hit Enter to open Windows Services.
  • From the list of Services, look for the Background Intelligent Transfer Service and double-click on it to open Properties.
  • After that, you need to set the Startup type to “Automatic (Delayed Start) and click on Apply.
  • Now click the Stop button to stop BITS and then click the Start button to restart the service.
  • Click OK to save the changes made and then restart your PC.

Option 5 – Try to update Windows after a couple of minutes or an hour

There are times when the issue is from Microsoft’s end. It could be that there’s some issue with Microsoft’s server so it would be better if you give it a couple of minutes or an hour or so before trying to run Windows Update again.

If you like to learn and find out more about various Windows errors, and how to repair them go to our vast archive or use search to find articles that will explain and help you in solving your issue.
However, if you prefer to do things fast and with automatization then we are proposing to use an automated solution for your issues. The application that we are recommending is Advanced System Repair Pro
Advanced System Repair utilizes multiple tools all in one to give you a quick, simple, reliable, and very thorough diagnosis of your PC. It brings you all the tools you need in one program to clean, fix, protect, optimize and boost your PC!
1-Click Maintenance
All the tools to make it simple and easy! It's like having a professional technician at the click of a mouse.

Junk Cleaner
Keeping your computer free from unnecessary clutter also helps make your computer last longer. Like any other machine, if you keep it clean and take care of it, it will serve you better for longer!

Optimize background apps
Optimize applications background activity with the built-in Application Optimizer feature.

Disk Defrag
With a simple 1-click, Advanced System Repair speeds up your PC by assembling fragmented files on your machine and organizing them more efficiently.

Malware Removal
Finds and removes all types of harmful malware including trojans, worms, bots, adware, spyware, PUPs, and more!

Privacy Cleaner
The all-in-one privacy suite to Clean Your Tracks & Protect Your Privacy! Make your computer safe, secure, and more efficient!

System Tweak/Optimizer
ASR will analyze your complete system and settings to adjust your PC to function at its maximum performance.

Registry Cleaner
Over time, as you install and uninstall applications, the registry can become cluttered with old entries and broken settings which can result in program crashes, and annoying messages and slow the computer down.
Visit our Advanced System Repair Pro Download page to inform yourself about all the benefits of this software and get a free trial copy of it.
advanced system repair pro

Advanced System Repair Pro

One-click automated PC repair solution
ASR logo
With Advanced System Repair Pro you can easily
Replace damaged files
Restore performance
Free disk space
Remove Malware
Protects WEB browser
Remove Viruses
Stop PC freezing
DOWNLOAD
Privacy Policy | Terms of Use | Uinstall
Advanced System Repair Pro is compatible with all versions of Microsoft Windows including Windows 11

Share this article:

You might also like

Fix Windows 11 Black Screen Error
A black screen error inside Windows 11 is a typical screen turning to solid black without any error message. This can be very annoying since it can randomly appear out of nowhere and it will appear while you are using the computer. Worry not, this is not a serious error and we have several solutions for it, so please keep reading and try them as presented in order.

Black screenRestart graphic driver

This is the first thing to check if the issue is due to software or driver malfunctioning, there is a shortcut for rebooting graphic driver inside Windows 11. Press WINDOWS + CTRL + SHIFT + B to reboot the graphic driver and see if this fixes the issue. A beep sound should be heard during this process and the screen should turn back to normal.

Check connections

Sometimes the screen can go black due to a faulty connection or cable. If you have it at your hand try a different cable or slightly and gently nudge the existing one to see will screen flicker. If you are on a laptop try gently moving the lid from back to front and pay attention to the screen. If screen flickers or picture returns with this method, cable or connector needs to be replaced.

Clean your computer

The black screen can be because the computer is overheating. If this is the case either fan inside is not working properly or there is a lot of dirt and dust that needs to be removed so airflow can be established again for proper cooling. We have an article on errortools.com on how to properly clean your PC but if you are not technical enough maybe the best solution would be to call someone who is or to take the PC to service for cleaning.

Change The Projection Settings

Press WINDOWS + P to open projection settings, check to see if PC is set to PC screen only. If any other option is selected change it to PC screen only since this can cause random black screen issues.

Uninstall latest updates

If this problem has started to manifest itself during the latest update, go to setting and roll back from the latest update to fix this issue.

Scan system for malware

The black screen can also be caused by various viruses and malware. IF you have anti-virus software, run a full system scan to check it for malware. If you do not have one, download a free one and run a system scan, we recommend Bitdefender.
Read More
How to Repair Error Code 31

How to Repair Error Code 31

What is Error Code 31?

Device Manager Error Code 31 pops up when Windows prevents the driver for a particular hardware device from loading. The error code 31 is almost always presented in the following format:

“This device is not working properly because Windows cannot load the drivers required for this device.” Code 31

This error can occur with any hardware device; however, in most cases, it occurs with Ethernet cards. The good news is that it belongs in the easy-to-resolve category. So repairing it should not be difficult.

Solution

driverfix boxError Causes

Error code 31 is related to driver problems, and the most common causes include:
  • Outdated drivers
  • Missing drivers
  • Mis-configured drivers
  • Corrupt drivers

Further Information and Manual Repair

To resolve error code 31 on your system, try the methods given below. We have listed down some of the most effective and easy-to-perform DIY methods for fixing Device Manager code 31 on your PC.

Method 1 - Rollback the Driver to its Previous State

This simply means to return the driver back to its previous state - to the version last installed. Try this method to resolve error code 31. This is probably the easiest way to return your PC to its previous working state.

However, by doing so, you will not be able to update your drivers and run new driver versions on your system. In other words, this is a temporary method to fix this issue.

You may still want to try other methods given below to ensure you have the latest drivers installed on your system.

You can roll back the driver to its previous version by accessing the Driver Rollback feature located in the driver settings within the Device Manager. Or another way to perform a rollback is to use the Windows System Restore Utility.

It is a recovery tool built-in the new Windows versions. To access it, simply go to the start menu and type System Restore Utility in the search menu.

Access it and pick a point in the past, also referred to as the restore point, to return your PC to its previous state before the error code 31 occurred.

However, to resolve the problem permanently, try method 2.

Method 2 - Update the Driver

Error code 31, as discussed above, may occur due to outdated, misconfigured, or corrupted drivers. Whatever the reason may be, to ensure the proper functioning of your hardware device, it is important to update the drivers on your system frequently.

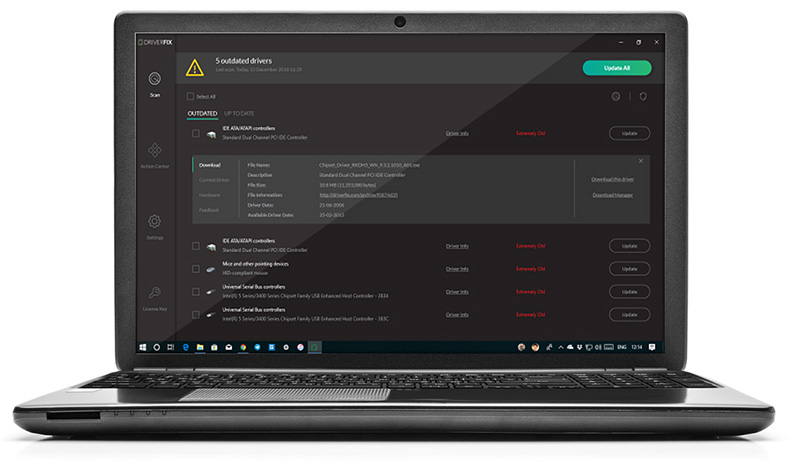
To start driver updates, first, it is important to find out and identify problematic drivers. You need to identify the drivers that are corrupt, misconfigured, and outdated. For this, go to the Device Manager and then look for devices with yellow exclamation marks.

The yellow exclamation marks next to the devices show that these device drivers are problematic. Once you’ve identified the problematic drivers, simply update them by finding the latest and compatible versions on the manufacturer’s website.

This process is time-consuming and can be frustrating at times, especially when doing it for the first time.

Also, once you’ve updated the drivers, you need to update them from time to time to ensure they don’t get outdated, or else you will have to encounter Device Manager error codes again.

Method 3 - Download DriverFIX to Update Drivers Automatically

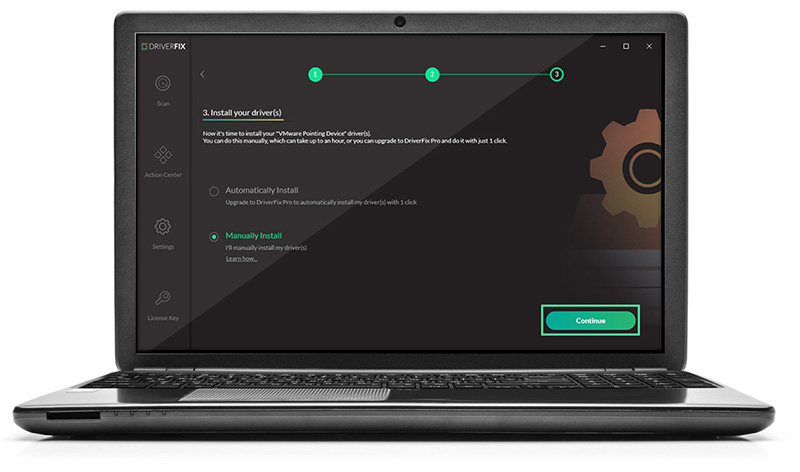
To avoid the hassle and stress involved in updating drivers manually, it is advisable to download and install DriverFIX.

DriverFIX is a smart, innovative, and feature-filled software embedded with an intelligent algorithm that quickly detects problematic drivers, matches them with the latest and compatible versions, and updates them immediately and automatically in just a few seconds and a couple of clicks.

It’s as simple as it can be. Furthermore, with this software installed on your PC, you don’t have to stress and worry about when your drivers need to be updated again.

DriverFIX ensures all drivers are continuously and regularly updated before they become outdated.

Click here to download DriverFIX to repair Device Manager error code 31 and update drivers automatically and regularly.

Read More
How to Fix the Error Code 28

How to Fix the Error Code 28

Error Code 28- What is it?

The error code 28 is a driver error. This is one of the many device manager error codes. When this error occurs on your computer, the following message is displayed:

“The drivers for this device are not installed. (Code 28)”

Another driver device error message you might encounter is error code 41. 

Error Causes

Error 28 occurs because of unsuccessful device driver installation. This usually happens when you try to update new drive versions on your system. It is advisable to repair this error right away as it can hamper your ability to use certain hardware. For example, if error 28 occurs due to the unsuccessful installation of the USB driver, then it if not fixed and resolved it may prevent you from using hardware devices. Unsuccessful driver installation means you either didn’t install it properly or your computer has registry issues. If it’s the registry then you must fix it without any delay because it can expose your PC to serious threats like system crash and failure. To avoid such inconvenience, repair it.

Further Information and Manual Repair

When it comes to repairing the error code 28, here’s what you can do: Simply go to the control panel and click on the Device Manager option:
  • In the details pane with the list of devices, locate the device for which you want to reinstall the driver software.
  • Double click on it to open the properties dialog box.
  • Now click on the driver tab and then click update driver.
After updating, try using that device again if it doesn’t work and shows the error code 28 on your computer screen then this means the underlying cause is the registry. Congratulations, you have just Fixed Error Code 28 In Windows 10 all by yourself. If you would like to read more helpful articles and tips about various software and hardware visit errortools.com daily. Now that’s how you fix Error Code 28 In Windows 10 on a computer. On the other hand, if your computer is going through some driver-related issues that have to get fixed, there is a one-click solution known as DRIVERFIX you could check out to resolve them. This program is a useful tool that could repair corrupted drivers and optimize your PC’s overall performance. This is basically a solution that’s within your grasp with just a click. It’s easy to use as it is user-friendly. For a complete set of instructions in downloading and using it, refer to the steps below Perform a full system scan using DRIVERFIX. To do so, follow the instructions below.
  1. Download and install DRIVERFIX. from the official site.
  2. Once the installation process is completed, run DRIVERFIX. to perform a full system scan. driverfix screenshot
  3. After the scan is completed click the “Update All” button. driverfix screenshot
Read More
No usable free extent could be found
One of the most useful and efficient command-line disk management tools is the DISKPART utility. It can be used to manage, delete or create new hard drive partitions. However, despite its efficiency, there are still times it could face some errors like the “No usable free extent could be found”. You can encounter this error when you create a partition. This error could be due to insufficient disk space which is why it is not able to carry out the operation. It is also possible that the disk is not recognized by the system. And since there are only four recognized primary partitions, when you try creating a fifth one, you will get this error. In addition, this error could also occur if the disk has been partitioned using the MBR disk partitioning format. To fix the “No usable free extent could be found” error, here are some suggestions you can follow.

Option 1 – Free up disk space using Storage Sense

The error could be caused by insufficient disk space in your computer and so you need to free up disk space using Storage Sense to fix the problem.
  • Open Setting > System > Storage from the WinX Menu.
  • From there, you will see a list of all the local and connected storage devices along with the details on the free space. Make sure that Storage Sense is on.
  • Next, find a link that says “Free Up Space” and click it to open.
  • After that, a screen which is the built-in program in Windows 10 will appear and will scan your computer for the following junk files so you can free up disk space:
    • Windows Upgrade Log Files
    • The system created Windows Error Reporting Files
    • Thumbnails
    • Temporary Internet Files
    • Previous Windows Installation Files
    • Delivery Optimisation Files
    • DirectX Shader Cache
  • Choose the files you want to get rid of and then click on the remove files option. Note that you’ll have an idea of the total size as you select any of the junk files listed above.
  • Now go to the “Free Up Space Now” section and click the Clear Now button. This will get rid of all the temporary or junk files in your computer and should hopefully fix Error 1310.
Note: You can also run the Disk Cleanup tool to free up disk space.

Option 2 – Try to run DISKPART in Command Prompt with administrator permissions

The next thing you can do to resolve the error is to run the DISKPART utility with admin privileges.
  • In the Start Search, type “command prompt” and from the search results that appear, look for Command Prompt.
  • Once you found it, right-click on it and select the “Run as administrator” option.
  • After that, try to execute the Diskpart operation once again. Note that you also have to specify different size & offset values for the partitioning and then see if you still encounter the same error.

Option 3 – Try to execute the DISKPART clean command

The next thing you can try is to execute the clean command in DISKPART to fix any issues in the disk.
  • Open Command Prompt with admin privileges.
  • Then execute this command: diskpart
  • The command you entered will initiate the DISKPART utility. Now execute this second command to view all the disk connects or all the partitions on those disks formed: list disk
  • After that, you need to select one command depending on the list command you executed and then execute this third command: select disk #
  • The third command you just executed will select the disk or partition you want to select. Now execute this fourth command: clean
  • The command you entered will remove all the volumes or partitions formatting the disk in focus.
  • Once it’s done, try to carry out the DISKPART operation you were trying to execute.

Option 4 – Try to update the USB drivers

Outdated USB drivers can also be the reason why you’re getting the error. Thus, you must update them from time to time. You can install the latest version of the USB driver for your system. But you need to check the manufacturer’s website or guidelines to update the driver according to your system. If it happens that the drivers might not be compatible with the version of the system your laptop is using which is unlikely, you can run the driver software in Compatibility Mode in that kind of situation. To update your USB drivers, follow these steps:
  • Tap the Win + R keys to launch Run.
  • Type in devmgmt.msc into the box and tap Enter or click OK to open the Device Manager.
  • After that, look for the USB Serial Bus controllers from the list of device drivers displayed. If you see a red or yellow sign that shows up against the driver, right-click on the driver’s name and select “Update Driver Software”. And if you find any “Unknown device”, you need to update it as well.
  • Select the “Search automatically for updated driver software” option and then follow the instructions to complete the process.

Option 5 – Run the Hardware and Devices troubleshooter or the USB troubleshooter

You can find the Hardware and Devices troubleshooter under the Troubleshooters section of the Windows Settings panel on your Windows 10 PC. You can use this troubleshooter to fix common hardware and external device-related issues without exerting too much effort. If you don’t know where to find it, follow these steps:
  • Tap the Win + I keys to open the Windows Settings.
  • Next, navigate to Update & Security > Troubleshoot.
  • You should see the option for Hardware and Devices on your right-hand side where you can also find the “Rub the troubleshooter” button – click on it to get started.
  • Follow the next on-screen instructions to fix the basic issues of common hardware and external device.
Note: If you want to, you can also use the USB Troubleshooter to fix the problem just go back to the Troubleshoot page where you can find it.
Read More
Fix Generic PnP monitor driver issue
Universal PnP or plug-and-play monitors use a generic PnP Windows driver. Whenever a user plugs a USB device or monitor into a PC the system will automatically identify the device and it will install the proper driver for smooth running. Generic PnP Monitor in Windows 10 means that Windows 10 installed a monitor driver as the PNP did not recognize the device. This generic PnP monitor driver may not work perfectly like the manufacturer’s one. It can lead to issues like unable to set the best monitor resolution and the screen refresh rate. Therefore, it is important to fix this issue. All of that being said let us fix your PnP display driver issue.
  1. Reconnect monitor

    Always try this first, just by unplugging the monitor and then plugging it back may resolve the issue, if the monitor was not detected properly the first time, there are very high chances that this method will resolve the issue.
  2. Check if the Device Manager is reporting an error and update the driver

    If the hardware is functioning properly then the issue might be in Windows not detecting device or driver malfunction. In any case, the Device Manager will be the one who will report this problem. In order to check to see if the driver is properly working press ⊞ WINDOWS + X to open the hidden start menu. keyboard with windows and x marked Once it opens, click on Device Manager to open it, If you have a driver device error inside Windows, you should see it immediately when entering the Device Manager, it will have a yellow exclamation mark beside it. Right-click on it and choose update driver.
  3. Reinstall driver

    If driver update failed or you already have the latest drivers, reinstalling them could fix the issue since drivers might have corrupted during installation of some update or application. Follow steps from point 3 to get to the driver in Device Manager, then right-click on it but instead of update choose to uninstall. Reboot Windows once the driver is uninstalled and Windows will install a new one automatically. If you do not want to update drivers automatically install the latest driver for your device, then reboot.
  4. Check Windows update

    Check to see if the latest Windows update is installed, update your Windows if needed
  5. Fix driver issue with DRIVERFIX

    If everything else fails, get DRIVERFIX, a premium solution for your PC issues, and fix driver errors.
Read More
How to Fix Windows Update Error 0x800f0900
If you are trying to update or upgrade your Windows 10 computer using the Windows Update and suddenly an “Error 0x800f0900” appears, then you’ve come to the right place as this post will help you resolve this Windows Update issue. When you encounter this error, you will see the following error message on your screen:
There were problems installing some updates, but we’ll try again later. If you keep seeing this and you want to search the web or contact support for information, this may help: 2018-03 Cumulative Update for Windows 10 Version 1709 for x64-based Systems (KB4088776) – Error 0X800F0900”
This kind of Windows Update error is most likely caused by some corrupted files in the system. It is also possible that the Windows Database might have become corrupted as well. So if you are currently experiencing this problem, refer to the options given below and see which one of them works best for you.

Option 1 – Try running the DISM Tool

Running the DISM Tool helps in repairing the Windows System Image as well as the Windows Component Store in Windows 10. Using this built-in tool, you have various options such as the “/ScanHealth”, “/CheckHealth”, and “/RestoreHealth”.
  • Open the Command Prompt as admin.
  • Then type in this command: exe /Online /Cleanup-image /Restorehealth
  • Do not close the window if the process takes a while as it will probably take a few minutes to finish.
After you run this tool, a log file is created at C:WindowsLogsCBSCBS.log. On the other hand, if the Windows Update client is already broken, you will be prompted to use a running Windows installation as the repair source or use a Windows side-by-side folder from a network share, as the source of the files. Although the chances of this happening are less, if it turns out to be the case, you need to run an advanced command in the DISM tool to repair a broken Windows Update. Just repeat the process above but use the following command instead:
DISM.exe /Online /Cleanup-Image /RestoreHealth /Source:C:RepairSourceWindows /LimitAccess

Option 2 – Try running the System File Checker or SFC scan

The SFC scan or System File Checker is a built-in command utility in Windows that helps in restoring corrupted files as well as missing files that cause several issues in the computer like the Windows Update Error 0x800f0900. It replaces bad and corrupted system files with good system files. To run the SFC command, follow the steps given below.
  • Tap Win + R to launch Run.
  • Type in cmd in the field and tap Enter.
  • After opening Command Prompt, type in sfc /scannow
The command will start a system scan which will take a few whiles before it finishes. Once it’s done, you could get the following results:
  1. Windows Resource Protection did not find any integrity violations.
  2. Windows Resource Protection found corrupt files and successfully repaired them.
  3. Windows Resource Protection found corrupt files but was unable to fix some of them.

Option 3 – Try running the Windows Update Troubleshooter

Running the built-in Windows Update troubleshooter could also help you resolve the Windows Update error 0x80073712. To run it, go to Settings and then select Troubleshoot from the options. From there, click on Windows Update and then click the “Run the troubleshooter” button. After that, follow the next on-screen instructions and you should be good to go.

Option 4 – Perform a System Restore

You can also try to perform a System Restore as it can also help you fix the Windows Update Error 0x800f0900. You can do this option either by booting into Safe Mode or in System Restore. If you are already in the Advanced Startup Options, just directly select System Restore and proceed with the next steps. And if you have just booted your PC into Safe Mode, refer to the steps below.
  • Tap the Win + R keys to open the Run dialog box.
  • After that, type in “sysdm.cpl” in the field and tap Enter.
  • Next, go to the System Protection tab then click the System Restore button. This will open a new window where you have to select your preferred System Restore point.
  • After that, follow the on-screen instructions to finish the process and then restart your computer and check if the problem is fixed or not.

Option 5 – Reset both the SoftwareDistribution and Catroot2 folders

You have to stop a couple of services such as BITS, Cryptographic, MSI Installer, and Windows Update Services. And to do that, you need to flush the contents in the SoftwareDistribution folder. The Software Distribution folder in the Windows operating system is a folder that can be found in the Windows directory and is used to store files temporarily which might be required to install the Windows Update on your PC. Thus, it is required by the Windows Update and maintained by WUAgent. Aside from that, it also contains all the Windows Update History files and once you delete them, you will most likely lose the Update history. As a result, the next time you run the Windows Update, it may result in a longer detection time.
  • Open the WinX Menu.
  • From there, open Command Prompt as admin.
  • Then type in the following command – don’t forget to hit Enter right after typing each one of them.
net stop wuauserv net start cryptSvc net start bits net start msiserver
  • After entering these commands, it will stop the Windows Update Service, Background Intelligent Transfer Service (BITS), Cryptographic, and the MSI Installer
  • Next, go to the C:/Windows/SoftwareDistribution folder and get rid of all the folders and files thereby tapping the Ctrl + A keys to select them all and then click on Delete. Note that if the files are in use, you won’t be able to delete them.
After resetting the SoftwareDistribution folder, you need to reset the Catroot2 folder to restart the services you just stopped. To do that, follow these steps:
  • Type each one of the following commands.
net start wuauserv net start cryptSvc net start bits net start msiserver
  • After that, exit Command Prompt and restart your computer, and then try to run Windows Update once more.
Read More
Fix Windows Error Code 0x80070017
If you suddenly encountered a Windows Error Code 0x80070017 during an Update, Installation or System Restore then it’s probably due to some missing or corrupted system files. This kind of error code can occur during an update, installation, or system restore and the only way out of it is to download the file once again and re-run the installation from the top. Before you start to troubleshoot the problem, you need to create a System Restore Point first. After you create a System Restore point, you can follow the troubleshooting options laid out below to fix the Windows Error Code 0x80070017. You just have to follow the troubleshooting option that applies to your situation and whether you got the error during an update, installation, or during System Restore. Whether you got the error 0x80070017 while updating Windows 10 or installing it or during a system restore, the first thing you must do is run the System File Checker. As pointed out early on, the Windows Error Code 0x80070017 might be caused by corrupted or missing system files so the first thing you can try is to run the System File Checker scan.
  • Tap Win + R to launch Run.
  • Type in cmd in the field and tap Enter.
  • After opening Command Prompt, type in sfc /scannow and hit Enter.
The command will start a system scan which will take a few whiles before it finishes. Once it’s done, you could get the following results:
  1. Windows Resource Protection did not find any integrity violations.
  2. Windows Resource Protection found corrupt files and successfully repaired them.
  3. Windows Resource Protection found corrupt files but was unable to fix some of them.
If you have encountered Windows Error Code 0x80070017 during an Update, then here are some options you need to try:

Option 1 – Delete the files/contents in the SoftwareDistribution Folder

The Software Distribution folder in the Windows operating system is a folder that can be found in the Windows directory and is used to store files temporarily which might be required to install the Windows Update on your PC. Thus, it is required by the Windows Update and maintained by WUAgent. A lot of users tried deleting the files in this folder to fix the problem and so far it has worked. Like them, you can try clearing the Windows Update cache by simply deleting the contents of the folder named “SoftwareDistribution” since Windows apparently can’t clear and re-download the update contents once they are corrupted. Thus, deleting the contents of this folder will make Windows download the contents again which will fix the problem. To do that, follow the steps below.
  • Open the WinX Menu.
  • From there, open Command Prompt as admin.
  • Then type in the following command – don’t forget to hit Enter right after typing each one of them.
net stop wuauserv net stop bits
  • After entering these commands, it will stop the Windows Update Service and the Background Intelligent Transfer Service.
  • Next, go to the C:/Windows/SoftwareDistribution folder and get rid of all the folders and files thereby tapping the Ctrl + A keys to select them all and then click on Delete. Note that if the files are in use, you won’t be able to delete them.
  • Once all the contents in the Software Distribution folder are deleted, restart your PC and then go back to Command Prompt and input the following commands again.
net start wuauserv net start bits
Since the folder has already been flushed, it will be populated afresh the instant your restart your computer and open Windows Update.

Option 2 – Run the Windows Update Troubleshooter

Running the built-in Windows Update troubleshooter could also help you resolve the Windows Update Error Code 0x80070017. To run it, go to Settings and then select Troubleshoot from the options. From there, click on Windows Update and then click the “Run the troubleshooter” button. After that, follow the next on-screen instructions and you should be good to go. On the other hand, if you got the error code 0x80070017 during a Windows 10 installation, then it’s because of bad media or corruption in ISO. Here are some troubleshooting steps for this kind of situation:

Option a – Try to create Windows 10 ISO media again

In this option, you will have to create a Windows 10 bootable media and use it to install the latest Windows 10 version. Most users reported that this option works and the reason why it does have something to do with the Windows Update client since the Windows Updates downloaded from the regular Windows Update client seem to create issues such as the error 0x80070017. However, issues like this one don’t occur when the very same Windows Updates are downloaded and installed via an ISO file. Take note that when using a Windows ISO file, you will be asked to choose what you want to do with the previous settings and apps. A lot of users opted for the “Not to keep the old Windows settings” option which has resolved the issue. So if you want to keep the previous settings then you must try to update Windows first while keeping the old settings. However, if it doesn’t work, you have to try installing the latest version of Windows without keeping the previous settings.
  • Click this link and then click the Download Tool Now button.
  • Next, click the “Use the tool to create installation media (USB flash drive, DVD, or ISO file)…” option and follow the next given instructions on the screen.
  • Now select the ISO file option in step 5.
  • After that, you should now have an ISO file.
  • Next, go to the location where you’ve downloaded the ISO file.
  • Then right-click on the Windows 10 ISO file and select the Open with the option and then select File Explorer.
  • Now click on “setup.exe” and follow the next instructions that appear on the screen. When asked, you have to select either Nothing (clean install) or Keep personal files only option. Take note that you must not select the “Keep personal files, apps, and Windows settings since it doesn’t really work.

Option b – Run Microsoft’s online troubleshooter

Running Microsoft’s online troubleshooter might also help you fix the Windows update error 0x80070017. This online troubleshooter is known to help in fixing Windows Update errors, it scans your computer for issues that might be causing the problem and then fixes them automatically. If you got the error during System Restore then this means that the files that are being copied from the disk are not making it to the hard drive. To resolve it, here’s what you can do:

Option 1 – Run System Restore in Safe Mode

You might want to run System Restore in Safe Mode and see if it works. Just reboot your PC into Safe Mode and then run System Restore.

Option 2 – Reset Repository

  • Boot your PC into Safe Mode.
  • Then open Command Prompt as admin.
  • Next, type the “net stop winmgmt” command and hit Enter to stop the Windows Management Instrumentation Service.
  • After that, go to C:/Windows/System32/wbem. From there, rename the repository folder to “repository-old”.
  • Restart your computer.
  • After your computer has restarted, open Command Prompt as admin again and then type the “net stop winmgmt” command and hit Enter.
  • Next, type the “winmgmt /resetRepository” and hit Enter to reset Repository.
  • Restart PC and check if System Restore now works.

Option 3 – Try resetting Windows 10

To fix the error 0x80070017, you can try resetting Windows 10. Doing so won’t get rid of any file in your system – instead of erasing all your media files and documents, it only resets all the system settings and files. Simply go to Settings > Recovery. From there click the Get started button under the Reset This PC section.
Read More
Disable Facebook face recognition
Facebook has an algorithm inside it that can recognize your face in pictures and videos which is meant to help people tag friends when they upload media into Facebook. It is a neat feature meant to help all Facebook users but what if we do not want to be detected in pictures and videos? What if we do not want to be tagged? If you are one of the Facebook users that do not wish to be detected and recognized by Facebook in media keep on reading to find out how you can disable this option.
  1. Open the Facebook website and log into your account.
  2. Click on the arrow visible in the top menu bar.
  3. Select the Settings & privacy option.
  4. Click on the Settings option.
  5. Switch to the Face recognition tab on the left-hand side.
  6. Click the Edit button.
  7. Select No from the drop-down list.
And you are done, you do not need to log out or restart facebook in order for changes to have an effect. Now you are free from face recognition and detection.
Read More
Make START menu full screen in Windows 10
Hello and welcome to another great tutorial from errortools.com. Today we will be making Windows START menu full screen. First introduced in Windows 8.1, the start menu has been shifted from full screen to gadget like in Windows 10 but if you prefer to have it over the entire screen with all of its glory and large icons you can do so and we will be happy to show you how. Press ⊞ WINDOWS and choose settings. Windows 10 Star menu with marked settings iconFrom the settings screen, choose Personalization. Windows 10 settings menu with marked Personalization groupUnder personalization options click on START. windows settings start screen sectionAnd then on the right part click on the button under Use Start full screen to turn it ON windows settings start screen switch for full screenThat's it, your start menu is now full screen.
Read More
Software review series: KRITA
Krita Desktop is a free and open-source painting application. Krita is a full-featured free digital painting studio for artists who want to create professional work from start to end. Krita is used by comic book artists, illustrators, concept artists, matte and texture painters, and in the digital VFX industry. Krita has been in development for over 10 years and has had an explosion in growth recently. It offers many common and innovative features to help the amateur and professional alike. Krita has a user-friendly interface. The dockers and panels can be moved and customized for your specific workflow. Once you have your setup, you can save it as your own workspace. You can also create your own shortcuts for commonly used tools. In addition to painting, Krita comes with vector, filter, group, and file layers. Combine, order, and flatten layers to help your artwork stay organized. There are also three different views on how to see the layers. Krita supports full color management through LCMS for ICC and OpenColor IO for EXR, allowing you to incorporate Krita into your existing color management pipeline. Open PSD files that even Photoshop cannot open. Load and save to PSD when you need to take your artwork across different programs. Krita is the only dedicated painting application that lets you open, save, edit and author HDR and scene-referred images. Furthermore, with OCIO and OpenEXR support, you can manipulate the view to examine HDR images, and use it in the most cutting-edge workflows from the film and visual effects industries.
Read More
1 2 3 162
Logo
Copyright © 2022, ErrorTools. All Rights Reserved
Trademarks: Microsoft Windows logos are registered trademarks of Microsoft. Disclaimer: ErrorTools.com is not affiliated with Microsoft, nor claim direct affiliation.
The information on this page is provided for information purposes only.
DMCA.com Protection Status