Fix Windows Update Error 0x80244007

Getting errors while trying to update your Windows 10 computer is not an uncommon occurrence. Although some of them are easy to fix, there are others that need a lot of time and research in order to resolve. One of these tough Windows Update errors is Error 0x80244007. This kind of Windows Update error halts the process of Windows Update and a simple system restart won’t help much to fix it.

When you encounter this Windows Update error, you will see a description that says, “SOAP client failed because there was a SOAP fault for reasons of WU_E_PT_SOAP_* error codes”. One of the main causes of such an error is that Windows was not able to renew the cookies for Windows Update. To fix this error, here are some suggestions that might be useful.

Option 1 – Clear up temporary or junk files

The error could be caused by some temporary or junk files in your computer and so you need to clear them up to fix the problem. You can achieve that using the Storage Sense feature.

  • Open Setting > System > Storage from the WinX Menu.
  • From there, you will see a list of all the local and connected storage devices along with the details on the free space. Make sure that Storage Sense is on.
  • Next, find a link that says “Free Up Space” and click it to open.
  • After that, a screen which is the built-in program in Windows 10 will appear and will scan your computer for the following junk files so you can free up disk space:
    • Windows Upgrade Log Files
    • The system created Windows Error Reporting Files
    • Thumbnails
    • Temporary Internet Files
    • Previous Windows Installation Files
    • Delivery Optimisation Files
    • DirectX Shader Cache
  • Choose the files you want to get rid of and then click on the remove files option. Note that you’ll have an idea of the total size as you select any of the junk files listed above.
  • Now go to the “Free Up Space Now” section and click the Clear Now button. This will get rid of all the temporary or junk files in your computer and should hopefully fix the Windows Update error 0x80244007.

Option 2 – Try running the Windows Update troubleshooter

Windows 10 have various troubleshooters that can help you resolve many system issues. So if you’re dealing with Windows Update errors like Error 0x80244007, you can run the Windows Update troubleshooter to resolve it.

To run it, go to Settings and then select Troubleshoot from the options. From there, click on Windows Update and then click the “Run the troubleshooter” button. After that, follow the next on-screen instructions and you should be good to go.

Option 3 – Try to reset the Windows Update components

If by any chance that the second option didn’t work, resetting the Windows Update components could also help you resolve the problem. How? Refer to the following steps:

  • Open Command Prompt with admin privileges.
  • After that, type each one of the following commands and hit Enter after you key in one after the other.
    • net stop wuauserv
    • net stop cryptsvc
    • net stop bits
    • net stop msiserver

Note: The commands you entered will stop the Windows Update components such as Windows Update service, Cryptographic services, BITS and MSI Installer.

  • After disabling WU components, you need to rename both the SoftwareDistribution and Catroot2 folders. To do that, type each one of the following commands below and don’t forget to hit Enter after you type one command after the other.
    • ren C:WindowsSoftwareDistribution SoftwareDistribution.old
    • ren C:WindowsSystem32catroot2 Catroot2.old
  • Next, restart the services you’ve stopped by entering another series of commands. Don’t forget to hit Enter after you key in one command after the other.
    • net start wuauserv
    • net start cryptsvc
    • net start bits
    • net start msiserver
  • Close Command Prompt and reboot your PC.
If you like to learn and find out more about various Windows errors, and how to repair them go to our vast archive or use search to find articles that will explain and help you in solving your issue.
However, if you prefer to do things fast and with automatization then we are proposing to use an automated solution for your issues. The application that we are recommending is Advanced System Repair Pro
Advanced System Repair utilizes multiple tools all in one to give you a quick, simple, reliable, and very thorough diagnosis of your PC. It brings you all the tools you need in one program to clean, fix, protect, optimize and boost your PC!
1-Click Maintenance
All the tools to make it simple and easy! It's like having a professional technician at the click of a mouse.

Junk Cleaner
Keeping your computer free from unnecessary clutter also helps make your computer last longer. Like any other machine, if you keep it clean and take care of it, it will serve you better for longer!

Optimize background apps
Optimize applications background activity with the built-in Application Optimizer feature.

Disk Defrag
With a simple 1-click, Advanced System Repair speeds up your PC by assembling fragmented files on your machine and organizing them more efficiently.

Malware Removal
Finds and removes all types of harmful malware including trojans, worms, bots, adware, spyware, PUPs, and more!

Privacy Cleaner
The all-in-one privacy suite to Clean Your Tracks & Protect Your Privacy! Make your computer safe, secure, and more efficient!

System Tweak/Optimizer
ASR will analyze your complete system and settings to adjust your PC to function at its maximum performance.

Registry Cleaner
Over time, as you install and uninstall applications, the registry can become cluttered with old entries and broken settings which can result in program crashes, and annoying messages and slow the computer down.
Visit our Advanced System Repair Pro Download page to inform yourself about all the benefits of this software and get a free trial copy of it.
advanced system repair pro

Advanced System Repair Pro

One-click automated PC repair solution
ASR logo
With Advanced System Repair Pro you can easily
Replace damaged files
Restore performance
Free disk space
Remove Malware
Protects WEB browser
Remove Viruses
Stop PC freezing
DOWNLOAD
Privacy Policy | Terms of Use | Uinstall
Advanced System Repair Pro is compatible with all versions of Microsoft Windows including Windows 11

Share this article:

You might also like

Samsung Odyssey Neo G9 monitor review
samsung Odyssey Neo G9Odyssey Neo G9 is a successor to Odyssey G9 curved gaming monitor and it is aimed again at the gaming community with its specifications but of course, it can be used for work as well. Gapping at a stunning $2500 USD price it is not really a cheap piece of hardware so it is normal to see what do you get for this kind of price and do features justify it, so let’s dive in.

Size and resolution

The first thing that you can notice about the screen is that it is big and curved, 49 inches big which is pretty big, and with it, I believe you can forget about using 2 or 3 screens because this single one will cover everything you need really. Going as far as 5120 X 1440 resolution is the strange definition, basically, this is 5K which is kind of nice but I do not see the advantage. Sure it is larger than 4K, but for the price of $2500 I expected an 8K monstrosity so if the resolution is not the main price justification then what is? Let’s move on and find out.

Odyssey tech specs

The monitor comes with HDR and 240Hz refresh rate which is very nice and coupled with 1ms pixel response time, adaptive sync, and Variable Refresh Rate you get pretty good other tech specs. All of this is very nice but the monitor's strongest selling point is Mini Led tech. Mini Led is a next-gen tech currently found only in high-end TVs. With this technology, monitors can produce truer blacks sort of speak thanks to a greater number of dimming zones. Odyssey Neo G9 is rated at 2000 nits in the brightness values and local dimming zones go to stunning 2048. It comes also with Quantum HDR that supports 10+, Freesync, and G-Sync capability. In connection, the department monitor comes with a single display 1.4 port and two HDMI 2.1 ports. It also includes a headphone jack along with two USB 3.0 ports.

Conclusion

While the resolution of the monitor is nothing impressive for the given price, its size and the rest of the tech specs surely are. Now I will not lie, the price is still a little too high but if you could afford it easily I think you should.
Read More
How to Fix Slow file copy speed in Windows 10
We tend to move and copy tons of files on our PCs and mostly, the process of copying or moving files, especially if the file has the size of 1GB or up, tends to take quite long. This may be caused by some issues which is why you face slow copy or move speed. So if you are experiencing this issue on your Windows 10 computer, then read on as this post will give you a couple of solutions you can try to increase the speed in copying or moving files. Follow the given instructions below.

Option 1 – Try to change the USB port

You might want to change the USB port since modern computers have a variety of USB ports. So if your USB drive supports USB 3.0 or 3.1, make sure that you plug it inside a USB 3.0 or 3.1 ports. If you’re not sure which port, just keep in mind that the USB 3 port is usually blue or you can also use your computer’s documentation or manual as a reference to locate it. It may sound nothing but changing the USB port can actually improve the copying or moving speeds drastically so this should be the first thing you can try to speed up the process of copying or moving files.

Option 2 – Update the USB Controller Drivers

  • First, click the Start button and type “device manager”.
  • Then click on the “Device Manager” from the search results to open it.
  • From there, look for the “Universal Serial Bus controllers” option and then right-click on each one of the USB drivers and select the Update Driver from the menu.
  • Restart your PC and then click the “Search automatically for updated driver software” option.
You also have the option to update the motherboard and the USB driver from the manufacturer’s official website.

Option 3 – Check for any hard disk errors

  • On your desktop, right-click on the “This PC” or computer icon and then select Manage to open the Disk Management. Here you get to check your drive’s health.
  • Next, click on Disk Management on the left side panel.
  • From there, check the state of your drives. If it shows that all your partitions are healthy then it means all is good and that the problem may have something to do with some physical issues with your hard drive.
You might also want to run the CHKDSK utility to help you fix any issues with your hard disk. If your hard drive has issues with integrity, the update will really fail as the system will think that it’s not healthy and that’s where the CHKDSK utility comes in. The CHKDSK utility repairs hard drive errors that might be causing the problem.
  • Open Command Prompt with admin privileges.
  • After opening Command Prompt, execute the following command and hit Enter:
chkdsk /f /r
  • Wait for the process to be completed and then restart your computer.

Option 4 – Try to disable Windows Auto Tuning

Disabling Windows Auto-Tuning can also help in increasing the copying or moving of files in your computer. It is said that this feature improves the performance of programs that receive TCP data over a network by adjusting the receive buffer size dynamically throughput and latency of the link. Thus, if you are trying to copy some data over the network, then the Auto Tuning feature is playing a role here. And in some cases, disabling this feature completely resulted in a lot faster copy speeds over the network.

Option 5 – Try changing the USB Removal Policy

  • First, plug your USB drive or external device into your PC and then open This PC.
  • Next, right-click on your device and select Properties.
  • After that, go to the hardware tab and select the storage media that you want to enhance and then click on the Properties button.
  • From there, you can select the Better performance option if you wish for your device to have a better performance. Once you select this option, it will enable write caching in your Windows 10 computer but you need to use the “Safely Remove Hardware” option from the notification area to safely disconnect the device otherwise it may result in data corruption.

Option 6 – Format your drive

  • To get started formatting your drive, tap the Win + E keys and then go to the access page of the drive.
  • Next, right-click on the drive and select Format.
  • After that, uncheck the “Quick Format” option and then format your drive properly.
  • Now once the formatting process is finished, unplug the drive and plug it back in afterward.
  • Check if the error is already fixed. If the drive is not initialized, tap the Win + R keys and hit Enter.
  • After opening the Run dialog box, type “diskmgmt.msc” and hit Enter to open Disk Management.
  • From there, right-click on the drive volume and select initialize disk.
  • Next, select the correct partition type and proceed.
Read More
How to Fix Failed to load DLL file Error
If your operating system cannot or is not able to load a required DLL file on your Windows startup and you encounter a message saying, “Failed to load DLL”, then you’ve come to the right place as this post will guide you in fixing this problem. When you encounter this kind of issue, you will see either of the following error messages on your screen:
“The dynamic library dll failed to load.” “Failed to load dll library.”
This kind of error can occur when your Windows operating system fails to locate the DLL library which the system needs to access during startup. It can also occur when the DLL file is not in a directory specified in the path or when the DLL file is corrupted or has gone missing. Moreover, you can also encounter this error if the DLL file is infected with some malware. Whatever the case is, here are some suggestions you have to check out to resolve the problem.

Option 1 – Try to reinstall the program

The first thing you can do is to reinstall the program that’s giving you this error. Once you’ve uninstalled the program, download its latest setup file from its official site and then install it again.

Option 2 – Try checking the startup programs

You might also want to check the startup programs on your computer, especially the Windows Registry startup paths, and then remove the startup entry to the concerned DLL file.

Option 3 – Try to re-register the problematic DLL file

You may have to re-register the ntdll.dll file using the regsvr32.exe before you can successfully install the program and fix the ntdll.dll file crash error. The Regsvr32 tool is a command-line utility that can be used to register and unregister OLE controls like DLL and ActiveX (OCX) control in the Windows operating system. Follow the steps below to use it.
  • Open Command Prompt as admin from the WinX menu.
  • Next, type the following commands in the elevated Command Prompt and hit Enter to execute the command. This will re-register the affected DLL file using the Windows operating system tool, regsvr32.exe.
    • exe /[DLL file]
    • exe [DLL file]
Note: Replace “[DLL file]” with the name of the DLL file that was pointed out in the error.
  • After you execute the given commands, you should see a message saying, “DllRegisterServer in vbscript.dll succeeded” if the Regsvr32 tool was able to run successfully. After that, try to install the program again and see if it now works.

Option 4 – Try to replace the DLL file with a trusted source

  • First, you need to get the new DLL file from another computer with preferably the same file version number.
  • After that, you need to boot your PC into Safe Mode and navigate to the paths listed below and then replace the file using a USB drive or other external storage devices.
    • x86: This PC > C:/Windows/System32
    • x64: This PC > C:/Windows/SysWOW64
  • Next, type “cmd” in the Cortana search box and right-click on Command Prompt, and select “Run as administrator” to open it with administrator privileges.
  • Now type the “regsvr32 ntdll.dll” command and hit Enter.
  • Restart your PC and check if the error is now fixed.

Option 5 – Try checking the details in the Event Viewer

Checking the details in the Event Viewer can also help you find out the root cause of the problem as the Event Viewer usually contains detailed information about the error.

Option 6 – Try running the DISM tool

You might want to repair potentially corrupted files in your system as having them could also trigger the “Failed to load DLL” error. To repair these corrupted system files, you can run the DISM commands:
  • Tap the Win + X keys and click on the “Command Prompt (Admin)” option.
  • After that, input each one of the commands listed below sequentially to execute them:
    • Dism /Online /Cleanup-Image /CheckHealth
    • Dism /Online /Cleanup-Image /ScanHealth
    • Dism /Online /Cleanup-Image /RestoreHealth
  • Once you’ve executed the commands given above, restart your computer and check if the “Failed to load DLL” error is now fixed.

Option 7 – Try scanning your computer using Windows Defender

The DLL file might also be infected with malware or virus and to eliminate it which could explain why you’re getting the “Failed to load DLL” error. Thus, you have to scan your computer using security programs like Windows Defender.
  • Tap the Win + I keys to open Update & Security.
  • Then click on the Windows Security option and open Windows Defender Security Center.
  • Next, click on Virus & threat protection > Run a new advanced scan.
  • Now make sure that Full Scan is selected from the menu and then click the Scan Now button to get started.
Read More
How to enable God mode inside Windows 11
God mode windows 11
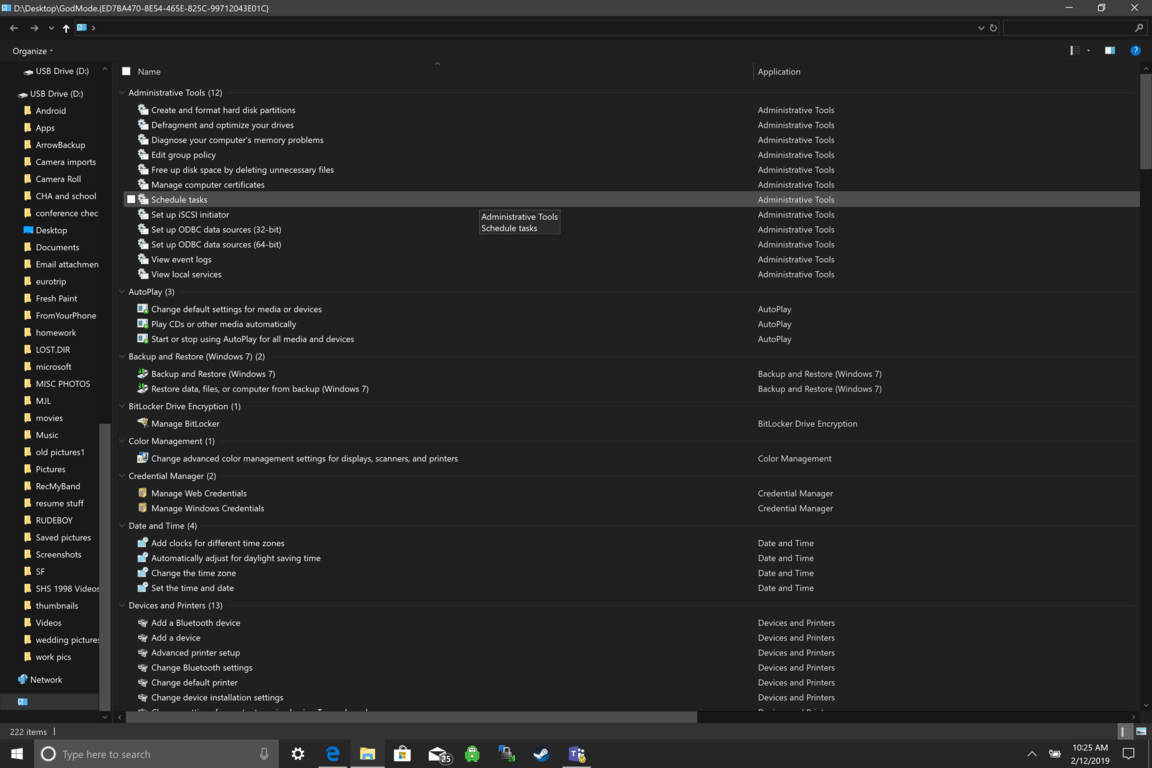
Like in Windows 10, Windows 11 will also support God mode to be enabled and used. For those readers that do know what God mode is, let me explain it in simple terms. God mode is the icon on the desktop that once clicked will open and let you adjust every option in the control panel and some hidden features for Windows inside one application. There are a lot of advantages to having this one-click fast access to features, especially if you are a power user. Luckily creating such an awesome icon and enabling God mode is very easy to accomplish, all you have to do is:
  1. Create a new folder where you want to have the God mode icon
  2. Rename folder exactly: {ED7BA470-8E54-465E-825C-99712043E01C}
  3. Enjoy God mode
As you can see creating and accessing all settings at your fingertips is much easier than most people think. Enjoy your ultimate access to Windows 11 features and if you wish you can drag and drop sections from it into the desktop or anywhere for easy access to that specific topic.
Read More
Fix Mic not working in DOTA2
DOTA2 involves teams of five players each, where each player chooses a “hero” character. Each game has two teams pitted against each other, on opposite sides of a map. Once you start, you and your teammates try to level up by fighting and defeating heroes from other teams as well as non-player characters who exist within the game universe. Once you have a strong enough team, you would then try to attack an opposing team’s base. If you destroy their “ancient,” your team wins. The teamwork and interactivity required to play the game are some of its biggest attractions. You can text and voice chat as part of the Dota 2 gameplay, enabling you and your team to come up with strategies to take over your opponents’ base and fortifications. For this reason, a properly working microphone and headset are important if you are to get the most out of this exciting online game. However, there are many times when you find that there are audio dropouts when you try to speak into your microphone. The question “How do I get my mic to work on Dota 2?” is one of the most commonly asked on gaming forums related to this game. Here are solutions for why this can happen:
  1. You are logged in to another computer that is running the STEAM client

    While entirely rare, there are cases where the microphone in Steam is disabled because the same account is active and in use on a different computer. It may not notify you that your account is in use elsewhere. If this is the error, try to log out on other devices and then test it on only one system. If you cannot access the other computer that has access to your account, then change your password. This will automatically disconnect your Steam account from the other computer and let you enjoy voice chat in Dota 2 and other Steam games.
  2. Your microphone is not properly set up in Dota 2

    From the main Dota 2 menu, before you start a match, you can set up your microphone for voice chat. At the top, left-hand corner, click the gear icon to open Settings Select the AUDIO tab and ensure that the Sound Device and Speaker Configuration are set to default. On the same tab, activate Voice (Party) and set your Push to Talk shortcut key for your team. Select the appropriate Open Mic Threshold using the slider at the bottom of this tab to get your microphone recorded at a comfortable level.
  3. The Windows Audio Enhancements setting is turned on

    If you still cannot get your microphone to work properly, then your problem could be Windows Audio Enhancement. It is possible to get your microphone to work with Dota 2 by disabling these features. Right-click your volume icon on the system tray and select Recording Devices. Choose your active microphone then click its Properties button. On the Microphone Enhancements tab, make sure the checkboxes marked Voice enhancements and Acoustic Echo cancellation is unchecked Reboot your PC and retry using your microphone to chat.
  4. Your audio drivers need to be updated

    If you try all of the steps above and still have Dota 2 not recognizing your mic input update mic drivers by going in device manager and choosing update driver.
Read More
Watch old game intros in 4k or 8K hi-definition
AI and neural networks are more and more being used in all parts of our lives. From face detections to deep fakes it is both amusing and frightening to watch at the same time. From some really bad uses of neural networks and AI overall, looking at you deep fakes, upscaling videos or images are mostly harmless pieces of work not harming anyone. There is one cool YouTube channel, well there are more but this one seems to have most of the videos on it and if I am wrong I apologize. https://www.youtube.com/channel/UC33rC3GO1UZFAkMcCCwjyWg So upscale is like previously mentioned a YouTube channel that hosts old game trailers and into videos but in full 4K or 8K video resolution, fully upscaled using neural networks. There are some videos that are not maybe top-notch but the large quantity of them is pretty well upscaled and they do indeed look great. So if you have some time and want that old nostalgia fix, go and check it out. You might find something that will bring that old you out and you might even drop a smile or two remembering old good days, I know I have.
Read More
Windows keyboard language changes on its own
If you have multiple keyboards, things can get quite tricky. There are times when the keyboard language changes on its own since the keyboard changes while you are typing. The thing is, the keyboard changes because sometimes we accidentally tap shortcuts like Win key + Space key or Alt + Shift or Ctrl + Shift which changes the keyboard pairs or language. Thus, if your keyboard language changes on its own, there are two ways to resolve it. First, you have to make sure that Windows 10 does not add keyboards without your permission. Second, you have to make sure that the shortcut keys don’t change the keyboard language. This second option is what we’re going to discuss in this post. You need to first set a different input method for each app window. To do that, you have to disable the change in layout. Refer to these steps:
  • Go to Settings > Language and input.
  • Next, type “switching input methods” to open the Advanced keyboard settings with this option inside.
  • After that, select the checkbox labeled as “Let me set a different input method for each app window” and then click the Save button.
  • Restart your computer.
Now that you’ve disabled the change in layout, you now have to find the keyboard settings. Just go to Settings > Devices > Typing > Advanced Keyboard settings. From there, you have the option to select which keyboard is going to be used for any app. When you change the keyboard every time you use an app, usually, Windows remember it so that you won’t have to set it up all over again. In addition, the Advanced keyboard settings page also allows you to override the default input method which could be different from the first one in your language list. Aside from that, there is also a Language bar option that comes in handy as you can quickly switch between keyboards. And if you removed it, you have the option to restore the language bar back as well. Now all that’s left for you to do is to change the Language Settings under the Administrative tab. A user from a forum that came up with this solution, reported that the issue occurred when he started typing in some program with non-Unicode characters which caused Windows to use the default system local language to interpret these characters even though the language is unavailable in the Language bar. To change the Language Settings under the Administrative tab, follow these steps:
  • Go to Settings > Time and Language > Language > Administrative language settings.
  • After that, click on Copy Settings under the Administrative tab.
  • Now make sure that all the Display language, Input language, and Format are English (United States) or any language you prefer.
  • Then mark the two checkboxes in “Copy your current settings to Welcome screen and system accounts & New user accounts”.
  • After that, click OK and then exit.
Note: You also have the option to disable those shortcut combinations which can change your keyboard settings accidentally.
Read More
Different types of computer viruses
Computer viruses are malicious applications that have the ability to self replicate and spread over the system and various devices, just like viruses in organisms. We all know that computer viruses are bad and that you should avoid them however you can. So in this spirit, we are taking a deeper dive into what kind of viruses exist and how they function.

viruses types1. File-infecting Virus

A virus that attached itself to an executable program. It is also called a parasitic virus which typically infects files with .exe or .com extensions. Some file infectors can overwrite host files and others can damage your hard drive’s formatting.

2. Macro Virus

This type of virus is commonly found in programs such as Microsoft Word or Excel. These viruses are usually stored as part of a document and can spread when the files are transmitted to other computers, often through email attachments.

3. Browser Hijacker

This virus targets and alters your browser setting. It is often called a browser redirect virus because it redirects your browser to other malicious websites that you don’t have any intention of visiting. This virus can pose other threats such as changing the default home page of your browser.

4. Web Scripting Virus

A very sneaky virus that targets popular websites. What this virus does is overwrite code on a website and insert links that can install malicious software on your device. Web scripting viruses can steal your cookies and use the information to post on your behalf on the infected website.

5. Boot Sector Virus

These viruses are once common back when computers are booted from floppy disks. Today, these viruses are found distributed in forms of physical media such as external hard drives or USB. If the computer is infected with a boot sector virus, it automatically loads into the memory enabling control of your computer.

6. Polymorphic Virus

This virus has the capability to evade anti-virus programs since it can change codes every time an infected file is performed.

7. Resident Virus

A resident virus stores itself on your computer’s memory which allows it to infect files on your computer. This virus can interfere with your operating system leading to file and program corruption.

8. Multipartite Virus

A type of virus that is very infectious and can easily spread on your computer system. It can infect multiple parts of a system including memory, files, and boot sector which makes it difficult to contain.
Read More
Fixing Error code 15 or Error code 16
If you get an Error Code 15 or Error Code 16 while you are browsing the web and you notice that your access is blocked to a particular website, then read on as this post will guide you in resolving this problem. Both Error Code 15 and Error Code 16 have the same message that states, “Access Denied: This request was blocked by the security rules”. Note that the error depends on what kind of browser you are using, as well as the operating system and network that you are using. On the other hand, the fixes for this error are the same and there is a handful of them that you can check out just make sure to follow each one of them carefully.

Option 1 – Sync Date and Time

The first thing you can try is to sync the Date and Time of your computer as the wrong Date and Time settings are one of the most common causes of connection problems like Error code 15 or Error code 16. This is because of the incompatibility between the SSL Certificate validation date and the System Clock. Thus, you have to sync your System Clock. Refer to the steps below to do so.
  • Right-click on the Taskbar and click on the Adjust Date and Time option.
  • Next, click on the Sync Now button to synchronize the Date and Time with the Microsoft Servers.
  • Now make sure that the Time Zone that’s set on the same page is correct.

Option 2 – Try to reset the affected browser

Resetting the affected browser might help in fixing Error Code 15 or Error Code 16.

Mozilla Firefox

  • Open Firefox and click the icon that looks like three stacked lines located at the top-right section of the browser.
  • Next, select the question mark icon from the drop-down menu.
  • Then select “Troubleshooting information” from the slide-out menu.
  • After that, click on the “Reset Firefox” button located at the top-right section of the newly opened web page.
  • Now select “Reset Firefox” in the confirmation pop-up window that appears.

Google Chrome

  • Open Google Chrome, then tap the Alt + F keys.
  • After that, click on Settings.
  • Next, scroll down until you see the Advanced option, once you see it, click on it.
  • After clicking the Advanced option, go to the “Restore and clean up option and click on the “Restore settings to their original defaults” option to reset Google Chrome.
  • Now restart Google Chrome.

Internet Explorer

  • Launch Internet Explorer.
  • Next, click the wrench icon for Settings.
  • Then click Internet Options.
  • After that, go to the Advanced tab.
  • From there, click the Reset button. This will reset Internet Explorer’s settings to their default condition.
  • Now click OK to save the changes made.

Option 3 – Temporarily disable Firewall and third-party antivirus

Firewall and antivirus programs are known to block files the instant it detects a threat to the system. However, there are some cases when it can also block a file even when it’s a safe one. Thus, your antivirus or firewall programs might be the reason why you can’t download anything on your Windows 10 computer. To isolate the issue, you need to temporarily disable both the Firewall and antivirus programs and then check if you can now download anything from the internet. Do not forget to enable them again as disabling them can leave your computer vulnerable to cyber threats.

Option 4 – Disable the Proxy server

You can also try to disable the Proxy server for your LAN to fix Error code 15 or Error code 16 especially if your computer was attacked by some malware or adware recently. In such cases, there is a chance that the malware or adware has changed your network settings in order to generate intrusive advertisements. Thus, you have to disable the proxy server and you can do that by following these steps:
  • Tap the Win + R keys to open the Run dialog box.
  • Then type “inetcpl.cpl” in the field and hit Enter to pull up the Internet Properties.
  • After that, go to the Connections tab and select the LAN settings.
  • From there. Uncheck the “Use a Proxy Server” option for your LAN and then make sure that the “Automatically detect settings” option is checked.
  • Now click the OK and the Apply buttons.
  • Restart your PC.
Note: If you are using a third-party proxy service, you have to disable it.

Option 5 – Check your VPN

If you are using a VPN application, there are times when it causes some issues like this error. If that’s the case, you can try to disable your VPN temporarily and see if the error is resolved or not and if turns out that your VPN is the culprit, you have to uninstall it and install a new one or its latest version. To uninstall it, follow the steps below.
  • Tap the Win + R keys to open the Run dialog box
  • Then type “appwiz.cpl” in the field and hit Enter to open the Programs and Features in Control Panel.
  • From there, look for the VPN service you are using, select it and then click on Uninstall to remove it.
  • After that, restart your computer and try to install the latest version of the program again. It should work now. If not, proceed to the next available option below.
Read More
Fix Error Code 0xc0000225 in Windows 10
Error 0xc0000225 is the error that occurs on system startup, most times error just disappears all by itself but in some cases, it can be really persistent and can even cause you not to be able to enter the system that could be a really annoying thing, especially if there is some important task waiting to be finished. In this guide, we will present you with solutions for this error and how to solve it so you can get back to work as soon as possible.

Solution if you can not log into windows due to repeating error

If an error repeats itself constantly and you are unable to boot into Windows itself you will need to prepare Windows boot USB. You can download the Microsoft media creation tool here and then use it to create a bootable USB with Windows 10. Once the USB is done reboot your system and boot from USB. CHoose repair Windows instead of install and follow onscreen instructions.

Solution if you can log into Windows

If you can log into Windows bring up the command prompt in administrator mode and type in it SFC /SCANNOW followed by ENTER, wait for the whole operation to finish, and then reboot the system.
Read More
1 2 3 162
Logo
Copyright © 2022, ErrorTools. All Rights Reserved
Trademarks: Microsoft Windows logos are registered trademarks of Microsoft. Disclaimer: ErrorTools.com is not affiliated with Microsoft, nor claim direct affiliation.
The information on this page is provided for information purposes only.
DMCA.com Protection Status