Windows requires a digitally signed driver

Device drivers are needed in order for the hardware and software to communicate in an operating system. Some of these drivers are digitally signed. These kinds of drivers are drivers that are signed by their issuing authority in a way that the end-user or any third party won’t be able to modify them. And there are times when you encounter an error that says, “Windows requires a digitally signed driver” when you try to install or update device drivers.

Driver Signing is the process of associating a digital signature with a driver package. Digital signatures are used in Windows device installations to verify the identity of the vendor providing the driver packages as well as to verify the integrity of the driver packages.

All the drivers you usually install on your PC from Windows Update, Original Equipment Manufacturers, or some other third-party driver download software and so on must be verified digitally by Microsoft through the digital signature. A digital signature is an electronic security mark that verifies the publisher for the driver and all the relevant information related to it. That’s why Windows won’t run a driver if it isn’t certified by Microsoft, be it a 32-bit or 64-bit system – this is called the Driver Signature Enforcement.

The only Kernel-mode drivers that Windows 10 will load are the ones that are digitally signed by the Dev Portal. However, the changes only affect the new installations of the operating system with Secure Boot on while the non-upgraded fresh installations would require drivers that are signed by Microsoft.

The “Windows requires a digitally signed driver” error indicates that the driver you are trying to update or install hasn’t been signed digitally by the issuing authority, preventing you from installing or updating it. To resolve this issue, you can try to update the drivers directly from the manufacturer’s site. You could also disable driver signing via Group Policy Editor.

Option 1 – Update the device drivers directly from the manufacturer’s site

The reason why you’re getting the “Windows requires a digitally signed driver” error in the first place is that you might have downloaded the drivers from external media. It could also be that the drivers didn’t update for some time now and the issuing authority changed its policies. Thus, you can try to update the drivers straight from the manufacturer’s website and install them. If this option didn’t work, then you’ll have to disable the driver signing or its recognition in Windows 10. Keep in mind that doing so is not advisable if you have to use the concerned driver.

Option 2 – Disable driver signing via Group Policy Editor

  • Tap the Win + R keys to open the Run utility and type “gpedit.msc” in the field and tap Enter to open the Group Policy Editor.
  • After that, navigate to this policy setting: User configuration > Administrative templates > System > Driver installation
  • Next, double click on the “Code signing for device drivers” entry located on the right pane to open its properties where you’ll see the following description:

“This setting determines how the system responds when a user tries to install device driver files that are not digitally signed. It establishes the least secure response permitted on the systems of users in the group. Users can use the System in Control Panel to select a more secure setting, but when this setting is enabled, the system does not implement any setting less secure than the one the setting established.

When you enable this setting, use the drop-down box to specify the desired response.

“Ignore” directs the system to proceed with the installation even if it includes unsigned files.

“Warn” notifies the user that files are not digitally signed and lets the user decide whether to stop or to proceed with the installation and whether to permit unsigned files to be installed. “Warn” is the default.

“Block” directs the system to refuse to install unsigned files. As a result, the installation stops, and none of the files in the driver package are installed.

To change driver file security without specifying a setting, use System in Control Panel. Right-click My Computer, click Properties, click the Hardware tab, and then click the Driver Signing button.”

  • Now select the radio button for “Enabled” and select Ignore from the drop-down menu under “When Windows detects a driver file without a digital signature”.
  • Then click on the Apply and OK buttons to save the changes made. This will get rid of the “Windows requires a digitally signed driver” error but take note that this will also make your system less secure.
If you like to learn and find out more about various Windows errors, and how to repair them go to our vast archive or use search to find articles that will explain and help you in solving your issue.
However, if you prefer to do things fast and with automatization then we are proposing to use an automated solution for your issues. The application that we are recommending is Advanced System Repair Pro
Advanced System Repair utilizes multiple tools all in one to give you a quick, simple, reliable, and very thorough diagnosis of your PC. It brings you all the tools you need in one program to clean, fix, protect, optimize and boost your PC!
1-Click Maintenance
All the tools to make it simple and easy! It's like having a professional technician at the click of a mouse.

Junk Cleaner
Keeping your computer free from unnecessary clutter also helps make your computer last longer. Like any other machine, if you keep it clean and take care of it, it will serve you better for longer!

Optimize background apps
Optimize applications background activity with the built-in Application Optimizer feature.

Disk Defrag
With a simple 1-click, Advanced System Repair speeds up your PC by assembling fragmented files on your machine and organizing them more efficiently.

Malware Removal
Finds and removes all types of harmful malware including trojans, worms, bots, adware, spyware, PUPs, and more!

Privacy Cleaner
The all-in-one privacy suite to Clean Your Tracks & Protect Your Privacy! Make your computer safe, secure, and more efficient!

System Tweak/Optimizer
ASR will analyze your complete system and settings to adjust your PC to function at its maximum performance.

Registry Cleaner
Over time, as you install and uninstall applications, the registry can become cluttered with old entries and broken settings which can result in program crashes, and annoying messages and slow the computer down.
Visit our Advanced System Repair Pro Download page to inform yourself about all the benefits of this software and get a free trial copy of it.
advanced system repair pro

Advanced System Repair Pro

One-click automated PC repair solution
ASR logo
With Advanced System Repair Pro you can easily
Replace damaged files
Restore performance
Free disk space
Remove Malware
Protects WEB browser
Remove Viruses
Stop PC freezing
DOWNLOAD
Privacy Policy | Terms of Use | Uinstall
Advanced System Repair Pro is compatible with all versions of Microsoft Windows including Windows 11

Share this article:

You might also like

Common Outlook Errors

Most Common Microsoft Outlook errors

When you have a program, you know before you even start to use it or even know how that you are going to have problems with it. There are always going to be error messages and things that don’t work on any program you buy or download; guaranteed. Even some of the most famous program developers in the world make mistakes from time to time and it is a small price to pay for the programs you get and that is a fact. Microsoft Outlook is like any other program; it has its errors. Here are some of the most common errors for Microsoft Outlook on your computer.

1. Problem receiving emails

Sometimes you can be waiting on really important emails. It is really infuriating when you know that they have been sent, however every time you check your email box, there is nothing there! Your inbox is empty and your patience is wearing thin, so could it possibly be an error with Microsoft Outlook? There is a high probability that this is the problem. The program can be a bit slow on receiving emails sometimes, often even by days. This can be caused by any number of things, from having too many emails coming through or having too many emails in your inbox. If you click ‘send and receive’ at the top, it should speed up your emails coming through, however, so give that a try if you’re waiting on anything to come through. If this doesn’t work, however, your inbox may be full. Try permanently deleting some useless messages and then click ‘send and receive’ again. All your emails should come through then!

2. General slow performance

Outlook, while it has its advantages, can often be very slow. It is probably slower than some other email programs that require a browser but it is quicker to access, which may make up for this fact. However, sometimes sluggish performance can be really irritating, so it may be wise to try and fix it if you can. One of the reasons it may be acting slow is if you have too many other Windows applications open. Applications that may interfere with your Outlook’s speed could be anything from Microsoft Word to Windows Live Messenger. If any of these are open, try closing them and see if that helps with the speed problem.

3. Corrupt files

.dbx files are not accessible by Microsoft Outlook. Therefore, they can cause problems with your emails if you have them within them. To solve this problem, you may have to delete all of your attached email accounts and then reattach them before you can open your emails again. These corrupt files can also cause you to be unable to delete emails. You will need to transfer these deleted corrupt files into a separate deletion folder as this is usually caused by the folder being corrupt. Of all the other most frequent problems with Microsoft Outlook, however, this is probably the least likely to happen, which shows how few problems there actually are with this application after all that!

Conclusion

So there are the most common problems with Microsoft Outlook! Not much wrong at all, is there?
Read More
A Quick Guide to Fixing the Flash.ocx Error on Your PC

Repair Flash.ocx Error on Your PC

Flash.ocx Error - What is it?

To understand this error, first, it is important to understand what Flash.ocx actually is. Flash.ocx is basically a flash plug-in or ActiveX file that is responsible for the adobe flash player to work on the system. The Flash.ocx error triggers due to issues in the Adobe flash player.

Solution

Restoro box imageError Causes

The error Flash.ocx may occur due to many reasons. These include:
  • Flash player corruption
  • Corrupted and broken Active X components
To this error code is not fatal but nonetheless it is still advisable to fix it right away to avoid inconvenience when using Flash player. The inability to run the Flash Player smoothly will hinder you from watching videos on your PC and playing exciting web-based games.

Further Information and Manual Repair

To resolve this error on your system, you don’t have to hire a professional and spend hundreds of dollars. This error code is quite easy to fix. You don’t need to be technically sound to resolve this error code. Simply follow the methods give below to fix the Flash.ocx error code in a few minutes.

Method 1: Reinstall the Flash Player

If the error occurs due to the corruption of the Flash Player, then it is advisable to reinstall the player on your PC. However, before you do that first remove the previous versions of Adobe Flash Player on your system. If the previous corrupted version is not removed properly, then you will be unable to re-install it properly on your PC again. Go to the Add/Remove Programs and find the Flash Player and uninstall it. Make sure the files are also removed from the registry. Once you have successfully uninstalled the corrupted version, now go to the official website of Adobe Flash Player and download the utility from the website. Install it and run it on your system. If it works, then this means the error is resolved. However, if the error still persists, then try method 2.

Method 2: Download Restoro to Fix Active X components

Another reason for Flash.ocx error code can be broken or corrupted Active X components. If this is the issue, then the best way to resolve it is to download Restoro. This is a multi Reimagefunctional and advanced PC Fixer deployed with multiple high-performance scanners including Active X and Class scanner. The Active X and Class scanner perform an entire PC scans for corrupt and broken Active X entries along with missing software paths and invalid combinations. After the scanning process is complete, it repairs and restores the components back to normal. Thereby resolving the Flash.ocx error right away and ensuring smooth video browsing over the web. Restoro is an efficient and a safe program. It has a user-friendly interface and easy navigations. It can be used by all level of users. Besides the Active X scanner, it includes 5 more value-added utilities like a registry scanner and an antivirus to name a few. It is compatible with all Windows versions Click here to download Restoro on your PC and resolve Flash.ocx error code now!
Read More
Problem prevented document from being scanned
If an error suddenly pops up that states, “A problem prevented the document from being scanned” when you’re scanning a document in your computer, then you’ve come to the right place as this post will guide you on how exactly you can fix the problem. A lot of users have reported that they receive a two-layer error message when they try to scan their documents – the first screen throws an error message that says, “Error applying Settings to Driver” while the next error message states, “A problem prevented the document from being scanned”. As a result, the scanning won’t be completed which defeats the whole process of buying a printer with a scanner. As you can see the two error messages point to two different situations, while the other one is pointing at the driver, the second one points to the scanning problem. To resolve these issues, there are several suggestions you need to check such as follows:

Option 1 – Run the Printer Troubleshooter

One of the first basic troubleshooting you can perform to resolve the printer issue is running the Printer Troubleshooter. This built-in troubleshooter can detect and automatically fix the problem for you. To use it, follow these steps:
  • Tap the Win + R keys to open the Run dialog box.
  • Next, type “msdt.exe /id PrinterDiagnostic” in the field and click OK or hit Enter to open the Printer Troubleshooter.
  • Then click the Next button and follow the next on-screen instructions to fix the issue with the printer.

Option 2 – Try updating the Printer drivers

You might also want to try updating your printer drivers. All you have to do is locate the USB Composite Device. For complete details, follow the steps below.
  • First, click the Start button and type “device manager”.
  • Then click on the “Device Manager” from the search results to open it.
  • From there, look for the USB Composite Device option and right-click on it, and select the Update Driver from the options.
  • Restart your PC and then click the “Search automatically for updated driver software” option.
Note: You also have the option to download the latest version of your Printer from the manufacturer’s website.

Option 3 – Try to reset the settings of the Printer or reinstall it

If none of the two options given above worked, you can try to either reset the printer settings or reinstall the printer so that it can go back to its default state. However, if it doesn’t work, you can try to uninstall the printer as well as its related drivers. To do so, follow these steps:
  • First, go to Settings > Devices > Printer and Scanners.
  • After that, select the printer and select the Remove Device option.
  • Once done, restart your computer and check again and see if the error is now fixed.

Option 4 – Try to modify the Registry settings for the Still Image devices

In case you don’t know, Windows has Registry settings for the Still Image devices like Scanners and Printers. And these devices have vendor-specific settings that if ended up getting corrupted or misconfigured then you will most likely encounter errors like “A problem prevented the document from being scanned”. Thus, to fix this error, you can try modifying the Still Image devices registry settings, and to do that, you need to follow the instructions below but before that, make sure that you create a System Restore Point first.
  • Once you’ve created a System Restore point, tap the Win + R keys to open the Run dialog box and type “Regedit” in the field, and then hit Enter to open the Registry Editor.
  • Next, navigate to this registry key: HKEY_LOCAL_MACHINESYSTEMCurrentControlSetControlStillImage
  • From there, right-click on the “StillImage” registry key and delete it.
  • After that, exit the Registry Editor and restart your computer.
  • Once your computer has restarted, Windows will recreate the settings of the Still Image devices back to their default settings.
Read More
Rebuild Search Index in Windows 10
If by any chance your search result in Windows is misleading, missing, or incorrect then it is a high probability that your search index is out of date. To repair this issue follow this guide step by step. Please take note that rebuilding the whole search index can take a long time on some systems depending on the size of the index itself, CPU speed, HD speed, etc. Sometimes it can take even hours on large drives. First, press ⊞ WINDOWS + R to open the run dialog and type in it Control panel to open the control panel. keyboard with windows and r markedrun dialog with control panel typed in Once you are in the control panel, switch your view to large icons and locate Indexing options. Control panel with indexing options selected
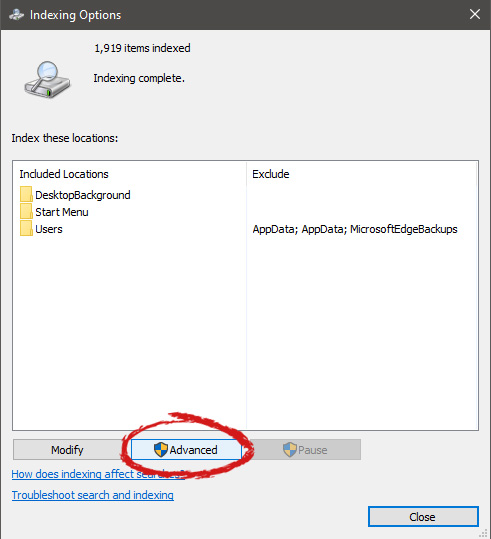
Inside indexing options, click on advanced. indexing options advanced button marked
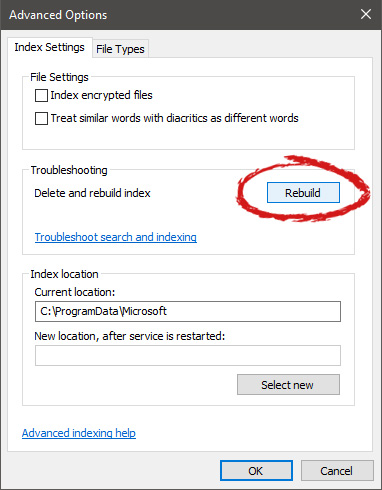
In advanced options click on the rebuild and confirm. indexing options rebuild button markedLeave your computer to finish and your searches should be working fine now.
Read More
How to Fix Error Code 0xC004C770

How to Fix Error Code 0xC004C770

Error Code 0xC004C770 – What is it?

If the Error Code 0xC004C770 popped up on your computer during your activation of the Windows 10 software, don’t worry. This is a fairly common error, especially for people who own more than one computer upon which Windows 10 is installed and activated. The gist of this error code is that the product key that you have entered has already been claimed or used on a different computer. Because there are limitations on the number of computers that can use any given license activation code or product key, this error code can arise when you have exceeded that limit. If you have a single-use license and have already entered the particular product key onto another machine, you may see this error come up during activation.

Both Error Code 0xC004C770 and Error Code 0x803FA071 arise from the same problem and the same steps can be used to resolve both error codes.

Solution

Restoro box imageError Causes

Error Code 0xC004C770 is likely to appear on your screen during activation of Windows 10 if you or anyone else in your organization have already entered in the product key used on another computer. If you have a multiple-use license, the product key that you are entering may already have been used for the maximum number of computers allowed under that license.

Further Information and Manual Repair

There are two basic methods for addressing the issues associated with Error Code 0xC004C770. These methods can easily be implemented by anyone who is comfortable interacting with the Windows Store from their computer, which makes the resolution of this particular error code fairly simple and straightforward.

If you are unable to complete the steps below or Error Code 0xC004C770 has not been resolved after following the guides below, contact a Windows technician who is familiar with the Windows 10 activation process to assist you in the process. You can also get in touch with the Windows technical support team to assist you in the process if needed.

Method One: Purchase A New Product Key from Windows

If you have already used the product key on another computer or have used it on the maximum number of allowed devices, you may need to purchase an additional product key for the computer with Error Code 0xC004C770. Product keys can be purchased physically from a retailer that sells Windows 10 software licenses or purchased directly from the Windows store.

To purchase a new product key directly from the Windows Store, follow the steps below:

  • Step One: Select the Windows start button at the bottom of your toolbar. Click on “Settings,” then select the option for “Update and Security.”
  • Step Two: Click on the “Activation” option.
  • Step Three: In the menu that appears, choose the option to “Go to Store” and follow any on-screen instructions to finalize a purchase of the Windows 10 software and product key.
  • Step Four: Use the new product key to complete the installation and activation of the Windows 10 software on your computer.

If you are unable to see the “Go to Store” option when you reach the “Activation” page, you may not be set as an administrator of your machine. In this case, get in touch with the support personnel from your company to complete the purchase, installation, and activation process on your computer.

Method Two: Attempt to Finish Activation via Phone

For users who have changed out parts of their computer’s hardware, like putting in a new motherboard or activating a new hard drive, you may have more success if you attempt activation through a phone.

In order to activate your copy of Windows 10 from your phone, follow the steps below:

  • Step One: On your mobile device, open up the search box from the taskbar.
  • Step Two: In the search box, enter the phrase “SLUI 04.”
  • Step Three: Select the “SLUI 04” option that appears.
  • Step Four: Follow the directions given on the screen to complete the activation process for your copy of Windows 10.

As with any error code resolution, if the methods above are not successful or if you are not comfortable with your ability to successfully complete the steps above, get in contact with a qualified professional who is trained in the Windows 10 activation process to assist you or download a powerful automated tool to get the job done.

Read More
Something went Wrong. Try to reopen later
Windows update issue may come up when the configuration for windows update service is not properly configured or this error can also come up when there is corrupt windows installation. Before trying any of the given solutions to this error try first to clean boot your Windows and turn off any 3rd party utility application. If this method fails move to the provided solutions.
  1. Change startup type of UOS service to automatic

    UOS or The Update Orchestrator Service is essential for proper Windows updates. If this service is by any means turned on manual it could be the reason for error since it can create incompatibility between OS modules, if this is the case, setting it to automatic will solve the issue. Press CTRL + SHIFT + ESC on your keyboard to bring the task manager up and click on the services tab. In the services find orchestrator service, right-click on it, and from the list of startup types choose automatic. Click on APPLY and reboot your computer.
  2. Try to fix it in the command prompt

    If the above method failed, try fixing the issue via command prompt. Press ⊞ WINDOWS + X to bring up the secret menu and start command prompt (administrator) In the command prompt write these lines one after another as they are finished: net stop bits net stop wuauserv net stop appidsvc net stop cryptsvc Ren %systemroot%SoftwareDistribution SoftwareDistribution.bak Ren %systemroot%system32catroot2 catroot2.bak Net Start bits Net Start wuauserv Net Start appidsvc Net Start cryptsvc After all this, reboot your system and check if updates are working properly.
  3. Try to fix it via registry editor

    Press ⊞ WINDOWS + R to bring run and type in it RegEdit, press ENTER find Computer\HKEY_LOCAL_MACHINE\SYSTEM\CurrentControlSet\Services\UsoSvc in the right part, find key START and change its value to 2 Reboot your system
  4. Try with a new user account

    If by any chance user account data is corrupted this may be the reason why we have this error. Create a new administrator user account Shut down your computer Turn in back ON and log in with the new account
  5. Perform SFC scan

    Press ⊞ WINDOWS + X and choose command prompt (administrator) type in: sfc /scannow This may take a while, sit back, let it finish, and try again windows update
That is all considering this particular error, we certainly hope that you have managed to fix it using any of provided solutions, if not, try Restoro, an automated error fixing tool and fix it with one click.
Read More
Mapped network drives are not working
When you have to connect to a drive that’s on a different computer or on external storage, that’s where the mapped network drives come in. Mapped network drives make accessing files a lot easier. However, there are times when it won’t work for some reason. Windows will notify you about the unavailability of mapped network drives in several ways. For one, Windows might display a red X on the network drives or it could be that its status will be unavailable when you try to use it from the Command Prompt or via a notification. It is recommended that you run a few scripts when you log in to your PC as it may so happen that the network drive takes more than usual to connect. Before you start troubleshooting the problem using the given options below, keep in mind that some workouts might only work under certain scenarios. You might need some network access at logon or you might need access to the Group Policy settings. So you need to choose what you prefer more. You can try the given workarounds below if the mapped network drives are not showing or connecting or working on your Windows 10 computer. These workarounds use scripts to make sure that you are connected to them as soon as you start to use your PC. As mentioned, before you can troubleshoot, you need to create scripts first. There are two scripts here namely MapDrives.ps1 which is executed by the second script named MapDrives.cmd and is done at a regular and non-elevated Command Prompt. Follow the steps below to get started.
  • You have to create a script file named “MapDrives.cmd” first and then save it on a place where the files are safe. To do that, open a text editor like Notepad and then copy and paste the following script:
PowerShell -Command "Set-ExecutionPolicy -Scope CurrentUser Unrestricted" >> "%TEMP%StartupLog.txt" 2>&1 PowerShell -File "%SystemDrive%ScriptsMapDrives.ps1" >> "%TEMP%StartupLog.txt" 2>&1
  • After that, save the file and name it “MapDrives.cmd”.
  • Next, create a script file named “MapDrives.ps1” and then copy and paste the following content. Just make sure to save both scripts in the same folder.
$i=3 while($True){     $error.clear()     $MappedDrives = Get-SmbMapping |where -property Status -Value Unavailable -EQ | select LocalPath,RemotePath     foreach( $MappedDrive in $MappedDrives)     {         try {             New-SmbMapping -LocalPath $MappedDrive.LocalPath -RemotePath $MappedDrive.RemotePath -Persistent $True         } catch {             Write-Host "There was an error mapping $MappedDrive.RemotePath to $MappedDrive.LocalPath"         }     }     $i = $i - 1     if($error.Count -eq 0 -Or $i -eq 0) {break}     Start-Sleep -Seconds 30 } Note: Now that you’ve created the script files, it’s time for you to proceed to the options given below.

Option 1 – Try creating a startup item

Note that this option only works on devices that have network access at login. So if it’s not there, the script will fail to reconnect the network drivers automatically. To create a startup item, here’s what you have to do:
  • Open the Startup folder located at %ProgramData%MicrosoftWindowsStart MenuProgramsStartUp.
  • From there, copy and paste the MapDrives.cmd.
  • After that, open the Scripts folder located at %SystemDrive%Scripts copy-paste MapDrives.ps1 and then copy and paste MapDrives.ps1 in there.
Note: After you complete the steps above, a log file named “StartupLog.txt” will be created in the %TEMP% folder. Now all that’s left for you to do is to log out of your computer and then log back in. This will ensure that the mapped drives are open.

Option 2 – Create a scheduled task

It is possible to create a scheduled task that runs as soon as you log in to your computer. To create a scheduled task, follow the steps below.
  • You have to copy the MapDrives.ps1 script file to the scripts folder of Windows located at %SystemDrive%Scripts.
  • After that, open the Task Scheduler and select Action > Create Task.
  • Next, type a name and description of the task in the General tab.
  • Then click on the Change User or Group button and select a local user group and click OK.
  • Now check the box labeled “Run with highest privileges” and switch to the Triggers tab.
  • From there, create a new trigger with the “At Logon” option in the Begin the task drop-down menu and then click OK.
  • After that, switch to the Actions tab and create a new action then choose to Start a program.
  • Next, type “Powershell.exe” in the Program/Script field, and in the Add arguments (optional) field, type the following:
-windowsstyle hidden -command .MapDrives.ps1 >> %TEMP%StartupLog.txt 2>&1
  • And in the Start in the (optional) field, type “%SystemDrive%Scripts” as the location of the script file.
  • Now under the Conditions tab, select the “Start only if the following network connection is available” option and then select Any connection and click OK.
  • Restart your computer or log off from your account and then log back in so that the task will be executed.

Option 3 – Use the Group Policy settings

You need this option if the mapped network drives are defined via Group Policy settings. You have to update the action of the drive maps to Replace. As a result, it will delete the existing mapped drive and create the mapping on each logon again. However, any settings on the mapped drive that are changed from the Group Policy settings will be gone on each logon. So if the changes don’t work, you need to run the gpupdate command together with the /force parameter in order to refresh the Group Policy setting quickly.
Read More
Fix DISM Error: The scratch directory size ...
One of the most useful and powerful built-in utility in Windows 10 is the DISM tool. This tool can be used with the Command Prompt command line as well as for other purposes. However, it is not without flaws and there are times when you may encounter some issues while using it. One of the problems you can get while using the DISM tool is the following error:
“The scratch directory size might be insufficient to perform this operation”
This kind of error in DISM occurs when the DISM command is executed from the Windows Recovery Environment due to the limited size permissions of a delivery where the operating is being performed. To fix this DISM error, you need to follow the instructions laid out below. Step 1: First, tap the Win + R keys to open the Run utility and then type “cmd” in the field and tap Enter to open Command Prompt. Step 2: Next, you have to specify a scratch directory that contains the Windows folder and to do that, you can either use the DIR command or the BCEDIT command. So in the elevated command prompt type and enter “dir” or “bcedit”. Step 3: After that, you will see a list of folders inside the C: partition. Now you have to create a folder named “scratch” inside the partition. To do so, execute the following command:
mkdir C:Scratch
Note: The command you just entered will create a directory inside the root of the C: partition named Scratch. Step 4: Now that you’ve created the Scratch folder, note that each time you run any of the DISM commands, you have to enter the following code snippet in them:
/ScratchDir:C:Scratch
 Note: For instance, if you are using the DISM tool to repair the offline Windows image, instead of executing the “Dism /Online /Cleanup-Image /RestoreHealth” command, you now have to execute the “DISM /Image:C: /ScratchDir:C: Scratch /Cleanup-Image /Restorehealth” command. And if you want to remove a selected installed update package, you can use the “DISM /image:C: /ScratchDir:C:Scratch /Remove-Package /PackageName:Package_for_RollupFix~31bf3856ad364e75~amd64~~16299.196.4.9” command. Keep in mind that the mentioned package is only an example. And lastly, you also have to replace the drive letter in the new code snippet when you execute the commands given above.
Read More
Fixing “The .NET Framework 4.7 is not supported on this operating system” Error in Windows 10
In case you don’t know, the .Net Framework is a programming infrastructure introduced by Microsoft. You will need it to run on lots of services and applications. Note that most of the applications that require the .Net Framework are packed with their installation files which is why it will be installed automatically on your computer when you install an application. However, there are instances when you’ll get an error message saying, “The .NET Framework 4.7 is not supported on this operating system” while trying to install the .NET Framework as a standalone service. The very reason why this error message appears is stated in the error message itself. Although the .Net Framework is supported on Windows 10, it is not actually compatible with some other Windows 10 versions. So it is most likely that you are seeing this error message because the .Net Framework in your computer is not compatible with the Windows 10 version you are running. Since that’s the case, you need to update Windows 10 to fix the problem. Updating your Windows 10 computer is the only solution you can try to fix this problem. Thus, it is advised that you check for Windows Updates even if you are now using the latest version of Windows 10. And since the issue is caused by an incompatible operating system version, once you install the exact version of Windows 10 required by the .Net Framework, the problem will be fixed. Simply follow the steps given below to do so.
  • Step 1: Tap the Win + R keys to open the Run dialog box.
  • Step 2: After that, type in “winver” in the field and tap Enter.
  • Step 3: Next, your Windows 10 version should be given in the new window that appears. Take note that the number after the Version which is in the second line is your version number of Windows 10. And that the number must be 1507 or 1709. The first two digits in these numbers are the year while the second two represent the month when the update was released. So if you are running a 1709 version, this means that the Windows 10 version you are using was released in September 2017.
  • Step 4: The next thing you have to do is to make sure that you have the Windows 10 version that’s compatible with the .Net Framework. To verify, you need to click here and click on the System Requirements.
After opening the link, take a look at the Supported Operating System section where it says, “Windows 10 Anniversary Update” and “Windows 10 Creators Update”. Since there are users who are not familiar with the version numbers related to both the Anniversary and Creators updates, refer to the list given below.
  • November Update (1511)
  • Anniversary Update (14393)
  • Creators Update (1703)
  • Fall Creators Update (1709)
  • Spring Creators Update (1803)
As you can see, the Creators Update has version 1703 while the Anniversary Update has version number 14393 so if you are using a version lower than the 14393 version then it’s no wonder you aren’t able to install the .Net Framework 4.7 on your Windows 10 PC. Now all that’s left to do is to update your Windows 10 version and make sure that you will be updating it to the latest version available and then try installing the .Net Framework again.
Read More
Fixing PowerShell: File cannot be loaded ...
If you are using Windows PowerShell and it suddenly throws an error message saying, “File cannot be loaded because running scripts is disabled on this system”, then read on as this post will guide you on how you can fix this issue your Windows 10 computer. This kind of error in PowerShell is most likely due to the fact that your user account does not have the required permissions to execute the script. Although this does not mean that you need to have administrator-level permissions as it could also indicate that you have to be unrestricted to run these types of PowerShell scripts or cmdlets. Thus, to fix the error and carry out the task, you have to set the execution policy to be unrestricted. And to do that, you need to use the steps provided below as a reference. Step 1: To get started, you have to check what policies are set for the individual user groups on your computer by tapping the Win + X key combination or by right-clicking on the Start button and clicking on Windows PowerShell (Admin). You can also search for PowerShell in the Start Search and then right-click on Windows PowerShell and select Run as administrator. Step 2: If a User Account Control or UAC prompt appears, just click Yes to proceed. Once you’ve pulled up Windows PowerShell, type the following command to get the List of Execution Policy for all the scopes on your computer.
Get-ExecutionPolicy –List
Step 3: After you execute the command, it will give you a list of the User Groups as well as their Execution Policy status, and under the Scope column, look for “LocalMachine”. Once you find its Execution Policy you will notice that it’s either set to Undefined or Restricted. Step 4: Now that you’ve determined the Execution Policy, you need to set it to Unrestricted if it is set to Restricted. To do that, you have to enter the following command in the very same PowerShell window.
Set-ExecutionPolicy Unrestricted
Step 5: After you execute the command, you will see a message that asks for various permissions for which you either have to tap Y to say Yes to each one of the messages individually or tap the A key to say Yes to all the messages to once. However, if the command throws another error, you can just force the Execution Policy to change by executing the following command.
Set-ExecutionPolicy Unrestricted -Force
Step 6: Once you’re done, it will finally set the Execution Policy for the Windows PowerShell scripts as well as cmdlets to be Unrestricted and fix the “File cannot be loaded because running scripts is disabled on this system” error.
Read More
1 2 3 162
Logo
Copyright © 2022, ErrorTools. All Rights Reserved
Trademarks: Microsoft Windows logos are registered trademarks of Microsoft. Disclaimer: ErrorTools.com is not affiliated with Microsoft, nor claim direct affiliation.
The information on this page is provided for information purposes only.
DMCA.com Protection Status