Fix Errors 0x80070001, 0x81000037, 0x80070003

Windows has a built-in Backup and Restore system so if the Windows Backup or Restore fails and you receive any of the errors 0x80070001, 0x81000037, 0x80070003, worry not for this post will guide you in fixing the problem. You might not be able to browse to the folders and files that you want to restore in the File Restore Wizard.

The cause of the error could vary depending on what error code you receive:

  • 0x80070001 – If you got this particular error code when trying to back up a specific library or when you accept the default settings in Windows Backup and Restore.
  • 0x81000037 – If you got this kind of error code when you try to read from the shadow copy on one of the volumes being backed up.
  • 0x80070003 – If you got this error code when trying to restore the folders or files in a library by using the Windows Backup and Restore.
  • On the other hand, you cannot use the Browse for files or the Browse for folders functionality.

Note that the Windows Backup or Restore failed, Errors 0x80070001, 0x81000037, 0x80070003 Error code 0x80070001, 0x81000037 occurs during backup while Error code 0x80070003 and “Browse for Files” issue occurs when you try to restore files. Whichever error codes you got, here are some possible fixes that might help.

Option 1 – Fix Windows Backup error codes 0x80070001, 0x81000037

The reason for the Windows Backup error codes 0x80070001, 0x81000037, as mentioned above, is when there is a volume that uses a FAT file system (0x80070001) and when a volume contains compressed files (0x81000037). To fix these errors, you need to remove the “reparse point” also known as SYMBOLIC LINK, and select the absolute path of this location in the Windows Backup configuration user interface. Refer to these steps to remove the reparse point.

  • Tap the Win + R keys to open the Run dialog box.
  • Then type “cmd” in the field and hit Enter to open Command Prompt.
  • Next, type the following command and hit Enter:

DIR /AL /S

  • After you enter the command, it will display the JUNCTION list.
  • Now to delete the mounted volume reparse point, you have to locate the reparse point you found and right-click on the reparse point icon, and click on Properties.
  • Confirm that the folder Type is Mounted Volume in the General tab and then delete this folder.

Option 2 – Fix the Windows Restore Error 0x81000037

When you try to restore a deleted backed-up directory, it fails and the Error code 0x81000037 pops up. You can also encounter this error when you select to restore the files to their original subfolders check box in the File Restore Wizard and you try to restore folders or files to an alternative location, then you will encounter error code 0x81000037 which will be displayed in an error message as shown below:

To fix this error, you need to re-create the missing directory using the following steps:

  • Take note of the path for which the error occurs.
  • Then create the corresponding folder.
  • Now perform the restore operation again.

And since you might have subfolders in the deleted folder, click to clear the “Restore the files to their original subfolders” checkbox when you run the File Restore Wizard.

Option 3 – Cannot use the Browse for files or the Browse for folders functionality

There is no proper fix for this particular error but if you remember the name of the files, you can just search for them. Click on the Search button when using the File Restore functionality and then type the name of the file and when that file appears, select and click on it to restore it.

If you like to learn and find out more about various Windows errors, and how to repair them go to our vast archive or use search to find articles that will explain and help you in solving your issue.
However, if you prefer to do things fast and with automatization then we are proposing to use an automated solution for your issues. The application that we are recommending is Advanced System Repair Pro
Advanced System Repair utilizes multiple tools all in one to give you a quick, simple, reliable, and very thorough diagnosis of your PC. It brings you all the tools you need in one program to clean, fix, protect, optimize and boost your PC!
1-Click Maintenance
All the tools to make it simple and easy! It's like having a professional technician at the click of a mouse.

Junk Cleaner
Keeping your computer free from unnecessary clutter also helps make your computer last longer. Like any other machine, if you keep it clean and take care of it, it will serve you better for longer!

Optimize background apps
Optimize applications background activity with the built-in Application Optimizer feature.

Disk Defrag
With a simple 1-click, Advanced System Repair speeds up your PC by assembling fragmented files on your machine and organizing them more efficiently.

Malware Removal
Finds and removes all types of harmful malware including trojans, worms, bots, adware, spyware, PUPs, and more!

Privacy Cleaner
The all-in-one privacy suite to Clean Your Tracks & Protect Your Privacy! Make your computer safe, secure, and more efficient!

System Tweak/Optimizer
ASR will analyze your complete system and settings to adjust your PC to function at its maximum performance.

Registry Cleaner
Over time, as you install and uninstall applications, the registry can become cluttered with old entries and broken settings which can result in program crashes, and annoying messages and slow the computer down.
Visit our Advanced System Repair Pro Download page to inform yourself about all the benefits of this software and get a free trial copy of it.
advanced system repair pro

Advanced System Repair Pro

One-click automated PC repair solution
ASR logo
With Advanced System Repair Pro you can easily
Replace damaged files
Restore performance
Free disk space
Remove Malware
Protects WEB browser
Remove Viruses
Stop PC freezing
DOWNLOAD
Privacy Policy | Terms of Use | Uinstall
Advanced System Repair Pro is compatible with all versions of Microsoft Windows including Windows 11

Share this article:

You might also like

VirtualBox FATAL:No bootable medium found!
If you continuously encountered the “VirtualBox FATAL: No bootable medium found, System halted” error when you try to install Windows 10 in VirtualBox, read on as this post will give you some potential fixes to resolve the problem – you will be guided on how to choose the ISO image to fix this error in VirtualBox. This kind of error is a very common one especially if you have a corrupted ISO file or if you have not selected an ISO file for your virtual machine. Like pointed out, this error pops up when you have a corrupted ISO file or if the ISO file is not attached to the virtual machine. You have to select the ISO file while you create the virtual hard disk, else, you will most likely face this problem, and to fix it, you need to download fresh Windows ISO, create a new IDE Controller, assign Windows ISO to the IDE Controller and then boot your virtual machine. For detailed steps, follow the instructions below but before you start, make sure that you have a valid and uncorrupted Windows ISO. Step 1: First, you need to open the VirtualBox program on your computer and select the virtual machine. Step 2: Next, click on the Settings button or you can also right-click on the virtual machine and select Settings from the context menu. Step 3: Once you’re in the Settings panel, go to the Storage section and from there, create a Controller: IDE. Step 4: To create a Controller: IDE, click the Add new storage controller icon and select the “Add IDE Controller” option. Step 5: After that, click the Add optical drive icon and click on the Choose disk button. You will then see all the attached and non-attached ISO files. However, you have to add the new ISO file that you just downloaded. Step 6: To add the new ISO file, click the Add button and select the ISO file and then select the .iso file from the Non Attached section. Step 7: Now click the Choose button and afterward, make a checkmark in the Live CD/DVD checkbox and then select the IDE Primary Master from the drop-down menu of the Optical Drive. Step 8: Once you’re done, save the changes made and try booting into your virtual machine again.
Read More
How to Fix 0xc000001d Error
[vc_row][vc_column][vc_column_text]

Repair Error 0xc000001d

What Is 0xc000001d Error?

The 0xc000001d error is a common yet critical error that can occur when Windows is damaged or fails to work as a result of either missing system files or corrupt system components. This error can be extremely dangerous to Windows as it can inflict major damage to data and component files.

Error Causes

A 0xc000001d error code can occur because of a number of reasons, of which corrupt registry files are the most common, and about 94% of the time, this results in the error. However, virus infection or an adware or spyware invasion can also result in this error. Outdated drivers and missing DLL files can also be critical and will lead to this error causing major damage to computer files. Contrary to popular belief, incomplete installation and unfinished uninstalls can also because of this error. Other causes include improper shutting down of computers and improper hardware or software deletion.

Solution

Restoro box imageFurther Information and Manual Repair

Because of this 0xc000001d error code, Windows can fail in starting some processes and the system’s performance can significantly slow down. In some cases, Windows has problems starting up and the system can freeze. Lastly, this error code can even result in the Blue screen of death error message, just like other critical Windows errors. If any of the above problems and symptoms occur in your PC, then you should immediately seek to resolve this problem. In order to resolve this 0xc000001d error code or repair the corrupted and damaged Windows files, you will need a 0xc000001d repair tool. There is more than one method of treating this kind of error code, and here is how you can manually do it:
  • Start the computer and log in as administrator
  • Go to the start button and select All Programs. Go to Accessories, System Tools, and then System Restore
  • Click on System Restore and in a new window, select the ‘Restore my computer to an earlier time’ option and click Next
  • On the new confirmation window that appears, click Next
  • Restart your computer after the restoration has been completed
Another way to manually repair this 0xc000001d error code is to:
  • Manually edit the Windows registry
  • Update all the drivers for the device
Congratulations, you have just fixed 0xc000001d Error in Windows 10 all by yourself. If you would like to read more helpful articles and tips about various software and hardware visit errortools.com daily. Now that’s how you fix 0xc000001d Error in Windows 10 on a computer. On the other hand, if your computer is going through some system-related issues that have to get fixed, there is a one-click solution known as Restoro you could check out to resolve them. This program is a useful tool that could repair corrupted registries and optimize your PC’s overall performance. Aside from that, it also cleans out your computer for any junk or corrupted files that help you eliminate any unwanted files from your system. This is basically a solution that’s within your grasp with just a click. It’s easy to use as it is user-friendly. For a complete set of instructions in downloading and using it, refer to the steps below Perform a full system scan using Restoro. To do so, follow the instructions below.
      1. Download and install Restoro from the official site.
      2. Once the installation process is completed, run Restoro to perform a full system scan. restoro application screen
      3. After the scan is completed click the “Start Repair” button. restoro application screen
[/vc_column_text][/vc_column][/vc_row]
Read More
NVIDIA Control Panel is not opening
Users who constantly use graphic-intensive applications like games or any video-rendering software need to control how their graphics card is used. There are some who always toggle their Graphic Quality settings to get the Frames Per Second or FPS up. While some tend to adjust the size, orientation, scaling, and other display settings in order to use their PCs in a more efficient way or to simply work better. And in all of that, that’s where the NVIDIA Graphics Card comes into the picture. Take note that this software only works on PCs which has NVIDIA Graphics Card attached to them. Thus, if you use another Graphics Card then this post is not for you, otherwise, proceed reading to know what you can do if the NVIDIA Control Panel is not opening on your Windows 10 PC. Here are a couple of things you can try if the NVIDIA Control Panel is not opening, not responding, or not working:
  • Restart the process of the NVIDIA Control Panel
  • Restart the NVIDIA Display Driver Service
  • Update your NVIDIA Display Drivers
For more details, refer to the instructions provided below.

Option 1: Restart the process of the NVIDIA Control Panel.

  • Tap the Ctrl + Shift + Esc keys to open the Task Manager.
  • After opening the Task Manager, look for the process named NVIDIA Control Panel Application.
  • Once you found it, expand it and right-click on the NVIDIA Control Panel sub-process, and click on End Task.
  • Now try opening the NVIDIA Control Panel from the Start Menu and see if it now works fine or not.

Option 2: Restart the NVIDIA Display Driver Service

  • Tap the Win + R keys to open the Run dialog box.
  • Then type “services.msc” in the field and hit Enter to open the Windows Services Manager.
  • After opening the Services window, you will see a list of services. From there, look for services named “NVIDIA Display Container LS” and double click on it to open its Properties.
  • Now make sure that the service is Started. If it isn’t, you need to start it, otherwise, you need to Stop it and Start It again. You also have to make sure that the Startup Type is set to Automatic.
  • Do the same for the NVIDIA LocalSystem Container service.
  • Restart your computer and check if the problem’s fixed.

Option 3: Try updating the drivers from the official site of NVIDIA

If both the first and second given options didn’t work, you can also try updating the drivers from the official NVIDIA website. And in case you don’t know the type of Nvidia graphics card that your computer is on, follow the steps below:
  • Tap the Win + R keys to open the Run dialog box.
  • Next type in “dxdiag” in the field and click OK or hit Enter to open the DirectX Diagnostic Tool.
  • From there, you can see what type of Nvidia graphics card that your system is on.
  • Take note of your graphics card information and then look for the best drivers for your operating system. Once you’ve downloaded and installed the file, restart your PC.
Read More
Software review series: BitWarden
BitWardenMany times we were talking and writing here on Errortools.com about security, privacy, hacking, identity theft, etc. We tried to raise important security questions and I hope I have managed to at least shed some light and change maybe some bad behaviors for some, helping them embrace better routines about their security on their PC. 
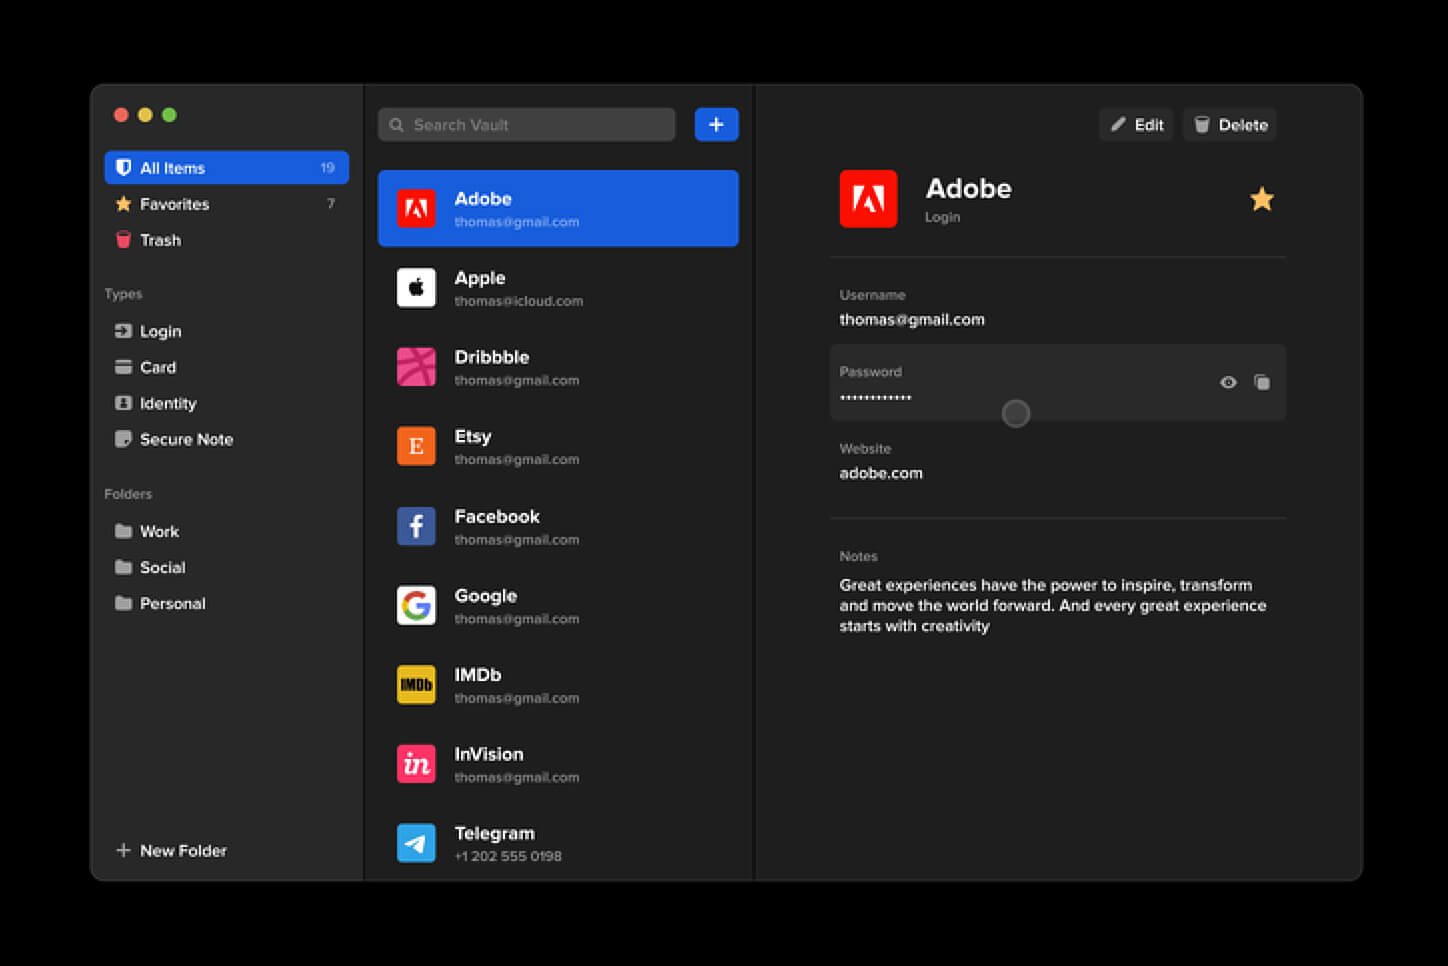
In this light, I will today present you with one neat and awesome piece of software, a password manager worth your time and money (if you want premium features): BitWarden.

What BitWarden offers?

The first thing that it offers is the completely free basic plan, granted BitWarden is not an open-source project nor completely free but it has an unlimited free basic plan that will cover 90% of user needs. There is also a free basic unlimited plan for Organizations letting you and one more user share files and other stuff via BitWarden making it a cool option if you need it. Premium features offer you encrypted sharing of files, two-step login, 1GB file attachments (encrypted), Bitwarden Authenticator (TOTP), Vault Health Reports, Emergency Access, and Priority Support. The cost for all of these additional features is 10 USD per year for an individual plan or 40 USD per year for organizations where you will get an increase of maximum users from 2 to 6. Yes, you read that correctly, only 10 USD per YEAR for the whole set of features. Granted if you do not need any of them, enjoy the free version forever. Besides very low premium cost BitWarden will offer you compatibility with all major browsers and devices including both Android and iOS platforms making it a great cross-platform solution to login and maintain your passwords anywhere with just one click. Once installed all you need to do is set one master password and be very careful not to lose or forget this one, if you do all of your other generated passwords will be lost forever.

Features

Secure Password Sharing

Share your encrypted data quickly and easily, and only with the users or teams who need access

Cross-Platform Accessibility

Access critical data in your Bitwarden vault from any location, browser, and device

Cloud-Based or Self-Host

Get up and running in minutes in the cloud or you can self-host Bitwarden for complete data control

Security Audit & Compliance

Open source and third-party audited, Bitwarden complies with Privacy Shield, GDPR, CCPA regulations

Vault Health Reports

Access insightful reports to reveal weak, reused passwords, and other helpful data security metrics

Directory Sync

Our powerful Directory Connector streamlines user and group onboarding and keeps them in sync

Always-On Support

Our Customer Success agents are available to support you around the clock

Detailed Event Logs

Bitwarden creates audit trails to help you keep track of user and group access to sensitive data

Flexible Integrations

Unite your existing systems with Bitwarden using SSO authentication, Directory services, or powerful APIs

Conclusion

There are many password managers out there but via recommendation I have tried BitWarden and truth to be told, I really never felt the need to try anything else, it is great at what it does and it is moving forward with features and it is constantly updated and maintained.
Read More
Fixing Error 633: The modem already in use
If you are trying to connect to the internet using a Wi-Fi, Ethernet, or a Wi-Fi connection and you suddenly encounter Error 633, then read on as this post will guide you on how you can fix this problem in your Windows 10 computer. According to users who encountered the same problem, when they try to connect to the internet, an error pops up that states, “The modem or other connecting device is either already in use or not appropriately configured”. This error is the VPN Error 633 which indicates that the modem is malfunctioning due to some broken configuration. It is possible that this broken configuration is caused by the WAN Miniport device which is associated with your preferred VPN protocol. It could also be due to the TCP port that’s required for the VPN connection to work might be used by another application. There are instances when Error 622 could occur when there are multiple internet connections set up on one device or when the communication port is exploited by another program. It could also occur when the affected modem is not bound to one specific device. Thus, any model and computer can be affected by this problem. The first and basic thing you can do to fix the VPN Error 633 is to turn off or unplug the modem your computer is using and then plug it back in to see if the problem is fixed. If not, then there are several other potential fixes you need to check out to resolve the problem. You can try the suggestions provided below and see if any of them help.

Option 1 – Run the Network Adapter Troubleshooter

  • Open the Search bar on your computer and type in “troubleshoot” to open the Troubleshoot settings.
  • Next, scroll down and select the “Network Adapter” option from the right pane.
  • Then click on the Run Troubleshooter” button.
  • After that, your computer will check for any possible errors and will pinpoint the root cause of the problem if possible.

Option 2 – Try to explicitly reserve the TCP port

The next thing you can do to fix the error is to reserve the TCP port explicitly and to do that, follow the steps below.
  • Tap the Win + R keys to pull up the Run dialog box and type “Regedit” in the field and hit Enter to open the Registry Editor.
  • Next, navigate to this registry path: HKEY_LOCAL_MACHINESYSTEMCurrentControlSetServicesTcpipParameters
  • After that, follow the path New > Multi-String Value on the edit menu and rename the multi-string value as “ReservedPorts” and then double click on it.
  • Now in the value data of ReservedPorts, input “1723-1723” and click OK to save the changes made.
  • Close the Registry Editor and restart your PC. Once your computer has restarted, check if the VPN Error 633 is fixed or not.

Option 3 – Try to use the netstat command

  • In the Windows Start Search, type “cmd” and from the search results that appear, right-click on Command Prompt and then select the “Run as administrator” option.
  • After opening Command Prompt as admin, type this command and hit Enter: netstat –aon
  • After that, the output will be displayed and from there, look for the process ID or PID of any program that uses the TCP port 1723 on your computer.
  • Next, type this next command and hit Enter: taskkill /PID PID /F
  • Once the command has been executed, the concerned program will be forced to close and the TCP port 1723 will be freed up. Keep in mind that the taskkill command ends the process corresponds to the process ID number and the given command above, “/F” option is used to end the program’s process forcefully.
  • Now restart your computer and after that, the concerned program should start using a TCP port other than 1723 which leaves the TCP port 1723 free for your internet device to use.

Option 4 – Remove any irrelevant internet device programs

You could also try removing any irrelevant device programs since it is possible that any of these programs could be the one that’s causing the modem to malfunction. These irrelevant programs could be an internet booster or third-party tools that comes with the modem and so on. These programs are not necessarily needed for your modem to function. Thus, if you want to fix the VPN Error 633, you can try uninstalling them and see if it fixed the error.

Option 5 – Update the Network Adapter drivers

You might also want to update the Network Adapter drivers by following these steps:
  • Tap the Win + R keys to launch the Run window and then type in the “devmgmt.msc” command and hit Enter to open the Device Manager window.
  • Under the Device Manager, you will see a list of drivers. From there, look for the Network Adapters and expand them.
  • Then right-click on each one of the Network drivers and update them all.
  • Restart your PC and see if it helped in fixing the BSOD error.
Note: If updating the network drivers didn’t help in fixing the VPN Error 633, you can also try to uninstall the very same drivers and restart your Windows 10 PC. After that, the system itself will reinstall the drivers you just uninstalled. Alternatively, you can also download and install the drivers from the manufacturer’s website directly. To reinstall the network adapter driver, refer to these steps:
  • Open the Devices Manager from the Win X Menu.
  • Then locate the device drivers and right-click on them to open the Properties.
  • After that, switch to the Driver tab and click on the Uninstall Device button.
  • Follow the screen option to completely uninstall it.
  • Finally, restart your computer. It will just reinstall the device drivers automatically.
Read More
Automatically Turn Off Hotspot when idle
One of the useful features that came with Windows 10 is the Mobile Hotspot although there’s a downside to it – it drains your battery faster especially if your Windows 10 device is running on battery. Another one of its flaws in the implementation of this feature is that it stays activated even when the connection is idle. In other words, it is still activated even if no devices are connected to it. As a result, it consumes battery life and affects it. There are also instances when it affects the performance of the network connection. At the time of writing, Microsoft hasn’t done anything about this dilemma yet so in the meantime, you can continue reading this post to resolve this issue on your Windows 10 device. You can remedy this Mobile Hotspot issue by running a command in Windows PowerShell. To get started, follow the given instructions below.

Turn off Mobile Hotspot Automatically:

Step 1: The first thing you have to do is to copy the following command:
powershell -windowstyle hidden -command "Start-Process cmd -ArgumentList '/s,/c,net stop "icssvc" & REG ADD "HKLMSYSTEMCurrentControlSetServicesicssvcSettings" /V PeerlessTimeoutEnabled /T REG_DWORD /D 1 /F & net start "icssvc"' -Verb runAs"
Step 2: After copying the command given above, open the Notepad app and paste the command you copied there and save it. And when saving it, select the “Save as” option and its File type as “All files”. Step 3: After that, put “TurnOnTimer.bat” as the file’s name and save it on your Desktop. Step 4: Once done, run the file you just created, and when a User Account Control or UAC prompt appears, just click on Yes. Step 5: After you run the file, it will run a series of scripts in a command line which will turn off the Mobile Hotspot automatically when idle. And that’s how you automatically turn off the Mobile Hotspot when your Windows 10 device is idle. On the other hand, if you want to undo the changes made, you can always do so using the steps provided below.

Turn on Mobile Hotspot:

Step 1: Copy and paste the following command in the Notepad app:
powershell -windowstyle hidden -command "Start-Process cmd -ArgumentList '/s,/c,net stop "icssvc" & REG ADD "HKLMSYSTEMCurrentControlSetServicesicssvcSettings" /V PeerlessTimeoutEnabled /T REG_DWORD /D 0 /F & net start "icssvc"' -Verb runAs"
Step 2: After copying and pasting the command, save it as “TurnOffTimer.bat” on the Desktop. Step 3: Once done, run the file like what you did earlier and select Yes when a UAC prompt pops up. This will run a series of scripts on a command line which will revert the changes back to their default state.
Read More
Fix Feature Update failed, error 0x8007000e
In every task carried out in the Windows 10 operating system, some of them don’t go smoothly and it could encounter a couple of errors along the way. One of these errors you could encounter is the Windows Update error code 0x8007000e. This particular error was reported to occur a lot when downloading and installing a Feature update via Windows Updates. And recently, it has been reported to occur a couple of times for the Windows 10 1903 May 2019 update. According to security experts, this error could be caused by a lack of memory or disk space as well as issues in the Windows Update mechanism. Whatever the cause is, troubleshooting this problem shouldn’t be hard as this post will give you some potential fixes you can check out. To fix this error, here are some options you need to consider:

Option 1 – Clear up temporary or junk files

The error could be caused by some temporary or junk files in your computer and so you need to clear them up to fix the problem. You can achieve that using the Storage Sense feature.
  • Open Setting > System > Storage from the WinX Menu.
  • From there, you will see a list of all the local and connected storage devices along with the details on the free space. Make sure that Storage Sense is on.
  • Next, find a link that says “Free Up Space” and click it to open.
  • After that, a screen which is the built-in program in Windows 10 will appear and will scan your computer for the following junk files so you can free up disk space:
    • Windows Upgrade Log Files
    • System created Windows Error Reporting Files
    • Thumbnails
    • Temporary Internet Files
    • Previous Windows Installation Files
    • Delivery Optimisation Files
    • DirectX Shader Cache
  • Choose the files you want to get rid of and then click on the remove files option. Note that you’ll have an idea of the total size as you select any of the junk files listed above.
  • Now go to the “Free Up Space Now” section and click the Clear Now button. This will get rid of all the temporary or junk files in your computer and should hopefully fix the Windows Update error 0x8007000e.

Option 2 – Reset the Windows Update components

If by any chance that the second option didn’t work, resetting the Windows Update components could also help you resolve the problem. How? Refer to the following steps:
  • Open Command Prompt with admin privileges.
  • After that, type each one of the following commands and hit Enter after you key in one after the other.
    • net stop wuauserv
    • net stop cryptsvc
    • net stop bits
    • net stop msiserver
Note: The commands you entered will stop the Windows Update components such as Windows Update service, Cryptographic services, BITS and MSI Installer.
  • After disabling WU components, you need to rename both the SoftwareDistribution and Catroot2 folders. To do that, type each one of the following commands below and don’t forget to hit Enter after you type one command after the other.
    • ren C:/Windows/SoftwareDistribution/SoftwareDistribution.old
    • ren C:/Windows/System32/catroot2/Catroot2.old
  • Next, restart the services you’ve stopped by entering another series of commands. Don’t forget to hit Enter after you key in one command after the other.
    • net start wuauserv
    • net start cryptsvc
    • net start bits
    • net start msiserver
  • Close Command Prompt and reboot your PC.

Option 3 – Try configuring the Windows Update-related Services

  • Tap the Win + R keys to open the Run dialog box.
  • Then type “cmd” in the field and tap Enter to open an elevated Command Prompt.
  • Next, execute the following commands. Note that you have to type and enter each the command one after the other.
    • SC config wuauserv start= auto
    • SC config bits start= auto
    • SC config cryptsvc start= auto
    • SC config trustedinstaller start= auto
  • The commands you executed will make sure that the Windows Update-related services are available. Once it’s done, restart your computer and see if the Windows Update error is now fixed.

Option 4 – Try running the Windows Update troubleshooter

Windows 10 have various troubleshooters that can help you resolve many system issues. So if you’re dealing with Windows Update errors like Error 0x8007000e, you can run the Windows Update troubleshooter to resolve it. To run it, go to Settings and then select Troubleshoot from the options. From there, click on Windows Update and then click the “Run the troubleshooter” button. After that, follow the next on-screen instructions and you should be good to go.

Option 5 – Try to use the Media Creation tool

The Media Creation tool in Windows allows you to use the ISO installation file to make a bootable device that you can use to install Windows on your PC. Note that this is kind of different from the usual installation process as it could erase your computer’s current settings and data on the primary drive. Thus, before you proceed, you need to backup all your data into some removable drive and then use the Media Creation tool to make a bootable drive.
  • After making the bootable drive, you need to plug it in your computer and then reboot.
  • Next, tap the F10 or Esc key to open the boot options.
  • Now set the boot priority of the removable drive the highest. Once the setup comes forth, follow the next onscreen instructions and install Windows without any problems.
Read More
Fix Windows Update Error 0x80242006
If you are trying to update your Windows 10 computer using Windows Update but encounter an error code 0x80242006, then you’ve come to the right place as this post will guide you in fixing this particular Windows Update error. This kind of error might be due to mishandling by the operating system. It could also be caused by the antivirus program or security software installed in your computer. When you encounter this error, you will see the following error message on your screen as you try to run Windows Update:
“0x80242006, WU_E_UH_INVALIDMETADATA. A handler operation could not be completed because the update contains invalid metadata.”
Here are some troubleshooting tips you can try to fix Windows Update Error 0x80242006.

Option 1 – Try to reset the Windows Update components

If by any chance that the second option didn’t work, resetting the Windows Update components could also help you resolve the problem. How? Refer to the following steps:
  • Open Command Prompt with admin privileges.
  • After that, type each one of the following command and hit Enter after you key in one after the other.
    • net stop wuauserv
    • net stop cryptsvc
    • net stop bits
    • net stop msiserver
Note: The commands you entered will stop the Windows Update components such as Windows Update service, Cryptographic services, BITS and MSI Installer.
  • After disabling WU components, you need to rename both the SoftwareDistribution and Catroot2 folders. To do that, type each one of the following commands below and don’t forget to hit Enter after you type one command after the other.
    • ren C:WindowsSoftwareDistribution SoftwareDistribution.old
    • ren C:WindowsSystem32catroot2 Catroot2.old
  • Next, restart the services you’ve stopped by entering another series of commands. Don’t forget to hit Enter after you key in one command after the other.
    • net start wuauserv
    • net start cryptsvc
    • net start bits
    • net start msiserver
  • Close Command Prompt and reboot your PC.

Option 2 – Run the Windows Update Troubleshooter

If resetting the Windows Update components didn’t work, you could also try running the Windows Update Troubleshooter as it could also help in fixing any issues related to Windows Update including this one. To run it, go to Settings and then select Troubleshoot from the options. From there, click on Windows Update and then click the “Run the troubleshooter” button. After that, follow the next on-screen instructions and you should be good to go.

Option 3 – Try to disable your antivirus program

Disabling the antivirus program or any security software installed in your computer is always a good idea you can try when the Windows Update process does not go smoothly. So before you try updating your computer again, make sure to disable the antivirus or security program and once the Windows Update is done, don’t forget to enable the antivirus program back again.

Option 4 – Check the Background Intelligent Service and the Cryptographic Service

  • Tap the Win + R keys to open the Run dialog box.
  • Next, type “services.msc” in the field and hit Enter or click OK to open Services.
  • From the list of Services, look for the following services and make sure that their Startup type is as follows:
    • Background Intelligent Transfer Service – Manual
    • Cryptographic Service ­– Automatic
  • After that, check if the Service status of the listed services above are set to Running. If they’re not, click on the Start button to start these services and then check if you can now enable the Windows Update service or not.

Option 5 – Run the System File Checker Scan

System File Checker or SFC is a built-in command utility that helps in restoring corrupted files as well as missing files. It replaces bad and corrupted system files to good system files. To run the SFC command, follow the steps given below.
  • Tap Win + R to launch Run.
  • Type in cmd in the field and tap Enter.
  • After opening Command Prompt, type in sfc /scannow
The command will start a system scan which will take a few while before it finishes. Once it’s done, you could get the following results:
  1. Windows Resource Protection did not find any integrity violations.
  2. Windows Resource Protection found corrupt files and successfully repaired them.
  3. Windows Resource Protection found corrupt files but was unable to fix some of them.
  • Restart your computer.

Option 6 – Try running the DISM tool

You can try running the Deployment Imaging and Servicing Management or DISM tool to fix the Windows Update error 0x80242006. Using this built-in tool, you have various options such as the “/ScanHealth”, “/CheckHealth”, and “/RestoreHealth”.
  • Open the Command Prompt with admin privileges.
  • Then type in the following commands and make sure to hit Enter right after you type each one of them:
    • Dism /Online /Cleanup-Image /CheckHealth
    • Dism /Online /Cleanup-Image /ScanHealth
    • exe /Online /Cleanup-image /Restorehealth
  • After that, wait until the process is finished and do not close the window as the process will probably take a couple of minutes.
  • Once it’s done, restart your computer.
Read More
How to Repair Bad_Pool_Header Error

Fix Bad_Pool_Header Error

Bad_Pool_Header Error - What is it?

Bad_Pool_Header is one of the types of BSOD (Blue Screen of Death) error codes. This error triggers a problem with Windows memory allocation. When this error message occurs, the screen turns blue and locks the user out of the application running on the system. The computer shuts down or restarts.

Solution

Restoro box imageError Causes

There is no one particular cause for the occurrence of the Bad_Pool_Header error code. It may appear on your system due to multiple reasons such as:
  • Device driver issues
  • Cluttered disk
  • Disk writing issues
  • Faulty memory hardware
Driver issues and disk writing issues occur when your try to update new driver versions. During this process, users often forget to remove the files of the uninstalled version from the registry. And due to the presence of the uninstalled driver files in the registry updating and disk writing becomes an uphill task which leads to the Bad_Pool_Header display on the computer screen. The main database of your system is the registry so you need to keep it clean to avoid disk cluttering. The hard disk clutters because the registry saves all the activities that you perform in your system. It saves junk files, internet history, invalid entries, and other unnecessary files. This occupies a lot of your disk space thus resulting in disk cluttering and faulty memory hardware issues triggering the Bad_Pool_Header. Ignoring the Bad_Pool_Header error is not wise. It is advisable to repair the Bad_Pool_Header right away as it can lead to serious threats like system failure and data loss.

Further Information and Manual Repair

The easiest, time and money-saving way to resolve the Bad_Pool_Header error on your system is to install Restoro. This is a high and multi-functional repair tool that features a powerful inbuilt registry cleaner, anti-virus, and a system optimizer. This tool is the one-stop solution for all your PC-related errors including the Bad_Pool_Header blue screen of death error. Whether it’s a driver issue, faulty memory, or cluttered disk, all the causes triggering the Bad_Pool_Header error code fall under the registry which is why it is recommended to install Restoro. Its innovative and powerful registry cleaner scans detect and repair all the errors related to the registry in one go including the Bad_Pool_Header errors. With this helper, you can easily remove all the unnecessary files cluttering your hard disk and damaging your registry. It wipes out the clutter in seconds and frees up disk space.

Why Should You Clean The Registry?

Sometimes the registry also gets cluttered by malicious software like viruses, spyware, and malware. These may also take up your disk space and prevent you to perform disk writing successfully and also corrupt the registry. The privacy error finding utility embedded in Restoro helps you scan for such malicious software on your system and removes them immediately. It lends the software anti-virus properties. When it comes to using repair tools, many users who are not technically sound often worried. They think it may be difficult to operate. If you think the same way, let us tell you that Restoro is very easy to use. It is integrated with a high-functional yet user-friendly interface complemented by simple navigation.

Restoro Special Features

This makes it simple for all levels of users to operate it regardless of whether they are technically adept or not. Restoro is compatible with all Windows versions. You can download it with ease and run it for scans on any Windows version you have installed on your system. To get started, all you have to do is:
  • Click here to install Restoro.
  • Once the installation is complete now run it to scan for errors like the Bad_Pool_Header
  • After that simply click on the ‘repair’ button to resolve
Read More
Fixing corrupted system files in Windows
Windows has a lot of built-in tools that help you fix tons of system-related issues. One of them is the System File Check which is the tool you can use to conveniently replace potentially corrupted or missing system files with good ones. But what happens when it does not work? Well, you’ve come to the right place as in this post, you will be guided on how you can replace a corrupted single Windows system file manually with a known good copy of the file if the System File Checker scan is not working. When you encounter this issue with the System File Checker, it will be unable to replace the corrupted system files and returns an error message instead. And so to fix and replace corrupted system files in your Windows 10 computer without the help of System File Checker, you can refer to the instructions provided below. Step 1: First, you need to open the log files listed below and identify which particular file has been corrupted:
  • %userprofile%Desktopsfcdetails.txt
  • Log %WinDir%LogsCBSCBS.log
Step 2: You will see all the details on the given log files. Once you find out the name and the path of the file, you have to take ownership of this corrupted system file. Step 3: To take ownership of the corrupted file, you need to pull up Command Prompt by tapping Win + R keys on your keyboard and then type “cmd” and tap Enter. Step 4: After opening Command Prompt, type and enter the command below to execute it:
takeown /f FileNameAndPath
Note: In the given command, “FileNameAndPath” represents the name and the path of the corrupted file. For instance, the corrupted file is named “wuapi.dll”, then you need to type “takeown /f C:/Windows/System32/wuapi.dll” Step 5: Next, you need to grant administrators full access & control to the corrupted file and you can do that via Command Prompt again. Step 6: In the elevated Command Prompt, type and enter the following command to execute it:
icacls FileNameAndPath /GRANT ADMINISTRATORS:F
Note: We’re going to use the wuapi.dll again as an example. So the command should be like this: icacls “C:/Windows/System32/wuapi.dll /grant administrators: F”. Step 7: Now all that’s left to do is replace the corrupted system file with a good copy from a trusted source. Once you have a copy, open an elevated Command Prompt again and execute the following command:
copy NewFileLocation FileNameAndPath
Note: In the command given above, the “NewFileLocation” is the location where you have saved the copy of the file. For instance, if you’ve saved it on your desktop, this is how it should look: “copy C:/Users/<username>/Desktop/wuapi.dll C:/windows/system32/wuapi.dll”
Read More
1 2 3 162
Logo
Copyright © 2022, ErrorTools. All Rights Reserved
Trademarks: Microsoft Windows logos are registered trademarks of Microsoft. Disclaimer: ErrorTools.com is not affiliated with Microsoft, nor claim direct affiliation.
The information on this page is provided for information purposes only.
DMCA.com Protection Status