How to fix windows 10 error code 0x80073712

Windows 10 has displayed one of the most efficient and user-friendly interfaces. However there have been many issues on the backend of this commonly praised operating system: For example, Windows Update is still a wonky and error-laded system application. One example of this error is Windows Update Error 0x80073712 which stands in the way of users just wanting to keep their PCs updated hassle-free.

The error code 0x80073712 signifies that a file needed by Windows Update to function is either damaged, missing, or corrupted. However, this does not mean that your Windows version will forever stay as-is with no mode to update it. Windows Update Error 0x80073712 is perfectly fixable with the set of provided steps below and some of Windows’ built-in troubleshooting steps:

Solution 1: Open Windows Update Troubleshooter

  1. Open the Windows Update Troubleshooter by pressing the Windows and S keys simultaneously.
  2. Enter the word “Troubleshoot” in the search box and select the Troubleshoot result
  3. On the new window, select “Windows Update” to troubleshoot.
  4. Run the troubleshooter, then open Windows Update and try to install the update again.

Solution 2: Run the DISM tool

  1. Open the command prompt by pressing Windows and S keys simultaneously
  2. Enter “cmd” in the search box. Right Click command prompt among the results and select “Run as administrator”
  3. In the Command Prompt window type the following and press the Enter key after every command

DISM.exe /Online /Cleanup-image /Scanhealth

DISM.exe /Online /Cleanup-image /Restorehealth

  1. To close the Administrator: Command prompt window, type Exit, and then press Enter.
  2. Run Windows Update again.

Solution 3: Rename the Software Distribution folder

  1. Open the command prompt as previously mentioned
  2. Input the following command pressing Enter after every line
    net stop wuauserv
    net stop cryptSvc
    net stop bits
    net stop msiserver
    rename c:/windows/SoftwareDistribution/softwaredistribution.old
    net start wuauserv
    net start cryptSvc
    net start bits
    net start msiserver
    exit
  3. Restart the PC and run the updater if it works again.

Solution 4: Restart Windows Update Services

  1. Press the Windows logo key and R together to open Run -> Input services.msc -> and press Enter
  2. Search for the Windows Update service -> Check its status
  3. If it is not indicated, right-click on the service and select Start to force start your Windows Update
  4. If you see an error, locate the Startup Type option and set it to Automatic
  5. Now you should reboot your computer and see if your Windows Update is OK

Solution 5: Fix Registry Issues

If after all the aforementioned solutions, you still experience problems with Windows Update, the problem may lie in the registry that is either damaged or corrupted. You may choose to do manual editing of your Windows registry by opening your Windows registry editor. But doing so is risky as one wrong letter may do incalculable damage to your system. To do so safely for more inexperienced users we recommend using a third-party registry cleaner/tools, many of which can be found online.

If you like to learn and find out more about various Windows errors, and how to repair them go to our vast archive or use search to find articles that will explain and help you in solving your issue.
However, if you prefer to do things fast and with automatization then we are proposing to use an automated solution for your issues. The application that we are recommending is Advanced System Repair Pro
Advanced System Repair utilizes multiple tools all in one to give you a quick, simple, reliable, and very thorough diagnosis of your PC. It brings you all the tools you need in one program to clean, fix, protect, optimize and boost your PC!
1-Click Maintenance
All the tools to make it simple and easy! It's like having a professional technician at the click of a mouse.

Junk Cleaner
Keeping your computer free from unnecessary clutter also helps make your computer last longer. Like any other machine, if you keep it clean and take care of it, it will serve you better for longer!

Optimize background apps
Optimize applications background activity with the built-in Application Optimizer feature.

Disk Defrag
With a simple 1-click, Advanced System Repair speeds up your PC by assembling fragmented files on your machine and organizing them more efficiently.

Malware Removal
Finds and removes all types of harmful malware including trojans, worms, bots, adware, spyware, PUPs, and more!

Privacy Cleaner
The all-in-one privacy suite to Clean Your Tracks & Protect Your Privacy! Make your computer safe, secure, and more efficient!

System Tweak/Optimizer
ASR will analyze your complete system and settings to adjust your PC to function at its maximum performance.

Registry Cleaner
Over time, as you install and uninstall applications, the registry can become cluttered with old entries and broken settings which can result in program crashes, and annoying messages and slow the computer down.
Visit our Advanced System Repair Pro Download page to inform yourself about all the benefits of this software and get a free trial copy of it.
advanced system repair pro

Advanced System Repair Pro

One-click automated PC repair solution
ASR logo
With Advanced System Repair Pro you can easily
Replace damaged files
Restore performance
Free disk space
Remove Malware
Protects WEB browser
Remove Viruses
Stop PC freezing
DOWNLOAD
Privacy Policy | Terms of Use | Uinstall
Advanced System Repair Pro is compatible with all versions of Microsoft Windows including Windows 11

Share this article:

You might also like

Chrome update failed error 3, 4, 7, 10, etc
If you find it hard to update Google Chrome to its latest version and each time you try to do so it keeps on failing, worry not for this post will guide you in fixing a list of Google Chrome Update errors. Even though there are a lot of error codes around Chrome, these are only caused by issues with the update. Here are some of the errors you can encounter when updating Google Chrome:
  • Update failed: You can encounter this error when the Updates are disabled by the administrator.
  • Update failed with
    • Error 3 or 11: When Chrome’s inbuilt updater fails to find the Update server to download the latest version.
    • Error 4 or 10: This happens while checking for updates with the message “Update check failed to start”
    • Error 7 or 12: This occurs when the download fails while checking for updates.
  • Windows OS version is not supported.
  • Google Chrome may not be able to keep itself updated.
  • Any other errors that mention that “Update failed”
Since these aforementioned error codes are related to “Update Failure”, then they have common solutions and here they are:

Option 1 – Restart your computer

You need to restart your computer first and then try updating Chrome again. There are times when it’s only a temporary issue that can be fixed by simply restarting your computer.

Option 2 – Try checking antivirus programs, firewall, and parental control settings

If you have antivirus programs, a firewall installed in your computer, as well as parental controls, then any of these could be blocking you to download anything, including the update for Chrome. This is why you have to double-check and make sure that software updates aren’t being blocked by these programs. On the other hand, you can also try running the Network Troubleshooter as it can help you resolve any DNS or connectivity issues. To use it, follow the steps below.
  • Open the Search bar on your computer and type in “troubleshoot” to open the Troubleshoot settings.
  • Next, scroll down and select the “Network Adapter” option from the right pane.
  • Then click on the Run Troubleshooter” button.
  • After that, your computer will check for any possible errors and will pinpoint the root cause of the problem if possible.

Option 3 – Try to remove Proxy

Removing the Proxy might also help you in fixing the Chrome Update errors. Here’s how you can do it:
  • Tap the Win + R keys to open the Run dialog box.
  • Then type “inetcpl.cpl” in the field and hit Enter to pull up the Internet Properties.
  • After that, go to the Connections tab and select the LAN settings.
  • From there. Uncheck the “Use a Proxy Server” option for your LAN and then make sure that the “Automatically detect settings” option is checked.
  • Now click the OK and the Apply buttons.
  • Restart your PC.
Note: If you are using a third-party proxy service, you have to disable it.

Option 4 – Try to reset Winsock, TCP/IP & Flush DNS cache

Resetting Winsock, TCP/IP, and flushing DNS might help in resolving the Chrome Update errors just follow these steps:
  • Right-click on the Start button and click on Command Prompt (administrator) so you can pull up an elevated Command Prompt.
  • After that, execute each one of the commands listed below. And after you typed in one after the other, you have to hit Enter.
  1. netsh winsock reset – type in this command to reset Winsock
  2. netsh int ip reset resettcpip.txt – type in this command to reset TCP/IP
  3. ipconfig /flushdns – type in this command to flush the DNS cache
  • Next, restart your PC and check if the problem’s fixed.

Option 5 – Try to run the Chrome Cleanup tool

You might want to run Google Chrome’s built-in Malware Scanner & Cleanup tool as it could also help in getting rid of any unwanted ads, pop-ups, and even malware, as well as unusual startup pages, toolbars, and anything else that might overtake the network and could affect the performance of the browser.

Option 6 – Get rid of any conflicting browser extensions

  • Open Chrome and press Alt + F keys.
  • Go to More tools and click Extensions to look for any suspicious browser extensions or toolbars.
  • Click the Recycle bin and select Remove.
  • Restart Chrome and press Alt + F keys again.
  • Proceed to On Startup and mark Open a specific page or set of pages.
  • To check if the browser hijacker is still active, click Set pages, if it is active, overwrite the URL.

Option 7 – Reset Google Chrome

Resetting Chrome can also help you get rid of the error. Resetting Chrome will restore its default settings, disabling all the extensions, add-ons, and themes. Aside from that, the content settings will be reset as well and the cookies, cache, and site data will also be deleted. To reset Chrome, here’s what you have to do:
  • Open Google Chrome, then tap the Alt + F keys.
  • After that, click on Settings.
  • Next, scroll down until you see the Advanced option, once you see it, click on it.
  • After clicking the Advanced option, go to the “Restore and clean up option and click on the “Restore settings to their original defaults” option to reset Google Chrome.
  • Now restart Google Chrome.
Read More
Delete files and folders using Command Prompt
There are times when you might find it difficult to delete folders or files in File Explorer and it could be due to many reasons. One of these reasons can be attributed to the failure that can lock down the folders or files which prevents you from deleting them. In this kind of situation, you can utilize the Command Prompt to delete the folders, sub-folders, and files on your computer, and in this post, you will be guided on how exactly you can do that. Before you proceed, keep in mind that when you use the Command Prompt incorrectly, it might affect your computer and render it inoperable, thus, you must be extra careful when executing the steps given below and it would also be better if you create a System Restore Point. After that, refer to the following instructions. Step 1: First, in the Start Search, type “command prompt” in the field and from the search results, right-click on Command Prompt and then select the “Run as administrator” option to open Command Prompt with admin privileges. Step 2: After opening Command Prompt as admin, navigate to the folder where the file you want to delete is located. Note that you have to execute the “cd” or the change directory command. Step 3: Next, execute the following command in Command Prompt:
DEL /F /A <file path with extension>
Note: In the given command, “/F” is the force delete command, while “/A” is the command that selects the files with the ready for archiving attribute. Step 4: After that, go to the location where you can find the folder you want to delete by using the “cd” command again. And then execute the following command right after:
RD /S <folder path>
Note: In the given command, “RD” is the command that removes the folder from the directory, while “/S” removes all of its sub-folders and files. On the other hand, if you also use the “/Q” parameter, you won’t see the “Y/N” confirmation but if you didn’t use it, then simply tap the Y button to proceed.
Read More
Facebook messengers alternatives
People are becoming more and more concerned with their privacy and Facebook's flagship messaging application is caught between it all. While still widely popular it has becoming to lose its ground due to many unanswered questions about privacy encryption. Lucky for all of us there are alternatives for more secure messaging.

SIGNAL

Arguably the most secure of all well-regarded messaging apps, Signal is the favorite of the European Commission, as well as newsrooms around the world. While Signal doesn’t disclose how many daily or monthly users the app has, Google’s Play Store says it has been installed more than 50 million times. While using Signal, each voice or video call connected through the app includes full end-to-end encryption. Signal takes an extra step by hiding message metadata so that the location of the original message is missing. While it asks for your mobile number, that number isn’t used with your profile. Instead, it acts as a numeric username. Once registered, you will find 1-1 chat, audio, and video calls, disappearing or “secret” chats, and a privacy lock so nobody can access the app even if they have your phone. Best of all, it’s completely free to use.

TELEGRAM

One of the biggest competitors to Facebook Messenger (and WhatsApp), Telegram is a very strong alternative. With more than 400 million users, it offers an interface that should feel right at home for anyone coming from Messenger. Telegram offers some huge benefits over Messenger, including features like groups that can hold up to 200,000 members for a chat. There is no limit on your media or chat size, and you can share all types of files between users and in groups. From a privacy standpoint, Telegram has robust security, but it is worth noting that only “secret” messages are end-to-end encrypted and can self-destruct. Non-secret messages can be stored on Telegram’s servers so you can pick them up between your devices quickly. That’s a consideration worth knowing prior to making Telegram your default Messenger replacement. Telegram is free across all platforms.

THREEMA

Rising in popularity, Threema is another privacy-focused alternative that has quickly become a competitor to Facebook Messenger. This paid service ($2.99 on both App Store and Play Store) is a pay-once, use forever option. Once you pay the small fee, you gain all of Threema’s touted privacy options, like open-source end-to-end encryption for both messages and calls. Like Signal, Threema won’t require you to link any phone numbers or emails to your account. All chats are handled anonymously, and the service generates a random user ID when you first open and register for the app. No data is collected from any of your chats and no ads are shown. The Swiss-made app does have its own servers hosted in Switzerland, which do not store any chat messages. Another privacy benefit of Threema is the notion that all of your contact lists, groups, and user profiles are hosted on your device, not on the Swiss servers. Because of that, Threema can once again state that none of your personal info is stored anywhere they have access.
Read More
Fix Update Standalone Installer 0x80096002
If you are using a Windows Update Standalone Installer to install Windows Updates in your Windows 10 computer but you suddenly encounter an error saying, “Installer encountered an error: 0x80096002, The certificate for the signer of the message is invalid or not found”, read on as this post will guide you on how you can fix it. This kind of error could be due to the vendor’s certificate that might have become invalid, compromised, or pulled. Aside from that, it is also possible that the update is not targeted at your OS version. You could get this error when you try to install an incompatible update or software on your computer. This error can also appear due to misconfigured system files or when you try to install BitLocker To Go Drive Encryption or BitLocker Drive Preparation Tool. To fix this error, you can try to run the standalone installer in Compatibility mode or enable the Windows Identity Foundation or run the Windows Update troubleshooter. Make sure to check if the error was resolved after every suggestion. It will help you learn what fixed the problem.

Option 1 – Try to run the installer in Compatibility mode

  • Look for the setup file.
  • Once you find it, right-click on it and select Properties from the context menu.
  • After that, go to the Compatibility tab and mark the checkbox for “Run this program in compatibility mode for:” and from the drop-down list, select the Windows OS version you want the installer to run on.
  • You also have to check the “Run as administrator” option.
  • Now click the Apply button and then click OK to save the changes made and check if it has resolved the issue or not.

Option 2 – Try to troubleshoot compatibility

This option is almost the same as the first one except it is an alternative way of fixing the error 0x80096002 in case the first one didn’t work. In this option, you will troubleshoot the compatibility issue.
  • Look for the setup file.
  • Then right-click on it and select the “Troubleshoot compatibility” from the context menu.
  • After that, click on the “Try recommended setting” option. Once the process is done, the error message should be gone.

Option 3 – Try to enable the Windows Identity Foundation

You might also want to enable the Windows Identity Foundation as some users reported that it helped in resolving the error for them. To do so, follow these steps:
  • In the Windows Start Search, type “Turn Windows features on or off” and click on the matching result.
  • This will open a list of Windows Features and from there, look for the Windows Identity Foundation.
  • Once you found it, click on its checkbox and click OK to enable it and save the changes made.
  • Now see if it has fixed the error or not. If not, you have to disable the feature.

Option 4 – Run the Windows Update Troubleshooter

Running the built-in Windows Update troubleshooter is one of the things you can first check out as it is known to automatically resolve any Windows Update errors like error 0x80096002. To run it, go to Settings and then select Troubleshoot from the options. From there, click on Windows Update and then click the “Run the troubleshooter” button. After that, follow the next on-screen instructions and you should be good to go.
Read More
Fix Template_fields error in Microsoft Word
As you know, Microsoft Office Word is a program that’s widely used all over the web and it’s because it’s the best program there is when it comes to editing and processing words. However, even when it is the best there is, it is not without its faults and so on as it can still encounter some errors every now and then. One of these errors is the Template_fields errors. When you encounter such an error, you will see a pop-up window. This strange error randomly appears on documents but you need not worry as this post will provide you with possible solutions to resolve the problem. But before you proceed with these solutions, you have to create a backup for all your Word documents to Microsoft OneDrive preferably. To fix the problem, you can try to disable the add-ins or try to start Word in Safe Mode or repair Office. For more details, refer to the options given below.

Option 1 – Disable the Add-ins

Although add-ins enhance Microsoft Word, there are times when they can also cause problems that end up breaking Microsoft Word instead of improving it which is why you have to disable them. Refer to the following steps to do so:
  • Open Microsoft Word and then click on File.
  • After that, select Options from the menu and then click on Add-ins.
  • From there, you’ll see Manage: Com Add-ins as well as a button that says Go.
  • Now click on the Go button and wait for a couple of seconds for a new window to appear.
  • In the newly opened window, uncheck all the Add-ins and click on OK.
  • Restart Microsoft Word and check if the “Template_fields” error is now fixed or not.

Option 2 – Try starting Word in Safe Mode

You might also want to try rebooting Microsoft Office in Safe Mode as it is one of your best shots in finding out whether the problem is internal or external. However, if the problem does not appear after you reboot Microsoft Word in Safe Mode, then there is a possibility that the problem is with Microsoft Office itself. On the other hand, if the problem persists, then it could be a deeper issue.
  • First, start Microsoft Word in Safe Mode.
  • Next, tap and hold the Ctrl key on your keyboard and open the Word document.
  • After that, you should see a dialog box. Click on Yes and see if Microsoft Word opens in Safe Mode.
  • Alternatively, you can open the search box and then type “winword.exe /safe” and hit Enter.

Option 3 – Try repairing Microsoft Office

If the first two options didn’t work, then you might want to try repairing Microsoft Office without getting rid of it. In most cases, this usually works in fixing any problems and returns the program back to its default state. To repair Microsoft Office, follow the steps below.
  • Right-click on the Start Menu button and select Apps and Features.
  • Next, scroll until you see the Microsoft Office program you want to repair and then select the Modify option.
  • After that, follow the options to repair Microsoft Office and then restart your PC and see if the “Template_fields” error is no longer present.
Read More
Moving Start Menu to the Second Monitor
One of the most important User Interface elements in a Windows 10 operating system is the Start Menu. Not too long ago, Microsoft has added some new features and redesigned the Start Menu a couple of times as well. Thus, it is not uncommon for Windows 10 users to use several monitors. That’s why in this post, you will be guided on how you can move the Start Menu to your second monitor in Windows 10. There are a lot of advantages in using more than one monitor like a better and widescreen as well as help in improving and increasing productivity. Usually, the Start Menu and the taskbar is present in the original monitor only. In most cases, it helps users in moving the Start Menu to the second monitor and helps users in segregating tasks, and uses separate monitors for each kind of task. There are two simple steps to move the Start Menu to the second monitor. You have the option to unlock and drag the taskbar, as well as make adjustments in the settings. To get started, refer to each one of the following options to move the Start Menu to the second monitor.

Option 1 – Move the second monitor by unlocking and dragging the taskbar

The first option you can try to move the Start Menu to the second display is to simply unlock and then drag the taskbar. To do so, follow these steps:
  • First, click on the Taskbar and unlock it.
  • Next, uncheck the Lock the taskbar feature in the menu of the Taskbar Settings. This will free the taskbar so you can move or drag it around.
  • After that, push the Start Menu to the furthermost corner of the screen and then transfer it to the second monitor.

Option 2 – Move the second monitor using the keyboard

  • The first thing you have to do is to tap the Windows key to open the Start Menu.
  • Next, close the Start Menu by tapping the Esc key.
  • After that, the controls will shift back to the taskbar.
  • Now open the context menu of the taskbar by tapping the Alt + space bar together. This will move the Start Menu to the second monitor.

Option 3 – Move the Start Menu to the second monitor via Settings

If you find that the Taskbar is moving to the wrong monitor automatically or if the program does not start on the same monitor as the taskbar, then you can try this option.
  • Click on Start first and click Run.
  • Then type “desk.cpl” in the field and click OK.
  • Alternatively, you could also right-click on the desktop and select the Screen Resolution option from the drop-down menu.
  • After that, click on the monitor that you want to use as the primary monitor and select the checkbox labeled “Make this my main display”.
  • Once done, you have to choose the “Show desktop” on only 1 from the drop-down menu of Multiple displays.
  • Now click the Keep Changes option and select the Extend these displays from the Multiple displays drop-down menu and then click on the Apply button to save the changes made.
  • Afterward, click the Keep changes option once the dialog box pops up.
Read More
REvil vanishes over night without trace
REvilREevil is one of the most active and successful hacking groups connected to Russia and operating all over the world. The group recently demanded a huge bitcoin ransom for an attack targeting IT firm Kaseya in the USA. Since Tuesday blog and payment site run by REvil group cannot be longer reached without any kind of explanation or why. The reason behind the disappearance is unknown but has sparked speculation that the group may have been targeted deliberately by authorities. US President Joe Biden said he raised the issue with Vladimir Putin during a phone call on Friday, after discussing the subject during a summit with the Russian president in Geneva last month. Mr. Biden told reporters that he had "made it very clear to him...we expect them to act" on information and also hinted the US could take direct digital retaliation on servers used for intrusions. The timing of Tuesday's outage has sparked speculation that either the US or Russian officials may have taken action against REvil - though officials have so far declined to comment and cyber experts say sudden disappearances of groups are not necessarily uncommon. The development comes after a series of high-profile ransomware attacks which have hit major US businesses this year. The FBI accused REvil - also known as Sodinokibi - of being behind a ransomware attack on the world's largest meat processing company JBS last month.
Read More
Switch audio devices in Windows 11 taskbar
windows 11 audio settings
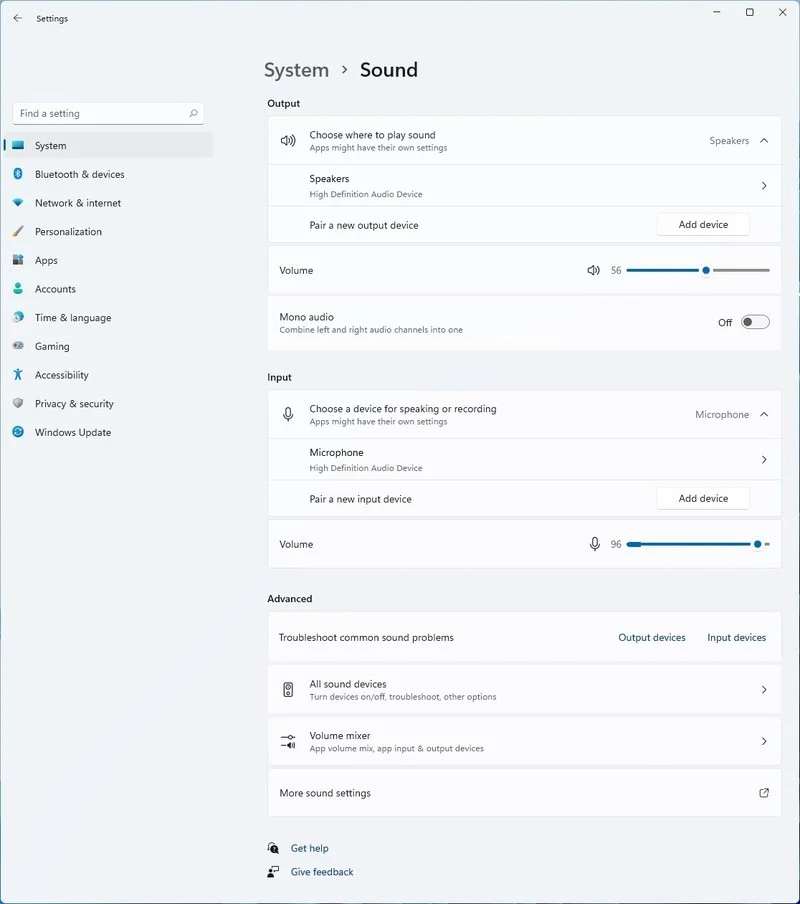
Windows 11 has brought some new features and changed some of the existing ones. One of these changes includes quick switching of audio devices which will play audio. Audio switching can still be done under the taskbar, it is just a little different and one could say even hidden. Follow this quick guide and you will be switching from your headphones to speakers as an example in a matter of seconds.
  1. Click on the speaker icon located in the far-right part of the taskbar.
  2. After the quick settings menu appears click on the right arrow located right of the volume slider. If the arrow is not present, instead of click on the pencil icon, then on add, and finally select Volume from the list.
  3. After clicking on the arrow icon, a list of all enabled audio devices on the system will replace the volume slider. Click on the desired audio device in order to make it active.
  4. Click anywhere outside the quick setting menu to save changes and close it.
Note: in the Quick settings menu if you choose More Volume Settings it will bring you to System > Sound where you can access more sound input and output options.
Read More
Almost complete List of Cortana commands
Cortana is your personal digital assistant fully integrated into Windows 10 designed to help you make your life easier. The more you use it, the more Cortana can learn about you, and the experience becomes more personalized and accurate. It can perform a variety of tasks, and it's full of handy tricks, but perhaps one of the best features is the advanced speech recognition that enables Cortana to understand the context of a natural voice conversation. On Windows 10, and across platforms with the Cortana app on iPhone and Android, the assistant can understand virtually any voice command and perform tasks. For example, by just speaking you can find facts, create reminders and manage your calendar, launch applications, change settings, and a lot more. Now, if you're looking for an official list of all the voice commands Cortana supports, you'll never find it because it doesn't exist. Cortana can understand natural language and context, there's no particular set of commands to make things happen. In a sort of way, you are speaking to Cortana as you would to any other person.

Invoking Cortana

Before using voice commands, it's important to know the ways in which you can invoke Cortana using natural language:
  • You can click the microphone icon in the taskbar next to the Start menu.
  • You can use the Shift + ⊞ Windows + C keyboard shortcut to open Cortana in listening mode.
  • You can use the Hey Cortana feature, which lets you invoke the assistant by simply saying Hey Cortana followed by the command. For example, Hey Cortana: How's the weather?.
  • On Windows 10 Mobile devices, you can press and hold the search button to open Cortana in listening mode.

Comprehensive list of Cortana voice commands

The following list of commands are examples you can use to learn how to control Cortana with voice commands. Keep in mind that there isn't a specific way to speak the commands. For example, Hey Cortana: Let me listen to some tunes is the same as asking for a more systematic command like Hey Cortana: Play music.

Cortana basic voice commands:

Getting the time for any location:

  • "What time is it?"
  • "What time is in New York?" or "What time is in Greece?"

Getting weather information for any location:

  • "What's the weather like?"
  • "What's the weather in Madrid?" or "What's the weather in Slovakia?"
  • "When does the sun set?"
  • "Is it hot in Hawaii?"
  • "How's the weather looking for tomorrow/next week?"

Opening (Store and desktop) apps and websites:

  • "Open Photoshop" or "Go to Firefox"
  • "Open errortools.com."

Getting news information:

  • "Show me top headlines."
  • "Show me the latest news."
  • "Show me weather news."
  • "Show me Blizzard stock."
  • "Show me bitcoin exchange rate."
  • "What was the score of the last Brazil football game."

Creating a note:

  • "Create a note."
  • "Create Shopping note."
  • "Create Shopping note: Buy a basket of eggs"
  • "Take a note."
  • "Draft a note."
  • "Write a note."

Translating to a different language:

  • "Translate."
  • "Translate Hello to German"
  • "Translate Where is the nearest park? to Spain"

Doing math:

  • "What's 34% or $764.89?"
  • "What's 43 times 59?"
  • "What the square root of 26509?"
  • "What's 29 times 6 divided by 12?"
  • "Convert 6.9 cups to fluid ounces."
  • "How many miles are in 89 Kilometers?"

Defining a word:

  • "Define Space."

Tracking packages:

  • "Where is my package?"
  • "Show me my packages."

Cortana search voice commands:

Finding documents, photos, videos:

  • "Find photos from August 1998."
  • "Find cat videos."
  • "Find document called Collection of poems."

Searching the web:

  • "Search the web for Heroes of Might and magic."

Finding facts:

  • "How tall is Mount Everest?"
  • "Who is Steve Jobs?"
  • "When Arnold Schwarzenegger was born?"
  • "Who is Mercedes CEO?"
  • "When does spring begin?"
  • "What's the capital of Zimbabwe?"
  • "When is Thanksgiving?"
It's important to note that Cortana is capable of conversational understanding, which means that you can also ask follow-up questions without having to be very specific. For example, if you ask Cortana: "Who is the president of the United States", you can then ask a follow-up question, such as "Who is his wife?" or "When was he born?" and the assistant should be able to answer those questions accurately.

Discovering food places nearby:

  • "Find food places near me."
  • "Find restaurants near me."
  • "Find bars near me."
  • "What's a good restaurant near me?"
  • "What's interesting nearby?"
  • "Show me Chinese restaurants near me."
  • "Show me Italians restaurants in Los Angeles."

Cortana health and fitness voice commands:

  • "How was my sleep last night?"
  • "What was my step count yesterday?"
  • "How many calories did I burn today?"
These commands require a tracking device, such as the Microsoft Band 2 to enable your fitness and health activities, and you need to connect Cortana with the Microsoft Health (Microsoft Band) service.

Cortana settings voice commands:

Opening the Settings app:

  • "Open Settings."
  • "Open Action Center."

Controlling settings:

  • "Turn on/off Bluetooth"
  • "Turn on/off Wi-Fi"
  • "Turn on/off Airplane Mode"

Cortana reminders voice commands:

Creating reminders:

  • "Remind me to wash the car."

Creating location-based reminders:

  • "Remind me to buy CDs next time I go to Walmart."

Creating person-based reminders:

  • "Remind me to ask for vacation time next time I talk to Goran."

Creating time-based reminders:

  • "Remind me to watch the basketball game at 6 PM."
  • "Remind me to buy the food for the d&d session on Sunday at 3 PM."

Viewing reminders:

  • "Show me my reminders."

Cortana calendar voice commands:

Viewing calendar events:

  • "How's my schedule looking today?"
  • "Show me my appointments for next week."
  • "When is my dentist appointment?"

Adding new calendar events:

  • "Add dental appointment for Monday at 2 PM."

Moving calendar events:

  • "Move dental appointment to Friday at 5 PM."

Cortana alarms voice commands:

Creating alarms:

  • "Set an alarm for next Monday at 5:30 AM."
  • "Set an alarm for Saturdays at 9 AM."

Viewing alarms:

  • "Show my alarms"

Removing alarms:

  • "Cancel alarm for Saturdays at 9 AM."

Cortana timer voice commands:

Creating a timer:

  • "Set a timer for 5 minutes."
You can only start a one-timer at one point in time. If there is a timer already running, Cortana will ask you to restart it at a new time.

Viewing timer:

  • "Show timer."
  • "How much time is left on the timer?"

Canceling timer:

  • "Stop timer."

Cortana location voice commands:

Knowing your exact location:

  • "Tell me where am I?"

Cortana messaging voice commands:

Sending text messages:

  • "Send a text to Milan: I'll be late for lunch today."

Sending quick emails:

  • "Send email to Milena: See you later tonight."
  • "Send email to John and Claudia: How is the project coming along?"

Cortana location voice commands:

Getting directions:

  • "What's the traffic like on the way home?"
  • "How do I get home."
  • "How long would it take to drive to Madison Square Garden?"
  • "Get me directions to Port Authority."
  • "How do I get from my location to Long Beach, New York?"
  • "How far away is the moon?"
  • "Show me walking directions to the nearest gas station."
  • "Show me public transit to 11 Times Sq, New York, NY 10036."
  • "Show me the map of San Francisco."

Tracking flights:

  • "Track flight 1056."
  • "Is my flight delayed?"
  • "Is my flight on time?"

Cortana entertainment voice commands:

Controlling music:

  • "Play Metallica."
  • "Put some Symphonic music."
  • "Shuffle music."
  • "Play and Justice for all by Metallica."
  • "Stop music"
  • "Pause music"
  • "Pause song."
  • "Play next"
  • "Next track"
  • "Skip track."

Identifying what's playing:

  • "What is this song?"
  • "What's playing?"

Movies & TV:

  • "What's Blade Runner run time?"
  • "Who was the director of Gladiator?"
  • "What movies are playing near me?"
  • "What are the showtimes for Star Trek lower decks?"

Cortana technical support voice commands:

  • "How do I install a printer?"
  • "How do I project my screen?"
  • "How do I change my background?"
  • "How do I update Windows?"
  • "How do I make a backup?"
  • "How do I change default apps?"
  • "How do I change Privacy?"
  • "How do I connect a wireless device?"
Sometimes asking a "How to do I" question will result in a web search response.

Cortana phone voice commands:

  • "Call wife on speakerphone."
  • "Call David at home."
  • "Call Goran."
  • "Redial."
  • "Send a photo to my PC."

Cortana random voice commands:

  • "Tell me a joke."
  • "Tell me a riddle."
  • "Tell me something interesting."
  • "Tell me something funny."
  • "Tell me a scary story."
  • "Sing me a song."
  • "Surprise me."
  • "Do an impression."
  • "What do you look like?"
  • "Which is the best smartphone?"
  • "What is love?"
  • "Which is better, Google or Bing?"
  • "Why should I buy this phone?"
  • "What do you think about Google?"
  • "Do you like Google?"
  • "What do you think about Yahoo?"
  • "Do you like Windows 10?"
  • "Play the movie game."
  • "Are you better than Siri?"
  • "Where is Clippy?"
  • "What do you think about Clippy?"
  • "Heads or tails?"
  • "Rock, paper, scissors."
  • "Roll a dice."
Read More
Fix rtf64x64.sys Blue Screen error on Windows
rtf64x64.sys Blue Screen error happens in random intervals but it is a regular occurrence, it can happen when playing games, when watching movies, or even when the computer is idle. in this article we will guide you on how to resolve this error from the most simple steps you could take and do not worry, altho the error seems dreadfully and scary, it is nothing to worry about. If you can boot Windows normally after error great, proceed with instructions, else reboot into safe mode or use installation media to boot.
  1. Use official Microsoft online troubleshooter Microsoft has an online blue screen troubleshooter that was made specifically for this kind of situation. Go to Troubleshoot screen error and answer questions needed. Most of the time this will be enough to solve any blue screen issue.
  2. Update network and sound drivers How is this error traced back to Realtek devices, go to the Realtek website and download drivers. Install them and reboot the system.
  3. Use a dedicated software solution DRIVERFIX is an application made for these and other kinds of driver issues and problems, it is one click automated solution for driver fixing. Visit the Driverfix site and download the application
  4. Perform system Restore If you have not managed to fix the issue with previous steps roll back to a previous restore point when everything was working.
  5. Replace network or sound card If everything failed including system restore then it is likely that it is a hardware malfunction. Replace faulty components and you should not receive errors anymore.
Read More
1 2 3 162
Logo
Copyright © 2022, ErrorTools. All Rights Reserved
Trademarks: Microsoft Windows logos are registered trademarks of Microsoft. Disclaimer: ErrorTools.com is not affiliated with Microsoft, nor claim direct affiliation.
The information on this page is provided for information purposes only.
DMCA.com Protection Status