How to Fix Win32kbase.sys BSOD error

There is various Blue Screen of Death errors that you can encounter as you use your Windows 10 computer and some of these Stop errors have something to do with the win32kbase.sys file. This post will guide you in fixing the BSOD errors related to the win32kbase.sys file.

  • A problem has been detected and Windows has been shut down to prevent damage to your computer. The problem seems to be caused by the following file: Win32kbase.sys.
  • Your PC ran into a problem and needs to restart. If you would like to know more, you can search online later for this error: win32kbase.sys.
  • SYSTEM_SERVICE_EXCEPTION (win32kbase.sys)
  • STOP 0x0000000A: IRQL_NOT_LESS_EQUAL – win32kbase.sys
  • STOP 0x0000001E:

KMODE_EXCEPTION_NOT_HANDLED – win32kbase.sys

  • STOP 0×00000050:

PAGE_FAULT_IN_NONPAGED_AREA – win32kbase.sys

The win32kbase.sys file is a Windows operating system Base Win32 Kernel Driver file located in the System32 folder so if it ends up getting corrupted or if it went missing, your computer will throw up Blue Screen error. To fix BSOD errors that have something to do with the win32kbase.sys file, here are some possible fixes that could help. Worry not for these possible fixes are not complicated.

Option 1 – Run the Check Disk or CHDSK utility

One of the first things you can try to resolve the win32kbase.sys Blue Screen error is running the CHKDSK utility. If your hard drive has issues with integrity, the update will really fail as the system will think that it’s not healthy and that’s where the CHKDSK utility comes in. The CHKDSK utility repairs hard drive errors that might be causing the problem.

  • Open Command Prompt with admin privileges.
  • After opening Command Prompt, execute the following command and hit Enter:

chkdsk /f C:

  • Wait for the process to be completed and then restart your computer.

Option 2 – Run SFC or System File Checker scan

System File Checker or SFC is a built-in command utility that helps in restoring corrupted files as well as missing files. It replaces bad and corrupted system files to good system files. To run the SFC command, follow the steps given below.

  • Tap Win + R to launch Run.
  • Type in cmd in the field and tap Enter.
  • After opening Command Prompt, type in sfc /scannow

The command will start a system scan which will take a few whiles before it finishes. Once it’s done, you could get the following results:

  1. Windows Resource Protection did not find any integrity violations.
  2. Windows Resource Protection found corrupt files and successfully repaired them.
  3. Windows Resource Protection found corrupt files but was unable to fix some of them.

 Restart your PC.

Option 3 – Try to run the DISM commands

You might want to repair potentially corrupted files in your system as having them could also trigger the win32kbase.sys Blue Screen error. To repair these corrupted system files, you can run the DISM commands:

  • Tap the Win + X keys and click on the “Command Prompt (Admin)” option.
  • After that, input each one of the commands listed below sequentially to execute them:
    • Dism /Online /Cleanup-Image /CheckHealth
    • Dism /Online /Cleanup-Image /ScanHealth
    • Dism /Online /Cleanup-Image /RestoreHealth
  • Once you’ve executed the commands given above, restart your computer and check if the dxgkrnl.sys Blue Screen error is now fixed.

Option 4 – Try to run the Blue Screen Troubleshooter

As you know, the Blue Screen troubleshooter is a built-in tool in Windows 10 that helps users in fixing Blue Screen errors related to the win32kbase.sys file. It can be found in the Settings Troubleshooters page. To use it, refer to these steps:

  • Tap the Win + I keys to open the Settings panel.
  • Then go to Update & Security > Troubleshoot.
  • From there, look for the option called “Blue Screen” on your right-hand side and then click the “Run the troubleshooter” button to run the Blue Screen Troubleshooter and then follow the next on-screen options. Note that you might have to boot your PC into Safe Mode.
If you like to learn and find out more about various Windows errors, and how to repair them go to our vast archive or use search to find articles that will explain and help you in solving your issue.
However, if you prefer to do things fast and with automatization then we are proposing to use an automated solution for your issues. The application that we are recommending is Advanced System Repair Pro
Advanced System Repair utilizes multiple tools all in one to give you a quick, simple, reliable, and very thorough diagnosis of your PC. It brings you all the tools you need in one program to clean, fix, protect, optimize and boost your PC!
1-Click Maintenance
All the tools to make it simple and easy! It's like having a professional technician at the click of a mouse.

Junk Cleaner
Keeping your computer free from unnecessary clutter also helps make your computer last longer. Like any other machine, if you keep it clean and take care of it, it will serve you better for longer!

Optimize background apps
Optimize applications background activity with the built-in Application Optimizer feature.

Disk Defrag
With a simple 1-click, Advanced System Repair speeds up your PC by assembling fragmented files on your machine and organizing them more efficiently.

Malware Removal
Finds and removes all types of harmful malware including trojans, worms, bots, adware, spyware, PUPs, and more!

Privacy Cleaner
The all-in-one privacy suite to Clean Your Tracks & Protect Your Privacy! Make your computer safe, secure, and more efficient!

System Tweak/Optimizer
ASR will analyze your complete system and settings to adjust your PC to function at its maximum performance.

Registry Cleaner
Over time, as you install and uninstall applications, the registry can become cluttered with old entries and broken settings which can result in program crashes, and annoying messages and slow the computer down.
Visit our Advanced System Repair Pro Download page to inform yourself about all the benefits of this software and get a free trial copy of it.
advanced system repair pro

Advanced System Repair Pro

One-click automated PC repair solution
ASR logo
With Advanced System Repair Pro you can easily
Replace damaged files
Restore performance
Free disk space
Remove Malware
Protects WEB browser
Remove Viruses
Stop PC freezing
DOWNLOAD
Privacy Policy | Terms of Use | Uinstall
Advanced System Repair Pro is compatible with all versions of Microsoft Windows including Windows 11

Share this article:

You might also like

Guide to Quick Fix Error 0x0000007B,0xF78524
[vc_row][vc_column][vc_column_text]

Error 0X0000007B (0xF78d2524) Repair

0X0000007B (0xF78d2524) - What is it?

If you are a laptop or a notebook user and you are trying to install Windows XP on it, you might come across 0x0000007B (0xF78524) error message. This error is a popular blue screen of death error and very similar to the error 0x0000007B.

Solution

Restoro box imageError Causes

The common causes of 0x0000007B (0xF78524) error code on your laptop might be:
  • File Corruption
  • Device Configuration Issues
  • Adware/spyware invasion
  • Incomplete Installations
  • Problem with your computer’s hard drive controller

Further Information and Manual Repair

Many people panic when they experience 0x0000007B (0xF78524) error on their laptops and notebooks simply because it is a blue screen of death error. The BSoD has this whole persona of being deadly computer errors that can almost cripple systems. If you have also experienced this error on your laptop, remain calm and follow the solutions given below to ensure you fix the error quickly without any hassle. Here are various ways to fix and resolve the BSOD error code 0x0000007B (0xF78524):
  1. Whether you have Lenovo IdeaPad Y550 or Dell Latitude E4300 or any other laptop for that matter, if device driver configuration is the cause of the error 0x0000007B (0xF78524), then all you need to do is start up your laptop and press F2 to enter BIOS. Now expand the ‘Drives’ section. After doing so, go to ‘SATA Operation’. SATA is the abbreviation for Serial Advanced Technology Attachment which enables mass storage devices like hard drives and optical drives to communicate with the motherboard by using a high-speed serial cable. For successful communication between devices, you need to configure SATA controller mode. Once you go to the ‘SATA Operation’ mode, change this from RAID AHCI to RAID ATA. Save changes and exit BIOS. This helps resolve the error 0x0000007B (0xF78524) in no time.
  2. Another way to fix this error is to download and install the 0x0000007B (0xF78524) repair tool. Once this tool is installed on your laptop, click the scan button. Once the scan is complete, you will see a list of errors; click the ‘Repair’ button to fix the errors found and then restart.
  3. The 0x0000007B (0xF78524) error may also occur due to the boot volume corruption. In such an event, it is advisable to run chkdsk command on the hard drive. This is recovery console command is used to check the hard drive, repair and recover data on the drive successfully.
[/vc_column_text][/vc_column][/vc_row]
Read More
Sandbox failed to start with error 0xc030106
If you suddenly encountered an error when you try to run the Windows Sandbox that says, “Windows Sandbox failed to start, Error 0xc030106, The virtual machine or container exited unexpectedly”, read on as this post will guide you on what you can do to resolve the problem. According to security experts, this kind of error in Windows Sandbox is due to some issues with the supporting virtualization component. It could also be caused by other factors and to fix it, there are several potential fixes you need to check out. You can try running the Windows Sandbox as an administrator. You should also make sure that all the supporting processes are running properly, as well as try to install any pending Windows Updates.

Option 1– Try to run Windows Sandbox as an admin

  • In the Start Menu, scroll down until you see the entry for the Windows Sandbox.
  • Then right-click on it and select More and then select the “Run as administrator” option to open it with admin privileges.
  • Next, if a User Account Control or UAC prompt pops up, just click on Yes to proceed.
  • You should now be able to open the Windows Sandbox without the error. However, if the error persists, proceed to the next given options below.

Option 2 – Ensure that all the supporting processes and services are running properly

If running Windows Sandbox as an administrator didn’t fix the error, you have to ensure that all related processes for Windows Sandbox are running properly. To do that, follow these steps:
  • Tap the Win + R keys to launch the Run utility and type “services.msc” in the field and hit Enter to open the Windows Services Manager.
  • Next, from the list of services, look for the following services in the given order:
    • Network Virtualization Service
    • Virtual Disk
    • Hyper – V Virtual Machine
    • Hyper – V Host Compute Service
    • Container Manager Services
  • After you find the aforementioned services, restart each one of them.
  • Once done, try to open the Windows Sandbox again and see if the error is fixed or not.

Option 3 – Try to install any pending Windows Updates

If the second option still didn’t work, then you might want to check Windows Updates on your computer and see if there are any pending Windows Updates you have to install. All you have to do is go to the Windows 10 Settings app and then go to the Windows Updates section and click on the “Check for updates” button to check if there are any pending updates that are needed to be installed. This could fix the Windows Sandbox error.
Read More
Fix Could not find the Recovery Environment
If you suddenly find the Windows Recovery Environment not working and you see an error message saying, “Could not find the recovery environment”, then you’ve come to the right place as this post will guide you on how you can fix it. In times when you can’t boot into the Windows Recovery Environment, there could be several reasons behind it. However, have you ever wondered where exactly the Windows Recovery Environment is in your computer? Windows initially places the Windows RE Image file in the installation partition during Windows Setup so if you have installed Windows in the C drive, you can find the Windows RE at the C:/Windows/System32/Recovery or C:/Recovery folder. Keep in mind that this folder is hidden and later on, the system copies the image file into the recovery tools partition to make sure that one can boot into recovery if there are any issues with the drive partition. The “Could not find the recovery environment” error mostly occurs if the Windows Recovery Environment is disabled or if the “Winre.wim” file is corrupted. Thus, to fix this error, you need to refer to the given suggestions below.

Option 1 – Try to enable Windows Recovery Environment

  • In the Windows Start Search, type “PowerShell” and from the search results that appear, right-click on Windows PowerShell and then select the “Run as administrator” option to open it with admin privileges.
  • Next, type the “reagentc /info” command and tap Enter to execute it.
  • After that, if the output states that Status is enabled, then you’re all set.
  • Now type the “reagentc /enable” command and tap Enter to enable the Windows Recovery Environment. You will see a success message at the end signifying that Windows RE is available.

Option 2 – Try to fix the corrupted or missing “Winre.wim” file

If the Winre.wim file is either corrupted or missing, you need to get a new copy of this file from another computer where the Windows RE is working. Once you’re able to get a new copy of the Winre.wim file, you have to set the image path to a new location. For more details, refer to these steps:
  • First, type “Powershell” in Windows Start Search and right-click on Windows PowerShell from the results, and select Run as administrator.
  • Next, execute the given command below to change the path of the WIM file to the new location. Note that the steps should be used when the file path of the Windows Recovery Environment is different from the usual spot.
Reagentc /setreimage /path C:RecoveryWindowsRE
  • As mentioned, if the file is corrupted, you just have to get a new copy from another PC but before you do that, make sure that the WINRE on that computer is disabled (just enable it later on) and then place it in the C:/Recovery path and then set its path again using the command given above and then verify its path by executing the following command.
reagentc /info command
Note: Since the Recovery folder is hidden as well as the WINRE folder in it and you won’t be able to access them using the Windows File Explorer, you need to use the Windows PowerShell or Command Prompt so that you can access them.

Option 3 – Try checking and fixing the WinRE Reference in the Windows Boot Loader

The Windows Boot Loader is the one that determines if it has to load the Windows Recovery Environment. It could be that the boot loader is pointing to an incorrect location which is why you’re getting the error. To resolve it, you have to check and fix the WinRE Reference in the boot loader. How? Follow these steps:
  • In the Windows Start Search, type “PowerShell” and from the search results that appear, right-click on Windows PowerShell and then select the “Run as administrator” option to open it with admin privileges.
  • After that, execute the “bcdedit /enum all” command.
  • Next, look for an entry in the Windows Boot Loader identifier set as Current and look for “recoverysequence” in that section and take note of the GUID.
  • Ensure that the device and the osdevice items show the path for the Winre.wim file and that they are the same. If not, you need to point the current identifier to the one which has the same.
  • Once you’ve found the new GUID, execute this command: bcdedit /set {current} recoverysequence {GUID_which_has_same_path_of_device_and_device}
  • Now check if the error in the Recovery Environment is fixed or not.

Option 4 – Try creating a Recovery Media

You could also try creating a Recovery Media to resolve the error in the Windows RE. All you have to do is download the Windows 10 ISO file using the Media Creation tool and then create a recovery drive. Once you’re done, check if it fixes the problem or not.
Read More
Turn On or Off the Recommended Troubleshooting
For a while now, Microsoft has been working hard to add various built-in troubleshooters in Windows 10. In fact, there is a troubleshooter for almost every standard or common error in Windows 10. And now with the newly released Windows 10 v1903, Microsoft has added the Recommended Troubleshooting which allows Windows 10 to automatically fix a lot of critical issues on your computer, and in this post, you will be guided on how you can turn on or off the Recommended Troubleshooting in Windows 10. The Microsoft Diagnostic & Feedback data only provides two settings – Basic and Full. So if you want to turn off the Recommended Troubleshooting for some reason, the only way to do so is to stop it from collecting complete data from your PC. And to turn it on or off, you can choose to switch between them. To do that, navigate to Settings > Privacy > Diagnostics & feedback and from there, select Basic under the Diagnostic Data section. After that, go back to Settings and go to Update & security > Troubleshoot. Once you’re there, you should see a warning message saying, “Share Full Diagnostic data to get additional troubleshooting recommendations”. Based on the message, Microsoft will only offer the recommended troubleshooting based on the Full Diagnostic data which it collects from your computer. On the other hand, if you know how to navigate and use the Windows Registry, then you can enable or disable the Recommended Troubleshooting via Registry Editor but before you proceed, make sure that you create a System Restore point. Once that’s covered, follow these steps:
  • Tap the Win + R keys to open the Run dialog box and type “regedit” in the field and tap Enter to open the Registry Editor.
  • Next, navigate to this registry path: HKEY_LOCAL_MACHINESOFTWAREMicrosoft
  • From there, look for the key named “WindowsMigration”. If you can’t find it, just right-click on the left pane and create a new key and then name it “WindowsMigration”.
  • After that, create a DWORD “UserPreference” and double click on it to set its value to “0” if you want to turn it off or “1” if you want to turn it on.
  • Exit the Registry Editor and restart your computer to apply the changes made.
Note: The Recommended Troubleshooting functionality can look into the error logs sent back to the Microsoft team and use an algorithm to set up a solution for you and they’re nothing but Diagnostics and Feedback data that Windows collects and sends back to Microsoft. Moreover, the recommendations are only visible if you are connected to the internet, else it will show the same message.
Read More
Perform System Restore when Windows won’t boot
System restore is usually the go-to tool when something goes bad in Windows, we fire it up and roll back Windows in the state when everything was working fine. But what if Windows does not want to boot? Can we use system restore in that case? The answer to that question would be yes, yes we can.
  1. Boot interrupt Windows 10 by starting your PC and as soon as you see the Windows logo; press and hold the power button to force a shutdown.
  2. Repeat this 2-4 times and Windows will open up the Advanced Startup Options menu for you.
  3. At the Advanced Startup Options screen, select Advanced Options.
  4. Select Troubleshoot.
  5. Under the Advanced options screen, select System Restore.
or if you prefer, use Windows USB installation.
  1. Boot the faulty PC using the Windows 10 installation media.
  2. The Windows Setup dialog box will appear.
  3. Set the Time and currency format, Keyboard or input method, and the language to install.
  4. Click Next.
  5. Click on Repair your computer from the lower-left corner.
  6. From the Choose an option screen, click on Troubleshoot.
  7. Click Advanced Options in the Troubleshoot screen.
  8. In the Advanced Options screen, click System Restore.
  9. Windows will take some time to prepare System Restore. It may even restart your computer or device.
  10. When System Restore is ready, you will be prompted to choose a user account to continue.
  11. Select an account that is set as administrator on your Windows 10 computer or device.
  12. At the next screen, change the keyboard layout if you want and then input the password for that account.
  13. Click the Continue button.
Read More
Enabling Enhanced Mode in the Windows Search
In case you don’t know, Microsoft has included an Enhanced Search Mode in the new Windows 10 v1903. This new Enhanced Search mode, compared to the Classic Mode, indexes everything on your Windows 10 computer, and in this post you will be guided on how you can disable this new feature as well as discuss how it is different from the Classic Search mode. Over the years, the Windows 10 Start Search has changed. When you tap the Start button and when you type, the results that appear are categorized into Apps, Documents, Email, Web, Folders, Music, People, Photos, Settings, Videos, and many more. This is the reason why the Enhanced Mode was brought into the picture. So unless everything is indexed, this new feature wouldn’t be of much use. A Classic Search is the term used for the old search technique in Windows 10. The Classic Search mode is restricted to Libraries and Desktop and end-users can only select to customize the search location by adding them manually to the indexer. To simply put it, it would only index files and folders which you want to get indexed and if the search term is not in the index, it would initiate the regular search which would take quite a while and this is where the Enhanced Windows Search comes in. It indexes everything as it is its default nature which is the exact opposite of the Classic Search mode. This feature allows you to exclude folders where the Search will not look and index anything that could be personal to you. In addition, it can also impact the life of the battery of laptops, if you are using one. The initial crawl of your data will take place only when connected to power and during that time, both the CPU usage and battery will take a bit of a hit.

To enable the Enhanced Search Mode in your Windows 10 computer, here’s what you have to do:

Step 1: Go to Settings > Search > Searching Windows. Step 2: Next, click on the radio button for Enhanced. Step 3: After that, select the folders which the Windows Indexer should exclude from the Enhanced Search mode. And that’s about it. The next time you search anything on your computer, Windows will be looking at all the locations except for the ones you excluded and the results will be a lot faster compared to the Classic Search. Now that you’ve enabled the Enhanced Search mode, there are two settings you need to check out.
  • Advanced Search Indexer Settings – this setting allows you to configure how or where Windows will search or what file types it will search in your computer. It will also open the same setting that’s available in the Classic Search.
  • Run the Indexing Troubleshooter – when you click on the Indexing Troubleshooter, it will start to troubleshoot any Search and Indexing issues on your Windows 10 computer and fix them automatically.
Read More
Basic IT skills everybody should know
In today’s world and age, there are some essential IT skills that basically everyone should know. No matter in what field you are working some skills are just needed in order to function properly in the work. So, without further ado let's dive into what are these essential IT skills everyone, even your grandmother should know.

Basic IT skills5 Essential IT skills everybody should know

  1. Word processing

    No matter are you creating or editing business documents or just trying to help a friend or relative, word processing skill is an essential asset and requirement in today’s age. Writing anything on a bunch of paper is time-consuming, papers can get lost, and searching for a particular item inside a bunch of papers is not a really enjoyable experience. A much easier solution is to write, format, and keep everything on the computer and almost all employers are asking for this skill.
  2. Send and using emails

    Today we live in the digital age and most communication is done in real-time via messaging apps and file sharing is done via file-sharing services. Despite mentioned technology, many files are shared and sent through emails. When a message is too long or complex when it needs to have some attachment or to be kept in archive emails are the way to go and therefore using email is a must-have essential skill.
  3. Using search engines

    When talking about using search engines we really do not think about firing up your favorite browser, going into the search engine,s and typing cat pictures. What we think is that a person should know how to use a search engine properly, tweak its search options, and phrase words and sentences to find everything he or she needs.
  4. Doing data work

    Data entry and data calculations have been made easier than ever thanks to today's technology. Microsoft excel, libre office calc, google sheets, etc. are all capable of performing a great variety of calculations and keeping track of plenty of required data. This skill is often asked by employers as an essential one.
  5. Cyber security

    Each employee or person, in general, should be quite aware of various scams and best practices to keep itself safe in this digital world. We have several articles on this topic and there are a great variety of articles on the internet as well.

Conclusion

No matter are you young or old, employed or looking for a job, these skills are a must-have in today’s world.  There are a lot of great tutorials online on these various topics and I am sure that your knowledgeable friend or cousin would be happy to help and show you how to do all of these things.
Read More
Open specific pages each time Chrome starts
When we are working on our computer, we have tendencies to make it look and behave to our best needs and however, best suits us. The Internet has crawled into our lives and made itself a must-have in modern society, internet browsers as a crucial piece of software for viewing the web have also grown and made themselves to be more open for user settings and personalization, Chrome, one of the most popular browser has the option to open a specific set of pages one it is opened and that is what we will cover today in this tutorial. No matter would you like to by default open some online store, maybe an email or news website, you can open each of them or all of them once Chrome is run, making your daily routine more enjoyable and stress-free. The first thing, of course, is to start Chrome itself, once Chrome is up, click on three dots in the upper right corner of the Chrome window and select settings. Google chrome settings
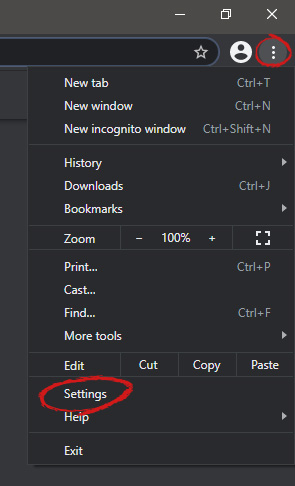
When you are in settings, on the left side move toward the bottom until you run into a tab that says On Startup and click on it. On right, a new section will open, click on Open a specific page or set of pages. Chrome startup pages
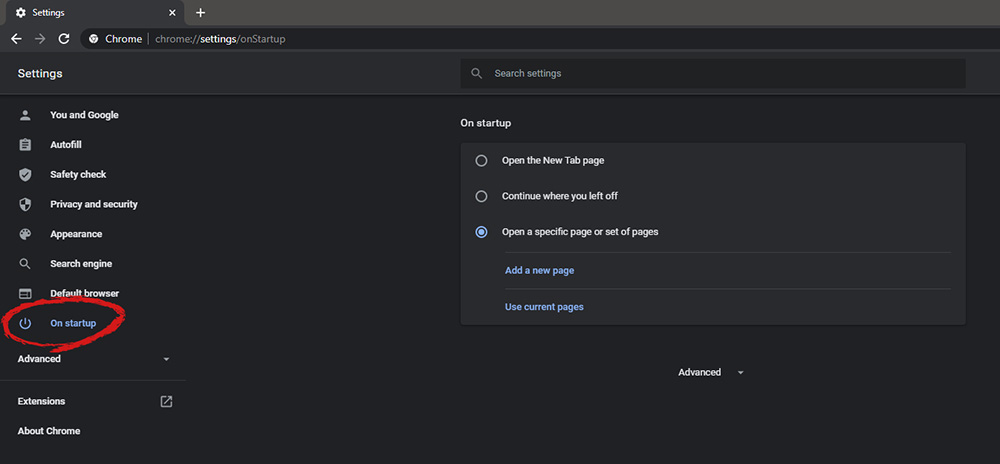
You will be presented with the option to add a new page by typing its URL or getting it from bookmarks or using a specific opened one. You can repeat this process until you have added all pages that you wish to be automatically opened once Chrome is opened for the first time.

BONUS:

If you have noticed right above the setting that we have used for opening a specific set of pages there is the option Continue where you left off, this option will open each page exactly where it was when Chrome was shut down letting you keep viewing where you have left off. This is useful if by any chance your battery ran out or you had to quickly turn the computer off for whatever reason.
Read More
How to Repair Bad_Pool_Header Error

Fix Bad_Pool_Header Error

Bad_Pool_Header Error - What is it?

Bad_Pool_Header is one of the types of BSOD (Blue Screen of Death) error codes. This error triggers a problem with Windows memory allocation. When this error message occurs, the screen turns blue and locks the user out of the application running on the system. The computer shuts down or restarts.

Solution

Restoro box imageError Causes

There is no one particular cause for the occurrence of the Bad_Pool_Header error code. It may appear on your system due to multiple reasons such as:
  • Device driver issues
  • Cluttered disk
  • Disk writing issues
  • Faulty memory hardware
Driver issues and disk writing issues occur when your try to update new driver versions. During this process, users often forget to remove the files of the uninstalled version from the registry. And due to the presence of the uninstalled driver files in the registry updating and disk writing becomes an uphill task which leads to the Bad_Pool_Header display on the computer screen. The main database of your system is the registry so you need to keep it clean to avoid disk cluttering. The hard disk clutters because the registry saves all the activities that you perform in your system. It saves junk files, internet history, invalid entries, and other unnecessary files. This occupies a lot of your disk space thus resulting in disk cluttering and faulty memory hardware issues triggering the Bad_Pool_Header. Ignoring the Bad_Pool_Header error is not wise. It is advisable to repair the Bad_Pool_Header right away as it can lead to serious threats like system failure and data loss.

Further Information and Manual Repair

The easiest, time and money-saving way to resolve the Bad_Pool_Header error on your system is to install Restoro. This is a high and multi-functional repair tool that features a powerful inbuilt registry cleaner, anti-virus, and a system optimizer. This tool is the one-stop solution for all your PC-related errors including the Bad_Pool_Header blue screen of death error. Whether it’s a driver issue, faulty memory, or cluttered disk, all the causes triggering the Bad_Pool_Header error code fall under the registry which is why it is recommended to install Restoro. Its innovative and powerful registry cleaner scans detect and repair all the errors related to the registry in one go including the Bad_Pool_Header errors. With this helper, you can easily remove all the unnecessary files cluttering your hard disk and damaging your registry. It wipes out the clutter in seconds and frees up disk space.

Why Should You Clean The Registry?

Sometimes the registry also gets cluttered by malicious software like viruses, spyware, and malware. These may also take up your disk space and prevent you to perform disk writing successfully and also corrupt the registry. The privacy error finding utility embedded in Restoro helps you scan for such malicious software on your system and removes them immediately. It lends the software anti-virus properties. When it comes to using repair tools, many users who are not technically sound often worried. They think it may be difficult to operate. If you think the same way, let us tell you that Restoro is very easy to use. It is integrated with a high-functional yet user-friendly interface complemented by simple navigation.

Restoro Special Features

This makes it simple for all levels of users to operate it regardless of whether they are technically adept or not. Restoro is compatible with all Windows versions. You can download it with ease and run it for scans on any Windows version you have installed on your system. To get started, all you have to do is:
  • Click here to install Restoro.
  • Once the installation is complete now run it to scan for errors like the Bad_Pool_Header
  • After that simply click on the ‘repair’ button to resolve
Read More
Not enough storage is available to process...
Each time you execute a command on your computer, it takes into account a number of files and space for the code in the background for the command to be executed. Thus, executing the command is not that easy which is why you could encounter some errors along the way due to various limitations or poor allocation of memory, and so on. One of the errors you might encounter when executing a command on Windows 10 and Windows Server is the “Not enough storage is available to process this command”. There are several potential fixes you can check out to fix this error. To fix this error, you can try to delete the temporary files in your computer, run the DISM tool or apply some registry tweaks. For more details, refer to each one of the given options below.

Option 1 – Try to delete the temporary files

The error could be caused by some temporary or junk files in your computer and so you need to clear them up to fix the problem. You can achieve that using the Storage Sense feature.
  • Open Setting > System > Storage from the WinX Menu.
  • From there, you will see a list of all the local and connected storage devices along with the details on the free space. Make sure that Storage Sense is on.
  • Next, find a link that says “Free Up Space” and click it to open.
  • After that, a screen which is the built-in program in Windows 10 will appear and will scan your computer for the following junk files so you can free up disk space:
    • Windows Upgrade Log Files
    • System created Windows Error Reporting Files
    • Thumbnails
    • Temporary Internet Files
    • Previous Windows Installation Files
    • Delivery Optimisation Files
    • DirectX Shader Cache
  • Choose the files you want to get rid of and then click on the remove files option. Note that you’ll have an idea of the total size as you select any of the junk files listed above.
  • Now go to the “Free Up Space Now” section and click the Clean now button. This will get rid of all the temporary or junk files in your computer and should hopefully fix Error 1310.

Option 2 – Run the DISM tool

You can also run the DISM Tool as it could also help in fixing the “Not enough storage is available to process this command” error in Windows 10. Using this built-in tool, you have various options such as the “/ScanHealth”, “/CheckHealth”, and “/RestoreHealth” that could help in fixing error 0x80246019.
  • You can run the DISM tool via Advanced Startup Options or you could boot your computer into a Clean Boot State and then select Command Prompt.
  • Open the Command Prompt with admin privileges.
  • Then type in the following commands and make sure to hit Enter right after you type each one of them:
    • Dism /Online /Cleanup-Image /CheckHealth
    • Dism /Online /Cleanup-Image /ScanHealth
    • exe /Online /Cleanup-image /Restorehealth
  • Do not close the window if the process takes a while as it will probably take a few minutes to finish. Once it’s done, restart your computer and try again. If it didn’t work, you can try to use the “/StartComponentCleanup” parameter: Dism /Online /Cleanup-Image /StartComponentCleanup

Option 3 – Try to use the Registry Editor

The memory range allocated for the tasks and commands to be executed is associated with the IRPStackSize DWORD. Thus, to fix the error, you need to extend the range by applying some registry tweak. Before you proceed, make sure that you create a System Restore point first. Once you’re done, follow these steps:
  • Tap the Win + R keys to open the Run dialog box and type “Regedit” in the field and tap Enter to open the Registry Editor.
  • Next, navigate to this registry key: ComputerHKEY_LOCAL_MACHINESYSTEMCurrentControlSetServicesLanmanServerParameters
  • From there, look for the DWORD named “IRPStackSize” and right-click on it. If you can’t find this DWORD, just right-click on any empty space and select New > DWORD (32-bit) Value.
  • Input “IRPStackSize” as the DWORD name and double click on it and set its Value data to be greater than its default value. Note that the maximum value allowed is “0xc” and the range starts from “0x1”.
  • Now click on OK and exit the Registry Editor and then restart your computer and see if the error is fixed.
Read More
1 2 3 162
Logo
Copyright © 2022, ErrorTools. All Rights Reserved
Trademarks: Microsoft Windows logos are registered trademarks of Microsoft. Disclaimer: ErrorTools.com is not affiliated with Microsoft, nor claim direct affiliation.
The information on this page is provided for information purposes only.
DMCA.com Protection Status