Fix Windows 0x8007002C – 0x400D Error

In Installing or upgrading your Windows 10, there really is no guarantee that everything will go smoothly as there are times you encounter errors like the “ We couldn’t install Windows 10, 0x8007002C - 0x400D ” error message among other Windows update/upgrade errors. When you encounter this particular error message you will the following message on your screen:

 “We’ve set your PC back to the way it was right before you started installing Windows 10.

0x8007002C-0x400D

The installation failed in the SECOND_BOOT phase with an error during MIGRATE-DATA operation”

This kind of Windows upgrade error indicates that some of the files needed for the installation are locked out for some reason and that Windows was not able to migrate them to a new version. It could be that your computer does not have sufficient space for those files. Thus, no matter how many times you try to upgrade your computer, you always end up going back to the previous version of Windows. To fix the “0x8007002C – 0x400D, The installation failed in the SECOND_BOOT phase with an error during MIGRATE-DATA operation” error, here are some suggestions that might help:

Option 1 – Disable your antivirus program

There are times when the antivirus program installed in your computer blocks file access and even disk access. Thus, disabling the antivirus program or any security software installed in your computer is always a good idea you can try when the Windows Update process does not go smoothly. So before you try updating your computer again, make sure to disable the antivirus or security program and once the Windows Update is done, don’t forget to enable the antivirus program back again.

Option 2 – Perform a Disk Cleanup to free up disk space

Chances are, some unnecessary files in your computer might be interrupting the installation process which explains why you’re getting the “0x8007002C – 0x400D, The installation failed in the SECOND_BOOT phase with an error during MIGRATE-DATA operation” error instead so you need to perform a Disk Cleanup in order to fix the problem.

  • In the Cortana Search box, type “disk cleanup” and click on the related search result.
  • Then select the disk you want to clean and click OK.
  • Wait for the process to be completed and then restart your PC and try to install the Windows upgrade again.

Option 3 – Get rid of any file protection software

The Windows setup migrates the folder from one version to another during the upgrade. However, if some of your folders, if not all, are protected using some file protection software, then Windows won’t succeed in moving the folder and you will encounter this Windows upgrade error instead. Thus, you need to unlock all those protected files or better yet uninstall the file protection software after you remove the locked files. After that, try installing the upgrade again.

Option 4 – Rename the SoftwareDistribution folder

The Software Distribution folder in the Windows operating system is a folder that can be found in the Windows directory and is used to store files temporarily which might be required to install the Windows Update on your PC. Thus, it is required by the Windows Update and maintained by WUAgent. Aside from that, it also contains all the Windows Update History files and once you delete them, you will most likely lose the Update history. As a result, the next time you run the Windows Update, it may result in a longer detection time.

  • Open the WinX Menu.
  • From there, open Command Prompt as admin.
  • Then type in the following command – don’t forget to hit Enter right after typing each one of them.

net stop wuauserv

net stop bits

rename c:windowsSoftwareDistribution SoftwareDistribution.bak

  • After entering these commands, it will stop the Windows Update Service, the Background Intelligent Transfer Service, and rename the SoftwareDistribution folder.
  • Next, got to the C:\Windows\SoftwareDistribution folder and get rid of all the folders and files thereby tapping the Ctrl + A keys to select them all and then click on Delete. Note that if the files are in use, you won’t be able to delete them.
  • Once all the contents in the Software Distribution folder are deleted, restart your PC and then go back to Command Prompt and input the following commands again.

net start wuauserv

net start bits

Since the folder has already been flushed, it will be populated afresh the instant your restart your computer and open Windows Update.

Option 5 – Run the DISM tool

As mentioned, the “0x8007002C – 0x400D, The installation failed in the SECOND_BOOT phase with an error during MIGRATE-DATA operation” error might also be caused by corrupted files in the computer. Thus, you can try using the DISM tool to repair them. Running the DISM tool can repair the Windows System Image and Windows Component Store in Windows 10.

  • Open the Command Prompt as admin.
  • Then type in this command: DISM /Online /Cleanup-Image /RestoreHealth
  • Do not close the window if the process takes a while as it will probably take a few minutes to finish.

Option 6 – Run the Windows Update Troubleshooter

Running the built-in Windows Update troubleshooter could also help you resolve this particular Windows upgrade error. To run it, go to Settings and then select Troubleshoot from the options. From there, click on Windows Update and then click the “Run the troubleshooter” button.

Option 7 – Try running Microsoft’s online troubleshooter

You also have the option to run Microsoft’s online troubleshooter which could help you fix Windows Update errors including the “0x8007002C – 0x400D, The installation failed in the SECOND_BOOT phase with an error during MIGRATE-DATA operation” error.

If you like to learn and find out more about various Windows errors, and how to repair them go to our vast archive or use search to find articles that will explain and help you in solving your issue.
However, if you prefer to do things fast and with automatization then we are proposing to use an automated solution for your issues. The application that we are recommending is Advanced System Repair Pro
Advanced System Repair utilizes multiple tools all in one to give you a quick, simple, reliable, and very thorough diagnosis of your PC. It brings you all the tools you need in one program to clean, fix, protect, optimize and boost your PC!
1-Click Maintenance
All the tools to make it simple and easy! It's like having a professional technician at the click of a mouse.

Junk Cleaner
Keeping your computer free from unnecessary clutter also helps make your computer last longer. Like any other machine, if you keep it clean and take care of it, it will serve you better for longer!

Optimize background apps
Optimize applications background activity with the built-in Application Optimizer feature.

Disk Defrag
With a simple 1-click, Advanced System Repair speeds up your PC by assembling fragmented files on your machine and organizing them more efficiently.

Malware Removal
Finds and removes all types of harmful malware including trojans, worms, bots, adware, spyware, PUPs, and more!

Privacy Cleaner
The all-in-one privacy suite to Clean Your Tracks & Protect Your Privacy! Make your computer safe, secure, and more efficient!

System Tweak/Optimizer
ASR will analyze your complete system and settings to adjust your PC to function at its maximum performance.

Registry Cleaner
Over time, as you install and uninstall applications, the registry can become cluttered with old entries and broken settings which can result in program crashes, and annoying messages and slow the computer down.
Visit our Advanced System Repair Pro Download page to inform yourself about all the benefits of this software and get a free trial copy of it.
advanced system repair pro

Advanced System Repair Pro

One-click automated PC repair solution
ASR logo
With Advanced System Repair Pro you can easily
Replace damaged files
Restore performance
Free disk space
Remove Malware
Protects WEB browser
Remove Viruses
Stop PC freezing
DOWNLOAD
Privacy Policy | Terms of Use | Uinstall
Advanced System Repair Pro is compatible with all versions of Microsoft Windows including Windows 11

Share this article:

You might also like

Choosing default browser in Windows 11
Default applications in previous Windows versions were a pretty straightforward process. The user went to the settings application and picked for each category which application he would like to choose from the list of installed ones. In Windows 11 things are little changed. In this article, we will show you how to choose the default internet browser inside Windows 11, and sadly it is a more tedious task than in previous versions.

windows 11 default browser
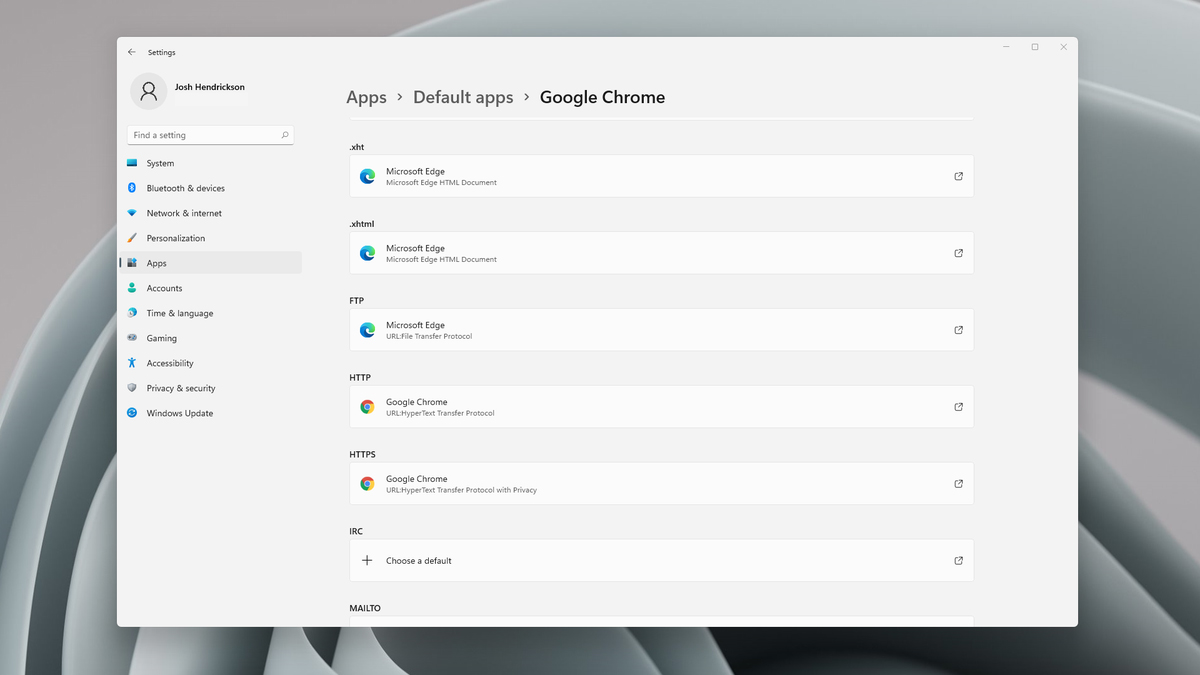
Choosing default browser in settings

As in previous versions of the Windows operating system you will need to use the settings application in order to change your default Internet browser. Previously, in Windows 10, a variety of general categories like email, web browser, and photo viewer were all listed under the Default Apps section of the Settings panel. It was easy to click on one of those categories and click on the option you like best from the small pop-up suggestion window. In the Windows 11 Insider Build, you’ll see a gauche list of an individual file or link types that you’ll need to specify your preferred browser for. The types include: HTM, HTML, PDF, SHTML, SVG, WEBP, SHT, FTP, HTTP, and HTTPS. There are additional optional types you can specify your preferred browser for as well. The issue here is in order to use a single browser which most users do you will have to go through each file type and set your preferred one. I am really not sure why this was introduced or why it has to be this way, all I can do is hope that in the final release of Windows 11 this feature will be rolled back as it used to be and that you could set your default browser in just one simple click.
Read More
Step By Step Guide to Fixing Regsvr32.exe Error On Windows

How to Resolve Regsvr32.exe Error Code

What is Regsvr32.exe Error?

Regsvr32 (Microsoft Register Server) is a command-line utility in Microsoft Windows Operating System. This is used for registering and unregistering OLE controls such as ActiveX controls and DLLs in the Windows Registry. This is executed as Regsvr32.exe.  The filename extension .exe is the abbreviation for executable.   It is installed in the %systemroot%System32 folder in Windows XP and new Windows versions. The Regsvr32.exe is an error that occurs when you attempt to run Regsvr32.exe to register a 32 bit DLL (Dynamic Link Library) on a 64-bit version of Windows. The error message is displayed as the following:
  • Filename.dll is not an executable file and no registration helper is registered for this file type.
  • Unrecognized flag: /invalid_flag
  • No DLL name specified
  • Dll_Name is not an executable file and no registration helper is registered for this file type.
  • The module "%1" failed to load.

Solution

Restoro box imageError Causes

There are multiple causes for the Regsvr32.exe error code. These include:
  • Invalid entry (command) path
  • Active X control errors
  • Missing or Damaged .dll files
  • Viral infection (Trojans) (.exe can easily get infected by viruses)
  • Registry issues
If you come across the Regsvr32.exe error code, it is advisable to repair it immediately before the damage sets in. Since this may occur due to viral infection, it can pose privacy and data security risks to your PC.

Further Information and Manual Repair

Here are solutions that you can implement to resolve the Regsvr32.exe error code on your system:
  1. If an invalid entry point is the cause of the error, then simply open an elevated command prompt. If the 32-bit DLL is in the %systemroot%System32 folder, then move it to the %systemroot%SysWoW64 folder. After that run the following command: %systemroot%SysWoW64regsvr32 <full path of the DLL>. This will help resolve the Regsvr32.exe error.
  2. If the cause of the error is a viral infection, then you will need to run a powerful antivirus to detect and remove viruses from your system to resolve the Regsvr32.exe error on your system.
  3. Nonetheless, if the causes for Regsvr32.exe are either Active X controls or registry corruption, then you will need to scan your computer with different tools to resolve each issue separately.
This can be time-consuming and too many program installations at one time can also slow down your system’s performance. This means you’ll also have to compromise on your PC’s speed.

Repair Regsvr32.exe Error With Restoro

To avoid all this hassle yet repair the Regsvr32.exe error, download Restoro. This is a multi-functional and innovative PC repair tool deployed with multiple utilities in one program including features like a registry cleaner and an Active X controls error fixer. It also functions as a system optimizer. It is a one-stop solution for all your PC-related errors including the Regsvr32.dll error. It is safe, efficient, and user-friendly. It is compatible with all Windows versions. When the RAM overloads it leads to damaged dlls and registry corruption. The registry cleaner utility repairs the damaged dll files and the corrupt registry. It wipes out all the unnecessary files cluttering the RAM including the junk files, invalid registry entries, and temporary files. Restoro also has an Active X controls scanning utility. This utility can be of great use if the Regsvr32.exe error is triggered by Active X control-related issues. Click here to download Restoro and resolve Regsvr32.exe on your computer right away.
Read More
Windows 365, what it is, and how you can get it
Windows 365
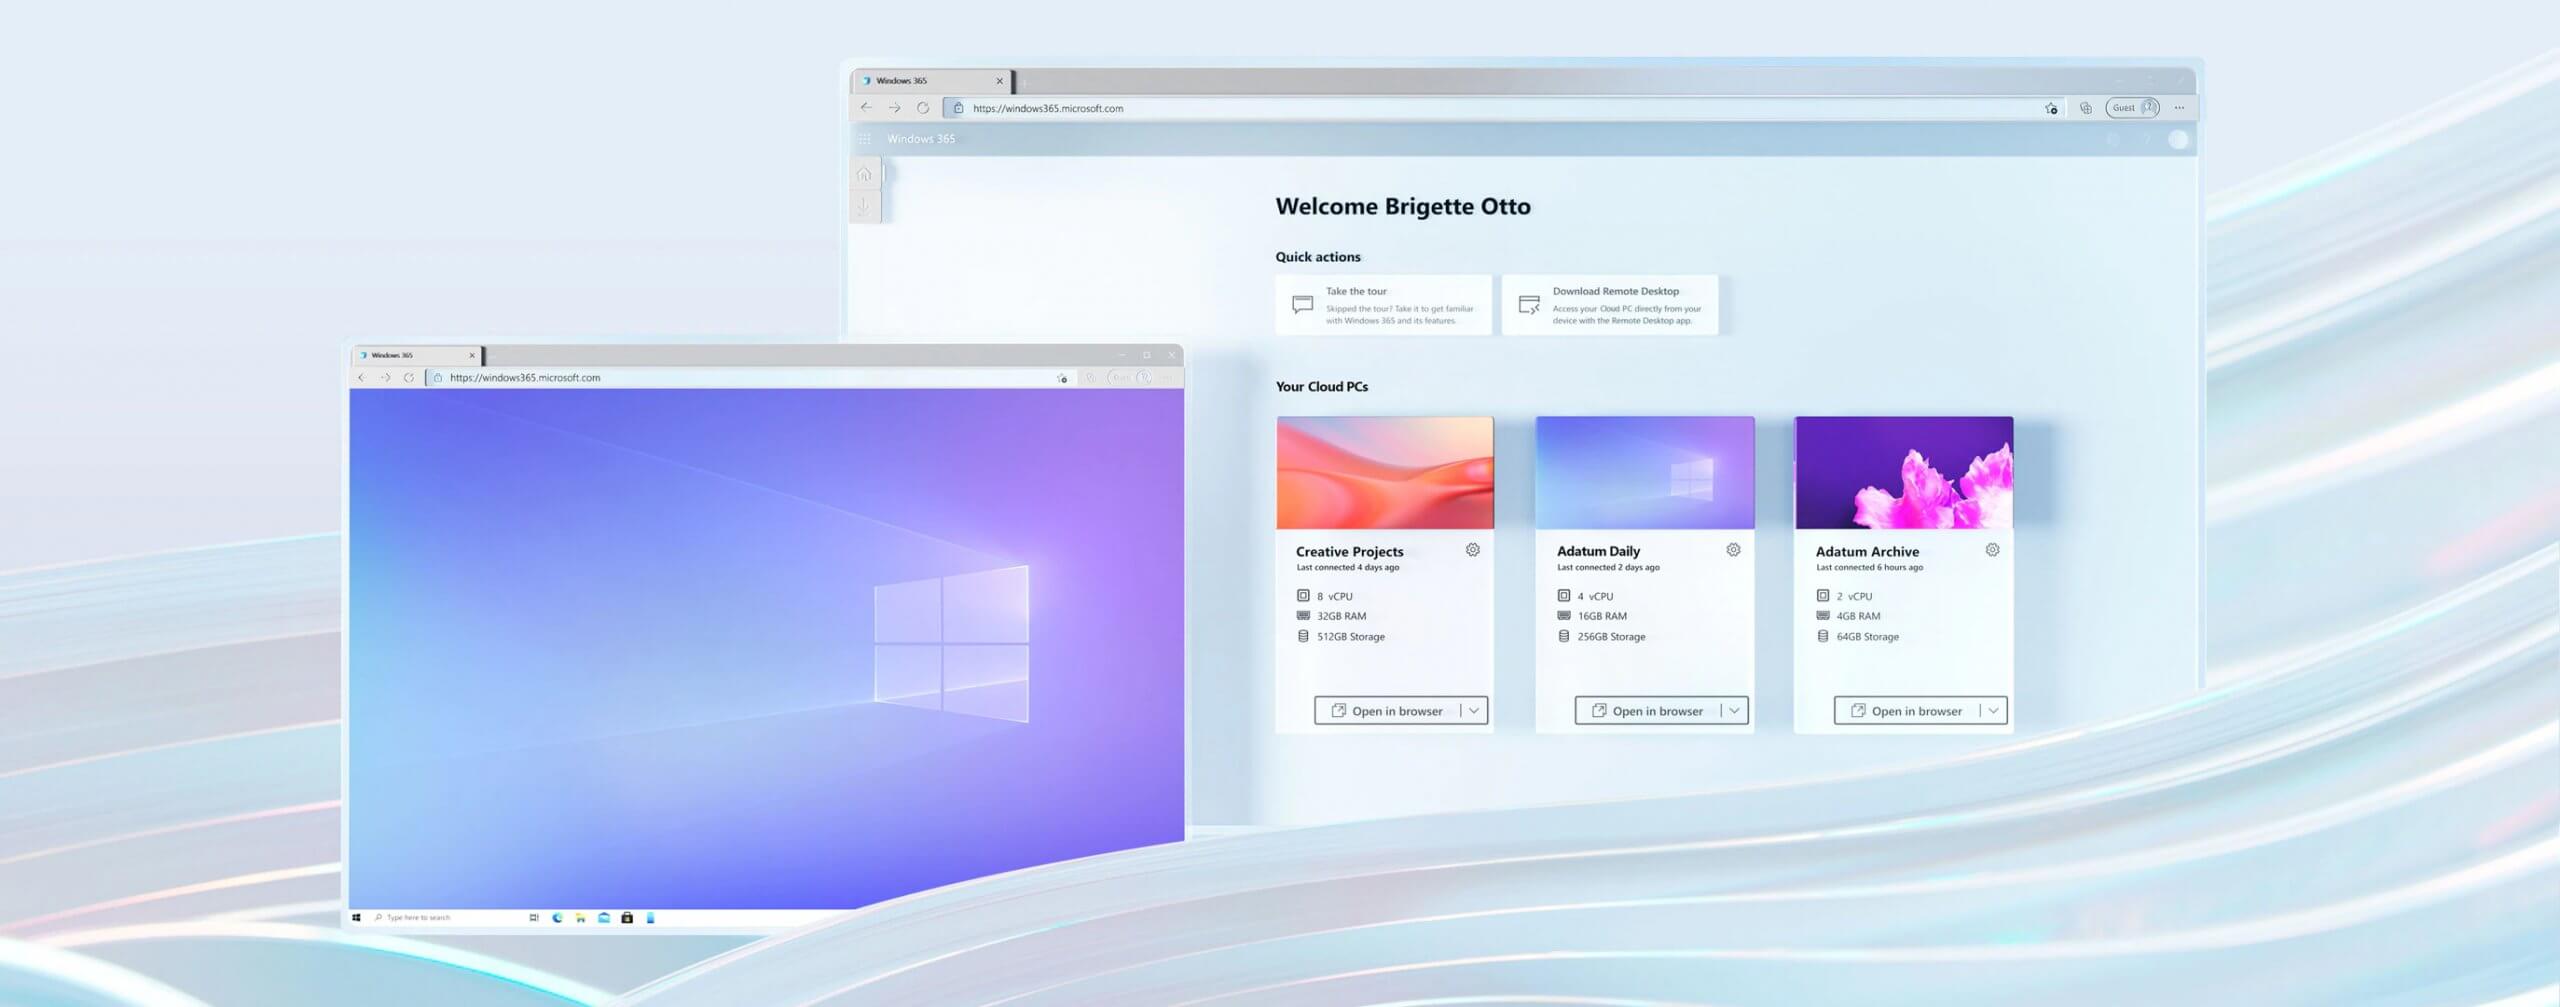
Microsoft has announced Windows 365, a new cloud-based operating system aimed mainly at businesses of all sizes. Just after Windows 11 announcement and presentation, we are seeing another Windows announcement from Microsoft. Dive into the following text in order to find out what exactly is new Windows 365, its role in today's IT world, and do you need it?

What is Windows 365 and when it is coming out?

Windows 365 is planned to be released this year (2021) on August 2nd. It is the first Microsoft cloud-based operating system meaning that OS itself will be installed on the cloud server and it will be accessed by the user via a web browser. Essentially you are accessing a remote PC with Windows on it, you can install whatever Windows application you want and use it as it was on your computer. When you disconnect from the cloud computing and reconnect again from the same or another device you will continue exactly where you left off. Cloud PC will remember the state it was left off and will greet you in that same state once it is awakened again. This of course offers some great benefits like moving from laptop to desktop and continuing exactly where you left off.

How can I access Windows 365?

Any device which has a web browser will be able to access Windows 365 making it a really great solution for business on the move or for anyone who switches devices during the day. That being said it is clear to see that Windows 365 can be accessed via Linux, macOS, iOS, Android, or any other operating system on any computer, tablet or phone.

Who is this OS made for?

Microsoft’s general idea is that Windows 365 is primarily made for business which in their minds can benefit most out of it. So far it is not made for a single user although there is a possibility that even a one-man business can subscribe and create accounts for it.

Price and technical characteristic

Microsoft will bill Windows 365 on a per-user, per-month basis. In other words, businesses will pay a fixed amount per employee every month. There will be two tiers: Windows 365 Business and Windows 365 Enterprise. Microsoft also said it will offer different performance tiers. Businesses can choose to pay for more CPU, RAM, and storage resources for certain cloud PCs depending on their needs. Microsoft told me the smallest configuration would be one CPU, 2GB of RAM, and 64GB of storage. The largest will be eight CPUs, 32GB of RAM, and 512GB of storage. After a business has chosen its plan tier and performance options, that business will pay a fixed amount every month. This is unlike Azure Virtual Desktop, which Windows 365 is built on. With Azure Virtual Desktop, companies pay on a usage model, depending on how much the remote system is used every month.

Conclusion

Windows 365 is around the corner and if you are a business no matter small or large with the need for software on the go, Windows 365 might be a worthwhile investment and a great asset to your business.
Read More
Fix Chrome Error ERR_ICANN_NAME_COLLISION
If you are browsing the internet using the Google Chrome browser in your Windows 10 computer but you suddenly encounter an error message that states, “ERR_ICAN_NAME_COLLISION”, read on as this post will walk you through in fixing the problem. Here’s the full content of the error message:
“The site can’t be reached, This site on the company, organization, or school intranet has the same URL as an external website. Try contacting your system administrator. ERR ICAN NAME COLLISION.”
This kind of error is caused by an error in a private namespace or a random redirection to an incorrect proxy server. There are several ways to fix this error. You can try to check the integrity of the Hosts file or check the proxy. You could also try to use the Registry Editor and apply some tweaks or remove any conflicting browser extensions or flush the DNS cache, as well as run a malware scan.

Option 1 – Try to check the integrity of the Hosts file

To check the integrity of the Hosts file, refer to the following steps:
  • You have to navigate to this path inside File Explorer: C:/Windows/System32/driversetc
  • After that, look for a file named “Hosts” and right-click on it, and open it with the Notepad app.
  • Next, make sure that you write the block URLs in your computer in the list and then save the file.
Note: There are times when you are logged in with administrator credentials and you may receive an error message. In such case, type “notepad” in the Start Search and right-click on Notepad from the search results, and then select the “Run as administrator” option. After that, open the Hosts file and make the necessary changes and save it.

Option 2 – Try to check the Proxy server

There are some users who reported that they’ve fixed the problem after they’ve disabled the use of a proxy server using the built-in way. Follow the steps below to disable the proxy server.
  • Tap the Win + R keys to open the Run dialog box.
  • Then type “inetcpl.cpl” in the field and hit Enter to pull up the Internet Properties.
  • After that, go to the Connections tab and select the LAN settings.
  • From there. Uncheck the “Use a Proxy Server” option for your LAN and then make sure that the “Automatically detect settings” option is checked.
  • Now click the OK and the Apply buttons.
  • Restart your PC.
Note: If you are using a third-party proxy service, you have to disable it.

Option 3 – Try to use the Registry Editor

Before you apply some registry tweaks, make sure that you create a System Restore point. Once you have that covered, follow these steps:
  • Tap the Win + R keys to open the Run utility and type “Regedit” in the field and tap Enter to open the Registry Editor.
  • After that, navigate to this registry key: HKEY_LOCAL_MACHINESYSTEMCurrentControlSetServicesTcpipParametersDataBasePath
  • Look for the default key and double click on it and make sure that its Value data is set as “C:/Windows/System32/driversetc”.
  • Now exit the Registry Editor and restart your computer to apply the changes made

Option 4 – Flush the DNS cache

You could also try to flush the DNS cache to fix the “ERR_ICAN_NAME_COLLISION” error. All you have to do is open Command Prompt as an administrator and then execute each one of the following commands sequentially to flush the DNS cache:
  • ipconfig/release
  • ipconfig/renew
  • ipconfig/flushdns

Option 5 – Get rid of any conflicting browser extensions

  • Open Chrome and press Alt + F keys.
  • Go to More tools and click Extensions to look for any suspicious browser extensions or toolbars.
  • Click the Recycle bin and select Remove.
  • Restart Chrome and press Alt + F keys again.
  • Proceed to On Startup and mark Open a specific page or set of pages.
  • To check if the browser hijacker is still active, click Set pages, if it is active, overwrite the URL.
Note: If removing the browser extensions or toolbars didn’t work, you can also try to reset your Google Chrome browser.
  • Open Google Chrome, then tap the Alt + F keys.
  • After that, click on Settings.
  • Next, scroll down until you see the Advanced option, once you see it, click on it.
  • After clicking the Advanced option, go to the “Restore and clean up option and click on the “Restore settings to their original defaults” option to reset Google Chrome.
  • Now restart Google Chrome.

Option 6 – Run a malware scan using Windows Defender

It is possible that your computer is infected with malware which could be why you’re getting the “ERR_ICAN_NAME_COLLISION” error. Thus, you need to scan your computer using Windows Defender.
  • Tap the Win + I keys to open Update & Security.
  • Then click on the Windows Security option and open Windows Defender Security Center.
  • Next, click on Virus & threat protection > Run a new advanced scan.
  • Now make sure that Full Scan is selected from the menu and then click the Scan Now button to get started.
Read More
Fix Boot Device Not Found Error in Windows
If you encounter an error saying, “Boot Device Not Found” when you turn on your Windows 10 computer, then you’ve come to the right place as this post will guide you on how you can fix this problem. Apart from the error message, you will also see a message that states, “Please install an operating system on your hard disk, Hard Disk<xxx>”. You will then be asked to tap the F2 key to initiate the System Diagnostics. If you install the Windows operating system, it becomes the boot device, and when your computer boots, the UEFI or the BIOS looks for the operating installed on your drive and continues the process. So when you encounter the “Boot Device Not Found” error, this means that the UEFI or the BIOS wasn’t able to locate the drive where it can boot. There are several suggestions you can check out to resolve this error. You can try checking the connection with your boot drive or change the boot order. You can also fix the Boot Record from Recovery and see if the primary partition is active or not. But before you troubleshoot the problem, make sure that you have a bootable Windows USB drive ready since two of the options provided below will require you to boot into the Advanced Recovery mode. Once you have this covered, proceed to each one of the following options.

Option 1 – Try checking the connection with the boot drive

If you have a custom computer that comes with a cabinet, you might want to open it and remove any connected power supply, and then check the wires. As you know, drives are connected with the motherboard using a cable. So all you have to do is check if both ends are connected properly and make sure that the connection is not loose. You could also try to unplug the cable and plug it back in.

Option 2 – Try changing the boot order

You might also want to try changing the boot order of your computer. Each time a computer boots, the BIOS or the UEFI follows a boot order. It is the one that tells where to first look for the boot drive and if for some reason, a USB is connected to your computer and the first boot device found in the USB, then you have resolved the problem. All you have to do is to remove the USB device and boot or go into the BIOS and change the boot order yourself.

Option 3 – Try to rebuild the BCD files

The next thing you can do to resolve the issue is to Rebuild Boot Configuration Data or BCD files.
  • You can start by booting into the installation environment for Windows 10 from an installation media.
  • After that, click on Repair your computer and on the blue screen, select Troubleshoot and then select the Advanced options menu.
  • From there, select Command Prompt and once you open it, enter each one of the commands given below by sequence.
    • bootrec /FixMbr
    • bootrec /FixBoot
    • bootrec /ScanOS
    • bootrec /RebuildBcd
  • Once you’re done executing the commands given above, type “exit” to close the Command Prompt window and then restart your computer and see if it fixed the “Boot Device Not Found” error.

Option 4 – Try setting the System Partition to Active

Like the first given option, you also have to make sure that you have a bootable Windows 10 USB drive before you proceed to set the System Partition to Active. Once you have it covered, refer to these steps:
  • Boot your computer using the bootable Windows 10 USB drive.
  • Next, click Next when you get to the Welcome Screen.
  • Then click on Repair your computer located at the bottom left part of the window and select Troubleshoot > Advanced Options > Command Prompt.
  • After opening Command Prompt, type the following command and hit Enter to start the Diskpart utility. It is a command line-based utility just like Command Prompt but has a UAC prompt once you provoke it. So if you encounter a UAC prompt, just click on Yes to proceed.
diskpart
  • Now type the following command:
list disk
  • From there, select your primary disk by typing the following command:
select disk number
  • After that, list all the partitions on the selected disk by entering the following command:
list partition
  • The command you just entered will list all the partitions created on your PC including both types of partitions that are visible to a normal user in the File Explorer as well as the ones created by Windows 10 by default which helps it in storing the boot files and other important system files.
  • Now type the following command to select the partition that is usually around 100 MB in size:
select partition number
  • Finally, type the following command to mark the partition active:
active
  • Then type the “exit” command to exit the disk part utility.
Once it’s done, the primary drive should now be active and you should now be able to boot into your computer without the “Boot Device Not Found” error.
Read More
Fix Partner did not connect to router Error
One of the great remote assistance software that helps you remotely access and control computers is TeamViewer. However, despite how efficient it is, there are still times when it throws up some errors and one of them is when TeamViewer is not able to connect and throws an error that says, “No connection to partner, Partner did not connect to router, Error Code WaitforConnectFailed”. This kind of error in TeamViewer mostly occurs when the Partner computer is not connected to a network. On the other hand, it could also occur when they are connected to a network so there are various causes for this issue. It could also be that the installation of the program itself was at fault or there is an incompatibility between the TeamViewer versions installed on both the computers and so on. Although there are several causes for this error, the potential fixes are still the same. You can try to restart the network or allow Full Access Control to TeamViewer or flush the DNS cache. For more information, refer to the following options but before you proceed, make sure that both your Windows 10 computer and TeamViewer program are updated to their latest stable versions.

Option 1 – Reboot your router

The first thing you can try to do to fix the error is to simply restart your router. All you need to do is reboot the router from its Admin panel or you can also turn it off manually and turn it back on after a couple of seconds so that it can completely reboot. Once you’re done, try accessing your server again and see if the error is now fixed.

Option 2 – Allow Full Access Control to TeamViewer

  • First, open TeamViewer, and then from the Menu bar, click on Extras.
  • After that, click on Options and select Advanced from the left side navigation panel.
  • Next, click on the “Show advanced options” button located on the right-hand side.
  • Then select Full Access from the drop-down menu of the Access Control option under the “Advanced settings for connection to this computer section”.
  • Now click OK and check if the error is now fixed or not.

Option 3 – Try to flush the DNS configuration

You could also try to flush the DNS configuration in your computer to fix the error. How? Refer to these steps:
  • Tap the Win + X key combination and click on the Command Prompt (Admin) option or you could also search “cmd” in the Cortana search box and right-click on Command Prompt from the search results and select the “Run as administrator” option.
  • After opening Command Prompt with admin privileges, enter each one of the commands given below sequentially in order to flush the DNS cache.
    • ipconfig/release
    • ipconfig/renew
    • ipconfig/flushdns
  • Now type the exit command to close Command Prompt and then restart your computer and see if the problem is fixed.
On the other hand, you could also try to reset Winsock as well as the TCP/IP.

Option 4 – Run the Network Adapter troubleshooter

To run the Network Troubleshooter, refer to these steps:
  • Open the Search bar on your computer and type in “troubleshoot” to open the Troubleshoot settings.
  • Next, scroll down and select the “Network Adapter” option from the right pane.
  • Then click on the Run Troubleshooter” button.
  • After that, your computer will check for any possible errors and will pinpoint the root cause of the problem if possible.
  • Restart your computer.

Option 5 – Try to perform Network Reset

You might perform a Network Reset to resolve the problem if none of the four given options worked. This will reset the entire network configuration including your IP address. To perform Network Reset, follow these steps:
  • Tap the Win + I keys to open Settings.
  • From there, go to the Network and Internet section.
  • Next, scroll down and look for “Network Reset” under the status pane.
  • After that, click on Network Reset and then on Reset now to start resetting the network configuration. Once done, check if it is able to fix the error or not.
Read More
How to remove GetCouponsFast.com from PC

The Get Coupons Fast Toolbar is a Browser Extension for Google Chrome developed by Mindspark Inc. This extension allows quick access to the most popular coupon websites available. While this might look like a good useful idea, keep in mind that it has been classified as a Browser Hijacker by Several anti-virus applications.

When installed this extension will hijack your new tab page, changing it to a customized version of Search.MyWay.com. While active It records user browser activity, this data is later used to better target ads. While browsing the internet with this extension installed you will see additional pop-up ads, sponsored content, and injected ads into your browser search results and pages. GetCouponsFast usually comes bundled with other PUP-s or Browser Hijackers that may harm your computer and it is recommended you remove it from your PC.

About Browser Hijackers

Browser hijacking means that a malicious code has taken control over and altered the settings of your internet browser, without your permission. They are created to disrupt browser functions for various reasons. It redirects you to the sponsored sites and inserts ads on your internet browser that assists its developer to generate revenue. While it might seem harmless, these tools were created by malicious people who always look to take advantage of you, so that they could make money from your naivety and distraction. They did not just ruin your browsers, but browser hijackers can also modify the system registry, making your computer or laptop susceptible to various other types of attacks.

Signs of browser hijacker infection

There are plenty of signs that indicate the web browser has been highjacked: 1. you notice unauthorized modifications to your web browser’s home-page 2. you find re-directed to internet sites you never intended to visit 3. the default browser configurations have been modified and/or your default web engine is altered 4. you’ll see many toolbars on your browser 5. you might see never-ending pop-up adverts on your computer screen 6. your browser has become unstable or starts running slowly 7. you are blocked to access the websites of antivirus solution providers.

How does a computer get infected with a browser hijacker?

Browser hijackers might use drive-by downloads or file-sharing networks or an email attachment in order to reach a targeted computer system. They could also come from add-on applications, also known as browser helper objects (BHO), web browser extensions, or toolbars. Some internet browser hijackers spread in user’s computers using a deceptive software distribution method called “bundling” (often through freeware and shareware). Browser hijackers will affect the user’s web browsing experience severely, monitor the websites visited by users and steal sensitive information, cause difficulty in connecting to the web, and eventually create stability problems, making programs and systems freeze.

Removal

Some hijackers can be simply removed by deleting the free software they were included with or by deleting any add-ons you have recently added to your browser. Unluckily, the majority of the software applications utilized to hijack an internet browser are deliberately designed to be difficult to detect or get rid of. And there is no denying the very fact that manual repairs and removal can certainly be a difficult task for a novice PC user. Moreover, there are various risks connected with tinkering around with the system registry files. Installing and running anti-malware software on the affected computer will automatically erase browser hijackers as well as other unwanted programs. In order to get rid of persistent browser hijackers effectively, install the award-winning Anti-Malware tool Safebytes Anti-Malware. Employ a pc optimizer (such as Total System Care) along with your anti-malware to repair various computer registry problems, remove computer vulnerabilities, and improve your computer performance.

How To Get Eliminate Virus That Is Blocking Antivirus Downloads?

Malware could cause all sorts of damage once they invade your computer, starting from stealing your private details to erasing data files on your computer system. Some malware is created to hinder or block things that you wish to do on your PC. It may not permit you to download anything from the net or it will prevent you from accessing a few or all of the websites, in particular the anti-virus sites. If you are reading this article right now, you may have perhaps realized that a malware infection is a reason for your blocked internet connectivity. So what to do if you want to download and install an anti-virus application like Safebytes? There are some steps you can take to circumvent this problem.

Boot Windows in Safe Mode

Safe Mode is actually a unique, simplified version of Windows in which just bare minimum services are loaded to prevent malware and also other troublesome programs from loading. If the malicious software is set to load automatically when the PC starts, shifting into this mode may prevent it from doing so. In order to enter into Safe Mode or Safe Mode with Networking, press the F8 key while the system is booting up or run MSCONFIG and find the “Safe Boot” options under the “Boot” tab. Once you are in safe mode, you can attempt to install your anti-malware program without the hindrance of the malicious software. Right after installation, run the malware scanner to remove standard infections.

Use an alternate web browser to download security software

Web-based malware can be environment-specific, aiming for a particular browser or attacking particular versions of the browser. The best solution to avoid this issue is to choose an internet browser that is known for its security features. Firefox contains built-in Malware and Phishing Protection to keep you secure online.

Run anti-virus from a pen drive

Another option would be to make a portable anti-malware program onto your USB flash drive. To run anti-virus using a pen drive, follow these simple measures: 1) Download Safebytes Anti-Malware or Windows Defender Offline onto a virus-free PC. 2) Plug the USB drive into the clean computer. 3) Double-click the Setup icon of the anti-malware program to run the Installation Wizard. 4) Select thumb drive as the place when the wizard asks you where you wish to install the application. Follow the directions to complete the installation process. 5) Unplug the flash drive. Now you can utilize this portable anti-virus on the infected computer. 6) Double click the Safebytes Anti-malware icon on the pen drive to run the application. 7) Click the “Scan Now” button to start the virus scan.

SafeBytes Anti-Malware Overview

Want to download the best anti-malware application for your desktop? There are many applications on the market that comes in free and paid versions for Windows systems. Some are very good ones, some are ok types, while some are just fake anti-malware programs that will damage your personal computer themselves! While looking for an antimalware program, pick one that offers reliable, efficient, and total protection against all known viruses and malware. On the list of recommended software is SafeBytes AntiMalware. SafeBytes has a good history of quality service, and customers appear to be happy with it. Safebytes is among the well-established PC solutions companies, which provide this all-inclusive anti-malware application. With its outstanding protection system, this tool will automatically detect and remove most of the security threats, which include adware, viruses, browser hijackers, PUPs, trojans, worms, and ransomware.

SafeBytes possesses a variety of wonderful features that can help you protect your computer from malware attacks and damage. Listed below are a few of the great ones:

Real-time Protection: SafeBytes provides round-the-clock protection for your computer restricting malware intrusions in real-time. They are very efficient in screening and getting rid of numerous threats because they’re regularly improved with new updates and alerts. Robust Anti-malware Protection: Built on a highly acclaimed antivirus engine, this malware removal tool has the capacity to find and remove various stubborn malware threats such as browser hijackers, PUPs, and ransomware that other common antivirus programs will miss. Web protection: SafeBytes checks the hyperlinks present on a webpage for possible threats and tells you if the website is safe to explore or not, through its unique safety rating system. Minimal CPU and Memory Usage: SafeBytes is a lightweight and simple to use antivirus and anti-malware solution. As it utilizes very low computer resources, this software leaves the computer power exactly where it belongs: with you. 24/7 Customer Service: Support service is available 24 x 7 x 365 days via chat and email to answer your queries. Overall, SafeBytes Anti-Malware is a solid program since it has lots of features and could identify and remove any potential threats. Now you may realize that this tool does more than just scan and delete threats on your computer. So when you need advanced forms of protection features and threat detections, purchasing SafeBytes Anti-Malware could be well worth the dollars!

Technical Details and Manual Removal (Advanced Users)

If you don’t want to use malware removal software and prefer to eliminate GetCouponsFast manually, you could do so by going to the Windows Add/Remove Programs menu in the control panel and deleting the offending program; in cases of browser extensions, you can remove it by visiting the browser’s Add-on/Extension manager. Additionally, it is advised to reset your web browser settings to their default state. Lastly, check your hard disk for all of the following and clean your registry manually to remove leftover application entries after uninstallation. Please keep in mind that only advanced users should attempt to manually edit the system files since deleting any single vital registry entry results in a serious problem or even a PC crash. Moreover, certain malicious programs are capable to defend against its removal. It is recommended that you do the removal process in Windows Safe Mode.
Files: %LOCALAPPDATA%\Google\Chrome\User Data\Default\Extensions\iadmakoacmnjmcacmhlcjcameijgcopj %UserProfile%\Local Settings\Application Data\Google\Chrome\User Data\Default\Extensions\iadmakoacmnjmcacmhlcjcameijgcopj %UserProfile%\Local Settings\Application Data\GetCouponsFastTooltab %LOCALAPPDATA%\GetCouponsFastTooltab Registry: HKEY_LOCAL_MACHINE\Software\[APPLICATION]\Microsoft\Windows\CurrentVersion\Uninstall..Uninstaller
Read More
Intel's open-source Clear Linux* Project
clear linux project
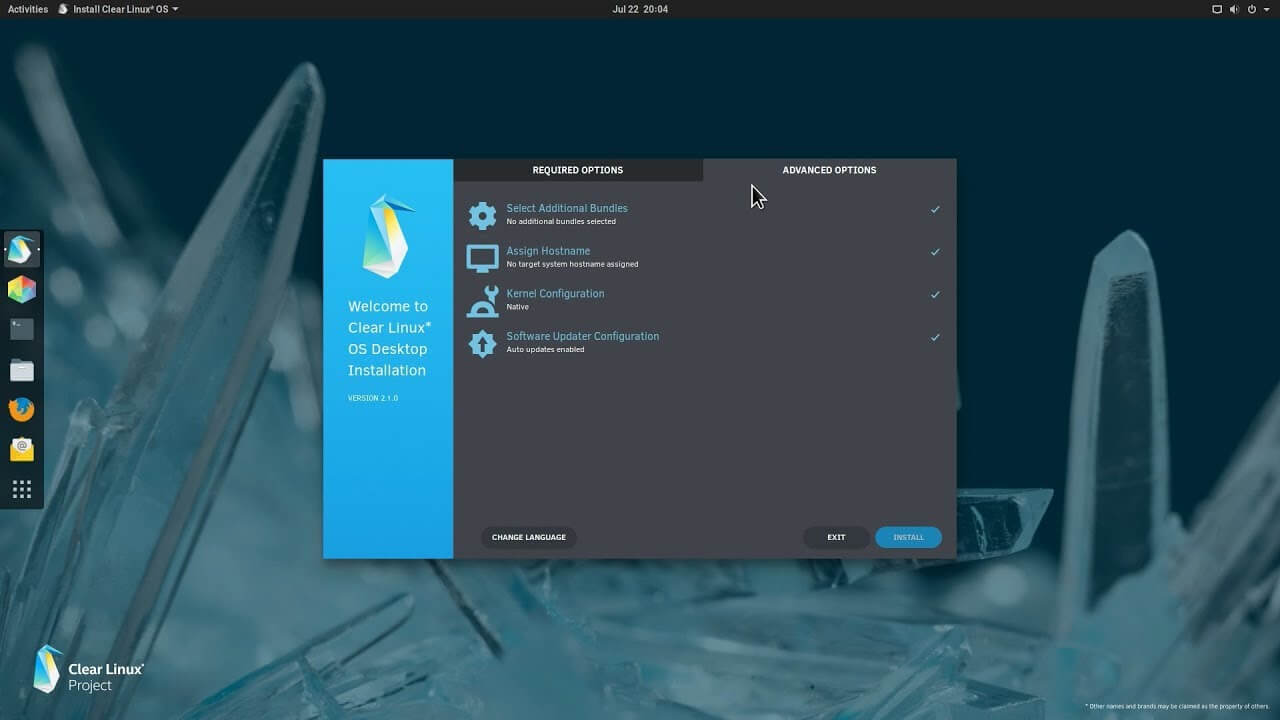
The Clear Linux Project creates an operating system and software stack that offers highly optimized performance, security, versatility, and manageability. Clearly optimized for Intel CPUs and based on GNOME it will offer you incredible speeds if you are on Intel CPU. The big news, though, is that Clear Linux sports the shiny new Gnome 40. This is a fresher Gnome than you'll find even on Ubuntu's more experimental 21.04 release. The only big names that let you test drive Gnome 40 are Fedora and Arch Linux.

Packages only when you need them

Installation of packages is used by Swupd, a Clear Linux* package management tool. It is easy to use and pretty straightforward.
  • "bundle-list" for showing what's installed
  • "bundle-info" for details on installed bundles (such as owned files via the "‑‑files" flag)
  • "search" for repository searching
  • "bundle-add" for installation
  • "bundle-remove" for uninstallation
The only problem here is the packages themselves. Clean Linux* has been imagined as a developer distro focusing mostly on well-development tolls. In intel’s words: “A Linux OS built for Linux developers”, so some things will be left out. Strangely enough some things as FFmpeg which if you want to have and blast some youtube videos while you work will have to complete manually by yourself.

Clear Linux* modular philosophy

Everything in Clear Linux* is based on a modular philosophy approach. There is no /etc/fstab file, the /boot directory is totally empty. Every partition to be mounted is enabled as a systemd "mount unit." Intel reaping the benefits of systemd's modular philosophy, where everything is a unit. If you know your way around systemd, intermediate-level configuration tasks should be straightforward. Any advanced configuration likely demands deep systemd knowledge.

Clear Linux* performance

As stated earlier this is Intel’s distro, optimized for Intel hardware meaning that Intel as the developer has every possible tool at its disposal to make use of hardware to its maximum potential and it shows. Distro almost leaves other ones two times in speed performance. So if you are looking for a distribution that will deliver you speed and it is aimed for developer Clear Linux* is for you.

Conclusion

Clear Linux* is a really interesting distro and seeing how Intel is adding new software packages on its official website it might have a bright future. But as always, be the judge for yourself and see if it can fit your needs. Go get it at: https://clearlinux.org/
Read More
PUP - Driver Pro complete removal guide

Driver Pro Description

DriverPro is a program developed by PC Utilities Pro. This program is often found bundled in other installations.

From the author: PC Utilities Pro is a leading software development company founded in 2009. As a group of young enthusiastic programmers, we constantly strive in creating powerful, yet easy-to-use solutions that would enable even the most basic computer users to keep their PCs running like new.

When installed, DriverPro will add registry entries for the current user that allow it to run each time to computer is started. It will also add a scheduled task in Windows, that allows it to run at various times. The optimizing nature of the application allows it to access any file and information on your computer without your knowledge.

Multiple anti-virus programs have marked this application as a Potentially Unwanted Program, and it is not recommended to keep it on your computer.

About Potentially Unwanted Applications

Have you ever discovered an unwanted program running on your PC and wondered exactly how the heck it got there? A PUA / PUP (potentially unwanted application / potentially unwanted program) is a software program that comes bundled with freeware/shareware and you agree to install on your computer. These are programs you certainly don’t want on your computer since it doesn’t provide any useful service. Despite being regarded very dangerous, PUPs aren’t necessarily computer viruses or malware What makes a PUP different from malware is the fact that whenever you download one, you are doing it with your consent – though in most instances unwittingly and unwillingly. PUPs might not be malware but still, they’re harmful programs to your computer. At best, these unwanted applications provide hardly any benefit, and at worst, they could be quite damaging to your computer.

What do PUPs do on your computer, really?

Most Potentially Unwanted Programs will come in the form of adware, which typically aims to exhibit numerous irritating pop-up ads, banners, coupons, and bargains on websites you go to. PUPs that come as browser add-ons and toolbars are readily identifiable. They’ll track your online activities, redirect your search results to unsafe websites where spyware and adware can be downloaded, hijack your home page, and slow your internet browser down to a crawl. PUPs load up a dangerous bite if kept unchecked. They will often include things like information gathering program code which could gather and send your sensitive information back to 3rd parties. These are programs that don’t really do anything good for you; in addition to occupying space on the hard drive, they also slow down your PC, often alter settings without your authorization, the list of annoying features goes on and on.

Great tips on protecting yourself from unwanted software

• When setting up anything on your computer system, always study the fine print, like the license agreement. Don’t accept terms of use that are for bundled programs. • Only Use the “custom” or “manual” install method – and never blindly click Next, Next, Next. • Use an advert blocker/pop-up blocker; Install anti-malware products such as Safebytes Anti-malware. These software programs could establish a wall between the computer and cybercriminals. • Think twice before you decide to download any type of freeware or shareware. Just before adding a plug-in or web browser extension, think about whether it is really necessary. • Only download programs from the original providers’ websites. Avoid download portals because they use their very own download manager to pack extra programs along with the initial download.

Help! Malware Blocking Anti-virus Installation And Access To The Web

All malware is bad, but certain kinds of malicious software do a lot more damage to your computer than others. Some malware is meant to hinder or block things that you wish to do on your computer. It may well not allow you to download anything from the net or it will stop you from accessing some or all websites, particularly the anti-malware sites. So what you should do if malware prevents you from downloading or installing Safebytes Anti-Malware? Do as instructed below to get rid of the malware in alternate ways.

Get rid of malware in Safe Mode

The Windows operating system has a special mode known as “Safe Mode” where just the bare minimum required programs and services are loaded. In the event, the virus is set to load automatically when the PC starts, shifting to this mode may well prevent it from doing so. To start the computer into Safe Mode, press the “F8” key on the keyboard just before the Windows boot screen appears; Or right after normal Windows boot up, run MSConfig, check the Safe Boot under the Boot tab, and click Apply. After you restart into Safe Mode with Networking, you could download, install, and update the anti-malware program from there. Now, you are able to run the anti-virus scan to eliminate computer viruses and malware without any interference from another malicious application.

Switch to some other internet browser

Web-based viruses could be environment-specific, aiming for a particular internet browser or attacking particular versions of the browser. If you appear to have malware attached to Internet Explorer, then switch over to a different internet browser with built-in safety features, such as Firefox or Chrome, to download your favorite antivirus program – Safebytes.

Run anti-virus from your USB drive

Another way is to download and transfer an anti-malware program from a clean computer to run a scan on the affected system. Adopt these measures to run the anti-malware on the infected computer system. 1) On a clean computer, download and install Safebytes Anti-Malware. 2) Plug the pen drive into the uninfected computer. 3) Run the setup program by double-clicking the executable file of the downloaded application, which has a .exe file format. 4) Select the USB flash drive as the location when the wizard asks you where you intend to install the software. Follow the activation instructions. 5) Remove the flash drive. You may now utilize this portable antivirus on the infected computer. 6) Run the Safebytes Anti-malware directly from the flash drive by double-clicking the icon. 7) Press the “Scan” button to run a full system scan and remove viruses automatically.

Detect And Remove Viruses With SafeBytes Anti-Malware

Want to download the very best anti-malware software for your laptop or computer? There are many applications available that come in paid and free versions for Microsoft Windows computers. A few are worth your money, but many aren’t. You need to pick a company that creates industry-best antimalware and has earned a reputation as reliable. Among few good programs, SafeBytes Anti-Malware is the strongly recommended software for the security-conscious end user. Safebytes is one of the well-established PC solutions firms, which provide this complete anti-malware software program. This software program can easily detect, remove, and protect your computer from the most advanced malware intrusions such as adware, spyware, trojan horses, ransomware, parasites, worms, PUPs, along with other potentially harmful software applications. SafeBytes anti-malware offers a plethora of advanced features that set it apart from all others. The following are some of the good ones: Real-time Protection: SafeBytes provides complete and real-time security for your personal machine. It will regularly monitor your computer for hacker activity and also gives users superior firewall protection. Best AntiMalware Protection: This deep-cleaning anti-malware program goes much deeper than most antivirus tools to clean out your computer system. Its critically acclaimed virus engine finds and disables hard to remove malware that hides deep within your PC. Web Protection: SafeBytes gives an instant safety rating about the web pages you are about to check out, automatically blocking unsafe sites and ensuring that you are certain of your safety while browsing the world wide web. Fast Scan: SafeBytes Anti-Malware has a multi-thread scan algorithm that works up to 5x faster than any other antivirus software. Very Low CPU and RAM Usage: This software program is not “heavy” on your computer’s resources, so you’ll not notice any overall performance problems when SafeBytes is operating in the background. Fantastic Tech Support Team: You will get 24/7 technical assistance to promptly resolve any issue with your security application.

Technical Details and Manual Removal (Advanced Users)

To remove Driver Pro manually, navigate to the Add/Remove programs list in the Control Panel and choose the offending program you want to get rid of. For web browser plug-ins, go to your web browser’s Addon/Extension manager and select the add-on you want to remove or disable. You may also want to reset your web browser settings, as well as clear your web browser cache and cookies. Lastly, check your hard disk for all of the following and clean your registry manually to remove leftover application entries after uninstalls. Please note that only professional computer users should try to manually edit the system files mainly because removing any single vital registry entry leads to a major problem or even a computer crash. Also, certain malware is capable of replicating itself or preventing its removal. Carrying out this in Safe Mode is suggested.
Files: %Program Files%\Driver Pro\Driver Pro.exe %UserProfile%\Desktop\Driver Pro.lnk %UserProfile%\Start Menu\Driver Pro\Driver Pro.lnk %UserProfile%\Start Menu\Driver Pro\Help.lnk %UserProfile%\Start Menu\Driver Pro\Registration.Lnk Registry: HKEY_CURRENT_USER\Software376694984709702142491016734454 HKEY_CURRENT_USER\Software\Microsoft\Windows\CurrentVersion\Run 13376694984709702142491016734454
Read More
Fix Windows Update Error 0x80242006
If you are trying to update your Windows 10 computer using Windows Update but encounter an error code 0x80242006, then you’ve come to the right place as this post will guide you in fixing this particular Windows Update error. This kind of error might be due to mishandling by the operating system. It could also be caused by the antivirus program or security software installed in your computer. When you encounter this error, you will see the following error message on your screen as you try to run Windows Update:
“0x80242006, WU_E_UH_INVALIDMETADATA. A handler operation could not be completed because the update contains invalid metadata.”
Here are some troubleshooting tips you can try to fix Windows Update Error 0x80242006.

Option 1 – Try to reset the Windows Update components

If by any chance that the second option didn’t work, resetting the Windows Update components could also help you resolve the problem. How? Refer to the following steps:
  • Open Command Prompt with admin privileges.
  • After that, type each one of the following command and hit Enter after you key in one after the other.
    • net stop wuauserv
    • net stop cryptsvc
    • net stop bits
    • net stop msiserver
Note: The commands you entered will stop the Windows Update components such as Windows Update service, Cryptographic services, BITS and MSI Installer.
  • After disabling WU components, you need to rename both the SoftwareDistribution and Catroot2 folders. To do that, type each one of the following commands below and don’t forget to hit Enter after you type one command after the other.
    • ren C:WindowsSoftwareDistribution SoftwareDistribution.old
    • ren C:WindowsSystem32catroot2 Catroot2.old
  • Next, restart the services you’ve stopped by entering another series of commands. Don’t forget to hit Enter after you key in one command after the other.
    • net start wuauserv
    • net start cryptsvc
    • net start bits
    • net start msiserver
  • Close Command Prompt and reboot your PC.

Option 2 – Run the Windows Update Troubleshooter

If resetting the Windows Update components didn’t work, you could also try running the Windows Update Troubleshooter as it could also help in fixing any issues related to Windows Update including this one. To run it, go to Settings and then select Troubleshoot from the options. From there, click on Windows Update and then click the “Run the troubleshooter” button. After that, follow the next on-screen instructions and you should be good to go.

Option 3 – Try to disable your antivirus program

Disabling the antivirus program or any security software installed in your computer is always a good idea you can try when the Windows Update process does not go smoothly. So before you try updating your computer again, make sure to disable the antivirus or security program and once the Windows Update is done, don’t forget to enable the antivirus program back again.

Option 4 – Check the Background Intelligent Service and the Cryptographic Service

  • Tap the Win + R keys to open the Run dialog box.
  • Next, type “services.msc” in the field and hit Enter or click OK to open Services.
  • From the list of Services, look for the following services and make sure that their Startup type is as follows:
    • Background Intelligent Transfer Service – Manual
    • Cryptographic Service ­– Automatic
  • After that, check if the Service status of the listed services above are set to Running. If they’re not, click on the Start button to start these services and then check if you can now enable the Windows Update service or not.

Option 5 – Run the System File Checker Scan

System File Checker or SFC is a built-in command utility that helps in restoring corrupted files as well as missing files. It replaces bad and corrupted system files to good system files. To run the SFC command, follow the steps given below.
  • Tap Win + R to launch Run.
  • Type in cmd in the field and tap Enter.
  • After opening Command Prompt, type in sfc /scannow
The command will start a system scan which will take a few while before it finishes. Once it’s done, you could get the following results:
  1. Windows Resource Protection did not find any integrity violations.
  2. Windows Resource Protection found corrupt files and successfully repaired them.
  3. Windows Resource Protection found corrupt files but was unable to fix some of them.
  • Restart your computer.

Option 6 – Try running the DISM tool

You can try running the Deployment Imaging and Servicing Management or DISM tool to fix the Windows Update error 0x80242006. Using this built-in tool, you have various options such as the “/ScanHealth”, “/CheckHealth”, and “/RestoreHealth”.
  • Open the Command Prompt with admin privileges.
  • Then type in the following commands and make sure to hit Enter right after you type each one of them:
    • Dism /Online /Cleanup-Image /CheckHealth
    • Dism /Online /Cleanup-Image /ScanHealth
    • exe /Online /Cleanup-image /Restorehealth
  • After that, wait until the process is finished and do not close the window as the process will probably take a couple of minutes.
  • Once it’s done, restart your computer.
Read More
1 2 3 162
Logo
Copyright © 2022, ErrorTools. All Rights Reserved
Trademarks: Microsoft Windows logos are registered trademarks of Microsoft. Disclaimer: ErrorTools.com is not affiliated with Microsoft, nor claim direct affiliation.
The information on this page is provided for information purposes only.
DMCA.com Protection Status