Fix Unknown USB Device error message

USB devices are one of the commonly used devices every day – from plugging mobile devices for charging using pen drives, you are making use of USB drives. However, there are times when you might encounter an error message saying, “Unknown USB Device” as you plug your USB device on your Windows 10 computer. So if you encounter this kind of error message followed by either of the following explanations, read on as this post will give you a couple of suggestions you can check out to resolve the issue.

  • Device Descriptor Request Failed
  • Port reset failed
  • The device failed enumeration
  • Set address failed
  • Error code 43

You can fix this error using several ways. You can try changing the Power Options, update or roll back the USB drivers, turn off Fast Startup, or run the USB troubleshooter. Follow the options given below for more details.

Option 1 – Try to change the Power Options

  • Tap the Win + R keys to open the Run utility.
  • Then type “powercfg.cpl” and tap Enter to open the Power Options window.
  • Next, go to your selected power plan and click the “Change plan settings” option to open a new page.
  • From there, click on the “Change advanced power settings” option. This will open a new window where you can see various power consumption options.
  • Now look for the USB Settings option and expand it.
  • Then set the USB selective suspend setting to “Disabled” for both scenarios: On Battery and Plugged in.
  • After that, click on OK and restart your computer to apply the changes made.

Option 2 – Update or reinstall the Universal Serial Bus Controller driver

Since it could be a driver issue, you can try to update or reinstall the Universal Serial Bus Controller drivers using the Device Manager. Refer to the following steps:

  • First, click the Start button and type “device manager”.
  • Then click on the “Device Manager” from the search results to open it.
  • From there, look for the “Universal Serial Bus controllers” option and then right-click on each one of the USB drivers and select the Update Driver from the menu.

Note: If it is a regular USB drive, then it will be listed as a USB Mass Storage Device but if you have a USB 3.0 device, then look for a USB 3.0 Extensible Host Controller.

  • Restart your PC and then click the “Search automatically for updated driver software” option.

Note: If updating the USB Controller drivers didn’t work, you can try to reinstall them instead.

Option 3 – Try turning off Fast Startup

  • Tap the Win + R keys to open the Run dialog box and type in “control” to open the Control Panel.
  • Next, click on the Hardware and Sound section and click on Power Options.
  • Afterwards, select the “Choose what the power buttons do” option from the left side menu pane.
  • Now click on Change settings that are currently unavailable and uncheck the entry that says, “Turn on fast startup (Recommended).
  • Then click on Save Changes and restart your computer and see if it has fixed the problem or not.

Option 4 – Run the Hardware and Devices Troubleshooters

  • The first thing you need to do is click on Start and then on the gear-like icon to pull up the window for Settings.
  • After opening Settings, look for the Update and Security option and select it.
  • From there, go to the Troubleshoot option located on the left-hand side of the list.
  • Next, select Hardware and Devices from the list and open the Troubleshooter and run it. Once it is doing its job, wait for it to complete the process and then restart the system.
  • After the system restarts, check if the problem’s now fixed. If not, refer to the next option given below.
If you like to learn and find out more about various Windows errors, and how to repair them go to our vast archive or use search to find articles that will explain and help you in solving your issue.
However, if you prefer to do things fast and with automatization then we are proposing to use an automated solution for your issues. The application that we are recommending is Advanced System Repair Pro
Advanced System Repair utilizes multiple tools all in one to give you a quick, simple, reliable, and very thorough diagnosis of your PC. It brings you all the tools you need in one program to clean, fix, protect, optimize and boost your PC!
1-Click Maintenance
All the tools to make it simple and easy! It's like having a professional technician at the click of a mouse.

Junk Cleaner
Keeping your computer free from unnecessary clutter also helps make your computer last longer. Like any other machine, if you keep it clean and take care of it, it will serve you better for longer!

Optimize background apps
Optimize applications background activity with the built-in Application Optimizer feature.

Disk Defrag
With a simple 1-click, Advanced System Repair speeds up your PC by assembling fragmented files on your machine and organizing them more efficiently.

Malware Removal
Finds and removes all types of harmful malware including trojans, worms, bots, adware, spyware, PUPs, and more!

Privacy Cleaner
The all-in-one privacy suite to Clean Your Tracks & Protect Your Privacy! Make your computer safe, secure, and more efficient!

System Tweak/Optimizer
ASR will analyze your complete system and settings to adjust your PC to function at its maximum performance.

Registry Cleaner
Over time, as you install and uninstall applications, the registry can become cluttered with old entries and broken settings which can result in program crashes, and annoying messages and slow the computer down.
Visit our Advanced System Repair Pro Download page to inform yourself about all the benefits of this software and get a free trial copy of it.
advanced system repair pro

Advanced System Repair Pro

One-click automated PC repair solution
ASR logo
With Advanced System Repair Pro you can easily
Replace damaged files
Restore performance
Free disk space
Remove Malware
Protects WEB browser
Remove Viruses
Stop PC freezing
DOWNLOAD
Privacy Policy | Terms of Use | Uinstall
Advanced System Repair Pro is compatible with all versions of Microsoft Windows including Windows 11

Share this article:

You might also like

VirtualBox FATAL:No bootable medium found!
If you continuously encountered the “VirtualBox FATAL: No bootable medium found, System halted” error when you try to install Windows 10 in VirtualBox, read on as this post will give you some potential fixes to resolve the problem – you will be guided on how to choose the ISO image to fix this error in VirtualBox. This kind of error is a very common one especially if you have a corrupted ISO file or if you have not selected an ISO file for your virtual machine. Like pointed out, this error pops up when you have a corrupted ISO file or if the ISO file is not attached to the virtual machine. You have to select the ISO file while you create the virtual hard disk, else, you will most likely face this problem, and to fix it, you need to download fresh Windows ISO, create a new IDE Controller, assign Windows ISO to the IDE Controller and then boot your virtual machine. For detailed steps, follow the instructions below but before you start, make sure that you have a valid and uncorrupted Windows ISO. Step 1: First, you need to open the VirtualBox program on your computer and select the virtual machine. Step 2: Next, click on the Settings button or you can also right-click on the virtual machine and select Settings from the context menu. Step 3: Once you’re in the Settings panel, go to the Storage section and from there, create a Controller: IDE. Step 4: To create a Controller: IDE, click the Add new storage controller icon and select the “Add IDE Controller” option. Step 5: After that, click the Add optical drive icon and click on the Choose disk button. You will then see all the attached and non-attached ISO files. However, you have to add the new ISO file that you just downloaded. Step 6: To add the new ISO file, click the Add button and select the ISO file and then select the .iso file from the Non Attached section. Step 7: Now click the Choose button and afterward, make a checkmark in the Live CD/DVD checkbox and then select the IDE Primary Master from the drop-down menu of the Optical Drive. Step 8: Once you’re done, save the changes made and try booting into your virtual machine again.
Read More
System32 Folder Keeps Popping up at Startup
The System32 folder contains vital configuration and information that are essential to the operating system. It is located inside the “Windows” folder and it consists of important DLL files as well as executable files. You probably have noticed some errors that have the “System32” word in them but that does not necessarily mean that the System32 folder is the one that triggers them as these kinds of errors have only occurred when some important files are corrupted or missing. Some users recently reported that each time they start their computers, the System32 folder will automatically open up in the File Explorer. If you encounter the same problem, read on as this post will guide you on what to do to fix it. This kind of issue is most likely caused by service or application interference – it is possible that there is a third-party application installed in your computer or a Windows service that triggers the System32 to pop up during startup. It is also possible that this is a result of system modification. Thus, you need to identify the third-party program or restore your computer to its previous state.

Option 1 – Put your computer in a Clean Boot State

As pointed out, it is possible that some third-party program or service is the one that’s behind the problem. To isolate this possibility and to identify the culprit, you have to put your computer into a Clean Boot State. To do so, follow the steps below.
  • Log onto your PC as an administrator.
  • Type in MSConfig in the Start Search to open the System Configuration utility.
  • From there, go to the General tab and click “Selective startup”.
  • Clear the “Load Startup items” check box and make sure that the “Load System Services” and “Use Original boot configuration” options are checked.
  • Next, click the Services tab and select the “Hide All Microsoft Services” check box.
  • Click Disable all.
  • Click on Apply/OK and restart your PC. (This will put your PC into a Clean Boot State. And configure Windows to use the usual startup, just simply undo the changes.)
After putting your PC in a Clean Boot State, try creating a system restore point and see if the problem still occurs. Clean Boot troubleshooting is designed to help you isolate the problem. For you to execute a clean boot troubleshooting, you must do a couple of actions (the steps given above) and then restart your PC after every action. You might have to disable one third-party app after the other to really isolate the issue. And once you’ve narrowed down the problem, you can either disable the third-party app that’s causing the problem or remove it. Note that you must switch your PC back into the Normal Startup mode after you’re done troubleshooting the problem. Here’s how you can do it:
  • From the “Start” menu, go to System Configuration.
  • After that, switch to the General tab and click the option for “Normal Startup”.
  • Next, go to the Services tab and clear the checkbox for “Hide all Microsoft services”.
  • Then find and click “Enable all” and if prompted, you have to confirm.
  • Afterward, go to the Task Manager and enable all the Startup programs and confirm the action.
  • Restart your PC when prompted.

Option 2 – Perform System Restore

  • First, press the Win + R keys to open the Run dialog box.
  • After that, type in “sysdm.cpl” in the field and tap Enter.
  • Next, go to the System Protection tab then click the System Restore button. This will open a new window where you have to select your preferred System Restore point.
  • After that, follow the on-screen instructions to finish the process and then restart your computer and check if the problem is fixed or not.

Option 3 – Run System File Checker scan

You might also try running the System File Checker or SFC scan to fix the issue. System File Checker is a command utility built into your computer that helps restore corrupted files and missing files. Refer to the following steps to run it:
  • Hit the Win + R keys to launch Run.
  • Type in cmd in the field and tap Enter.
  • After opening Command Prompt, type in sfc /scannow
The command will start a system scan which will take a few whiles before it finishes. Once it’s done, you could get the following results:
  1. Windows Resource Protection did not find any integrity violations.
  2. Windows Resource Protection found corrupt files and successfully repaired them.
  3. Windows Resource Protection found corrupt files but was unable to fix some of them.
 Restart your computer and see if the System32 folder still pops up at startup or not.
Read More
Fix Some apps need to be uninstalled
When you update or upgrade your computer to Windows 10, the setup will look for the compatibility of both the hardware and software. And in this process, if suddenly got an error message saying, “Some apps need to be uninstalled” or “You need to uninstall a program in order to continue”, you have to look for the program(s) that might be causing the compatibility issues. But worry not as this post will help you resolve the issue. Simply follow the given suggestions below.

Option 1 – Look for the incompatible programs

There are times when Windows 10 will point out the programs that are incompatible with Windows 10. In this situation, just click on the Uninstall and continue button and then wait for the process to be completed. For more information, you can check out the official site Ready for Windows by Microsoft. This site can help you determine which software versions are compatible with Windows 10 and which ones are not. All you have to do is select the Windows 10 version and type your App name, after that, you will see the results about its compatibility. Thus, it’s now easier for you to figure out which software is causing an issue and if there is a new updated version available that you can install instead.

Option 2 – Try to install the Windows Update in a Clean Boot State

Putting your PC in a Clean Boot state can also help you install Windows Updates or Upgrades without any trouble because, during this state, you can start the system with a minimum number of drivers and startup programs that will surely help you in isolating the root cause of the issue.
  • Log onto your PC as an administrator.
  • Type in MSConfig in the Start Search to open the System Configuration utility.
  • From there, go to the General tab and click “Selective startup”.
  • Clear the “Load Startup items” checkbox and make sure that the “Load System Services” and “Use Original boot configuration” options are checked.
  • Next, click the Services tab and select the “Hide All Microsoft Services” check box.
  • Click Disable all.
  • Click on Apply/OK and restart your PC. (This will put your PC into a Clean Boot State. And configure Windows to use the usual startup, just simply undo the changes.)
  • After that, try to install the Windows Updates or upgrade again.

Option 3 – Try creating a new user account

Creating a new user account can resolve the “Some apps need to be uninstalled” error when upgrading or updating your Windows 10 PC. All you have to do is create a new admin account and initiate the setup. And this is a new user account, there will be no third-party applications installed on your computer. Thus, the installation should go through without any trouble. And in case you’ve already installed programs for that user, you just have to uninstall them all and then re-run the setup.

Option 4 – Perform a clean install

If none of the options worked, you can try to clean install Windows 10. Just make sure that you have the ISO from the official Microsoft Website and then a bootable USB drive to install Windows 10 again. Take note that this will delete all the data from your drive where Windows 10 was installed previously.
Read More
Enable or disable Console Mode Sign-in
Microsoft has been bringing new lock-screen features with every iterative feature release of Windows 10 in order to improve user experience. However, Windows 10 users have different opinions regarding it. Some users are pleased with it while some users simply do not like it. So if you are one of the users who seem to not approve of this feature, read on as this post will be about enabling or disabling the Console Mode sign-in feature in Windows 10. Before you proceed, take note that you will not be able to use your mouse pointer in this Consol Mode login screen and you can only use your keyboard to navigate around various options. You might also want to create a System Restore point just in case. To enable or disable the Console Mode sign-in in your Windows 10 computer, refer to the given steps below. Step 1: Tap the Win + R keys to open the Run dialog box. Step 2: Then type in “Regedit” in the field and tap Enter to open the Registry Editor. Step 3: Next, navigate to the following registry path:
ComputerHKEY_LOCAL_MACHINESOFTWAREMicrosoftWindowsCurrentVersionAuthenticationLogonUITestHooks
Step 4: From there, look for a DWORD named “ConsoleMode”. If you don’t see this DWORD, you can just create a new DWORD and name it as “ConsoleMode” and make sure that its base is set to Hexadecimal. Step 5: After that, double click on ConsoleMode and change its value to “0” to disable it and “1” to enable it. Step 6: Now restart your computer to apply the changes made. Like pointed out, you can only use your keyboard when you’re in the Console Mode login window or screen. You can just use the ESC button to go back to the menu while you can utilize the arrow keys so you can go through the options that are mostly vertically arranged and the Enter key to select an option. In the Console Mode, sign-in using the Passwords and PINs worked efficiently.
Read More
Domain Users Sign in using Biometrics
The use of Biometrics is supported by Windows 10. Aside from that, it also supports PIN, password, picture password on all computers and if your computer has the proper hardware, Windows 10 also supports facial scanning, iris scanning, and even fingerprint scanning. You can see all these exciting features inside Settings > Accounts > Sign In Options. On the other hand, you can’t really expect to make use of all the above-mentioned features since it depends if the hardware is available to support them. One of the most interesting features is the use of Biometrics which is really useful in workplaces and so this post will show you how you can enable or disable the Domain Users Sign In on Windows 10 using Biometrics via Registry Editor or Group Policy Editor. But before you go on, you need to create a System Restore Point first since the modifications you’re about to do might affect the functioning of your computer. So in case something went wrong, you can always undo the changes you’ve made.

Option 1 – via Registry Editor

  • Tap the Win + R keys to open the Run dialog box.
  • Next, type “Regedit” in the field and hit Enter to open the Registry Editor.
  • After that, navigate to the following registry path:
HKEY_LOCAL_MACHINESOFTWAREPoliciesMicrosoftBiometricsCredential Provider
  • From there, right-click on the right-side panel and click on New > DWORD (32-bit) Value.
  • And then set the name of the newly created DWORD as “Domain Accounts”.
  • Afterward, click on “Domain Accounts” and set its value to “1”. This will allow the domain users to sign in to Windows 10 using Biometrics. While the value of 0 will disable the domain users sign in to Windows 10 using Biometrics.
  • Exit the Registry Editor and restart your computer for the changes to take effect.

Option 2 – via Group Policy Editor

  • Tap the Win + R keys to open the Run dialog box.
  • Next, type “gpedit.msc” in the field and hit Enter to open the Group Policy Editor.
  • After that, navigate to the following setting:
Computer Configuration > Administrative Templates > Windows Components > Biometrics
  • Then double click on the following entries located on the right-side panel and set the radio button to Enabled on all of them.
    • Allow the use of Biometrics.
    • Allow users to log on using Biometrics.
    • Allow domain users to log on using biometrics.
  • Now exit the Group Policy Editor and restart your computer to apply the changes made properly.
Read More
WEB sites for cheap game purchases
Gaming can be sometimes a very cheap hobby, sometimes can be really expensive. It really depends on your preferences or gaming habits. So for all of you game spenders, we have compiled a little list of WEB sites where you can find games cheap. Provided sites are checked ones and not scam. You can purchase without concern. Also, note that some of these sites will require you to create an account in order to be able to make a purchase.

List of WEB sites for cheap purchases

is there any deal cheap gamesIs There Any Deal

https://isthereanydeal.com/ Is there any deal really behaves as it sounds, it is basically a search engine tailored to find existing deals on required games. Type in the desired game and see if anywhere you can find a deal on it. The site also features wait for better price options as well as the price history of the game and the trend of its sales.

cheap shark dealsCheap Shark

https://www.cheapshark.com/ On cheap shark by typing game name, you will get its listing on different online retailers, like Steam, EPIC, etc. so you can compare prices among them and pick the best deal. Site packs are also the cheapest ever feature so you can check the lowest price ever on the wished title and you can get alerts and notifications on prices.

humble bundleHumble Bundle

https://www.humblebundle.com/ Humble bundle got famous for its pay what you want approach due to its origins where it was selling games and donate money to charities. Even today they go by this logic once they decide to place great games on sale for charity purposes and you can donate any amount you wish (there is the minimum amount, but it is very cheap). And regular cheap bundles make this site one of the best out there.

fanatical cheap gamesFanatical

https://www.fanatical.com/ Fanatical is a site that will offer you to get titles in a bundle with a discount, the good stuff is that you can create your own bundle and get a discount on bulk purchases. And the site also offers flash deals and holds sales where you can buy stuff cheaper.

sick dealsSlick Deals

https://slickdeals.net/deals/games/ If you are looking for the best deals on daily basis slick deals is the site for you. We could not found a better website that offers cheaper deals on a daily basis and you can subscribe to get notified in email about daily discounts.

green man gamingGreen Man Gaming

https://www.greenmangaming.com/ Green Man Gaming is one of the best stores and game discount sites out there, it might not be the cheapest but one very important thing about it is that keys for Stream and Xbox come directly from the game publisher so you can rest assured that they are all 100% legal and do not come from some third party benefits and resellers. And that's it for now. We hope to see you again on our site for more articles and error fixing tips.
Read More
Bluetooth A2dp Source not working Code 52
A number of users have recently reported that they were going through an issue with their Bluetooth devices on their Windows 10 computers. This issue involves an error saying,
“Windows cannot verify the digital signature for the drivers required for this device. A recent hardware or software change might have installed a file that is signed incorrectly or damaged, or that might be malicious software from an unknown source. (Code 52).”
If you are one of the users who encountered this kind of error on your Windows 10 computer, read on as this post will guide you on how you can fix this Bluetooth error. According to security experts, the key to fixing this error is to sign the Bluetooth A2DP files with the built-in tool, System File Checker. Apart from that, you could also run the Hardware and Devices troubleshooter or perform System Restore, as well as update or reinstall the concerned drivers. For more details, refer to each one of the options provided below.

Option 1 – Try to check Bluetooth-related services

In Services, there is a Bluetooth-related service that helps users use Bluetooth so if that particular service suddenly malfunctions for some reason, you will most likely get the “Windows was unable to connect with your Bluetooth network device” error message. That’s why you need to check Services and to do that, refer to these steps:
  • Tap Win + R keys to open Run prompt and type in “services.msc” then tap Enter to open Services.
  • Next, look for the Bluetooth Support Service and double click on it to open Properties.
  • From there, verify if the Service status is showing “Running” or “Stopped”. If it’s the latter, you have to click the Start button.
  • Lastly, check if the Startup type is set to Manual.

Option 2 – Try running System File Checker or SFC scan

You could also run System File Checker or SFC scan to fix the Bluetooth error. It is a built-in command utility that helps in restoring corrupted files as well as missing files. It replaces bad and corrupted system files with good system files. To run the SFC command, follow the steps given below.
  • Tap Win + R to launch Run.
  • Type in cmd in the field and tap Enter.
  • After opening Command Prompt, type in sfc /scannow
The command will start a system scan which will take a few whiles before it finishes. Once it’s done, you could get the following results:
  1. Windows Resource Protection did not find any integrity violations.
  2. Windows Resource Protection found corrupt files and successfully repaired them.
  3. Windows Resource Protection found corrupt files but was unable to fix some of them.
  • Reboot your PC.

Option 3 – Try to perform System Restore

You might also want to perform System Restore as the error might be caused by system modifications. Thus, to undo them, you can use System Restore. Run it using these steps:
  • First, tap the Win + R keys to open the Run dialog box.
  • After that, type in “sysdm.cpl” in the field and tap Enter.
  • Next, go to the System Protection tab then click the System Restore button. This will open a new window where you have to select your preferred System Restore point.
  • After that, follow the on-screen instructions to finish the process and then restart your computer and check if the problem is fixed or not.

Option 4 – Try running the Hardware and Devices Troubleshooter

The next thing you can do to fix the problem is to run the Hardware and Devices troubleshooter. Although it won’t make much of a difference, there’s still a possibility that it could automatically fix the Bluetooth error. To use it, refer to these steps:
  • The first thing you need to do is click on Start and then on the gear-like icon to pull up the window for Settings.
  • After opening Settings, look for the Update and Security option and select it.
  • From there, go to the Troubleshoot option located on the left-hand side of the list.
  • Next, select Hardware and Devices from the list and open the Troubleshooter and run it. Once it is doing its job, wait for it to complete the process and then restart the system.
  • After the system restarts, check if the problem’s now fixed. If not, refer to the next option given below.

Option 5 – Try to reinstall or update the Bluetooth driver

The issue might have something to do with the Bluetooth drivers. It could be that it is outdated and needs to be updated or that you recently updated it and since then you have trouble removing the Bluetooth devices and so to fix the issue, you can update, roll back or uninstall the Bluetooth drivers. How? Follow the steps below.
  • Tap the Win + X keys to open the Device Manager.
  • Next, look for the Bluetooth device and right-click on it.
  • Select the option “Update driver”.
  • After that, a new popup window will appear. In there, select the option, “Search automatically for updated driver software”.
Note: Checking the update may take a few minutes so you’ll have to wait until it finishes. If it is able to find an update, you must install it. And if you want to reinstall the Bluetooth driver, just select the “Uninstall driver” option and follow the next on-screen instructions that follow.
Read More
A Quick Guide to Fixing the Entry.Dll Error

Repair the Entry.Dll Error

Entry.dll Error - What is it?

Entry.Dll is a type of Dynamic Link Library file. This file consists of small programs that are called to load and run desired applications. Just like any other dll file, the entry.dll file is also a shared file. It supports and is compatible with multiple applications. You may experience entry.dll error message on your PC, when the Windows cannot properly load the entry.dll file.  This error most often occurs during PC startup, application startup or while trying to use a specific function in your program. The enrty.dll error message is often displayed in either of the following formats:
  • “Entry.dll not found.”
  • “The file Entry.dll is missing."
  • “Cannot register Entry.dll."
  • “Cannot find C:WindowsSystem32\Entry.dll."
  • “Cannot start YAPC: Europe. A required component is missing: Entry.dll. Please install YAPC: Europe again."
  • “Entry.dll Access Violation."

Solution

Restoro box imageError Causes

The entry.dll file error may occur due to multiple reasons including but not limited to:
  • Corrupt entry.dll registry entry
  • Entry Dll file is not registered properly
  • Open source hardware failure  for example  a bad hard drive
  • Virus or malware infection
No matter what the underlying reason may be, it is advisable to repair and resolve the dll file error on your PC to ensure the program is accessible without any inconvenience.

Further Information and Manual Repair

Here are different ways to fix and resolve the Entry.dll error on your PC:

1. Re-Register Entry.dll File

When you install software that uses the Entry.dll, the software automatically registers that file for you. However, in some cases the dill file may not register properly and as a result you may experience the error Entry.dll not registered. In such situations it is advisable to use ‘Microsoft Register Server’ built-in utility to re-register the entry.dll file. This utility can be accessible in Windows XP, Vista, 7 and 8 through the command prompt. To get started, here’s what you need to do:-
  • Go to the start menu and type command in the search box.
  • Now press Ctrl and Shift together and hit the Enter key.
  • After that you will be prompted with a permission dialog box; click yes to continue.
  • Now type the following command: regsvr32 /u Entry.dll. Press enter to un-register the file.
  • Type the following command: regsvr32 /i Entry.dll and press enter again. This will re-register the file.
  • Close the command prompt window and try accessing the desired program supported my entry.dll file. If the program is accessible and you don’t encounter the error message, this means the error is resolved.

2. Update Outdated and Corrupt Device Drivers

Another method to fix this error is to update the device drivers that are incompatible, corrupt or outdated. Download the latest versions of the corrupt drivers and re-install them on your PC.

3. Clean the Registry to Remove Invalid Entry Files

The entry.dll file error can be related to problems in the Windows registry. The registry gets damaged when it gets overloaded with too many unnecessary and obsolete files such as junk files, bad registry keys, invalid entries and cookies. These files not only take up great deal of disk space but also damage the registry, system and dll files. You can clean the registry manually but it is time consuming and needs technical expertise. However, to repair the error right away in seconds download Restoro. This is a powerful Registry Cleaner integrated with an intuitive algorithm that detects and removes all types of registry issues on your entire PC in no time. It wipes out the unnecessary files and invalid entries, repairs dll files including the entry.dll file and restores the registry.

4. Scan for Malware and Viruses

Another cause of the entry.dll error can be malware and viruses. These malicious programs can also corrupt dll files. It is important to remove all of them from your PC to resolve the issue. For this you need to scan your PC with an antivirus. If you download Restoro, you don’t need to download an antivirus program. This is because Restoro includes multiple utilities including an antivirus too. You can run it to scan and remove all types of malicious programs like malware, viruses, spyware and Trojans on your system. Restoro also features a system optimizer. This utility boosts your system’s speed significantly ensuring your PC performs at its optimum level. It is safe, user-friendly and can be installed on any Windows versions. It has easy navigations making it quite simple to use by all levels of users. It is bug free and efficient. In just a few clicks you can resolve practically all PC related issues. To resolve entry.dll error on your PC, click here to download Restoro today!
Read More
Windows computer goes to sleep automatically
If your Windows 10 computer or laptop keeps on going to sleep randomly even when you’re using it, read on as this post will walk you through the process of resolving the problem. There are a number of users who reported about how their Windows 10 computers would automatically go into Sleep Mode. One particular user claimed that when he installed a fresh Windows 10 version he began experiencing the same problem. It turns out that the screen goes to sleep but what’s odd is that the power lights and the keyboard are still working. The computer is also warm to touch which shouldn’t be the case when it is in sleep mode. And when some users tried checking the event log, it showed them that the computer didn’t actually go into sleep mode but it shut down instead. To fix this issue, here are some possible fixes that could hopefully work.

Option 1 – Edit the Power Plan settings using Control Panel

  • Click the Cortana button and type “control panel” in the field and select the appropriate result to open Control Panel.
  • After opening Control Panel, click on the Power Options.
  • From there, select the “Edit Plan Settings” option and make sure that the option to “Put the computer to sleep” is set to Never.

Option 2 – Edit the Power Options using Settings

  • Tap the Windows key + I to open the Settings app.
  • After that, select Settings and go to the Power & sleep section.
  • Next, set the system to “Never” when the device is running on battery power or plugged in.
  • Now restart your computer to make sure that everything is working properly.

Option 3 – Try running the Power Troubleshooter

Another option that could help resolve the problem is the Power Troubleshooter. This built-in troubleshooter in Windows can help you get things up and running again.

Option 4 – Troubleshoot Sleep Mode issue in a Clean Boot State

The issue with Sleep Mode might be caused by some third-party programs installed on your computer. This program might be the one that puts your computer to sleep and so to isolate this possibility, you have to put your PC in a Clean Boot State using the steps below.
  • Log onto your PC as an administrator.
  • Type in MSConfig in the Start Search to open the System Configuration utility.
  • From there, go to the General tab and click “Selective startup”.
  • Clear the “Load Startup items” check box and make sure that the “Load System Services” and “Use Original boot configuration” options are checked.
  • Next, click the Services tab and select the “Hide All Microsoft Services” check box.
  • Click Disable all.
  • Click on Apply/OK and restart your PC. (This will put your PC into a Clean Boot State. And configure Windows to use the usual startup, just simply undo the changes.)
  • After that, try to install the Windows Updates or upgrade again.

Option 5 – Try checking the Sleep Advanced Settings

  • Click on the Windows key and type “control panel” in the field and select the related search result.
  • Next, select the Security and Maintenance option and click on the Power Options.
  • After that, you have to select the Change Plan Settings but keep in mind that this option is barely readable so you need to read each option carefully.
  • Now click on the Change advanced power settings button and a new window will appear.
  • Then look for the “Sleep” option and expand it to select the Allow hybrid sleep” option. Turn this option off and close all the opened windows.
  • Reboot your computer and check if your computer now functions properly. If it still didn’t work, you may have to reverse the changes you’ve made.

Option 6 – Try installing v9 or 10 of the MEI or Intel Management Engine Interface

Note that this option only applies to users who are using an HP laptop. And if your motherboard does not support Hybrid Sleep, you might have to downgrade the Intel MEI to version 9 or 10. To install v9 or v10, you need to go to the HP Drivers & Downloads page and look for the MEI driver version 9 from the website’s Driver Chipset section. Once you’ve downloaded the driver, install it and if a dialog box warning pops up, simply ignore it and proceed.

Option 7 – Update the device drivers

  • Reboot your computer into Safe Mode with networking support.
  • Tap the Win + R keys on your keyboard to open the Run dialog box.
  • After that, type “devmgmt.msc” in the field and hit Enter or click OK to open the Device Manager.
  • After opening the Device Manager, update all the outdated Device drivers on your computer.
  • Next, right-click on all the driver entries that are appropriately labeled, and then click the Update driver option.
  • Now restart your PC and check if your computer is now back to normal.
Read More
Razer new table concept looks futuristic
The new razer modular table looks like something that came out from Star Trek. Project Sophia is a desk but, it is a special kind of desk. It comes with modules that attach themselves underneath the table itself for customization purposes so each user can somewhat create a layout on the table itself as he or she desires. The table itself comes packed with intel CPU and Nvidia GPU but it is said that this component and PC parts will overall be easily upgraded to different ones as users desires. razer sophia
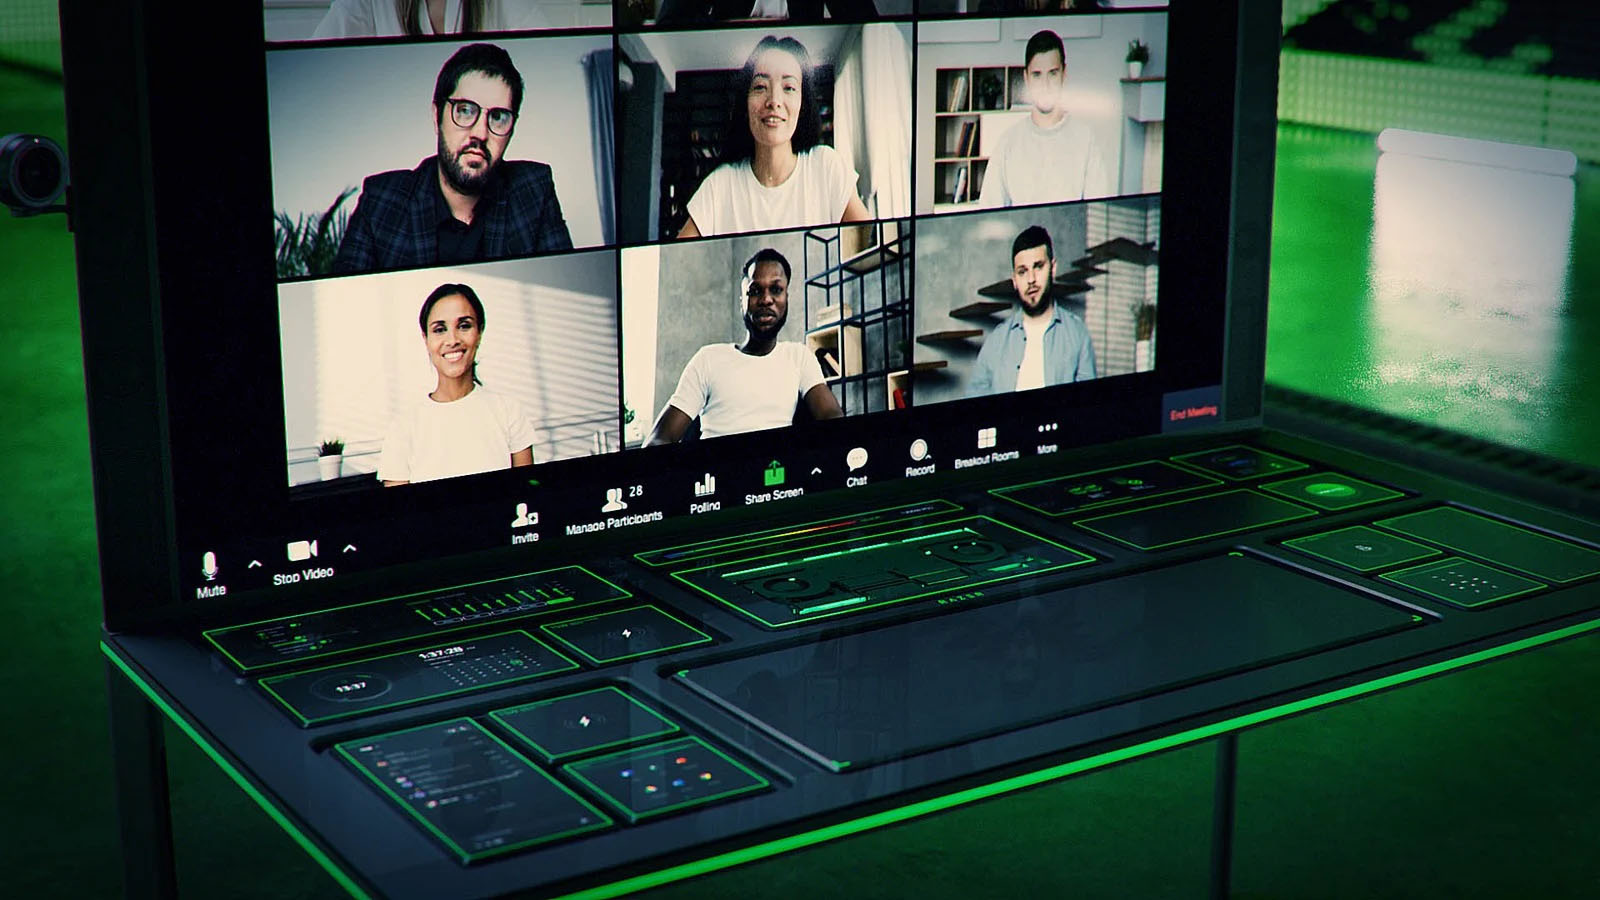
The table itself looks very basic and it comes with a very large OLED screen between two different sizes depending on your table choice. You can choose between 65” or 77” screen sizes and OLED is mounted on the table itself so you cannot move it or adjust the angle of it that I somewhat find annoying but that comes from th4e fact I am used to adjusting my screens, but for this large screen maybe you do not need to adjust its rotation in order to get best viewing angle. Modules themselves will offer some on-the-fly information and quick settings for the PC itself while being modular in a sense they could be mounted in different positions on the table itself providing some customization and order to suit users needs. Modules, for now, are: THX Spatial Surround Sound Controls, system monitoring, programmable hotkey module, Thunderbolt™ Powered eGPU, RAID Controller, Network Performance Module, 15W Wireless Charger, Thunderbolt™ 4 Hub, Media Controls. Of course table, itself will have Razer chroma RGB on its surface and Razer says it will have a total of 13 different modules available on launch for a true level of personalization.

Conclusion

Is this Razer table something that you really need or just another expensive toy? Personally, I would not mind this table at all but I would choose modules for work, not gaming. Having some things like media controls or RAID controllers all the time at your fingertips is a great time saver and productivity asset. Razer also advertises some modules and setup already for streamers, creators, or team members and has some according modules like touch screen digitizer with stylus and similar.
Read More
1 2 3 162
Logo
Copyright © 2022, ErrorTools. All Rights Reserved
Trademarks: Microsoft Windows logos are registered trademarks of Microsoft. Disclaimer: ErrorTools.com is not affiliated with Microsoft, nor claim direct affiliation.
The information on this page is provided for information purposes only.
DMCA.com Protection Status