How to Fix Slow file copy speed in Windows 10

We tend to move and copy tons of files on our PCs and mostly, the process of copying or moving files, especially if the file has the size of 1GB or up, tends to take quite long. This may be caused by some issues which is why you face slow copy or move speed. So if you are experiencing this issue on your Windows 10 computer, then read on as this post will give you a couple of solutions you can try to increase the speed in copying or moving files. Follow the given instructions below.

Option 1 – Try to change the USB port

You might want to change the USB port since modern computers have a variety of USB ports. So if your USB drive supports USB 3.0 or 3.1, make sure that you plug it inside a USB 3.0 or 3.1 ports. If you’re not sure which port, just keep in mind that the USB 3 port is usually blue or you can also use your computer’s documentation or manual as a reference to locate it. It may sound nothing but changing the USB port can actually improve the copying or moving speeds drastically so this should be the first thing you can try to speed up the process of copying or moving files.

Option 2 – Update the USB Controller Drivers

  • First, click the Start button and type “device manager”.
  • Then click on the “Device Manager” from the search results to open it.
  • From there, look for the “Universal Serial Bus controllers” option and then right-click on each one of the USB drivers and select the Update Driver from the menu.
  • Restart your PC and then click the “Search automatically for updated driver software” option.

You also have the option to update the motherboard and the USB driver from the manufacturer’s official website.

Option 3 – Check for any hard disk errors

  • On your desktop, right-click on the “This PC” or computer icon and then select Manage to open the Disk Management. Here you get to check your drive’s health.
  • Next, click on Disk Management on the left side panel.
  • From there, check the state of your drives. If it shows that all your partitions are healthy then it means all is good and that the problem may have something to do with some physical issues with your hard drive.

You might also want to run the CHKDSK utility to help you fix any issues with your hard disk. If your hard drive has issues with integrity, the update will really fail as the system will think that it’s not healthy and that’s where the CHKDSK utility comes in. The CHKDSK utility repairs hard drive errors that might be causing the problem.

  • Open Command Prompt with admin privileges.
  • After opening Command Prompt, execute the following command and hit Enter:

chkdsk /f /r

  • Wait for the process to be completed and then restart your computer.

Option 4 – Try to disable Windows Auto Tuning

Disabling Windows Auto-Tuning can also help in increasing the copying or moving of files in your computer. It is said that this feature improves the performance of programs that receive TCP data over a network by adjusting the receive buffer size dynamically throughput and latency of the link. Thus, if you are trying to copy some data over the network, then the Auto Tuning feature is playing a role here. And in some cases, disabling this feature completely resulted in a lot faster copy speeds over the network.

Option 5 – Try changing the USB Removal Policy

  • First, plug your USB drive or external device into your PC and then open This PC.
  • Next, right-click on your device and select Properties.
  • After that, go to the hardware tab and select the storage media that you want to enhance and then click on the Properties button.
  • From there, you can select the Better performance option if you wish for your device to have a better performance. Once you select this option, it will enable write caching in your Windows 10 computer but you need to use the “Safely Remove Hardware” option from the notification area to safely disconnect the device otherwise it may result in data corruption.

Option 6 – Format your drive

  • To get started formatting your drive, tap the Win + E keys and then go to the access page of the drive.
  • Next, right-click on the drive and select Format.
  • After that, uncheck the “Quick Format” option and then format your drive properly.
  • Now once the formatting process is finished, unplug the drive and plug it back in afterward.
  • Check if the error is already fixed. If the drive is not initialized, tap the Win + R keys and hit Enter.
  • After opening the Run dialog box, type “diskmgmt.msc” and hit Enter to open Disk Management.
  • From there, right-click on the drive volume and select initialize disk.
  • Next, select the correct partition type and proceed.
If you like to learn and find out more about various Windows errors, and how to repair them go to our vast archive or use search to find articles that will explain and help you in solving your issue.
However, if you prefer to do things fast and with automatization then we are proposing to use an automated solution for your issues. The application that we are recommending is Advanced System Repair Pro
Advanced System Repair utilizes multiple tools all in one to give you a quick, simple, reliable, and very thorough diagnosis of your PC. It brings you all the tools you need in one program to clean, fix, protect, optimize and boost your PC!
1-Click Maintenance
All the tools to make it simple and easy! It's like having a professional technician at the click of a mouse.

Junk Cleaner
Keeping your computer free from unnecessary clutter also helps make your computer last longer. Like any other machine, if you keep it clean and take care of it, it will serve you better for longer!

Optimize background apps
Optimize applications background activity with the built-in Application Optimizer feature.

Disk Defrag
With a simple 1-click, Advanced System Repair speeds up your PC by assembling fragmented files on your machine and organizing them more efficiently.

Malware Removal
Finds and removes all types of harmful malware including trojans, worms, bots, adware, spyware, PUPs, and more!

Privacy Cleaner
The all-in-one privacy suite to Clean Your Tracks & Protect Your Privacy! Make your computer safe, secure, and more efficient!

System Tweak/Optimizer
ASR will analyze your complete system and settings to adjust your PC to function at its maximum performance.

Registry Cleaner
Over time, as you install and uninstall applications, the registry can become cluttered with old entries and broken settings which can result in program crashes, and annoying messages and slow the computer down.
Visit our Advanced System Repair Pro Download page to inform yourself about all the benefits of this software and get a free trial copy of it.
advanced system repair pro

Advanced System Repair Pro

One-click automated PC repair solution
ASR logo
With Advanced System Repair Pro you can easily
Replace damaged files
Restore performance
Free disk space
Remove Malware
Protects WEB browser
Remove Viruses
Stop PC freezing
DOWNLOAD
Privacy Policy | Terms of Use | Uinstall
Advanced System Repair Pro is compatible with all versions of Microsoft Windows including Windows 11

Share this article:

You might also like

Desktop widgets in Windows 10
Windows 7 was an operating system that had one thing which no other Windows had, even today. Official Microsoft desktop widgets. With an attractive design, users loved to exploit the adequacy and neatness of these gadgets. However, Microsoft had to discontinue these gadgets as they posed a serious security threat to the Operating System. It was believed that a potential attacker could even use a gadget to take complete control of your PC. With Windows 10, things have changed big time. You have all the fantastic apps and live tiles at your disposal providing a more native experience. Despite all this, if you still have a fondness for fancy gadgets, we have just the right tool for you to get started with similar “Widgets” on Windows 10. Win10 Widgets is a tool that places the most important information right in front of you, on your desktop.

Win10 Widgets

Win10 Widgets is a desktop app package provided by Rainmeter which is an effective system customization engine for Windows. It brings some informative widgets to Windows 10 which look almost native with their intuitive and sleek design. You can pin them on your desktop to keep an eye on various system figures like CPU usage, data storage, battery usage, detailed computer performance, etc.

Native looking Widgets for Windows 10

These widgets are designed in such a way that it looks totally indigenous to the Windows 10 UI. With a similar design language, visual style, accent color, and even font settings, these widgets almost look like an inseparable system component. You can choose between different size variants to pin on your desktop and arrange them in an orderly fashion to make the most of it.

Highly customizable desktop gadgets

Apart from the default size variants, you can configure several other parameters pertaining to the look and appearance of any widget. As Rainmeter is an open-source program, you are provided with the .ini configuration files which you can customize as per your wish. You can make adjustments to the widget coordinates, position and transparency as well. You can even create your own skins (.rmskin package) using the built-in Skin Packager and publish them for general usage through Rainmeter.

Illustro Skins

Over and above the cool widgets, Rainmeter also contains Illustro, a simple collection of skins that shows the range of Rainmeter’s capabilities. You can load the skins on your desktop for a brief look at your system internals. You can also start editing these skins to make them yours by taking advantage of the Rainmeter manual and forum link provided on the Welcome screen. Win10 Widgets is a great tool if you like widgets or gadgets on your Desktop. It blends into the background and puts the important piece of information right on your desktop without you having to look somewhere else. If you already have the Rainmeter application, you can download the Win10 Widgets .rmskin file from here, else you can download the combined bundle for both Rainmeter and Win10 Widgets from here.
Read More
NoteHomepage removal guide

NoteHomepage (by MyWay) is a browser extension that may be bundled with other free software that you download off of the Internet, or delivered via other advertising means. When installed NoteHomepage will set the homepage and search engine for your web browser to http://search.myway.com. While installing this extension will gather information from your browsing sessions, including website visits, clicked links, and sometimes even private information, that it later sends back to display unwanted ads into your browser. Several anti-virus scanners have marked this extension as a Browser Hijacker and are therefore not recommended to keep on your computer. It is considered potentially unwanted, and many users wish to remove it, so it is flagged for optional deletion.

About Browser Hijackers

Browser hijacking is a form of unwanted software program, usually a web browser add-on or extension, which then causes modifications in the web browser’s settings. Browser hijacker malware is developed for many different reasons. Generally, browser hijacking is utilized for earning advertising revenue from forced advert mouse clicks and site visits. Even though it might seem harmless, these tools are designed by malicious individuals who always look to take full advantage of you, so that they can earn money from your naivety and distraction. Some browser hijackers are programmed to make certain modifications beyond the browsers, like altering entries on the system registry and letting other malware further damage your machine.

Find out how to identify a browser hijack

Below are some signs and symptoms that suggest your browser has been hijacked: the home page of your browser is changed unexpectedly; your browser is constantly being redirected to adult websites; the default search engine is changed; you are getting browser toolbars you have never noticed before; never-ending pop-up advertisements show up and/or your web browser popup blocker is disabled; your web browser gets sluggish, buggy, crashes regularly; Inability to navigate to certain websites, particularly anti-malware and also other security software websites.

So how exactly does a browser hijacker infect a computer?

Browser hijackers might use drive-by downloads or file-sharing networks or an e-mail attachment in order to reach a targeted PC. They could also come from add-on programs, also called browser helper objects (BHO), web browser plug-ins, or toolbars. Browser hijackers sneak into your computer in addition to free software application downloads also that you unknowingly install alongside the original. A good example of some infamous browser hijackers includes Babylon, Anyprotect, Conduit, SweetPage, DefaultTab, Delta Search, and RocketTab, however, the names are regularly changing. Browser hijackers will affect the user’s web surfing experience severely, track the websites frequented by users and steal personal information, cause difficulty in connecting to the web, and eventually create stability problems, causing software programs and systems to crash.

Learn how to remove browser hijackers

Some hijackers can be removed by just uninstalling the corresponding freeware or add-ons through the Add or Remove Programs in the Windows control panel. But, many browser hijackers are difficult to get rid of manually. No matter how much you try to get rid of it, it might keep returning again and again. Additionally, manual removals demand in-depth system knowledge and thus can be a very difficult job for novices. Industry experts always suggest users remove any malicious software including browser hijacker with an automatic malware removal tool, which is easier, safer, and quicker than the manual removal method. Safebytes Anti-Malware has a cutting-edge anti-malware engine to help you avoid browser hijacker infection in the first place, and mop up any pre-existing problems. Employ a pc optimizer (such as Restoro) along with your anti-malware software to solve various registry issues, remove computer vulnerabilities, and boost your computer performance.

Find Out How To Install Safebytes Anti-Malware On An Infected Computer

Malware can cause many different types of damage to computers, networks, and data. Some malware types modify internet browser settings by adding a proxy server or modify the PC’s DNS configurations. In such cases, you will be unable to visit certain or all websites, and therefore not able to download or install the required security software to clear out the malware. If you are reading this article, you may have infected by malware that prevents you from installing computer security software like Safebytes Antimalware on your PC. Although this type of problem can be difficult to get around, there are some steps you can take.

Download the software in Safe Mode with Networking

If the malware is set to run immediately when Windows starts, stepping into safe mode may block the attempt. Just minimal required applications and services are loaded whenever you start your laptop or computer in Safe Mode. To launch your Windows XP, Vista, or 7 PCs in Safe Mode with Networking, follow the instructions below. 1) At power on, hit the F8 key before the Windows splash screen begins to load. This would invoke the “Advanced Boot Options” menu. 2) Select Safe Mode with Networking with arrow keys and press ENTER. 3) As soon as this mode loads, you should have an internet connection. Now, get the malware removal software you want by utilizing the web browser. To install the program, follow the directions in the installation wizard. 4) Immediately after installation, run a full scan and let the software remove the threats it discovers.

Switch over to an alternate browser

Some viruses may target vulnerabilities of a particular web browser that obstruct the downloading process. If you’re not able to download the anti-virus software program using Internet Explorer, this means malware is targeting IE’s vulnerabilities. Here, you need to switch to a different internet browser such as Firefox or Chrome to download the Safebytes program.

Run anti-virus from a pen drive

To successfully get rid of the malware, you have to approach the problem of installing anti-malware software on the affected computer system from a different perspective. Adopt these measures to run the anti-virus on the affected computer system. 1) Download the anti-malware software on a virus-free computer. 2) Plug the USB drive into the clean computer. 3) Double click on the downloaded file to open the installation wizard. 4) Select flash drive as the location when the wizard asks you exactly where you wish to install the application. Follow the on-screen instructions to finish the installation process. 5) Remove the flash drive. Now you can utilize this portable anti-malware on the affected computer. 6) Double-click the anti-malware software EXE file on the USB drive. 7) Press the “Scan” button to run a full computer scan and remove viruses automatically.

Detect And Destroy Viruses With SafeBytes Anti-Malware

These days, anti-malware software can protect your PC from various types of online threats. But how to decide on the right one amongst plenty of malware protection software that’s available on the market? As you may be aware, there are numerous anti-malware companies and tools for you to consider. A few are really worth your money, but most aren’t. You must choose one that is efficient, practical, and has a good reputation for its malware protection. Among few good applications, SafeBytes Anti-Malware is the highly recommended program for security-conscious people. Safebytes is one of the well-established computer solutions companies, which offer this comprehensive anti-malware program. Through its cutting-edge technology, this software protects your PC against infections brought on by different types of malware and similar internet threats, including adware, spyware, viruses, worms, trojans, keyloggers, potentially unwanted programs (PUPs), and ransomware. SafeBytes has excellent features when compared to other anti-malware programs. These are some of the highlighted features included in the application. World-class AntiMalware Protection: Safebytes is made on the very best virus engine within the industry. These engines will detect and remove threats even during the early stages of a malware outbreak. Real-Time Protection: SafeBytes delivers complete and real-time security for your laptop or computer. It will check your personal computer for suspicious activity continuously and shields your personal computer from unauthorized access. Web Filtering: SafeBytes checks the links present on a web page for possible threats and informs you if the site is safe to explore or not, through its unique safety rating system. Fast Scan: SafeBytes’s virus scan engine is one of the fastest and most efficient within the industry. Its targeted scanning highly increases the catch rate for viruses which is embedded in various computer files. Low Memory/CPU Usage: SafeBytes is really lightweight software. It consumes an extremely small amount of processing power as it runs in the background so you’re free to use your Windows-based computer the way you want. 24/7 Customer Service: For any technical queries or product assistance, you may get 24/7 professional assistance via chat and e-mail. To sum it up, SafeBytes Anti-Malware is pretty great for securing your PC against all kinds of malware threats. Malware trouble will become a thing of the past when you put this application to use. If you need advanced forms of protection features & threat detections, buying SafeBytes Anti-Malware will be worth the dollars!

Technical Details and Manual Removal (Advanced Users)

To eliminate NoteHomepage manually, navigate to the Add or Remove programs list in the Windows Control Panel and select the program you want to get rid of. For web browser plug-ins, go to your web browser’s Addon/Extension manager and choose the add-on you want to disable or remove. You might also want to reset your home page and search providers, as well as clear your web browser cache and cookies. Finally, check your hard disk for all of the following and clean your Windows registry manually to remove leftover application entries after uninstalls. Please be aware that this is for professional users only and could be challenging, with incorrect file removal resulting in additional PC errors. In addition to that, certain malware is capable of replicating or preventing deletion. You’re advised to do this procedure in Windows Safe Mode.
Files: C:\Users\%USERNAME%\AppData\Local\Google\Chrome\User Data\Default\Extensions\lamecoaceiheggdhlnjnmciaonfdamlg.600.11.14900_0 C:\Users\%USERNAME%\AppData\Local\Google\Chrome\User Data\Default\Local Extension Settings\lamecoaceiheggdhlnjnmciaonfdamlg C:\Users\%USERNAME%\AppData\Local\Google\Chrome\User Data\Default\Sync Extension Settings\lamecoaceiheggdhlnjnmciaonfdamlg C:\Users\%USERNAME%\AppData\Local\NoteHomepageTooltab C:\Users\%USERNAME%\AppData\Roaming\Mozilla\Firefox\Profiles\profile\extensions\[email protected] C:\Users\%USERNAME%\AppData\Roaming\Mozilla\Firefox\Profiles\profile\extensions\[email protected]\chrome C:\Users\%USERNAME%\AppData\Roaming\Mozilla\Firefox\Profiles\profile\extensions\[email protected]\META-INF C:\Users\%USERNAME%\AppData\Roaming\Mozilla\Firefox\Profiles\profile\notehomepage_j Registry: HKLM\SOFTWARE\Classes\AppID\NoteHomepage Toolbar.exe HKEY_LOCAL_MACHINE\SOFTWARE\Microsoft\Internet Explorer\Extensions HKEY_LOCAL_MACHINE\Software\Microsoft\Windows\CurrentVersion\Explorer\Browser Helper Objects HKEY_LOCAL_MACHINE\Software\Microsoft\Internet Explorer\Toolbar HKEY_LOCAL_MACHINE\SOFTWARE\Google\Chrome\Extensions HKEY_LOCAL_MACHINE\SOFTWARE\Mozilla\Firefox\Extensions HKEY_CURRENT_USER\Software\Opera Software\Explorer\Main\Start Page Redirect=http://random.com HKEY_LOCAL_MACHINE\SOFTWARE\Microsoft\Windows NT\CurrentVersion\NoteHomepage HKEY_CURRENT_USER\Software\Microsoft\Windows NT\CurrentVersion\Winlogon Shell = %AppData%\IDP.ARES.Generic.exe HKEY_CURRENT_USER\Software\Microsoft\Windows\CurrentVersion\Run Random HKEY_LOCAL_MACHINE\Software\Microsoft\Windows NT\CurrentVersion\Random. HKEY_CURRENT_USER\Software\Microsoft\Internet Explorer\Main HKEY_CURRENT_USER\Software\Microsoft\Windows\CurrentVersion\Uninstall\NoteHomepageTooltab Uninstall Internet Explorer HKEY_CURRENT_USER\Software\NoteHomepage
Read More
Gaming Wonderland Removal Tutorial

Gaming Wonderland is a Browser Extension for Google Chrome developed by Mindspark. This extension allows you to look up some popular browser games, as well as to find multiplayer games. When installed it changes your default search provider and your default home page to MyWebSearch. While browsing the internet, this extension will gather your browsing information, website visits, clicks, and other information that is later sent to Mindspark ad servers and used to better target ads.

While using this extension you will see additional unwanted ads appearing throughout your browser sessions.

Due to the nature of this application and the fact that it has been marked as a Browser Hijacker by several anti-virus scanners, it is not recommended to keep it on your computer.

About Browser Hijackers

Browser hijacking means that a malicious code has power over and modified the settings of your internet browser, without your consent. They are made to disrupt browser functions for a variety of reasons. These are generally used to force visitors to a specific site, manipulating web traffic to generate ad revenue. It may appear harmless, but the majority of such sites are not legitimate and will present a serious risk to your online safety. As soon as the program attacks your computer or laptop, it begins to mess things up a whole that slows your system down to a crawl. In the worse case, you could be pushed to tackle serious malware threats as well.

Browser hijacking symptoms

When your web browser is hijacked, the following could happen: you find unauthorized modifications to your web browser’s home-page; new bookmarks pointing to pornographic websites have been added to your bookmarks; default web engine is changed; you are finding browser toolbars you haven’t noticed before; unstoppable flurries of popup advertisements show up on your PC screen; your browser gets slow, buggy, crashes quite often; you’re prohibited access to specific websites, including the site of an anti-malware software firm like SafeBytes.

How does a browser hijacker infect a PC

Browser hijackers might use drive-by downloads or file-sharing websites or even an e-mail attachment in order to reach a targeted computer. They could also be deployed through the installation of a web browser toolbar, add-on, or extension. A browser hijacker can also be installed as a part of freeware, shareware, demoware, and pirated programs. A good example of a notorious browser hijacker is the latest Chinese malicious software called “Fireball”, which has attacked 250 million PCs worldwide. It works as a hijacker but can be turned into a fully functioning malware downloader later on. Browser hijackers will affect the user’s browsing experience severely, keep track of the websites visited by users and steal private information, cause problems in connecting to the net, and eventually create stability issues, making applications and computers freeze.

Browser Hijacker Malware – Removal

Some kinds of browser hijackers can be removed from your computer by deleting malicious software applications or any other recently added shareware. At times, it can be a tough task to discover and get rid of the malicious component since the associated file might be running as part of the operating system process. Novice PC users should not try for the manual form of removal, since it calls for thorough computer knowledge to do fixes on the system registry and HOSTS file. Installing and running antivirus applications on the affected system will automatically erase browser hijackers and also other unwanted applications. Safebytes Anti-Malware incorporates a cutting-edge anti-malware engine that will help you prevent browser hijacker infection in the first place, and clean up any existing problems. Use a system optimizer (like Restoro) together with your antivirus software to fix various registry problems, remove system vulnerabilities, and boost your computer's overall performance.

Help! Malware Blocking Antivirus Installation And Access To The Web

Viruses can cause plenty of damage to your PC. Some malware variants alter internet browser settings by adding a proxy server or change the PC’s DNS settings. In such cases, you will be unable to visit certain or all websites, and therefore not able to download or install the required security software to eliminate the malware. So what you should do if malware keeps you from downloading or installing Safebytes Anti-Malware? There are a few actions you can take to circumvent this issue.

Use Safe Mode to resolve the issue

In Safe Mode, you may change Windows settings, uninstall or install some programs, and remove hard-to-delete viruses and malware. In case the virus is set to load immediately when the PC starts, shifting into this mode may well prevent it from doing so. To boot into Safe Mode, press the “F8” key on the keyboard right before the Windows logo screen appears; Or right after normal Windows boot up, run MSCONFIG, look over Safe Boot under Boot tab, and then click Apply. Once you’re in safe mode, you can try to install your antivirus program without the hindrance of malicious software. At this point, you can actually run the antivirus scan to get rid of viruses and malware without any interference from another malicious application.

Switch to an alternate internet browser

Some viruses might target vulnerabilities of a specific browser that obstruct the downloading process. If you seem to have a trojan attached to Internet Explorer, then switch to an alternate browser with built-in security features, such as Firefox or Chrome, to download your favorite antivirus program – Safebytes.

Create a bootable USB antivirus drive

Another solution is to save and run an antivirus software program completely from a USB drive. Adopt these measures to run the anti-malware on the infected computer. 1) On a virus-free computer, install Safebytes Anti-Malware. 2) Connect the USB drive to a USB port on the clean computer. 3) Double-click the Setup icon of the antivirus software to run the Installation Wizard. 4) Select the drive letter of the flash drive as the place when the wizard asks you exactly where you want to install the antivirus. Follow the activation instructions. 5) Unplug the USB drive. Now you can use this portable anti-virus on the affected computer. 6) Run the Safebytes Anti-malware directly from the USB drive by double-clicking the icon. 7) Simply click “Scan Now” to run a complete scan on the infected computer for viruses.

Detect And Remove Viruses With SafeBytes Anti-Malware

If you are looking to download the anti-malware program for your PC, there are various tools on the market to consider however, you cannot trust blindly anyone, regardless of whether it is paid or free program. A few are really worth your money, but most aren’t. You must opt for a company that creates industry-best antimalware and has earned a reputation as reliable. On the list of strongly recommended software is SafeBytes AntiMalware. SafeBytes carries a good track record of quality service, and customers appear to be happy with it. SafeBytes anti-malware is trustworthy software that not only protects your system completely but is also quite user-friendly for people of all skill levels. Using its outstanding protection system, this tool will automatically detect and eliminate most of the security threats, including browser hijackers, viruses, adware, PUPs, trojans, worms, and ransomware.

SafeBytes anti-malware takes computer protection to a totally new level with its advanced features. Below are some of the features you might like in SafeBytes.

Anti-Malware Protection: This deep-cleaning anti-malware software program goes much deeper than most anti-virus tools to clean out your personal computer. Its critically acclaimed virus engine locates and disables hard-to-remove malware that hides deep within your personal computer. Real-time Protection: SafeBytes delivers complete and real-time security for your PC. It’ll constantly monitor your pc for hacker activity and also provides end-users with sophisticated firewall protection. Website Filtering: SafeBytes gives an instant safety rating to the pages you are going to visit, automatically blocking unsafe sites and making sure that you are certain of your safety while browsing the net. High-Speed Malware Scanning Engine: SafeBytes’s high-speed malware scanning engine lessens scan times and extends battery life. Simultaneously, it will effectively find and get rid of infected computer files or any internet threat. Low CPU/Memory Usage: SafeBytes is well-known for its low impact on processing power and great detection rate of various threats. It runs silently and efficiently in the background so you are free to utilize your personal computer at full power all the time. 24/7 Premium Support: You can get 24/7 technical assistance to quickly resolve any issue with your security software. To sum it up, SafeBytes Anti-Malware provides outstanding protection combined with very low system resource usage with great malware prevention and detection. You now may know that this tool does more than just scan and remove threats from your PC. If you’re searching for the absolute best malware removal application out there, and if you don’t mind spending a few bucks for it, go for SafeBytes Anti-Malware.

Technical Details and Manual Removal (Advanced Users)

If you would like to do the removal of Gaming Wonderland manually instead of using an automated software tool, you may follow these measures: Go to the Windows Control Panel, click the “Add or Remove Programs” and there, select the offending application to uninstall. In case of suspicious versions of browser plug-ins, you can easily get rid of it through your web browser’s extension manager. You may even want to reset your home page and search engine providers, and also delete temporary files, browsing history, and cookies. In order to ensure the complete removal, manually examine your hard drive and registry for all of the following and remove or reset the values accordingly. Having said that, editing the Windows registry is really a difficult job that only advanced users and professionals should try to fix it. Furthermore, some malicious programs have the capability to defend against its deletion. It is advisable that you do the removal procedure in Windows Safe Mode.
Files: %PROGRAMFILES%\GamingWonderland %PROGRAMFILES(x86)%\GamingWonderland %USERPROFILE%\AppData\LocalLow\GamingWonderland %UserProfile%\Local Settings\Application Data\GamingWonderlandTooltab %LOCALAPPDATA%\GamingWonderlandTooltab %LOCALAPPDATA%\Google\Chrome\User Data\Default\Extensions\fenbipnfkodbfdjlgndbgokhkneidbom %UserProfile%\Local Settings\Application Data\Google\Chrome\User Data\Default\Extensions\hjkdfjgajdjedjpapojndcfhekhbpkjp %LOCALAPPDATA%\Google\Chrome\User Data\Default\hjkdfjgajdjedjpapojndcfhekhbpkjp Registry: HKEY_LOCAL_MACHINE\SOFTWARE\AppDataLow\HKEY_LOCAL_MACHINE\SOFTWARE\GamingWonderland HKEY_LOCAL_MACHINE\HKEY_LOCAL_MACHINE\SOFTWARE\Classes\GamingWonderland.DynamicBarButton.1 HKEY_LOCAL_MACHINE\HKEY_LOCAL_MACHINE\SOFTWARE\Classes\GamingWonderland.FeedManager HKEY_LOCAL_MACHINE\HKEY_LOCAL_MACHINE\SOFTWARE\Classes\GamingWonderland.FeedManager.1 HKEY_LOCAL_MACHINE\HKEY_LOCAL_MACHINE\SOFTWARE\Classes\GamingWonderland.HTMLMenu HKEY_LOCAL_MACHINE\HKEY_LOCAL_MACHINE\SOFTWARE\Classes\GamingWonderland.HTMLMenu.1 HKEY_LOCAL_MACHINE\HKEY_LOCAL_MACHINE\SOFTWARE\Classes\GamingWonderland.HTMLPanel HKEY_LOCAL_MACHINE\HKEY_LOCAL_MACHINE\SOFTWARE\Classes\GamingWonderland.HTMLPanel.1 HKEY_LOCAL_MACHINE\HKEY_LOCAL_MACHINE\SOFTWARE\Classes\GamingWonderland.MultipleButton HKEY_LOCAL_MACHINE\HKEY_LOCAL_MACHINE\SOFTWARE\Classes\GamingWonderland.PseudoTransparentPlugin.1 HKEY_LOCAL_MACHINE\HKEY_LOCAL_MACHINE\SOFTWARE\Classes\GamingWonderland.Radio HKEY_LOCAL_MACHINE\HKEY_LOCAL_MACHINE\SOFTWARE\Classes\GamingWonderland.Radio.1 HKEY_LOCAL_MACHINE\HKEY_LOCAL_MACHINE\SOFTWARE\Classes\GamingWonderland.RadioSettings HKEY_LOCAL_MACHINE\HKEY_LOCAL_MACHINE\SOFTWARE\Classes\GamingWonderland.RadioSettings.1 HKEY_LOCAL_MACHINE\SOFTWARE\Classes\GamingWonderland.ScriptButton HKEY_LOCAL_MACHINE\SOFTWARE\Classes\GamingWonderland.ScriptButton.1 HKEY_LOCAL_MACHINE\SOFTWARE\Classes\GamingWonderland.SettingsPlugin HKEY_LOCAL_MACHINE\SOFTWARE\Classes\GamingWonderland.SkinLauncher.1 HKEY_LOCAL_MACHINE\SOFTWARE\Classes\GamingWonderland.SkinLauncherSettings HKEY_LOCAL_MACHINE\SOFTWARE\Classes\GamingWonderland.SkinLauncherSettings.1 HKEY_LOCAL_MACHINE\SOFTWARE\Classes\GamingWonderland.ThirdPartyInstaller HKEY_LOCAL_MACHINE\SOFTWARE\Classes\GamingWonderland.ThirdPartyInstaller.1 HKEY_LOCAL_MACHINE\SOFTWARE\Classes\GamingWonderland.ToolbarProtector HKEY_LOCAL_MACHINE\SOFTWARE\Classes\GamingWonderland.ToolbarProtector.1 HKEY_LOCAL_MACHINE\SOFTWARE\Classes\GamingWonderland.XMLSessionPlugin.1 HKEY_LOCAL_MACHINE\SOFTWARE\Wow6432Node\Microsoft\Internet Explorer\Low Rights\ElevationPolicy\0c7bac04-8f5d-4bbd-956a-34fafa547752 HKEY_LOCAL_MACHINE\SOFTWARE\Wow6432Node\Microsoft\Internet Explorer\Low Rights\ElevationPolicy\16fbdf8c-476f-4d6b-8009-84471903cf96 HKEY_LOCAL_MACHINE\SOFTWARE\Wow6432Node\Microsoft\Internet Explorer\Low Rights\ElevationPolicy\82bacdc9-afce-41ee-92f5-b54f6db45a1c HKEY_LOCAL_MACHINE\SOFTWARE\Wow6432Node\Microsoft\Internet Explorer\Low Rights\ElevationPolicy\8b70e4e8-100a-4b4f-b928-6d8126b730bb HKEY_LOCAL_MACHINE\SOFTWARE\Wow6432Node\Microsoft\Internet Explorer\Low Rights\ElevationPolicy\c1151fbb-ef5b-4a2b-91e4-e8776f091f37 HKEY_LOCAL_MACHINE\SOFTWARE\Microsoft\Internet Explorer\Low Rights\ElevationPolicy\82bacdc9-afce-41ee-92f5-b54f6db45a1c HKEY_LOCAL_MACHINE\SOFTWARE\Microsoft\Internet Explorer\Low Rights\ElevationPolicy\8b70e4e8-100a-4b4f-b928-6d8126b730bb HKEY_LOCAL_MACHINE\SOFTWARE\Microsoft\Internet Explorer\Low Rights\ElevationPolicy\c1151fbb-ef5b-4a2b-91e4-e8776f091f37 HKEY_LOCAL_MACHINE\SOFTWARE\Microsoft\Internet Explorer\Low Rights\ElevationPolicy\e65f4fe3-b8a9-408f-9e8d-37689e565618 HKEY_LOCAL_MACHINE\SOFTWARE\Wow6432Node\Microsoft\Windows\CurrentVersion\explorer\Browser Helper Objects\ab5d199e-9659-47a2-930b-fc3b69061353 HKEY_LOCAL_MACHINE\SOFTWARE\Wow6432Node\Microsoft\Windows\CurrentVersion\Ext\PreApproved\f4d7584b-6643-4bc7-8e24-17c3258dc5ef HKEY_LOCAL_MACHINE\SOFTWARE\Wow6432Node\Microsoft\Windows\CurrentVersion\Ext\PreApproved\26A73C38-B71A-4D3A-80B7-E010420DA1E7 HKEY_LOCAL_MACHINE\SOFTWARE\Wow6432Node\Microsoft\Windows\CurrentVersion\Ext\PreApproved\1a30aa28-2fc6-4360-9e14-cfa627d51b6c HKEY_LOCAL_MACHINE\SOFTWARE\Wow6432Node\Microsoft\Windows\CurrentVersion\Ext\PreApproved\08fbcb5f-de4f-49e0-977e-e4269f4d7206 HKEY_LOCAL_MACHINE\SOFTWARE\Microsoft\Windows\CurrentVersion\Ext\PreApproved\f4d7584b-6643-4bc7-8e24-17c3258dc5ef HKEY_LOCAL_MACHINE\SOFTWARE\Microsoft\Windows\CurrentVersion\Ext\PreApproved\99c8d756-4d22-4d0f-898a-34a232884ce1 HKEY_LOCAL_MACHINE\SOFTWARE\Microsoft\Windows\CurrentVersion\Ext\PreApproved\75faf80f-56c7-4bb3-b825-39d0a706b5a4 HKEY_LOCAL_MACHINE\SOFTWARE\Microsoft\Windows\CurrentVersion\Ext\PreApproved\4c297ddf-0a36-4b17-b8fa-0c0395f2c5bc HKEY_LOCAL_MACHINE\SOFTWARE\Wow6432Node\MozillaPlugins\@GamingWonderland.com/Plugin HKEY_LOCAL_MACHINE\SOFTWARE\MozillaPlugins\@GamingWonderland.com/Plugin HKEY_LOCAL_MACHINE\SOFTWARE\Wow6432Node\Microsoft\Windows\CurrentVersion\Run, value: GamingWonderland Search Scope Monitor HKEY_LOCAL_MACHINE\SOFTWARE\Wow6432Node\Microsoft\Windows\CurrentVersion\Uninstall\GamingWonderlandbar Uninstall Firefox HKEY_LOCAL_MACHINE\SOFTWARE\Wow6432Node\Microsoft\Windows\CurrentVersion\Uninstall\GamingWonderlandbar Uninstall Internet Explorer HKEY_LOCAL_MACHINE\SOFTWARE\Microsoft\Windows\CurrentVersion\Run, value: GamingWonderland Search Scope Monitor HKEY_LOCAL_MACHINE\SOFTWARE\Wow6432Node\GamingWonderland HKEY_LOCAL_MACHINE\SOFTWARE\Wow6432Node\Google\Chrome\Extensions\hpflffkopmgalfhfholanbnhoiblmajp HKEY_LOCAL_MACHINE\SOFTWARE\Google\Chrome\Extensions\hpflffkopmgalfhfholanbnhoiblmajp HKEY_LOCAL_MACHINE\SOFTWARE\Wow6432Node\Microsoft\Internet Explorer\Toolbar, value: a899079d-206f-43a6-be6a-07e0fa648ea0 HKEY_LOCAL_MACHINE\SOFTWARE\Microsoft\Internet Explorer\Toolbar, value: a899079d-206f-43a6-be6a-07e0fa648ea0 HKEY_LOCAL_MACHINE\SOFTWARE\Wow6432Node\Microsoft\Windows\CurrentVersion\Uninstall\GamingWonderland Chrome Extension Uninstall HKEY_LOCAL_MACHINE\SOFTWARE\Wow6432Node\Microsoft\Internet Explorer\SearchScopes\3d29c02b-bf3e-4d3b-8a7a-e0e7d0f6dbab HKEY_LOCAL_MACHINE\SOFTWARE\Microsoft\Internet Explorer\SearchScopes\3d29c02b-bf3e-4d3b-8a7a-e0e7d0f6dbab HKEY_LOCAL_MACHINE\SOFTWARE\Wow6432Node\Microsoft\Internet Explorer\Low Rights\ElevationPolicy\c5ce0d8e-0300-4a17-a89c-6cc8078348ad HKEY_LOCAL_MACHINE\SOFTWARE\Microsoft\Internet Explorer\Low Rights\ElevationPolicy\c5ce0d8e-0300-4a17-a89c-6cc8078348ad HKEY_LOCAL_MACHINE\SOFTWARE\Microsoft\Internet Explorer\DOMStorage\free.gamingwonderland.com HKEY_LOCAL_MACHINE\SOFTWARE\Microsoft\Internet Explorer\DOMStorage\gamingwonderland.com HKEY_LOCAL_MACHINE\SOFTWARE\Microsoft\Internet Explorer\Approved Extensions, value: 7C8F8FE5-9785-4F74-BCF8-895EF9752D97 HKEY_LOCAL_MACHINE\SOFTWARE\Microsoft\Internet Explorer\Approved Extensions, value: A899079D-206F-43A6-BE6A-07E0FA648EA0 HKEY_LOCAL_MACHINE\SOFTWARE\Microsoft\Internet Explorer\Approved Extensions, value: AB5D199E-9659-47A2-930B-FC3B69061353 HKEY_LOCAL_MACHINE\SOFTWARE\Microsoft\Windows\CurrentVersion\Run, value: GamingWonderland EPM Support HKEY_LOCAL_MACHINE\SOFTWARE\Wow6432Node\Microsoft\Windows\CurrentVersion\Run, value: GamingWonderland EPM Support HKEY_LOCAL_MACHINE\SOFTWARE\Microsoft\Internet Explorer\DOMStorage\gamingwonderland.dl.myway.com
Read More
Change default audio output for Narrator
For PC users that are blind or have low vision, the Narrator accessibility feature in Windows 10, lets you use your PC without a display or mouse to complete common tasks – it reads and interacts with things on the screen, like text and buttons. The narrator can be used to read and write an email, browse the internet, and work with documents. In Windows 10, there are a lot of options for Narrator that you can customize. You can change its keyboard shortcuts, personalize Narrator’s voice, enable Caps Lock warnings, and more. You can choose the voice for the Narrator, adjust the speaking rate, pitch, and volume. To change the default audio output device used to play the voice of the Narrator in Windows 10:
  • Press the ⊞ WINDOWS + I
  • From the Settings menu, click Ease of Access.
  • Click Narrator on the left pane.
  • In the Narrator window, on the right pane, toggle the button to On to enable Narrator if required.
  • Scroll down to the Personalize Narrator’s voice section.
  • For the Select where you hear Narrator’s voice option, click the drop-down and select the audio output device you want from the list. Please know that you will not be able to choose if you do not have multiple audio output devices connected to your Windows 10 computer.
  • Exit Settings when done.
If you would like to read more helpful articles and tips about various software and hardware visit errortools.com daily.
Read More
Fixing SYNTP.SYS Blue Screen error in Windows
What is SYNTP.SYS file? it is a system file created by Synaptics Touchpad drivers that are responsible for all the gestures and tracking users’ touch on the Touchpad. However, what happens when this driver fails? Well, it’s either that your touchpad will partially stop working or it will completely stop working at all. And in such cases, you will encounter the SYNTP.SYS Blue Screen error along with any of the following error codes:
  • IRQL_NOT_LESS_EQUAL
  • KMODE_EXCEPTION_NOT_HANDLED
  • INVALID_PROCESS_ATTACH_ATTEMPT
To resolve the problem, use the instructions given below as a reference.

Option 1 – Run the Memory Diagnostic Tool to check for Memory leaks

  • Tap the Win + R keys to open Run and type exe and hit Enter to open the Windows Memory Diagnostic Tool.
  • After that, it will give two options such as:
    • Restart now and check for problems (Recommended)
    • Check for problems the next time I start my computer
  • Once your computer has restarted, perform a basic scan or you could also go for the “Advanced” options such as “Test mix” or “Pass count”. Simply tap the F10 key to start the test.
Note: After you select the option, your PC will restart and check for memory-based issues. If it finds any issues, it will automatically fix them and if there’s no issue found, then it’s most likely not a memory-based issue so you should try the other options given below.

Option 2 – Try reinstalling the Synaptics Driver

You might want to reinstall the Synaptics driver to resolve the SYNTP.SYS Blue Screen error.
  • Tap the Win + R keys to open the Run dialog box.
  • After that, type “appwiz.cpl” in the field and hit Enter to open the Programs and Features section in the Control Panel.
  • Next, you have to look for the “Synatics Point Device driver” and right-click on it, and then click on Uninstall to remove it from your computer.
  • Restart your PC and then check for updates under the Windows Update section.
  • After that, it will find the latest available and stable Synaptics driver and then install it.
  • Then click the “Check or Updates” under the Windows update section and it will automatically look for the latest available Synaptic driver and install it for you.
  • Now restart your PC and for the changes to take effect.

Option 3 – Try to run a System File Checker scan

You can also try to run a System File Checker or SFC scan in order to scan your computer for corrupted files that might be the cause behind the Error 0x80000003. Once it finds any corrupted system files, it will automatically fix them. To run System File Checker, here’s what you have to do:
  • Tap Win + R to launch Run.
  • Type in cmd in the field and tap Enter.
  • After opening Command Prompt, type in sfc /scannow
The command will start a system scan which will take a few whiles before it finishes. Once it’s done, you could get the following results:
  1. Windows Resource Protection did not find any integrity violations.
  2. Windows Resource Protection found corrupt files and successfully repaired them.
  3. Windows Resource Protection found corrupt files but was unable to fix some of them.
  • Restart your computer after the scan is completed.

Option 4 – Perform a System Restore

Performing System Restore might help you in fixing the SYNTP.SYS Blue Screen error. You can do this option either by booting into Safe Mode or in System Restore. If you are already in the Advanced Startup Options, just directly select System Restore and proceed with the next steps. And if you have just booted your PC into Safe Mode, refer to the steps below.
  • Tap the Win + R keys to open the Run dialog box.
  • After that, type in “sysdm.cpl” in the field and tap Enter.
  • Next, go to the System Protection tab then click the System Restore button. This will open a new window where you have to select your preferred System Restore point.
  • After that, follow the on-screen instructions to finish the process and then restart your computer and check if the problem is fixed or not.

Option 5 – Try to run the CHKDSK utility

Running the CHKDSK utility might also help you resolve the SYNTP.SYS errors. If your hard drive has issues with integrity, the update will really fail as the system will think that it’s not healthy and that’s where the CHKDSK utility comes in. The CHKDSK utility repairs hard drive errors that might be causing the problem.
  • Open Command Prompt with admin privileges.
  • After opening Command Prompt, execute the following command and hit Enter:
chkdsk /f /r
  • Wait for the process to be completed and then restart your computer.

Option 6 – Use the Blue Screen Troubleshooter

The Blue Screen troubleshooter is a built-in tool in Windows 10 that helps users in fixing BSOD errors like SYNTP.SYS Blue Screen error. It can be found on the Settings Troubleshooters page. To use it, refer to these steps:
  • Tap the Win + I keys to open the Settings panel.
  • Then go to Update & Security > Troubleshoot.
  • From there, look for the option called “Blue Screen” on your right-hand side and then click the “Run the troubleshooter” button to run the Blue Screen Troubleshooter and then follow the next on-screen options. Note that you might have to boot your PC into Safe Mode.
Read More
How to Fix Error 0x0000605 in Windows
Recently, some users reported not being able to boot up their Windows 10 computers. And during the startup phase, at some time, the bootup sequence is halted with a Recovery error along with an error message saying, “Your PC/Device needs to be repaired” with an error code of 0x0000605. This kind of error message indicates that Windows was not able to verify the digital signature for the file as the signing certificate or it could be that it has expired. To resolve this error, you can follow the potential fixes given below and see if you stumble upon a fix that might work out for you.

Option 1 – Change the Date & Time settings in the BIOS

Some users reported that they were able to fix the error by changing the Date & Time settings in the BIOS. Upon checking, they saw that in their BIOS settings, the date was off several years. As a result, the incorrect date and time settings end up ticking the system into believing that the Windows build has expired long before the actual expiration date. You can check if the error pops up due to the same reasons by accessing the BIOS settings. To do so, you have to tap the Boot key that’s associated with your motherboard manufacturer during the initial startup phase. After that, you can search for a particular boot key online or you can also tap keys like F2, F4, F8, F10, F12, and the Delete key. Once you’re able to access the BIOS settings, locate the Date & time or anything similar, and then check if the date is correct or not. If not, you need to change the date to the actual date and then save the changes made and restart your computer and then check if the issue is now fixed or not. Just remember that if the actual date is past the expiration date of the build you have, you need to change it to an older date. If your Windows 10 PC is able to boot back up, you have to update it to a stable Windows build and then go back to the BIOS settings and change the date to the current one else you will definitely encounter Windows update errors in the future as well as security alerts.

Option 2 – Perform a clean install of a stable Windows 10 build

If every system boot fails accompanied by a BSOD error with error code 0x0000605 “A component of the operating system has expired” and you’ve already followed every instruction on option 1, then it’s most likely that your current Windows build has already expired. Remember that almost all the Windows 10 Insider Preview builds (98xx) are created along with an expiration date and when your computer reaches the expiration date, you won’t be able to boot your computer up. Note that the exact expiration date varies based on the build number. And prior to the expiration date, the operating system will start to display some error warnings telling you that the build will expire and urge you to update the most recent build available. And so once the computer reaches its expiration date, it will begin to reboot every three hours until it no longer boots up which is about 2 weeks approximately after the license has expired. Once the expiration date is up and your computer no longer boots up, you need to perform a clean install and then install the latest Windows 10 build to resolve the issue once and for all.
Read More
DNS_PROBE_FINISHED_BAD_CONFIG error in Chrome
If you always use Google Chrome when browsing the internet, then you might have come across an error saying, “This webpage is not available, DNS PROBE FINISHED BAD CONFIG”. If you do, then this problem certainly has something to do with the DNS since any error code which has “DNS” in it points out a network issue in the computer. Getting the DNS_PROBE_FINISHED_BAD_CONFIG error indicates that your computer is not able to connect the website because the Domain Name Server or DNS wasn’t able to resolve the website name into IP address or it is not available at all. So in this guide, we’ll help you sort out this issue in Chrome on your Windows 10 PC.

Option 1 – Check the Network Cables and restart your router then reconnect

The most obvious thing you can do first is to try checking if the network cables connected to your computer or router are properly connected or not. If it turns out that some network cables are not connected properly, then it’s probably why you’re getting the DNS_PROBE_FINISHED_BAD_CONFIG error in Chrome. And if your computer is connected via Wi-Fi, you need to make sure to restart your router once. In addition, you can also forget the Wi-Fi your computer is currently connected to and then try reconnecting again to see if it would work.

Option 2 – Flush the DNS and reset TCP/IP

Flushing the DNS and reset TCP/IP could also help in fixing the DNS_PROBE_FINISHED_BAD_CONFIG error in Chrome. To do so, refer to these steps:
  • Click the Start button and type in “command prompt” in the field.
  • From the search results that appear, right-click on Command Prompt and select the “Run as administrator” option.
  • After opening Command Prompt, you have to type each one of the commands listed below. Just make sure that after you type each command, you hit Enter
    • ipconfig /release
    • ipconfig /all
    • ipconfig /flushdns
    • ipconfig /renew
    • netsh int ip set dns
    • netsh winsock reset
After you key in the commands listed above, the DNS cache will be flushed and the Winsock, as well as the TCP/IP, will reset.

Option 3 – Try to remove the Proxy

You can also try to remove the Proxy as it might also help you in fixing the DNS_PROBE_FINISHED_BAD_CONFIG error. Here’s how you can do it:
  • Tap the Win + R keys to open the Run dialog box.
  • Then type “inetcpl.cpl” in the field and hit Enter to pull up the Internet Properties.
  • After that, go to the Connections tab and select the LAN settings.
  • From there. Uncheck the “Use a Proxy Server” option for your LAN and then make sure that the “Automatically detect settings” option is checked.
  • Now click the OK and the Apply buttons.
  • Restart your PC.
Note: If you are using a third-party proxy service, you have to disable it.

Option 4 – Change the DNS

Try to use the Google Public DNS If the first option didn’t work, you can try to use the Public DNS by Google and see if it can help fix the DNS error. You have to modify the DNS settings in your system explicitly and use the DNS IP addresses.
  • The first thing you have to do is right-click on the network icon in the Taskbar and select Network and Sharing Center.
  • Next, click on the “Change Adapter Settings” option.
  • After that, search for the network connection that you are using to connect to the internet. Note that the option might be “Wireless Connection” or “Local Area Connection”.
  • Right-click on your network connection and click on Properties.
  • Then select the new window to choose the “Internet Protocol 4 (TCP/IPv4)” option.
  • After that, click on the Properties button and click the checkbox in the new window for the option “Use the following DNS server addresses”.
  • Type in “8.8.8” and “8.8.4.4” and click OK and exit.

Option 5 – Clear Chrome’s browsing data

If your browsing data in Chrome hasn’t been cleared for some time now then that might be the reason why you’re suddenly getting the DNS_PROBE_FINISHED_BAD_CONFIG error when you browse the web. To fix this error, you need to clear your web browsing data. Refer to the following steps to do so.
  • Tap the Ctrl + Shift + Delete buttons to go to the Clear browsing data section in Chrome.
  • Next, set the time range to “All time” and tick all the boxes and then click on the Clear data button.
  • After that, restart the Chrome browser and try to open the website you were trying to open earlier.

Option 6 – Try running the Chrome Cleanup tool

In case you don’t know, there is actually a built-in malware scanner and cleanup tool in Chrome that helps you get rid of any unwanted ads, pop-ups, and even malware, as well as unusual startup pages, toolbars, and other things that could affect the performance of the browser.
Read More
Windows 10 tips and tricks for easy work
Hello everyone and welcome to our new Windows 10 tips and tricks article. Today we will be focusing on small Windows tricks that could prove very useful in everyday workflow and hopefully make your life easier by implementing them in your daily routine. I am very excited to share this with you all and I hope that you will use them from now on. That being said let us begin.

Tip 1: Minimize all open windows except one.

Daily to the daily routine can involve many opened windows on a desktop and sometimes things can get messy, if you want to minimize all windows to the taskbar except one do this: Click on one window thus selecting him, click and hold the left mouse button on that windows title bar, now shake it up and down and all other windows will escape down to taskbar leaving only one you are shaking on the desktop.

Tip 2: Open the Secret Windows menu.

Through our tutorials on various errors and fixes, we have used this method already but here it is again since it is worth mentioning. If you want to open the command prompt easy and fast, or device manager, event viewer, shut down, etc. In order to open this secret menu all you need to do is press ⊞ WINDOWS + X.

Tip 3: Create an Event without opening the calendar application.

You can easily create an event without opening a calendar application, all you have to do is left-click on the clock in the taskbar, click once on a date for the event, and under calendar in event field type event description. The event will show in the calendar application like it was entered there.

Tip 4: Taking a screenshot.

This one is my favorite and it speeds up workflow very very much. Typically you take screenshots by pressing the PrntScr button on your keyboard. Now, the problem with this approach is that the screen is placed in computer memory, in the clipboard and you will need another picture processing application in order to save it. Now if you would press ⊞ WINDOWS + PrntScr, the picture would be automatically saved in your pictures/screenshots folder. And if that is not enough, you can press ⊞ WINDOWS + S + SHIFT to start Snip & Sketch tool and select the area which you would like to screen capture, this method will also place pictures in the clipboard.

Tip 5: Open pinned applications in your taskbar with your keyboard.

We have covered this one in our Windows keyboard shortcuts tips and tricks here, but if you missed that article here is the tip again. By pressing ⊞ WINDOWS + number 1,2,3...0 you will start the application from your taskbar counted from left to right.

Tip 6: Check how much Hard drive space installed applications are taking.

Applications and temporary files grow over time and can slow the system and cause some other unpleasant experiences. Go to Settings > System > Storage, click on the Hard drive on which you have installed applications, and see how much each one is taking, you can remove it from this screen also freeing some space.

Tip 7: Remove ads from the START menu.

Windows has so-called suggestions in the START menu, no matter how Microsoft is calling them, let's face it, they are ads and in my opinion, they do not belong in my START menu. To turn them off, go to Settings > Personalization > Start. Toggle the setting called Show suggestions occasionally in Start to the off position.

Tip 8: Shut down background applications.

Some applications are running in the back and are taking system resources and can send telemetry information, if you want to turn them all off go to Settings > Privacy > Background apps. To stop all apps from running in the background, toggle Let apps run in the background to off. You can choose which apps to run in the background individually by going down the list on the same page.

Tip 9: Use Background scrolling.

Did you know that you can scroll on inactive windows? To do this, just hover over the inactive background window and roll your mouse when the content of the window should be scrolling even if it's not one you are working on. If by any chance this is not happening, go to Settings > Devices > Mouse, and toggle Scroll inactive windows when I hover over them to On.

Tip 10: Show file extensions in File Explorer.

By default extensions of files are hidden, so let's say that for example, you are in a folder with pictures, you have plenty of pictures there but you do not know are they JPG or JPEG for example, do not worry there is an easy fix to bring showing extensions back. Start File Explorer, click on view top menu item, click on options, Uncheck the box that says Hide extensions for known file types. Click Apply, and OK.

Tip 11: Use focus assist.

Set it up by going to Settings > System > Focus assist. Choose from three options: Off (get all notifications from your apps and contacts), Priority (see only selected notifications from a priority list that you customize, and send the rest to your action center), and Alarms only (hide all notifications, except for alarms). You can also choose to automatically turn this feature on during certain hours, or when you're playing a game.

Tip 12: Rotate your screen.

If you have multiple screens set up or you have the rotatable screen press and hold CTRL + ALT together, then use a directional arrow to flip the screen. The right and left arrows turn the screen 90 degrees, while the down arrow will flip it upside down. Use the up arrow to bring the screen back to its normal position.

Tip 13: Enable GOD mode.

Have you always felt limited with Windows settings? Don't be, Right-click on the desktop and select New > Folder. Re-name the new folder with this bit of code: GodMode.{ED7BA470-8E54-465E-825C-99712043E01C} To enter the "God Mode" window, double-click the folder.

Tip 14: Use Virtual Desktops.

Click on Task View (the icon next to the search box). This will separate all your open windows and apps into icons. You can then drag any of them over to where it says "New desktop," which creates a new virtual desktop. Once you click out of Task View, you can toggle between virtual desktops by pressing the ⊞ WINDOWS + CTRL + right/left arrows. To remove the virtual desktops, just go back into task view and delete the individual virtual desktops, this will not close out the apps contained within that desktop, but rather just send them to the next lower desktop.

Tip 15: Customize the command prompt.

Yes, you can customize the command prompt, in order to do so, open it and right-click on its title bar, choose properties and go wild. Special badge if you make it look like commodore 64 BASIC.

Tip 16: Dictate, not type.

If you have speech recognition ON, pressing ⊞ WINDOWS + H will bring up a voice recorder, just speak and see how you can easily "write" emails, etc.

Tip 17: Use sandbox.

In Windows you have a sandbox option, which will open another Windows instance inside Windows, what do you need this? Well once the sandbox is closed everything in it is closed and if you catch the virus or other dangerous software, closing the sandbox will destroy it not affecting your actual Windows. Use it for safety testing and enjoy an easy life. Enable Windows Sandbox inside the Control Panel.

Tip 18: Use a hidden game bar.

Press the ⊞ WINDOWS + G, you can pull up the new-and-improved Game Bar. This lets you switch your Windows PC into gaming mode, which pools system resources to the game, turns off notifications, and lets you record and broadcast your gaming, along with added panels for controlling your audio, monitoring FPS, and tracking achievements. And that's it, Our 18 tips and trick to make your Windows 10 life easier, more productive, and overall more enjoyable. I certainly hope you have enjoyed reading this article same as I was writing it. Until next time if I do not see you, good afternoon, good evening, and good night.
Read More
Diablo 2 Resurrected facing server issues
It has been some time since the release of Diablo 2 resurrected and overall reception was pretty good. People are enjoying the old classic game in hi-def. resolution and with new and improved visuals. Sadly some server issues are present still until this day and somewhat spoil the experience for players. diablo 2 server status
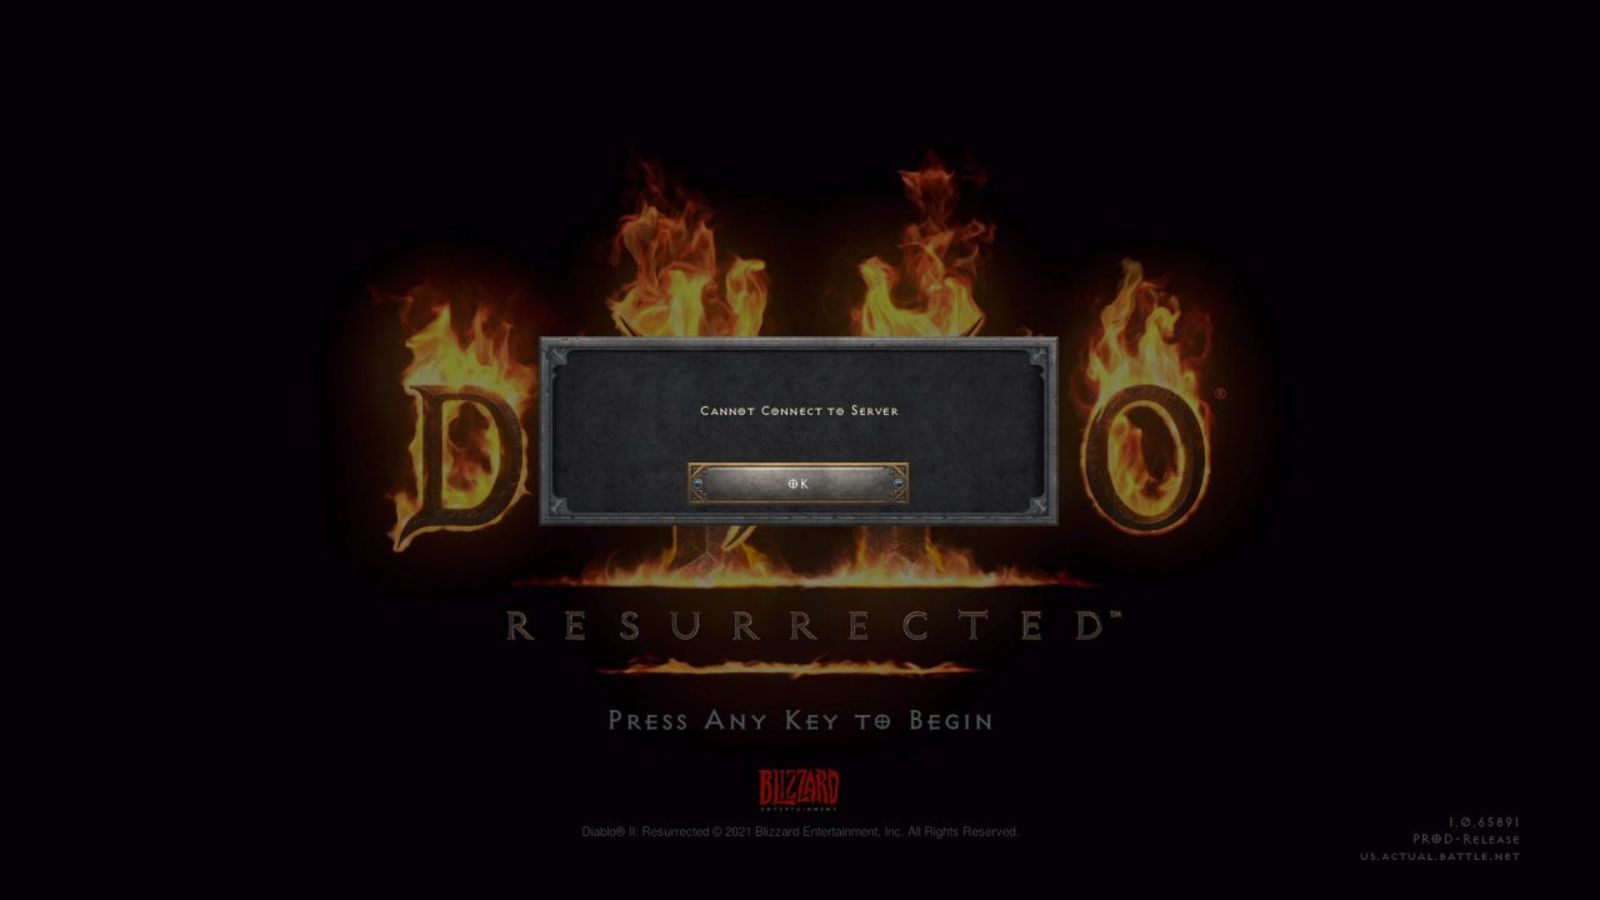
The greatest lag and server crashes are pinpointed to game-creating events. When a player creates a new online game, the server needs to pull a lot of details from the database and make a game, due to some legacy code present this process takes some time and it is demanding a bit on the server-side, and although code was optimized to cater to more modern approach some legacy code still remains. Another thing that was spotted to affect performance itself is player behavior, to be more specific, modern gamer behavior. Where players find good builds and runs on the internet and then go to farm-specific areas or bosses for loot or experience points, which in return boils down to making plenty and short runs that are made by creating games and after run eliminating them. Now pair that with the previous statement about legacy server and database code and you can add 1 and 1 and see how this might be an issue. A lot of short games over legacy code are placing games in a state it was not designed for back in 2001 and therefore we have issues. Sadly solutions without completely rewriting the whole code are not very promising and they include rate limiting, which will prevent players to create many games in succession in a short period of time and maybe even login queues to drop a load on servers. Blizzard reached to people in the whole company, even old diablo 2 developers to ask for advice and they say that they are working on solutions so they could lift limitations and have everything running fine.
Read More
Error: 0x80070035. Network path was not found
As you know, Windows allows you to share files between systems that are on the same network even though they are not connected physically. All you have to do is to make sure that the folder administrator allows access to the intended use and that your computer should be connected to the internet. Once you meet these conditions, you can share files between systems. However, recently a number of users reported that despite fulfilling these conditions, they end up getting errors instead when they try to access the shared drive. The error states:
“Error code: 0x80070035. The network path was not found.”
One of the common causes of this error is the antivirus program or the Firewall installed on your computer. It could also be that the drive is not shared in the first place or there are some issues with your network drivers. Whichever the case is, here are some potential fixes you need to check out to fix the Error code: 0x80070035.

Option 1 – Try to temporarily disable anti-virus and Windows Defender Firewall

As mentioned, the error could be due to the antivirus program or the Windows Defender Firewall installed on your computer. Thus, disabling them or any security software installed in your computer is always a good idea you can try when you’re not able to access the shared drive on your computer. There are times when you encounter problems like Error code: 0x80070035 due to interference of antivirus or security programs. Thus, you have to disable both your antivirus program and Windows Defender Firewall for the meantime and check if it fixes the error or not.

Option 2 – Check if the drive is shared

Before you further troubleshoot the problem, make sure that the drive you are trying to access is shared first. To do so, follow these steps:
  • Right-click on the folder and select Properties.
  • Go to the Sharing tab and check the status of the Network File and Folder Sharing.
  • And if the status is “Not Shared”, you need to select Share.
  • Next, select the intended Network User for sharing the file and choose the permission level for the user.
  • After that, click on the Apply and OK buttons to save the changes made. You or the intended user should now be able to access the shared folder or file.

Option 3 – Try to ping the IP address of the targeted computer

Even though the shared folder or file is shared correctly, it is possible that the network channel is not connected properly which is why you have to test it by pinging the IP address of the targeted computer from the primary computer.
  • Tap the Win + R keys to launch the Run dialog box.
  • Type “cmd” in the field and tap Enter to open Command Prompt.
  • Next, type the “ipconfig/all” command and tap Enter to execute it. This will populate various details.
  • From the given details, take note of the IPv4 address.
  • Afterward, open Command Prompt on the primary computer and then type the “ping <IPv4 address of the target computer>” command and hit Enter.
  • Now check if you get 4 confirmation replies or not. If not, you can try to access the Network Adapter Troubleshooter.
To run the Network Troubleshooter, refer to these steps:
  • Open the Search bar on your computer and type in “troubleshoot” to open the Troubleshoot settings.
  • Next, scroll down and select the “Network Adapter” option from the right pane.
  • Then click on the Run Troubleshooter” button.
  • After that, your computer will check for any possible errors and will pinpoint the root cause of the problem if possible.
  • Restart your computer.

Option 4 – Verify if Network Discovery is enabled

All you have to do is go to Start > Settings > Network & Internet and from there, click on the “Change connection properties” option and shift the radio button for Network profile to Private. After that, check if folder sharing is now working.

Option 5 – Try to modify the Network Security settings

There are times when the Network Security settings interfere with the folder or file sharing process. And if that’s the case, you can modify it to resolve the problem. How? Refer to these steps:
  • Tap the Win + R keys to open the Run dialog box.
  • Then type “secpol.msc” in the field and tap Enter to open the Local Security Policy manager window.
  • After that, go to Local Policies > Security Options located on the left pane.
  • Next, double click on Network security: LAN Manager authentication level in the right pane to open its Properties.
  • And then select the “Send LM & NTLM-use NTLMv2 session security if negotiated” option from the drop-down menu.
  • Now click on Apply and OK buttons to save the changes made.
  • Reboot your computer.

Option 6 – Try to enable NetBIOS over TCP/IP

  • Tap the Win + R keys to open the Run dialog box.
  • Then type “ncpa.cpl” in the field and tap Enter to open the Network Connections window.
  • After that, right-click on your network and select Properties.
  • Next, double click on Internet Protocol Version 4 and click on the Advanced button.
  • From there, go to the WINS tab and shift the radio button to Enable NetBIOS over TCP/IP.
  • Now click OK to save the changes made and then restart your computer.

Option 7 – Update the Network Adapter drivers

You might also want to update the Network Adapter drivers by following these steps:
  • Tap the Win + R keys to launch the Run window and then type in the “MSC” command and hit Enter to open the Device Manager window.
  • Under the Device Manager, you will see a list of drivers. From there, look for the Network Adapters and expand it.
  • Then right-click on each one of the Network drivers and update them all.
  • Restart your PC and see if it helped in fixing the BSOD error.
Note: If updating the network drivers didn’t help in fixing Error code: 0x80070035, you can also try to uninstall the very same drivers and restart your Windows 10 PC. After that, the system itself will reinstall the drivers you just uninstalled. Alternatively, you can also download and install the drivers from the manufacturer’s website directly. To reinstall the network adapter driver, refer to these steps:
  • Open the Devices Manager from the Win X Menu.
  • Then locate the device drivers and right-click on them to open the Properties.
  • After that, switch to the Driver tab and click on the Uninstall Device button.
  • Follow the screen option to completely uninstall it.
  • Finally, restart your computer. It will just reinstall the device drivers automatically.
Read More
1 2 3 162
Logo
Copyright © 2022, ErrorTools. All Rights Reserved
Trademarks: Microsoft Windows logos are registered trademarks of Microsoft. Disclaimer: ErrorTools.com is not affiliated with Microsoft, nor claim direct affiliation.
The information on this page is provided for information purposes only.
DMCA.com Protection Status