Fix Out of Memory error while copying files

What is Out of Memory error while copying files? As you know, both the hard drive and RAM play a major role in performing any operation on a computer since every process or task that takes place in the system requires some RAM storage as well as hard drive storage to be executed. However, there are times when you may receive the following error messages when you try to copy files from one location to another:

“Out of memory or system resources, Close some windows or programs and try again.”

“There is not enough memory to complete this operation – copying files.”

These errors are caused by the Desktop Heap limitation when there is no longer enough memory to complete the operation while copying the files. If you encounter any of these errors, you will be guided in this post with the help of some potential fixes that can increase its limit and will hopefully fix this error on your Windows 10 computer.

You may try to close all the open windows and programs and then try copying the file again and see if that helps. If not, then proceed to the instructions given below. But before you do that, make sure that you create a System Restore point first. This way, you can undo the changes you’ve made any time in case there are some unwanted changes you want to reverse. After you create a System Restore point, refer to the steps provided below.

Step 1: Tap the Win + R keys to open the Run utility and type “Regedit” in the field and tap Enter to open the Registry Editor.

Step 2: Next, navigate to this registry key: ComputerHKEY_LOCAL_MACHINESYSTEMCurrentControlSetControlSession ManagerSubSystems

Step 3: Now double click on the DWORD named Windows to modify it.

Step 4: Change the values for SharedSection in the Value Data field. It should be in the format of “SharedSection=aaaa,bbbb,cccc”. Note that you have to change the value of “bbbb” and “cccc”. So in case you are using an x86 operating system, set the value of bbbb to 12288 and then set the value for cccc to 1024. On the other hand, if you are using an x64 operating system, set the bbbb value to 20480 and the cccc value to 1024.

Step 5: Exit the Registry Editor and restart your computer to successfully apply the changes made.

Note: The bbbb value in the SharedSection registry is the size of the desktop heap for each interactive window station while the cccc section of the SharedSection value is the size of the desktop heap for each non-interactive window station. In addition, you must keep in mind that setting the value of bbbb to more than 20480 KB is not really recommended.

On the other hand, there is another tool that could help in resolving the Out of Memory error. This tool is called the Memory Diagnostic tool in windows can help resolve the Out of Memory error by checking and automatically fixing any memory-based issues. To run it, refer to these steps:

  • Tap the Win + R keys to open Run and type mdsched.exe and hit Enter to open the Windows Memory Diagnostic Tool.
  • After that, it will give two options such as:
    • Restart now and check for problems (Recommended)
    • Check for problems the next time I start my computer
  • Once your computer has restarted, perform a basic scan or you could also go for the “Advanced” options such as “Test mix” or “Pass count”. Simply tap the F10 key to start the test.

Note: After you select your preferred option, your computer will restart and check for memory-based issues. If it finds any issues, it will automatically fix them.

If you like to learn and find out more about various Windows errors, and how to repair them go to our vast archive or use search to find articles that will explain and help you in solving your issue.
However, if you prefer to do things fast and with automatization then we are proposing to use an automated solution for your issues. The application that we are recommending is Advanced System Repair Pro
Advanced System Repair utilizes multiple tools all in one to give you a quick, simple, reliable, and very thorough diagnosis of your PC. It brings you all the tools you need in one program to clean, fix, protect, optimize and boost your PC!
1-Click Maintenance
All the tools to make it simple and easy! It's like having a professional technician at the click of a mouse.

Junk Cleaner
Keeping your computer free from unnecessary clutter also helps make your computer last longer. Like any other machine, if you keep it clean and take care of it, it will serve you better for longer!

Optimize background apps
Optimize applications background activity with the built-in Application Optimizer feature.

Disk Defrag
With a simple 1-click, Advanced System Repair speeds up your PC by assembling fragmented files on your machine and organizing them more efficiently.

Malware Removal
Finds and removes all types of harmful malware including trojans, worms, bots, adware, spyware, PUPs, and more!

Privacy Cleaner
The all-in-one privacy suite to Clean Your Tracks & Protect Your Privacy! Make your computer safe, secure, and more efficient!

System Tweak/Optimizer
ASR will analyze your complete system and settings to adjust your PC to function at its maximum performance.

Registry Cleaner
Over time, as you install and uninstall applications, the registry can become cluttered with old entries and broken settings which can result in program crashes, and annoying messages and slow the computer down.
Visit our Advanced System Repair Pro Download page to inform yourself about all the benefits of this software and get a free trial copy of it.
advanced system repair pro

Advanced System Repair Pro

One-click automated PC repair solution
ASR logo
With Advanced System Repair Pro you can easily
Replace damaged files
Restore performance
Free disk space
Remove Malware
Protects WEB browser
Remove Viruses
Stop PC freezing
DOWNLOAD
Privacy Policy | Terms of Use | Uinstall
Advanced System Repair Pro is compatible with all versions of Microsoft Windows including Windows 11

Share this article:

You might also like

Disable Taskbar on the second display
If you have a dual monitor setup on your Windows 10 computer and you mostly use the second screen when you are presenting something, this makes the Taskbar completely unnecessary and is not really required. So if you are using your computer generally and do not want the taskbar on your second screen, read on as this post will guide you in disabling Taskbar on your second display. The good thing is, Windows comes with a built-in feature to disable Taskbar on your second screen or projector connected to your computer. In this post, you will be guided on how you can hide or disable the Taskbar from the second monitor in Windows 10. This post is coming in handy especially if you are using projectors or multiple displays. Refer to the steps given below to disable Taskbar on the second display in Windows 10. Step 1: Go to Settings and click on Taskbar from the left menu. Step 2: After that, scroll down to lo look for Multiple Displays. Step 3: Next, turn off the toggle labeled, “Show taskbar on all displays”. Note: After completing the steps given above, it will disable the Taskbar on all the secondary displays. Bear in mind that these settings will work only if you are running a second screen in Extended mode. Contrariwise, if you are in the Duplicate mode, this setting will not work but you can always set your Taskbar to Autohide so that it won’t be displayed.

On the other hand, if you are facing some issues in finding which screen is primary and which one is secondary, refer to these steps:

Step 1: Go to Settings and select System. Step 2: Next, from the left menu open Display. Step 3: From there, select the desired display and make it the primary one as required by your setup.
Read More
Intel’s GPU ARC coming aimed at AMD & Nvidia
intel ARC
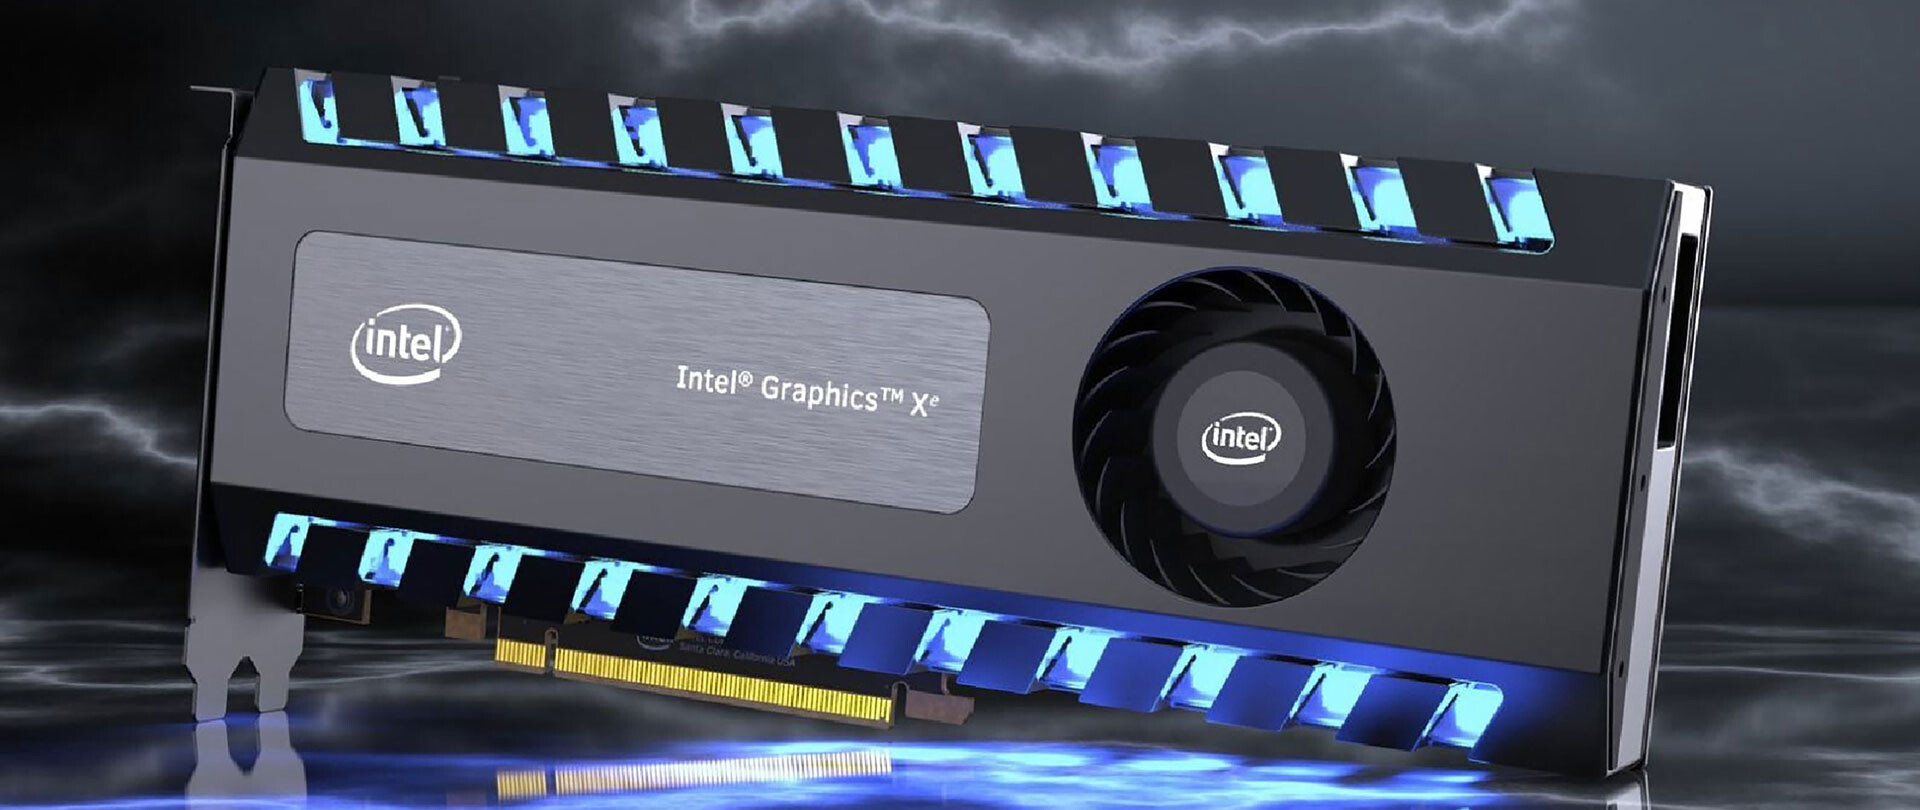
This is not the first time that Intel is trying to enter the GPU field but its adventures so far were, well let us agree not so good. All of that is hoping to be changed with the upcoming ARC GPU. The first generation of Arc graphics, code-named Alchemist and previously known as DG2, will support desktop PCs and laptops and is set to arrive in the first quarter of 2022. Alchemist will have hardware-based Ray tracing and AI-driven supersampling. This indicates that GPU is aimed to compete in the Hi-end spectrum and battle side by side with Nvidia and AMD on the market. Alchemist will also pack full DirectX 12 Ultimate support. Intel also released names for the next upcoming future generations of ARC GPUs: Battlemage, Celestial & Druid. More information about ARC products will be released later this year. “Today marks a key moment in the graphics journey we started just a few years ago. The launch of the Intel Arc brand and the reveal of future hardware generations signifies Intel’s deep and continued commitment to gamers and creators everywhere,” Roger Chandler, Intel vice president, and general manager of client graphics products and solutions.
Read More
Fix Shell Infrastructure Host stopped working
The Windows 10 operating system supports the logging in of multiple users at the same time. Aside from that, it also allows administrators to create a Guest Account that has limited rights. However, there are some instances when you could encounter an error when you use the Guest Account. The error may state:
“Shell Infrastructure Host has stopped working. A problem caused the program to stop working correctly. Please close the program”.
This error indicates that the Shell Infrastructure Host or SiHost.exe process that is used for handling graphical elements, has crashed. And to fix this error, there are several options you can check out. You can try to reinstall the Microsoft Redistributable Packages or run a System File Checker scan. In addition, you can also use a new Guest Account or troubleshoot the problem in a Clean Boot State.

Option 1 – Try to install or repair Microsoft Visual C++ Redistributable 2013

A corrupted Microsoft Visual C++ Redistributable package or the absence of it can trigger the “Shell Infrastructure Host has stopped working” error – so if you do not have this package yet, you have to install it but if you already have it, follow the steps below to repair it.
  • Open Control Panel and proceed to Program and Features.
  • Under Programs and Features, look for Microsoft Visual C++ Redistributable package among the list.
  • Then right-click on it and click the Change button.
  • Next, you should see the Repair option – click on it to repair the installation of the Microsoft Visual C++ Redistributable package.
  • The process may take a couple of minutes before it finishes so once it does, you have to restart your PC.
After doing all these steps and you still encounter the problem, you might have to uninstall this package and download it directly from Microsoft’s website. However, if you are using Windows 10, you might not be able to do so since it only supports Windows versions up to Windows 8.1 so just proceed to the next option below.

Option 2 – Try to run a System File Checker scan

  • In the Windows Start Search, type “command prompt” and right-click on Command Prompt from the search results, and then select the “Run as administrator” option.
  • After opening Command Prompt with admin privileges, type the “sfc /scannow” and tap Enter to execute it.
  • Once the scan is finished, restart your computer and see if the Windows Script Host error.

Option 3 – Try using a new Guest Account

You might want to use a new Guest Account as it could help get rid of the error. All you have to do is have your admin delete the old Guest Account and create a new one and see if it helps in fixing the error.

Option 4 – Try troubleshooting the problem in a Clean Boot State

Setting your computer in a Clean Boot State can help you diagnose and later troubleshoot the problems in your computer. During this state, the system will start with a minimal number of drivers and startup programs that help in isolating the problem with the interfering software. To put your computer in a Clean Boot State, follow the given steps below.
  • Log onto your computer as an administrator.
  • Type in MSConfig in the Start Search to open the System Configuration utility.
  • From there, go to the General tab and click “Selective startup”.
  • Clear the “Load Startup items” check box and make sure that the “Load System Services” and “Use Original boot configuration” options are checked.
  • Next, click the Services tab and select the “Hide All Microsoft Services” check box.
  • Click Disable all.
  • Click on Apply/OK and restart your PC. (This will put your PC into a Clean Boot State. And configure Windows to use the usual startup, just simply undo the changes.)
  • From there, start to isolate the problem by checking which one of the programs you installed recently is the root cause of the problem.
Read More
Delete last 15 min of browsing history on phone
google browsing 15min history delete
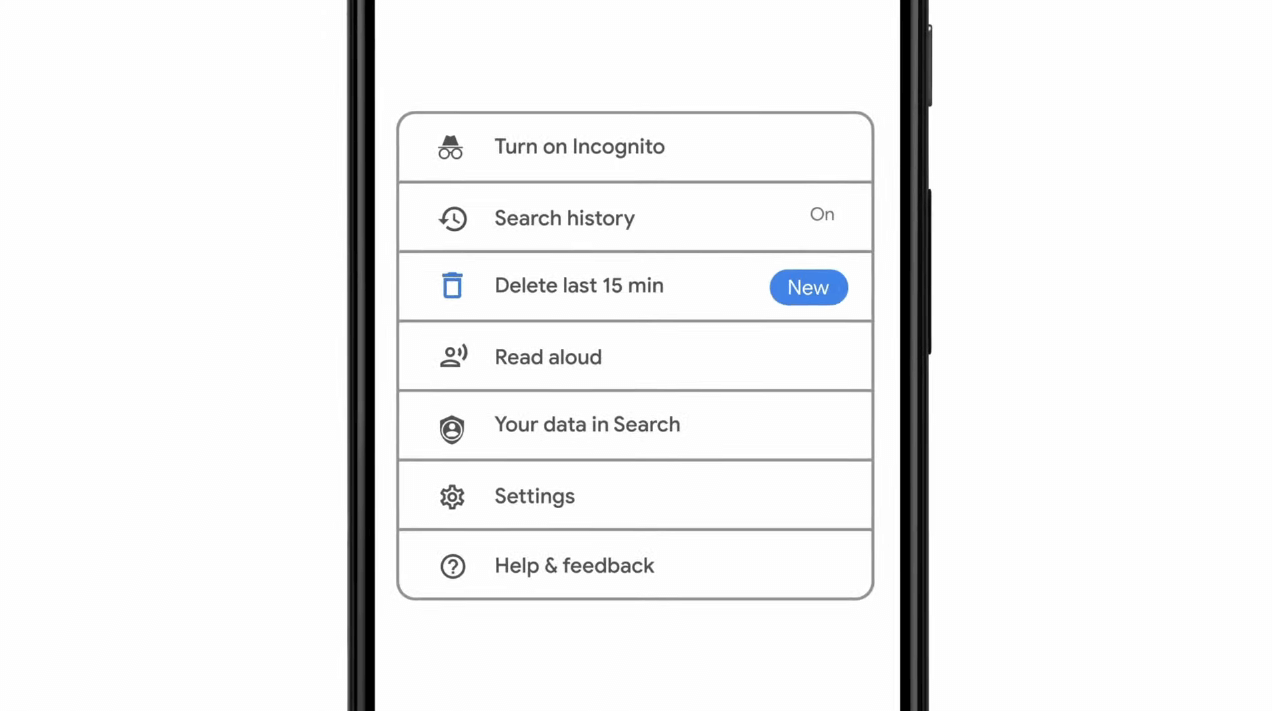
As previously announced by Google feature to quickly delete the last 15min of browsing history via one button is rolling out now. For now, only Apple users will be available to use this feature but the Android update is scheduled for later this year, a strange move by Google but it is what it is. For anyone who is unfamiliar with this feature, basically, Google wants a quick way to remove the last 15min of browsing history as a supposedly stated request to make deleting browsing history much easier. Google came up with this idea so you can keep the previous history intact but remove just 15min time frame, no additional explanation was given on why 15 but I presume it is some round number that came up as the middle one with research, read telemetry info. Using quick delete requires being signed into Search with a Google account. Users can access the option by simply tapping on the avatar icon to access the settings then choosing "Delete last 15 minutes."
Read More
Troubleshoot Error 651 on Your PC

Fixing Error 651

Error 651 - What is it?

Are you a Windows 7 PC user? Are you experiencing error 651? If yes, then read on. We will discuss what is this error, the causes, and easy DIY solutions to help you resolve this issue immediately. Error 651 is a common Windows 7 error. This error occurs when you try to connect using your PPPoE connections. The error message is displayed in the following format:
“Error 651: The Modem (or other connecting device) has reported an error.”

Solution

Restoro box imageError Causes

The error code 651 occurs due to multiple reasons. However, some of the most common error causes include:
  • The raspppoe.sys file saved in the wrong location
  • IP setting  issues
  • Registry issues

Further Information and Manual Repair

Here are some of the best and easiest solutions to resolve the error code 651 on your system immediately. These solutions are so easy to perform that you don’t need any technical expertise or knowledge to get started. So here we go!

Solution 1: Reset TCP/IP Settings

To reset TCP/IP settings on your PC, here’s what you need to do. Simply replace the RAS PPPoE driver. First open a command prompt, then write the following command in the command prompt:  TAKEOWN /F"C:Windowssystem32driversraspppoe.sys" ICACLS "C:Windowssystem32driversraspppoe.sys" /grant administrators:F. After that, press enter to continue. Now close the command prompt and go to the folder C:\Windows\system32\drivers, here rename the raspppoe.sys file to raspppoe2.sys. Now right click on save the link as Vista RAS PPPoE Driver and save it in the C:\Windows\system32\drivers folder. Once this process is complete, to activate changes made, restart your PC. This is most likely to resolve the error code 651 on your system.

Solution 2: Try Power Cycling your Modem and your Router

This is another way to resolve error 651. However, before you try this solution, it is recommended that you save all your work on your system, close all your open applications, and then shut down your PC. After that first turn your router off and wait for about 2 minutes. Then turn off your modem too. Now disconnect all the Ethernet cables that are connected to your modem, router and your system. Reconnect them again and make sure that the connections are not loose. After reconnecting the cables, reboot your PC and switch on the modem first. After your modem gets initialized, turn on the router. See if this procedure works. If it does, then that’s great the issue is resolved. However, if the error persists, then this indicates deeper problems. The error message is triggered due to registry issues.

Solution 3: Clean and Repair the Registry

Sometimes the underlying cause of error 651 is a corrupt and damaged registry. Registry is the database where operating system stores all the information associated with installed programs and activities performed on your PC. Registry issues typically result due to poor PC maintenance. When you don’t clean the registry the unnecessary and obsolete files accumulate and acquire a lot space. It damages the registry and DLL files. This often leads to disk fragmentation and files are then saved in segments in different locations. This also slows down your PC performance. This could also be the reason for why the raspppoe.sys file is saved in the wrong location. Though you can repair the registry manually but it may be complex for you especially if you are not technically sound. And besides, it is also slightly time-consuming.

Restoro - Premier Registry Cleaner

Therefore, to resolve errors like 651 triggered by the registry issues on your system in seconds, it is advisable to download Restoro. Restoro is a cutting-edge and multi-functional PC Fixer. It is deployed with a powerful intuitive algorithm and multiple highly functional utilities designed to resolve practically all types of PC errors. It includes utilities like a registry cleaner, an antivirus, and a system optimizer. The registry cleaning feature scans for all types of registry issues and errors and resolves them instantly. It wipes out unnecessary and redundant files like cookies, internet history, junk files, and bad/ invalid registry entries. It cleans the registry freeing up space. Furthermore, it also repairs the damaged files and restores the registry back to normal.

Restoro Special Features

Other features include an antivirus that removes all types of malicious software hiding in your PC including viruses, Trojans, spyware, malware, and adware. The system optimizer feature ensures that your computer performs at its optimal level at all times. Restoro is safe and bug-free. Its user-friendly interface and simple navigations makes it quite easy for users to operate it without any difficulty. Furthermore, compatibility is not an issue with this software. You can download it on any Windows version. Click here to download Restoro and fix error 651 on your PC today!
Read More
Software review series: Tor Browser
Back in the mid-'90s, when the US Navy was looking into ways to securely communicate sensitive intelligence information, a mathematician and two computer scientists emerged from the Naval Research Lab with something called "onion routing." It was a new kind of technology that would protect your internet traffic with layers of privacy. By 2003, The Onion Routing project, acronym Tor, was in the hands of the public, where its vast network of users the engine enabling Tor has since continued to grow. Today, thousands of volunteers all over the world are connecting their computers to the internet to create the Tor network by becoming "nodes" or "relays" for your internet traffic.

What is Tor?

At a basic level, Tor is a type of internet-connected network with its own internet browser. Once you connect to the internet with the Tor browser, your internet traffic is stripped of its first layer of identifying information as it enters the Tor network and is then sent bouncing through those relay nodes, which serve to encrypt and privatize your data, layer by layer like an onion. Finally, your traffic hits an exit node and leaves the Tor network for the open web. Once you're in the Tor network, it's nearly impossible for others to track your traffic's manic pinballing path across the globe. And once you leave the Tor network via an exit node, the website you view (assuming it has HTTPS in front of its address) isn't sure which part of the world you're hailing from, offering you more privacy and protection. Because Tor is a volunteer-run network, speed can often be an issue. As your traffic moves from node to node, you're likely to notice more speed loss than you would, for instance, with most commercial virtual private networks. This becomes particularly noticeable if you try to watch streaming Netflix content over Tor or make voice-over-IP phone calls or video calls with an app like Zoom. Tor technology isn't necessarily built to provide seamless audio-video experiences.

Tor and plugins

Speaking of videos, there are also limits to the amount of privacy Tor can offer you if you enable certain browser media plugins like Flash. Likewise, your browser's JavaScript plug-in which enables you to view a lot of websites' embedded media can still leak your IP address information. Torrenting files with Tor also exposes you to privacy risks. Because of these risks, Tor's privacy settings have these kinds of plug-ins disabled by default. If you're just looking to do general, daily internet perusal using a browser that will better hide your traffic from spying eyes, Tor probably isn't the best choice due to its slow speeds and incompatibility with most embedded media. But if you're concerned enough about privacy around a particular topic of internet research (and you don't have a VPN), Tor is probably the best choice for you.
If you would like to read more helpful articles and tips about various software and hardware visit errortools.com daily.
Read More
How to remove Easy Home Decorating (easyhomedecorating.com) toolbar

Easy Home Decorating is a Browser Extension for Google Chrome. It offers users tips and tricks on how to manage your home decoration, you can find ideas for certain rooms, combine and plan. This might seem useful at the start, however, all this extension does is add a toolbar that links you to the most popular Home Decor Websites that you can find on any Search engine within seconds.

When installed it changes your default search engine and new tab page to MyWay.com or Ask.com (depending on the extension version). It monitors user browsing activity in the background, allowing it to gather visited websites, clicked links, search queries, and other user information. This data is later sent/sold to better target ads.

While using this extension you will see additional ads and sponsored content displaying throughout your browsing sessions. Several anti-virus applications have marked this extension as a Browser Hijacker and a potential security flaw and are therefore not recommended to keep on your computer.

About Browser Hijackers

Browser hijackers (sometimes referred to as hijackware) are a type of malware that modifies web browser configurations without the user’s knowledge or approval. These hijacks happen to be increasing at an alarming rate worldwide, and it could be actually nefarious and sometimes harmful too. Browser hijacker malware is developed for many different reasons. These are generally used to force visitors to a particular website, manipulating web traffic to earn ad revenue. It might seem naive, but the majority of these websites are not legitimate and can present a serious risk to your online safety. Moreover, hijackers could make the whole infected system vulnerable – other destructive malware and viruses would use these opportunities to get into your computer effortlessly.

How one can know if your browser has been hijacked

Here are some signs and symptoms that suggest you’ve been hijacked: your web browser’s home page is suddenly different; if you enter a URL, you find yourself regularly directed to a different site than the one you meant; the default online search engine is modified; unsolicited new toolbars are added to your web browser; you see a lot of pop-up ads on your computer screen; your web browser gets slow, buggy, crashes frequently; you can’t visit specific websites like home pages of security software.

How does a computer get infected with a browser hijacker?

Browser hijackers infect computer systems in numerous ways, including through a drive-by download, a file-share, or an infected email. They can also come from any BHO, extension, add-on, toolbar, or plug-in with malicious purpose. Other times you might have inadvertently accepted a browser hijacker as part of a software bundle (generally freeware or shareware). Examples of well-known browser hijackers are Fireball, GoSave, Ask Toolbar, CoolWebSearch, Babylon Toolbar, and RocketTab. Browser hijackers could affect the user’s web browsing experience significantly, monitor the websites visited by users and steal private information, cause difficulty in connecting to the web, and finally create stability problems, causing programs and systems to freeze.

How you can fix a browser hijack

Certain kinds of browser hijackers can be effortlessly removed from your PC by deleting malicious software applications or any other recently installed shareware. But, many hijackers are very hard to identify or eliminate as they might get themselves associated with some important computer files which allow it to operate as a necessary operating system process. Rookie computer users should never try the manual form of removal methods since it requires comprehensive computer knowledge to carry out repairs on the computer registry and HOSTS file. Anti-malware application is really efficient with regards to picking up and removing browser hijackers that normal anti-virus application has overlooked. To eradicate any kind of browser hijacker from your PC, you can download this certified malware removal program – SafeBytes Anti-Malware. Employ a system optimizer (like Total System Care) together with your antivirus software to solve various registry issues, remove system vulnerabilities, and improve your computer's overall performance.

How To Install Safebytes Anti-Malware On An Infected PC

All malware is bad, but certain kinds of malware do much more damage to your PC than others. Some malware is designed to restrict or prevent things that you wish to do on your personal computer. It may well not permit you to download anything from the net or prevent you from accessing some or all of the websites, especially the anti-virus sites. If you’re reading this article, you probably have got infected by a virus that prevents you from downloading a computer security program such as Safebytes Antimalware on your PC. There are some steps you can take to get around this issue.

Install in Safe Mode

The Windows OS has got a special mode known as “Safe Mode” in which just the bare minimum required programs and services are loaded. If the malware is blocking access to the internet and affecting your PC, running it in Safe Mode allows you to download antivirus and run a scan while limiting possible damage. In order to get into Safe Mode or Safe Mode with Networking, press the F8 key while the computer is starting up or run MSCONFIG and locate the “Safe Boot” options in the “Boot” tab. Once you are in Safe Mode, you can attempt to download and install your antivirus program without the hindrance of the malicious software. Now, you can run the antivirus scan to eliminate viruses and malware without any interference from another application.

Switch to an alternate internet browser

Web-based malware could be environment-specific, aiming for a particular web browser or attacking specific versions of the browser. In case you suspect that your Internet Explorer has been hijacked by a computer virus or otherwise compromised by cybercriminals, the most effective course of action is to switch to a different internet browser such as Chrome, Firefox, or Safari to download your favorite computer security software – Safebytes Anti-Malware.

Run anti-virus from a USB drive

Another solution is to save and operate an antivirus software program entirely from a Thumb drive. To run antivirus using a thumb drive, follow these simple steps: 1) On a clean PC, download and install Safebytes Anti-Malware. 2) Put the USB drive into the uninfected PC. 3) Double-click the Setup icon of the anti-malware program to run the Installation Wizard. 4) When asked, choose the location of the USB drive as the place in which you would like to store the software files. Follow the instructions to finish the installation process. 5) Now, insert the pen drive into the infected PC. 6) Double-click the EXE file to open the Safebytes program right from the flash drive. 7) Click “Scan Now” to run a complete scan on the affected computer for viruses.

SafeBytes Anti-Malware Overview

To help protect your laptop or computer from various internet-based threats, it’s very important to install an anti-malware program on your PC. But with countless numbers of antimalware companies out there, these days it’s challenging to decide which one you should buy for your PC. Some of them are good, some are ok types, while some will harm your PC themselves! You must pick a company that builds industry-best anti-malware and has gained a reputation as reliable. Amongst few good programs, SafeBytes Anti-Malware is the highly recommended software program for the security-conscious user. SafeBytes is a powerful, real-time anti-spyware application that is designed to assist the everyday computer end user in safeguarding their computer from malicious internet threats. With its cutting-edge technology, this application will allow you to remove several types of malware including viruses, trojans, PUPs, worms, ransomware, adware, and browser hijackers.

There are plenty of great features you’ll get with this particular security product. Listed here are a few of the great ones:

Real-time Threat Response: SafeBytes offers real-time active checking and protection from all known viruses and malware. It’ll monitor your PC for suspicious activity continuously and its unparalleled firewall shields your PC from illegal access by the outside world. Antimalware Protection: Built upon a greatly acclaimed anti-virus engine, this malware removal tool can find and get rid of many obstinate malware threats such as browser hijackers, PUPs, and ransomware that other typical anti-virus software will miss. Website Filtering: SafeBytes checks and gives a unique safety rating to every website you visit and block access to webpages known to be phishing sites, thus protecting you against identity theft, or known to contain malicious software. Lowest CPU and RAM Usage: SafeBytes provides complete protection from internet threats at a fraction of the CPU load due to its advanced detection engine and algorithms. Premium Support: For any technical questions or product support, you could get 24/7 expert assistance through chat and email. Overall, SafeBytes Anti-Malware is a solid program as it has lots of features and could detect and remove any potential threats. You can be sure that your PC will be protected in real-time once you put this software program to use. You will get the very best all-around protection for the money you pay on SafeBytes Anti-Malware subscription, there’s no question about it.

Technical Details and Manual Removal (Advanced Users)

If you don’t wish to use an automated tool and prefer to get rid of Easy Home Decorating manually, you might accomplish this by going to the Windows Add/Remove Programs menu in the control panel and removing the offending software; in cases of web browser add-ons, you could remove it by visiting the browser’s Add-on/Extension manager. Additionally, it is suggested to factory reset your web browser settings to their default state. To make sure of complete removal, find the following Windows registry entries on your computer and delete it or reset the values appropriately. Please remember that this is for experienced users only and might be challenging, with incorrect file removal causing additional PC errors. Also, certain malware is capable of replicating itself or preventing deletion. Completing this task in Safe Mode is suggested.
Files: Search and Delete: 73Bar.dll 73bar.dll 73highin.exe 73medint.exe 73regfft.dll 73regiet.dll 73hkstub.dll 73reghk.dll 73barsvc.exe 73bprtct.dll 73datact.dll 73dlghk.dll 73dlghk64.dll 73feedmg.dll 73htmlmu.dll 73httpct.dll 73idle.dll 73mlbtn.dll 73Plugin.dll 73script.dll 73skin.dll 73skplay.exe 73SrcAs.dll APPINTEGRATOR.EXE AppIntegrator64.exe APPINTEGRATORSTUB.DLL AppIntegratorStub64.dll ASSISTMONITOR.DLL ASSISTMONITOR64.DLL CREXT.DLL CrExtP73.exe DPNMNGR.DLL HKFXMGR.DLL HKFXMGR64.DLL HPG.DLL Hpg64.dll T8EPMSUP.DLL T8EXTEX.DLL T8EXTPEX.DLL T8HTML.DLL 73SrchMn.exe 73srchmr.dll NP73Stub.dll 73auxstb.dll 73auxstb64.dll 73ieovr.dll 73radio.dll 73brmon.exe 73brstub.dll
Read More
Error 0x00000024 – A Quick Fix
[vc_row][vc_column][vc_column_text]

Repair Error 0x00000024

What is Error 0x00000024?

Error 0x00000024 can be seen when you start up and a screen comes up asking which mode you would startup in. Regardless of the mode you select, it leads up to the Windows screen with the loading bar and your computer crashes from there onwards. When you press F8 in order to select the “Disable Automatic Restart On System Failure” option, that is when this error shows up:
ST0P 0X00000024 (x00190203, 0x82700550, 0xc000012, 0x00000000)
Due to this error, both Safe and Normal modes become inaccessible.

Solution

Restoro box imageError Causes

If you’re having this error then it is the indication of an issue with the file NTFS.sys. Further, there might also be problems with the IRP (Interrupt Request Packet) or the disk may have been corrupted. There are multiple other causes of this error, including heavy fragmentation of your hard drive or problems caused by your antivirus software.

Further Information and Manual Repair

First and foremost, you are suggested to run Chkdsk. In order to do this, you have to enter your BIOS and select CDROM as your primary booting device. Now follow the below-mentioned steps:
  1. Insert your Windows XP installation CD into the CDROM and reboot your PC.
  2. Press any key to proceed with the boot from CD when you are prompted to do so.
  3. When the Windows XP setup menu shows up, hit the “R” key to proceed with repairing Windows.
  4. If there is only one Windows installed on your computer then hit the “1” key and proceed by pressing enter. If there are more than two Windows then hit the number which is associated (according to the screen you are viewing) to the Windows you want to repair. Usually, this is C:/Windows and associated with “1” but if that is not the case then you should simply press the number that corresponds with the windows you want to repair and proceed.
  5. Now, you will see a screen that prompts you to enter your administrator password. Most people don’t have an admin password and in that case, you should simply hit enter and you’d be good to go. If you do have an administrator password, however, then you should type it in, hit enter, and proceed.
  6. When the DOS prompt shows up, type in chkdsk/f and hit return.
If you see no improvement in solving Error 0x00000024, and the problem keeps persisting, then you should start over. But this time you should type sfc/scannow instead of chkdsk/f and hit return. There are a few other complex methods that you can try as well but this is the most recommended procedure as it is easier, quicker, and most likely to fix the error.[/vc_column_text][/vc_column][/vc_row]
Read More
Upcoming Windows features for future
It is no secret that Microsoft is trying to keep Windows relevant and that it is trying to make it as good as possible. A new Windows update will bring some interesting stuff in it which well some like it, some not so much. Among various technical and security updates Microsoft will bring some directly visible to each user.

First

of these features will be File explorer compact mode. This feature is a sort of spacing content in file explorer giving it easier access if you are using a touch screen device. Now, this feature is somewhat strange, and altho I can understand and get behind the logic of this move I am not sure I like it. Lucky for me and others who feel the same this option can be turned off for now.

Second

feature is something I can get behind, improvements for virtual desktops. There is an article on errortools about virtual desktops feature and I really hope you are using it since it is a great feature. Anyway, new update will bring us separate desktop wallpapers for each desktop and we will be able to arrange them in order we like.

Third

thing that I would like to address is animation features. We will have windows slowly fade and resize when opened, minimized, maximized, etc. So far we are unable to tell how this can and will it affect overall system performance. I am sure it will have some impact but hopes are that it will be kept to a minimum. If you would like to read more helpful articles and tips about various software and hardware visit errortools.com daily.
Read More
Fix Windows Update Error 0x80070103
This post will guide you in fixing the error 0x80070103 when installing Windows Update. According to users who encountered this problem, Windows Update (WU) fails to install several different updates. This kind of Windows Update error is can mostly be seen in the Windows Update screen inside the update reports although it is also known to occur when a user attempts to install a peripheral driver – only if the Windows Update offers to update the driver through a prompt and when you click Yes. There are several possible causes for this error, it could be that Windows Update is trying to install a particular driver for the second time already which happens when it gets confused by an additional piece of identical hardware like the graphics adapter. Aside from that, the Windows Update might have already installed the driver which is known to occur with unsuitable versions of the already installed driver. In addition, the error could also be due to a third-party program interference like a security program or a utility program that is using the same driver and conflicts with the Windows Update. Here are some suggestions that might help in fixing the Windows Update error 0x80070103.

Option 1 – Install the updates in a Clean Boot State

You might want to try putting your computer in a Clean Boot state and then install Windows Updates again without any trouble. During this state, you can start the system with a minimum number of drivers and startup programs that will surely help you in isolating the root cause of the issue.
  • Log onto your PC as an administrator.
  • Type in MSConfig in the Start Search to open the System Configuration utility.
  • From there, go to the General tab and click “Selective startup”.
  • Clear the “Load Startup items” check box and make sure that the “Load System Services” and “Use Original boot configuration” options are checked.
  • Next, click the Services tab and select the “Hide All Microsoft Services” check box.
  • Click Disable all.
  • Click on Apply/OK and restart your PC. (This will put your PC into a Clean Boot State. And configure Windows to use the usual startup, just simply undo the changes.)
  • After that, try to install the Windows Updates or upgrade again.

Option 2 – Try installing the failing driver without using Windows Update

If installing the updates in a clean boot state didn’t help, you can try a manual approach to yield much better results using the Device Manager or by downloading the driver from the manufacturer’s website manually.
  • Tap the Win + R keys to launch Run.
  • Type in msc into the box and tap Enter or click OK to open the Device Manager.
  • After that, a list of device drivers will be displayed. Look for the device driver you and then select either “Update driver” or “Uninstall device”. And if you find any “Unknown device”, you need to update it as well.
  • Select the “Search automatically for updated driver software” option and then follow the instructions to complete the process.
  • If you have chosen to uninstall the driver, follow the screen options to complete the process and then restart your PC.
Note: You also have the option to go directly to the website of your device driver manufacturer and go to the section called Drivers then check if there’s a new available update – if there is, download and install it.

Option 3 – Try to run the Windows Update Troubleshooter

You might also want to run the built-in Windows Update Troubleshooter in Windows that could help you in resolving the Windows Update error 0x80070103. All you have to do is go to Settings > Update& security > Troubleshoot > Windows Update. From there, click on the Run the troubleshooter button and follow the next one-screen instructions that appear. After that, restart your computer and check if the error is now fixed or not by trying to install the update once again.
Read More
1 2 3 162
Logo
Copyright © 2022, ErrorTools. All Rights Reserved
Trademarks: Microsoft Windows logos are registered trademarks of Microsoft. Disclaimer: ErrorTools.com is not affiliated with Microsoft, nor claim direct affiliation.
The information on this page is provided for information purposes only.
DMCA.com Protection Status