Fix Origin Error when loading the webpage

If you encounter a blank page with an error message saying, “Origin Error” when you try to load a webpage, then this post will surely help you resolve this error. As you can see, this error is a very uncommon one and it is not about the popular game known as Origin where all you have to do is reinstall the client.

Although this error message is a very uncommon one, you will see a blank page with a message saying, “Origin Error” when you attempt to load a webpage. To fix this error, this post will provide you some potential fixes that might help. Follow the fixes given below carefully and see which one fixes the problem.

Option 1 – Use Ctrl + F5 keys to clear browser cache

The first thing you can try is to “Hard Refresh” to clear the cache of your browsers. You can do that by using the Ctrl + F5 keys on your keyboard. On the other hand, you can also clear the cache manually for Chrome, Edge, and Firefox.

Option 2 – Remove the Proxy

You might also want to try removing the Proxy as it could also help you in fixing the Origin error. Here’s how you can do it:

  • Tap the Win + R keys to open the Run dialog box.
  • Then type “inetcpl.cpl” in the field and hit Enter to pull up the Internet Properties.
  • After that, go to the Connections tab and select the LAN settings.
  • From there. Uncheck the “Use a Proxy Server” option for your LAN and then make sure that the “Automatically detect settings” option is checked.
  • Now click the OK and the Apply buttons.
  • Restart your PC.

Note: If you are using a third-party proxy service, you have to disable it.

Option 3 – Try to flush the DNS, reset Winsock and the TCP/IP

You might also want to flush the DNS and reset Winsock as well as reset TCP/IP as it could help in fixing the Origin error. To do so, refer to these steps:

  • Click the Start button and type in “command prompt” in the field.
  • From the search results that appear, right-click on Command Prompt and select the “Run as administrator” option.
  • After opening Command Prompt, you have to type each one of the commands listed below. Just make sure that after you type each command, you hit Enter
    • ipconfig /release
    • ipconfig /all
    • ipconfig /flushdns
    • ipconfig /renew
    • netsh int ip set dns
    • netsh winsock reset

After you key in the commands listed above, the DNS cache will be flushed and the Winsock, as well as the TCP/IP, will reset.

  • Now restart your computer and open Google Chrome then try opening the website you were trying to open earlier.

Option 4 – Try using Google Public DNS

You might want to try changing your current DNS to the Google Public DNS. All you have to do is change the DNS settings explicitly on your operating system by using the DNS IP addresses. Here’s are the steps to do that:

  • The first thing you have to do is right-click on the network icon in the Taskbar and select Network and Sharing Center.
  • Next, click on the “Change Adapter Settings” option.
  • After that, search for the network connection that you are using to connect to the internet. Note that the option might be “Wireless Connection” or “Local Area Connection”.
  • Right-click on your network connection and click on Properties.
  • Then select the new window to choose the “Internet Protocol 4 (TCP/IPv4)” option.
  • After that, click on the Properties button and click the checkbox in the new window for the option “Use the following DNS server addresses”.
  • Type in “8.8.8” and “8.8.4.4” and click OK and exit.
If you like to learn and find out more about various Windows errors, and how to repair them go to our vast archive or use search to find articles that will explain and help you in solving your issue.
However, if you prefer to do things fast and with automatization then we are proposing to use an automated solution for your issues. The application that we are recommending is Advanced System Repair Pro
Advanced System Repair utilizes multiple tools all in one to give you a quick, simple, reliable, and very thorough diagnosis of your PC. It brings you all the tools you need in one program to clean, fix, protect, optimize and boost your PC!
1-Click Maintenance
All the tools to make it simple and easy! It's like having a professional technician at the click of a mouse.

Junk Cleaner
Keeping your computer free from unnecessary clutter also helps make your computer last longer. Like any other machine, if you keep it clean and take care of it, it will serve you better for longer!

Optimize background apps
Optimize applications background activity with the built-in Application Optimizer feature.

Disk Defrag
With a simple 1-click, Advanced System Repair speeds up your PC by assembling fragmented files on your machine and organizing them more efficiently.

Malware Removal
Finds and removes all types of harmful malware including trojans, worms, bots, adware, spyware, PUPs, and more!

Privacy Cleaner
The all-in-one privacy suite to Clean Your Tracks & Protect Your Privacy! Make your computer safe, secure, and more efficient!

System Tweak/Optimizer
ASR will analyze your complete system and settings to adjust your PC to function at its maximum performance.

Registry Cleaner
Over time, as you install and uninstall applications, the registry can become cluttered with old entries and broken settings which can result in program crashes, and annoying messages and slow the computer down.
Visit our Advanced System Repair Pro Download page to inform yourself about all the benefits of this software and get a free trial copy of it.
advanced system repair pro

Advanced System Repair Pro

One-click automated PC repair solution
ASR logo
With Advanced System Repair Pro you can easily
Replace damaged files
Restore performance
Free disk space
Remove Malware
Protects WEB browser
Remove Viruses
Stop PC freezing
DOWNLOAD
Privacy Policy | Terms of Use | Uinstall
Advanced System Repair Pro is compatible with all versions of Microsoft Windows including Windows 11

Share this article:

You might also like

Outlook 2013 Preview

Outlook 2013 preview and sneak peek

Hello and welcome to our Outlook 2013 Preview. Everyone has heard of sneak peeks when it comes to new movies and games that are coming out soon. That is what advertisements and test reels are for to get the audience interested and excited before the piece of media even comes out. It serves to entertain the target audience in the months, maybe even years, up until the release date of this thing they want to play or see and it keeps it in the public mind. It is also great for the viewers because it is a hint to what they will expect when it comes out and it keeps them wanting more excitedly. However, did you know that sometimes computer software’s release previews and sneak peeks too?

Outlook 2013

Well, they do and Microsoft has released some sneak peeks and previews of their new Outlook, Outlook 2013! This is probably to get consumers ready for when it comes out next year; people are going to be getting excited about this new makeover that Microsoft Office, with Outlook, has given itself, people from Microsoft even saying it is ‘the most ambitious’ version of Office yet! The new orange color scheme and logo design look promising enough for the consumer without even checking the new features and special things that have been revealed about it yet!

Outlook 2013 Features

The best part of this new Outlook is that you can move widgets around in it. If you don’t like the fact that your inbox is placed over your outbox, you can move it- simple as that! It will be really handy for people who like messing around with layouts and will also be handy for people who tend to overlook things at the bottom of the pile like spam and trash if they can move them to a more noticeable location for themselves. Another great thing is that the new Microsoft Office that Outlook comes with has a cool new stylus option, allowing you to personalize things with your own handwriting or even drawings. This can then be used as your email signature on Outlook which can give a really nice and personal feel to emails you are sending. Another new thing is their labeling of drafts. Like Gmail, Google’s own email service, a red-lettered ‘draft’ will now appear over composing messages you have not yet sent.

Handy Email Tools in Outlook 2013

This is handy because you know where your message has been saved as opposed to how it could be saved in your outbox or be sent to the trash. Also, there are new links with Facebook that allow you to see what your friends are doing through Outlook. You can also converse with Facebook friends through Outlook now, which is a big step forward in this age of social media. You can get an email from a person and, at a click of a button, also read all their Facebook posts. However, there is not an option for Twitter or Tumblr or even Myspace, which is a shame I suppose, but maybe in the next update. So, I think Outlook 2013 will be worth looking at, don’t you?
Read More
Check if your data has been stolen for free

Website breaches and stealing user data is nothing new in the world of the internet. Although a very unpleasant experience it still happens even on some high-quality websites. In this article, we will not focus on how can you not be the target of this kind of attack, because you really cannot. Weel you can kind of if you decide not to have your data on websites at all, but let's just say that is not something you are willing to do.

stolenSo, in this case, you have some social, forum, or gaming accounts but you heard that service has been breached and that your email or password might be stolen. Well in this case all you need to do is of course to login into the service and change your password. But, what happens if you are not aware at all that service has been compromised?

Mozilla foundation has asked themselves this same question it seems and they have decided to help us out. They have placed a free online service where you can just by typing in your email address find out if your email or data has been compromised in any way.

Go to https://monitor.firefox.com/ and check it out, if you find out that there is some website that you did not know was breached, change your password right away, and if you have used the same password for anything else (I hope not), change them as well.

Read More
Fix Windows Update Error 0x8024000B
As you know, Windows Updates are essential for your operating system as it keeps it protected from potential threats, fixes bugs and improves your experience in using Windows 10. However, there are instances when Windows Updates also cause errors and one of them is the Windows Update Error 0x8024000B. One of the causes of this particular Windows Update error is that Windows was not able to read the Update Manifest file which is needed to install the Windows Updates. This means that the operation was canceled by either the service or the user. On the other hand, this error could also occur if you are not able to filter the results. When you encounter this error, you will see an error message that says, “WU_E_CALL_CANCELLED: Operation was canceled”. This indicates that the operation was canceled by the operating system itself. To resolve the Windows Update Error 0x8024000B, here are some suggestions you need to check out.

Option 1 – Try to run the Cleanup (Decline) Superseded updates PowerShell script

The first thing you can do to fix the Windows Update Error 0x8024000B is to run the Cleanup (Decline) Superseded updates PowerShell script. This is actually an easy fix since all you have to do is download and run it from the Microsoft Technet site. Once you’re done downloading and running the file, restart your computer and see if the error is fixed or not.

Option 2 – Try to rename the Spupdsvc.exe file

If the first option didn’t work, you can try renaming the Spupdsvc.exe file which is one of the reasons why you’re getting the Windows Update Error 0x8024000B.
  • First, tap the Win + R keys to launch the Run utility.
  • Next, type the following command and hit Enter to execute it in cmd:
 /c ren %systemroot%System32Spupdsvc.exe Spupdsvc.old
  • The command you entered will rename the troublesome “Spupdsvc(.)exe” file to “Spupdsvc(.)old”.
  • Now restart your computer after the command has been executed.

Option 3 – Try to restart various Windows Update-related services and components

You could also try to restart some Windows Update-related services to resolve the Windows Update error. Refer to the following steps to do so:
  • Tap the Win + X key combination and select Command Prompt (Admin) to open Command Prompt with admin privileges.
  • After opening Command Prompt, copy and paste each one of the commands listed below one by one and tap Enter right after you enter each command.
    • net stop wuauserv
    • net stop bits
    • net stop appidsvc
    • ren %systemroot%SoftwareDistribution SoftwareDistribution.bak
    • ren %systemroot%system32catroot2 catroot2.bak
  • Once you’ve entered all the commands given above, they will stop all the Windows Update services that are running on your computer as well as clear the SoftwareDistribution folder, and reset the Catroot2 folder. Now you have to start all these Windows Update services you’ve just stopped by executing the following commands:
    • net start wuauserv
    • net start bits
    • net start appidsvc
    • net start cryptsvc
  • After that, restart your computer and try to run the setup again, and see if the error is now fixed.

Option 4 – Try to run the Windows Update Troubleshooter

You should also try to run the built-in Windows Update troubleshooter as it could help you resolve the Windows Update Error 0x8024000B. To run it refer to these steps:
  • Go to Settings and then click on Windows Update from the given menu.
  • Next, click on the Troubleshoot option and select Windows Update from the given options to run the Windows Update troubleshooter.
  • After that, follow the next on-screen instructions and wait until the process is completed, and check if the Windows Update Error 0x8024000B is fixed or not.
Read More
Completely Remove iLivid Malware Removal Guide from PC

iLivid is a video download manager for YouTube and other third-party video-hosted websites. iLivid download manager has powerful features that make it the fastest and easiest way to download hosted files. iLivid includes XBMC plug-ins that let you play almost all popular audio and video formats, in any available protocol and in any media type: streaming, CDs, DVDs, and RAR and archived files from your hard drive.

Livid is a program developed by Bandoo Media Inc. Upon installation, it defines an auto-start registry entry which allows the program to run on each boot for the user who installed it. A scheduled task is added to Windows Task Scheduler in order to launch the program at various scheduled times. The software is designed to connect to the Internet and adds a Windows Firewall exception in order to do so without being interfered with.

Multiple Anti-Virus scanners have detected iLivid as a possible Malware and are therefore not recommended.

About Potentially Unwanted Applications

Have you ever discovered an unwanted program running on your computer system and wondered how the heck it got there? These unwanted programs, which are referred to as Potentially Unwanted Programs, or PUP briefly, typically tag along as a software package when downloading the program and could cause serious problems for computer users. The term PUP was actually coined to identify this downloadable crapware as something other than malicious software. The primary reason for this is the fact that the majority of PUPs get into users’ computers not because they exploit security weaknesses, for instance, but mainly because the users grant consent to install it – unwittingly in many instances. However, it is obvious that PUPs continue to be bad news for PC users as they could be really detrimental to your computer in numerous ways.

How does unwanted software affect you?

PUPs come in various forms; having said that, many are classified as adware, which always displays irritating ads and advertising banners on internet pages that you’re exploring. Additionally, they come in the form of web browser extension add-ons and toolbars. Not only they entirely fill up space on your computer screen, but toolbars could also manipulate search engine results, monitor your web browsing activities, decrease your web browser’s efficiency, and slow down your web connection to a crawl. PUPs load up a nasty bite if left unchecked. Some PUPs carry keyloggers, dialers, and other software to gather your personal details which might lead to identity theft. Often, such software will turn off security protections and settings to take control over your computer, making that computer susceptible to online hackers and data thieves. At a minimum, PUPs slow your PC down with every added program.

Preventing unwanted programs

• When installing anything on your desktop, always study the fine print, including the EULA. Don’t accept terms of use that are for bundled programs. • Choose the “custom” install whenever installing an application. In particular, focus on those tiny boxes that have been checked as default, where you may ‘agree’ to get advertisements or install software bundlers. • Use an advert blocker/pop-up blocker; Deploy anti-malware products such as Safebytes Anti-malware. These software programs will establish a wall between your computer and cybercriminals. • Avoid installing applications you don’t really need. Do not ever install software programs that appear suspicious or malicious. • Don’t download programs from popups, internet advertising, file sharing sites, and also other unreliable sources; be cautious about any preset, unwanted options when downloading software. Avoid going to weblogs and sites that promote pirated software.

Can't Install Safebytes Anti-malware because of a Virus? Do This!

Malware could potentially cause a lot of damage to your personal computer. Some malware is designed to interfere with or prevent things that you wish to do on your computer. It may not allow you to download anything from the net or it will stop you from accessing some or all of the internet sites, particularly the anti-virus websites. If you’re reading this article, chances are you’re stuck with a virus infection that is preventing you to download and/or install the Safebytes Anti-Malware program on your computer system. There are a few solutions you could try to get around with this issue.

Download the software in Safe Mode with Networking

If the malware is set to load automatically when Microsoft Windows starts, getting into Safe Mode may block the attempt. Since just the bare minimum programs and services launch in safe mode, there are hardly any reasons for conflicts to take place. Below are the steps you have to follow to boot into the Safe Mode of your Windows XP, Vista, or 7 computers (visit Microsoft site for directions on Windows 8 and 10 PCs). 1) After switching on the computer, hit the F8 key while the Windows splash screen begins to load. This should bring up the Advanced Boot Options menu. 2) Choose Safe Mode with Networking with arrow keys and press Enter. 3) Once this mode loads, you will have the internet. Now, make use of your web browser to download and install Safebytes Anti-malware. 4) Immediately after installation, run a full scan and allow the software program to get rid of the threats it finds.

Switch to an alternate browser

Web-based malware could be environment-specific, targeting a particular internet browser or attacking particular versions of the browser. If you seem to have malware attached to Internet Explorer, then switch to a different internet browser with built-in safety features, such as Chrome or Firefox, to download your preferred antivirus program – Safebytes.

Run anti-virus from your USB drive

Another option is to save and run an anti-malware software tool entirely from a Pen drive. Follow these steps to use a USB drive to fix your corrupted computer. 1) On a virus-free computer, install Safebytes Anti-Malware. 2) Put the USB drive into the uninfected computer. 3) Double-click the Setup icon of the anti-malware software package to run the Installation Wizard. 4) Select the drive letter of the flash drive as the place when the wizard asks you where you want to install the antivirus. Follow the on-screen instructions to complete the installation process. 5) Unplug the USB drive. Now you can use this portable anti-malware on the infected computer system. 6) Double-click the antivirus program EXE file on the pen drive. 7) Run Full System Scan to identify and clean-up up all kinds of malware.

Let's Talk About SafeBytes Security Suite!

If you’re looking to download an anti-malware application for your computer, there are various tools in the market to consider nonetheless, you should not trust blindly anyone, no matter whether it is a free or paid program. Some of them are excellent, some are decent, while some will ruin your computer themselves! You have to select a company that creates industry-best anti-malware and has earned a reputation as reliable. Among few good programs, SafeBytes Anti-Malware is the highly recommended tool for the security-conscious individual. Safebytes is one of the well-established PC solutions companies, which offer this complete anti-malware application. This software program could easily identify, eliminate, and protect your PC from the most advanced malware attacks such as spyware, adware, trojan horses, ransomware, worms, PUPs, and other possibly damaging software applications. There are lots of amazing features you will get with this security product. Here are some popular features present in this software: Real-time Threat Response: SafeBytes gives complete and real-time security for your personal machine. It will check your personal computer for suspicious activity at all times and safeguards your personal computer from unauthorized access. Anti-Malware Protection: This deep-cleaning anti-malware application goes much deeper than most anti-virus tools to clean your computer. Its critically acclaimed virus engine detects and disables hard-to-remove malware that conceals deep inside your PC. Web Security: Through its unique safety score, SafeBytes informs you whether a site is safe or not to access it. This will make sure that you’re always certain of your online safety when browsing the net. High-Speed Malware Scanning Engine: Safebytes Anti-Malware, with its advanced scanning engine, offers super-fast scanning that can promptly target any active online threat. Lowest CPU/Memory Usage: SafeBytes gives you complete protection from online threats at a fraction of the CPU load due to its enhanced detection engine and algorithms. 24/7 Online Technical Support: You will get 24/7 technical support to quickly resolve any problem with your security application.

Technical Details and Manual Removal (Advanced Users)

If you wish to manually get rid of iLivid without using an automated tool, it may be possible to do so by deleting the program from the Windows Add/Remove Programs menu, or in cases of browser extensions, going to the browser’s AddOn/Extension manager and uninstalling it. It is also recommended to factory reset your browser to its default condition to fix corrupt settings. If you decide to manually remove the system files and registry entries, utilize the following list to ensure that you know exactly what files to remove before executing any actions. However, editing the registry is really a complicated job that only advanced computer users and professionals should try to fix the problem. Moreover, certain malicious programs are capable to defend against its deletion. It is recommended that you do the removal process in Windows Safe Mode.
Folders: %Application Data%iLivid Registry: Key HKEY_CURRENT_USERSoftwareiLivid Key HKEY_CURRENT_USERSOFTWAREMicrosoftWindowsCurrentVersionUninstalliLivid Key HKEY_CLASSES_ROOTSOFTWAREClassesApplicationsiLividSetupV1.exe HKEY_CLASSES_ROOT.torrent HKEY_CLASSES_ROOTiLivid.torrent HKEY_CLASSES_ROOTMagnetDefaultIcon HKEY_CLASSES_ROOTMagnetshellopencommand HKEY_CURRENT_USERSoftwareiLivid HKEY_CURRENT_USERSoftwareMicrosoftWindowsCurrentVersionExplorerFileExts.torrent HKEY_CURRENT_USERSoftwareMicrosoftWindowsCurrentVersionExplorerFileExts.torrentUserChoice HKEY_CURRENT_USERSoftwareMicrosoftWindowsCurrentVersionRun HKEY_CURRENT_USERSoftwareTrolltechOrganizationDefaultsQt Factory Cache 4.8com.trolltech.Qt.QImageIOHandlerFactoryInterface:C:Users N A M E AppDataLocaliLivid HKEY_CURRENT_USERSoftwareTrolltechOrganizationDefaultsQt Plugin Cache 4.8.falseC:Users N A M E AppDataLocaliLivid
Read More
Recover or set a BIOS or UEFI Password
If you have been using Windows for quite some time now then you’re probably aware of the BIOS or UEFI password. This password lock is the one that ensures you enter the set password even before your Windows PC boots up. However, there’s just one downside with the BIOS or UEFI password – there is no recovery option, unlike your Microsoft account. Worry not though for this post will guide you on how you can set or recover a BIOS or UEFI password on your Windows computer. The BIOS or UEFI passwords are stored at the hardware level which means that unless the OEM wants or has configured a way to recover the password, it is pretty much impossible to reset it. There are times when they are so strict that the only way to get through it by contacting customer care. Note that any Windows computer with this lock can’t be unlocked by trying to reinstall Windows. In this post, you’re going to have to remove the CMOS battery temporarily, clear unknown BIOS/UEFI passwords using the bios-PW website as well as call customer care. For more details, refer to the options provided below.

Option 1 – Remove the CMOS battery temporarily

In case you didn’t know, every motherboard comes with a CMOS battery which helps the computer system to keep the clock ticking and in making sure that the BIOS settings are not lost when the computer is powered down. Every time a computer is turned on, the CMOS battery ensures that the information is available for the computer to boot up. So when you remove the CMOS battery temporarily, say about 30 seconds or a minute, the settings will be lost. There are some motherboards that are built-in ways that when you remove the battery for long, it will reset everything including the password for the BIOS or UEFI.

Option 2 – Clear the unknown BIOS or UEFI passwords using a bios-PW website

If the first option didn’t work, you can try using this BIOS Password website at http://bios-pw.org/ to clear the password.
  • When prompted by the BIOS, enter the wrong password a couple of times as doing so will lock you out of the system.
  • After that, you will see a new number or code on the screen which will include a message about System Disabled [XXXXX] Service TAG [YYYYY].
  • Next, open the BIOS Password website and enter the XXXXX code in it and make sure to tap the Shift + Enter keys or just enter.
  • Now it will open multiple unlock keys which you can use to clear out the BIOS or UEFI lock on your Windows PC.

Option 3 – Call the customer care

If the second option still didn’t work, you have to call customer care and follow their suggestions for they will walk you through fixing the problem using the service tag or might suggest that you visit a service center to make things easier for you. Note: You also have the option to set a BIOS or UEFI password. Although it isn’t recommended, you still can do it if you really want to. Remember that the BIOS or UEFI interface varies from OEM to OEM so you must find something related to either PASSWORD or SECURITY. You will have the following similar options:
  • Supervisor password – it’s the same as the master password that can change important system settings.
  • User password – with this password, any user can change minor settings.
  • Master password – you can use this password for a hard drive or as a general password.
There are several OEMs that offer micro-control where you have to enter the BIOS password. For instance, you’ll have the option to skip for a normal restart, or when you select a boot device while you might have to enter the password for unattended reboots or when your PC is powered on, etc. And if you are here to remove the password, you need to find a remove password option in the same section. You will be prompted to enter the set password once and if it’s correct, it will remove the BIOS password. After that, you have to save and exit the BIOS then restart your computer and check if the settings are properly applied.
Read More
How to Fix Windows 10 Error 0x80072efe

How to Fix Windows 10 Error 0x80072efe

Error Code 0x80072efe - What is it?

Error Code 0x80072efe is a fairly common error code that generally occurs in Windows 10. It is most often associated with the process of performing updates using the Windows Update tool.

Common symptoms include:

  • Inability to install or complete updates on your Windows machine
  • Computer freezing as programs are run or started
  • Inability to perform installations of downloaded programs
  • Programs crashing or failing to work properly

While Error Code 0x80072efe can cause a number of frustrating issues on your device, the good news is that there are several methods that can be used to fix this error. The two most common methods are actually fairly easy to perform and do not require advanced tools or knowledge. However, if you don’t feel like you will be able to perform the necessary steps on your own, be sure to get in touch with a qualified computer repair technician to help you in the resolution of this particular error.

Solution

Restoro box imageError Causes

Two things are generally behind the appearance of Error Code 0x80072efe on a Windows device. The first is that one or more of your registry keys are not available, have been corrupted, or are not installed properly. The second is that necessary DLL files aren’t working properly within your machine.

However, other things can mimic these causes, which is why the two methods listed below will resolve the issue in most cases.

Further Information and Manual Repair

Fortunately, there are two resolution methods that can be used quickly and easily when Error Code 0x80072efe arises on your Windows computer. Neither of these requires advanced knowledge or skill, but if you don’t feel comfortable with performing these steps on your own, it is recommended that you contact a qualified computer repair technician in order to get assistance.

Here are the best ways to resolve Error Code 0x80072efe on your computer:

Method One:  Check Your Time and Date Settings for Accuracy

If your time or date has been set incorrectly, it can make your system logs appear to have incorrect information, which can lead to the appearance of Error Code 0x80072efe. Because this is the easiest thing to fix if it is indeed the problem that is making the error code appear, this should always be the first thing that you try when this error code arises.

In order to check your time and date settings, follow these simple steps:

  • Step One: Make sure that you are logged into your computer as an administrator.
  • Step Two: Click on the time and date listed on the lower right edge of your screen. If the settings are not correct, choose the option to change the time and date.

If method one has not successfully resolved Error Code 0x80072efe, you may need to attempt method two.

Method Two:  Check Your Firewall Settings During Updates

In some cases, your firewall can prevent your machine from accessing the information that it needs in order for the installation or update to go through correctly. If that is the case, you can follow a few simple steps to turn off your firewall, just while you install the update, and then turn it back on.

In order to do so, follow these steps:

  • Step One: In the Start menu, choose the option to open the Control Panel.
  • Step Two: Select the option for System and Security, looking for and clicking on Windows Firewall.
  • Step Three: Turn off any private network firewalls.
  • Step Four: Reboot your computer to apply the changes that you have made.
  • Step Five: Re-attempt to run your Windows Update.

Note that if this method allows you to successfully bypass the error code, you’ll need to make sure to turn the firewall back on when you are finished. Even though it can interfere with the Update process, your firewall is still very important to your computer.

Method Three: Use An Automated Tool

If you wish to always have at your disposal a utility tool to fix these Windows 10 and other related issues when they do arise, download and install a powerful automated tool.

Read More
Resize icons on desktop quickly in Windows 10
Resize icons on desktop in Windows 10 in a matter of seconds! Hello everyone and welcome to today's quick tip. If you have ever been dissatisfied with icon size on your desktop and any of the default sizes like small, medium large, etc have not been appropriate know that there is a quick way to resize icons on your desktop in between sizes. All that you have to do in order to use this built-in feature is: Press and hold CTRL and scroll with the mouse. That's it! Find your appropriate size for icons and enjoy. icons on desktop
Read More
Fix Error Accessing the Registry in Windows
If you encounter an error saying, “error accessing the registry” when you try to merge a registry key on your Windows 10 computer, you’re not alone as some users also experienced the same problem. According to these users, they encounter the error after they’ve re-installed their Windows version and tried to open a .reg file. Based on the reports, this error could occur if the registry file does not have administrative privileges. Meaning to say, the program does not have the necessary permission to merge the .reg file. This is common with fresh installs as well as reinstalls. Moreover, this kind of issue could also occur due to system file corruption. Whichever the case may be, here are some troubleshooting tips you can check out to resolve the error.

Option 1 – Try to import the .reg file with admin privileges

As pointed out, the error may be due to a lack of admin privileges. It could be that the Registry Editor does not have admin privileges to merge the registry file. This is common with new Windows installations especially since the Registry Editor hasn’t been opened before. So you need to import the .reg file again and this time, with admin privileges.
  • Tap the Win + R keys to open the Run dialog box.
  • Then type “Regedit” in the field and tap the Ctrl + Shift + Enter keys to open the Registry Editor with admin privileges.
  • A User Account Control or UAC prompt will appear where you have to click Yes to proceed.
  • After opening the Registry Editor, go to File > Import using the ribbon bar at the top.
  • Next, use the import menu to go to the location of the file you were trying to merge. Once you’ve found it, click Open to merge it with your current registry. This should fix the problem. If not, refer to the next options below.

Option 2 – Try performing a System Restore

Running System Restore can also help you fix the error when accessing the Registry. You can do this option either by booting into Safe Mode or in System Restore. If you are already in the Advanced Startup Options, just directly select System Restore and proceed with the next steps. And if you have just booted your PC into Safe Mode, refer to the steps below.
  • Tap the Win + R keys to open the Run dialog box.
  • After that, type in “sysdm.cpl” in the field and tap Enter.
  • Next, go to the System Protection tab then click the System Restore button. This will open a new window where you have to select your preferred System Restore point.
  • After that, follow the on-screen instructions to finish the process and then restart your computer and check if the problem is fixed or not.
  • Once the next startup is complete, you have to merge or import the file again and see if the error is now fixed or not.

Option 3 – Try to perform repair install by creating a Windows 10 installation media

  • Click this link and then click the Download Tool Now button.
  • Next, click the “Use the tool to create installation media (USB flash drive, DVD, or ISO file)…” option and follow the next given instructions on the screen.
  • Now select the ISO file option in step 5.
  • After that, you should now have an ISO file.
  • Next, go to the location where you’ve downloaded the ISO file.
  • Then right-click on the Windows 10 ISO file and select the Open with option and then select File Explorer.
  • Now click on “setup.exe” and follow the next instructions that appear on the screen. When asked, you have to select either Nothing (clean install) or Keep personal files only option. Take note that you must not select the “Keep personal files, apps, and Windows settings since it doesn’t really work.

Option 4 – Try running the System File Checker Scan

As mentioned, the error when accessing the Registry might be caused by file corruption. And that’s where the SFC scan comes in. The SFC or System File Checker scan could detect and automatically repair damaged system files. SFC is a built-in command utility that helps in restoring corrupted files as well as missing files. It replaces bad and corrupted system files with good system files. To run the SFC command, follow the steps given below.
  • Tap Win + R to launch Run.
  • Type in cmd in the field and tap Enter.
  • After opening Command Prompt, type in sfc /scannow
The command will start a system scan which will take a few whiles before it finishes. Once it’s done, you could get the following results:
  1. Windows Resource Protection did not find any integrity violations.
  2. Windows Resource Protection found corrupt files and successfully repaired them.
  3. Windows Resource Protection found corrupt files but was unable to fix some of them.
  • Now restart your computer.
Read More
Parallels Desktop 17 brings Windows 11 to MAC
Parallels Desktop 17
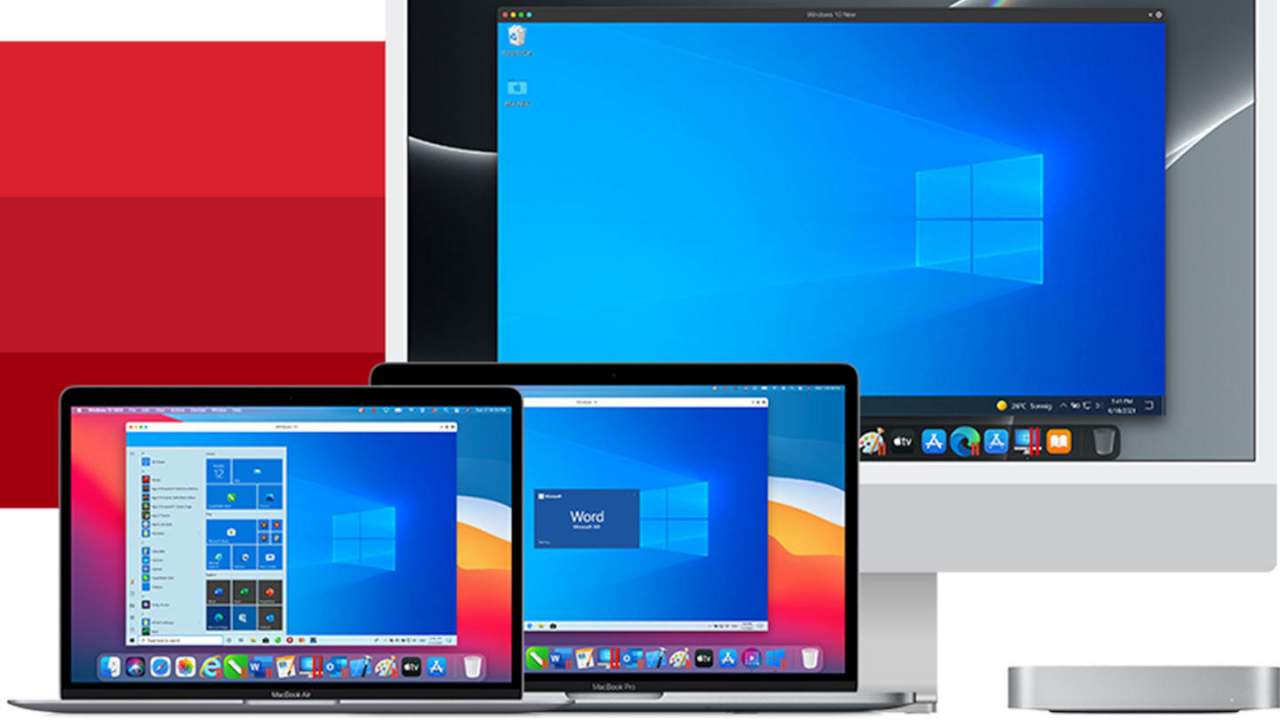
Parallels is an application developer for MAC OS mostly known for its PC virtualization software Parallels Desktop, a PC virtualization software running on Macs enabling running Windows and Linux with respective software on your MAC. With its latest Desktop 17 version, the software can run natively on both Intel-based and M1-based MACs. Thanks to this feature MAC users will be able to benefit from various speed improvements while running both Windows 10 or Windows 11 preview. On both Intel and M1 setups, Parallels resumes Windows and Linux up to 38% faster, provides an up to 25% bump in 2D graphics and a six-time increase in OpenGL graphics processing. M1-centric stats include 33% faster Windows start-up times, up to 28% faster DirectX 11 performance, and up to 20% better disk performance on Windows 10 Insider Preview. Parallels Desktop 17 delivers a set of fresh features including a new video driver that enhances video and game playback and boosts Windows UI responsiveness. An improved Coherence mode lets users run Windows apps within the Mac environment, cutting down on distracting changes in appearance during Windows sign-in, shut down, and software updates. Drag-and-drop operations are also improved, with support for text and graphics between Mac and Windows applications. This function works well with MAC OS Monterey's Quick Note feature, which can accept content from any Windows app. USB support, disk management, copy and paste unformatted text, and automatic virtual machine optimization also receive upgrades.
Read More
How to Fix Error Code 0xc004f034 in Windows 10

Error Code 0xc004f034 – What is it?

Error code 0xc004f034 occurs when Windows 10 users fail to activate their operating system. This activation error code affects not only Windows 10 but those using other versions of the Windows operating system including Windows 8.1. Users experiencing this problem will notice the following common symptoms which occur:

  • Inability to activate Windows 10 operating system
  • Message box with error code 0xc004f034

Solution

Restoro box imageError Causes

Error code 0xc004f034 usually results from issues related to activation servers. In such cases when servers are busy, users will not be able to complete the activation process which would result in access to their Windows 10 edition of choice. The error code may also result from issues related to your product key. For this reason, be sure to use the correct product key when you attempt to activate Windows 10.

Further Information and Manual Repair

The completion of manual repair methods can be an effective way to correct issues like error codes in Windows 10. To begin, however, ensure you follow the instructions as given as making even a slight mistake will result in unfavorable results. If, for whatever reason, you have trouble completing the steps suggested below, feel free to contact a Windows repair technician. This type of IT professional is usually equipped with knowledge and expertise to access your particular situation. Otherwise, see the manual repair methods listed below and complete at least one method to fix error code 0xc004f034.

Method One: Ensure You Enter a Valid Product Key

If there is a problem with your product key, you will need to ensure you fix it before you can resolve error code 0xc004f034. Follow the instructions below after ensuring you have a valid product key.

  • Step one: Click the Start button then select Settings
  • Step two: Select Update & security then Activation
  • Step three: Click the Change product key
  • Step four: Type in your valid product key with its 25 characters in the correct order

Your system will activate Windows 10 if the issue was related to the use of an invalid product key. However, attempt manual method two if error code 0xc004f034 reappears and you are unable to complete the activation process.

Method Two: Reattempt Windows 10 Activation Until Process Completes

In many cases, error code 0xc004f034 occurs simply due to a busy server. This was the case in 2015 in particular when Windows users first received access to editions of Windows 10 like Windows 10 Pro. To complete this process, you will need to follow the instructions below, repeating the last step until the activation occurs.

  • Step one: Click the Start button then select Settings
  • Step two: After selecting Settings, click Update & Security
  • Step three: Select Windows Update then the Check for updates tab
  • Step four: Click Activate Windows 10 update

If this method is successful, you will finally be able to update your system to the Windows 10 edition of your choice. This process may take just a few minutes – and several attempts – before you resolve the issue. Remember to be patient. However, contact a Windows repair technician to evaluate your system if the issue persists for more than a few days.

Method Three: Use an Automated Tool

If you wish to always have at your disposal a utility tool to fix these Windows 8 and other related issues when they do arise, download and install a powerful automated tool.
Read More
1 2 3 162
Logo
Copyright © 2022, ErrorTools. All Rights Reserved
Trademarks: Microsoft Windows logos are registered trademarks of Microsoft. Disclaimer: ErrorTools.com is not affiliated with Microsoft, nor claim direct affiliation.
The information on this page is provided for information purposes only.
DMCA.com Protection Status