Ordinal not found, dynamic link library Error

If you encounter an error message saying, “The ordinal xxx could not be located in the dynamic link library C:/Program Files (x86)/Microsoft VS Code Insiderscode – insiders.exe“ and you see a reference of a missing DLL file, then this indicates that the software is trying to locate the related DLL file, however, it is missing, hence the error.

The error mentioned “Ordinal” which refers to the order of a number mathematically, e.g. 1st, 2nd, etc. And in this error message, the ordinal is referring to an Xth file of an XX.DLL file which is missing which is why you’re getting this kind of error.

When you get this particular error, it means that your computer is missing the Microsoft Visual C++ Redistributable program. As per the error message, XXX is a number that in turn is the Ordinal. There is also another common error related to Ordinal which says, “The ordinal 12404 could not be located in the dynamic link library mfc90u.dl”.

The error message could be referring to any DLL in the message. And since all these DLL files are part of the package, the error changes quite a bit as the Visual Studio looks for that DLL file. To fix this error, here are some suggestions that might be of help.

Option 1 – Try installing Microsoft Visual C++ Redistributable

As pointed out earlier, the error pops up when the Microsoft Visual C++ Redistributable program is missing on your computer. Thus, you need to download it from the official website of Microsoft. Once you’ve downloaded the Microsoft Visual C++ Feature Pack Redistributable Package, install it and then check if the error is now fixed.

Option 2 – Try to install OpenSSL

If you encounter the same error message but it points out that the LIBEAY32.DLL file is missing, then you have to install OpenSSL. In such a case, you will see the following error message:

“Ordinal not found. The Ordinal [Xxxx] could not be located in the Dynamic Link Library Libeay32.dll.”

 Make sure that when you install OpenSSL, you do it into the Windows system directory since the Libeay32.dll file is related to security.

Option 3 – Try to check Windows Updates

There are instances when Microsoft rolls out the framework and related updates via Windows Updates. It could be that an update related to DLL is still pending which is why you need to check Windows Updates. To do so, go to Settings > Update and Security and from there check if there is any pending update. If there is, you need to install that update and then restart your computer if needed.

If you like to learn and find out more about various Windows errors, and how to repair them go to our vast archive or use search to find articles that will explain and help you in solving your issue.
However, if you prefer to do things fast and with automatization then we are proposing to use an automated solution for your issues. The application that we are recommending is Advanced System Repair Pro
Advanced System Repair utilizes multiple tools all in one to give you a quick, simple, reliable, and very thorough diagnosis of your PC. It brings you all the tools you need in one program to clean, fix, protect, optimize and boost your PC!
1-Click Maintenance
All the tools to make it simple and easy! It's like having a professional technician at the click of a mouse.

Junk Cleaner
Keeping your computer free from unnecessary clutter also helps make your computer last longer. Like any other machine, if you keep it clean and take care of it, it will serve you better for longer!

Optimize background apps
Optimize applications background activity with the built-in Application Optimizer feature.

Disk Defrag
With a simple 1-click, Advanced System Repair speeds up your PC by assembling fragmented files on your machine and organizing them more efficiently.

Malware Removal
Finds and removes all types of harmful malware including trojans, worms, bots, adware, spyware, PUPs, and more!

Privacy Cleaner
The all-in-one privacy suite to Clean Your Tracks & Protect Your Privacy! Make your computer safe, secure, and more efficient!

System Tweak/Optimizer
ASR will analyze your complete system and settings to adjust your PC to function at its maximum performance.

Registry Cleaner
Over time, as you install and uninstall applications, the registry can become cluttered with old entries and broken settings which can result in program crashes, and annoying messages and slow the computer down.
Visit our Advanced System Repair Pro Download page to inform yourself about all the benefits of this software and get a free trial copy of it.
advanced system repair pro

Advanced System Repair Pro

One-click automated PC repair solution
ASR logo
With Advanced System Repair Pro you can easily
Replace damaged files
Restore performance
Free disk space
Remove Malware
Protects WEB browser
Remove Viruses
Stop PC freezing
DOWNLOAD
Privacy Policy | Terms of Use | Uinstall
Advanced System Repair Pro is compatible with all versions of Microsoft Windows including Windows 11

Share this article:

You might also like

How to Fix the Socket Error 10060

Repair Socket Error 10060

Socket Error 10060 - What is it?

Socket Error 10060 is a typical Outlook Express error. This error often occurs when the connection to the server fails. It specifically refers to a timeout while communicating with the email providers servers. The vast majority of all emails use SMTP for outgoing mail. Socket error 10060 in most instances is related to the SMTP settings for the user’s email. The error message is sometimes displayed in the following format:
Outlook Express Socket Error10060 - The connection to the server failed Account:’ your account’
Another thing you must know about this error is that it only stops the user from sending emails. This means that you can only receive emails, not send them.

Solution

Restoro box imageError Causes

The cause of this error code is hard to narrow down typically because there are many causes that can trigger the socket error code 10060. Some of the most common causes of this error code are:
  • Issues in email settings
  • Authentication settings
  • Firewall settings
  • Malware
Though this is not a critical error code it is advisable to fix it immediately without any delays. This error can hamper your communication via email and slow down your work productivity especially if you use Outlook for communication across the organization.

Further Information and Manual Repair

Here are some of the many methods to fix and resolve this error code. To help you resolve this issue, we have selected and listed down the best, quick, and easy do-it-yourself methods. Try them and repair Socket error code 10060 all by yourself without any professional assistance.

Method 1 - Check the Names of POP3 and SMTP Servers

To begin with, first check the names of the POP3 and SMTP servers to ensure that they are correct. Then check the outgoing SMTP port. Contact your email provider to determine the correct settings. Sometimes email providers change this value more than any other in their individual settings. Get it verified. Change the settings if needed.

Method 2 - Outgoing SMTP Server Requires Authentication

Sometimes the error code may occur due to authentication issues. If this is the reason then, don’t worry it is easy to fix. Simply go to the settings options and check the box ‘My server requires authentication’. Once you check the box, try sending the email again. This is most likely to resolve the socket error 10060 on your PC.

Method 3 - Disable Firewall

Your Firewall security may sometimes be the reason for socket error 10060 too. Therefore if after trying method 1 and 2, the error still persists, then it is advisable to disable firewall. Once you disable it, try sending an email using your Outlook account. If it works, the error is resolved.

Method 4 - Scan for Malware

There is a possibility that the Socket error 10060 is popping on your PC due to malware infection. If so, then it is advisable to download Restoro. This is a highly functional and a user-friendly PC fixer deployed with a powerful antivirus and several other scanners. Run it on your PC to scan for malware. It detects and removes all types of malware including Trojans, viruses, adware, spyware, and more in seconds. Click here to download Restoro to resolve socket error 10060 on your system today.
Read More
DRIVER_UNLOADED_WITHOUT_CANCELLING_PENDING_OPERATION
If you encounter the DRIVER_UNLOADED_WITHOUT_CANCELLING_PENDING_OPERATION Blue Screen error with an error code of 0x000000CE then it means that a driver failed to cancel the pending operations before unloading. Some of the driver files that might be the culprit include the intelppm.sys, intcdaud.sys, tmxpflt.sys, mrxsmb.sys and asusptpfilter.sys. This kind of Blue Screen error occurs when the driver failed to cancel lookaside lists, worker threads, DPCs, and other items before unloading. You can usually identify which driver file is triggering the BSOD error in the BSOD error itself since its name would be printed on the blue screen and stored in memory at the location (PUNICODE_STRING) KiBugCheckDriver. Refer to the possible solutions given below to fix the DRIVER_UNLOADED_WITHOUT_CANCELLING_PENDING_OPERATIONS error.

Option 1 – Perform a System Restore

Performing System Restore might help you in fixing the SYNTP.SYS Blue Screen error. You can do this option either by booting into Safe Mode or in System Restore. If you are already in the Advanced Startup Options, just directly select System Restore and proceed with the next steps. And if you have just booted your PC into Safe Mode, refer to the steps below.
  • Tap the Win + R keys to open the Run dialog box.
  • After that, type in “sysdm.cpl” in the field and tap Enter.
  • Next, go to the System Protection tab then click the System Restore button. This will open a new window where you have to select your preferred System Restore point.
  • After that, follow the on-screen instructions to finish the process and then restart your computer and check if the problem is fixed or not.

Option 2 – Disable the BIOS Memory options

Disabling the BIOS Memory options such as Caching and Shadowing can help you in fixing the DRIVER_UNLOADED_WITHOUT_CANCELLING_PENDING_OPERATIONS Blue Screen error. All you have to do is enter the BIOS first and then use the Arrow and Enter keys to select your choices. And if you can’t seem to find it, look for specific instructions from your OEM or you could also look out for instructions from the manufacturer of your motherboard.

Option 3 – Update or rollback your device drivers

If the first option didn’t work for you, then it’s time to either update or roll back the device drivers. It is most likely that after you updated your Windows computer that your driver also needs a refresh. On the other hand, if you have just updated your device drivers then you need to roll back the drivers to their previous versions. Whichever applies to you, refer to the steps below.
  • Open the Devices Manager from the Win X Menu.
  • Then locate the device drivers and right-click on them to open the Properties.
  • After that, switch to the Driver tab and click on the Uninstall Device button.
  • Follow the screen option to completely uninstall it.
  • Finally, restart your computer. It will just reinstall the device drivers automatically.
Note: You can install a dedicated driver on your computer in case you have it or you could also look for it directly from the website of the manufacturer.

Option 4 – Try to run the CHKDSK utility

Running the CHKDSK utility might also help you resolve the DRIVER_UNLOADED_WITHOUT_CANCELLING_PENDING_OPERATIONS Blue Screen error. If your hard drive has issues with integrity, the update will really fail as the system will think that it’s not healthy and that’s where the CHKDSK utility comes in. The CHKDSK utility repairs hard drive errors that might be causing the problem.
  • Open Command Prompt with admin privileges.
  • After opening Command Prompt, execute the following command and hit Enter:
chkdsk /f /r
  • Wait for the process to be completed and then restart your computer.

Option 5 – Run the Memory Diagnostic Tool to check for Memory leaks

  • Tap the Win + R keys to open Run and type exe and hit Enter to open the Windows Memory Diagnostic Tool.
  • After that, it will give two options such as:
    • Restart now and check for problems (Recommended)
    • Check for problems the next time I start my computer
  • Once your computer has restarted, perform a basic scan or you could also go for the “Advanced” options such as “Test mix” or “Pass count”. Simply tap the F10 key to start the test.
Note: After you select the option, your PC will restart and check for memory-based issues. If it finds any issues, it will automatically fix them and if there’s no issue found, then it’s most likely not a memory-based issue so you should try the other options given below.

Option 6 – Try analyzing the Memory Dump Files

You can also try to analyze the Memory Dump files as it can help you identify the root cause of the DRIVER_UNLOADED_WITHOUT_CANCELLING_PENDING_OPERATIONS error.

Option 7 – Try checking the Registry settings

You might also want to try disabling the concerned driver file if it is mentioned in the Stop error. For example, if the stop error mentioned the “intelppm.sys” driver file then you have to disable this driver file since it is most likely the culprit. To do that, follow the steps below.
  • Tap the Win + R keys to open the Run dialog box.
  • Next, type “Regedit” in the field and hit Enter to open the Registry Editor.
  • After that, go to the this registry path: HKEY_LOCAL_MACHINE > SYSTEM > CurrentControlSet > Services > Processor
  • From there, double click on Start and change its value to “4”.
  • Now go to this path: HKEY_LOCAL_MACHINE > SYSTEM > CurrentControlSet > Services > Intelppm.
  • Set its value to “4” and then restart your computer to apply the changes made.

Option 8 – Run the Blue Screen Troubleshooter

The Blue Screen troubleshooter is a built-in tool in Windows 10 that helps users in fixing BSOD errors like DRIVER_UNLOADED_WITHOUT_CANCELLING_PENDING_OPERATIONS. It can be found on the Settings Troubleshooters page. To use it, refer to these steps:
  • Tap the Win + I keys to open the Settings panel.
  • Then go to Update & Security > Troubleshoot.
  • From there, look for the option called “Blue Screen” on your right-hand side and then click the “Run the troubleshooter” button to run the Blue Screen Troubleshooter and then follow the next on-screen options. Note that you might have to boot your PC into Safe Mode.
Read More
How to Resolve Error 80073712 in Windows 10

Error Code 80073712—What is it?

Error code 80073712 is one of the dozens of error codes affecting Windows 10 users. It occurs when users attempt to upgrade their operating system but experience a failure. The error code usually results from problems associated with missing or damaged files within Windows Update. Common symptoms of this error code include the following:

  • The inability of Windows Update to successfully complete the upgrade process
  • Message box highlighting the presence of error code

Solution

Restoro box imageError Causes

In the case of error code 80073712, the issues preventing Windows Update from completing the upgrade process are most likely due to problems with files within Windows Update. For instance, there may be corruption within the Component-Based Servicing (CBS) manifest.

Further Information and Manual Repair

Manual repair methods offer solutions to Microsoft users who are experiencing Windows error codes like the upgrade error code 80073712 in Windows 10. The manual repair methods in this article are not guaranteed to fix problems unrelated to this error code. Thus, be certain you are experiencing error code 80073712 before you attempt to implement the solutions provided below.

Method One: Run Windows Update Troubleshooter

Since issues related to Windows Update may be causing error code 80073712 to occur, one of the best solutions you can consider is to run the Windows Update Troubleshooter. This troubleshooter will be able to detect and fix corruptions within Windows Update files or any other issues directly related to Windows Update. To implement this manual repair method, follow the steps listed below:

  • Step one: Open your Internet browser
  • Step two: Type www.microsoft.com/downloads
  • Step three: Type Windows Update Troubleshooter in the search bar at the top-right corner of the Microsoft website.
  • Step four: Select Windows Update Troubleshooter then wait for the webpage to load.
  • Step five: Select Run troubleshooter

Once you run the troubleshooter, you should be able to verify and fix any errors within Windows Update files. Restart your machine after the troubleshooting process is complete them proceed by checking Windows Update to see if you are able to complete the upgrade. If Windows Update downloads the upgrade and the installation of the upgrade occurs, the problem has been resolved. Otherwise, error code 80073712 will reoccur, in which case you will need to move to manual repair method two.

Method Two: Run DISM Tool

Another option available to Windows users experiencing error code 80073712 is to download and run the Deployment Image Servicing and Management (DISM) tool. This tool checks for inconsistencies or corruptions that may be preventing Windows Update services from functioning correctly. To download and run the tool, follow the instructions below:

  • Step one: Type Command Prompt in the search box near the Start button
  • Step two: Right-click Command Prompt, then click Run as administrator, providing administrator password or confirmation where necessary.
  • Step three: Select Allow
  • Step four: Press Enter after typing the following command:
DISM.exe /Online /Cleanup-image /Restorehealth

Wait a few minutes to ensure that the process is complete. Once you’ve run the DISM tool, it will detect errors, for instance within registry data, and correct or replace them. Restart your machine after running this tool then check Windows Update. Attempt to download the upgrade to see if you have successfully resolved error code 80073712. If you experience an upgrade failure, move to the next manual repair method mentioned below.

Method Three: Perform a Clean Install of Windows 10

The issues related to error code 80073712 may also be resolved by performing a clean install of Windows 10. This manual repair method ensures that any previous versions of your Windows operating system are removed before you attempt to access an upgrade. This can prove effective as it helps users avoid issues that would otherwise cause error codes or poor PC performance in cases where errors are present on one’s system.

To successfully perform a clean installation of Windows 10, be prepared to follow step-by-step procedures that include the following:
  • Step one: Download and run media creation tool
  • Step two: Click Run, then select Create installation media for another PC
  • Step three: Select changes to the installation options, then select Next
  • Step four: Choose USB flash drive or ISO file, then click Next
  • Step five: Select drive, then Next
  • Step six: Select Finish, then restart your computer, ensuring that the media option you choose, whether USB flash drive or DVD, is in your machine before you choose to reboot.
  • Step seven: Press any key then follow the prompts provided to set up Windows 10.

Method Four: Download an Automated Tool

If you wish to always have at your disposal a utility tool to fix these Windows 8 and other related issues when they do arise, download and install a powerful automated tool.

Read More
Problem prevented document from being scanned
If an error suddenly pops up that states, “A problem prevented the document from being scanned” when you’re scanning a document in your computer, then you’ve come to the right place as this post will guide you on how exactly you can fix the problem. A lot of users have reported that they receive a two-layer error message when they try to scan their documents – the first screen throws an error message that says, “Error applying Settings to Driver” while the next error message states, “A problem prevented the document from being scanned”. As a result, the scanning won’t be completed which defeats the whole process of buying a printer with a scanner. As you can see the two error messages point to two different situations, while the other one is pointing at the driver, the second one points to the scanning problem. To resolve these issues, there are several suggestions you need to check such as follows:

Option 1 – Run the Printer Troubleshooter

One of the first basic troubleshooting you can perform to resolve the printer issue is running the Printer Troubleshooter. This built-in troubleshooter can detect and automatically fix the problem for you. To use it, follow these steps:
  • Tap the Win + R keys to open the Run dialog box.
  • Next, type “msdt.exe /id PrinterDiagnostic” in the field and click OK or hit Enter to open the Printer Troubleshooter.
  • Then click the Next button and follow the next on-screen instructions to fix the issue with the printer.

Option 2 – Try updating the Printer drivers

You might also want to try updating your printer drivers. All you have to do is locate the USB Composite Device. For complete details, follow the steps below.
  • First, click the Start button and type “device manager”.
  • Then click on the “Device Manager” from the search results to open it.
  • From there, look for the USB Composite Device option and right-click on it, and select the Update Driver from the options.
  • Restart your PC and then click the “Search automatically for updated driver software” option.
Note: You also have the option to download the latest version of your Printer from the manufacturer’s website.

Option 3 – Try to reset the settings of the Printer or reinstall it

If none of the two options given above worked, you can try to either reset the printer settings or reinstall the printer so that it can go back to its default state. However, if it doesn’t work, you can try to uninstall the printer as well as its related drivers. To do so, follow these steps:
  • First, go to Settings > Devices > Printer and Scanners.
  • After that, select the printer and select the Remove Device option.
  • Once done, restart your computer and check again and see if the error is now fixed.

Option 4 – Try to modify the Registry settings for the Still Image devices

In case you don’t know, Windows has Registry settings for the Still Image devices like Scanners and Printers. And these devices have vendor-specific settings that if ended up getting corrupted or misconfigured then you will most likely encounter errors like “A problem prevented the document from being scanned”. Thus, to fix this error, you can try modifying the Still Image devices registry settings, and to do that, you need to follow the instructions below but before that, make sure that you create a System Restore Point first.
  • Once you’ve created a System Restore point, tap the Win + R keys to open the Run dialog box and type “Regedit” in the field, and then hit Enter to open the Registry Editor.
  • Next, navigate to this registry key: HKEY_LOCAL_MACHINESYSTEMCurrentControlSetControlStillImage
  • From there, right-click on the “StillImage” registry key and delete it.
  • After that, exit the Registry Editor and restart your computer.
  • Once your computer has restarted, Windows will recreate the settings of the Still Image devices back to their default settings.
Read More
A Guide to Quick Fixing Error 10013

Repair Error 10013

Error 10013 - What is it?

Error 10013 is a type of Socket Windows PC error. Socket error 10013 occurs when the attempt to access the server is denied. This indicates that the needed socket connection is denied which further implies that a port is blocked or unreachable.

Solution

Restoro box imageError Causes

The socket error 10013 can occur due to multiple reasons:
  • Antivirus or firewall software
  • Incompatible drivers
  • Registry corruption
  • Misconfigured files

Further Information and Manual Repair

To resolve the socket error 10013 on your PC, here are some methods that you can try:

1. Disable Firewall

To resolve this issue on your PC, you may have to temporarily disable Firewall. Sometimes Firewall can stop you from connecting to the server. Try doing this; it is most likely to resolve the error. If the Firewall is the reason for the denied access, turning it off will surely help.

2. Disable your Antivirus Software

If disabling the Firewall doesn’t resolve the issue, try disabling your antivirus software temporarily. If the error still persists, then try other solutions listed below.

3. Upgrade Drivers

Incompatible drivers could be a reason too for denied server access. Your server may no longer be using the drivers that you have on your PC which is why you may not be getting permission to access it. If this is the cause, then the best way to resolve it is to upgrade drivers. To find out about new drivers, visit the software manufacturer’s website for new drivers and then download them to your PC.

4. Registry Issues

Sometimes the underlying cause of the error could be registry issues and misconfigured files. If you don’t wipe out unnecessary and obsolete files from your systems like junk files, cookies, internet history, temporary files, and other files from your PC, it can damage and corrupt the registry and misconfigured files thereby causing socket error 10013 on your system. To resolve registry issues and repair your PC, download Restoro. It is an advanced, easy to use, and highly functional PC fixer embedded with multiple utilities including a powerful registry cleaner. It is deployed with an intuitive algorithm that scans and detects all registry issues in seconds. It removes all the unnecessary and obsolete files stored in your PC overloading your registry. This registry cleaner repairs the damaged and misconfigured files and restores the registry, thereby resolving socket error 10013 on your system right away. It has simple navigations and a user-friendly interface which makes it very easy for all levels of users to work around and use it to its maximum advantage.  Furthermore, it can be installed on all Windows PC. Restoro is compatible with all Windows versions. In addition to this, it also includes several other value-added features such as an antivirus, a system optimizer, and an Active X controls and class scanner. These utilities can be used to resolve numerous other PC-related errors. Click here to download Restoro today and resolve socket error 10013 on your PC right away.
Read More
Application failed to initialize 0xc0000005
If you suddenly encountered an error saying, “The application failed to initialize properly (0xc0000005)” when you are using an application on your Windows 10 computer, read on as this post will provide you some potential fixes that could help you fix the error. You can encounter the “The application failed to initialize properly (0xc0000005)” error on many applications such as VLC, Chrome, Word, and any other executable files and even the operating system files. When you get this kind of error, you will see the following error message:
“The application failed to initialize properly (0xc0000005). Click on OK to close the application.”
This kind of application error can occur due to several reasons which include damaged installation of the application or system files may have gotten corrupted or damaged. It could also be caused by a malware infection. There are a couple of suggestions provided in this post to help you resolve the error. You can try to run both a System File Checker scan and the DISM tool or reinstall the problematic application or repair-install Windows 10 as well as run a malware scan. Note that the options provided below do not have to be followed in sequence.

Option 1 – Try to run a System File Checker scan

As mentioned, the error could be due to corrupted or damaged system files and one of the ways you can fix that is by running a System File Checker or SFC scan on your computer. To do so, follow these steps:
  • In the Windows Start Search, type “command prompt” and right-click on Command Prompt from the search results, and then select the “Run as administrator” option.
  • After opening Command Prompt with admin privileges, type the “sfc /scannow” and tap Enter to execute it.
  • Once the scan is finished, restart your computer and see if the “The application failed to initialize properly (0xc0000005)” error is fixed or not.

Option 2 – Run the DISM tool

You can try running the Deployment Imaging and Servicing Management or DISM tool to fix the application error. Using this built-in tool, you have various options such as the “/ScanHealth”, “/CheckHealth”, and “/RestoreHealth”.
  • Open the Command Prompt with admin privileges.
  • Then type in the following commands and make sure to hit Enter right after you type each one of them:
    • Dism /Online /Cleanup-Image /CheckHealth
    • Dism /Online /Cleanup-Image /ScanHealth
    • exe /Online /Cleanup-image /Restorehealth
  • Do not close the window if the process takes a while as it will probably take a few minutes to finish.

Option 3 – Try reinstalling the application

You might also want to uninstall the application and download its latest working version and then install it back again. Note that when you do this, you will lose all your app data.

Option 4 – Try to repair install Windows 10

  • First, you have to click this link and then click the Download Tool Now button.
  • Next, click the “Use the tool to create installation media (USB flash drive, DVD, or ISO file)…” option and follow the next given instructions on the screen.
  • Now select the ISO file option in step 5.
  • After that, you should now have an ISO file.
  • Next, go to the location where you’ve downloaded the ISO file.
  • Then right-click on the Windows 10 ISO file and select the Open with option and then select File Explorer.
  • Now click on “setup.exe” and follow the next instructions that appear on the screen. When asked, you have to select either Nothing (clean install) or Keep personal files only option. Take note that you must not select the “Keep personal files, apps, and Windows settings”.

Option 5 – Try scanning your computer using Windows Defender

It is possible that your computer is infected with malware which could be why you’re getting the “The application failed to initialize properly (0xc0000005)” error. Thus, you need to scan your computer using Windows Defender.
  • Tap the Win + I keys to open Update & Security.
  • Then click on the Windows Security option and open Windows Defender Security Center.
  • Next, click on Virus & threat protection > Run a new advanced scan.
  • Now make sure that Full Scan is selected from the menu and then click the Scan Now button to get started.
Read More
The Extended Attributes Are Inconsistent Error
One of the most critical errors inside your Windows operating system is The Extended Attributes Are Inconsistent error. This error means that your operating system has been corrupted and it may produce many annoying issues like for example time lags, random crashes, and even freezing of the system when running multiple applications. There are a lot of reasons for this error, from the registry to faulty application installations to sometimes even hardware issues like bad RAM memory or bad hard drive. Mostly issue is due to corrupted files inside Windows and most often people only think that resetting the PC or complete reinstallation is the only way to fix this problem. Although reinstalling the system or resetting the PC will solve this error for sure there are other less time-consuming ways to fix this error. The Extended Attributes Are Inconsistent Error
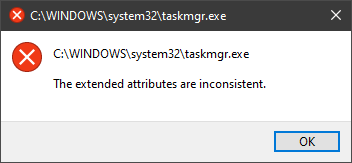
In this guide, we will show you common ways in fixing Extended Attributes are inconsistent errors inside your Windows that are easy to do and less time-consuming than complete reinstallation of the system.

Fixing Extended Attributes Are Inconsistent error

Run SFC scan

  1. Press ⊞ WINDOWS + X to open the hidden menu
  2. Click on command prompt (admin)
  3. In command prompt type in SFC /scannow and press ENTER
  4. Wait for the operation to complete
  5. Reboot your PC

Use System Image Repair Tool

  1. Press ⊞ WINDOWS + X to open the hidden menu
  2. Click on command prompt (admin)
  3. In command prompt type in Dism /Online /Cleanup-Image /RestoreHealth and press ENTER
  4. Wait for the operation to complete
  5. Reboot your PC

Change all user accounts to the administrator

  1. Press ⊞ WINDOWS + R to open the run dialog
  2. Type in netplwiz and press ENTER
  3. Select a first user account and click on Properties
  4. Click on the Group Membership tab
  5. Choose Others from the options
  6. Select administrator (if all accounts are already administrators change all to users)
  7. Repeat process for all other accounts
  8. Click OK to save settings

Change Windows Sound scheme to default

  1. Right-click on the sound icon in the taskbar
  2. Click on Sound options
  3. Go to the Sounds tab
  4. In Sound Scheme click and choose Windows Default
  5. Under Program Events choose Windows User Account Control
  6. Click on the drop-down menu and choose None
  7. Click on Apply
  8. Click on OK

Downgrade the Sound driver

  1. Press ⊞ WINDOWS + X to open the hidden menu
  2. Click on Device Manager
  3. Find your Audio driver and right-click on it
  4. Click on uninstall and then on OK
  5. Reboot your system

Do System Restore

If none of the provided solutions have worked, perform a system restore to the last point where everything was working fine.

Reset PC

If even system restore has not solved the issue or you do not have valid point in system restore time, perform Reset this PC and hopefully, the error will be finally fixed.

Conclusion

If all of the provided methods have not managed to repair this error that checks your hardware, your computer might have some faulty components if after complete PC reset error persists.
Read More
Hardware review: Bytezone Advanced desk
If you spend a large amount of time gaming or working on a computer gaming chair is a very important asset. One other thing that is mostly looked past but could help greatly is a good desk. A great chair accompanied by a great desk can make your long sitting sessions more pleasant and more healthy which is very important in the long run. Hey, but it is only a desk, what is so special about having an expensive desk? Well truth to be told desk is just a desk and any kind of desk can serve the purpose of hosting a keyboard, mice, and screen. But a good desk will offer some other advantages that may not seem so important but they could mean a lot like adjusting desk height so it fits perfectly on your size and sitting position making long hours more pleasant and lower stress on hands sitting on it.

bytezone gaming deskAdvanced desk features

Bytezone might not be a company that will sound familiar to you, mostly because they manufacture gaming chairs and desks, now in the gaming chairs world there are a lot of competitors and Bytezone has managed to make a name for itself despite this fact. But they are more popular in their gaming and office modern-looking desk category. The advanced desk is made from carbon steel and plastic combination, it is very durable and it weighs 27kg. Now that is not really light but it is not very heavy if we compare it to wood desks. The top layer of the table is made from easy-to-clean material and the desk comes with a large mouse and keyboard pad. The table itself includes a cup holder, headphones bracket under the table and it has a cable management drawer in the back. The desk is sized 66x120x76 cm. Also for anyone interested desk itself comes also with RGB lights for that true gaming feel.
Read More
Fix Chassis Intruded…Fatal Error…System Halted
When you encounter an error message that says, Chassis Intruded…Fatal Error…System Halted on your monitor then it indicates that the Chassis or the cabinet that holds the CPU, GPU, motherboard, and many more is open. It is a security feature offered by OEMs wherein a connector that is found in the motherboard can detect if the chassis component has been replaced or removed. There are a few OEMs that offer onboard speaker or PC chassis speaker which goes off in this kind of situation. Obviously, the problem has something to do with the hardware and in most cases, you have to put the jumper back on the motherboard with the pin-labeled chassis signal and ground. There are times when some OEMs offer a simple switch that is armed automatically when you properly close the chassis. Thus, you need to check if this switch has something to do with the error. If there is no switch or if it doesn’t resolve the issue, although you may be able to get into Windows with a warm boot, the normal Windows boot won’t really work unless you fix the problem. It is rather false positive and has something to do with the RTC RAM state or the BIOS. You might need to completely disable the Chassis intrusion feature to fix the error. Refer to the suggestions given below to try and fix the “Chassis Intruded, Fatal Error … System Halted” error.

Option 1 – Try to clear CMOS

You can easily clear CMOS by shorting two pins which can be found side by side on the motherboard. Keep in mind that it may vary from OEM to OEM although the basics are still the same to clear CMOS. In addition, you might also have to download the manual from the OEM’s website so that you’ll know its exact location.

Option 2 – Try booting into the BIOS

You can also try booting into the BIOS. All you have to do is tap either the DEL or F2 keys to get there. Note that everything will be set back to their default setting after you reset the CMOS.

Option 3 – Try disabling Chassis intrusion

In this option, you have to look for the Chassis intrusion feature in your BIOS. It might be located under security. From there, disable it and check if the problem’s fixed.

Option 4 – Try to reconfigure the BIOS

Once you have disabled the Chassis feature, you need to reconfigure the BIOS the way you expect it to be or to what it was before the reset.
Read More
TitleBar, Minimize, Maximize and Close missing
In case you don’t know, the Title bar comes with the Maximize, Minimize, as well as the Close button. However, there are instances when you might notice that the Title bar, Maximize, Minimize and Close buttons are missing in the File Explorer. This kind of problem might be due to some glitch in the computer, or it could also be caused by some built-in tool or an installed program in your computer. Moreover, there are also other factors that you have to consider such as corruption in the system files as well as errors in the user profile which is generated on a domain network, and so on. There are several suggestions you can check out to fix the problem. You can try to boot your computer in a Clean Boot State to see if a third-party program is the root cause of the problem. You can also try to run built-in tools like System File Checker and the DISM tool. You could also get the video buffer emptied, reset or reinstall the program, or recreate the User Profile.

Option 1 – Put your computer in a Clean Boot State

As pointed out, it is possible that some third-party program or service is the one that’s behind the problem. To isolate this possibility and to identify the culprit, you have to put your computer into a Clean Boot State. To do so, follow the steps below.
  • Log onto your PC as administrator.
  • Type in MSConfig in the Start Search to open the System Configuration utility.
  • From there, go to the General tab and click “Selective startup”.
  • Clear the “Load Startup items” check box and make sure that the “Load System Services” and “Use Original boot configuration” options are checked.
  • Next, click the Services tab and select the “Hide All Microsoft Services” check box.
  • Click Disable all.
  • Click on Apply/OK and restart your PC. (This will put your PC into a Clean Boot State. And configure Windows to use the usual startup, just simply undo the changes.)
  • You need to disable one third-party app after the other to really isolate the issue. And once you’ve narrowed down the problem, you can either disable the third-party app that’s causing the problem or remove it.

Option 2 – Run System File Checker scan

You might also try running the System File Checker or SFC scan to fix the issue. System File Checker is a command utility built into your computer that helps restore corrupted files and missing files. Refer to the following steps to run it:
  • Hit the Win + R keys to launch Run.
  • Type in cmd in the field and tap Enter.
  • After opening Command Prompt, type in sfc /scannow
The command will start a system scan which will take a few whiles before it finishes. Once it’s done, you could get the following results:
  1. Windows Resource Protection did not find any integrity violations.
  2. Windows Resource Protection found corrupt files and successfully repaired them.
  3. Windows Resource Protection found corrupt files but was unable to fix some of them.
  • Restart your computer and see if the System32 folder still pops up at startup or not.

Option 3 – Try running the DISM tool

You can try running the Deployment Imaging and Servicing Management or DISM tool to fix the Windows Upgrade problem. Using this built-in tool, you have various options such as the “/ScanHealth”, “/CheckHealth”, and “/RestoreHealth”.
  • Open the Command Prompt with admin privileges.
  • Then type in the following commands and make sure to hit Enter right after you type each one of them:
    • Dism /Online /Cleanup-Image /CheckHealth
    • Dism /Online /Cleanup-Image /ScanHealth
    • exe /Online /Cleanup-image /Restorehealth
  • Do not close the window if the process takes a while as it will probably take a few minutes to finish.

Option 4 – Try to empty the Vide buffer

These kinds of problems could also be due to bad data in the Video Buffer. Thus, you can try to empty the Video buffer to resolve the problem. All you have to do is tap the Shift + Ctrl + Win key + B keys on your keyboard. After that, leave your computer idle for about 10 seconds until you notice it blink once. Now you try using your computer as usual and see if the glitch is now fixed or not.

Option 5 – Try to reset or reinstall the program

Another thing you can do to fix the issue is to reset or reinstall the program where you encounter the problem. Chances are, you are running the application in the Full-screen mode but you can exit it by simply tapping the Esc or F11 key. However, if nothing changed, then consider resetting or reinstalling the program. Just go to the Windows 10 Settings app and navigate to Apps > Apps & Features. From there, look for the entry of the application you’re having problems with and select it and then click on the Advanced options. After that, click on the Reset button under the Reset section.

Option 6 – Try recreating the User Profile

You might also want to try recreating the User Profile on your computer since some errors in the creation of a User Profile can result in problems like this one. Thus, you have to try deleting the User Profile and then recreate it.
Read More
1 2 3 162
Logo
Copyright © 2022, ErrorTools. All Rights Reserved
Trademarks: Microsoft Windows logos are registered trademarks of Microsoft. Disclaimer: ErrorTools.com is not affiliated with Microsoft, nor claim direct affiliation.
The information on this page is provided for information purposes only.
DMCA.com Protection Status