
Although the Google Chrome browser is one of the most used browsers, a lot of things could still go wrong when browsing the web using it. One of the errors you might encounter is the “ NETWORK_FAILED ” error. This kind of error in Chrome indicates that Chrome wasn’t able to send your request through the network connection. It could be that your computer has trouble connecting to a stable internet connection or there is some plugin in your Chrome browser that is causing the issue. The worst-case would be malware. But worry not for this post will guide you on what you can do when you encounter the NETWORK_FAILED error in Google Chrome. Make sure to follow each one of the options given below and see which one of them worked best for you.
As you know, browser extensions help in enhancing the browsing experience but there are also times when it does exactly the opposite, and such is the case with the NETWORK_FAILED error in Chrome. It could be that one of the extensions in your browser is the one that’s causing the trouble. To disable or remove these unwanted extensions, here’s what you have to do:
If removing or disabling the unwanted extension didn’t help in fixing the error, you can try using the built-in malware scanner and cleanup tool in Google Chrome. These tools help you get rid of any unwanted pop-ups, ads, unusual Startup pages, toolbars, and even malware.
If you are using a proxy, you might want to consider disabling it as it could have something to do with the NETWORK_FAILED error.
After you key in the commands listed above, the DNS cache will be flushed and the Winsock, as well as the TCP/IP, will reset.
Deleting the WLAN Profiles might be a good idea if you are not able to connect to the internet on your computer and if you’re using Wi-Fi. It could be that the networks that were connected previously have gone rogue which is why it is not connecting properly. And so deleting the WLAN profiles would be for the best.
That should do it.

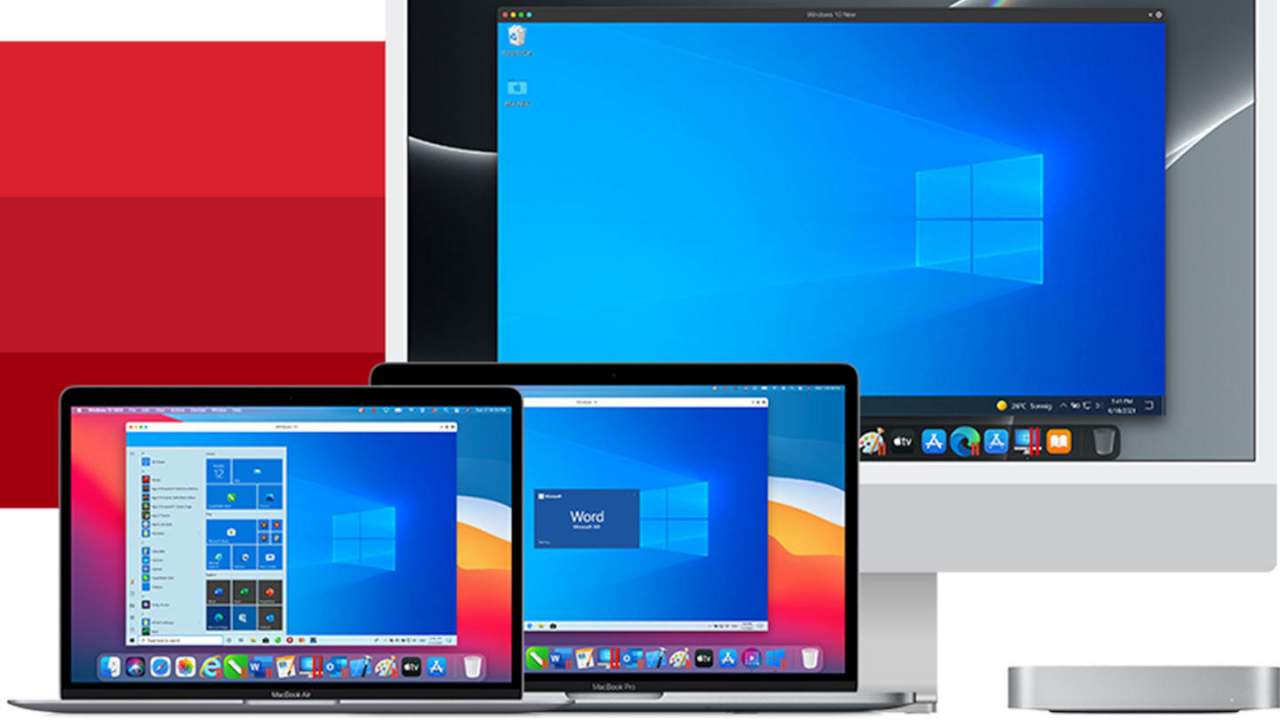 Parallels is an application developer for MAC OS mostly known for its PC virtualization software Parallels Desktop, a PC virtualization software running on Macs enabling running Windows and Linux with respective software on your MAC.
With its latest Desktop 17 version, the software can run natively on both Intel-based and M1-based MACs. Thanks to this feature MAC users will be able to benefit from various speed improvements while running both Windows 10 or Windows 11 preview.
On both Intel and M1 setups, Parallels resumes Windows and Linux up to 38% faster, provides an up to 25% bump in 2D graphics and a six-time increase in OpenGL graphics processing. M1-centric stats include 33% faster Windows start-up times, up to 28% faster DirectX 11 performance, and up to 20% better disk performance on Windows 10 Insider Preview.
Parallels Desktop 17 delivers a set of fresh features including a new video driver that enhances video and game playback and boosts Windows UI responsiveness. An improved Coherence mode lets users run Windows apps within the Mac environment, cutting down on distracting changes in appearance during Windows sign-in, shut down, and software updates.
Drag-and-drop operations are also improved, with support for text and graphics between Mac and Windows applications. This function works well with MAC OS Monterey's Quick Note feature, which can accept content from any Windows app.
USB support, disk management, copy and paste unformatted text, and automatic virtual machine optimization also receive upgrades.
Parallels is an application developer for MAC OS mostly known for its PC virtualization software Parallels Desktop, a PC virtualization software running on Macs enabling running Windows and Linux with respective software on your MAC.
With its latest Desktop 17 version, the software can run natively on both Intel-based and M1-based MACs. Thanks to this feature MAC users will be able to benefit from various speed improvements while running both Windows 10 or Windows 11 preview.
On both Intel and M1 setups, Parallels resumes Windows and Linux up to 38% faster, provides an up to 25% bump in 2D graphics and a six-time increase in OpenGL graphics processing. M1-centric stats include 33% faster Windows start-up times, up to 28% faster DirectX 11 performance, and up to 20% better disk performance on Windows 10 Insider Preview.
Parallels Desktop 17 delivers a set of fresh features including a new video driver that enhances video and game playback and boosts Windows UI responsiveness. An improved Coherence mode lets users run Windows apps within the Mac environment, cutting down on distracting changes in appearance during Windows sign-in, shut down, and software updates.
Drag-and-drop operations are also improved, with support for text and graphics between Mac and Windows applications. This function works well with MAC OS Monterey's Quick Note feature, which can accept content from any Windows app.
USB support, disk management, copy and paste unformatted text, and automatic virtual machine optimization also receive upgrades. nbtstat -R nbtstat -RR netsh int reset all netsh int ip reset netsh winsock reset
sudo chmod -R 777 /usr/local/flexnetserver
sudo mkdir /usr/local/flexnetserver/licenses
touch debug.log
/usr/local/flexnetserver/lmgrd -c /usr/local/flexnetserver/licenses/adsk_license.lic -l /usr/local/flexnetserver/debug.log
sudo /usr/local/flexnetserver/lmgrd -c /usr/local/flexnetserver/licenses/adsk_license.lic -l /usr/local/flexnetserver/debug.log
/usr/local/flexnetserver/lmutil lmstat -a -c /usr/local/flexnetserver/licenses/adsk_license.lic
/usr/local/flexnetserver/lmutil lmdown -q -force
ps -ax | grep lmgrd
ps -ax | grep adskflex
kill -9
"C:\Program Files (x86)\Common Files\Autodesk Shared\AdskLicensing\Current\helper\AdskLicensingInstHelper.exe" change -pk PRODKEY -pv VER.0.0.F -lm "" -ls "" -lt""
Note:
“Windows cannot start new hardware devices because the system hive is too large (exceeds the Registry Size Limit), (Code 49)”There are instances when it may so happen that the device or devices are no longer attached to the computer but they are still listed in the system hive of the registry. For instance, if you were removing hardware and application for years but they weren’t removed from the registry then the size of the system hive keeps on growing until it hits the maximum limit. As you know, making changes in the registry manually, no matter how knowledgeable you are on such things is not sage since the registry is not only important but also complex. In addition, the System Hive is also a permanent part of the Registry associated with a set of files that contain information related to the configuration of the computer on which the OS is installed. To resolve this error, you must remove or uninstall any hardware devices that are no longer in the system. In fact, the Device Manager hides them by default so you need to enable hidden or non-present devices. Follow the instructions given below to set the Devices Manager to display devices that are no longer connected to the computer. Step 1: Tap the Win + R keys to open the Run dialog box. Step 2: After that type in “cmd” and hit Enter to open the Command Prompt. Step 3: Type “set devmgr_show_nonpresent_devices=1” in the Command Prompt and hit Enter to enable the hidden devices option. Step 4: After that, exit Command Prompt and tap Win + X + M to open the Devices Manager. Step 5: After opening the Devices Manager, click on View and then select the “Show hidden devices” option. This will show you all the devices that are not connected to the computer but are still mentioned. Step 6: Next, select a non-present device and click Uninstall from the Driver tab. Step 7: After that, repeat what you’ve done on step 5 for any other device that you no longer use. Step 8: Restart your computer. You can check the device Properties dialog box in the Device Manager after you’re done removing all the useless devices, to check if the error is now fixed or not. Moreover, you can also try running the Hardware and Devices Troubleshooter as it can also help resolve hardware-related problems. To use it, refer to the steps below.
Error Code 38 is a device driver error that users encounter on any Windows 2000 operating system and its following versions.
It occurs when the peripheral device that you connect to your PC cannot be accessed due to an inability of the Windows system to acknowledge the driver as a previous record of the driver being loaded is found in its memory.
It is a common error that users come across and appears on your PC with the following message:
“Windows cannot load the device driver for this hardware because a previous instance of the device driver is still in memory. (Code 38)”
 Error Causes
Error Code 38 is prompted when incomplete program files are left in the Windows system which damage or corrupt its files. There are various factors that contribute to this, some of which are:
The above triggers are very likely to create incomplete files within the Windows registry thereby leading to its damage and corruption.
This is especially true in the case of your PC when it has recovered from viruses when using anti-virus software. The anti-virus in its effort to remove the virus also could remove the files which contain them thereby increasing the risk of the error code.
These damaged files can severely impact the health of your PC and are imperative to fix it immediately to prevent further problems.
Although this error code may pose serious problems for your PC, thankfully, it is very similar to other PC driver errors and thus is an easy one to get rid of. Here are various methods that you can use to get your PC running smoothly again.
If restarting your PC does not help, you will have to find the exact nature of the problem by running the troubleshooting wizard for the device and then address the problem accordingly. To do this, proceed with the following steps:
After following the directions of the Troubleshooting wizard, make sure to restart your PC for the changes to take effect. Now check if your device is still causing problems.
If the error persists, you can use system restore to eliminate the problem. Here is how to do so:
By restoring the system via a last saved system checkpoint, you can obtain undamaged Windows system files that can help resolve the error code.
If using system restore does not work either, you may have to resort to manually uninstalling and then reinstalling the device driver causing the problem.
This would be necessary since the remaining incomplete files due to a partial removal or installation of programs are responsible for the error code. By uninstalling and reinstalling the device driver program, it would lead to the completion of the files.
You can do this by firstly logging in as Administrator and opening Device Manager. Select the device that is causing the problem and double click it; make sure that the peripheral is connected properly to the PC.
Upon opening, click on the ‘Driver’ tab and then select ‘Update Driver’. Make sure to refer to the system documentation that you received with your PC or computer to check for the motherboard details and driver specifics.
Manually uninstalling and reinstalling the driver will do the trick; however, it may be time-consuming especially when you would have to resort to your hardware user manual.
Using a program such as DriverFIX can save you a lot of time and frustration in having your device to work properly on your computer.
DriverFIX, with its user-friendly approach to help you fix your PC issues, comes with an integrated database that detects which drivers you need to reconfigure within just a few seconds and downloads it automatically.
It further ensures that your drivers are installed in their entirety leaving no room for any incomplete files to remain that create Error Code 38, or any other driver-related errors for that matter.
It also has the added advantage of being able to backup and restores your files should there be the slightest possibility of system file damage. DriverFIX is the answer to fixing your PC error codes accurately and quickly.
Click here to download DriverFIX to fix Error Code 38 quickly and effectively!
 The console itself is coming in cylindrical shape powered by Intel CPU and ASUS GPU of the unknown chipset. It has Seagate Baraccuda 1TB SSD and it is VR-ready. The console will have raytracing and will be 4K ready.
‘Sending and receiving reported error "0x80004005": The operation failed.’ ‘This message could not be sent. Try sending the message again or contact your network administrator. The client operation failed. Error is [OX80004005- 0X0004B9-OXOO501].’


‘An error is preventing the photo or video from being displayed’ Error code 0x80010108
 Error Causes
net stop wuauserv net start cryptSvc net start bits net start msiserver
net start wuauserv net start cryptSvc net start bits net start msiserver