A Quick Guide to Fixing Error Code 7

Troubleshoot Error Code 7

Error Code 7 - What is it?

This is a typical system error that occurs during Windows setup. To be precise, this error may pop on your computer screen during the text mode portion of Windows setup.

The setup hangs and stops responding and the error message is displayed in either one of the following formats:

‘The file I386Ntkrnlmp.exe could not be loaded. The error code is 7.’
or
‘The file I386L_intl.nlf could not be loaded. The error code is 7.’

Solution

Restoro box imageError Causes

Error 7 may be triggered due to several reasons but the 2 most common causes for this error code are:

  • Incorrect settings of the BIOS
  • Faulty RAM modules
  • Registry corruption

Further Information and Manual Repair

To resolve this error on your system, here are some easy and effective DIY methods that you can try.

Method 1 - Change Back the BIOS to its Default Settings

If the underlying cause of error code 7 is related to incorrect BIOS settings, then it is recommended to restore default settings to resolve.

You can reset your computer’s BIOS (basic input and output system) settings to factory defaults by selecting the restore defaults option within BIOS or by removing CMOS ( Complementary Metal Oxide Semi-Conductor) battery from your unplugged computer for about five minutes.

The battery removal method requires opening the computer case, so only attempt it if you are unable to access BIOS.
To reset BIOS follow these steps, reboot your PC and then press the key assigned to loading BIOS during your computer boot splash screen.

The key assigned to load and access BIOS varies from manufacturer to manufacturer but usually, it's F1, F2, or F12. Once you enter the BIOS, select the ‘Restore Defaults’ option listed in the menu.  I

t may be a keyboard shortcut or be under the Advanced settings menu. Confirm settings and then exit BIOS. Hopefully, this will resolve Error 7.

Method 2 - Remove the Faulty RAM

When error code 7 is triggered by faulty RAM modules, then to resolve it simply remove the memory modules that are installed in the computer.

If the error code is displayed again after you remove the memory module, remove a different memory module. This procedure requires you to reboot your PC several times to identify the specific memory module that is not working properly.

Method 3 - Repair the Corrupted Registry

Error code 7 is sometimes also linked with registry issues. If the reason for the error occurrence is a damaged or corrupted registry, then simply download Restoro.

This is a powerful PC Fixer embedded with a registry cleaner. It is easy to operate and user-friendly. The registry cleaner detects and removes all errors in seconds. It cleans the registry and repairs the damages in no time.

Click here to download Restoro.

If you like to learn and find out more about various Windows errors, and how to repair them go to our vast archive or use search to find articles that will explain and help you in solving your issue.
However, if you prefer to do things fast and with automatization then we are proposing to use an automated solution for your issues. The application that we are recommending is Advanced System Repair Pro
Advanced System Repair utilizes multiple tools all in one to give you a quick, simple, reliable, and very thorough diagnosis of your PC. It brings you all the tools you need in one program to clean, fix, protect, optimize and boost your PC!
1-Click Maintenance
All the tools to make it simple and easy! It's like having a professional technician at the click of a mouse.

Junk Cleaner
Keeping your computer free from unnecessary clutter also helps make your computer last longer. Like any other machine, if you keep it clean and take care of it, it will serve you better for longer!

Optimize background apps
Optimize applications background activity with the built-in Application Optimizer feature.

Disk Defrag
With a simple 1-click, Advanced System Repair speeds up your PC by assembling fragmented files on your machine and organizing them more efficiently.

Malware Removal
Finds and removes all types of harmful malware including trojans, worms, bots, adware, spyware, PUPs, and more!

Privacy Cleaner
The all-in-one privacy suite to Clean Your Tracks & Protect Your Privacy! Make your computer safe, secure, and more efficient!

System Tweak/Optimizer
ASR will analyze your complete system and settings to adjust your PC to function at its maximum performance.

Registry Cleaner
Over time, as you install and uninstall applications, the registry can become cluttered with old entries and broken settings which can result in program crashes, and annoying messages and slow the computer down.
Visit our Advanced System Repair Pro Download page to inform yourself about all the benefits of this software and get a free trial copy of it.
advanced system repair pro

Advanced System Repair Pro

One-click automated PC repair solution
ASR logo
With Advanced System Repair Pro you can easily
Replace damaged files
Restore performance
Free disk space
Remove Malware
Protects WEB browser
Remove Viruses
Stop PC freezing
DOWNLOAD
Privacy Policy | Terms of Use | Uinstall
Advanced System Repair Pro is compatible with all versions of Microsoft Windows including Windows 11

Share this article:

You might also like

Fix Windows Update error code 0x80d02002
A lot of users have experienced various issues either in installing a Feature or a Windows Update. One of these errors is the one with the error code 0x80d02002. If you are one of the users who is facing this problem right now, then the working solutions given in this post will surely help. The Windows Update error code 0x80d02002 indicates that Windows 10 fails to upgrade or install as there is some issue with the files that have been downloaded and Windows encounters an error in installing them. Thus, the best thing you can do in such a case is to start the installation from scratch but before you do that, here are some suggestions that might help.

Option 1 – Try to rename the SoftwareDistribution folder

The Software Distribution folder in the Windows operating system is a folder that can be found in the Windows directory and is used to store files temporarily which might be required to install the Windows Update on your PC. Thus, it is required by the Windows Update and maintained by WUAgent. Aside from that, it also contains all the Windows Update History files and once you delete them, you will most likely lose the Update history. As a result, the next time you run the Windows Update, it may result in a longer detection time.
  • Open the WinX Menu.
  • From there, open Command Prompt as admin.
  • Then type in the following command – don’t forget to hit Enter right after typing each one of them.
net stop wuauserv net stop bits rename c:windowsSoftwareDistribution SoftwareDistribution.bak
  • After entering these commands, it will stop the Windows Update Service, the Background Intelligent Transfer Service, and rename the SoftwareDistribution folder.
  • Next, got to the C:\Windows\SoftwareDistribution folder and get rid of all the folders and files thereby tapping the Ctrl + A keys to select them all and then click on Delete. Note that if the files are in use, you won’t be able to delete them.
  • Once all the contents in the Software Distribution folder are deleted, restart your PC and then go back to Command Prompt and input the following commands again.
net start wuauserv net start bits
Since the folder has already been flushed, it will be populated afresh the instant your restart your computer and open Windows Update.

Option 2 – Try to reset the Catroot2 folder

You can also try resetting the catroort2 folder as it is known to fix tons of Windows Update issues including the Windows Update error code 0x80d02002. Both the Catroot and catroot2 are Windows operating system folders that are required for the Windows update process.  So when you run the Windows Update, the catroort2 folders stores the signatures of the Windows Update package and helps it in the installation. It makes use of the “%windir%System32catroot2edb.log” file in the updating process. Afterward, the updates are stored in the SoftwareDistribution folder which is used then by the Automatic Updates in order to execute the updating process. Keep in mind that you must not rename or delete the Catroot folder. Although the Catroot2 folder is recreated automatically by Windows, the Catroot folder isn’t.

Option 3 – Try running the DISM tool to fix the broken Windows Update client

The Windows update/upgrade error 0x80d02002 might be caused by some issues in the Windows Update client so you need to run the DISM tool to repair it. Note that you have to use another computer or another Windows from a shared network to fix it.

Option 4 – Try to run the Windows Update Troubleshooter

Running the built-in Windows Update troubleshooter could also help you resolve the Windows Update error 0x80d02002. To run it, go to Settings and then select Troubleshoot from the options. From there, click on Windows Update and then click the “Run the troubleshooter” button.

Option 5 – Try to run Microsoft’s troubleshooter online

You also have the option to run Microsoft’s online troubleshooter which could help you fix Windows Update errors.
Read More
A Guide to Fixing Error 101

Easy Methods to Fix Error 101

Error 101 - What is it?

Error 101 is a Google Chrome error. You may experience this error if you browse the internet using Google Chrome. This error results when the existing HTTP connection between Chrome and the website is broken. The error is displayed in the following format: “Error 101 (net::ERR_CONNECTION_RESET): The connection was reset.”

Solution

Restoro box imageError Causes

The cause of Google Chrome error 101 cannot be narrowed down. This error can be triggered on your PC due to multiple reasons. These include:
  • The inability of the Google Chrome installer to create a temporary directory on your PC during the installation process
  • Enabled DNS Prefetching
  • Firewall
  • Viral Infection
  • Bad Registry Entries
  • Poor Internet Connection
Though this error code is not fatal, nonetheless it is advisable to fix it to ensure you are able to browse the internet using Google Chrome.

Further Information and Manual Repair

The good news is that this error is quite easy to resolve. Even if you are not a technical whiz you can still manage to fix it by trying these easy and effective DIY methods we have listed below:

Method 1: Reload the Website link on Chrome or Check Your Internet Connection

Sometimes refreshing the webpage can resolve the issue easily. Try doing it. Reload the link by pressing Ctrl +R. This will refresh the webpage. If it starts working then that’s great but if it doesn’t then it is advisable to check your internet connection. Disable and Enable the connection and then try browsing on Chrome again. If websites are accessible then the problem is resolved. If the error persists then try other methods.

Method 2: Disable DNS Pre-fetching

Sometimes this error may occur due to enabled DNS pre-fetching. To resolve the issue, open Chrome, then click on the wrench key. Go to setting and under the bonnet and Privacy section, look for the DNS perfecting option. If it is enabled, then uncheck it to disable DNS Pre-fetching. Save the changes and then close the browser. Now open it again and try browsing on Chrome. If error 101 does not appear and you are able to access websites then the issue is fixed.

Method 3: Scan for Viruses

Another way to fix this is to download and run a powerful antivirus. Scan and remove viruses to fix the problem.

Method 4: Check the permission for your temporary folder

As mentioned above, another underlying reason for error 101 can be Google Chrome installer was unable to create a temporary directory on your system during the installation process. To resolve it, check the permission for your temporary folder. Here’s how to do it: First go to the start menu and type Run. Now enter one of the following directories in the text fields 1. Windows XP: %USERPROFILE%Local Settings 2. Windows Vista: %USERPROFILE%AppDataLocal After that press OK. This will open a new window. In the Window that opens, right-click the temp folder. Now select properties and press the security tab to continue. In the group and user names section, select your user profile name. In the permissions, section verify that the checkboxes for READ, WRITE, and READ  & EXECUTE permissions in the DENY column are not selected. After you have verified, click apply and then ok. Now try reinstalling the Google Chrome browser again on your system.

Method 5: Remove Bad Entries by Cleaning the Registry

Bad entries and cookies saved in the registry can also lead to error 101. You can remove them manually but that will take a great deal of time and can be slightly difficult if you are not technically sound. Therefore, it is advisable to download Restoro. This is a user-friendly PC Fixer integrated with a registry cleaner that scans and removes all registry issues in a few clicks. It removes all the bad entries and junk files cluttering the registry and repairs it instantly. Click here to download Restoro.
Read More
The boot configuration data store can not open
The Boot Configuration Data or BCD files have the instructions required by the Windows operating system in order to properly boot the computer. So if you experience any trouble when you boot your computer, then it is possible that it is due to some misconfiguration or even corrupted Boot Configuration Data files. And if you also encounter an error saying,
“The boot configuration data store could not be opened”
while you try to carry out any command on the bcedit.exe, then you’ve come to the right place as this post will guide you on how you can fix this error in Windows 10. This kind of error could pop up if the system is not able to locate the specified file. It is also possible that the requested system device can’t be found or that the boot configuration data store could not be opened. In addition, when you open the System Configuration or MSConfig, you might notice that there is no Boot data, and according to the reports, is that when you try to dual boot the computer, the installer will replace the default bootloader.

Explanation

In case you don’t know, Windows’ earlier versions were stored in the “Boot.ini” file. You can find the entry in the EFI firmware boot manager of the EFI-based operating system which is located at EFIMicrosoftBootBootmgfw.efi. Whatever the cause of the error is, there are several suggestions you can check out to resolve the problem. You can try to set an entry option value in BCD or enable the Advanced options menu, as well as rebuild the BCD. Before you proceed with the troubleshooting options provided below, make sure that you boot your computer into the Advanced Recovery Mode first since that’s where you can find Command Prompt under the Advanced Options. In addition, you also have to suspend or disable BitLocker and Secure Boot on your PC.

Option 1 – Try to set an entry option value in BCD

  • Once you’re in the Advanced Options, select Command Prompt.
  • Next, execute this command to set an entry point: bcdedit /set {current} Description "TheNameYouWant"
  • After the command has been executed, it will enable the system to trust a version of Windows that is not trusted by default. This should fix the problem, if not, follow the next given options below.

Option 2 – Try to specify the BCD file

  • In the elevated Command Prompt, execute this command: bcdedit /store c:BootBCD
  • Once done, the command will give you a list of options and then execute this next command: bcdedit /store c:BootBCD /set bootmenupolicy legacy
  • After that, restart your computer and select your Windows and then tap the F8 key right away.
Note: When you select the legacy option, the Advanced Options menu will be available during the computer boot up and then you can select into which operating system you can boot your computer into.

Option 3 – Try to rebuild the BCD files

The first thing you can do to resolve the issue is to Rebuild Boot Configuration Data or BCD files.
  • You can start by booting into the installation environment for Windows 10 from an installation media.
  • After that, click on Repair your computer and on the blue screen, select Troubleshoot and then select the Advanced options menu.
  • From there, select Command Prompt and once you open it, enter each one of the commands given below by sequence.
    • bootrec /FixMbr
    • bootrec /FixBoot
    • bootrec /ScanOS
    • bootrec /RebuildBcd
  • Once you’re done executing the commands given above, type “exit” to close the Command Prompt window and then restart your computer and see if it fixed error code 0xc000014c.
Read More
Turn On/Off and Clear Windows Clipboard
Windows 10 has a Cloud Clipboard feature that allows users to have a list of multiple copied text in place so that they can reuse it. And each time the computer restarts, the Clipboard Data is cleared. However, you can actually do it manually. How? Read on as this post will walk you through how you can turn on or off as well as clear the Clipboard history in Windows 10. This kind of feature is already available in Windows 10 v1903. In the previous versions of Windows, there was no feature to turn off history in the clipboard and users have to use other ways to clear the clipboard history. And now it seems that Microsoft has put an end to this dilemma as it now allows users to clear the clipboard history. To turn on or off or clear the Clipboard history, here are some instructions you need to follow: Step 1: Tap the Win + X keys to open the power menu and select Settings. Step 2: After that, navigate to Settings > System > Clipboard. Step 3: From there, turn off the toggle button under the Clipboard history section. This will turn off the Cloud Clipboard feature. As a result, the default clipboard will hold one last item and will not display the data on the clipboard. Note: When you tap the Win + V keys to invoke the clipboard manager, you will see a prompt that says, “Can’t show history, See all copied items in place, Turn on clipboard history”. You have the option to turn it back on by simply clicking on the available button. Doing so would only hide the existing data and makes sure that no copy of the data is kept.

Conclusion

On the other hand, if you want to clear the clipboard without affecting its history data, you have to make sure to pin the items on the clipboard that you want to stay. After that, click on the three-dotted icon for the menu and click on the “clear all” option. This will delete all the entries but will keep the pinned items on your clipboard.
Read More
How to Repair Windows 10 Upgrade Error 0x800F0923

Repair Windows 10 Upgrade Error 0x800F0923

Code 0x800F0923 – What is it?

The Error Code 0x800F0923 is one that appears only when attempting to update from older versions of Microsoft Windows to Microsoft Windows 10. This error does not occur with every install and is believed to be the result of a driver incompatibility issue. It is unclear which specific drivers are having the compatibility issues, though it is widely believed that DuplexSecure's SPTD drivers are the ones at fault. When operating correctly, without errors, the update process should not take longer than 30 minutes. Common symptoms include:
  • Error message window/pop-up during the install process, giving the Error Code 0x800F0923
  • Inability to install and update from older versions of Microsoft Windows to version 10

Solution

Restoro box imageError Causes

There are various relevant factors associated with the error code 0x800F0923 incompatibility issue in Windows 10 installation/upgrade. These factors include but are not limited to:
  • The Operating System (OS) upgrading does not support older hardware.
  • Your computer’s specs did not meet the minimum requirements.
  • Not enough hard disk space.
  • The new software might lack software drivers for older hardware

Further Information and Manual Repair

Microsoft has recently released its Windows 10 operating system. While there are still a few kinks to be worked out, overall the reviews have been positive. As with any new Microsoft update, compatibility issues can arise. If you are unsure whether your current PC will be able to handle the new Windows 10, here is an easy way to check your system.

Method 1: Check if your computer is compatible

  • Locate the “Get Windows 10” application icon in your notification tray (bottom right corner of your screen, white Windows logo).
  • Right-click on this icon, then select the “check your upgrade status” option.
  • Be prepared for the menu to take a few minutes to open.
  • Click on the menu on the upper left-hand corner of this new dialog box. (It looks like three blue horizontal lines)
  • Select “check your PC”
  • After the system checks for compatibility, it will let you know whether or not your PC has the appropriate drivers, etc. (Keep in mind that this is not a foolproof method for checking compatibility status).

Method 2: Download or upgrade your drivers/software

If you have already attempted to update to Windows 10, and have received the Error Code 0x800F0923, this is the simplest way to solve the issue yourself.

1. Open the “Get Windows 10” application. 2. Open the menu in the upper left corner, looks like three blue lines. 3. Select “Check your PC”. 4. The system will tell you which drivers are incompatible. 5. Go to the Microsoft Support website to install and/or update the drivers that proved to be an issue. 6. Once the driver issue is corrected, retry the Windows 10 update.

Method 3: Create space on your computer

If your computer does not have sufficient space to accept the upgrade, you might want to clear up some space on your computer. Here’s how to do it. If you have not attempted to install Microsoft Windows 10 yet, it is a good idea to check your system's compatibility prior to installing. While it is not absolutely necessary, it will save time and frustration. Microsoft Support suggests contacting them directly if you are unable to solve your driver compatibility issues, or if the above do-it-yourself method is unsuccessful. To resolve this compatibility issue and get your upgrade going use a powerful and user-friendly tool to clean up the problem. Click here to download Restoro. Users should also be aware that those who choose to upgrade to Windows 10 have 30 days in which they may decide that they would rather use their old system. However, reverting back to the older system may not be a smooth process, and some data could be lost.
Read More
Hardware review: Bytezone Advanced desk
If you spend a large amount of time gaming or working on a computer gaming chair is a very important asset. One other thing that is mostly looked past but could help greatly is a good desk. A great chair accompanied by a great desk can make your long sitting sessions more pleasant and more healthy which is very important in the long run. Hey, but it is only a desk, what is so special about having an expensive desk? Well truth to be told desk is just a desk and any kind of desk can serve the purpose of hosting a keyboard, mice, and screen. But a good desk will offer some other advantages that may not seem so important but they could mean a lot like adjusting desk height so it fits perfectly on your size and sitting position making long hours more pleasant and lower stress on hands sitting on it.

bytezone gaming deskAdvanced desk features

Bytezone might not be a company that will sound familiar to you, mostly because they manufacture gaming chairs and desks, now in the gaming chairs world there are a lot of competitors and Bytezone has managed to make a name for itself despite this fact. But they are more popular in their gaming and office modern-looking desk category. The advanced desk is made from carbon steel and plastic combination, it is very durable and it weighs 27kg. Now that is not really light but it is not very heavy if we compare it to wood desks. The top layer of the table is made from easy-to-clean material and the desk comes with a large mouse and keyboard pad. The table itself includes a cup holder, headphones bracket under the table and it has a cable management drawer in the back. The desk is sized 66x120x76 cm. Also for anyone interested desk itself comes also with RGB lights for that true gaming feel.
Read More
Disable non MS store apps in Windows 11
Disable non MS store apps in Windows 11 post picture
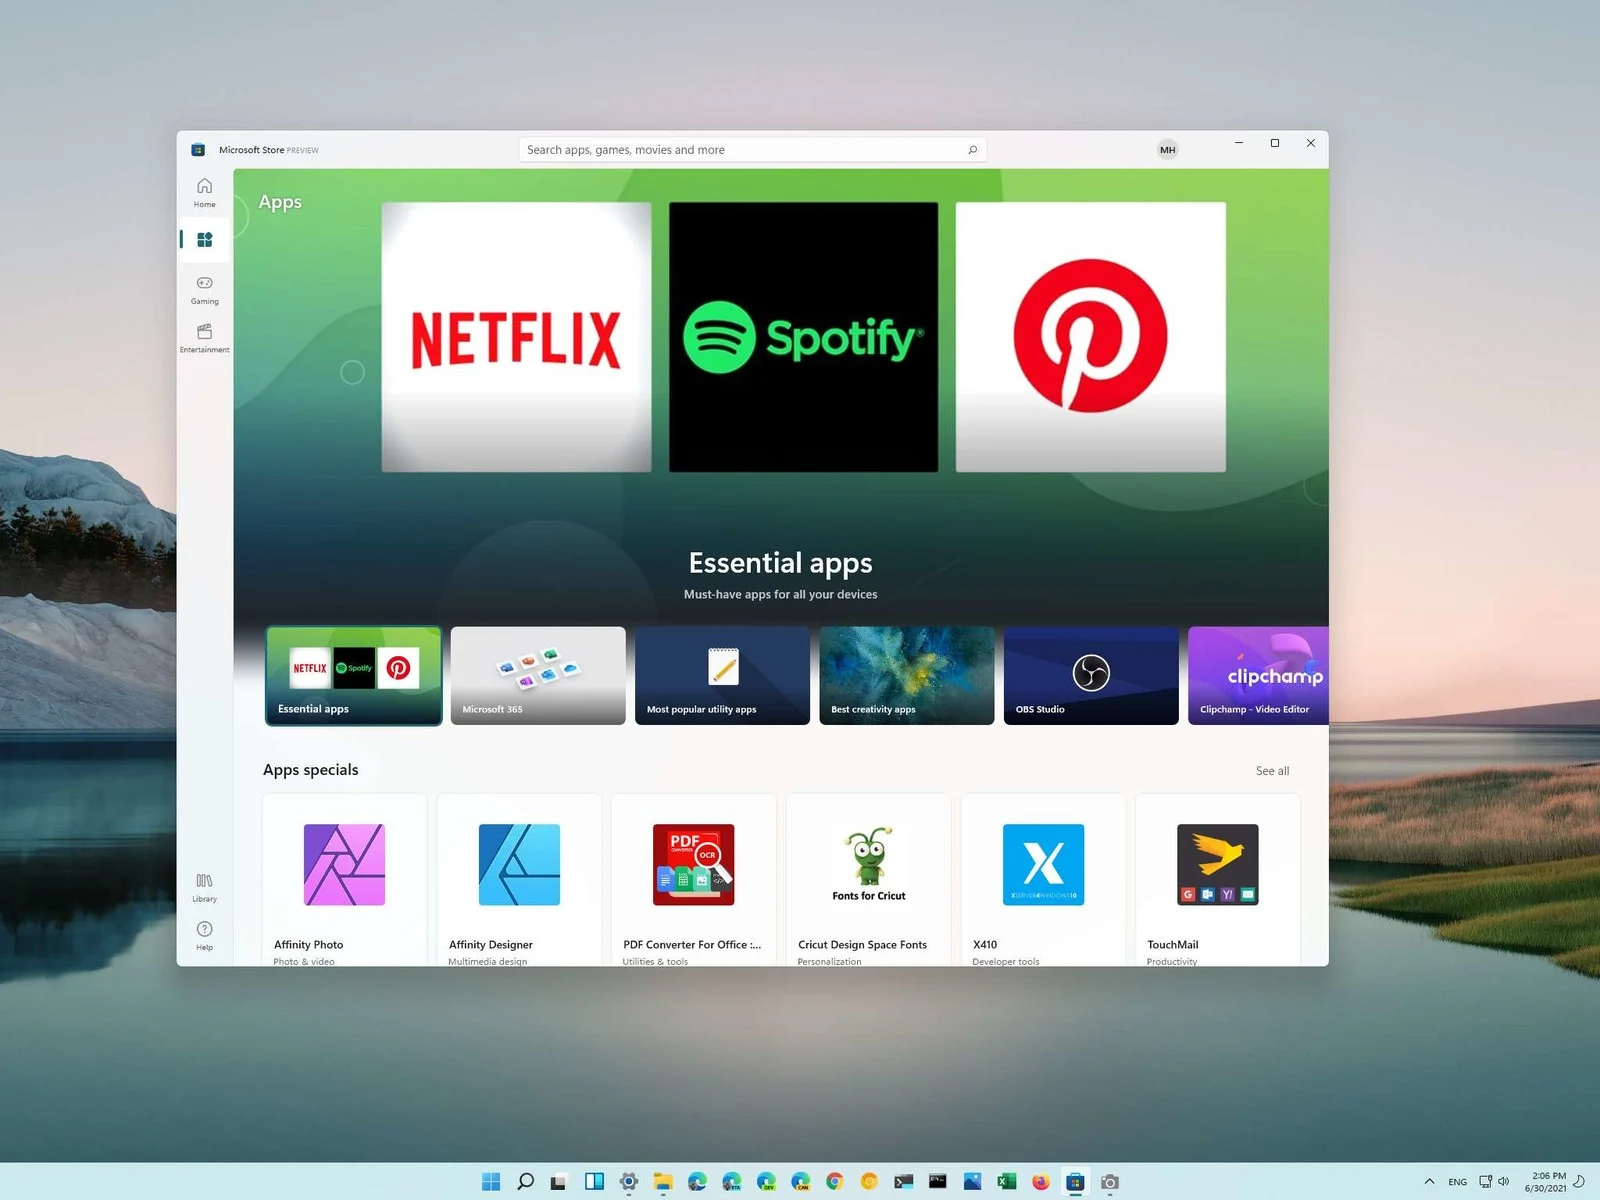
You can prevent starting of app installations files if they have not come from the MS store inside Windows 11. This can make your PC more secure because all apps in the store will have to be digitally signed and overall it can provide you with more control over what will be installed. Follow the guide below to find out how can you easily turn this feature ON.
  1. Press ⊞ WINDOWS + I to open Windows settings
  2. Select Apps and then choose Apps & Features
  3. Click on Choose where to get apps to bring a drop-down menu
  4. Select The Microsoft Store only (Recommended)
  5. Close settings
Settings will apply changes immediately and you continue using Windows right away. With these settings turned ON if you want to install a downloaded application or run the installer you will not be able to, and message The app you’re trying to install isn’t a Microsoft-verified app will show on your screen. You can always reverse this setting by choosing Anywhere in settings instead of Microsoft store only.
Read More
How to Fix Windows 10 Error 0xC1900200, 0x20008

How to Fix Windows 10 Error 0xC1900200, 0x20008

Error Code 0xC1900200, 0x20008 (Code 0xC1900202 – 0x20008)   – What is it?

Error Code 0xC1900200, 0x20008 (Code 0xC1900202 – 0x20008)  is an error that occurs when you attempt to upgrade to Microsoft Windows 10, but the minimum requirements have not been met by your computer. You will therefore be unable to upgrade to Microsoft Windows 10 until your computer is updated or upgraded to meet those requirements. Common symptoms include:
  • When attempting to upgrade a dialog box with Code 0xC1900200 – 0x20008 (Code 0xC1900202 – 0x20008) is displayed.
  • Your computer is unable to begin the Microsoft Windows 10 upgrade process.

Solution

Restoro box imageError Causes

Error Code 0xC1900200 – 0x20008 (Code 0xC1900202 – 0x20008)  occurs when you are unable to begin the Microsoft Windows 10 upgrade because your computer does not meet the minimum requirements to run Microsoft Windows 10.
  • You are unable to begin the upgrade because your computer does not meet the required system or hardware specifications.
  • You are not running the correct version of Microsoft Windows to be able to begin the upgrade.
  • You are not running the latest updated version of Microsoft Windows 7 SP1 or Microsoft Windows 8.1.
Error Code 0xC1900200 – 0x20008 (Code 0xC1900202 – 0x20008) as stated, simply means your computer does not meet the requirements to update and does not indicate a permanent problem or inability to continue to use your computer. This error only means that you will not be able to upgrade to Microsoft Windows 10 until your computer is made to meet these requirements.

Further Information and Manual Repair

There are several solutions that the user can complete at home that should fix the problem resulting in a manifestation of Error Code 0xC1900200 – 0x20008 (Code 0xC1900202 – 0x20008). Below are several options that should resolve this error.

Method 1:

Verify what version of Microsoft Windows you are currently running, older, outdated, or no longer supported versions of Microsoft Windows are not able to upgrade to Microsoft Windows 10. If you are not running one of the following versions you will have to update before being able to upgrade.
  • The most current version of Microsoft Windows 7 SP1
  • The most current version of Microsoft Windows 8.1

Method 2:

Your computer's system specifications do not meet the requirements to be able to upgrade to and run Microsoft Windows 10. To check your system specifications do the following.
  1. Click on the start button in the bottom left corner, then locate the control panel on the menu, click on it to open.
  2. Once it opens, locate system and security on the menu and click to open, click on system and this will show you your amount of RAM and processor speed.
  3. Find device manager on the left-hand side click this then select display adapter, and it will show you your current video card.
  4. Click on the start button again, then click on the computer in the menu, this will show you your hard drive size, and available space.
If you have the option available you can simply run the get Microsoft Windows 10 app to check compatibility. Once you have your system specs make sure they meet or exceed the following.
  • 1 GHz or higher processor or SoC
  • 1 gig of RAM for 32 bit and 2 gigs of RAM for 64 bit
  • 16 GB available hard drive space for 32 bit, 20 GB for 64 bit
  • Minimum of DirectX9 that has 1.0 WDDM
  • At least an 800x600display
If your computer does not meet these minimum requirements, upgrade the components necessary to meet them. If you do not possess the technical expertise required to accomplish this yourself or do not feel comfortable doing so, download and install a powerful automated tool to get the job done.

Method 3:

Your computer might not meet the aforementioned requirements to make an upgrade because of insufficient hard drive space or resources. Learn how to create or make space on your computer here.

Method 4:

Many people hold on to and use the same computer for a very long time. It is possible that your computer cannot be upgraded to meet the requirements, or that the cost to do so would be so high that a new computer would be cheaper. If that is the case, your only option may be to replace your computer.
Read More
Intel & MS fixed DRM issue with alder lake
Due to its hybrid core technology, the Alder Lake line of processors had some DRM issues with some game titles where DRM protection software detected hybrid core design switching via manager as a hack attempt and prevented the game from working properly. Over 50 titles were affected by this issue, now only 3 remain still affected but it is being worked on them so that can be also resolved. alder lake drm
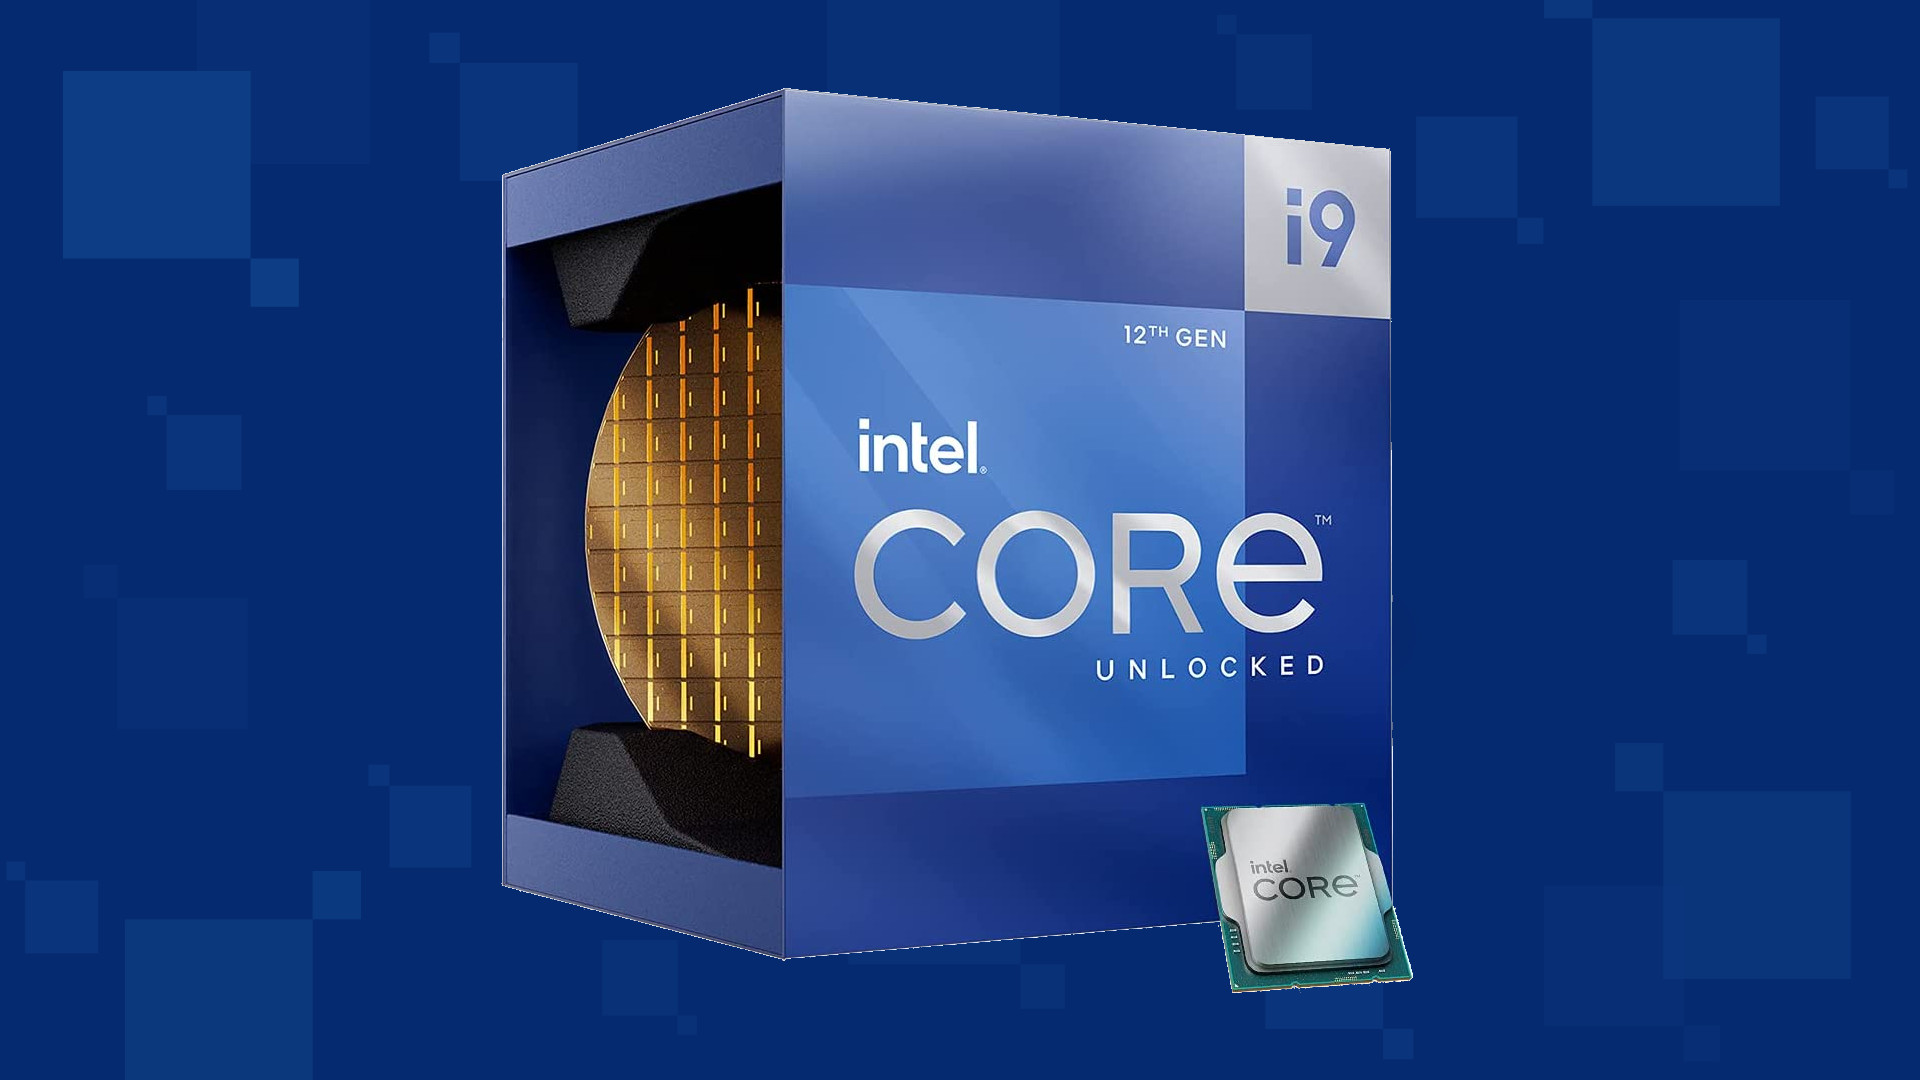
Intel says that the remedy to the issue for these games is the scroll lock fix which can be done so by enabling Legacy Game Compatibility mode from the BIOS of your motherboard. When running the said games, you can press scroll lock to park the E-cores on Intel's Alder Lake Desktop CPUs to get rid of DRM issues. Certain motherboard manufacturers such as MSI and Gigabyte have made this even easier through software tools with which you don't have to access the BIOS. All you need to do is select a button in the tool which works on both Windows 11 and Windows 10 operating systems and you will enable compatibility mode.
Read More
Shift Key is not working in Windows
A lot of users rely on keyboard shortcuts to carry out tasks on their PCs. One of the most common keyboard shortcuts used is the Ctrl + Shift + Esc which opens the Task Manager. As you can see, the Shift key is not just used to capitalize a text as it can also be used for other functions and plays an essential role in operating a computer. However, if you suddenly find it not working, read on as this post will help you fix the problem. If your Shift key is not working, there are several potential fixes you can check out to fix it. These are the different ways to get rid of the Shift key not working issue on Windows 10:
  1. Physically clean the key and keyboard
  2. Disable Sticky Keys.
  3. Update, Reinstall, or Rollback Keyboard driver.
  4. Test the keyboard on another system.
  5. Check your connections
  6. Run the Hardware troubleshooter
  7. Troubleshoot in Clean Boot State.

Option 1 – Clean the keyboard keys physically

Your keyboard might not be working properly due to some dirt or other corrosion. Thus, you need to clean your keyboard, especially the Shift key. First, you need to shut down your computer and then unplug the keyboard if you are using a desktop computer and then prepare it for cleaning. After that, use a small cotton ear cleaning tool to get between the creases and clean them. You can dip it slightly in alcohol to make it more efficient in cleaning dust and dirt. And if you can, you have the option to pull apart the keyboard completely and then wipe away all the corrosion from the inside. Once you’re done, put the keyboard back together and then plug it back into your PC. Now turn your PC on and check if the Shift key is now working.

Option 2 – Try to disable the Sticky keys

Another thing you can try is to disable the Stick keys. How? Refer to these steps:
  • Tap the Win + I keys to open the Settings app.
  • After that, navigate to the Ease of Access section, and here, select Keyboard.
  • Next, make sure that the option for Press one key at a time under the Sticky Keys is toggled off.

Option 3 – Reinstall, update or rollback your keyboard driver

Once you’ve determined that the problem is in the software part of the keyboard, it is now time to try to reinstall, update or roll back your keyboard drivers. To reinstall the driver for your keyboard, refer to these steps:
  • From the WinX Menu, open the Device Manager.
  • In the Device Manager, you should find your laptop’s keyboard under the “Keyboards” option. Right-click on it and select the “Uninstall” option.
Note: If you’re not quite certain about your laptop’s keyboard, you can uninstall all the keyboards if there’s more than one.
  • After that, restart your PC and see if the keyboard driver is installing automatically. If not, open the Device Manager again and right-click on Keyboards, and select the option “Scan for hardware changes” to install it.
Once the keyboard driver is installed again, check if your keyboard is now working properly or not.

Option 4 – Try connecting the keyboard to a different USB port or another computer

The problem might have something to do with the USB port that’s currently in use by your keyboard. It could be that it’s not working so it makes sense to unplug it and attach it to another USB port. You can also clean the USB port on both ends to ensure that they are not affected by corrosion. In addition, you can also try connecting the keyboard to a different computer and see if the Shift key works there or not.

Option 5 – Try to check your connections

You can also try checking if the connection mode you are using for your keyboard is functioning properly. For instance, if you are using a Surface 2-in-device, you can clean the connection pins and see if it resolves the problem.

Option 6 – Run the Hardware and Devices Troubleshooters

  • The first thing you need to do is click on Start and then on the gear-like icon to pull up the window for Settings.
  • After opening Settings, look for the Update and Security option and select it.
  • From there, go to the Troubleshoot option located on the left-hand side of the list.
  • Next, select Hardware and Devices from the list and open the Troubleshooter and run it. Once it is doing its job, wait for it to complete the process and then restart the system.
  • After the system restarts, check if the problem’s now fixed. If not, refer to the next option given below.

Option 7 – Put your PC in a Clean Boot State

You might also want to put your computer in a Clean Boot State to fix the problem with the Shift key. It could be that there is a third-party program that’s preventing the Shift key from functioning. To isolate this possibility, you need to put your computer in a Clean Boot State.
  • Log onto your PC as an administrator.
  • Type in MSConfig in the Start Search to open the System Configuration utility.
  • From there, go to the General tab and click “Selective startup”.
  • Clear the “Load Startup items” check box and make sure that the “Load System Services” and “Use Original boot configuration” options are checked.
  • Next, click the Services tab and select the “Hide All Microsoft Services” check box.
  • Click Disable all.
  • Click on Apply/OK and restart your PC. (This will put your PC into a Clean Boot State. And configure Windows to use the usual startup, just simply undo the changes.)
  • Now try to connect the external devices and check if the error is now gone.
Read More
1 2 3 162
Logo
Copyright © 2022, ErrorTools. All Rights Reserved
Trademarks: Microsoft Windows logos are registered trademarks of Microsoft. Disclaimer: ErrorTools.com is not affiliated with Microsoft, nor claim direct affiliation.
The information on this page is provided for information purposes only.
DMCA.com Protection Status