Error: 0x80070035. Network path was not found

As you know, Windows allows you to share files between systems that are on the same network even though they are not connected physically. All you have to do is to make sure that the folder administrator allows access to the intended use and that your computer should be connected to the internet. Once you meet these conditions, you can share files between systems. However, recently a number of users reported that despite fulfilling these conditions, they end up getting errors instead when they try to access the shared drive. The error states:

“Error code: 0x80070035. The network path was not found.”

One of the common causes of this error is the antivirus program or the Firewall installed on your computer. It could also be that the drive is not shared in the first place or there are some issues with your network drivers. Whichever the case is, here are some potential fixes you need to check out to fix the Error code: 0x80070035.

Option 1 – Try to temporarily disable anti-virus and Windows Defender Firewall

As mentioned, the error could be due to the antivirus program or the Windows Defender Firewall installed on your computer. Thus, disabling them or any security software installed in your computer is always a good idea you can try when you’re not able to access the shared drive on your computer. There are times when you encounter problems like Error code: 0x80070035 due to interference of antivirus or security programs. Thus, you have to disable both your antivirus program and Windows Defender Firewall for the meantime and check if it fixes the error or not.

Option 2 – Check if the drive is shared

Before you further troubleshoot the problem, make sure that the drive you are trying to access is shared first. To do so, follow these steps:

  • Right-click on the folder and select Properties.
  • Go to the Sharing tab and check the status of the Network File and Folder Sharing.
  • And if the status is “Not Shared”, you need to select Share.
  • Next, select the intended Network User for sharing the file and choose the permission level for the user.
  • After that, click on the Apply and OK buttons to save the changes made. You or the intended user should now be able to access the shared folder or file.

Option 3 – Try to ping the IP address of the targeted computer

Even though the shared folder or file is shared correctly, it is possible that the network channel is not connected properly which is why you have to test it by pinging the IP address of the targeted computer from the primary computer.

  • Tap the Win + R keys to launch the Run dialog box.
  • Type “cmd” in the field and tap Enter to open Command Prompt.
  • Next, type the “ipconfig/all” command and tap Enter to execute it. This will populate various details.
  • From the given details, take note of the IPv4 address.
  • Afterward, open Command Prompt on the primary computer and then type the “ping <IPv4 address of the target computer>” command and hit Enter.
  • Now check if you get 4 confirmation replies or not. If not, you can try to access the Network Adapter Troubleshooter.

To run the Network Troubleshooter, refer to these steps:

  • Open the Search bar on your computer and type in “troubleshoot” to open the Troubleshoot settings.
  • Next, scroll down and select the “Network Adapter” option from the right pane.
  • Then click on the Run Troubleshooter” button.
  • After that, your computer will check for any possible errors and will pinpoint the root cause of the problem if possible.
  • Restart your computer.

Option 4 – Verify if Network Discovery is enabled

All you have to do is go to Start > Settings > Network & Internet and from there, click on the “Change connection properties” option and shift the radio button for Network profile to Private. After that, check if folder sharing is now working.

Option 5 – Try to modify the Network Security settings

There are times when the Network Security settings interfere with the folder or file sharing process. And if that’s the case, you can modify it to resolve the problem. How? Refer to these steps:

  • Tap the Win + R keys to open the Run dialog box.
  • Then type “secpol.msc” in the field and tap Enter to open the Local Security Policy manager window.
  • After that, go to Local Policies > Security Options located on the left pane.
  • Next, double click on Network security: LAN Manager authentication level in the right pane to open its Properties.
  • And then select the “Send LM & NTLM-use NTLMv2 session security if negotiated” option from the drop-down menu.
  • Now click on Apply and OK buttons to save the changes made.
  • Reboot your computer.

Option 6 – Try to enable NetBIOS over TCP/IP

  • Tap the Win + R keys to open the Run dialog box.
  • Then type “ncpa.cpl” in the field and tap Enter to open the Network Connections window.
  • After that, right-click on your network and select Properties.
  • Next, double click on Internet Protocol Version 4 and click on the Advanced button.
  • From there, go to the WINS tab and shift the radio button to Enable NetBIOS over TCP/IP.
  • Now click OK to save the changes made and then restart your computer.

Option 7 – Update the Network Adapter drivers

You might also want to update the Network Adapter drivers by following these steps:

  • Tap the Win + R keys to launch the Run window and then type in the “MSC” command and hit Enter to open the Device Manager window.
  • Under the Device Manager, you will see a list of drivers. From there, look for the Network Adapters and expand it.
  • Then right-click on each one of the Network drivers and update them all.
  • Restart your PC and see if it helped in fixing the BSOD error.

Note: If updating the network drivers didn’t help in fixing Error code: 0x80070035, you can also try to uninstall the very same drivers and restart your Windows 10 PC. After that, the system itself will reinstall the drivers you just uninstalled. Alternatively, you can also download and install the drivers from the manufacturer’s website directly.

To reinstall the network adapter driver, refer to these steps:

  • Open the Devices Manager from the Win X Menu.
  • Then locate the device drivers and right-click on them to open the Properties.
  • After that, switch to the Driver tab and click on the Uninstall Device button.
  • Follow the screen option to completely uninstall it.
  • Finally, restart your computer. It will just reinstall the device drivers automatically.
If you like to learn and find out more about various Windows errors, and how to repair them go to our vast archive or use search to find articles that will explain and help you in solving your issue.
However, if you prefer to do things fast and with automatization then we are proposing to use an automated solution for your issues. The application that we are recommending is Advanced System Repair Pro
Advanced System Repair utilizes multiple tools all in one to give you a quick, simple, reliable, and very thorough diagnosis of your PC. It brings you all the tools you need in one program to clean, fix, protect, optimize and boost your PC!
1-Click Maintenance
All the tools to make it simple and easy! It's like having a professional technician at the click of a mouse.

Junk Cleaner
Keeping your computer free from unnecessary clutter also helps make your computer last longer. Like any other machine, if you keep it clean and take care of it, it will serve you better for longer!

Optimize background apps
Optimize applications background activity with the built-in Application Optimizer feature.

Disk Defrag
With a simple 1-click, Advanced System Repair speeds up your PC by assembling fragmented files on your machine and organizing them more efficiently.

Malware Removal
Finds and removes all types of harmful malware including trojans, worms, bots, adware, spyware, PUPs, and more!

Privacy Cleaner
The all-in-one privacy suite to Clean Your Tracks & Protect Your Privacy! Make your computer safe, secure, and more efficient!

System Tweak/Optimizer
ASR will analyze your complete system and settings to adjust your PC to function at its maximum performance.

Registry Cleaner
Over time, as you install and uninstall applications, the registry can become cluttered with old entries and broken settings which can result in program crashes, and annoying messages and slow the computer down.
Visit our Advanced System Repair Pro Download page to inform yourself about all the benefits of this software and get a free trial copy of it.
advanced system repair pro

Advanced System Repair Pro

One-click automated PC repair solution
ASR logo
With Advanced System Repair Pro you can easily
Replace damaged files
Restore performance
Free disk space
Remove Malware
Protects WEB browser
Remove Viruses
Stop PC freezing
DOWNLOAD
Privacy Policy | Terms of Use | Uinstall
Advanced System Repair Pro is compatible with all versions of Microsoft Windows including Windows 11

Share this article:

You might also like

Free Quake upgrade comes to Steam and more
quake remasterWithout any fanfare, news, or information Bethesda has released a completely free upgrade for legendary Quake 1. Free upgrade is automatically applied to all users who possess the original game and it has already been rolled out.

What has changed for good?

New textures, effects, and resolutions are one thing that will come first into your focus when you start the game. From the moment game is started it feels and looks like a game you remember from a long time ago. Models are also upgraded with a higher polygon count. Another thing that will hit you right away is the legendary OST by Trent Reznor in its full glory. If you have the original Quake and played it you will know that OST was missing from the Steam release and having it fully back is a great feature. I would argue that placing just OST alone in the steam release is enough for people to play it again since it adds so much atmosphere. Deathmatch and other multiplayer goodies are all here as well and there is a completely free new episode in the game with several levels. Yes, you get a free Quake upgrade in HD with an extra episode completely free.

The bad side of Quake coin

So this might come as a purist or obsessive nit-picking but there were two things that I, personally am not a fan of and have noticed during my gameplay. Please know that this is personal preference and by no other chance reflects the quality of the game itself but I just had to talk about it. Quake remake is made in a new engine and as such dynamic and gunplay feel different from the original, granted they have done the best they could to replicate the authentic feeling of the original game but there are parts of the game where I have felt that simply put, it feels different. Another thing is also tied to technology and the overall game is somewhat a little brighter and in some areas little softer in dark areas. Like I said this is purely personal preference and might come as nitpicking but I preferred the darker and grittier look of the original game. Darkplaces, the free custom-made upgrade did this in my opinion better.
Read More
How to Fix Error Code 0x80240001 on Your PC

How to Fix Error Code 0x80240001 on Your PC

Error Code 0x80240001- What is it?

Error Code 0x80240001 usually occurs in Windows 10 and is specific to the process of updating your system. It is similar to an error code found in previous versions of the software during the update process. There are a number of steps that can be taken to solve this error code, most of which are fairly easy for the average user to undertake.

Common symptoms for this particular error code include:

  • Inability to complete the updating process of your Windows 10 system
  • A notice that the Windows Update Agent is not able to provide appropriate services through the update module.

While it can be frustrating to have this message appear during the update process, users can resolve the error in a number of ways. However, if you are not confident in your ability to follow the steps below or if the methods listed fail to resolve the problem, contact a certified Windows 10 repair technician to assist you in the process.

Solution

Restoro box imageError Causes

Error Code 0x80240001 occurs when the Windows Update tool is unable to complete its service successfully. This error occurs most often when users attempt to update to Windows 10 from older versions of the software, including Windows 7, 8, or 8.1.

This particular error code can also occur when your system has not been updated in a regular fashion. Stacked updates make it more likely for Error Code 0x80240001 to occur.

In most cases, when Error Code 0x80240001 appears on your screen, the update process will be halted. Sometimes, the screen may display a single color background, removing the appearance of all other windows and applications.

Fortunately, there are several methods that you can use to attempt to circumvent the problem and see the update process through to completion.

Further Information and Manual Repair

While it can be frustrating to deal with an error when you attempt to update your Windows software, there are several ways that you can seek to resolve the issue that causes Error Code 0x80240001. These steps are relatively simple to complete and do not require advanced techniques to be used. However, if you are not confident in your ability to complete the steps listed below, enlist the aid of a qualified Windows technician to help you.

Here are the most common ways that Error Code 0x80240001 can be resolved for Windows 10:

Method One:  Download and Use the Windows Repair Tool

From the Windows website, you can download the Windows Repair tool, if it is not already installed on your computer. While there are other tools available through outside sites that claim that they can resolve this error, in many cases, they can be a carrier for viruses and other kinds of malware, so it is inadvisable to use non-Windows tools to fix this particular error code.

Once you have successfully added the Windows Repair tool to your computer, open it up and look for the option to run “Repair Windows Update.” Using this process, your system can search for and resolve the error, allowing you to successfully run the update tool through to completion.

Method Two:  Uninstall Recently Added Software

In some cases, software that has been recently added to a non-updated computer can cause the update process to experience issues. If you believe that this may have occurred in your case, simply uninstall the software in question, then attempt to run the Windows 10 Update process again.

The best way to prevent this error from reoccurring when you seek to update your Windows 10 system is to apply updates within a short period of time from their release date. It is recommended that users update regularly, which can allow them to avoid a number of issues that are common to the update process.

If you have any difficulty in resolving Error Code 0x80240001 after you have attempted these steps, you may need to enlist the help of a qualified technician who is familiar with the specific errors related to the Windows 10 Update process. This can especially be helpful if you have recently installed a number of new kinds of software and are unsure of whether or not any specific one may be causing your issues. If you wish to always have at your disposal a utility tool to fix these Windows 10 and other related issues when they do arise, download and install a powerful automated tool.

Read More
A Quick Guide to Fixing Connapi.dll Error Code

Troubleshoot Connapi.dll Error Code

Connapi.dll Error Code - What is it?

Connapi.dll is a type of dynamic link library file. This file contains small programs like any other DLL file and is called to load certain programs on your PC. The Connapi.dll error message occurs either when using or installing programs. This error message is displayed in either of the following messages:
“Connapi.dll Not Found" "This application failed to start because connapi.dll was not found. Re-installing the application may fix this problem." "The file connapi.dll is missing." "Cannot start [APPLICATION]. A required component is missing: connapi.dll. Please install [APPLICATION] again." "Cannot find [PATH]connapi.dll"

Solution

Restoro box imageError Causes

Connapi.dll error may occur due to numerous reasons on your PC. The most common causes include:
  • Missing Connapi.dll file
  • Corruption of the Connapi.dll file
  • Driver Issues
  • Viral Infection
  • Registry Issues such as bad and invalid entries
This error may hamper your ability to access your desired programs causing you a great deal of inconvenience. And if the underlying cause of the error is related to the registry, then your computer can be at serious risks like system failure and crash.

Further Information and Manual Repair

To resolve Connapi.dll error code on your PC, here is a list of solutions. These are easy, very simple to perform, deliver the best results, and more importantly require no technical expertise.

Solution 1: Check your Recycle Bin - You May Have Deleted the File Accidentally

As dll files are shared files, it is possible that you accidentally deleted the Connapi.dll file while uninstalling a program from your system. In such a situation, go to the recycle bin and look for the file. If you find the missing Connapi.dll file, simply restore it and then try running your desired program again. If the program runs, then the error is resolved. However, if it still persists, then try other solutions given below.

Solution 2: Update the Drivers

Try updating drivers for hardware devices on the system. To do this, go to the start menu and then Control Panel. Double click on Add or Remove programs icon. Now select incompatible drivers and remove them. After that, restart your PC to activate changes. Now go to the manufacturers’ website to download new drivers and install them on your PC.

Solution3: Scan for Viruses

Another solution is to scan for viruses and malware. Sometimes these can also damage and corrupt dll files on your system. To perform a scan, simply download a powerful antivirus program and run it.

Solution 4: Clean and Restore the Registry

If the error code is still there, then this means the problem is triggered by the registry issues. To resolve it you must clean the registry and remove all the unnecessary and obsolete files like junk files, internet history, temporary files, and cookies. The best way to clean these files instantly is to install Restoro. This is an advanced, cutting-edge, and multi-functional PC Fixer. It has a user-friendly interface and is integrated with powerful utilities like a registry cleaner, anti-virus, and a system optimizer. It is compatible with all Windows versions. The registry cleaning feature scans your entire PC in seconds and detects all the registry issues. It removes all the bad registry entries and unnecessary files. Simultaneously, it also fixes the system files and dll files like Connapi.dll. The anti-virus utility removes all types of malicious software on your system while the system optimizer utility ensures your system performs at its optimum speed. To resolve Connapi.dll error, click here to download Restoro.
Read More
Fix Windows is still setting up ... Code 56
If your internet suddenly stops working on your Windows 10 computer and you get an error message saying, “Windows is still setting up the class configuration for this device (Code 56)”, then read on as this post will show you what you can do to resolve it. This kind of issue has something to do with the Network Adapter and you can see this error message in the Properties menu of the corresponding Network Adapter under the Device Manager. This kind of issue could be caused by many things. For one, it could be caused by your VPN connection if you are using one or it could also be due to an outdated driver. Whatever the cause may be, here are some suggestions you have to check out to fix the error.

Option 1 – Check your VPN

When you install a virtual machine or VPN software on your computer, a new setup will be added in the Network Connection settings and helps your computer in using that adapter setting each time the VPN is turned on. Assuming that you are using an Ethernet connection but your system is trying to use another adapter or settings, that’s when issues occur and one of them is the “Windows is still setting up the class configuration for this device” error. To fix it, you can try to disable your VPN temporarily and see if the error is resolved or not and if turns out that your VPN is the culprit, you have to uninstall it and install a new one or its latest version. To uninstall it, follow the steps below.
  • Tap the Win + R keys to open the Run dialog box
  • Then type “appwiz.cpl” in the field and hit Enter to open the Programs and Features in Control Panel.
  • From there, look for the VPN service you are using, select it and then click on Uninstall to remove it.
  • After that, restart your computer and try to install the latest version of the program again. It should work now. If not, proceed to the next available option below.

Option 2 – Try to update or rollback or uninstall the Network Adapter drivers

You might also want to update, roll back or disable your Network drivers to fix the “This operation failed as no adapter is in the state permissible for this operation” error.
  • Tap the Win + R keys to launch the Run window and then type in the “devmgmt.msc” command and hit Enter to open the Device Manager window.
  • Under the Device Manager, you will see a list of drivers. From there, look for the Network Adapters and expand it.
  • Then right-click on each one of the Network drivers and depending on your preference, you can either select “Update driver”, “Disable device” or “Uninstall device”.
  • After that, restart your PC and see if it helped in fixing the netio.sys Blue Screen error.

Option 3 – Try to run the Network Adapter troubleshooter

To run the Network Troubleshooter, refer to these steps:
  • Open the Search bar on your computer and type in “troubleshoot” to open the Troubleshoot settings.
  • Next, scroll down and select the “Network Adapter” option from the right pane.
  • Then click on the Run Troubleshooter” button.
  • After that, your computer will check for any possible errors and will pinpoint the root cause of the problem if possible.
  • Restart your computer.

Option 4 – Try to reset the Network

You might perform a Network Reset to resolve the problem if none of the three given options above worked. This will reset the entire network configuration including your IP address. To perform Network Reset, follow these steps:
  • Tap the Win + I keys to open Settings.
  • From there, go to the Network and Internet section.
  • Next, scroll down and look for “Network Reset” under the status pane.
  • After that, click on Network Reset and then on Reset now to start resetting the network configuration. Once done, check if it is able to fix the error or not.
Read More
How to Fix the TWCU.EXE Failed to Load Library File Error in Windows 10
The TWCU.EXE or TP-LINK Wireless Client Utility is a configuration application required to run wireless adapters successfully. The TP-LINK Wireless Client Utility application only exists on computers that are using the TP-LINK adapters. Upon the installation of this application, the service will be automatically added to the Windows service list that will continuously run in the background. The Twcu.exe is placed at the C:\Program Files\TP-LINKTP-LINK\Wireless Utility folder and is used by TP-LINK to connect to the internet. The name of the main executable file is twcu.exe and can be viewed in the Services tab of the Task Manager. If you are one of the users who just upgraded to Windows 10 from the previous Windows versions, then you’ll most likely see an error saying, “Failed to load the library file!” that has something to do with twcu.exe or TWCU. This error pops up when you go to your desktop and every time you log into your Windows 10 PC. Like pointed out, this error is related to the TP-LINK Wireless Client Utility and every user who is using the TP-LINK Wireless Client Utility is experiencing this problem which may be due to some compatibility issues especially when you start getting this error right after you upgraded to Windows 10. To fix this problem, follow each one of the options given below.

Option 1 – Try running in Compatibility Mode

The best thing you can do is to run the TP-LINK Wireless Client Utility in the compatibility mode since the problem is due to some compatibility issue. To run this utility in the compatibility mode, here’s what you have to do:
  • Look for the TP-LINK Wireless Client Utility which should be located on your desktop.
  • Once you find it, right-click on it and select Properties from the context menu.
  • After that, go to the Compatibility tab and mark the checkbox for “Run this program in compatibility mode for:” and from the drop-down list, select either Windows 7 or Windows 8.
  • Click the Apply button and then click OK to save the changes made and check if it has resolved the issue or not.

Option 2 – Try troubleshooting compatibility

This option is almost the same as the first one except it is an alternative way of fixing the TP-LINK Wireless Client Utility in case the first one didn’t work. In this option, you will troubleshoot the compatibility issue of the TP-LINK Wireless Client Utility.
  • Look for the TP-LINK Wireless Client Utility which as mentioned, is on your desktop.
  • Then right-click on it and select the “Troubleshoot compatibility” from the context menu.
  • After that, click on the “Try recommended setting” option. Once the process is done, the error message should be gone.
Read More
How to Fix 0x80040154 Error Code

Best Tricks to Fix Error 0x80040154

What is 0x80040154 Error Code?

0x80040154 is a typical ‘class not registered’ error message. It occurs when PC users try to register and Run a 32-bit DLL (dynamic link library) Windows programs on a 64-bit version of Windows.

Solution

Restoro box imageError Causes

  • The 0x80040154 error causes include:
  • Incompatible software
  • Invalid entry command path
  • Damaged and corrupt DLL files
  • COM components not properly registered
  • Active X control and class issues
To avoid the inconvenience of running programs on your Windows PC, it is advisable to resolve the 0x80040154 error.

Further Information and Manual Repair

Here are some of the best methods that you can try to resolve the 0x80040154 error code on your PC:

# 1. Use Regsvr32.exe to Re-register the Failing COM Component

This is one way to resolve the 0x80040154 error code. Regsvr32.exe is a program that you can use to register DLLs (Dynamic Link Libraries) and ActiveX controls in the registry. To use this file to re-register the failing COM components, simply open an elevated command prompt. If the 32-bit DLL is in the %systemroot%System32 folder, then move it to the %systemroot%SysWoW64 folder. After that run the following command: %systemroot%SysWoW64regsvr32 <full path of the DLL>. This will help resolve the issue.

# 2. Install and Run Restoro PC Fixer.

Another alternative is to download Restoro. This is a new, advanced, and innovative PC repair tool deployed with multiple utilities like Active X control and class fixer, system optimizer, an antivirus, and a registry cleaner. It has a user-friendly interface with simple navigation. This makes it quite easy to use for all levels of users. It is safe, fast, and compatible on all Windows versions. The Active X control and class utility scans your entire PC, detects and resolves all errors like 0x80040154 triggering ActiveX and class ID issues in seconds. Besides this, Restoro also offers other benefits. By running this software on your system you can also ensure good PC health and performance as it also removes anti-viruses, repairs registry issues, fixes damaged DLL files, and also boosts the speed of your PC. DLL files often can get damaged and corrupt due to data overload. This is associated with the registry. If you don’t clean the registry frequently, it overloads with data and damages the DLL files. However, with the help of the registry cleaner utility embedded inside this software, you can repair these files easily. The registry cleaner wipes out all the unnecessary files from your system occupying your disk space and simultaneously fixes the damaged DLL files and restores the registry. However, if the DLL files are damaged due to a malware attack, the antivirus module takes care of them. It removes all the malicious software like adware, spyware, viruses, and Trojans and restores your files. Click here to download Restoro on your PC and resolve the error 0x80040154 on your PC now!
Read More
Fix The drive is not a valid backup location
USB storage devices are used to store small and even big files, depending on their sizes. Usually, the sizes of the USB vary from 2GB up to 16GB. And as time passes, they have advanced quite a bit and now it’s common to find USB sticks with a capacity of 32GB, 64GB, or even 128GB. And since they now have large capacities, USB storage devices are often used for storing backups of system data as well as creating an image. However, there are times when you might encounter an error message while trying to create a backup or image on your USB device. The error message states:
“The drive is not a valid backup location.”
One of the causes of this problem is that Windows was not able to recognize the USB drives as a valid backup location since USB storage devices weren’t previously large enough to store system images. To fix this error, here are some possible solutions that might help.

Option 1 – Try creating a sub-folder in the USB drive and backup all the images there

The first thing you can try to do is to create a sub-folder on your USB device. This is one good way you can bypass the USB drive limitation. How? Refer to the steps below.
  • First, right-click on the USB storage device and select Format.
  • Next, select NTFS as the File System and check the box next to Quick Format.
  • After that, click on Start to initiate the formatting process.
  • Once the formatting process is completed, open the USB drive and right-click anywhere inside its main drive window, and then select New > Folder.
  • Then name the folder to be created as “Image (or anything you please)”.
  • Afterward, right-click on the folder and select Properties.
  • From there, go to the Sharing tab and click on Share.
  • Now check if the Permission level on the System owner which should be your username is labeled as “Owner”.
  • Then try to back up your files again using your USB drive while keeping the sub-folder as the backup location.

Option 2 – Update the USB Controller Drivers

  • First, click the Start button and type “device manager”.
  • Then click on the “Device Manager” from the search results to open it.
  • From there, look for the “Universal Serial Bus controllers” option and then right-click on each one of the USB drivers and select the Update Driver from the menu.
  • Restart your PC and then click the “Search automatically for updated driver software” option.
You also have the option to update the motherboard and the USB driver from the manufacturer’s official website.

Option 3 – Run CHKDSK utility to check the drive for errors

When it comes to some issues concerning the hard drive or removable devices, there is a utility in Windows that might help which is called “chkdsk”. To use it, follow the steps below.
  • Tap the Win + S keys to open the Search box.
  • Then type “command prompt” in the field and from the search results that appear, right-click on Command Prompt and select “Run as administrator”.
  • After opening an elevated command prompt, copy and paste the following command and hit Enter:
CHKDSK [volume [[path] filename]] [/F] [/V] [/R] [/X] [/C] [: size]]
Note: In the command given above, “[/F]” will try to fix the system errors while “[/R]” will be the one to fix the bad sectors.
  • Now if you are prompted to run CHKDSK after your reboot your PC, just tap Y and reboot your PC.
  • If CHKDSK is not able to find any errors, tap the Win + E keys and navigate the access window. From there, right-click on the concerned drive and click on Properties.
  • After opening Properties, click on the tab Tools and then click on the “Check” button under the Error-checking section.
  • Wait until the process is completed and then restart your computer.
Read More
Rebuild Search Index in Windows 10
If by any chance your search result in Windows is misleading, missing, or incorrect then it is a high probability that your search index is out of date. To repair this issue follow this guide step by step. Please take note that rebuilding the whole search index can take a long time on some systems depending on the size of the index itself, CPU speed, HD speed, etc. Sometimes it can take even hours on large drives. First, press ⊞ WINDOWS + R to open the run dialog and type in it Control panel to open the control panel. keyboard with windows and r markedrun dialog with control panel typed in 
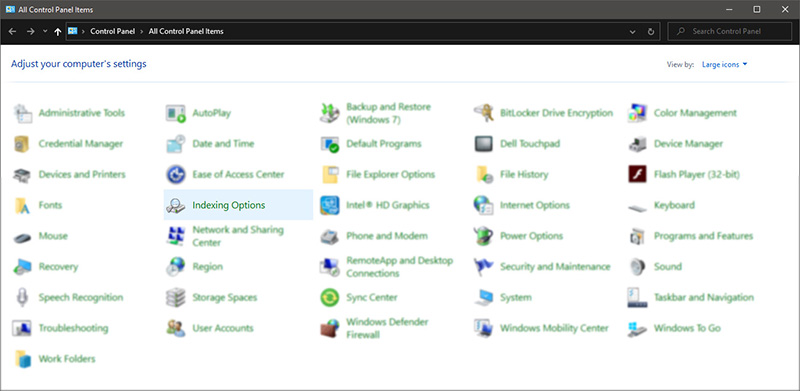
Once you are in the control panel, switch your view to large icons and locate Indexing options. Control panel with indexing options selected
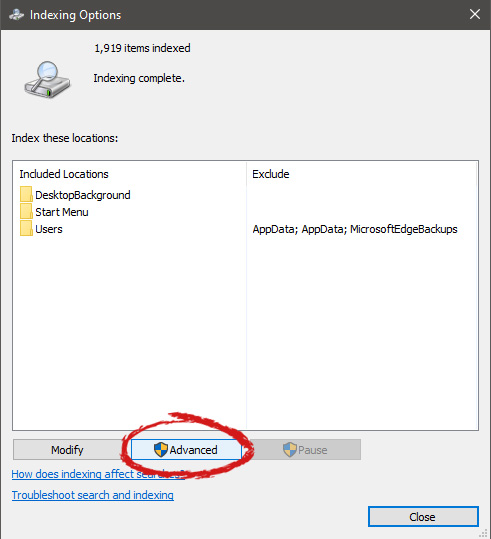
Inside indexing options, click on advanced. indexing options advanced button markedIn advanced options click on the rebuild and confirm. indexing options rebuild button marked
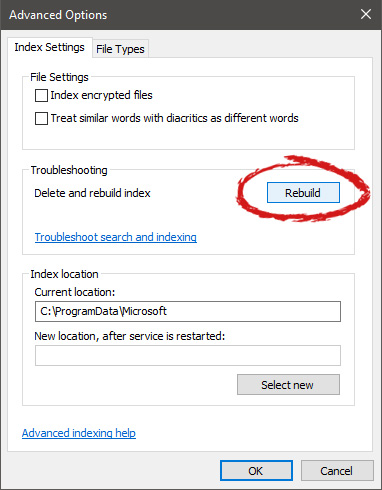
Leave your computer to finish and your searches should be working fine now.
Read More
How to Fix Installer Error 1603

Correct Installer Error 1603

Installer Error 1603 - What is it?

Installer Error 1603 message occurs during the installation of the Microsoft Windows installer Package. The error message is often displayed as the following:
'Error 1603: A fatal error occurred during installation.'
It indicates a problem occurred during the installation process and unsuccessful installation.

Solution

Restoro box imageError Causes

The installer error 1603 may occur if:
  • The folder you are trying to install the Windows Installer package to is encrypted
  • The system account does not have full control permissions
  • Incorrect installation
  • Registry issues

Further Information and Manual Repair

To resolve this error on your system, try the solutions listed below:

Solution 1: Install-Package in an Un-Encrypted Folder

Try installing the package to a folder that is not encrypted. However, if the error still persists, try other solutions listed below.

Solution 2: Enable Full System Control Permissions

Sometimes the error may occur when you don’t have system full control permissions. To enjoy full control permissions here’s what you need to do, go to my computer and right-click the drive that you wish to install the Windows Installer Package to. After that click properties and the security tab. If you can’t locate the security tab, this means your Simple File Sharing feature is turned on. You need to turn it off to continue. For that go to my computer, tools, and then click folder options. Now here press the view tab and check the Simple File Sharing box to turn it off. Press OK to save changes. Now you will be able to locate the security tab. Click on the Security tab and verify the name box that contains the system user account. If the system user account is empty then insert the account name. To insert, click Add, and then select user's dialog box, add a name, and close. Now go to the permissions section and check the box ‘Allow’ under full control. After that go to the ‘Advanced’ tab and do the following: If you are an XP user, select ‘Replace permission entries on all child objects with entries shown here that apply to child objects’ and then press OK to confirm. If you are not an XP user, then follow the same instructions but select the check box that says ‘Reset permissions on all child objects and enable propagation of inheritable permissions’ for the system account. Now click OK to confirm. To activate changes you will have to wait for a while. Once the changes are activated, try installing the Windows Installer package again.

Solution 3: Clean and Repair Registry

The Installer error 1630 can occur due to registry problems as well. To resolve registry-related issues download Restoro. This is a cutting-edge and advanced registry cleaner that scans your entire PC for registry-related errors in seconds and resolves them spontaneously. It removes all the unnecessary junk files, bad keys, invalid registry entries, cookies, and internet history cluttering and corrupting the registry. It repairs the damaged system files and repairs the registry right away thereby resolving Installer Error 1630 on your PC. It is safe and efficient. It is embedded with an intuitive algorithm and a sophisticated user-friendly interface. It is easy to use and operate. You can download it on any Windows version. Besides functioning as a registry cleaner, it also functions as an antivirus and a system optimizer. Click here to download Restoro on your PC to resolve all registry issues generating the installer error 1603 on your system.
Read More
Facebook messengers alternatives
People are becoming more and more concerned with their privacy and Facebook's flagship messaging application is caught between it all. While still widely popular it has becoming to lose its ground due to many unanswered questions about privacy encryption. Lucky for all of us there are alternatives for more secure messaging.

SIGNAL

Arguably the most secure of all well-regarded messaging apps, Signal is the favorite of the European Commission, as well as newsrooms around the world. While Signal doesn’t disclose how many daily or monthly users the app has, Google’s Play Store says it has been installed more than 50 million times. While using Signal, each voice or video call connected through the app includes full end-to-end encryption. Signal takes an extra step by hiding message metadata so that the location of the original message is missing. While it asks for your mobile number, that number isn’t used with your profile. Instead, it acts as a numeric username. Once registered, you will find 1-1 chat, audio, and video calls, disappearing or “secret” chats, and a privacy lock so nobody can access the app even if they have your phone. Best of all, it’s completely free to use.

TELEGRAM

One of the biggest competitors to Facebook Messenger (and WhatsApp), Telegram is a very strong alternative. With more than 400 million users, it offers an interface that should feel right at home for anyone coming from Messenger. Telegram offers some huge benefits over Messenger, including features like groups that can hold up to 200,000 members for a chat. There is no limit on your media or chat size, and you can share all types of files between users and in groups. From a privacy standpoint, Telegram has robust security, but it is worth noting that only “secret” messages are end-to-end encrypted and can self-destruct. Non-secret messages can be stored on Telegram’s servers so you can pick them up between your devices quickly. That’s a consideration worth knowing prior to making Telegram your default Messenger replacement. Telegram is free across all platforms.

THREEMA

Rising in popularity, Threema is another privacy-focused alternative that has quickly become a competitor to Facebook Messenger. This paid service ($2.99 on both App Store and Play Store) is a pay-once, use forever option. Once you pay the small fee, you gain all of Threema’s touted privacy options, like open-source end-to-end encryption for both messages and calls. Like Signal, Threema won’t require you to link any phone numbers or emails to your account. All chats are handled anonymously, and the service generates a random user ID when you first open and register for the app. No data is collected from any of your chats and no ads are shown. The Swiss-made app does have its own servers hosted in Switzerland, which do not store any chat messages. Another privacy benefit of Threema is the notion that all of your contact lists, groups, and user profiles are hosted on your device, not on the Swiss servers. Because of that, Threema can once again state that none of your personal info is stored anywhere they have access.
Read More
1 2 3 162
Logo
Copyright © 2022, ErrorTools. All Rights Reserved
Trademarks: Microsoft Windows logos are registered trademarks of Microsoft. Disclaimer: ErrorTools.com is not affiliated with Microsoft, nor claim direct affiliation.
The information on this page is provided for information purposes only.
DMCA.com Protection Status