How to fix Error 2753, The file is not marked

Installing programs on your Windows 10 computer does not go smoothly as you could encounter some issues along the way that could prevent you from successfully installing the program. One of the common errors you can encounter during the installation of programs is Error 2753. There are times when the packages are corrupted or those packages are not working properly or it wasn’t able to create files and paths. When you encounter this kind of error, you will get the following error message:

“Error 2753, The File is not marked for installation.”

Note that this kind of error is not bound to only some specific files but it can also happen with any file, be it an executable file or an MSI file. To fix this error, here are some possible solutions that you could try.

Option 1 – Fresh download the setup file

The first thing you can do is to fresh download the setup file from the official homepage and then place it in a different location. Just make sure that you download the correct setup file that’s compatible with your operating system. Then restart your computer and sign in as administrator. After that, right-click on the setup file and select the Run as administrator to proceed with the installation.

Option 2 – Try removing all the previous versions of the software

If there is a previous version of the program that’s still installed on your computer, you need to uninstall that program since it might be the reason why you’re getting Error 2753.

  • Tap the Win + R keys to open the Run dialog box
  • Then type “appwiz.cpl” in the field and hit Enter to open the Programs and Features in Control Panel.
  • From there, look for the previous version of the program you are trying to install, select it and then click on Uninstall to remove it.
  • After that, restart your computer and try to install the latest version of the program again. It should work now. If not, proceed to the next available option below.

Option 3 – Run the setup file as administrator

The setup file may need more permission in order to execute properly and so you need to run it as an administrator. To do so, you need to give it more privileges for it to work as intended by its developer.

  • Right-click on the setup file and select the Run as administrator option.
  • Afterward, a User Account Control or UAC prompt will appear and from there, click on Yes and then check if the file runs or not.

Note: If the setup file does not run, you may have to take ownership of the folder where the setup file is located. To take ownership of the folder, refer to these steps:

  • First, locate the concerned folder and right-click on it then select Properties.
  • Next, click on the Edit button in the Properties window and click OK to confirm if you got a User Account Control elevation request.
  • After that, select user/group from the permission windows or click on the Add button to add another user or group. It would be best if you add “Everyone” to give permission.
  • Then check “Full Control” under the “Allow” column to assign full access rights control permissions.
  • Now edit the permission to Full Control for “Everyone”.
  • Click OK to save the changes made and then exit.

Option 4 – Try running the setup file in Compatibility Mode

You may be getting Error 2753 if the setup file is not intended to run on the Windows 10 version you are using which is why you have to run it in Compatibility Mode. This will allow the setup file to think that it is running in a compatible environment as it is intended to.

Option 5 – Try to re-register the vbscript.dll file

You may have to re-register the vbscript.dll file using the regsvr32.exe before you can successfully install the program and fix Error 2753. The Regsvr32 tool is a command-line utility that can be used to register and un-register the OLE controls like DLL and ActiveX (OCX) control in the Windows operating system. Follow the steps below to use it.

  • Open Command Prompt as admin from the WinX menu.
  • Next, type exe vbscript.dll in the elevated Command Prompt and hit Enter to execute the command. This will re-register the affected DLL file using the Windows operating system tool, regsvr32.exe.
  • You should see a message saying, “DllRegisterServer in vbscript.dll succeeded” if the Regsvr32 tool was able to run successfully. After that, try to install the program again and see if it now works.
If you like to learn and find out more about various Windows errors, and how to repair them go to our vast archive or use search to find articles that will explain and help you in solving your issue.
However, if you prefer to do things fast and with automatization then we are proposing to use an automated solution for your issues. The application that we are recommending is Advanced System Repair Pro
Advanced System Repair utilizes multiple tools all in one to give you a quick, simple, reliable, and very thorough diagnosis of your PC. It brings you all the tools you need in one program to clean, fix, protect, optimize and boost your PC!
1-Click Maintenance
All the tools to make it simple and easy! It's like having a professional technician at the click of a mouse.

Junk Cleaner
Keeping your computer free from unnecessary clutter also helps make your computer last longer. Like any other machine, if you keep it clean and take care of it, it will serve you better for longer!

Optimize background apps
Optimize applications background activity with the built-in Application Optimizer feature.

Disk Defrag
With a simple 1-click, Advanced System Repair speeds up your PC by assembling fragmented files on your machine and organizing them more efficiently.

Malware Removal
Finds and removes all types of harmful malware including trojans, worms, bots, adware, spyware, PUPs, and more!

Privacy Cleaner
The all-in-one privacy suite to Clean Your Tracks & Protect Your Privacy! Make your computer safe, secure, and more efficient!

System Tweak/Optimizer
ASR will analyze your complete system and settings to adjust your PC to function at its maximum performance.

Registry Cleaner
Over time, as you install and uninstall applications, the registry can become cluttered with old entries and broken settings which can result in program crashes, and annoying messages and slow the computer down.
Visit our Advanced System Repair Pro Download page to inform yourself about all the benefits of this software and get a free trial copy of it.
advanced system repair pro

Advanced System Repair Pro

One-click automated PC repair solution
ASR logo
With Advanced System Repair Pro you can easily
Replace damaged files
Restore performance
Free disk space
Remove Malware
Protects WEB browser
Remove Viruses
Stop PC freezing
DOWNLOAD
Privacy Policy | Terms of Use | Uinstall
Advanced System Repair Pro is compatible with all versions of Microsoft Windows including Windows 11

Share this article:

You might also like

There’s no Incognito Mode in Chrome
As you know, just like other web browsers, Google Chrome offers Incognito Mode or private browsing which you can use to make sure that your browsing activities are not being tracked by any websites you visit and it also keeps targeted ads at bay. On the other hand, signing in to a website, even when in Incognito Mode is a different thing since that website can track your browsing activities. Thus, Incognito Mode is still useful especially if you want to browse the web safely and without getting tracked except when you log in to some site. However, there have been reports recently that Incognito Mode is missing in Chrome and users are clueless as to how or why it happened. If you are one of them, worry not for this post will walk you through what you can do if there’s no Incognito Mode in Chrome on your Windows 10 computer. This is an unusual and strange issue since the Incognito Mode in Chrome is available by default and you don’t have to do anything to enable it. It is possible that there might be corruption in the Windows Registry which caused the disappearance of Incognito Mode, worry not though for there are some tweaks you can apply to restore the missing Incognito Mode. To apply these tweaks, you need to create first a System Restore point, and then once you’re done, follow the instructions provided below carefully. Step_1: Tap the Win + R keys to open the Run dialog box and type “Regedit” in the field and then hit Enter to open the Registry Editor. Step_2: Next, after opening the Registry Editor, navigate to this path – ComputerHKEY_LOCAL_MACHINESOFTWAREPolicies Step_3: From there, look for ChromePolicies and locate the DWORD named “IncognitoModeAvailability” and double click on it. Step_4: Edit the value of the “IncognitoModeAvailability” DWORD by changing its value from 1 to 0 so you can enable Incognito Mode in Chrome. Step_5: Once done, exit the Registry Editor and restart your computer and then check if you can now see Incognito Mode in Chrome. On the other hand, there is also another option that allows you to force open your Chrome browser in Incognito Mode. All you have to do is set the value of the “IncognitoModeAvailability” key to “2” instead of 0. This can be useful especially if you always browse the web in this mode. But you need to remember that you won’t be able to go back to the normal mode once you do this. Here are what the values of the IncognitoModeAvailability DWORD actually mean:
  • 0 – Incognito mode is enabled by default
  • 1 – Incognito mode is disabled
  • 2 – Chrome is forced to always open in Incognito mode
Read More
INET_E_RESOURCE_NOT_FOUND
The previous Windows versions all came with Microsoft's browser Internet Explorer. A lot of users love it because not only that it is easy to use. It is also very fast. Users didn’t have to worry about compatibility because it is almost always compatible with its Windows Version. When they introduced Windows 10, they changed the name of the browser from Internet Explorer to Microsoft Edge. It is faster and more user-friendly compared to its predecessors. But after the Creator Update, some experienced receiving the inet_e_resource_not_found error code. In contrary to what everyone expects, you actually don’t have to uninstall and reinstall the Microsoft Edge App. What you can do is reset the browser in your Apps & Features Settings in your Microsoft Settings.

To reset the browser you can follow the steps below:

  1. Click on the Windows icon and go to settings.
  2. Click on Apps and this will bring you to the Apps & Features page. Look for Microsoft Edge from the list of Apps and click on it.
  3. Choose Advance Option
  4. Scroll down then Under Reset, click on repair or reset. When you repair it will fix the existing problem but the data that caused the problem may still be present and can still cause problems. If you click on reset, it will delete all the cache and cookies that are installed in your browser but it will save your Favorites as well as your bookmarks.

Another way to resolve this is by disabling the feature TCP Fast Open on Microsoft Edge. To disable this, go ahead and follow the steps below:

  1. Open the Microsoft Edge browser.
  2. Type in about: flags on the Address (URL) bar.
  3. Under Networking, uncheck the Enable TCP Fast Open.
  4. Close your Microsoft Edge browser and open a new one.
Flushing the DNS also worked for other Users. Sometimes, the error code the inet_e_resource_not_found is caused by a corrupted DNS cache. There are 2 ways to flush your DNS. The first option is to use the command prompt to run the command.
  1. To access the Command prompt or CMD, you can search for it on Cortana or you can click on the Windows icon to access the Programs, scroll down to the Windows System folder and click on it.
  2. A drop-down menu will show up, click on Command Prompt which is the first on the list.
  3. Type in the code ipconfig /flushdns and press enter.
  4. There will be a message that will show that says Windows IP configuration successfully flushed the DNS Resolver Cache
  5. Exit the CMD by typing exit and press enter.
The easiest way to do this is to Press the keys Window + R on your keyboard. Type in ipconfig /flushdns in the search box and hit enter or click on OK. These are only some of the ways to resolve the inet_e_resource_not_found. There are other ways to further troubleshoot this issue such as reinstalling your Wifi Adapter Driver or adjusting the DNS Server Address. But most of the time, users are able to resolve the issue with the steps provided above.
Read More
The boot configuration data store can not open
The Boot Configuration Data or BCD files have the instructions required by the Windows operating system in order to properly boot the computer. So if you experience any trouble when you boot your computer, then it is possible that it is due to some misconfiguration or even corrupted Boot Configuration Data files. And if you also encounter an error saying,
“The boot configuration data store could not be opened”
while you try to carry out any command on the bcedit.exe, then you’ve come to the right place as this post will guide you on how you can fix this error in Windows 10. This kind of error could pop up if the system is not able to locate the specified file. It is also possible that the requested system device can’t be found or that the boot configuration data store could not be opened. In addition, when you open the System Configuration or MSConfig, you might notice that there is no Boot data, and according to the reports, is that when you try to dual boot the computer, the installer will replace the default bootloader.

Explanation

In case you don’t know, Windows’ earlier versions were stored in the “Boot.ini” file. You can find the entry in the EFI firmware boot manager of the EFI-based operating system which is located at EFIMicrosoftBootBootmgfw.efi. Whatever the cause of the error is, there are several suggestions you can check out to resolve the problem. You can try to set an entry option value in BCD or enable the Advanced options menu, as well as rebuild the BCD. Before you proceed with the troubleshooting options provided below, make sure that you boot your computer into the Advanced Recovery Mode first since that’s where you can find Command Prompt under the Advanced Options. In addition, you also have to suspend or disable BitLocker and Secure Boot on your PC.

Option 1 – Try to set an entry option value in BCD

  • Once you’re in the Advanced Options, select Command Prompt.
  • Next, execute this command to set an entry point: bcdedit /set {current} Description "TheNameYouWant"
  • After the command has been executed, it will enable the system to trust a version of Windows that is not trusted by default. This should fix the problem, if not, follow the next given options below.

Option 2 – Try to specify the BCD file

  • In the elevated Command Prompt, execute this command: bcdedit /store c:BootBCD
  • Once done, the command will give you a list of options and then execute this next command: bcdedit /store c:BootBCD /set bootmenupolicy legacy
  • After that, restart your computer and select your Windows and then tap the F8 key right away.
Note: When you select the legacy option, the Advanced Options menu will be available during the computer boot up and then you can select into which operating system you can boot your computer into.

Option 3 – Try to rebuild the BCD files

The first thing you can do to resolve the issue is to Rebuild Boot Configuration Data or BCD files.
  • You can start by booting into the installation environment for Windows 10 from an installation media.
  • After that, click on Repair your computer and on the blue screen, select Troubleshoot and then select the Advanced options menu.
  • From there, select Command Prompt and once you open it, enter each one of the commands given below by sequence.
    • bootrec /FixMbr
    • bootrec /FixBoot
    • bootrec /ScanOS
    • bootrec /RebuildBcd
  • Once you’re done executing the commands given above, type “exit” to close the Command Prompt window and then restart your computer and see if it fixed error code 0xc000014c.
Read More
How to fix random Computer crashes
Computer crashes are one of the most annoying things that can happen to users. It often loses your data and work, you must spend extra time if you were in the middle of something and can even break Windows itself. Computer without crashes working fineBefore we move to the article I just want to say that technically there are no random crashes, there is always a reason why the system hangs up, why you received blue screen, annoying restarts out of nowhere and many more PC crashes. In this article, we will explore many possible reasons why something may occur and offer you straight forward solution on how to escape the situation and prevent it from happening again. Without further delay, let's begin:
  1. Check switch connectors and power outlets

    Yes, sometimes the most basic approach provides the best results, check to see if your power outlet is stable and providing you with constant voltage, if not, maybe you want to invest in a UPS system so you do not face random shutdowns and restarts during work, also while you are at it, check to see if that reset and power switch are connected properly and that they are not dirty or loose.
  2. Clean your PC and check connectors

    Dirt can cause many issues with computers, from overheating to shutdowns to blue screens and memory dumps, check to see if your computer is clean enough and that all connectors are connected tight into their respective sockets.
  3. Check the temperature of your CPU

    CPU overheating can cause so-called random freezes and blue screens, the computer might shut down or restart also without any visible reason. Check to see if your fan on the CPU is working properly and change the thermal paste if needed.
  4. Check the health of your hard drive

    If your hard drive is beginning to go down the path of dying out, many issues can come from this condition. There are many tools on the internet and in Windows itself to check if your hard drive is working properly.
  5. Run antivirus and firewall

    Random lock-ups or similar issues can also occur if by any chance you have some malware on your system, run protection software, and keep it updated to make sure the issue does not come from the computer being infected with malicious applications.
  6. Keep system clean

    Have a habit to clean regularly system files and registries, keep removing unnecessary files from your computer and regularly update your Windows and applications along with drivers.
  7. Run memory test

    Bad RAM bank can cause many issues during the work, check it out to be sure the problem is not RAM itself.
  8. Do not run applications that are too demanding for your system

    Some applications require stronger hardware, and some require the latest hardware, if your computer is a little outdated, running a demanding application can cause issues like freezing, restarts, etc.
  9. Remove applications you do not use

    This does not seem like anything important but if you are not using a specific application just remove it from the system, why? Sometimes an application has some ties to certain services and if it is outdated can cause issues for newer ones.
  10. Stop installing everything you find on the internet

    Yes, that extension for chrome looks cool, yes, that fancy new player seems sick but if it is from an unverified source and from the unknown publisher without any reviews maybe you are better off with it. You can never tell what you might be placing into your system from the internet.
And that's it, 10 reasons and solutions on what to do on random computer freezes, crashes, etc.
Read More
Can’t download anything on your Windows PC
Recently, a number of users reported that they weren’t able to download anything from the internet after they’ve updated their Windows 10 computers. This kind of problem occurs because of some Internet options settings located in the Control Panel. Based on the reports, this issue has been known to occur in all kinds of browsers and not only on Microsoft Edge. Not being able to download anything from the internet is a huge problem since almost everything is wrapped around the internet. To resolve this problem, here are some suggestions that you can try.

Option 1 – Temporarily disable Firewall and third-party antivirus

Firewall and antivirus programs are known to block files the instant it detects a threat to the system. However, there are some cases when it can also block a file even when it’s a safe one. Thus, your antivirus or firewall programs might be the reason why you can’t download anything on your Windows 10 computer. To isolate the issue, you need to temporarily disable both the Firewall and antivirus programs and then check if you can now download anything from the internet. Do not forget to enable them again as disabling them can leave your computer vulnerable to cyber threats.

Option 2 – Try changing the Internet Options settings

According to users, changing the Internet Options settings helped them resolve the problem. There are times when the drive location in your Internet Options settings is not the system drive, chances are, it will cause the error to pop up which is why you need to make sure that it’s correct.
  • Go to Control Panel and search for Internet Options and open it.
  • Next, go to the General tab and click on Settings.
  • From there, check if the drive location is “C:”. If it is, close the window, otherwise, click on the “Move folder…” option, and then select your preferred folder under drive C: and click OK.
  • Now restart your computer and check if changing the Internet Options settings helped in fixing the problem.

Option 3 – Try clearing browser data

There are instances when browser data can cause issues in downloading files online. And so you can try to clear your browser’s data. This might be a very basic solution but oftentimes it works in fixing this kind of error. Follow the steps below to clear the data in your browser.
  • Open your Google Chrome browser.
  • After that, tap the Ctrl + H keys. Doing so will open a new panel that allows you to delete the browsing history and other data in your browser.
  • Now select every checkbox that you see and click on the Clear browsing data button.
  • Then restart your Chrome browser and check if you can now open any website or not.

Option 4 – Get rid of any conflicting browser extensions

  • Open Chrome and press Alt + F keys.
  • Go to More tools and click Extensions to look for any suspicious browser extensions or toolbars.
  • Click the Recycle bin and select Remove.
  • Restart Chrome and press Alt + F keys again.
  • Proceed to On Startup and mark Open a specific page or set of pages.
  • To check if the browser hijacker is still active, click Set pages, if it is active, overwrite the URL.

Option 5 – Try to remove Proxy

Removing the Proxy might also help you in fixing the connection issue in Cortana. Here’s how you can do it:
  • Tap the Win + R keys to open the Run dialog box.
  • Then type “inetcpl.cpl” in the field and hit Enter to pull up the Internet Properties.
  • After that, go to the Connections tab and select the LAN settings.
  • From there. Uncheck the “Use a Proxy Server” option for your LAN and then make sure that the “Automatically detect settings” option is checked.
  • Now click the OK and the Apply buttons.
  • Restart your PC.
Note: If you are using a third-party proxy service, you have to disable it.

Option 6 – Try reinstalling your browser

If none of the options given above worked in fixing the problem, you can try to reinstall your browser. There are times when the browser wasn’t installed properly which can cause several issues like not being able to download anything from the web. Thus, reinstall your browser and see if that helps.
Read More
IW Unicorn and Scorpion PC Chair cockpits
Recently on errortools.com, we were talking about Cooler Master’s Orb X gaming chair that is an absolute beast and an amazing product. One downside of Orb X is its price. IW product line is somewhat competing with Orb X with a much more affordable price aiming to probably take customer base with lower income but offering them a great experience as well. The first thing you will notice is a different design and somewhat feeling of cheaper quality if you compare it to Orb X but that is quite reasonable considering the chair itself is around 3.5 times cheaper than Orb X which really puts it in range of everyone can get it. But does a much cheaper price means low quality? Let’s explore.

IW Unicorn

IW unicorn
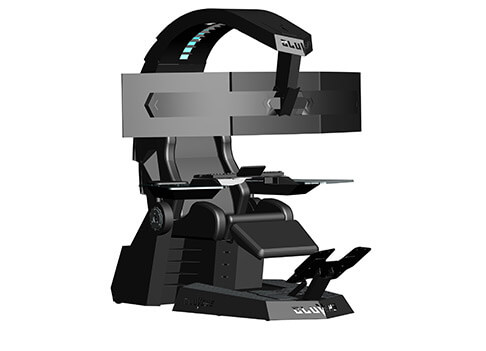
The 2021 CLUVENS BRAND newly issued model UNICORN has fully electrical tilting capabilities to 160 degrees, Reading light-two LED & RGB illumination lighting, manual open/close keyboard tray, and armrests. This model is suitable for home and office, and also gaming computer work environments. It offers functions that enable the user to experience unprecedented comfort and quasi total immersion through strategically positioned 1-3 monitors, audio systems, and accessories. The result is a complete computer office, ergonomically optimized, with a minimal footprint that improves overall performance and productivity and health and comfort. Sitting on a chair can help a lot for relieving health problems like lower back pain, herniated discs, sciatica, and neck pain and also enhance performance and viewing effects.

More Luxury and More comfortable:

Equipped with Luxury feeling reclining Gaming chair made with high-density Mold Shaping Foam and superior quality PU leather with very comfortable texture, electrical recline to 128 degrees, and more to 160 degrees for the flat position for the user.

More High-End Setting and more High-tech:

Manual push for open / close of big sized (87x34cm) Self-Balancing Keyboard tray, adjustable with 20cm distance range with Electrical control for the height of roof arm & monitors. Electrical control for reclining Zero Gravity position or even flat position, Manual adjusted Feet pedal for a more comfortable position for feet. Using a High-Quality PU leather Gaming chair that has Heat/Massage functions with it! The IW-Unicorn monitor mounts allow the use of a single monitor up to Ultra-wide 49” or 43” in size or triple monitor setups up to 3 x 29” other monitors configurations are available upon request. (VESA standard)

IW Scorpion

IW scorpion
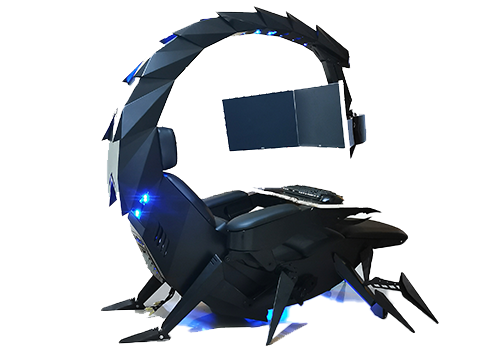
Scorpion is basically a premium version of Unicorn with being able to hold more weight, having cup holders on the armrest, etc. The look is also similar with Scorpion being more sinister-looking but overall Steel frame and chair are the same.

Conclusion

Sadly I have not personally experienced neither of these products including Orb X but from all information I have found and looked over, I would say these products are not trying to compete with each other. Although Products are similar in nature, Orb X is aimed at hi end-users focusing on privacy and robustness while IW is filling the gap of users that would like an advanced chair but are not willing or ready to shell hi amount of money for it offering advanced chairs with advanced features in somewhat affordable price.
Read More
A Quick Guide to Fixing the Entry.Dll Error

Repair the Entry.Dll Error

Entry.dll Error - What is it?

Entry.Dll is a type of Dynamic Link Library file. This file consists of small programs that are called to load and run desired applications. Just like any other dll file, the entry.dll file is also a shared file. It supports and is compatible with multiple applications. You may experience entry.dll error message on your PC, when the Windows cannot properly load the entry.dll file.  This error most often occurs during PC startup, application startup or while trying to use a specific function in your program. The enrty.dll error message is often displayed in either of the following formats:
  • “Entry.dll not found.”
  • “The file Entry.dll is missing."
  • “Cannot register Entry.dll."
  • “Cannot find C:WindowsSystem32\Entry.dll."
  • “Cannot start YAPC: Europe. A required component is missing: Entry.dll. Please install YAPC: Europe again."
  • “Entry.dll Access Violation."

Solution

Restoro box imageError Causes

The entry.dll file error may occur due to multiple reasons including but not limited to:
  • Corrupt entry.dll registry entry
  • Entry Dll file is not registered properly
  • Open source hardware failure  for example  a bad hard drive
  • Virus or malware infection
No matter what the underlying reason may be, it is advisable to repair and resolve the dll file error on your PC to ensure the program is accessible without any inconvenience.

Further Information and Manual Repair

Here are different ways to fix and resolve the Entry.dll error on your PC:

1. Re-Register Entry.dll File

When you install software that uses the Entry.dll, the software automatically registers that file for you. However, in some cases the dill file may not register properly and as a result you may experience the error Entry.dll not registered. In such situations it is advisable to use ‘Microsoft Register Server’ built-in utility to re-register the entry.dll file. This utility can be accessible in Windows XP, Vista, 7 and 8 through the command prompt. To get started, here’s what you need to do:-
  • Go to the start menu and type command in the search box.
  • Now press Ctrl and Shift together and hit the Enter key.
  • After that you will be prompted with a permission dialog box; click yes to continue.
  • Now type the following command: regsvr32 /u Entry.dll. Press enter to un-register the file.
  • Type the following command: regsvr32 /i Entry.dll and press enter again. This will re-register the file.
  • Close the command prompt window and try accessing the desired program supported my entry.dll file. If the program is accessible and you don’t encounter the error message, this means the error is resolved.

2. Update Outdated and Corrupt Device Drivers

Another method to fix this error is to update the device drivers that are incompatible, corrupt or outdated. Download the latest versions of the corrupt drivers and re-install them on your PC.

3. Clean the Registry to Remove Invalid Entry Files

The entry.dll file error can be related to problems in the Windows registry. The registry gets damaged when it gets overloaded with too many unnecessary and obsolete files such as junk files, bad registry keys, invalid entries and cookies. These files not only take up great deal of disk space but also damage the registry, system and dll files. You can clean the registry manually but it is time consuming and needs technical expertise. However, to repair the error right away in seconds download Restoro. This is a powerful Registry Cleaner integrated with an intuitive algorithm that detects and removes all types of registry issues on your entire PC in no time. It wipes out the unnecessary files and invalid entries, repairs dll files including the entry.dll file and restores the registry.

4. Scan for Malware and Viruses

Another cause of the entry.dll error can be malware and viruses. These malicious programs can also corrupt dll files. It is important to remove all of them from your PC to resolve the issue. For this you need to scan your PC with an antivirus. If you download Restoro, you don’t need to download an antivirus program. This is because Restoro includes multiple utilities including an antivirus too. You can run it to scan and remove all types of malicious programs like malware, viruses, spyware and Trojans on your system. Restoro also features a system optimizer. This utility boosts your system’s speed significantly ensuring your PC performs at its optimum level. It is safe, user-friendly and can be installed on any Windows versions. It has easy navigations making it quite simple to use by all levels of users. It is bug free and efficient. In just a few clicks you can resolve practically all PC related issues. To resolve entry.dll error on your PC, click here to download Restoro today!
Read More
REvil vanishes over night without trace
REvilREevil is one of the most active and successful hacking groups connected to Russia and operating all over the world. The group recently demanded a huge bitcoin ransom for an attack targeting IT firm Kaseya in the USA. Since Tuesday blog and payment site run by REvil group cannot be longer reached without any kind of explanation or why. The reason behind the disappearance is unknown but has sparked speculation that the group may have been targeted deliberately by authorities. US President Joe Biden said he raised the issue with Vladimir Putin during a phone call on Friday, after discussing the subject during a summit with the Russian president in Geneva last month. Mr. Biden told reporters that he had "made it very clear to him...we expect them to act" on information and also hinted the US could take direct digital retaliation on servers used for intrusions. The timing of Tuesday's outage has sparked speculation that either the US or Russian officials may have taken action against REvil - though officials have so far declined to comment and cyber experts say sudden disappearances of groups are not necessarily uncommon. The development comes after a series of high-profile ransomware attacks which have hit major US businesses this year. The FBI accused REvil - also known as Sodinokibi - of being behind a ransomware attack on the world's largest meat processing company JBS last month.
Read More
Automatically Turn Off Hotspot when idle
One of the useful features that came with Windows 10 is the Mobile Hotspot although there’s a downside to it – it drains your battery faster especially if your Windows 10 device is running on battery. Another one of its flaws in the implementation of this feature is that it stays activated even when the connection is idle. In other words, it is still activated even if no devices are connected to it. As a result, it consumes battery life and affects it. There are also instances when it affects the performance of the network connection. At the time of writing, Microsoft hasn’t done anything about this dilemma yet so in the meantime, you can continue reading this post to resolve this issue on your Windows 10 device. You can remedy this Mobile Hotspot issue by running a command in Windows PowerShell. To get started, follow the given instructions below.

Turn off Mobile Hotspot Automatically:

Step 1: The first thing you have to do is to copy the following command:
powershell -windowstyle hidden -command "Start-Process cmd -ArgumentList '/s,/c,net stop "icssvc" & REG ADD "HKLMSYSTEMCurrentControlSetServicesicssvcSettings" /V PeerlessTimeoutEnabled /T REG_DWORD /D 1 /F & net start "icssvc"' -Verb runAs"
Step 2: After copying the command given above, open the Notepad app and paste the command you copied there and save it. And when saving it, select the “Save as” option and its File type as “All files”. Step 3: After that, put “TurnOnTimer.bat” as the file’s name and save it on your Desktop. Step 4: Once done, run the file you just created, and when a User Account Control or UAC prompt appears, just click on Yes. Step 5: After you run the file, it will run a series of scripts in a command line which will turn off the Mobile Hotspot automatically when idle. And that’s how you automatically turn off the Mobile Hotspot when your Windows 10 device is idle. On the other hand, if you want to undo the changes made, you can always do so using the steps provided below.

Turn on Mobile Hotspot:

Step 1: Copy and paste the following command in the Notepad app:
powershell -windowstyle hidden -command "Start-Process cmd -ArgumentList '/s,/c,net stop "icssvc" & REG ADD "HKLMSYSTEMCurrentControlSetServicesicssvcSettings" /V PeerlessTimeoutEnabled /T REG_DWORD /D 0 /F & net start "icssvc"' -Verb runAs"
Step 2: After copying and pasting the command, save it as “TurnOffTimer.bat” on the Desktop. Step 3: Once done, run the file like what you did earlier and select Yes when a UAC prompt pops up. This will run a series of scripts on a command line which will revert the changes back to their default state.
Read More
How to get rid of PuzzleGamesDaily

PuzzleGamesDaily is a Browser extension developed by Mindspark. This extension monitors user activity such as website visits, clicked links and other web-related tasks that It later uses to display targeted ads.

When installed it changed the default home page, search engine and new tab page to MyWay.com, and while browsing the internet with this extension active you will see additional pop-up ads, injected (unwanted) ads, and sponsored links during your browsing sessions.

From the Terms of Use: You hereby acknowledge and agree that by using an MS Product you may be exposed to Content that may be offensive, indecent or objectionable in your community […] MS Products are exposed to various security issues, and should be regarded as insecure. By accepting this Agreement, you acknowledge and accept that the MS Products and any information you download or offer to share by means of an MS Product, may be exposed to unauthorized access, interception, corruption, damage, or misuse, and should be regarded as insecure. You accept all responsibility for such security risks and any damage resulting therefrom.

This extension has been marked as a Browser Hijacker by several anti-virus scanners and has been flagged for optional removal. It is not considered malicious but many users wish to remove it due to the above reasons.

About Browser Hijackers

Browser hijacking is regarded as the internet’s constant danger that targets internet browsers. It’s a type of malware program that directs the web browser requests to some other suspicious internet sites. Browser hijacker malware is created for many different reasons. Often, it will force users to particular sites which are aiming to boost their advertising campaign income. Many people believe that these websites are legitimate and harmless but that is not true. Nearly every browser hijacker pose an existent threat to your online safety and it’s vital to categorize them under privacy risks. Browser hijackers could also permit other destructive programs without your knowledge to further damage your computer.

Major signs that your internet browser has been hijacked

There are many signs that indicate your web browser is highjacked: the browser’s home-page is modified; bookmark and new tab are likewise modified; the main web browser settings is modified and unwanted or insecure sites is put into the trusted sites listing; you are getting browser toolbars you have never found before; you observe numerous ads show up on your web browsers or display screen; your browser has instability problems or displays frequent errors; Inability to navigate to certain sites, especially anti-malware and also other computer security software webpages.

So how exactly does a browser hijacker infect a computer?

Browser hijackers attack computers through malicious e-mail attachments, downloaded infected documents or by checking out infected sites. They can be included with toolbars, BHO, add-ons, plugins, or browser extensions. Browser hijackers sneak to your computer in addition to free software application downloads that you unwittingly install along with the original. An example of some infamous browser hijacker includes Babylon, Anyprotect, Conduit, SweetPage, DefaultTab, RocketTab, and Delta Search, but the names are regularly changing. Browser hijackers could record user keystrokes to gather potentially important information leading to privacy concerns, cause instability on systems, significantly disrupt the user experience, and eventually slow down the computer to a stage where it will become unusable.

Removal

Some hijackers can be easily removed by uninstalling the free software they were included with or by deleting any extension you’ve recently added to your PC. Yet, certain hijackers are far more difficult to discover or get rid of since it could get itself associated with certain crucial computer files that enable it to operate as a necessary operating system process. Inexperienced PC users shouldn’t ever attempt for the manual form of removal, since it needs detailed computer knowledge to carry out fixes on the system registry and HOSTS file. Anti-malware application is very effective with regards to catching and removing browser hijackers that regular anti-virus software has overlooked. Among the best tools for fixing browser hijacker malware is SafeBytes Anti-Malware. It assists you eliminate any pre-existing malicious software on your system and provides you real-time monitoring and protection from new threats.[/section][/vc_column_text][/vc_column][/vc_row][vc_row][vc_column][vc_column_text][section header="How One Can Eliminate Malware that is Blocking Websites or Preventing Downloads"]Malware could cause several different types of damage to PCs, networks, and data. Some malware sits in between your computer and the net connection and blocks some or all websites that you would like to visit. It might also prevent you from adding anything on your computer, particularly anti-malware applications. If you’re reading this article, you may have infected by malware that prevents you from downloading a computer security program such as Safebytes Antimalware on your PC. Refer to the instructions below to eliminate malware through alternative ways.

Install the antivirus in Safe Mode

The Windows OS has a special mode known as “Safe Mode” in which just the minimum required programs and services are loaded. If the malicious software is set to load automatically when PC boots, switching into this mode could prevent it from doing so. To enter into Safe Mode or Safe Mode with Networking, press F8 while the PC is starting up or run MSCONFIG and look for the “Safe Boot” options under the “Boot” tab. After you restart into Safe Mode with Networking, you may download, install, as well as update anti-malware program from there. After installation, run the malware scanner to remove most standard infections.

Switch to a different web browser

Certain malware may target vulnerabilities of a particular web browser that block the downloading process. If you are not able to download the security program using Internet Explorer, it means virus could be targeting IE’s vulnerabilities. Here, you need to switch over to another web browser like Chrome or Firefox to download Safebytes Anti-malware software. Create a portable antivirus for eliminating viruses Another option is to store and run an antivirus program entirely from a Flash drive. To run anti-malware using a flash drive, follow these simple steps: 1) On a clean computer, install Safebytes Anti-Malware. 2) Mount the pen-drive onto the same computer. 3) Double-click the Setup icon of the antivirus software package to run the Installation Wizard. 4) Pick thumb drive as the place when the wizard asks you exactly where you wish to install the application. Follow the on-screen instructions to complete the installation process. 5) Now, transfer the thumb drive to the infected PC. 6) Double-click the anti-malware program EXE file on the USB flash drive. 7) Simply click “Scan Now” to run a complete scan on the infected computer for viruses.

A Look at the Best AntiMalware Program

If you’re looking to install anti-malware software for your computer, there are plenty of tools on the market to consider nonetheless, you cannot trust blindly anyone, regardless of whether it is a free or paid program. Some of them are great, some are decent, and some will destroy your computer themselves! When looking for an anti-malware program, purchase one that offers dependable, efficient, and complete protection against all known viruses and malware. When considering the trustworthy software programs, Safebytes Anti-Malware is certainly the highly recommended one. SafeBytes is a powerful, real-time antivirus application that is designed to assist the average computer end user in safeguarding their PC from malicious threats. Using its cutting-edge technology, this software can help you eliminate several types of malware which includes computer viruses, trojans, PUPs, worms, ransomware, adware and browser hijackers.

SafeBytes anti-malware takes PC protection to a totally new level with its advanced features. Here are some of the good ones:

Active Protection: SafeBytes provides real-time active monitoring and protection against all of known viruses and malware. They are extremely efficient in screening and removing numerous threats because they’re continuously improved with latest updates and alerts. Best AntiMalware Protection: Using a critically acclaimed malware engine, SafeBytes offers multilayered protection that is intended to catch and eliminate threats that are hidden deep in your computer’s operating-system. Fast Multi-threaded Scanning: SafeBytes’s virus scan engine is among the quickest and most efficient in the industry. Its targeted scanning vastly increases the catch rate for viruses that is embedded in various computer files. Website Filtering: Safebytes assigns all sites a unique safety ranking that helps you to get an idea of whether the website you’re about to visit is safe to view or known to be a phishing site. Lightweight Tool: SafeBytes gives complete protection from online threats at a fraction of the CPU load because of its enhanced detection engine and algorithms. 24/7 Online Support: Support service is available for 24 x 7 x 365 days via email and chat to answer your concerns. To sum it up, SafeBytes Anti-Malware is pretty great for securing your computer against all kinds of malware threats. There is no doubt that your computer system will be protected in real-time once you put this tool to use. You will get the very best all-around protection for the money you spend on SafeBytes Anti-Malware subscription, there is no doubt about it.

Technical Details and Manual Removal (Advanced Users)

If you would like to perform the removal of PuzzleGamesDaily manually rather than utilizing an automated software tool, you can follow these measures: Go to the Windows Control Panel, click the “Add or Remove Programs” and there, select the offending program to uninstall. In case of suspicious versions of browser plugins, you can actually remove it via your web browser’s extension manager. You may even want to reset your web browser settings, and also clear your browser cache and cookies. To make sure of complete removal, find the following registry entries on your computer and remove it or reset the values appropriately. However, this can be a difficult task and only computer professionals can carry out safely. Furthermore, certain malware is capable of replicating or preventing removal. It is advisable that you carry out the removal process in Safe Mode.
Files: %Documents and Settings%\%UserName%\Application Data\%random% %AllUsersProfile%\Application Data\.dll Registry: HKCU\Software\Microsoft\Windows\CurrentVersion\Run\KB8456137 = %LocalAppData%\KB8456137\KB8456137.exe HKEY_CLASSES_ROOT\CLSID\28949824-6737-0594-0930-223283753445\InProcServer32 (Default) = \.dll
Read More
1 2 3 162
Logo
Copyright © 2022, ErrorTools. All Rights Reserved
Trademarks: Microsoft Windows logos are registered trademarks of Microsoft. Disclaimer: ErrorTools.com is not affiliated with Microsoft, nor claim direct affiliation.
The information on this page is provided for information purposes only.
DMCA.com Protection Status