Fix Error 1310, Error writing to file

If you were trying to install a program on your Windows 10 computer but encounter an error instead that says, “Error 1310, Error writing to file: <PATH>, Verify that you have access to that directory” then read on as this post will guide you on how you can fix it. This kind is a fairly common type of error encountered by many Windows users.

You can get this error when you try to install certain programs like Excel, AutoCAD, Adobe Photoshop, and some other Adobe products on Windows. One of the most likely causes for this error is that the required files or location is already used by some other software which means that Windows finds that you are trying to overwrite a software that is already installed. Aside from that, it could also occur if the program installer does not have access to write to that directory.

To fix Error 1310, here are some potential fixes that could help.

Option 1 – Clear up temporary or junk files

The error could be caused by some temporary or junk files in your computer and so you need to clear them up to fix the problem. You can achieve that using the Storage Sense feature.

  • Open Setting > System > Storage from the WinX Menu.
  • From there, you will see a list of all the local and connected storage devices along with the details on the free space. Make sure that Storage Sense is on.
  • Next, find a link that says “Free Up Space” and click it to open.
  • After that, a screen which is the built-in program in Windows 10 will appear and will scan your computer for the following junk files so you can free up disk space:
    • Windows Upgrade Log Files
    • The system created Windows Error Reporting Files
    • Thumbnails
    • Temporary Internet Files
    • Previous Windows Installation Files
    • Delivery Optimisation Files
    • DirectX Shader Cache
  • Choose the files you want to get rid of and then click on the remove files option. Note that you’ll have an idea of the total size as you select any of the junk files listed above.
  • Now go to the “Free Up Space Now” section and click the Clean Now button. This will get rid of all the temporary or junk files in your computer and should hopefully fix Error 1310.

Option 2 – Reinstall the program in a Clean Boot State

You can also troubleshoot Error 1310 in a Clean Boot state. It could be that there are some third-party applications in your computer that's preventing the program from getting installed and to isolate this possibility, you need to boot your computer in a Clean Boot State and then try installing the program again. Putting your computer in this state can help you identify which program is the culprit and thus isolates the problem. In a Clean Boot state, your computer will start using only the pre-selected minimal set of drivers and startup programs. Note that you have to disable and enable one process at a time.

  • Log onto your PC as an administrator.
  • Type in MSConfig in the Start Search to open the System Configuration utility.
  • From there, go to the General tab and click “Selective startup”.
  • Clear the “Load Startup items” check box and make sure that the “Load System Services” and “Use Original boot configuration” options are checked.
  • Next, click the Services tab and select the “Hide All Microsoft Services” check box.
  • Click Disable all.
  • Click on Apply/OK and restart your PC. (This will put your PC into a Clean Boot State. And configure Windows to use the usual startup, just simply undo the changes.)
  • After you’ve set your computer into a Clean Boot State, make sure that you’re signed in as administrator and then try to install the program again.

Option 3 – Try to unregister and re-register the Windows Installer Module

  • Tap the Win + R keys to open the Run dialog box.
  • Then type the “msiexec /unregister” command and hit Enter to unregister the Windows Installer Module.
  • Next, type the “msiexec /regserver” command and hit Enter to re-register the Windows Installer Module.
  • Now restart your computer and see if un-registering and re-registering the Windows Installer Module fixed the problem or not.

Option 4 – Take ownership of the location where you want to install the app

The next thing you can try to do is to take ownership of the particular folder as this worked for some users who experienced the same problem. But before you do that, you have to create a System Restore Point first, once that’s done, proceed to the given steps below.

  • First, locate the concerned folder and right-click on it then select Properties.
  • Next, click on the Edit button in the Properties window and click OK to confirm if you got a User Account Control elevation request.
  • After that, select user/group from the permission windows or click on the Add button to add another user or group. It would be best if you add “Everyone” to give permission.
  • Then check “Full Control” under the “Allow” column to assign full access rights control permissions.
  • Now edit the permission to Full Control for “Everyone”.
  • Click OK to save the changes made and then exit.
  • Finally, try to install the application again.
If you like to learn and find out more about various Windows errors, and how to repair them go to our vast archive or use search to find articles that will explain and help you in solving your issue.
However, if you prefer to do things fast and with automatization then we are proposing to use an automated solution for your issues. The application that we are recommending is Advanced System Repair Pro
Advanced System Repair utilizes multiple tools all in one to give you a quick, simple, reliable, and very thorough diagnosis of your PC. It brings you all the tools you need in one program to clean, fix, protect, optimize and boost your PC!
1-Click Maintenance
All the tools to make it simple and easy! It's like having a professional technician at the click of a mouse.

Junk Cleaner
Keeping your computer free from unnecessary clutter also helps make your computer last longer. Like any other machine, if you keep it clean and take care of it, it will serve you better for longer!

Optimize background apps
Optimize applications background activity with the built-in Application Optimizer feature.

Disk Defrag
With a simple 1-click, Advanced System Repair speeds up your PC by assembling fragmented files on your machine and organizing them more efficiently.

Malware Removal
Finds and removes all types of harmful malware including trojans, worms, bots, adware, spyware, PUPs, and more!

Privacy Cleaner
The all-in-one privacy suite to Clean Your Tracks & Protect Your Privacy! Make your computer safe, secure, and more efficient!

System Tweak/Optimizer
ASR will analyze your complete system and settings to adjust your PC to function at its maximum performance.

Registry Cleaner
Over time, as you install and uninstall applications, the registry can become cluttered with old entries and broken settings which can result in program crashes, and annoying messages and slow the computer down.
Visit our Advanced System Repair Pro Download page to inform yourself about all the benefits of this software and get a free trial copy of it.
advanced system repair pro

Advanced System Repair Pro

One-click automated PC repair solution
ASR logo
With Advanced System Repair Pro you can easily
Replace damaged files
Restore performance
Free disk space
Remove Malware
Protects WEB browser
Remove Viruses
Stop PC freezing
DOWNLOAD
Privacy Policy | Terms of Use | Uinstall
Advanced System Repair Pro is compatible with all versions of Microsoft Windows including Windows 11

Share this article:

You might also like

0x8019019a when setting up Yahoo Mail
The error code 0X8019019A is shown when a user fails to add his Yahoo account to the Mail app due to the outdated or corrupt installation of the Mail app. Not using an App-specific but a normal Yahoo account password may also result in the error at hand. In this guide, we will show you how to effectively fix this error so you can set up Yahoo mail.
  1. Reboot PC

    Perform a restart of your system to rule out a temporary glitch in the system. Also, check if you can successfully access your email through a web browser using the same credentials as you are using with the Mail app. Additionally, make sure that no VPN or proxy server is being used to access the internet (VPN/proxy may work fine with the web version of Yahoo mail but may hinder the access through a mail client).
  2. Update Windows and the Mail App to the Latest Build

    If your system is not updated to the latest build it can create incompatibility between the OS modules. Updating the Windows and Mail app of your system to the latest build may solve the problem.
  3. Re-add the Yahoo Account to the Mail App

    The Yahoo account issue could be a result of a temporary glitch in the communication modules of the system. The glitch may get cleared if you remove and then re-add the Yahoo account to the Mail app.
  4. Reset the Mail App to the Defaults

    You may fail to add the Yahoo account to the Mail app if the installation of Mail itself is corrupt. In this scenario, resetting the Mail app to the defaults may solve the problem.
  5. Generate an App Password and Use it to Add the Yahoo Account to the Mail App

    Yahoo has implemented tons of security features to its accounts. One such feature is the use of app-specific passwords for less secure apps like the Mail app. If your Yahoo username or password is not working with the Mail app, then using the App-specific password may solve the problem.
Read More
Best fitness trackers for your health needs
fitness trackerIf this unfortunate COVID-19 worldwide pandemic has managed to teach us, I would argue it is that our health is the most important thing. So in that spirit, we will continue in this article reviewing some of the best fitness trackers that can be found in the time of writing this article in 2021. Now the market for fitness trackers is not small by any means and offerings are also not small, from no-name manufacturers costing only a few bucks to more serious one’s going slightly over 100 USD there is a fitness tracker for everyone. In this particular article, we will not focus on cheap few dollars no-name ones, instead, we will be offering top ones in the field among some in the middle range simply because we can stand behind them considering quality and precision.

Fitbit Charge 4 fitness and activity tracker

Fitbit is not a pioneer company in the world of fitness trackers and it shows. Charge 4 model offers maybe the best quality, performance, and features for its price. It stands out with implemented GPS meaning that you will need your phone for tracking workouts. It also offers step tracking, sleep tracking, automatic workout-tracking, active zone minutes, etc. It weighs 30g and has 1 inch grayscale OLED. Battery life is said to hold up to 4 days if you use built-in GPS regularly, if you decide to use GPS constantly device will last only 5 hours. Without GPS it can last up to 7 days and it is water-resistant and waterproof up to 50 meters.

Amazfit Band 5

Amazon’s offering of fitness tracker is aimed at beginners and as such, it is lacking some advanced features including an automated working tracker or GPS, also the model does not have replaceable bands so customization is not an option. It does however offer activity and sleep tracking, heart rate monitoring and it is the only model that integrates with Alexa. The manufacturer states that the battery can last up to 15 days depending on usage which places Amazfit Band 5 as a device that has a longer life of use. The device itself is packed with a 1.1-inch color OLED and it weights 12g. It is splash-resistant, not water-resistant.

Xiaomi Mi Band 6

Xiaomi tracker is the best budget version on this list including in it 30 sport modes like running, cycling, yoga, swimming, and more. Battery life is not bad also packing up to 14 days of life but only if the device is not used constantly. It has activity and sleep tracking, a heart rate monitor, sleep tracking, customizable replicable bands and it is water-resistant up to 50m. It comes in a 1.56 inch AMOLED color display and it weighs 63g. The device also has menstrual health tracking making it a great device for women.

Samsung Galaxy Fit 2 fitness tracker

Now we are getting into serious and little more expensive ones. Galaxy Fit 2 is among the top-notch trackers currently on the market. It of course can work along with Samsung’s smartwatches and mobile phones. Packed in the military-grade 1.1-inch casing with color AMOLED and weighing 91g with battery life up to 21 days and water resistance up to 50m this bracelet is an absolute beast. It comes packed with features from standard sleep tracking to automated workout-tracking but it also has a connection to Samsung’s Health mobile app to choose from over 90 workouts, it monitors heart rate and stress levels making it really one of the complete solutions for serious fitness enthusiasts.

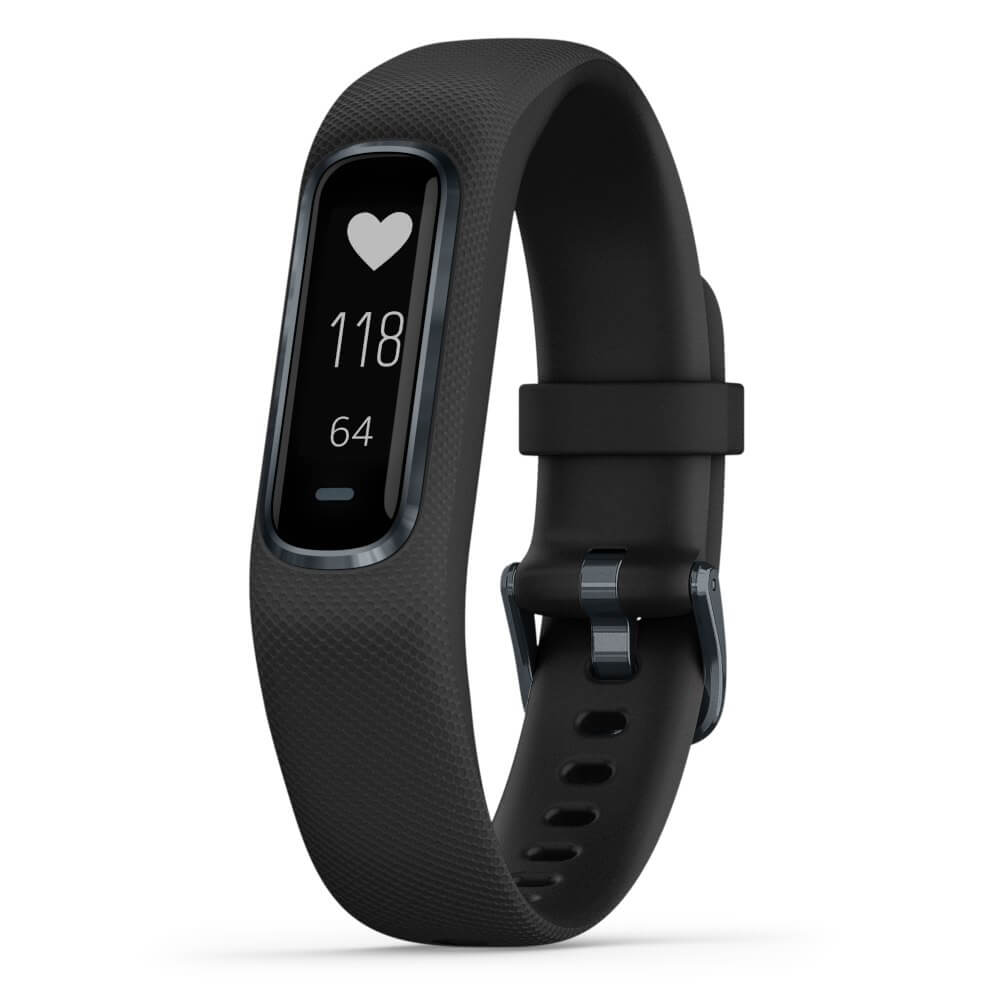
Garmin Vivosmart 4 fitness tracker

Last on our list is Garmin vivosmart 4. The device itself is not very impressive, 7 days battery life with 0.7 inch OLED display and 17g weight packed with 50m water resistance is nothing spectacular, Samsung’s model is packing better hardware and way more battery life but all of the mentioned devices fall flat if we compare software to Garvin. Garvin’s Vivosmart 4 software is best on the list, it keeps track of your steps, sleep, calories burned, floors climbed, various exercises, and heart rate as standard features but you'll have advanced sleep tracking with REM sleep. It can also gauge blood oxygen saturation levels during the night with its wrist-based Pulse Ox sensor. In addition, a relaxation breathing timer complements the all-day stress tracking feature. Lastly, the "Body Battery" monitor helps optimize your daily activities based on your energy levels making it truly the only complete tracking solution on this list. That's it for our review of fitness trackers of today, be sure to come back each day to find more interesting articles and tips for your everyday digital life.
Read More
GoDaddy data breach compromised 1.2M accounts
A very serious data breach has happened to the unfortunate GoDaddy hosting service placing a little over 1.2 million accounts affected. Security breaches sadly are not a rare occurrence but this time it is a little different. GoDaddy breachEach time when the company is breached data is stolen and that places the company in a bad light usually because its user database has been compromised and people are concerned about their data being misused. This is very rational fear and concern but this time things are a little bit different than usual, why is that, you might ask? Well, as before mentioned GoDaddy is a hosting company and the vector of attack was aimed at the part where it is hosting WordPress. Attackers were able to get their hands on the sFTP credentials of customers on that server meaning that all of the websites are also been relieved of their user base as well. This potentially means that there is a high chance that all of the hosted web site's content is also compromised, meaning that your data could also be compromised even if you were not a GoDaddy customer, all you needed to do is to be a member of any site hosted on their platform. GoDaddy has reset WordPress passwords and private keys, so it’s already taken the steps required to stock the attacker from exploiting anything with the passwords obtained. The company is in the process of generating new SSL certificates for customers. Bad thing is that the attack used a compromised password to get into systems all the way back around September 6th, 2021, the breach was discovered on November 17th, 2021, which is more than a 2-month active time where the attacker could harvest tons of data. The outcome of this attack will be seen in the upcoming time, until then be safe, and Just in case change your passwords.
Read More
Microsoft vs Google & Facebook
microsoft hqMicrosoft wants to escalate the situation from Australia to the EU, what a surprise. Hello all and welcome to another news article, this time we are focusing on Microsoft pushing the EU to accept law proposition from Australia. For all of you who are not familiar with the given situation let me quickly explain. The feud began when the Australian government proposed a new law that targeted Facebook and Google specifically. The government said that it believed that both of the tech giants were using content from news outlets without paying. Have you ever seen the little news snippets that Google or Facebook sometimes show its users to keep them up to date? These are lifted directly from news websites, and the Australian government claimed that this practice meant that people didn't bother visiting the news website. This then staved news websites of revenue. As such, the government put forward a new law that would mean Google and Facebook would have to pay the source website for every time they displayed a news snippet. Facebook responded by removing its Australian news coverage in light of the law. Google, however, put up a fight. It argued that its snippets encouraged people to click on it to read more, thus driving more traffic to the news website. It also said that such a law would be too expensive to maintain in the long run. As such, Google threatened to remove itself from Australia if the law passed. This was likely a scare tactic, as 95 percent of Australian web users use Google; however, it actually opened the door for its rival, Microsoft. Microsoft saw how it could push its own search engine BING to replace google. It of course went and reached the Australian government to assure them that BING is more than capable to fulfill its needs and fully abide by the proposed law. Now Microsoft knows that if this law passes it could see a similar situation happening in Europe and it is pushing it. US News reported on how Microsoft plans to encourage EU countries to adopt this new law too. The company has teamed up with the European Publishers Council and News Media Europe to make the following statement: Publishers might not have the economic strength to negotiate fair and balanced agreements with these gatekeeper tech companies, who might otherwise threaten to walk away from negotiations or exit markets entirely
Read More
Fix can not open EXE file in Windows 10
Can not open and run EXE file in Windows is not a new issue and sadly it can still happen from time to time, luckily this step by step solution will help you to resolve this problem fast and effective in no time. Try the below solutions in no particular order and I hope that you will solve the issue fast and be able to return to using the computer like it never happened
  1. Run SFC scan

    As the EXE file not opening issue lies in the Windows OS, the SFC tool will be able to identify the cause and fix this issue. Press ⊞ WINDOWS + X and choose command prompt (admin) in command prompt type: sfc /scannow Press ENTER
  2. Check registry and modify if needed

    Sometimes value in the registry key is wrong and can cause this error, in order to check if this is the case, we will open the registry editor and find out Press ⊞ WINDOWS + R to bring run dialog up type in it: RegEdit and press ENTER In the left pane of the Registry Editor window, click on the HKEY_CLASSES_ROOT to expand the section Scroll down to find out the .exe registry and click on it Go to the right pane of the window and double-click on the Default and set the Value Data as exefile Click on the OK button Next, located the given in the window: HKEY_CLASSES_ROOT>exefile>shell>open>command Click on the “Command” in the left pane of the window In the right pane of the window double-click on the Default and set Value Data as “%1” %* Click on the OK button Restart your computer and check if the issue persists
  3. Turn off Firewall and defender

    If you have a firewall and antivirus active there might be a chance of a conflict and that firewall or antivirus is preventing the EXE file from starting, disable your firewall and anti-virus and try again to open the EXE file.
  4. Turn off user account control

    User account control can also like a firewall prevent some files from executing, go into accounts and turn off user account control to see if this might be an issue preventing you from opening the file.
Read More
Error Code 0x80d02002: How to Fix It In Windows 10

Error Code 0x80d02002? - What Is It?

Error Code 0x80d02002 is one of the common errors encountered by Windows users upgrading to Windows 10 or installing new Windows updates. This error results in program lock-ups, system crashes, and freezes, or slow PC performance. It can also cause possible loss of private data on your device.

Some of the common error messages involving Error Code 0x80d02002 include:

  • Something went wrong, Please try again later. Windows update error dt_000 – 0x80d02002
  • Error(s) found: Code 0x80d02002 Windows update encountered an unknown error. Windows update ran into a problem.
  • Windows Update Cannot Check For Updates – 0x80d02002
  • 0x80d02002 – Windows could not search for new updates. An error occurred while checking for new updates for your computer. Some updates were not installed.
  • There were some problems installing updates, but we’ll try again later If you keep seeing this and want to search the web or contact support for information, this may help – 0x80d02002
While upgrading to Windows 10, depending on the state of your computer, you might encounter other error messages, including error code 0xc000021a

Solution

Restoro box imageError Causes

Error Code 0x80d02002 normally occurs when a user updates their system, upgrades to Windows 10 from Windows 7 or Windows 8/8.1, or installs new Windows updates. There are several reasons why this error happens which includes:
  • Internet connection problems
  • Blocked system ports
  • Conflict on system level

Further Information and Manual Repair

In trying to fix Error Code 0x80d02002, you can employ manual repair methods to effectively and efficiently solve the issue. However, keep in mind that one tiny error made in using the command prompt can result in data loss or put your computer in a no-boot situation. In such cases, you can seek help from a Windows professional or consider using an automated tool whenever necessary.

You can try doing the following manual repair methods in an attempt to fix Error Code 0x80d02002:

Method One: Reset Windows Update Components

In trying to fix Error Code 0x80d02002, you may try resetting manually and check the Windows update components by doing the following steps:

  1. Right-click on the Start button then select Command Prompt (Admin) from the list to open a Command Prompt window.
  2. Once the Command Prompt window appears, type or copy and paste the following commands all at once then hit Enter:
net stop wuauserv net stop cryptSvc net stop bits net stop msiserver ren C:WindowsSoftwareDistribution SoftwareDistribution.old ren C:WindowsSystem32catroot2 catroot2.old net start wuauserv net start cryptSvc net start bits net start msiserver pause
  1. Exit the Command Prompt then check if the issue is resolved.

Method Two: Check If The Region Is Correct

  1. On the Start screen, type Region. Afterward, click on Settings then hit
  2. Under the Format tab, choose English (United Kingdom).
  3. Select Language Preferences then click on Add a language. Afterward, add “your language.”
  4. After you’ve added your preferred language, choose it then click on Move Up to make it the first language. Close now the Language window.
  5. On the Region window, select Additional Settings and see if the values are the same.
  6. Select the Location tab then change the Home Location to “your country,” then hit

Method Three: Perform an SFC Scan

Check if there are system files that need to be repaired by running an SFC Scan. Follow the steps below:

  1. Type CMD in the search bar then right-clicks on it. Select Run as Administrator. This will open a Command Prompt window in elevated mode.
  2. In the next window, select
  3. Once the Command Prompt window appears, type the command: sfc /scannow
  4. Leave the Command Prompt window open and wait for the process to complete. This might take a while depending on how fast or slow your device is.
  5. When everything’s fine, the message saying “Windows Resource Protection did not find any integrity violations” will appear.

 Method Four: Disable Skype or Antivirus

There are times when Skype or your installed antivirus can conflict in updating your system. You can disable first your antivirus or Skype as you update your system and enable them once again when you successfully update your system.

Method Five: Download A Powerful Automated Tool 

Can’t seem to put up with the long and technical manual repair process? You can still fix this error by downloading and installing a powerful automated tool that will surely get the job done in a jiffy!

Read More
Run Windows 10 from your USB drive
Windows 10 to goMany Linux users if not all of them can run their distros from a USB drive but did you know you can run Windows 10 from a USB drive as well? Microsoft has introduced all the way back to Windows 8 one feature called Windows To Go and it kept it in Windows 8.1 and in Windows 10 as well. This feature is intended as a convenient way for workers to carry their corporate environments with them, but having your own copy of Windows on a thumb drive could be handy for backup purposes, too, or if you frequently use public machines that lack your preferences/applications or that have a restricted OS.

What you will need?

In order to actually make Windows 10 run from a USB drive you will need the following things:
  1. USB drive with a minimum size of 20GB
  2. Working computer with Windows 10 running on it
  3. Rufus or another ISO to UBS tool, get Rufus here: https://rufus.ie/en_US/
  4. Windows 10 ISO file

Making Windows 10 UBS drive

Install Rufus on your Windows 10 and run it. Stick USB in PC and open Rufus. On the screen that follows choose your Windows 10 ISO image and under Image options choose Windows To Go. Click on ready and you are finished, that’s it. After Rufus finishes you have now fully working Windows 10 bootable drive which you can use on another PC for whatever reason.
Read More
Fix Windows defender 0x800700AA Error
Windows defender error 0x800700AA, service can not be started comes when the user is trying to run Windows defender scan on their system. This kind of behavior happens for two reasons mostly, third-party application conflict or corrupted system files. In this article, we will tackle both scenarios and provide you with solutions in both cases.

Use third party automatic solution

If you are not tech-savvy or you do not wish to manually tackle with Windows system you can use RESTORO (guide and download link below) to automatically repair this error. RESTORO will automatically scan your system and fix all errors with just a single click of a mouse. If you wish to fix the error manually keep on reading.

Third-party application conflict

In this rare scenario when Windows defender can not start scan due to conflict with installed service or application in the system solution is quite simple. Restart your PC into safe mode and run the scan from there. In a safe mode environment, minimum drivers and services are only loaded eliminating any conflicts that might occur when everything is booted. If Windows defender can not run the scan in safe mode and you get the same 0x800700AA error then you can eliminate application conflict as a reason and move to the next solution which will tackle corrupted system files. If you, however, managed to run a scan then you have a rare third-party application conflict, you can boot normally into windows and try to eliminate one by one to see which one is causing the issue. The safest bet would be to start with security software because most of the time that is what causes conflicts in running services and applications.

Corrupted system files

If the previous solution has not provided you with results then you have system file corruption that needs to be fixed. Move from one solution to another as presented below:
  1. Run SFC scan

    SFC scan is a built-in Windows tool for solving corrupted system files issues, it is fully automated and does not require from the user any kind of knowledge or information. To run it and scan the system do the following: Press ⊞ WINDOWS + X to open the secret menu Left-click on the command prompt (admin) In command prompt type SFC /SCANNOW and press ENTER Wait for the process to finish, do not interrupt it and once it is done, restart your computer
  2. Run DISM scan

    DISM scan is similar to SFC scan but it tackles different types of system file corruption and it is recommended to run it also after SFC has been completed. Please note that for DISM scan to be successful you will need a stable internet connection since DISM will replace corrupted files with new ones downloaded from Microsoft. To run it do the following: Press ⊞ WINDOWS + X to open the secret menu Left-click on the command prompt (admin) inside command prompt type: exe /online /cleanup-image /scanhealth followed by ENTER, then type: Dism.exe /online /cleanup-image /restorehealth also followed with ENTER. Leave scan to finish and reboot your PC
Read More
How to Fix Error 0x0000605 in Windows
Recently, some users reported not being able to boot up their Windows 10 computers. And during the startup phase, at some time, the bootup sequence is halted with a Recovery error along with an error message saying, “Your PC/Device needs to be repaired” with an error code of 0x0000605. This kind of error message indicates that Windows was not able to verify the digital signature for the file as the signing certificate or it could be that it has expired. To resolve this error, you can follow the potential fixes given below and see if you stumble upon a fix that might work out for you.

Option 1 – Change the Date & Time settings in the BIOS

Some users reported that they were able to fix the error by changing the Date & Time settings in the BIOS. Upon checking, they saw that in their BIOS settings, the date was off several years. As a result, the incorrect date and time settings end up ticking the system into believing that the Windows build has expired long before the actual expiration date. You can check if the error pops up due to the same reasons by accessing the BIOS settings. To do so, you have to tap the Boot key that’s associated with your motherboard manufacturer during the initial startup phase. After that, you can search for a particular boot key online or you can also tap keys like F2, F4, F8, F10, F12, and the Delete key. Once you’re able to access the BIOS settings, locate the Date & time or anything similar, and then check if the date is correct or not. If not, you need to change the date to the actual date and then save the changes made and restart your computer and then check if the issue is now fixed or not. Just remember that if the actual date is past the expiration date of the build you have, you need to change it to an older date. If your Windows 10 PC is able to boot back up, you have to update it to a stable Windows build and then go back to the BIOS settings and change the date to the current one else you will definitely encounter Windows update errors in the future as well as security alerts.

Option 2 – Perform a clean install of a stable Windows 10 build

If every system boot fails accompanied by a BSOD error with error code 0x0000605 “A component of the operating system has expired” and you’ve already followed every instruction on option 1, then it’s most likely that your current Windows build has already expired. Remember that almost all the Windows 10 Insider Preview builds (98xx) are created along with an expiration date and when your computer reaches the expiration date, you won’t be able to boot your computer up. Note that the exact expiration date varies based on the build number. And prior to the expiration date, the operating system will start to display some error warnings telling you that the build will expire and urge you to update the most recent build available. And so once the computer reaches its expiration date, it will begin to reboot every three hours until it no longer boots up which is about 2 weeks approximately after the license has expired. Once the expiration date is up and your computer no longer boots up, you need to perform a clean install and then install the latest Windows 10 build to resolve the issue once and for all.
Read More
Hard drive shows wrong free space
If you are using your computer and you notice that Hard drive shows high space utilization even if you only have a few applications installed on your computer, then you’ve come to the right place as this post will guide you on what you can do to sort this problem. Upon noticing the odd state of your hard drive and you check the actual volume that’s occupied by the apps in your drive and you see that they are not really occupying a lot of space. This kind of issue could indicate that your hard drive is not showing the correct value for the free storage space of the drive-in your Windows 10 computer. This kind of problem could be passed off as a system bug, however, it could also be a serious problem. In fact, as you are aware, there are hidden folders and files in your computer that could be occupying space and since most of them are associated with system applications, you might not realize it unless you thoroughly check the folders.

The most common causes of the issue are as follows:

  1. The system information folder might be utilizing a lot of space. If you wonder where the information for the system restore points is stored, they are stored in the system information folder which in turn is stored in the drive as a hidden file.
  2. An issue with system maintenance could cause the problem.
  3. Malware or some other software might have created an undetectable hidden file.
  4. Space could be occupied by the trashbin folder.
  5. These hidden files could occupy significant space in the folder, thus slowing down the system and impacting its performance. If you face this issue, try our suggestions and see if they help you.
  6. Run ChkDsk
  7. Clear all Junk files
  8. Reduce the space occupied by the system restore points
  9. Run the System Maintenance troubleshooter

Option 1 – Run CHKDSK utility to check the drive for errors

When it comes to some issues concerning the hard drive or removable devices, there is a utility in Windows that might help which is called “chkdsk”. To use it, follow the steps below.
  • Tap the Win + S keys to open the Search box.
  • Then type “command prompt” in the field and from the search results that appear, right-click on Command Prompt and select “Run as administrator”.
  • After opening an elevated command prompt, copy and paste the following command and hit Enter:
CHKDSK [volume [[path] filename]] [/F] [/V] [/R] [/X] [/C] [: size]]
Note: In the command given above, “[/F]” will try to fix the system errors while “[/R]” will be the one to fix the bad sectors.
  • Now if you are prompted to run CHKDSK after your reboot your PC, just tap Y and reboot your PC.
  • If CHKDSK is not able to find any errors, tap the Win + E keys and navigate the access window. From there, right-click on the concerned drive and click on Properties.
  • After opening Properties, click on the tab Tools and then click on the “Check” button under the Error-checking section.
  • Wait until the process is completed and then restart your computer.

Option 2 – Try to delete the temporary files

The error could be caused by some temporary or junk files in your computer and so you need to clear them up to fix the problem. You can achieve that using the Storage Sense feature.
  • Open Setting > System > Storage from the WinX Menu.
  • From there, you will see a list of all the local and connected storage devices along with the details on the free space. Make sure that Storage Sense is on.
  • Next, find a link that says “Free Up Space” and click it to open.
  • After that, a screen which is the built-in program in Windows 10 will appear and will scan your computer for the following junk files so you can free up disk space: 
    • Windows Upgrade Log Files
    • The system created Windows Error Reporting Files
    • Thumbnails
    • Temporary Internet Files
    • Previous Windows Installation Files
    • Delivery Optimisation Files
    • DirectX Shader Cache
  • Choose the files you want to get rid of and then click on the remove files option. Note that you’ll have an idea of the total size as you select any of the junk files listed above.
  • Now go to the “Free Up Space Now” section and click the Clean Now button. This will get rid of all the temporary or junk files in your computer and should hopefully fix the error.

Option 3 – Try to reduce the space occupied by the system restore points

In case you don’t know, system restore points actually occupy a significant space in your computer which is stored in the System Information folder. Thus, you need to check the size of this folder and unhide the folders and files and then click on the folder. The size of the folder should be displayed in the right pane of the window. To fix the storage space problem, you could delete all the old System Restore Points as well as Previous versions of files or you could also restrict the disk usage of the System Restore points.

Option 4 – Try to run the System Maintenance troubleshooter

The problem could also be caused by the System Maintenance and to fix it, you have to run the System Maintenance troubleshooter by following these steps:
  • In the Windows Search bar, type “control panel” and double click on Control Panel from the search results.
  • Next, go to this path: Control PanelAll Control Panel ItemsTroubleshootingSystem and Security.
  • After that, click on the System Maintenance troubleshooter to run it.
  • Once the process is completed, restart your computer.
Read More
1 2 3 162
Logo
Copyright © 2022, ErrorTools. All Rights Reserved
Trademarks: Microsoft Windows logos are registered trademarks of Microsoft. Disclaimer: ErrorTools.com is not affiliated with Microsoft, nor claim direct affiliation.
The information on this page is provided for information purposes only.
DMCA.com Protection Status