Fix Error 0x8004230F when creating Restore

Creating a System Restore point is definitely a must especially when you are about to make some changes to your computer. This will help make sure that the system settings and files can go back to an earlier point, should something go wrong, without affecting any personal files. However, there are cases when creating a System Restore Point does not go smoothly and you encounter an error that says, “The shadow copy provider had an unexpected error while trying to process the specified operation ( ox8004230F )”. Aside from creating System Restore Point, you can also encounter this error when you create a system image or backup.

According to reports, this error pops up when the required services are not running or not properly responding. And to fix it, there are several recommendations that will be provided in this post to fix the Error 0x8004230F when creating System Restore point in Windows 10. You can try to check the Volume Shadow Copy Services status or run the VSSADMIN tool. You could also check the status of the Microsoft Software Shadow Copy Provider Service or create System Restore Point in a Clean Boot State. For more details, refer to the provided options below.

Option 1 – Try checking the status of the Volume Shadow Copy Service

  • Tap the Win + R keys to launch the Run utility and type “services.msc” in the field and hit Enter to open the Windows Services Manager.
  • From the list of services, look for the Volume Shadow Copy service and double-click on it.
  • After that, this will open the Properties where you have to make sure that the Startup type is set to Automatic (Delayed Start) and then click on the Start button underneath it.
  • Once done, click on Apply and then OK to save the changes made.
  • Now try creating a System Restore Point again and see if the error is already fixed or not.

Option 2 – Try to run the VSSADMIN tool

In case you don’t know, the shadow copy provider is sensitive and some other backup, disk cloning, etc. can make it malfunction. To fix this, you can run the VSSADMIN tool by following these steps:

  • Tap the Win + R keys to open the Run dialog box and type “cmd” and hit Enter to open Command Prompt.
  • Next, execute this command to check if you have other third party VSS admin providers: vssadmin list providers
  • After that, if it finds any, you need to disable them but if it does not find anything, then proceed.

Option 3 – Try to check the Microsoft Software Shadow Copy Provider Service status

  • Tap the Win + R keys to launch the Run utility and type “services.msc” in the field and hit Enter to open the Windows Services Manager.
  • From the list of services, look for the Microsoft Software Shadow Copy Provider Service and double click on it.
  • After that, this will open the Properties where you have to make sure that the Startup type is set to Automatic (Delayed Start).
  • Once done, click Apply and OK to save the changes and then try creating System Restore Point again.

Option 4 – Troubleshot the problem in a Clean Boot State

It is possible that some third-party program installed in your computer might be the one that’s causing the ox8004230F when you try to create a System Restore point. Thus, you can try to boot your computer in a Clean Boot State and then try to perform the task again.

  • Log onto your PC as an administrator.
  • Type in MSConfig in the Start Search to open the System Configuration utility.
  • From there, go to the General tab and click “Selective startup”.
  • Clear the “Load Startup items” check box and make sure that the “Load System Services” and “Use Original boot configuration” options are checked.
  • Next, click the Services tab and select “Hide All Microsoft Services” check box.
  • Click Disable all.
  • Click on Apply/OK and restart your PC. (This will put your PC into a Clean Boot State. And to configure Windows to use the usual startup, just simply undo the changes.)
  • Once your computer has restarted try to create a System Restore Point again and if it now works, start to isolate the problem by checking which one of the programs you installed recently is the root cause of the problem.
If you like to learn and find out more about various Windows errors, and how to repair them go to our vast archive or use search to find articles that will explain and help you in solving your issue.
However, if you prefer to do things fast and with automatization then we are proposing to use an automated solution for your issues. The application that we are recommending is Advanced System Repair Pro
Advanced System Repair utilizes multiple tools all in one to give you a quick, simple, reliable, and very thorough diagnosis of your PC. It brings you all the tools you need in one program to clean, fix, protect, optimize and boost your PC!
1-Click Maintenance
All the tools to make it simple and easy! It's like having a professional technician at the click of a mouse.

Junk Cleaner
Keeping your computer free from unnecessary clutter also helps make your computer last longer. Like any other machine, if you keep it clean and take care of it, it will serve you better for longer!

Optimize background apps
Optimize applications background activity with the built-in Application Optimizer feature.

Disk Defrag
With a simple 1-click, Advanced System Repair speeds up your PC by assembling fragmented files on your machine and organizing them more efficiently.

Malware Removal
Finds and removes all types of harmful malware including trojans, worms, bots, adware, spyware, PUPs, and more!

Privacy Cleaner
The all-in-one privacy suite to Clean Your Tracks & Protect Your Privacy! Make your computer safe, secure, and more efficient!

System Tweak/Optimizer
ASR will analyze your complete system and settings to adjust your PC to function at its maximum performance.

Registry Cleaner
Over time, as you install and uninstall applications, the registry can become cluttered with old entries and broken settings which can result in program crashes, and annoying messages and slow the computer down.
Visit our Advanced System Repair Pro Download page to inform yourself about all the benefits of this software and get a free trial copy of it.
advanced system repair pro

Advanced System Repair Pro

One-click automated PC repair solution
ASR logo
With Advanced System Repair Pro you can easily
Replace damaged files
Restore performance
Free disk space
Remove Malware
Protects WEB browser
Remove Viruses
Stop PC freezing
DOWNLOAD
Privacy Policy | Terms of Use | Uinstall
Advanced System Repair Pro is compatible with all versions of Microsoft Windows including Windows 11

Share this article:

You might also like

Fix One Drive Error: This is not a valid file name
As you know, Microsoft’s consumer cloud storage platform is none other than OneDrive. It is where users can save any of their files albeit it’s mostly used to store common files like documents and photos. However, there are times when you might encounter some problems when saving these files. Recently, some users reported that they had problems saving Word documents to OneDrive and if you experience the same issue, then you’ve come to the right place as this post will guide you on how to resolve it. According to users who encountered the problem, when they try to save Word documents on OneDrive, an error message appears instead stating, “This is not a valid file name”. This kind of error only occurs when the file is opened from within OneDrive for saving in a different folder. In other words, if the file is saved in the same folder, the error won’t pop up but if it is saved in a separate folder, that’s when the error appears. Worry not though for fixing this error is not complicated and won’t take too long. It seems that this error is due to the 259-character limitation when creating and saving files as far as the Office products are concerned. To resolve it, there are several workarounds you can check out. Before you proceed with these workarounds, make sure that you have a stable internet connection.

Option 1 – Try renaming the file with a shorter name

The first thing you can do to fix the problem is to rename the file with a shorter name. Just right-click on the file and select the Rename option from the menu and then type in the new name and click OK or tap Enter to rename the file.

Option 2 – Try renaming the folders where the file is located

Like what you did in the first given option, all it takes is a right-click but this time on a folder. Rename the folder with a different name and save the changes made and then check if you can now save the Word document on OneDrive.

Option 3 – Try moving the file to a folder with a shorter path

If the first two options didn’t work, you can try moving the file to a folder with a shorter path. Note that it is not the same as doing it locally on a Windows 10 computer so you have to right-click on the file and select the “Move to” option. After that, locate the folder where you want to move the file and select it and then click on the Move button to complete the task.

Option 4 – Try making some changes in the document

You could also try to make some modifications to the document. Once you’ve done that, click the File tab and select the Save As option and then go to the folder where you want to save the file and tap enter.
Read More
FindGoFind Browser Hijacker Removal Guide

FindGoFind is a browser extension for Google Chrome.Developers present findgofind.com as an improved Internet search engine that supposedly enhances the Internet browsing experience by generating better search results. These claims often trick users into believing that findgofind.com is legitimate and useful. In fact, developers promote this site using deceptive software download/installation set-ups that hijack web browsers and modify various options without permission. Furthermore, findgofind.co continually records various data relating to users’ Internet browsing activity.

While this extension is installed, users will see additional unwanted ads throughout their browsing sessions. Furthermore, this extension changed the default search engine to FindGoFind to easier display Sponsored content.

About Browser Hijackers

Browser hijackers (also known as hijackware) are a type of malicious software that modifies web browser configuration settings without the computer owner’s knowledge or approval. These hijacks are raising at an astonishing rate across the world, and they can be truly nefarious and sometimes harmful too. Browser hijackers can do a variety of things on your computer. These are typically used to force hits to a specific site, manipulating web traffic to earn ad revenue. Many people believe that the browser hijacker is just a harmless website but that is incorrect. Almost every browser hijacker poses an actual threat to your online safety and it’s vital to categorize them under privacy risks. When the malware attacks your computer, it begins to mess things up a whole lot that slows your PC down to a crawl. In the worse case, you will be pushed to tackle serious malware threats too.

How one can know if your browser is hijacked

The typical signs that signify having this malicious software on your PC are: 1. the home page of the browser is changed all of a sudden 2. you see new unwanted favorites or bookmarks added, usually directed to advertisement-filled or porn websites 3. the default browser configurations are changed and/or your default web engine is altered 4. you’ll see multiple toolbars in your internet browser 5. you see lots of pop-ups on your screen 6. your internet browser has become unstable or starts running slowly 7. you can’t navigate to certain websites, like security software-related sites.

Exactly how they infect computer systems

Browser hijackers may use drive-by downloads or file-sharing websites or even an e-mail attachment to reach a targeted computer. They also come from add-on programs, also known as browser helper objects (BHO), web browser plug-ins, or toolbars. Also, certain freeware and shareware can put the hijacker in your PC through “bundling”. Some of the most well-known hijackers are FindGoFind, Babylon Toolbar, Conduit Search, Sweet Page, OneWebSearch, and CoolWebSearch.

How you can get rid of a browser hijacker

Some hijackers can be simply removed by uninstalling the free software they came with or by deleting any add-ons you have recently added to your system. In some cases, it can be a difficult job to find and delete the malicious program because the associated file might be running as part of the operating system process. Apart from that, manual removal expects you to perform several time-consuming and complicated actions that are tough to do for new computer users. Industry experts always recommend users to eliminate any malware including browser hijacker with an automatic malware removal tool, which is easier, safer and faster than the manual removal method. SafeBytes Anti-Malware can counter relentless hijackers and provide you with proactive PC protection against all kinds of malware.

What you can do if Virus Prevents You From Downloading Anti-virus?

Malware may cause several kinds of damage to computers, networks, and data. Some malware sits in between the computer and your net connection and blocks a few or all internet sites that you want to visit. It will also block you from adding anything to your system, particularly the anti-virus program. So what to do if malicious software keeps you from downloading or installing Anti-Malware? There are a few actions you can take to get around this issue.

Download the application in Safe Mode with Networking

If the malware is set to load at Windows startup, then booting in Safe Mode should prevent it. Just the minimum required programs and services are loaded when you start your computer in Safe Mode. To start your Windows XP, Vista, or 7 computers in Safe Mode with Networking, do as instructed below. 1) At power on/start-up, hit the F8 key in one-second intervals. This will conjure up the Advanced Boot Options menu. 2) Select Safe Mode with Networking with arrow keys and press Enter. 3) When this mode loads, you will have the internet. Now, use your browser to download and install Safebytes Anti-malware. 4) Following installation, run a complete scan and let the software delete the threats it detects.

Use an alternate web browser to download an antivirus application

Some malware may target vulnerabilities of a particular browser that obstruct the downloading process. If you’re not able to download the anti-malware software program using Internet Explorer, it means the virus is targeting IE’s vulnerabilities. Here, you need to switch over to a different browser like Firefox or Chrome to download Safebytes Anti-malware software.

Make a bootable USB anti-virus drive

Another option would be to make a portable antivirus program onto your USB thumb drive. Adopt these measures to use a flash drive to fix your infected computer system. 1) Download the anti-malware program on a virus-free PC. 2) Connect the USB flash drive to a USB port on the uninfected computer. 3) Double click on the downloaded file to run the installation wizard. 4) Pick a USB flash drive as the place when the wizard asks you exactly where you intend to install the application. Follow the activation instructions. 5) Transfer the pen drive from the clean PC to the infected PC. 6) Run the Safebytes Anti-malware directly from the pen drive by double-clicking the icon. 7) Hit the “Scan” button to run a full computer scan and remove viruses automatically.

Protect your PC against Malware With SafeBytes Security Suite

If you are looking to download an anti-malware application for your PC, there are several tools out there to consider nonetheless, you should not trust blindly anyone, no matter whether it is free or paid software. A few are good ones, some are decent, and some are merely fake anti-malware software that will harm your PC themselves! You need to be very careful not to select the wrong product, particularly if you buy a paid application. When considering commercial application options, the majority of people select well-known brands, like SafeBytes, and are very happy with them. SafeBytes anti-malware is trustworthy software that not only secures your PC permanently but is also very easy to use for people of all ability levels. Once you have installed this software, SafeByte's sophisticated protection system will ensure that no viruses or malicious software can seep through your personal computer.

SafeBytes has excellent features when compared to other anti-malware programs. Listed below are some of the features you may like in SafeBytes.

Robust Anti-malware Protection: With a critically acclaimed anti-malware engine, SafeBytes offers multilayered protection which is made to find and get rid of viruses and malware that are hidden deep in your computer’s operating system. Real-Time Protection: SafeBytes gives complete and real-time security for your PC. It’ll inspect your personal computer for suspicious activity at all times and its unparalleled firewall protects your PC from illegal access by the outside world. High-Speed Malware Scanning Engine: SafeBytes Anti-Malware has got a multi-thread scan algorithm that works up to 5 times faster than any other antivirus software. Safe Web Browsing: SafeBytes provides an instant safety rating on the web pages you are going to check out, automatically blocking unsafe sites and making sure that you’re certain of your online safety while browsing the web. Lightweight: The program is lightweight and can run silently in the background, and that does not impact your PC efficiency. Premium Support: For any technical queries or product guidance, you can obtain 24/7 professional assistance through chat and e-mail. To sum it up, SafeBytes has created a meaningful anti-malware solution that is aimed to protect your computer against all manner of malware. There is no doubt that your PC will be protected in real-time as soon as you put this software program to use. You’ll get the best all-around protection for the money you pay on SafeBytes Anti-Malware subscription, there’s no question about it.

Technical Details and Manual Removal (Advanced Users)

If you wish to carry out the removal of FindGoFind manually instead of employing an automated tool, you may follow these simple steps: Navigate to the Windows Control Panel, click the “Add or Remove Programs” and there, select the offending program to remove. In case of suspicious versions of browser plug-ins, you can actually remove it via your browser’s extension manager. You’ll likely also want to reset your browser. If you opt to manually delete the system files and Windows registry entries, use the following list to make sure you know precisely what files to remove before performing any actions. Please remember that this is for experienced users only and might be challenging, with wrong file removal resulting in additional system errors. In addition, some malicious programs have the capability to defend against its deletion. Doing this malware-removal process in Safe Mode is recommended.
Registry: HKEY_LOCAL_MACHINE\SOFTWARE\Microsoft\Windows\FindGoFind.comTT0-F49X-LPA01-3150QB HKEY_LOCAL_MACHINE\SOFTWARE\Microsoft\Windows\CurrentVersion\FindGoFind.comWG9-L33B-ZSH05-1418OI HKEY_LOCAL_MACHINE\SOFTWARE\Microsoft\Windows\Shell\FindGoFind.comRegistry: HKEY_LOCAL_MACHINE\SOFTWARE\Microsoft\Windows\FindGoFind.comTT0-F49X-LPA01-3150QB HKEY_LOCAL_MACHINE\SOFTWARE\Microsoft\Windows\CurrentVersion\FindGoFind.comWG9-L33B-ZSH05-1418OI HKEY_LOCAL_MACHINE\SOFTWARE\Microsoft\Windows\Shell\FindGoFind.com%#MANIFEST#%PH1-S39W-JGS29-6268LL HKEY_CURRENT_USER\Software\Microsoft\Windows\CurrentVersion\Run [random].exe HKEY_CURRENT_USER\Software\AppDataLow\Software\FindGoFind.com HKEY_LOCAL_MACHINE\SOFTWARE\Microsoft\Windows\CurrentVersion\Uninstall\ FindGoFind.com HKEY_LOCAL_MACHINE\SOFTWARE\Microsoft\Windows\CurrentVersion\Explorer\BrowserHelperObjects\[random numbers]PH1-S39W-JGS29-6268LL HKEY_CURRENT_USER\Software\Microsoft\Windows\CurrentVersion\Run [random].exe HKEY_CURRENT_USER\Software\AppDataLow\Software\FindGoFind.com HKEY_LOCAL_MACHINE\SOFTWARE\Microsoft\Windows\CurrentVersion\Uninstall\ FindGoFind.com HKEY_LOCAL_MACHINE\SOFTWARE\Microsoft\Windows\CurrentVersion\Explorer\BrowserHelperObjects\[random numbers]
Read More
New Snipping tool redesigned in Windows 11
Windows 11 Snipping tool
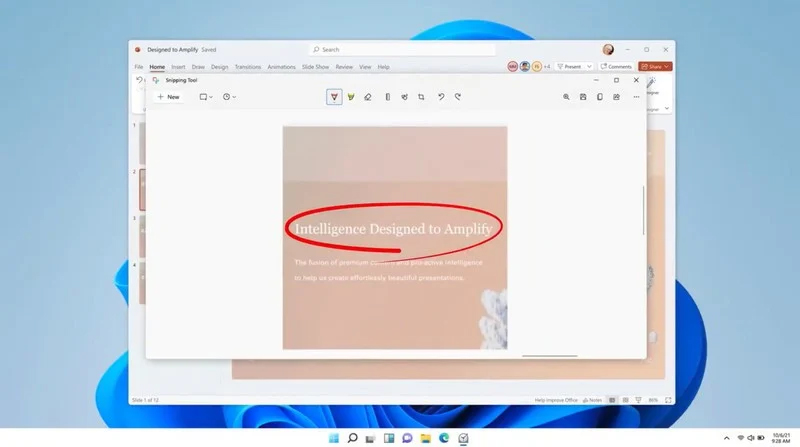
The latest update from Panos Panay on Twitter is including New and redesigned Snipping tool inside Windows 11. From the shared video, we can see that it includes modern Windows 11 UI redesign and it looks and feels like a part of Windows 11. More things that can be seen from the shared video is that it looks like the new snipping tool is a merged version of the old with snip & sketch. It is good to see that it is still possible to capture screen with easier way natively inside Windows 11 but some more functionality would be more welcome I guess. Users were asking for added functions for a long time like adding simple text for example but from shared video, no new features were presented so for some users 3rd party solutions will still be the way to go. The new and redesigned Snipping tool will roll out with the next update and we will see then about all new features inside it firsthand. Until then, take care.
Read More
How to place control panel in File explorer
Recent Windows updates have been slowly but surely moved a lot of control panel features into settings. This indicates that in the long term goal is probably to get rid of the control panel altogether. No matter how the setting app is easy to use and good there are still things in the control panel that we need and we will still need until they are all moved in the setting application. There are several ways to open and get to the control panel from run dialog to shortcut keys but one perhaps more convenient and easiest way is to just simply have in file explorer right beside hard drives double click away. In order to place the control panel icon inside file explorer, we will need the help of our old friend: the registry editor. As always playing with the registry editor can cause some instability and it is always a smart thing to back up it first before attempting any kind of edits.

Registry editor adding a key

To open registry editor press ⊞ WINDOWS + R to open the run dialog and inside type in REGEDIT followed by ENTER Once the registry editor is opened locate the following key: HKEY_LOCAL_MACHINE\SOFTWARE\Microsoft\Windows\CurrentVersion\Explorer\MyComputer Right-click on the NameSpace folder on the left navigation pane and then select New > Key Rename the key with {21EC2020-3AEA-1069-A2DD-08002B30309D} (This CLSID code will add access to the Category view of the Windows 10 Control Panel) or with {26EE0668-A00A-44D7-9371-BEB064C98683} (This CLSID code will add access to the large icons view of the Windows 10 Control Panel) Save and exit the registry editor Now when opened, file explorer will show a control panel icon for easy access.
Read More
How to Fix Windows 10 Error 0x80004002

How to Fix Windows 10 Error 0x80004002

Error Code 0x80004002 - What is it?

Error Code 0x80004002 is a Windows-based error code that affects Windows 10 and previous operating systems, including Windows XP, Vista, Windows 7, and Windows 8. In most instances, the message box that shows Error Code 0x80004002 pops up as you attempt to install new software or programs on your machine.

Common symptoms include:

  • Problems running programs that once worked
  • Slow response time of your computer to commands entered with the keyboard or mouse
  • Trouble shutting down or starting up your machine
  • Error message regarding your registry, updates, or response time.

There are a number of different solutions that you can use to attempt to resolve Error Code 0x80004002. Because there are multiple causes to the issue, some of the methods used to successfully address the problems at hand are fairly simple, while others require advanced knowledge or abilities to complete. If the methods below are not successful in the resolution of the issue or if you aren’t confident in your skills to implement these methods, contact a qualified Windows repair technician to assist you. Once this error message is not rectified, you could be exposing your computer to other error messages, including error code 0x80240020.

Solution

Restoro box image

Error Causes

There are many different issues that can contribute to the appearance of Error Code 0x80004002. The most common causes for this particular error message include:

  • Errors in registry files
  • Missing system files that have accidentally been associated with other programs and deleted
  • Viruses or malware that cause corruption in program or system files
  • Installations that have failed to complete fully

Further Information and Manual Repair

Due to the number of causes that can contribute to Error Code 0x80004002, there are a number of methods that you can use to attempt to resolve the issues behind the error. While some of these methods are fairly easy to implement, others may require you to use programs like registry cleaners and driver installation wizards, so if you are not comfortable using these kinds of software, contact a certified Windows repair technician to assist you.

Here are the top ways that you can attempt to address Error Code 0x80004002:

Method One:  Run Your Windows Registry Cleaner

Many different registry cleaning tools exist on the Internet, but not all of these are provided by trustworthy sources. Rather than trusting a file from an unknown publisher, you can use the registry cleaning program included in your Windows software package.

Run this tool to complete a scan of your files, discovering which ones may need to be repaired. In most cases, the registry cleaner itself can repair the necessary files and resolve the error.

It is always a good idea to restart your computer after you have run the registry cleaning tool to ensure that your machine can accurately assess the newly repaired files.

Method Two:  Update Your Drivers and Software

In some cases, Error Code 0x80004002 arises when drivers are out of date. If you believe that this is the case, you can check on the status of your various drivers by going into the settings for your operating system and selecting the “Update Drivers” option.

You can also check your system for any necessary updates to your Windows software, which may serve to address the error code.

After you have checked and installed any necessary drivers, make sure to restart your computer to fully apply any changes that the installation process has introduced.

Method Three:  Reinstall Your Windows Software

In some cases, the best way to address the missing or corrupt files that can cause Error Code 0x80004002 is to simply reinstall your copy of Windows. Always make sure to back up your files before reinstalling your software.

Method Four:  Run Your Virus Scan Software

Because Error Code 0x80004002 can also be caused by malware or a virus, you can run your virus scan software to detect and resolve the problem. After doing so, run the registry repair tool to fix any affected files and restart your computer.

Method Five: Use An Automated Tool

If you wish to always have at your disposal a utility tool to fix these Windows 10 and other related issues when they do arise, download and install a powerful automated tool.
Read More
The Best Way to Recover Lost MS Outlook Password

The Best Way to Recover Lost MS Outlook Password

What's the PST record?

Do you often use MS-Outlook for communicating in your work environment? If so, you should be aware that all e-mails messages you send and receive, attachments, contacts, and schedule items you be, the files you create and the details you include are all stored within an Outlook Data File folder. This includes 2 kinds of files .OST and .PST. OST is the offline Storage Table that allows Outlook users to gain access to the e-mail account with no internet access. But this document is vulnerable to corruption. So you need to change it into the PST (Personal Storage Table) file structure. This document keeps data protected and saves all of the data in your view e-mail accounts including e-mails, calendar items, contact info, notifications, and accessories in your local hard drive securely. For security and privacy purposes password protection is necessary.

How can the PST File get locked?

However, with a lot of work to do, a lot of people frequently have a tendency to overlook and easily forget the Outlook password. This affects the user's capability to gain access to the account and execute the associated e-mail features. That is very difficult for those who have contacts stored in it and significant e-mails which one would like to see instantly. In this case, there is also the threat of losing the data that was significant in the long term. Sadly, Outlook will not provide an easy method without removing all of your own personal data to regain this password.

Why Should I Use Stellar Phoenix Outlook PST Repair Tool

Stellar Phoenix Outlook PST Repair tool may be the best fix software out there. It's easy to use, secure, dependable, and quick. You do not have to be a pro to use it. In just a couple of clicks, your password can be recovered, without losing any of your crucial data, including associates contacts and e-mail communications. This repair tool is full of special characteristics. It's compatible with most if not all variants of Windows, including 2000 and Vista, Win7, Windows 2003. Additionally, it helps fix all MS-outlook versions like 2010 and 2000, 2002, 2003, 2007.

Here is what you should do

Just click here Download and install Stellar Phoenix Outlook PST Repair tool in your computer. Run it to regain all of your data within your e-mail account and to regain your lost MS-Outlook PST File Password.
Besides assisting you to regain your PST file password, it can be utilized to solve malfunctions in the PST Files and any other associated problems. For instance, this repair tool can help to fix damaged and corrupted PST file size limit errors as well as PST files. If you use MS Outlook 2002 version on your PC and you use it quite often and prefer not to delete emails in it, then you might come across the PST file size 2GB limit error. This error occurs when you reach or exceed the 2 gigabytes memory limit. If this happens, your ability to send and receive emails through your MS-Outlook account is greatly hindered. You can't add new contacts either. In instances such as these, Stellar Phoenix Outlook PST Repair Tool is useful. It helps increase the GB limit twice as much as normal. This means that your memory limit rises from 2-4GB making Stellar PST Outlook Repair a crucial tool for all MS Outlook users.
Read More
An Easy Guide to Fixing Mingwm10.dll Error Code

An Easy Guide to Fixing Mingwm10.dll Error Code

Mingwm10.dll Error Code - What is it?

Mingwm10.dll is a dynamic link library file. This file is associated with the gaming program called the Adventures of Tintin developed for Windows OS by Ubisoft. Like all other DLL files, Mingwm10.dll file also contains small programs that are used to load and run this gaming program on your PC and several other programs developed by Ubisoft. Mingwm10.dll error code may occur when this file fails to run and load the Adventures of Tintin, the game on your PC. This error may appear on your PC in different formats such as:
  • "Mingwm10.dll not found."
  • "The file mingwm10.dll is missing."
  • "Cannot register mingwm10.dll."
  • "Cannot find C:\Windows\System32\mingwm10.dll."
  • "Mingwm10.dll Access Violation."
  • "Cannot start The Adventures of Tintin The Game. A required component is missing: mingwm10.dll.Please install The Adventures of Tintin The Game again."
  • "This application failed to start because mingwm10.dll was not found. Re-installing the application may fix this problem."

Solution

Restoro box imageError Causes

Mingwm10.dll error code is triggered due to a plethora of reasons. These include causes like:
  • Registry damage or corruption
  • Viral infection
  • Hardware failure
  • Corrupt or missing Mingwm10.dll file
Though this error is not fatal nonetheless it is advisable to fix it promptly to ensure you are able to access your desired program successfully without any restriction. Please note, this error can become a major PC threat as the underlying causes are registry corruption or viral infection.

Further Information and Manual Repair

Listed below are some of the best, proven, and easy DIY methods to help you resolve the Mingwm10.dll error code on your system. These are simple methods and require no technical expertise or know-how.

Method 1 - Restore the Missing File

As mentioned above DLL are shared files, there is a possibility that you accidentally deleted the Mingwm10.dll file on your system while uninstalling a program developed by Ubisoft. In such an event, the best and the easiest way to fix the error is to check your recycle bin and restore the deleted Mingwm10.dll file on your system.

Method 2 - Download Mingwm10.dll File from a Reliable Website

If you are unable to locate the missing Mingwm10.dll file in the recycle bin, then another method to fix the issue can be to download the Mingwm10.dll file from a trusted website. The reason why we say trusted is that viruses often enter computer systems when users download files from unreliable websites. So, to avoid bigger problems first make sure the site you select to download the Mingwm10.dll file is authorized and trusted.

Method 3 - Update Outdated Drivers

Hardware failure is related to outdated drivers. If the cause of the Mingwm10.dll error code is hardware failure, simply update the outdated drivers to resolve. Since the Mingwm10.dll file is used to run and load Adventures of Tintin, a gaming software program, then most probably the error is caused because of the outdated video card driver. Therefore update it to fix the issue. For this, go to the start menu, type Device Manager in the search bar. Once it opens use the driver update wizard to make updates. The wizard will walk you through the entire process, making the driver update task easy.

Method 4 - Repair the Corrupt Registry

The registry is the part that stores all the information and activities performed on your system. From important files to obsolete files it saves everything. If the obsolete files like the junk files, bad entries, invalid registry keys, and cookies are not removed from the registry frequently, these files accumulate in the registry and corrupt important system files like DLL files, popping error codes like Mingwm10.dll error. To resolve, download Restoro. It is a PC Fixer embedded with a  registry cleaner. The registry cleaner scans and removes all the obsolete files. It cleans the registry and the corrupted system files in just a few clicks, thereby fixing the problem. Click here to download Restoro to resolve the Mingwm10.dll error code on your PC
Read More
A Quick Guide to Fixing Error 0x80010108

Repair Error 0x80010108

What is Error 0x80010108?

Error 0x80010108 is a Windows Live Photo Gallery error. This error prevents the Windows PC user from viewing photos. The error code is often displayed in the following format:
‘An error is preventing the photo or video from being displayed’ Error code 0x80010108
 

Solution

Restoro box imageError Causes

The error 0x80010108 occurs due to multiple reasons including:
  • The issue in Windows Live Essential Settings
This error occurs while using Windows Photo Gallery but it is actually related to the Windows Live Photo Viewer within the Windows Live Essentials software.
  • Viral Infection
  • Registry Issues
To view the photos on your Windows PC, it is advisable to fix the problem right away. Furthermore, you should also not delay in fixing this problem especially if the underlying causes are related to the registry or viral infection. These can pose serious system and security threats including system failure, crash and data breaches.

Further Information and Manual Repair

To resolve this error on your system, you don’t always have to hire a technical expert or be a technical whiz yourself. Here are some easy and effective methods to resolve error 0x80010108 on your PC immediately:

Method #1

To repair Windows Live Essential Software Settings, go to the start menu and then click the control panel. Now in the control panel go the option Programs. In the programs click the tab programs and features and then select Windows Live Essentials and click repair tab. Once the settings are repaired, restart your PC to activate changes.

Method #2

Go to the start menu and type regedit.exe and then press enter. Type the following key: HKEY_CLASSES_ROOT WindowsLive.PhotoGallery.bmp.15.4 shell open DropTarget then right-click DropTarget and then Rename. Prefix a hyphen so that it becomes “-DropTarget”. Now type the following for each GIF/ICO/JPG/PNG/TIF file types: HKEY_CLASSES_ROOTWindowsLive.PhotoGallery.gif.15.4 shellopen DropTarget HKEY_CLASSES_ROOT WindowsLive.PhotoGallery.ico.15.4 shell open DropTarget HKEY_CLASSES_ROOT WindowsLive.PhotoGallery.jpg.15.4 shell open DropTarget HKEY_CLASSES_ROOT WindowsLive.PhotoGallery.png.15.4 shell open DropTarget HKEY_CLASSES_ROOT WindowsLive.PhotoGallery.tif.15.4 shell open DropTarget

Method #3

Download Restoro on your PC to scan for both registry issues and malware. Restoro is a multi-functional PC Fixer embedded with utilities like a powerful registry cleaner, an antivirus, and a system optimizer to name a few. The registry cleaner scans and detects all registry-related issues. It removes all unnecessary files damaging the registry and corrupting the registry settings. Simultaneously, the antivirus removes all kinds of malicious software affecting your PC including spyware, viruses, and Trojans. The system optimizer feature ensures that your PC works at the optimal level and does not slow down during and after the cleaning process. Restoro is efficient and safe. It has a user-friendly interface and simple navigations which makes it quite easy to operate. It can be downloaded on all Windows versions including. Click here to download Restoro to resolve error 0x80010108.
Read More
Fix WHEA_UNCORRECTABLE_ERROR, 0x00000124
Any modifications in a computer, either big ones or small ones can definitely trigger some errors which is why you have to be careful when you modify the system setting. One of the errors you might encounter when you’ve modified your computer is the WHEA_UNCORRECTABLE_ERROR 0x00000124 Blue Screen Error. According to the error data provided by the Windows Hardware Error Architecture or WHEA, aside from system modifications, you could also encounter this error if your computer has a hardware failure which could be due to a hard drive, RAM, or any other hardware component. In most cases, it is related to physical hardware failures which might have something to do with defective hardware, heat-related, memory as well as a processor that is starting to fail or has already failed. To fix the WHEA_UNCORRECTABLE_ERROR 0x00000124 Blue Screen error, here are some suggestions you have to check out.

Option 1 – Try to perform System Restore

Before you further troubleshoot the problem, you might want to perform System Restore first as the BSOD error might be caused by system modifications. Thus, to undo them, you can use System Restore. Run it using these steps:
  • First, tap the Win + R keys to open the Run dialog box.
  • After that, type in “sysdm.cpl” in the field and tap Enter.
  • Next, go to the System Protection tab then click the System Restore button. This will open a new window where you have to select your preferred System Restore point.
  • After that, follow the on-screen instructions to finish the process and then restart your computer and check if the problem is fixed or not.

Option 2 – Try disabling Overclocking

If overclocking is enabled, you might have to disable it as some users reported that the WHEA_UNCORRECTABLE_ERROR 0x00000124 error started to appear right after overclocking. To disable it, follow the steps below.
  • Go to the Start Menu and open Settings.
  • Next, select Update and Security and go to the Recover tab.
  • From there, click on Restart now in Advanced startup. This will restart your computer.
  • Once you’re in the Advanced startup, go to Troubleshoot and then select the Advanced Options.
  • From there, select the UEFU Firmware Settings.
  • Now click on Restart. Once your computer has restarted, it will automatically open BIOS.
  • From the BIOS, go to the Advanced tab and navigate to Performance and then look for Overclocking.
  • Once you’ve found Overclocking, make sure that it is disabled. If it’s not, then disable it and then save the changes made by tapping the F10 key.
  • Start your computer normally and check if the WHEA_UNCORRECTABLE_ERROR 0x00000124 error is now fixed.

Option 3 – Check your computer’s cooling components and make sure that they are working

It is a known fact that an overheated PC causes system slowdowns and even Blue Screen errors like WHEA_UNCORRECTABLE_ERROR 0x00000124. To fix it, you need to check your computer’s cooling components to see whether they’re properly working or not. Then make sure that you clean them up including the fan and other hardware from dust and other debris.

Option 4 – Use the Windows Memory Diagnostics

Since the problem has something to do with the physical RAM, you need to use Windows Memory Diagnostics. To run it, refer to these steps:
  • Tap the Win + R keys to open Run and type exe and hit Enter to open the Windows Memory Diagnostic Tool.
  • After that, it will give two options such as:
    • Restart now and check for problems (Recommended)
    • Check for problems the next time I start my computer
  • Once your computer has restarted, perform a basic scan or you could also go for the “Advanced” options such as “Test mix” or “Pass count”. Simply tap the F10 key to start the test.
Note: After you select the option, your PC will restart and check for memory-based issues. If it finds any issues, it will automatically fix them.

Option 5 – Update or rollback or disable concerned device drivers

To fix the WHEA_UNCORRECTABLE_ERROR 0x00000124 error, you can also try to roll back, or update, or disable the concerned device drivers.
  • Open the Devices Manager from the Win X Menu.
  • Then locate the device drivers particularly the ones that are under the sections of Keyboard, Mouse, USB, and HID Drivers.
  • Next, right-click on them to open the Properties.
  • After that, switch to the Driver tab and click on the Uninstall Device button.
  • Follow the screen option to completely uninstall it.
  • Finally, restart your computer. It will just reinstall the device drivers automatically.
Note: You can install a dedicated driver on your computer in case you have it or you could also look for it directly from the website of the manufacturer. On the other hand, if you have just updated your device drivers then you need to roll back the drivers to their previous versions or disable them.

Option 6 – Try running System File Checker or SFC scan

You could also run System File Checker or SFC scan to fix the BSOD error. It is a built-in command utility that helps in restoring corrupted files as well as missing files. It replaces bad and corrupted system files with good system files. To run the SFC command, follow the steps given below.
  • Tap Win + R to launch Run.
  • Type in cmd in the field and tap Enter.
  • After opening Command Prompt, type in sfc /scannow
The command will start a system scan which will take a few whiles before it finishes. Once it’s done, you could get the following results:
  1. Windows Resource Protection did not find any integrity violations.
  2. Windows Resource Protection found corrupt files and successfully repaired them.
  3. Windows Resource Protection found corrupt files but was unable to fix some of them.
  • Reboot your PC.

Option 7 – Try to disable the Digital Driver Signature Enforcement

  • Reboot your computer from the Start menu.
  • Then select the option while pressing the Shift key. This will open the Advanced Boot menu.
  • From there, click on Troubleshoot and select Startup Settings.
  • Now select the “Disable driver signature enforcement” option using the arrow keys on your keyboard and then restart your computer normally.
Read More
Five Ways of Fixing Error Code 37

Repair Device Manager Error Code 37

What is Error Code 37?

Error Code 37 is a Device Manager Error Code that you may come across when you are unable to use an installed hardware device on your PC. It will pop up on your screen with the following display:

“Windows cannot initialize the device driver for this hardware. (Code 37)”

If you receive the above message, it means that your operating system was unable to acknowledge the drivers for a particular peripheral device.

Solution

driverfix boxError Causes

Error Code 37 mainly occurs due to device driver corruption. However, there are other factors that can trigger this error code, some of which are the following:

  • Missing device drivers
  • Out-of-date device drivers
  • Presence of malware or spyware in the system
  • The particular device is not compatible with your PC

Device driver corruption or other data corruption is not uncommon and part of everyday PC use.

From an installation gone wrong to an unexpected shutdown, commonly generated data errors are considered the main culprit behind error codes.

Further Information and Manual Repair

Just like most PC error codes, Error Code 37 isn’t that difficult to get rid of. There are many DIY methods you can try to have your PC running smoothly in no time. Here are a few methods to resolve this issue:

Method 1: Restart your PC

It is possible that the display of the error code is merely due to a temporary issue with your peripheral device and not anything serious.

Therefore, the quickest and easiest method to solve the error code 37 is to simply restart your PC.

Method 2: Scan for Viruses

If restarting does not do the trick, a quick scan for viruses and removing them is another simple method you can follow to fix your PC.

Since the error code is due to corruption of data, viruses such as malware or spyware create error in your PC’s registry and eliminating them can help restore some of the corrupt data, which also speeds up your PC.

Method 3: Undo recent changes

A possible explanation for the error code may be the recent changes in your Device Manager or due to the peripheral device installation. You can thus undo the changes by either:

  • Remove or change settings of the installed peripheral device
  • Roll back the version of the driver to the one before the update.
  • Use System Restore to reverse the changes made in the Device Manager

Method 4: Manually uninstall and reinstall the drivers

If the above stated methods do not help in speeding up your PC and is still giving you an error code, you may want to manually uninstall and reinstall the corrupt or missing drivers. Here are the following steps:

  • Double-check if the installed external device is properly connected and working smoothly
  • Open Device Manager and double click on the device that is causing problems
  • When it opens, click on the ‘Driver’ tab and click ‘Update Driver’

Method 5: Use DriverFIX

However, updating the missing or corrupt drivers can be time consuming and may also require having a hardware documentation ready that contains specific details about the driver that you should download.

To avoid this time-consuming process, you can use DriverFIX software.

DriverFIX will help you to download the required driver without you having to waste your precious time and effort looking it up in a user manual. This latest software technology is embedded with its own database that tracks the missing or corrupt driver according to your PC’s motherboard version and specific details.

It is user-friendly, which means that it will relieve you from the frustration of such PC error codes appearing from time to time and enable your PC to work efficiently in no time.

Click here to download DriverFIX to resolve Device Manager error code 37 today!

Read More
1 2 3 162
Logo
Copyright © 2022, ErrorTools. All Rights Reserved
Trademarks: Microsoft Windows logos are registered trademarks of Microsoft. Disclaimer: ErrorTools.com is not affiliated with Microsoft, nor claim direct affiliation.
The information on this page is provided for information purposes only.
DMCA.com Protection Status