ERR_CERT_COMMON_NAME_INVALID error in Chrome

In case you don’t know, when you visit a website that uses HTTPS, it also offers an SSL certificate to the browser in order to verify the website’s identity. Although it may contain lots of things inside it, one of them is the URL of the website. So if the certificate does not match the URL to what you entered, you will most likely get the “Server’s certificate does not match, ERR CERT COMMON NAME INVALID” error which indicates that the connection is not private and the site may try to steal your data but worry not, as this post will guide you in resolving this issue.

To fix the ERR_CERT_COMMON_NAME_INVALID error, here are some suggestions that might help.

Option 1 – Check the website’s certificate

If you own the website where you’re getting the error, then you might have to check if the website’s certificate is installed properly and configured on the server as it could be the reason why you’re suddenly getting the error.

Option 2 – Check the Windows Host file

You can also try to cross-check the Windows Hosts file to find out if the website you are trying to open has been blocked, because if it is, then it’s no wonder why you’re getting the ERR_CERT_COMMON_NAME_INVALID error. There are instances when some third-party application modifies the file and adds some websites to the blocklists. So if the website is indeed blocked, you need to remove it from the list.

Option 3 – Use the Google Public DNS

You might want to change your DNS to Google Public DNS as it could also help you in fixing the ERR_CERT_COMMON_NAME_INVALID error in Chrome. To do so, follow the steps below.

  • The first thing you have to do is right-click on the network icon in the Taskbar and select Network and Sharing Center.
  • Next, click on the “Change Adapter Settings” option.
  • After that, search for the network connection that you are using to connect to the internet. Note that the option might be “Wireless Connection” or “Local Area Connection”.
  • Right-click on your network connection and click on Properties.
  • Then select the new window to choose the “Internet Protocol 4 (TCP/IPv4)” option.
  • After that, click on the Properties button and click the checkbox in the new window for the option “Use the following DNS server addresses”.
  • Type in “8.8.8.8” and “8.8.4.4” and click OK and exit.

Option 4 – Run the built-in Malware Scanner and Cleanup Tool in Chrome

In case you don’t know, there is actually a built-in malware scanner and cleanup tool in Chrome that helps you get rid of any unwanted ads, pop-ups, and even malware, as well as unusual startup pages, toolbars, and other things that could affect the performance of the browser. In addition, this built-in tool in Chrome might also help in fixing the ERR_CERT_COMMON_NAME_INVALID error.

Option 5 – Reset Chrome

Resetting Chrome can also help you get rid of the error. Resetting Chrome means restoring its default settings, disabling all the extensions, add-ons, and themes. Aside from that, the content settings will be reset as well and the cookies, cache, and site data will also be deleted. To reset Chrome, here’s what you have to do:

  • Open Google Chrome, then tap the Alt + F keys.
  • After that, click on Settings.
  • Next, scroll down until you see the Advanced option, once you see it, click on it.
  • After clicking the Advanced option, go to the “Restore and clean up option and click on the “Restore settings to their original defaults” option to reset Google Chrome.
  • Now restart Google Chrome.
If you like to learn and find out more about various Windows errors, and how to repair them go to our vast archive or use search to find articles that will explain and help you in solving your issue.
However, if you prefer to do things fast and with automatization then we are proposing to use an automated solution for your issues. The application that we are recommending is Advanced System Repair Pro
Advanced System Repair utilizes multiple tools all in one to give you a quick, simple, reliable, and very thorough diagnosis of your PC. It brings you all the tools you need in one program to clean, fix, protect, optimize and boost your PC!
1-Click Maintenance
All the tools to make it simple and easy! It's like having a professional technician at the click of a mouse.

Junk Cleaner
Keeping your computer free from unnecessary clutter also helps make your computer last longer. Like any other machine, if you keep it clean and take care of it, it will serve you better for longer!

Optimize background apps
Optimize applications background activity with the built-in Application Optimizer feature.

Disk Defrag
With a simple 1-click, Advanced System Repair speeds up your PC by assembling fragmented files on your machine and organizing them more efficiently.

Malware Removal
Finds and removes all types of harmful malware including trojans, worms, bots, adware, spyware, PUPs, and more!

Privacy Cleaner
The all-in-one privacy suite to Clean Your Tracks & Protect Your Privacy! Make your computer safe, secure, and more efficient!

System Tweak/Optimizer
ASR will analyze your complete system and settings to adjust your PC to function at its maximum performance.

Registry Cleaner
Over time, as you install and uninstall applications, the registry can become cluttered with old entries and broken settings which can result in program crashes, and annoying messages and slow the computer down.
Visit our Advanced System Repair Pro Download page to inform yourself about all the benefits of this software and get a free trial copy of it.
advanced system repair pro

Advanced System Repair Pro

One-click automated PC repair solution
ASR logo
With Advanced System Repair Pro you can easily
Replace damaged files
Restore performance
Free disk space
Remove Malware
Protects WEB browser
Remove Viruses
Stop PC freezing
DOWNLOAD
Privacy Policy | Terms of Use | Uinstall
Advanced System Repair Pro is compatible with all versions of Microsoft Windows including Windows 11

Share this article:

You might also like

Windows 10 tips and tricks for easy work
Hello everyone and welcome to our new Windows 10 tips and tricks article. Today we will be focusing on small Windows tricks that could prove very useful in everyday workflow and hopefully make your life easier by implementing them in your daily routine. I am very excited to share this with you all and I hope that you will use them from now on. That being said let us begin.

Tip 1: Minimize all open windows except one.

Daily to the daily routine can involve many opened windows on a desktop and sometimes things can get messy, if you want to minimize all windows to the taskbar except one do this: Click on one window thus selecting him, click and hold the left mouse button on that windows title bar, now shake it up and down and all other windows will escape down to taskbar leaving only one you are shaking on the desktop.

Tip 2: Open the Secret Windows menu.

Through our tutorials on various errors and fixes, we have used this method already but here it is again since it is worth mentioning. If you want to open the command prompt easy and fast, or device manager, event viewer, shut down, etc. In order to open this secret menu all you need to do is press ⊞ WINDOWS + X.

Tip 3: Create an Event without opening the calendar application.

You can easily create an event without opening a calendar application, all you have to do is left-click on the clock in the taskbar, click once on a date for the event, and under calendar in event field type event description. The event will show in the calendar application like it was entered there.

Tip 4: Taking a screenshot.

This one is my favorite and it speeds up workflow very very much. Typically you take screenshots by pressing the PrntScr button on your keyboard. Now, the problem with this approach is that the screen is placed in computer memory, in the clipboard and you will need another picture processing application in order to save it. Now if you would press ⊞ WINDOWS + PrntScr, the picture would be automatically saved in your pictures/screenshots folder. And if that is not enough, you can press ⊞ WINDOWS + S + SHIFT to start Snip & Sketch tool and select the area which you would like to screen capture, this method will also place pictures in the clipboard.

Tip 5: Open pinned applications in your taskbar with your keyboard.

We have covered this one in our Windows keyboard shortcuts tips and tricks here, but if you missed that article here is the tip again. By pressing ⊞ WINDOWS + number 1,2,3...0 you will start the application from your taskbar counted from left to right.

Tip 6: Check how much Hard drive space installed applications are taking.

Applications and temporary files grow over time and can slow the system and cause some other unpleasant experiences. Go to Settings > System > Storage, click on the Hard drive on which you have installed applications, and see how much each one is taking, you can remove it from this screen also freeing some space.

Tip 7: Remove ads from the START menu.

Windows has so-called suggestions in the START menu, no matter how Microsoft is calling them, let's face it, they are ads and in my opinion, they do not belong in my START menu. To turn them off, go to Settings > Personalization > Start. Toggle the setting called Show suggestions occasionally in Start to the off position.

Tip 8: Shut down background applications.

Some applications are running in the back and are taking system resources and can send telemetry information, if you want to turn them all off go to Settings > Privacy > Background apps. To stop all apps from running in the background, toggle Let apps run in the background to off. You can choose which apps to run in the background individually by going down the list on the same page.

Tip 9: Use Background scrolling.

Did you know that you can scroll on inactive windows? To do this, just hover over the inactive background window and roll your mouse when the content of the window should be scrolling even if it's not one you are working on. If by any chance this is not happening, go to Settings > Devices > Mouse, and toggle Scroll inactive windows when I hover over them to On.

Tip 10: Show file extensions in File Explorer.

By default extensions of files are hidden, so let's say that for example, you are in a folder with pictures, you have plenty of pictures there but you do not know are they JPG or JPEG for example, do not worry there is an easy fix to bring showing extensions back. Start File Explorer, click on view top menu item, click on options, Uncheck the box that says Hide extensions for known file types. Click Apply, and OK.

Tip 11: Use focus assist.

Set it up by going to Settings > System > Focus assist. Choose from three options: Off (get all notifications from your apps and contacts), Priority (see only selected notifications from a priority list that you customize, and send the rest to your action center), and Alarms only (hide all notifications, except for alarms). You can also choose to automatically turn this feature on during certain hours, or when you're playing a game.

Tip 12: Rotate your screen.

If you have multiple screens set up or you have the rotatable screen press and hold CTRL + ALT together, then use a directional arrow to flip the screen. The right and left arrows turn the screen 90 degrees, while the down arrow will flip it upside down. Use the up arrow to bring the screen back to its normal position.

Tip 13: Enable GOD mode.

Have you always felt limited with Windows settings? Don't be, Right-click on the desktop and select New > Folder. Re-name the new folder with this bit of code: GodMode.{ED7BA470-8E54-465E-825C-99712043E01C} To enter the "God Mode" window, double-click the folder.

Tip 14: Use Virtual Desktops.

Click on Task View (the icon next to the search box). This will separate all your open windows and apps into icons. You can then drag any of them over to where it says "New desktop," which creates a new virtual desktop. Once you click out of Task View, you can toggle between virtual desktops by pressing the ⊞ WINDOWS + CTRL + right/left arrows. To remove the virtual desktops, just go back into task view and delete the individual virtual desktops, this will not close out the apps contained within that desktop, but rather just send them to the next lower desktop.

Tip 15: Customize the command prompt.

Yes, you can customize the command prompt, in order to do so, open it and right-click on its title bar, choose properties and go wild. Special badge if you make it look like commodore 64 BASIC.

Tip 16: Dictate, not type.

If you have speech recognition ON, pressing ⊞ WINDOWS + H will bring up a voice recorder, just speak and see how you can easily "write" emails, etc.

Tip 17: Use sandbox.

In Windows you have a sandbox option, which will open another Windows instance inside Windows, what do you need this? Well once the sandbox is closed everything in it is closed and if you catch the virus or other dangerous software, closing the sandbox will destroy it not affecting your actual Windows. Use it for safety testing and enjoy an easy life. Enable Windows Sandbox inside the Control Panel.

Tip 18: Use a hidden game bar.

Press the ⊞ WINDOWS + G, you can pull up the new-and-improved Game Bar. This lets you switch your Windows PC into gaming mode, which pools system resources to the game, turns off notifications, and lets you record and broadcast your gaming, along with added panels for controlling your audio, monitoring FPS, and tracking achievements. And that's it, Our 18 tips and trick to make your Windows 10 life easier, more productive, and overall more enjoyable. I certainly hope you have enjoyed reading this article same as I was writing it. Until next time if I do not see you, good afternoon, good evening, and good night.
Read More
How to Fix Error 0x0000007E
[vc_row][vc_column][vc_column_text]

Repair Error 0x0000007E

What is 0x0000007E?

 Error 0x0000007E is a Windows Stop error message that is displayed on a blue screen. This may appear when browsing the internet, listening to music on some media player application or while working on an important document on MS Word or Excel.  This message strikes terror as the screen goes blue without any warning.

Solution

Restoro box imageError Causes

The error code 0x0000007E is triggered because of:

Further Information and Manual Repair

If you experience this error on your PC, you don’t have to panic and call a professional. This error is rated as an easy fix. And you can easily resolve the issue even if you don’t have a piece of strong technical knowledge about computers. Here are some quick fixes to repair the error 0x0000007E on your PC in the shortest time and without any hassle:
  • Cause: Faulty Hard Drive

Solution: In the event of a faulty hard drive, it is best to create a backup of all your data and get a new hard drive. However, first, it is advisable to use the Windows tool called Chkdsk (Check Disk) to identify and determine if the hard drive is faulty or not. To do so, click on the start menu and type CMD into the search box. Click on it to run. Now a black box will be displayed on the screen, simply type the command Chkdsk and run it to find out if your hard drive is faulty and damaged. If so, then get a new hard drive.
  • Cause: Hard Drive is full

Solution: Error 0x0000007E may also occur if the hard drive is full. To check the storage space on your hard drive, go to My Computer. If the space is full, then it is advisable to delete some files or uninstall heavy and recently installed programs to free up some space.
  • Cause:  BIOS not updated

Solution: You may come across this blue screen error if your BIOS is not updated. To update your BIOS, restart your computer and press F2 to enter setup.  Now go to SATA Operation and change RAID AHCI to RAID ATA. Save changes and then exit. By doing so, you can update your BIOS and fix the error 0x0000007E immediately. It’s that easy![/vc_column_text][/vc_column][/vc_row]
Read More
Fix Some apps need to be uninstalled
When you update or upgrade your computer to Windows 10, the setup will look for the compatibility of both the hardware and software. And in this process, if suddenly got an error message saying, “Some apps need to be uninstalled” or “You need to uninstall a program in order to continue”, you have to look for the program(s) that might be causing the compatibility issues. But worry not as this post will help you resolve the issue. Simply follow the given suggestions below.

Option 1 – Look for the incompatible programs

There are times when Windows 10 will point out the programs that are incompatible with Windows 10. In this situation, just click on the Uninstall and continue button and then wait for the process to be completed. For more information, you can check out the official site Ready for Windows by Microsoft. This site can help you determine which software versions are compatible with Windows 10 and which ones are not. All you have to do is select the Windows 10 version and type your App name, after that, you will see the results about its compatibility. Thus, it’s now easier for you to figure out which software is causing an issue and if there is a new updated version available that you can install instead.

Option 2 – Try to install the Windows Update in a Clean Boot State

Putting your PC in a Clean Boot state can also help you install Windows Updates or Upgrades without any trouble because, during this state, you can start the system with a minimum number of drivers and startup programs that will surely help you in isolating the root cause of the issue.
  • Log onto your PC as an administrator.
  • Type in MSConfig in the Start Search to open the System Configuration utility.
  • From there, go to the General tab and click “Selective startup”.
  • Clear the “Load Startup items” checkbox and make sure that the “Load System Services” and “Use Original boot configuration” options are checked.
  • Next, click the Services tab and select the “Hide All Microsoft Services” check box.
  • Click Disable all.
  • Click on Apply/OK and restart your PC. (This will put your PC into a Clean Boot State. And configure Windows to use the usual startup, just simply undo the changes.)
  • After that, try to install the Windows Updates or upgrade again.

Option 3 – Try creating a new user account

Creating a new user account can resolve the “Some apps need to be uninstalled” error when upgrading or updating your Windows 10 PC. All you have to do is create a new admin account and initiate the setup. And this is a new user account, there will be no third-party applications installed on your computer. Thus, the installation should go through without any trouble. And in case you’ve already installed programs for that user, you just have to uninstall them all and then re-run the setup.

Option 4 – Perform a clean install

If none of the options worked, you can try to clean install Windows 10. Just make sure that you have the ISO from the official Microsoft Website and then a bootable USB drive to install Windows 10 again. Take note that this will delete all the data from your drive where Windows 10 was installed previously.
Read More
Free Quake upgrade comes to Steam and more
quake remasterWithout any fanfare, news, or information Bethesda has released a completely free upgrade for legendary Quake 1. Free upgrade is automatically applied to all users who possess the original game and it has already been rolled out.

What has changed for good?

New textures, effects, and resolutions are one thing that will come first into your focus when you start the game. From the moment game is started it feels and looks like a game you remember from a long time ago. Models are also upgraded with a higher polygon count. Another thing that will hit you right away is the legendary OST by Trent Reznor in its full glory. If you have the original Quake and played it you will know that OST was missing from the Steam release and having it fully back is a great feature. I would argue that placing just OST alone in the steam release is enough for people to play it again since it adds so much atmosphere. Deathmatch and other multiplayer goodies are all here as well and there is a completely free new episode in the game with several levels. Yes, you get a free Quake upgrade in HD with an extra episode completely free.

The bad side of Quake coin

So this might come as a purist or obsessive nit-picking but there were two things that I, personally am not a fan of and have noticed during my gameplay. Please know that this is personal preference and by no other chance reflects the quality of the game itself but I just had to talk about it. Quake remake is made in a new engine and as such dynamic and gunplay feel different from the original, granted they have done the best they could to replicate the authentic feeling of the original game but there are parts of the game where I have felt that simply put, it feels different. Another thing is also tied to technology and the overall game is somewhat a little brighter and in some areas little softer in dark areas. Like I said this is purely personal preference and might come as nitpicking but I preferred the darker and grittier look of the original game. Darkplaces, the free custom-made upgrade did this in my opinion better.
Read More
Moving Start Menu to the Second Monitor
One of the most important User Interface elements in a Windows 10 operating system is the Start Menu. Not too long ago, Microsoft has added some new features and redesigned the Start Menu a couple of times as well. Thus, it is not uncommon for Windows 10 users to use several monitors. That’s why in this post, you will be guided on how you can move the Start Menu to your second monitor in Windows 10. There are a lot of advantages in using more than one monitor like a better and widescreen as well as help in improving and increasing productivity. Usually, the Start Menu and the taskbar is present in the original monitor only. In most cases, it helps users in moving the Start Menu to the second monitor and helps users in segregating tasks, and uses separate monitors for each kind of task. There are two simple steps to move the Start Menu to the second monitor. You have the option to unlock and drag the taskbar, as well as make adjustments in the settings. To get started, refer to each one of the following options to move the Start Menu to the second monitor.

Option 1 – Move the second monitor by unlocking and dragging the taskbar

The first option you can try to move the Start Menu to the second display is to simply unlock and then drag the taskbar. To do so, follow these steps:
  • First, click on the Taskbar and unlock it.
  • Next, uncheck the Lock the taskbar feature in the menu of the Taskbar Settings. This will free the taskbar so you can move or drag it around.
  • After that, push the Start Menu to the furthermost corner of the screen and then transfer it to the second monitor.

Option 2 – Move the second monitor using the keyboard

  • The first thing you have to do is to tap the Windows key to open the Start Menu.
  • Next, close the Start Menu by tapping the Esc key.
  • After that, the controls will shift back to the taskbar.
  • Now open the context menu of the taskbar by tapping the Alt + space bar together. This will move the Start Menu to the second monitor.

Option 3 – Move the Start Menu to the second monitor via Settings

If you find that the Taskbar is moving to the wrong monitor automatically or if the program does not start on the same monitor as the taskbar, then you can try this option.
  • Click on Start first and click Run.
  • Then type “desk.cpl” in the field and click OK.
  • Alternatively, you could also right-click on the desktop and select the Screen Resolution option from the drop-down menu.
  • After that, click on the monitor that you want to use as the primary monitor and select the checkbox labeled “Make this my main display”.
  • Once done, you have to choose the “Show desktop” on only 1 from the drop-down menu of Multiple displays.
  • Now click the Keep Changes option and select the Extend these displays from the Multiple displays drop-down menu and then click on the Apply button to save the changes made.
  • Afterward, click the Keep changes option once the dialog box pops up.
Read More
Software review series: QuickLook
QuickLook app is one of the best options to preview files without opening them in Windows 10. It works similar to the Quick Look feature of macOS. This Microsoft Store app has some really interesting features. It lets you preview images, documents, and media files. Also, just a hotkey is needed to preview the content of a file. There is no interface for the app. Only a preview window is visible. You can also expand the preview window to full size. Apart from that, it lets you keep the preview window on top of the other opened applications. For image files, it also provides the EXIF data. After installing this app, just select some file that you want to preview, and press the Spacebar key. That’s it! The preview window will open immediately to view the file content. If you would like to read more helpful articles and tips about various software and hardware visit errortools.com daily.
Read More
Setting default applications in Windows 11
Setting default applications in Windows 11
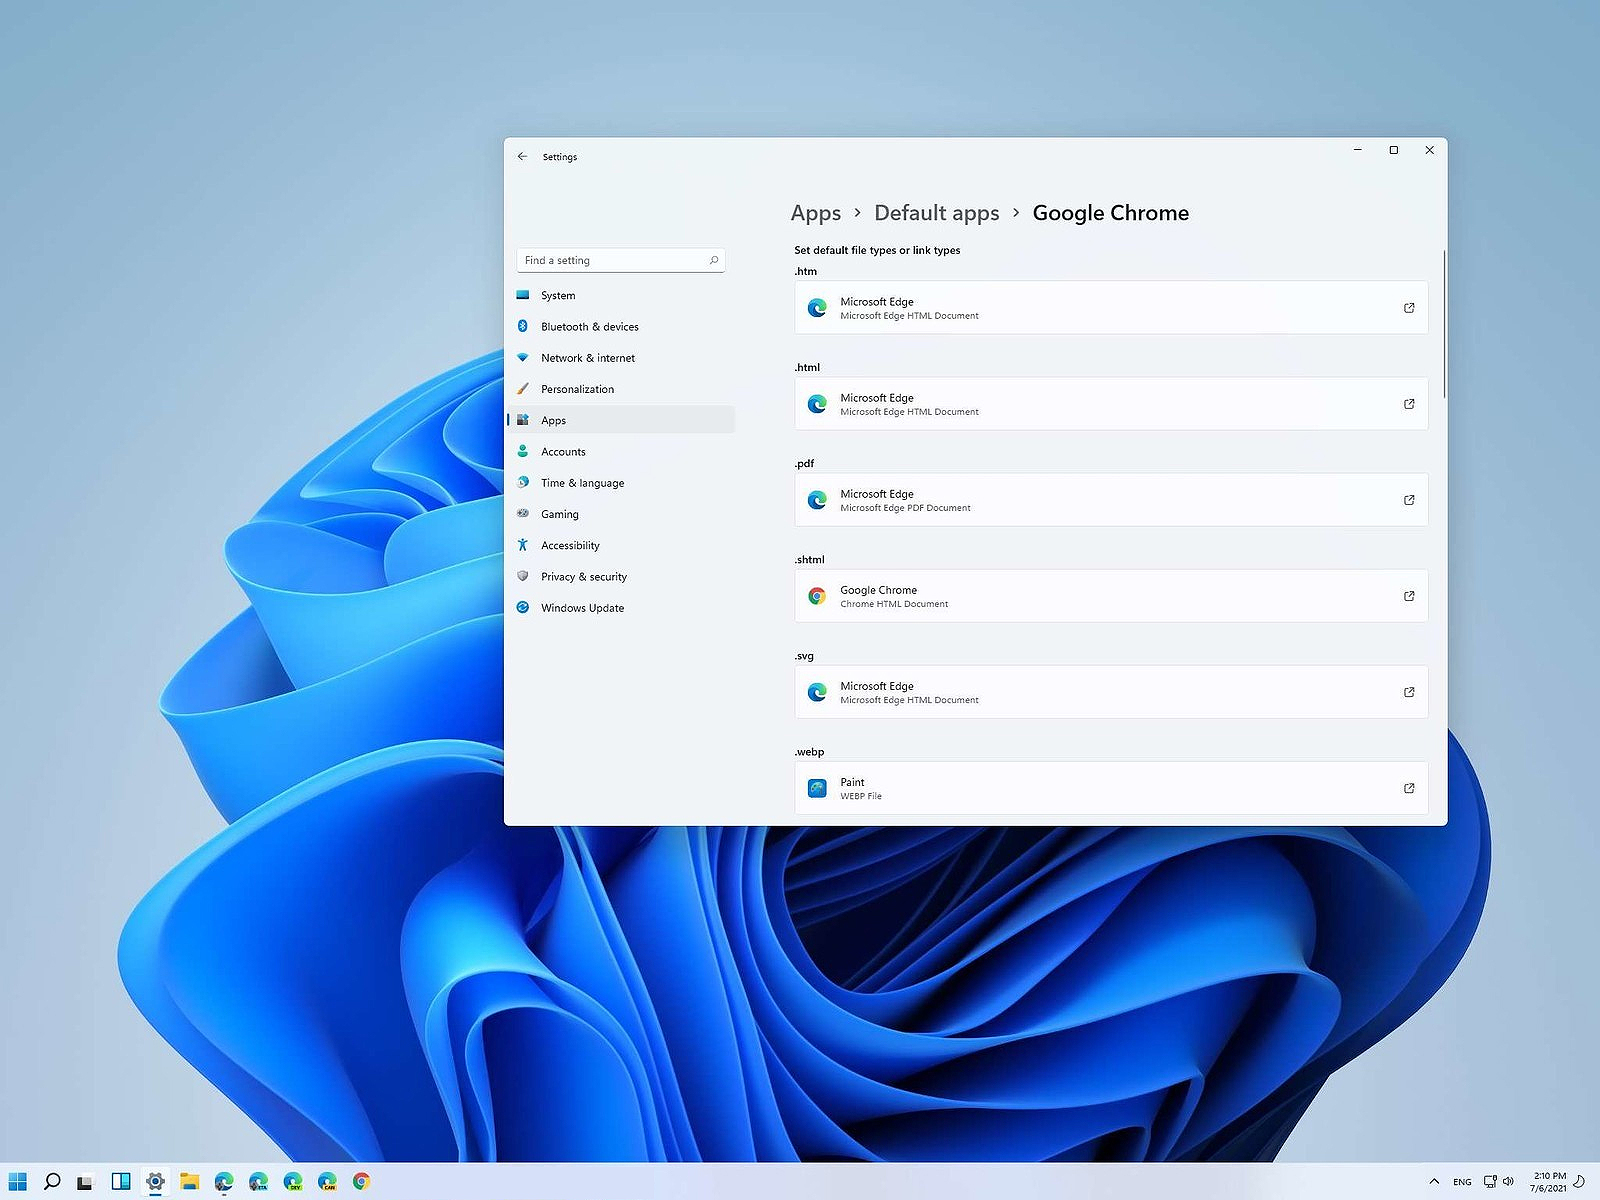
Same as in previous Windows versions, Windows 11 will also use certain applications as default ones for opening certain file types and file extensions. And yes, same as in previous versions it will come preconfigured for certain file types and associated applications like for example photos for pictures. Of course, users usually have their own favorite applications for certain file types and much more prefer to open them inside the application of their choice instead of the default one. We can change the default application like in previous Windows versions but this time there are two ways and overall more control of this process. Windows 11 has settings for choosing default file type applications and default file extension applications giving you more control of this process.

The opening setting for apps

Whatever you wish to change default application or default extension application you will need to open settings for default application. Follow steps to quickly go into it.
  1. Press ⊞ WINDOWS + I to open settings
  2. Select Apps on left
  3. On the right part select Default Apps
Now you are in settings for choosing default applications

Choosing default application by file type extension

This is considering by Microsoft as a typical way to set default applications inside Windows 11. Once you are inside the settings app there is a box labeled Enter a file type or link type. Inside the search box, type in file extension that you wish to associate the application with like .JPG, .TXT, or other. If the file extension is not associated with any application you will be presented with a Choose a Default button, if however, the file extension is already associated with the app, you will need to click on the app box itself. In any case, a pop-up will appear and ask How do you want to open YOUR FILE EXTENSION files from now on? Choose Application from the list of presented ones and click on OK.

Choosing default file type

Another method is to select the default application by file type selecting application for it. In the settings screen, under the search box, you will have a list of installed applications. Choose the application that you would like to associate a file type with and click on it. On the next details screen scroll down and select the file type that you want to associate with the selected application and click on OK.

Other/third method

There is also the third method for choosing the default application for file type but it includes some surfing on your hard drive and it can be more time-consuming for first-time settings. But it is fairly quick when you need to only use it once on some new file type (for example you have a new application installed and want to switch just one file type extension to that application). Locate the file that you want to associate with the application and right-click on it. Select Open With from the menu and then Choose Another App. Pop up will appear, select the application that you would like to use, and check the box beside Always use this app to open CHOOSEN EXTENSION files followed by clicking on the OK button.
Read More
Fix Windows Update Error 0x80242006
If you are trying to update your Windows 10 computer using Windows Update but encounter an error code 0x80242006, then you’ve come to the right place as this post will guide you in fixing this particular Windows Update error. This kind of error might be due to mishandling by the operating system. It could also be caused by the antivirus program or security software installed in your computer. When you encounter this error, you will see the following error message on your screen as you try to run Windows Update:
“0x80242006, WU_E_UH_INVALIDMETADATA. A handler operation could not be completed because the update contains invalid metadata.”
Here are some troubleshooting tips you can try to fix Windows Update Error 0x80242006.

Option 1 – Try to reset the Windows Update components

If by any chance that the second option didn’t work, resetting the Windows Update components could also help you resolve the problem. How? Refer to the following steps:
  • Open Command Prompt with admin privileges.
  • After that, type each one of the following command and hit Enter after you key in one after the other.
    • net stop wuauserv
    • net stop cryptsvc
    • net stop bits
    • net stop msiserver
Note: The commands you entered will stop the Windows Update components such as Windows Update service, Cryptographic services, BITS and MSI Installer.
  • After disabling WU components, you need to rename both the SoftwareDistribution and Catroot2 folders. To do that, type each one of the following commands below and don’t forget to hit Enter after you type one command after the other.
    • ren C:WindowsSoftwareDistribution SoftwareDistribution.old
    • ren C:WindowsSystem32catroot2 Catroot2.old
  • Next, restart the services you’ve stopped by entering another series of commands. Don’t forget to hit Enter after you key in one command after the other.
    • net start wuauserv
    • net start cryptsvc
    • net start bits
    • net start msiserver
  • Close Command Prompt and reboot your PC.

Option 2 – Run the Windows Update Troubleshooter

If resetting the Windows Update components didn’t work, you could also try running the Windows Update Troubleshooter as it could also help in fixing any issues related to Windows Update including this one. To run it, go to Settings and then select Troubleshoot from the options. From there, click on Windows Update and then click the “Run the troubleshooter” button. After that, follow the next on-screen instructions and you should be good to go.

Option 3 – Try to disable your antivirus program

Disabling the antivirus program or any security software installed in your computer is always a good idea you can try when the Windows Update process does not go smoothly. So before you try updating your computer again, make sure to disable the antivirus or security program and once the Windows Update is done, don’t forget to enable the antivirus program back again.

Option 4 – Check the Background Intelligent Service and the Cryptographic Service

  • Tap the Win + R keys to open the Run dialog box.
  • Next, type “services.msc” in the field and hit Enter or click OK to open Services.
  • From the list of Services, look for the following services and make sure that their Startup type is as follows:
    • Background Intelligent Transfer Service – Manual
    • Cryptographic Service ­– Automatic
  • After that, check if the Service status of the listed services above are set to Running. If they’re not, click on the Start button to start these services and then check if you can now enable the Windows Update service or not.

Option 5 – Run the System File Checker Scan

System File Checker or SFC is a built-in command utility that helps in restoring corrupted files as well as missing files. It replaces bad and corrupted system files to good system files. To run the SFC command, follow the steps given below.
  • Tap Win + R to launch Run.
  • Type in cmd in the field and tap Enter.
  • After opening Command Prompt, type in sfc /scannow
The command will start a system scan which will take a few while before it finishes. Once it’s done, you could get the following results:
  1. Windows Resource Protection did not find any integrity violations.
  2. Windows Resource Protection found corrupt files and successfully repaired them.
  3. Windows Resource Protection found corrupt files but was unable to fix some of them.
  • Restart your computer.

Option 6 – Try running the DISM tool

You can try running the Deployment Imaging and Servicing Management or DISM tool to fix the Windows Update error 0x80242006. Using this built-in tool, you have various options such as the “/ScanHealth”, “/CheckHealth”, and “/RestoreHealth”.
  • Open the Command Prompt with admin privileges.
  • Then type in the following commands and make sure to hit Enter right after you type each one of them:
    • Dism /Online /Cleanup-Image /CheckHealth
    • Dism /Online /Cleanup-Image /ScanHealth
    • exe /Online /Cleanup-image /Restorehealth
  • After that, wait until the process is finished and do not close the window as the process will probably take a couple of minutes.
  • Once it’s done, restart your computer.
Read More
Remove PriceGong from your Windows PC

PriceGong is a browser add-in for Internet Explorer, Chrome and Firefox that analyzes web sites your browser visits and attempts to find coupons and other deals associated with the merchant’s product offerings or services. If PriceGoing sees a corresponding deal, it will attempt to inject an affiliate ‘code’ in order to collect various affiliate based commissions if a purchase is made while trying to offer you the best price of that particular product, or, in many cases try and show you an alternative product that is similar even if it is sold by a different merchant. Upon further inspection it was found that PriceGong failed to function in our testing.

While installed, this extension might display additional ads, inject sponsored content into webpages, even if the sponsored content is of lower quality than the original ones.

About Browser Hijackers

Browser hijackers (sometimes known as hijackware) are a kind of malicious software that alters web browser settings without the computer owner’s knowledge or consent. These types of hijacks are increasing at an alarming rate around the globe, and it could be really nefarious and often dangerous too. They’re created to disrupt browser programs for various purposes. In most cases, hijackers are designed for the benefit of online hackers usually through income generation from forced advert mouse clicks and site visits. Though it might seem naive, all browser hijackers are damaging and thus always regarded as security risks. In a much worst case, your browser could be hi-jacked to download malware that will do a great deal of damage to your computer or laptop. Major symptoms that an internet browser has been hijacked Signs that an internet browser is hijacked include: 1. home page is changed 2. bookmark and the new tab are also modified 3. the essential web browser settings are modified and unwanted or insecure sites are put into the trusted websites list 4. discover new toolbars that you didn’t add 5. never-ending pop-up ads appear and/or your web browser popup blocker is disabled 6. your web browser has become unstable or starts running sluggishly 7. you’re disallowed access to specific web pages, for example, the website of an antivirus software manufacturer like SafeBytes.

Precisely how browser hijacker infects computers

A browser hijacker can be installed on your computer if you visit an infected website, click an email attachment, or download something from a file-sharing site. They are usually included with toolbars, add-ons, BHO, plug-ins or browser extensions. Other times you may have accidentally accepted a browser hijacker as part of a software program bundle (usually freeware or shareware). An example of some well-known browser hijacker includes Anyprotect, Conduit, Babylon, SweetPage, DefaultTab, RocketTab, and Delta Search, but the names are regularly changing. The existence of any browser hijacker on your computer can substantially diminish the web browsing experience, record your internet activities that result in troublesome privacy issues, create system stability problems and finally cause your computer to slow down or to a practically unusable state.

Browser Hijacker Malware – Removal

Some hijackers can be removed by uninstalling the freeware they were included with or by removing any extension you have recently added to your system. However, most browser hijackers are hard to get rid of manually. No matter how much you try to eliminate it, it might come back over and over. You should think about performing manual repairs only if you are a tech-savvy individual, as there are potential risks associated with messing around with the system registry and HOSTS file. Installing and running antivirus application on the affected computer could automatically erase browser hijackers and other malicious programs. SafeBytes Anti-Malware discovers all kinds of hijackers – including PriceGong – and eliminates every trace quickly and efficiently. Use a system optimizer (such as Restoro) along with your antivirus software to solve various computer registry issues, remove system vulnerabilities, and improve your computer's overall performance.

Tips on How to Remove Malware that is Blocking Websites or Preventing Downloads

Practically all malware is bad, but certain kinds of malware do much more damage to your PC than others. Some malware variants alter browser settings by including a proxy server or modify the PC’s DNS configuration settings. In these cases, you’ll be unable to visit some or all of the websites, and therefore unable to download or install the required security software to eliminate the infection. If you are reading this now, you may have perhaps recognized that a virus infection is the real cause of your blocked web traffic. So how to proceed if you want to install an anti-malware application like Safebytes? There are a few fixes you can attempt to get around with this particular issue.

Use Safe Mode to resolve the problem

Safe Mode is actually a unique, simplified version of Windows where just bare minimum services are loaded to counteract viruses as well as other troublesome programs from loading. In case the malware is set to load automatically when computer boots, switching into this particular mode could prevent it from doing so. To boot into Safe Mode, hit “F8” key on the keyboard right before Windows boot screen shows up; Or after normal Windows boot up, run MSCONFIG, look over “Safe Boot” under Boot tab, and click Apply. Once you’re in Safe Mode, you can attempt to download and install your antivirus program without the hindrance of the virus. At this point, you could run the antivirus scan to eliminate viruses and malware without any hindrance from another malicious application.

Download the anti-malware program in an alternate web browser

Malicious program code may exploit vulnerabilities in a specific internet browser and block access to all anti-malware software websites. If you appear to have a virus attached to Internet Explorer, then switch to an alternate web browser with built-in security features, such as Firefox or Chrome, to download your favorite anti-malware program – Safebytes. Create a bootable USB antivirus drive Another option is to save and operate an anti-malware software program entirely from a Flash drive. Follow these steps to use a flash drive to clean your infected PC. 1) On a virus-free computer, install Safebytes Anti-Malware. 2) Plug in the USB drive to a USB port on the uninfected computer. 3) Double-click on the downloaded file to open the installation wizard. 4) Choose the flash drive as the location for saving the software file. Follow activation instructions. 5) Transfer the flash drive from the clean computer to the infected PC. 6) Double-click the anti-malware software EXE file on the pen drive. 7) Run Full System Scan to detect and clean-up up all sorts of malware.

SafeBytes Anti-Malware: Light-weight Malware Protection for Windows Computer

If you’re looking to buy anti-malware for your laptop or computer, there are lots of brands and packages for you to consider. A few of them do a great job in eliminating threats while some will harm your computer by themselves. You should select a company that builds industry-best anti-malware and has earned a reputation as trustworthy. On the list of highly recommended application by industry analysts is SafeBytes Anti-Malware, a popular security application for Microsoft Windows. SafeBytes antimalware is a very effective and easy to use protection tool which is ideal for users of all levels of IT literacy. This software could easily detect, eliminate, and protect your computer from the most advanced malware intrusions such as spyware, adware, trojan horses, ransomware, PUPs, worms, parasites as well as other potentially harmful software applications.

SafeBytes possesses a plethora of wonderful features that can help you protect your computer from malware attack and damage. Let’s check out some of them below:

Robust, Anti-malware Protection: Using a critically acclaimed malware engine, SafeBytes provides multilayered protection which is designed to find and remove threats which are hidden deep inside your computer’s operating system. Real-time Threat Response: SafeBytes provides a totally hands-free live protection that is set to observe, block, and remove all threats at its very first encounter. It will constantly monitor your laptop or computer for hacker activity and also provides users with advanced firewall protection. Web Filtering: SafeBytes inspects the hyperlinks present on a webpage for possible threats and notifies you if the website is safe to browse or not, through its unique safety ranking system. Fast Scan: Safebytes Anti-Malware, with its enhanced scanning engine, offers ultra-fast scanning which will immediately target any active on-line threat. Lightweight: SafeBytes is a light-weight and user friendly anti-virus and antimalware solution. Since it utilizes very little computer resources, this application leaves the computer’s power exactly where it belongs: with you. 24/7 Guidance: Support service is readily available for 24 x 7 x 365 days through chat and email to answer your queries. SafeBytes can keep your PC protected from most advanced malware threats automatically, thus keeping your internet experience secure and safe. You can rest assured that your computer will be protected in real-time as soon as you put this software to use. So if you are looking for the best anti-malware subscription for your Windows-based PC, we highly recommend SafeBytes Anti-Malware program.

Technical Details and Manual Removal (Advanced Users)

To eliminate PriceGong manually, navigate to the Add/Remove programs list in the Control Panel and choose the offending program you want to remove. For web browser extensions, go to your web browser’s Addon/Extension manager and choose the add-on you want to disable or remove. You might even want to reset your home page and search engine providers, and also clear your web browser cache and cookies. Finally, check your hard disk for all of the following and clean your registry manually to remove leftover application entries following uninstalls. However, editing the Windows registry is actually a complicated job that only advanced computer users and professionals should attempt to fix the problem. In addition to that, certain malware is capable of replicating or preventing deletion. You’re advised to do this procedure in Windows Safe Mode.
Folders: C:\Documents and Settings\Lynn\Application Data\PriceGong C:\Documents and Settings\Lynn\Application Data\PriceGong\Data Files: C:\Documents and Settings\Lynn\Application Data\PriceGong\Data.xml C:\Documents and Settings\Lynn\Application Data\PriceGong\Data\a.xml C:\Documents and Settings\Lynn\Application Data\PriceGong\Data\b.xml C:\Documents and Settings\Lynn\Application Data\PriceGong\Data\c.xml C:\Documents and Settings\Lynn\Application Data\PriceGong\Data\d.xml C:\Documents and Settings\Lynn\Application Data\PriceGong\Data\e.xml C:\Documents and Settings\Lynn\Application Data\PriceGong\Data\f.xml C:\Documents and Settings\Lynn\Application Data\PriceGong\Data\g.xml C:\Documents and Settings\Lynn\Application Data\PriceGong\Data\h.xml C:\Documents and Settings\Lynn\Application Data\PriceGong\Data\i.xml C:\Documents and Settings\Lynn\Application Data\PriceGong\Data\J.xml C:\Documents and Settings\Lynn\Application Data\PriceGong\Data\k.xml C:\Documents and Settings\Lynn\Application Data\PriceGong\Data\l.xml C:\Documents and Settings\Lynn\Application Data\PriceGong\Data\m.xml C:\Documents and Settings\Lynn\Application Data\PriceGong\Data\mru.xml C:\Documents and Settings\Lynn\Application Data\PriceGong\Data\n.xml C:\Documents and Settings\Lynn\Application Data\PriceGong\Data\o.xml C:\Documents and Settings\Lynn\Application Data\PriceGong\Data\p.xml C:\Documents and Settings\Lynn\Application Data\PriceGong\Data\q.xml C:\Documents and Settings\Lynn\Application Data\PriceGong\Data\r.xml C:\Documents and Settings\Lynn\Application Data\PriceGong\Data\s.xml C:\Documents and Settings\Lynn\Application Data\PriceGong\Data\t.xml C:\Documents and Settings\Lynn\Application Data\PriceGong\Data\u.xml C:\Documents and Settings\Lynn\Application Data\PriceGong\Data\v.xml C:\Documents and Settings\Lynn\Application Data\PriceGong\Data\w.xml C:\Documents and Settings\Lynn\Application Data\PriceGong\Data\x.xml C:\Documents and Settings\Lynn\Application Data\PriceGong\Data\y.xml C:\Documents and Settings\Lynn\Application Data\PriceGong\Data\z.xml Registry: HKEY_CURRENT_USER\Software\PriceGong
Read More
Fixing Tcpip.sys Blue Screen Error in Windows
One of the most common Blue Screen of Death errors you can encounter on your Windows 10 computer is the Tcpip.sys Blue Screen error. The Tcpip.sys file is a driver file that is associated with the Transmission Control Protocol over Internet Protocol. When you see this kind of BSOD error, you may see any of the following error descriptions:
  • IRQL_NOT_LESS_EQUAL
  • KMODE_EXCEPTION_NOT_HANDLED
  • PAGE_FAULT_IN_NONPAGED_AREA
Whichever error description you got, you need to do use the following instructions below as a reference to obliterate the Tcpip.sys Blue Screen error.

Option 1 – Run the Blue Screen Troubleshooter

The Blue Screen troubleshooter is a built-in tool in Windows 10 that helps users in fixing BSOD errors like Tcpip.sys Blue Screen error. It can be found on the Settings Troubleshooters page. To use it, refer to these steps:
  • Tap the Win + I keys to open the Settings panel.
  • Then go to Update & Security > Troubleshoot.
  • From there, look for the option called “Blue Screen” on your right-hand side and then click the “Run the troubleshooter” button to run the Blue Screen Troubleshooter and then follow the next on-screen options. Note that you might have to boot your PC into Safe Mode.

Option 2 – Try resetting TCP/IP

In case you didn’t notice, the Tcpip.sys file is associated with the TCP/IP protocols in your computer system which is why resetting TCP/IP can help in resolving the Tcpip.sys Blue Screen of Death error especially when the TCP/IP has been modified.
  • First, you need to type “command prompt” in the Windows Search bar and then right-click on the related search result and select the “Run as administrator” option to open Command Prompt.
  • After that, type the following command in the elevated cmd window and hit Enter:
netsh int ip reset
  • Now reboot your computer after the command has been executed and check if it helped to fix the Blue Screen error.

Option 3 – Try to rollback your Network driver

If you have updated the driver software as of late and you suddenly got this BSOD error, you might have to roll back the device driver – in other words, switch back to the previous working version. To do that, follow these steps:
  • Tap the Win + R keys to launch the Run window and then type in the “devmgmt.msc” command and hit Enter to open the Device Manager window.
  • Under the Device Manager, you will see a list of drivers. From there, look for the Network Adapters and expand it.
  • Next, select the driver entries that are labeled appropriately other than anything in the context of the WAN Miniport.
  • Then select each one of them and double click to open a new mini window.
  • After that, make sure that you’re on the Driver tab and if you are not, just navigate to it then click the Roll Back Driver button to switch back to the previous version of your Network adapters.
  • Now restart your computer to successfully apply the changes made.

Option 4 – Try to update the Network drivers

You might also want to try updating all your network drivers in order to fix the Tcpip.sys Blue Screen error. To do so, here’s what you have to do:
  • Tap the Win + R keys to launch the Run window and then type in the “MSC” command and hit Enter to open the Device Manager window.
  • Under the Device Manager, you will see a list of drivers. From there, look for the Network Adapters and expand it.
  • Then right-click on each one of the Network drivers and update them all.
  • Restart your PC and see if it helped in fixing the BSOD error.
Note: If updating the network drivers didn’t help in fixing the problem, you can also try to uninstall the very same drivers and restart your Windows 10 PC. After that, the system itself will reinstall the drivers you just uninstalled. Alternatively, you can also download and install the drivers from the manufacturer’s website directly.

Option 5 – Try to disable both the Antivirus program and Firewall temporarily

There are times when antivirus programs and the firewall blocks a website that they consider to be malicious or even because of false-positive effects which is why you have to disable these programs temporarily as it might be the reason why you’ve encountered the error when trying to browse the internet.
Read More
1 2 3 162
Logo
Copyright © 2022, ErrorTools. All Rights Reserved
Trademarks: Microsoft Windows logos are registered trademarks of Microsoft. Disclaimer: ErrorTools.com is not affiliated with Microsoft, nor claim direct affiliation.
The information on this page is provided for information purposes only.
DMCA.com Protection Status