If you were trying to copy, move modify or delete a folder or a file in your computer but you’re not able to do so and encountered an error instead that says, “Could not find this item, This is no longer located in <path>, Verify the item’s location and try again”, then you’ve come to the right place as this post will guide you on how you can fix this error.
You can encounter this error when you delete, rename, open or copy a certain file which is often created by third-party software and lacks important information like file format, and so on. Although you can see these files in File Explorer, you might not be able to perform some operations in them. To fix this problem, you need to check out the given suggestions below.
Option 1 – Try to rename the file via Command Prompt
If you were trying to rename the file but unable to do so, you can achieve that by executing a command in Command Prompt. Make sure to follow the steps carefully.
- Type in “Command Prompt” In the Start menu to search for it or you could also click the search button right next to the Start menu and then right-click on the related result and select the option “Run as administrator” to open Command Prompt with admin privileges.
- Next, type in “cd” followed by the path where the file is located with this format – “C:/Folder1/Folder2/Folder3”. However, you have to omit the problematic file this time. To put it simply, the last folder in the command must be the folder where the file is located.
- After inputting the command, press Enter on your keyboard and then use the set of commands given below. Note that each command is a new line so you need to tap Enter after copying each line.
- DIR /A /X /P
- RENAME (the current name of the problematic file) (a non-problematic name)
- EXIT
Note: Make sure that you only input the current name and the new name separated by a space. You must not write the brackets in the command. If everything goes well, you will now be able to operate the file like you used to before.
Option 2 – Try to delete the file using Command Prompt
On the other hand, if you were trying to delete the file instead of renaming it, you can execute another command in Command Prompt.
- Open Command Prompt with admin privileges like what you did earlier.
- Once you’ve opened Command Prompt, copy and paste the command given below and tap Entre after you do so. You also have to make sure that you key in the correct path where the file is located as well as its name.
rd /s \?X:badfolderpath
Note: In the command above, “X” is the placeholder letter so you must input the letter that corresponds to the drive’s letter where the file is located.
- After that, you will see the “Operation completed successfully” message on your screen. If you don’t, check if you’ve really inputted the correct location of the file or its name.
Option 3 – Delete the file without any extension
If the file you were trying to delete does not have an extension, this means that Windows does not know what to do with this file which is why it’s throwing an error message. The best thing to do in such cases is to delete the file especially if it takes up a lot of memory. To delete these kinds of files, here’s what you have to do:
- Follow the first two steps from the previous option above so you can navigate to the location of the file accurately just be careful in inputting the folders.
- Don’t forget to tap Enter right after each command and then use the next command below so you can delete the affected file which has no extension:
del *.*
- After you’re done, open the File Explorer and then check if the file is now deleted or not.
If you like to learn and find out more about various Windows errors, and how to repair them go to our vast archive or use search to find articles that will explain and help you in solving your issue.
However, if you prefer to do things fast and with automatization then we are proposing to use an automated solution for your issues. The application that we are recommending is Advanced System Repair Pro
Advanced System Repair utilizes multiple tools all in one to give you a quick, simple, reliable, and very thorough diagnosis of your PC. It brings you all the tools you need in one program to clean, fix, protect, optimize and boost your PC!
1-Click Maintenance
All the tools to make it simple and easy! It's like having a professional technician at the click of a mouse.
Junk Cleaner
Keeping your computer free from unnecessary clutter also helps make your computer last longer. Like any other machine, if you keep it clean and take care of it, it will serve you better for longer!
Optimize background apps
Optimize applications background activity with the built-in Application Optimizer feature.
Disk Defrag
With a simple 1-click, Advanced System Repair speeds up your PC by assembling fragmented files on your machine and organizing them more efficiently.
Malware Removal
Finds and removes all types of harmful malware including trojans, worms, bots, adware, spyware, PUPs, and more!
Privacy Cleaner
The all-in-one privacy suite to Clean Your Tracks & Protect Your Privacy! Make your computer safe, secure, and more efficient!
System Tweak/Optimizer
ASR will analyze your complete system and settings to adjust your PC to function at its maximum performance.
Registry Cleaner
Over time, as you install and uninstall applications, the registry can become cluttered with old entries and broken settings which can result in program crashes, and annoying messages and slow the computer down.
Visit our Advanced System Repair Pro Download page to inform yourself about all the benefits of this software and get a free trial copy of it.

 Interesting information has come out from Microsoft, Windows 11 dark theme will include a different sound theme from its standard light one.
When in dark mode on Windows 11, the system sounds generally become softer, and they echo a bit, creating a more soothing experience that matches the overall look and feel of the dark mode. Flipping back to light mode brings the system sounds back to their normal level.
However, even though the light model has slightly louder sounds than the dark mode, Microsoft has taken great care to make sure the audio is more soothing, according to a report from CNBC.
The designers of Windows 11 took inspiration from an approach called calm technology. Microsoft’s Christian Koehn and Diego Baca wrote about calm technology in a post on Medium. In it, they said, “Windows 11 facilitates this through foundational experiences that feel familiar, soften formerly intimidating UI, and increase emotional connection.”
According to a Microsoft spokesperson in a statement to CNBC, “The new sounds have a much rounder wavelength, making them softer so that they can still alert/notify you, but without being overwhelming.”
Interesting information has come out from Microsoft, Windows 11 dark theme will include a different sound theme from its standard light one.
When in dark mode on Windows 11, the system sounds generally become softer, and they echo a bit, creating a more soothing experience that matches the overall look and feel of the dark mode. Flipping back to light mode brings the system sounds back to their normal level.
However, even though the light model has slightly louder sounds than the dark mode, Microsoft has taken great care to make sure the audio is more soothing, according to a report from CNBC.
The designers of Windows 11 took inspiration from an approach called calm technology. Microsoft’s Christian Koehn and Diego Baca wrote about calm technology in a post on Medium. In it, they said, “Windows 11 facilitates this through foundational experiences that feel familiar, soften formerly intimidating UI, and increase emotional connection.”
According to a Microsoft spokesperson in a statement to CNBC, “The new sounds have a much rounder wavelength, making them softer so that they can still alert/notify you, but without being overwhelming.” 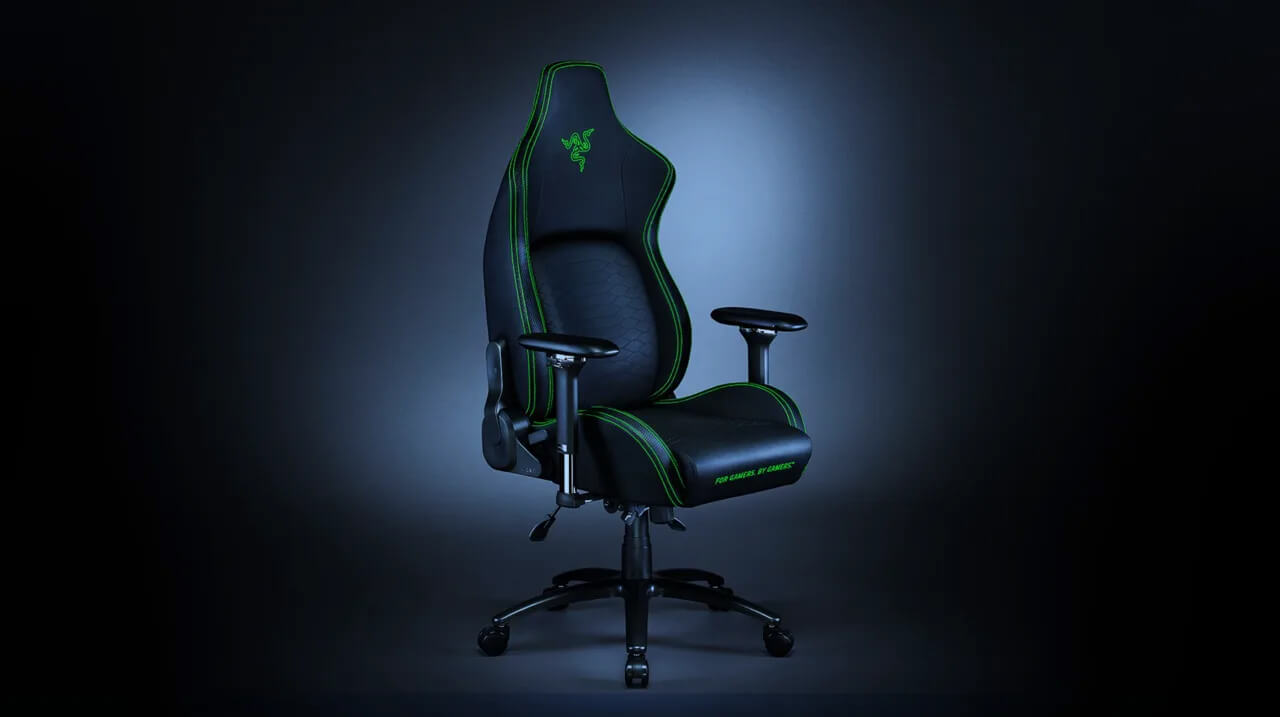 It seems that last few days we were riding some Razer bandwagon but rest assured that we are not sponsored by them in any way, truth is that simply they come up with some interesting accessories which I believe are worth covering.
Gaming Chair itself comes in two colors, fully black and green black combination and it is not really an entry-level chair if we are talking about price. The chair itself is around 600USD depending on the distributor and considering that price range it is placed in more top cream of gaming chairs but it is worth every dime.
It seems that last few days we were riding some Razer bandwagon but rest assured that we are not sponsored by them in any way, truth is that simply they come up with some interesting accessories which I believe are worth covering.
Gaming Chair itself comes in two colors, fully black and green black combination and it is not really an entry-level chair if we are talking about price. The chair itself is around 600USD depending on the distributor and considering that price range it is placed in more top cream of gaming chairs but it is worth every dime.