Fix Communication with service process failed

This post will guide you in fixing the “Communication with service process failed” error in Windows 10. This error is related to the Intel Driver and Support Assistant application. Although this error does not reportedly cause any loss of functionality in the computer, however, it still indicates that there is something wrong with some of your driver modules.

Intel has taken a bold step and combined its older modules into this new application (Intel Driver and Support Assistant) recently. This application enables users to scan their computers for any available updates from Intel. This is the main application of Intel and provides users a way to update their driver software automatically instead of manually updating it. However, with the recent reports submitted by some users, it seems that something is wrong with this application, and users to have to deal with the “Communication with service process failed” error. This error might be caused by several reasons, for one, it could be that the application is corrupted or incomplete in its nature which is possible since this is still a developing and newly released app. It could also be that there are other utilities or modules that conflict with the Intel software. Whichever the reason may be, you can try out the options given below to resolve the problem but before you proceed, make sure that you have an administrator account as well as an active and stable internet connection.

Option 1 – Disable DSATray in Startup

If you receive this error message every time you start your computer then this means that the application is not able to launch properly. Like pointed out, it could be that it is still incomplete in nature or it conflicts with other applications. Thus, you can try to disable the service from the startup and check if it fixes the problem.

  • Tap the Win + R keys to open the Run dialog box.
  • Then type “taskmgr” in the field and hit Enter to open the Task Manager.
  • After that, go to the Startup tab and look for the Intel Driver and Support Assistant app.
  • Right-click on the app and select Disable.
  • Restart your PC and check if the error is now fixed or not

Option 2 – Reinstall the Intel Driver and Support Assistant

If the first option did not work, you can try reinstalling the Intel Driver and Support Assistant app. To do so, follow these steps:

  • In the search box, type in “control” and then click on Control Panel (desktop app) among the search results.
  • After that, select Programs and Features from the list which will give you a list of all the programs installed on your computer.
  • From there, look for Intel Driver and Support Assistant and select it and then uninstall it.
  • After you have the app uninstalled, open your browser and go to Intel’s official website. From there, download the driver utility manually.
  • Once the download is finished, right-click on it and select “Run as administrator” and install the app on your PC with elevated access.
  • Restart your PC and then check if the error is now fixed.
If you like to learn and find out more about various Windows errors, and how to repair them go to our vast archive or use search to find articles that will explain and help you in solving your issue.
However, if you prefer to do things fast and with automatization then we are proposing to use an automated solution for your issues. The application that we are recommending is Advanced System Repair Pro
Advanced System Repair utilizes multiple tools all in one to give you a quick, simple, reliable, and very thorough diagnosis of your PC. It brings you all the tools you need in one program to clean, fix, protect, optimize and boost your PC!
1-Click Maintenance
All the tools to make it simple and easy! It's like having a professional technician at the click of a mouse.

Junk Cleaner
Keeping your computer free from unnecessary clutter also helps make your computer last longer. Like any other machine, if you keep it clean and take care of it, it will serve you better for longer!

Optimize background apps
Optimize applications background activity with the built-in Application Optimizer feature.

Disk Defrag
With a simple 1-click, Advanced System Repair speeds up your PC by assembling fragmented files on your machine and organizing them more efficiently.

Malware Removal
Finds and removes all types of harmful malware including trojans, worms, bots, adware, spyware, PUPs, and more!

Privacy Cleaner
The all-in-one privacy suite to Clean Your Tracks & Protect Your Privacy! Make your computer safe, secure, and more efficient!

System Tweak/Optimizer
ASR will analyze your complete system and settings to adjust your PC to function at its maximum performance.

Registry Cleaner
Over time, as you install and uninstall applications, the registry can become cluttered with old entries and broken settings which can result in program crashes, and annoying messages and slow the computer down.
Visit our Advanced System Repair Pro Download page to inform yourself about all the benefits of this software and get a free trial copy of it.
advanced system repair pro

Advanced System Repair Pro

One-click automated PC repair solution
ASR logo
With Advanced System Repair Pro you can easily
Replace damaged files
Restore performance
Free disk space
Remove Malware
Protects WEB browser
Remove Viruses
Stop PC freezing
DOWNLOAD
Privacy Policy | Terms of Use | Uinstall
Advanced System Repair Pro is compatible with all versions of Microsoft Windows including Windows 11

Share this article:

You might also like

What to do if Windows is stuck in Tablet Mode
To make the Windows 10 operating system a lot more user-friendly, Microsoft introduced the Tablet Mode for Windows 10 devices, especially the 2-in-1 devices like Surface Pro and Surface Book. Despite the Tablet Mode’s efficiency, it also encounters some errors from time to time. One of the issues users reported about tablet mode is that they can’t turn off or exit tablet mode. If you are one of these users, read on as this post will guide you in what you can do to fix the issue. To fix the problem with Tablet Mode, there are several suggestions you can check out. You can try to check the full-screen setting, or perform a full shutdown or perform two buttons to restart the Surface devices. You could also disable Tablet Mode via Registry Editor or perform System Restore or change the settings in the System tab or the Action Center.

Option 1 – Try to check the full-screen setting

  • Tap the Win + I keys to open the Windows Settings app.
  • Then navigate to this path, Personalization > Start.
  • Next, scroll down to toggle off the “Use Start Full Screen” option.
  • After that, restart your computer and see if the problem is fixed.

Option 2 – Perform a full shutdown

  • Open Command Prompt with admin privileges first.
  • Next, execute this command to perform a full shutdown: shutdown /s /f /t 0
  • The command you entered will shut down your computer and once it’s turned off, wait for a couple of minutes and then turn it back on.

Option 3 – Try to perform a two-button restart on your Surface device

  • Tap and hold the power button for about 30 seconds.
  • Then release them after 30 seconds.
  • After that, tap and hold the volume up + the power button for 20 seconds. This will cause the display to flash a few times but you have to keep those buttons pressed until your Surface device is turned off.
  • Wait for a couple of minutes and your Surface will turn back on. This should resolve the problem.

Option 4 – Try to disable the Tablet Mode via Registry Editor

  • In the Start Search, type “registry editor” and right-click on the Registry Editor from the results, and then select the Run as administrator option. This will open the Registry Editor with admin privileges.
  • Next, navigate to this registry key: ComputerHKEY_CURRENT_USERSoftwareMicrosoftWindowsCurrentVersionImmersiveShell
  • From there, look for the DWORD named “SignInMode” and double click on it.
  • Set its value to “1” and its base as hexadecimal.
  • After that, click on OK to save the changes made. This will make sure that you are signed in to the desktop mode when you log into your account.
  • Now look for the DWORD named “TabletMode” and double click on it and set its value data to “0” and it's base as hexadecimal.
  • Click on OK to save the changes made and then restart your computer.

Option 5 – Run System Restore

  • Tap the Win + R keys to open the Run dialog box.
  • After that, type in “sysdm.cpl” in the field and tap Enter.
  • Next, go to the System Protection tab then click the System Restore button. This will open a new window where you have to select your preferred System Restore point.
  • After that, follow the on-screen instructions to finish the process and then restart your computer and check if the problem is fixed or not.

Option 6 – Try changing the settings in the System tab or the Action Center

  • Go to Settings and navigate to System > Tablet Mode.
  • After that, scroll down to set the “Use desktop mode” from the drop-down menu under the “When I sign in” section.
  • Now restart your computer and see if the issue is fixed.
Read More
Connecting a Wireless Printer to a Windows PC
Although it’s easy to set up wired printers in most cases and they have their charm, you don’t have to be around the printer if you are connected to the same network. So in this post, you will be guided on how you can install and set up a wireless printer on your Windows 10 computer. The idea here is to ensure that your Wi-Fi printer and your Windows 10 computer are connected on the same network and to do that, you need to carry out the following steps:
  • You have to connect the printer to the Wi-Fi network.
  • You have to add the printer or scanner to Windows 10.
  • You have to install the printer software.
  • You have to change the default printer.
  • And troubleshoot the printer.

For more details, follow the instructions below.

Step 1: Connect your printer to the Wi-Fi network. In this step, you need to turn on your printer and look for the option to connect to a Wi-Fi network. Note that the step to connect to the Wi-Fi network depends on what kind of printer you use as well as its OEM since there will be a user interface or a Wi-Fi button that will get the job done for you. Once your printer is connected to the Wi-Fi network, you need to keep it turned on until the setup is completed. Step 2: Next, add a printer or scanner to Windows 10
  • Since you’re already connected to the Wi-Fi network, you now have to go to Settings > Devices > Printers & scanners.
  • From there, click on the Add a printer or scanner option.
  • After that, the scanning process will begin as Windows 10 looks for the printer and once it finds it, it will display the printer in the result.
  • Choose the Wi-Fi printer from the results and click on the Add device option. Once you click this option, Windows will install the drivers via Windows 10 update. Note that this process will apply to all the printers – connected, wireless, and so on.
Step 3: You have to install a printer software In this step, you need to use the driver software from the OEM even though the default printer software works since in most cases, the driver software from OEM works better compared to the default ones and offers much better functionality like ink-saving modes, and many more. Step 4: You now have to change the default printer After installing the printer software, you now have to set or change the default printer in your computer. If you have not installed any printer, the default printer in Windows is the one that saves the files. Now since you have already installed your printer, all that’s left for you to do is to change the default printer of Windows 10 to the one you installed earlier. To do that, follow these sub-steps:
  • Go to Settings and navigate to Devices > Printers & scanners.
  • From there, check the checkbox labeled, “Let Windows manage my default printer” if there are many printers. This will recommend you to use the most used printer. But if you don’t want to switch to the most used printer, then uncheck the checkbox.
  • Once done, click on the printer you want to set as the default one and go to Manage, and then click on the Set as default button.
Step 5: If you have any issues with your newly installed printer, then you need to troubleshoot it One of the first basic troubleshooting you can perform to resolve the printer issue is running the Printer Troubleshooter. This built-in troubleshooter can detect and automatically fix the problem for you. To use it, follow these steps:
  • Tap the Win + R keys to open the Run dialog box.
  • Next, type “exe /id PrinterDiagnostic” in the field and click OK or hit Enter to open the Printer Troubleshooter.
  • Then click the Next button and follow the next on-screen instructions to fix the issue with the printer.
Read More
How to Fix Error 0x0000605 in Windows
Recently, some users reported not being able to boot up their Windows 10 computers. And during the startup phase, at some time, the bootup sequence is halted with a Recovery error along with an error message saying, “Your PC/Device needs to be repaired” with an error code of 0x0000605. This kind of error message indicates that Windows was not able to verify the digital signature for the file as the signing certificate or it could be that it has expired. To resolve this error, you can follow the potential fixes given below and see if you stumble upon a fix that might work out for you.

Option 1 – Change the Date & Time settings in the BIOS

Some users reported that they were able to fix the error by changing the Date & Time settings in the BIOS. Upon checking, they saw that in their BIOS settings, the date was off several years. As a result, the incorrect date and time settings end up ticking the system into believing that the Windows build has expired long before the actual expiration date. You can check if the error pops up due to the same reasons by accessing the BIOS settings. To do so, you have to tap the Boot key that’s associated with your motherboard manufacturer during the initial startup phase. After that, you can search for a particular boot key online or you can also tap keys like F2, F4, F8, F10, F12, and the Delete key. Once you’re able to access the BIOS settings, locate the Date & time or anything similar, and then check if the date is correct or not. If not, you need to change the date to the actual date and then save the changes made and restart your computer and then check if the issue is now fixed or not. Just remember that if the actual date is past the expiration date of the build you have, you need to change it to an older date. If your Windows 10 PC is able to boot back up, you have to update it to a stable Windows build and then go back to the BIOS settings and change the date to the current one else you will definitely encounter Windows update errors in the future as well as security alerts.

Option 2 – Perform a clean install of a stable Windows 10 build

If every system boot fails accompanied by a BSOD error with error code 0x0000605 “A component of the operating system has expired” and you’ve already followed every instruction on option 1, then it’s most likely that your current Windows build has already expired. Remember that almost all the Windows 10 Insider Preview builds (98xx) are created along with an expiration date and when your computer reaches the expiration date, you won’t be able to boot your computer up. Note that the exact expiration date varies based on the build number. And prior to the expiration date, the operating system will start to display some error warnings telling you that the build will expire and urge you to update the most recent build available. And so once the computer reaches its expiration date, it will begin to reboot every three hours until it no longer boots up which is about 2 weeks approximately after the license has expired. Once the expiration date is up and your computer no longer boots up, you need to perform a clean install and then install the latest Windows 10 build to resolve the issue once and for all.
Read More
DisplayLink in Windows 10 is not working
This post will guide you in what to do if the DisplayLink in Windows 10 is not working. There are several users who reported that their DisplayLink device has stopped working with the Windows 20 Anniversary or the Creators update all of a sudden. According to users, this issue occurs right after they finish installing a big Windows Update like the Anniversary Update or the Creators Update or right when the DisplayLink driver is updated using Windows Update. DisplayLink is a graphics transport technology that allows users to connect to any computer that supports USB or Wi-Fi. Aside from that, it is also an excellent universal docking solution to any platform which makes it a great solution for enabling multiple displays. Thus, it can be quite annoying when DisplayLink suddenly stops working. There really is no actual error message when it happens. The only telltale sign is that all the devices that use the DisplayLink technology will also stop functioning. There could be tons of reasons why DisplayLink stopped working. It could be due to an incompatible driver, or the DisplayLink driver itself is corrupted or is connected to a USB 2.0 port. In addition, the problem could also be due to the Nvidia Share (ShadowPlay) that conflicts with DisplayLink or that the Universal Serial Bus is broken. To resolve the issue, refer to the following options laid out below.

Option 1 – Run the Hardware and Devices troubleshooter

As you know, Windows comes with a built-in tool that you can use to troubleshoot the problem with DisplayLink. You can find it in Settings > Update & Security > Troubleshoot. For further instructions, follow these steps:
  • The first thing you need to do is click on Start and then on the gear-like icon to pull up the window for Settings.
  • After opening Settings, look for the Update and Security option and select it.
  • From there, go to the Troubleshoot option located on the left-hand side of the list.
  • Next, select Hardware and Devices from the list and open the Troubleshooter and run it. Once it is doing its job, wait for it to complete the process and then restart the system.
  • After the system restarts, check if the problem’s now fixed. If not, refer to the next option given below.

Option 2 – Try to uninstall DisplayLink and reconnect the docking station

If the Hardware and Device troubleshooter is of no help, you can try uninstalling DisplayLink and reconnecting the docking station. To do so, follow these steps:
  • Disconnect the docking station or any other device that uses DisplayLink.
  • Tap the Win + R keys to open the Run dialog box.
  • Then type “cpl” and hit Enter to open Programs and Features.
  • From there, look for DisplayLink, right-click on it and click Uninstall.
  • After that, follow the next on-screen instructions that appear on your screen to completely remove DisplayLink from your computer.
  • Once you’ve uninstalled DisplayLink, click this link to download and install DisplayLink again.
  • Now reconnect the docking station as well as other devices that use DisplayLink and follow the next on-screen instructions to reinstall the required drivers in your computer.
  • Restart your computer and then check if DisplayLink is now working fine or not.

Option 3 – Try using a USB 3.0 port

If you are experiencing this issue with DisplayLink with a monitor that you’re trying to connect using DisplayLink, then you have to make sure that you are using a USB 3.0 port. Based on some reports, there are certain monitors that will not work with DisplayLink while connected to a USB 2.0 port since they have insufficient power to run the monitor. Like pointed out earlier, the problem with DisplayLink might have something to do with the Nvidia ShadowPlay. This streaming feature was often reported to crash the DisplayLink monitors which is why you might want to try disabling it for a while to check if it’s really true. Once you’ve disabled Nvidia ShadowPlay, restart your computer and check if your DisplayLink monitor now works.

Option 5 – Reinstall the Universal Serial Bus controller

You can also reinstall the Universal Serial Bus controller to fix DisplayLink since a malfunctioning USB port can sometimes cause issues with DisplayLink.
  • Tap the Win + R keys to open the Run dialog box.
  • Then type “msc” in the field and hit Enter to open the Device Manager.
  • From there, look for the Universal Serial Bus controllers and expand its drop-down menu.
  • Next, right-click on every Host Controller and then click on Uninstall Device.
  • After uninstalling every entry, restart your computer to force your system to reinstall the drivers you’ve just uninstalled.
  • Once your computer has rebooted, wait until the drivers are reinstalled and then try opening DisplayLink again.

Option 5 – Reinstall the Universal Serial Bus controller

You can also try to perform a System Restore as it can also help you fix DisplayLink. You can do this option either by booting into Safe Mode or in System Restore. If you are already in the Advanced Startup Options, just directly select System Restore and proceed with the next steps. And if you have just booted your PC into Safe Mode, refer to the steps below.
  • Tap the Win + R keys to open the Run dialog box.
  • After that, type in “sysdm.cpl” in the field and tap Enter.
  • Next, go to the System Protection tab then click the System Restore button. This will open a new window where you have to select your preferred System Restore point.
  • After that, follow the on-screen instructions to finish the process and then restart your computer and check if the problem is fixed or not.
Read More
Steam Deck will be able to dual boot
Steam Deck release is almost upon us and more news comes to light. The Latest officially confirmed technical detail is that the user will have access to device's BIOS and that dual booting will be officially supported. steam deck
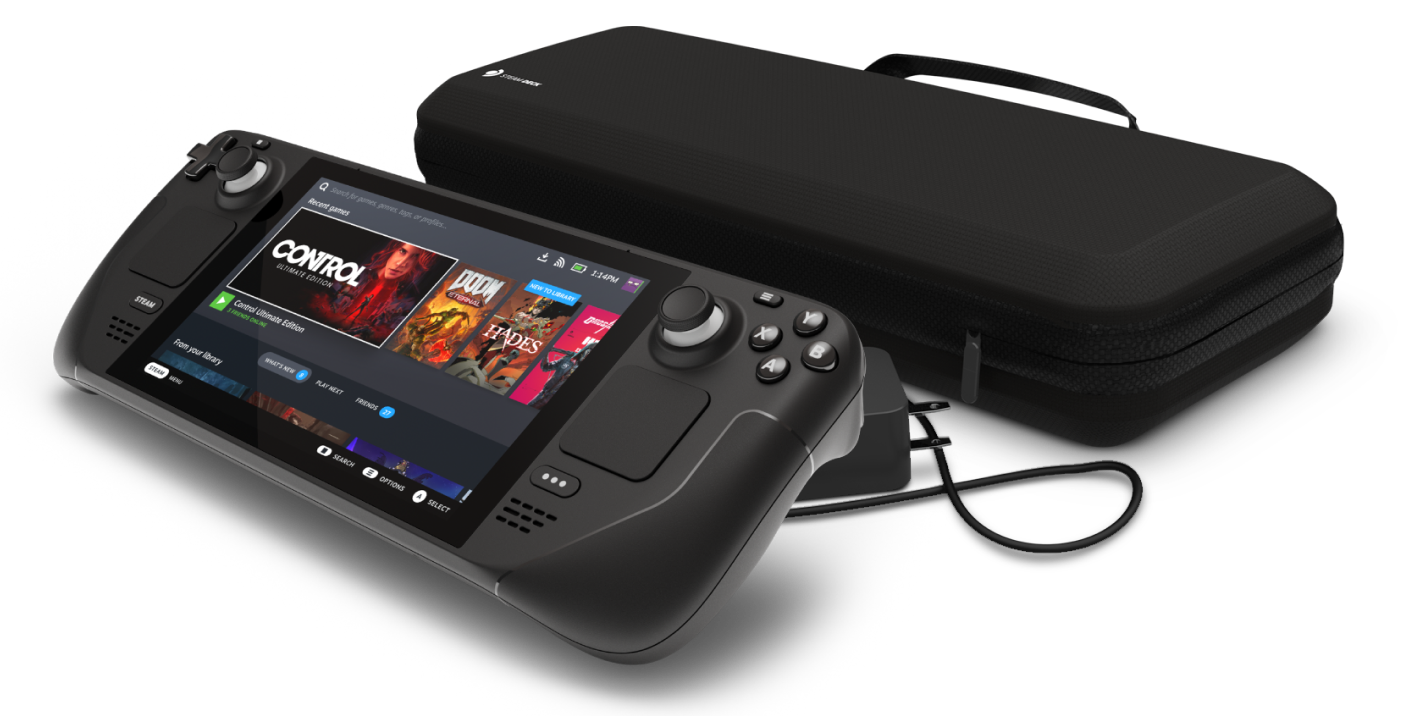
This, of course, means that you will be able to have both Proton and Windows on your device letting you play anything that you wish if the hardware is strong enough. Valve also said that you can launch OS from an SD card! This of course will save space available for games themselves, especially for entry models with less than one available. All of this information really pushes Deck into the territory of a handheld PC and not just another console and I must admit that this announcement left a smile on my face.
Read More
Fix CHKDSK is not available for RAW drives
One of the most useful tools you can use to repair bad or corrupted sectors in the hard disk of your computer is the CHKDSK utility. However, there are also instances when this Disk Checking tool could encounter some issues and one of them is the error that states, “The type of the file system are RAW, CHKDSK is not available for RAW drives”. This kind of issue is due to the RAW file format which is not recognized by the Windows operating system that you’ve installed which explains why you’re getting this error when running the CHKDSK utility. You can also encounter this error in case there is something wrong with the drive encryption. To fix this error, you have to change the File System of the drive. How? Refer to the steps given below. Step 1: The first thing you need to do is create a bootable Windows 10 media. Step 2: After that, click on Repair your computer on the first Windows 10 installation setup window. Step 3: Next, you have to select the operating system partition from the given options and then click on Next. Step 4: Now select Command Prompt from the System Recovery Options box and then type the following command and tap Enter to initiate the Diskpart utility inside Command Prompt.
diskpart
Step 5: Afterwards, type in either of the following commands to help you in either listing all the Disk connects or all the partitions on those disks formed.
diskpart or list volume
Step 6: Next, you need to select any of the two given commands below depending on the list you entered on the previous step.
select disk # or select volume #
Step 7: After you enter the command, it will select the Disk or the Partition you want to select. Now you have to type and enter the following command to clean your drive.
clean
Step 8: Now enter any of the two following commands.
list disk or list volume
Step 9: Then type the next command below to create a specified partition.
create partition primary
Step 10: Once done, type in the following command to select the newly created partition.
select partition 1
Step 11: Next, type the following command to mark the selected partition as active.
active
Step 12: Finally, restart your computer to successfully apply the changes made and then see if it has fixed the problem or not.
Read More
Fix This device is currently in use, USB Error
USB storage devices, peripherals, and other devices are almost used on a daily basis. And as you know, when removing the USB storage devices, it is recommended to always use the “Safely remove the USB storage device” option in order to prevent data corruption in the USB storage device. However, there are times when you may see the following error message after you use the “Safely remove the USB storage device” option:
“Problem ejecting USB Mass Storage – This device is currently in use, close any programs or windows that might be using this device, and then try again.”
This kind of error message occurs when the device is still interacting with the operating system in the background. There are several ways you can fix this error but before you check them out below, you need to close all the open windows and programs that may be using the USB storage device and then wait for a couple of seconds and then try safely removing it again. However, if you are still getting the same error message, then here are some tips you should try:

Option 1 – Try to use the Task Manager

  • Tap the Ctrl + Shift + Esc keys on your keyboard to open the Task Manager.
  • After that, look for the running processes and programs hogging on your USB Storage device. The error could be due to a program or process that’s using the USB device. This program or process will hog onto some Disk or CPU while transferring data and interacting with the device.
  • Once you find the culprits, right-click on each one of them and select End Process or End Task. You could also try to restart the process for “Explorer.exe” and see if it fixes the problem.

Option 2 – Try using DISKPART

The next thing you can try to resolve the issue is to use DISKPART. Refer to the given steps below to do so.
  • Tap the Win + R keys to launch Run and then type “cmd” in the field and tap Enter or click OK to open an elevated Command Prompt.
  • Next, type and enter this command to execute it: diskpart
  • The command you entered will initiate the DISKPART utility. After that, type and enter this second command: list disk
  • Next, type and enter this third command: list volume
  • The commands you just executed will help you in either listing all the Disk connects or all the partitions on those disks formed and from there, you need to select one command depending on the “list” command you entered. You can execute either of the two following commands:
    • select disk #
    • select volume #
  • After that, it will select the Disk or Partition you want to select.
  • Now type either one of the following commands:
    • offline disk #offline volume #
  • The command you entered will mark the selected disk is Offline. Afterward, try to safely remove your USB Storage device. Just remember that when you plug it back in again, you have to carry out the same method except for the last given command as this time you will have to enter either of these commands in order to get your USB storage device back online:
    • online disk #
    • online volume #

Option 3– Try using the Disk Management utility

  • Tap the Win + R keys to open Run.
  • Then type “diskmgmt.msc” in the field and hit Enter to open the Disk Management utility.
  • Next, look for the entry for your USB Storage device and once you’ve found it, right-click on it and select Offline.
  • After that, try to safely remove your USB Storage device again and see if the error is fixed. Note that you need to go over the same steps again if you want to plug your USB Storage device back in but make sure to select the Online option instead of Offline to get your device back online.
Read More
Fix KMODE EXCEPTION NOT HANDLED e1d65x64.sys
KMODE_EXCEPTION_NOT_HANDLED seems to be connected primarily to a third-party driver, e1d65x64.sys associated with the Intel(R) Gigabit adapter, NIC/Wired network NDIS (Network Driver Interface Specification) 6.x driver. Error is known to produce the dreaded blue screen of death or BSOD. Most usually error is connected with gaming on Windows 10 computer and it manifests itself during gaming sessions. If you are unlucky and you are faced with this unfortunate error we will be happy to try to help you and present with tips and tricks in order for you to find a solution for it. Before you proceed with the provided solutions, be sure you have sufficient disk space on the Windows drive, run Disk Cleanup and then run CHKDSK.

1) Run the Blue Screen Online Troubleshooter

Open Control Panel, change the view setting to icons. Click Troubleshooting, and click “View all” in the tasks pane. Click “Blue Screen”. This opens the Blue Screen Troubleshooter.

2) Run Driver Verifier

  1. Start a Command Prompt window by selecting Run as an administrator, and type verifier to open Driver Verifier Manager.
  2. Select Create standard settings (the default task), and select Next. You can also choose to Create custom settings to select from predefined settings, or to select individual options. For more information, see Driver Verifier options and rule classes and Selecting Driver Verifier Options.
  3. Under Select what drivers to verify, choose one of the selection schemes described in the following table.
    Driver verifier table:
    Option Recommended use
    Automatically select unsigned drivers Useful for testing on computers that are running versions of Windows that do not require signed drivers.
    Automatically select drivers built for older versions of Windows Useful for testing driver compatibility with newer versions of Windows.
    Automatically select all drivers installed on this computer Provides maximum coverage in terms of the number of drivers that are tested on a system. This option is useful for test scenarios where a driver can interact with other devices or drivers on a system. This option can also exhaust the resources available for Special Pool and some resource tracking. Testing all drivers can also adversely affect system performance.
    Select driver names from a list In most cases, you will want to specify which drivers to test. Selecting all drivers in a device stack allows the Enhanced I/O Verification option to track objects and check compliance because an I/O request packet (IRP) is passed between each of the drivers in the stack, which allows for a greater level of detail to be provided when an error is detected. Select a single driver if you are running a test scenario that measures system or driver performance metrics, or if you want to allocate the greatest number of resources available for detecting memory corruption or resource tracking issues (such as deadlocks or mutexes). The Special Pool and I/O Verification options are more effective when used on one driver at a time.
  4. If you chose Select driver names from a list, select Next, and then select one or more specific drivers.
  5. Select Finish, and then restart the computer.

3) Update network device drivers

Go to the official Intel website and try to find newer versions of drivers, if there are none perhaps you will need to revert back to the previous version.

4) Scan memory for issues

Run a memory test on your system, sometimes these errors can be traced back to a faulty RAM bank.

5) Stop over-clocking your PC

If you have overclocked your PC please reverse it back to its original state and see if that would solve the issue

6) Perform System Restore to the previous restore point

If none of the previous solutions have bared fruit, roll back to a previous restore point and that should solve the issue.
Read More
ERR_SSL_VERSION_OR_CIPHER_MISMATCH
If you encounter an error message saying, “ERR SSL VERSION OR CIPHER MISMATCH” while visiting a website, then it is not primarily your fault as an end-user. In fact, it can happen on any website like Chrome, Edge, Firefox, and even Internet Explorer. Getting this error means that the website you are visiting is using an SSL certificate which your browser seems to be rejected because there is some issue with the certificate. It is also possible that the certificate that’s downloaded on your computer is corrupted or that your computer configuration for TSL/SSL is misconfigured. Here are the complete details of the error message:
“A secure connection cannot be established because this site uses an unsupported protocol, Error code ERR_SSL_VERSION_OR_CIPHER_MISMATCH”
To resolve the ERR_SSL_VERSION_OR_CIPHER_MISMATCH error, refer to the options given below and see which one works for you.

Option 1 – Try to access the website with the only HTTP

The first thing you can do is to try accessing the website using HTTP instead of HTTPS. If you can open the website using HTTP then it means that the problem is in the website itself. And if you are the website owner, you can check the following:
  • Check if your website’s SSL certificate name is mismatched. Here you need to ensure that the name and alias of the websites match with the actual website URL where the certificate is installed.
  • Second, check if your server is using the RC4 Cipher. If it is, then you need to fix that.
On the other hand, you may also check if your CDN also supports SSL since most of the CDN nowadays supports SSL. All you have to do is configure it correctly and it should be good to go.

Option 2 – Try enabling SSL 3 / TLS and disable QUIC Protocol

If you were using Google Chrome when you got the ERR SSL VERSION OR CIPHER MISMATCH error, then you need to follow the protocol fixes for SSL3/TLS and QUIC which are usually some of the reasons that cause the SSL version / Cipher Mismatch. It also has a few fixes for Windows 10 computer where you can clear the certificates and make sure that your computer date and time is in sync with your time zone and so on. If you were using Edge or Internet Explorer when you got the error, then you have to follow the steps below.
  • Type “Internet” in the search box of your browser. After that, you should see the Internet Options from the search results.
  • Next, open the Internet Properties window and switch to the Advanced tab and then scroll down to the Security section.
  • From there, check the “Use TLS 1.1” checkbox as well as the “Use TLS 1.2” checkbox and then click OK to save the changes made.
  • Restart the browser.
On the other hand, if you were using Firefox when you go the error, here’s what you have to do.
  • Open Firefox and in the address bar, type “about:config” and hit Enter.
  • If a warning appears, just click on the “I accept the risk!” button to proceed.
  • Next, type in “TLS” in the search field and hit Enter.
  • Then look for “security.tls.version.min” and double click on it and set its integer value to 3 to force the protocol of TLS 1.3.
  • Now click OK and restart Firefox and do the same thing with SSL.
Read More
How to Disable Restart in Firefox
Mozilla Firefox has introduced a new feature known as Restart with Windows which allows the browser to automatically start when your Windows 10 computer boots. This means that if you leave the Firefox browser opened while shutting down your computer, Firefox will re-open automatically along with the tabs that were opened right before you shut down your computer. Although some users may find this feature convenient, there are others who do not approve at all as it could be a nuisance. So if you’re one of the latter, then read on as this post will show you how you can disable the Restart with Windows feature in the Firefox browser on your Windows 10 computer. Refer to the instructions laid out below to get started.
  • Step 1: Open Mozilla Firefox and if it’s opened already, just open a new tab and then type the following text in the address bar:
about:config
  • Step 2: After typing the text given above, hit Enter and if a prompt with a warning message pops up, simply click on the “I accept the risk!” button to proceed.
  • Step 3: Next, type “Restart” in the search filter which should display the following preference in the window:
“toolkit.winRegisterApplicationRestart”
  • Step 4: After that, check for the preference value and then see if it’s set to true or not. If it is set to true, then it means that the Restart with Windows feature is enabled so obviously, to disable it, you need to set its value to false.
  • Step 5: Now restart your computer without closing Firefox. After restarting your computer, you should no longer see Firefox starting automatically.
The Restart with Windows feature by default is disabled for most users. On the other hand, Mozilla will have this feature enabled as the default configuration in the coming weeks so it’s best that you now know what to do when that time comes since the newer versions of Mozilla Firefox are already being shipped with the Restart with Windows feature. However, if this post did not help you, then you might want to check if the feature has been added to the Startup folder, and from there, you can disable this startup program using the Task Manager > Startup tab.
Read More
1 2 3 162
Logo
Copyright © 2022, ErrorTools. All Rights Reserved
Trademarks: Microsoft Windows logos are registered trademarks of Microsoft. Disclaimer: ErrorTools.com is not affiliated with Microsoft, nor claim direct affiliation.
The information on this page is provided for information purposes only.
DMCA.com Protection Status