How to Fix Camera app Error code 0xa00f4243

Windows 10 has a UWP app for its Camera that you can use to take pictures and videos. However, if you suddenly encounter an error code 0xa00f4243 while using the Camera UWP app, then you’ve come to the right place as this post will provide some potential fixes that you can use to fix the problem.

This kind of error could be due to an outdated or corrupted driver or a third-party program. When this error appears on the Camera UWP app, you will see the following error message:

“Close other apps. It looks as though another app is already using the camera. If you need it, here’s the error code: 0xA00F4243 (0xC00D3704)”

To fix the error code: 0xA00F4243 (0xC00D3704) in the Camera UWP app, you can try to run the Windows Store Apps troubleshooter or reset the Camera app or update or reinstall the driver or apply some tweaks in the Registry Editor. In addition, you can also try checking the Windows Services or run the System File Checker.

Option 1 – Try to run the Windows Store Apps troubleshooter

The Windows 10 Store Apps Troubleshooter will help you in fixing the Camera UWP app error code: 0xA00F4243 (0xC00D3704). This is a great built-in tool from Microsoft that helps users fix any app installation issues. So this is worth a try to solve the problem. This built-in tool also helps you fix the Windows 10 Store if it isn’t working.

To use the Windows Store Apps Troubleshooter, follow the steps below.

  • Tap Win + I keys again to open the Windows Settings panel.
  • Go to Update & Security and then go to Troubleshoot.
  • Under the Troubleshoot section, on your left-hand side, scroll down to find Window Store Apps.
  • Then click on the Run the troubleshooter option and follow the on-screen instructions and then see if it fixes the problem.

Option 2 – Try to reset the Camera app to fix

As pointed out earlier, you can also reset the Camera app to fix the error. To do so, follow the steps below.

  • The first thing you have to do is go to the My Pictures folder under the C: drive of the File Explorer and then delete the Camera Roll folder.
  • Once you’re done, right-click on an empty area on your screen and create a new folder and name it “Camera Roll”.
  • Then from the Start menu open the Settings app and select System.
  • From there, navigate to the Apps and features section.
  • Now go to Camera and click on the Advanced Options and click the Reset button.

Option 3 – Try to reinstall the drivers for the Camera app

You might want to reinstall the Camera drivers as it could resolve the problem. To do so, refer to these steps:

  • First, boot your computer into Safe Mode.
  • After that, tap the Win + R keys to launch Run.
  • Type in devmgmt.msc  into the box and tap Enter or click OK to open the Device Manager.
  • After that, a list of device drivers will be displayed. From there, look for the driver listed under the Camera section and then, right-click on each entry of the device drivers and select the “Uninstall Device” option from the menu.
  • Now restart your computer.
  • After restarting your computer, go to the Settings app and Check for Updates in the Windows Update section.

Option 4 – Try to use the Registry Editor

  • Tap the Win + R keys to open the Run utility and type “Regedit” in the field and hit Enter to open the Registry Editor.
  • After that, navigate to this registry key: ComputerHKEY_LOCAL_MACHINESOFTWAREWOW6432NodeMicrosoftWindows Media FoundationPlatform
  • Here, look for a DWORD named “EnableFrameServerMode” and if you can’t see it, just create a new DWORD by right-clicking on any empty space.
  • Then select New > DWORD (32-bit) Value and name it as “EnableFrameServerMode”.
  • Double click on the newly created DWORD and set its Value data to “0” and click on OK.
  • Restart your computer and see if it fixes the Camera UWP app error code: 0xA00F4243 (0xC00D3704).

Option 5 – Try checking the Windows Services

Note that this option only applies to computers with Intel Hardware for the Camera.

  • Tap the Win + R keys to open the Run dialog box and type “services.msc” and hit Enter to open the Services Manager.
  • Next, look for the “Intel(R) RealSense(TM) Depth” service from the list of services and double click on it to open its Properties.
  • After that, change its Startup Type to “Automatic” and make sure it’s running and then click on the Apply and OK buttons to save the changes made.
  • Restart your computer and check if the problem has been resolved.

Option 6 – Try running System File Checker or SFC scan

System File Checker or SFC is a built-in command utility that helps in restoring corrupted files as well as missing files. It replaces bad and corrupted system files to good system files. To run the SFC command, follow the steps given below.

  • Tap Win + R to launch Run.
  • Type in cmd in the field and tap Enter.
  • After opening Command Prompt, type in sfc /scannow

The command will start a system scan which will take a few whiles before it finishes. Once it’s done, you could get the following results:

  1. Windows Resource Protection did not find any integrity violations.
  2. Windows Resource Protection found corrupt files and successfully repaired them.
  3. Windows Resource Protection found corrupt files but was unable to fix some of them.
  • Reboot your PC.
If you like to learn and find out more about various Windows errors, and how to repair them go to our vast archive or use search to find articles that will explain and help you in solving your issue.
However, if you prefer to do things fast and with automatization then we are proposing to use an automated solution for your issues. The application that we are recommending is Advanced System Repair Pro
Advanced System Repair utilizes multiple tools all in one to give you a quick, simple, reliable, and very thorough diagnosis of your PC. It brings you all the tools you need in one program to clean, fix, protect, optimize and boost your PC!
1-Click Maintenance
All the tools to make it simple and easy! It's like having a professional technician at the click of a mouse.

Junk Cleaner
Keeping your computer free from unnecessary clutter also helps make your computer last longer. Like any other machine, if you keep it clean and take care of it, it will serve you better for longer!

Optimize background apps
Optimize applications background activity with the built-in Application Optimizer feature.

Disk Defrag
With a simple 1-click, Advanced System Repair speeds up your PC by assembling fragmented files on your machine and organizing them more efficiently.

Malware Removal
Finds and removes all types of harmful malware including trojans, worms, bots, adware, spyware, PUPs, and more!

Privacy Cleaner
The all-in-one privacy suite to Clean Your Tracks & Protect Your Privacy! Make your computer safe, secure, and more efficient!

System Tweak/Optimizer
ASR will analyze your complete system and settings to adjust your PC to function at its maximum performance.

Registry Cleaner
Over time, as you install and uninstall applications, the registry can become cluttered with old entries and broken settings which can result in program crashes, and annoying messages and slow the computer down.
Visit our Advanced System Repair Pro Download page to inform yourself about all the benefits of this software and get a free trial copy of it.
advanced system repair pro

Advanced System Repair Pro

One-click automated PC repair solution
ASR logo
With Advanced System Repair Pro you can easily
Replace damaged files
Restore performance
Free disk space
Remove Malware
Protects WEB browser
Remove Viruses
Stop PC freezing
DOWNLOAD
Privacy Policy | Terms of Use | Uinstall
Advanced System Repair Pro is compatible with all versions of Microsoft Windows including Windows 11

Share this article:

You might also like

File is Too Large for the Destination Error
The file is too large for the destination file system is the error when you try to copy a file larger than 4GB on a drive formatted in the FAT32 file system. FAT32 is the old file system used in previous Windows versions and it was replaced by superior NTFS, altho FAT32 is still used because of its compatibility fact that it could be accessed in various operating systems its disadvantage among others is that it can not hold files larger than 4GB in size. This refers to the size of a single file, so if you have a file that is this large and when you try to copy or move it on a drive formatted in FAT32 you will get this message, and the operation will not be able to complete.

Format drive

In order to actually transfer the file in its glorious size, I am afraid that you will need to format destination drive in NTFS or if you have data on drive which you do not want to lose with formatting, use third-party software to convert file system from FAT32 to NTFS without losing data. I would recommend AOMEI partition assistant, it is a free and proven application letting you both manage your partitions and convert any one of them into another file system without data loss. You can get AOMEI here.

Split file

Another option if you are not keen on installing third-party tools or formating is to divide large files into smaller ones that are less than 4GB in size. You can use any archiving application since built-in Windows ZIP support will not let you split file into various different sizes. The best tool in my humble opinion is WinRAR, but you can choose any proven one. When file is split into parts less than 4GB in size, you will have no issues copying or move the file to the destination drive.
Read More
Jzip PUP Easy Removal Tutorial

jZip is a software utility published by Bandoo Media and is classified as a Potentially Unwanted Program. The software is an archive tool that used to compress and extract files in the rar, zip, and other formats. The program is typically bundled upon installation with other unwanted applications and is itself often installed in co-bundles. As of publication time, over 40 AntiViruses have flagged jZip as malicious or potentially unwanted.

It injects itself in Windows shell, providing quick access to the program by right-clicking on any file. jZip displays it's advertising in your browser, instead of the default search results, to better do this, it collects information about your browsing history and your current browsing session, so it can better target ads. This software, upon install, defines an auto-start registry key in your system, this allows the software to launch every time your computer is rebooted, no matter what Windows account you log in to, it also adds Windows Tasks, to allow it to launch by itself at random times, even when closed.

About Potentially Unwanted Applications

If you have ever downloaded software programs from the internet (shareware, freeware, etc,), odds are high you’ve unintentionally installed unwanted programs on your personal computer. Potentially Unwanted Programs (PUP), also referred to as Potentially Unwanted Applications (PUA), are applications that you never wanted in the first place and quite often come bundled with freeware software. Once installed, most of these applications can be hard to remove and become more of a nuisance rather than a necessity. The idea of PUP was actually coined to define this crapware as something other than malware. The primary reason for this is that most PUPs get into users’ computers not because they exploit security vulnerabilities, for instance, but because the users grant consent to install it – unwittingly in many instances. Nevertheless, there isn’t any doubt that PUPs are still bad news for PC users as they could be incredibly damaging to the computer in lots of ways.

What do PUPs do on your computer, precisely?

The unwanted programs after installation display a lot of annoying pop-up advertisements create fake alerts, and quite often it even pushes the end-user to buy the software. PUPs which come as browser add-ons and toolbars are widely identifiable. Not just they needlessly take up space on your computer screen, toolbars could also manipulate search results, monitor your browsing activities, decrease your internet browser’s overall performance, and slow your net connection to a crawl. They might seem innocent but PUPs tend to be spyware. The worst part of setting up a PUP is the spyware, adware, and keystroke loggers that might lurk inside. Even if the PUPs aren’t inherently malicious, these programs still do absolutely nothing good on your PC – they will take valuable system resources, slow down your computer or laptop, weaken your device’s security, and make your PC more susceptible to trojans.

Some tips on protecting yourself from unwanted software

• Read the EULA meticulously. Look for clauses that say that you have to accept advertisements and pop-ups or bundled programs from the company. • Typically, when setting up a program you will get two options, ‘Standard Installation (recommended)’ and ‘Custom Installation’. Don’t pick ‘Standard’ as unwanted programs will automatically be installed that way! • Have a solid anti-virus program such as Safebytes Anti-Malware that will protect your personal machine from PUPs. Once you install this software, the defense against viruses and PUPs is already switched on. • Avoid installing freeware software you will not utilize. Turn off or get rid of toolbars and internet browser extensions you don’t really need. • Only download programs from the original providers’ websites. Avoid download portals since they use their own download manager to bundle extra programs along with the initial download.

Can't Install Safebytes Anti-malware because of a Virus? Do This!

Malware may cause several kinds of damage to computers, networks, and data. Some malware types alter browser settings by including a proxy server or change the computer’s DNS configuration settings. In such cases, you will be unable to visit some or all of the websites, and therefore unable to download or install the required security software to clear out the infection. So what to do if malicious software keeps you from downloading or installing Safebytes Anti-Malware? Follow the instructions below to eliminate malware in alternate ways.

Make use of Safe Mode to fix the issue

In Safe Mode, you are able to modify Windows settings, un-install or install some software, and eliminate hard-to-delete viruses. In case the virus is set to load immediately when the computer starts, switching to this particular mode may well prevent it from doing so. In order to get into Safe Mode or Safe Mode with Networking, press the F8 key while the system is booting up or run MSConfig and find the “Safe Boot” options in the “Boot” tab. After you restart the PC into Safe Mode with Networking, you may download, install, and update the anti-malware program from there. After installation, run the malware scanner to remove most standard infections.

Download the security program using an alternate internet browser

Web-based viruses can be environment-specific, aiming for a particular web browser or attacking particular versions of the browser. The most effective solution to avoid this issue is to opt for an internet browser that is known for its security measures. Firefox contains built-in Phishing and Malware Protection to help keep you safe online.

Create a portable USB antivirus for eliminating viruses

Another solution is to save and run an anti-malware software tool completely from a USB drive. Adopt these measures to employ a USB drive to clean your corrupted system. 1) Download Safebytes Anti-Malware or MS Windows Defender Offline onto a clean computer. 2) Plug the Flash drive into the uninfected computer. 3) Double-click the exe file to open the installation wizard. 4) When asked, choose the location of the USB drive as the place in which you want to store the software files. Follow the activation instructions. 5) Now, plug the thumb drive into the corrupted PC. 6) Run the Safebytes Anti-malware directly from the pen drive by double-clicking the icon. 7) Run Full System Scan to detect and clean-up up all kinds of malware.

SafeBytes Anti-Malware Features

These days, anti-malware software can protect your laptop or computer from different kinds of internet threats. But how to select the right one among several malware protection application that is available in the market? Perhaps you might be aware, there are many anti-malware companies and tools for you to consider. Some of them are good, some are decent, while some will ruin your computer themselves! You must pick one that is dependable, practical, and has a good reputation for its malware source protection. On the list of recommended software programs is SafeBytes Anti-Malware. SafeBytes carries a superb track record of top-quality service, and customers seem to be happy with it. Safebytes is one of the well-established PC solutions companies, which offer this comprehensive anti-malware program. Once you’ve got installed this software program, SafeByte's state-of-the-art protection system will ensure that absolutely no viruses or malicious software can seep through your computer. SafeBytes anti-malware comes with a myriad of enhanced features which sets it aside from all others. Here are a few typical features found in this application: Active Protection: SafeBytes provides real-time active monitoring service and protection against all known computer viruses and malware. This software will constantly monitor your PC for any suspicious activity and updates itself continuously to keep current with the newest threats. Most effective AntiMalware Protection: By using a critically acclaimed malware engine, SafeBytes offers multilayered protection that is designed to catch and remove viruses and malware which are concealed deep in your computer system. Safe Browsing: SafeBytes gives an instant safety rating about the web pages you are about to check out, automatically blocking harmful sites and make sure that you’re certain of your safety while browsing the world wide web. Fast Multithreaded Scanning: Safebytes Anti-Malware, using its enhanced scanning engine, gives super-fast scanning which can promptly target any active internet threat. Minimal CPU Usage: SafeBytes is a lightweight tool. It consumes a really small amount of processing power as it works in the background which means you won’t observe any computer performance issues. 24/7 Customer Support: You will get 24/7 technical support to quickly resolve any issue with your security application.

Technical Details and Manual Removal (Advanced Users)

If you wish to manually remove Jzip without the use of an automated tool, it may be possible to do so by removing the program from the Windows Add/Remove Programs menu, or in cases of browser extensions, going to the browsers AddOn/Extension manager and removing it. You will likely also want to reset your browser. To ensure the complete removal, manually check your hard drive and registry for all of the following and remove or reset the values accordingly. Please note that this is for advanced users only and may be difficult, with incorrect file removal causing additional PC errors. In addition, some malware is capable of replicating or preventing deletion. Doing this in Safe Mode is advised.

The following files, folders, and registry entries are created or modified by Jzip

Files: File APPDATAjziptoolbaruninstallIE.dat. File APPDATAMozillaExtensions1FD91A9C-410C-4090-BBCC-55D3450EF433. File COMMONDESKTOPEmoticons for your messenger!.url. File LOCALSETTINGSTempinstallhelper.dll. File LOCALSETTINGSTempnsb2.tmp.exe. File LOCALSETTINGSTempSetupDataMngr_jZip.exe. File PROGRAMFILESMozilla Firefoxextensions1FD91A9C-410C-4090-BBCC-55D3450EF433. File PROGRAMFILESMozilla FirefoxsearchpluginsjZipWebSearch.xml. Directory APPDATAjzipband. Directory APPDATAjziptoolbar. Directory APPDATAMozillaFirefoxProfilesENV(jZip_ff_profile)extensions1e48c56f-08cd-43aa-a6ef-c1ec891551ab. Directory APPDATAMozillaFirefoxProfilesENV(jZip_ff_profile)jziptoolbar. Directory PROGRAMFILESWindows jZip ToolbarDatamngr. Directory PROGRAMFILESWindows jZip ToolbarToolBar. Registry: Key in HKEY_CLASSES_ROOT named JzipIEHelper.DNSGuard.*, plus associated values. Key in HKEY_CLASSES_ROOT named JzipIEHelper.DNSGuard, plus associated values. Key 1e48c56f-08cd-43aa-a6ef-c1ec891551ab at HKEY_CLASSES_ROOTCLSID. Key 1e48c56f-08cd-43aa-a6ef-c1ec891551ab at HKEY_LOCAL_MACHINESOFTWAREMicrosoftWindowsCurrentVersionExplorerBrowser Helper Objects. Key 41C4AA37-1DDD-4345-B8DC-734E4B38414D at HKEY_CLASSES_ROOTCLSID. Key 41C4AA37-1DDD-4345-B8DC-734E4B38414D at HKEY_LOCAL_MACHINESOFTWAREMicrosoftWindowsCurrentVersionExplorerBrowser Helper Objects. Key 99D9640D-7DD9-4AB1-946C-AD779E1EABE0 at HKEY_CLASSES_ROOTTypeLib. Key jZipMediabarTb at HKEY_LOCAL_MACHINESOFTWARE. Key jziptoolbar at HKEY_CURRENT_USERSoftware. Value 1e48c56f-08cd-43aa-a6ef-c1ec891551ab at HKEY_LOCAL_MACHINESOFTWAREMicrosoftInternet ExplorerToolbar. Value <$PROGRAMFILES>Windows jZip ToolbarToolBardtUser.exe at HKEY_LOCAL_MACHINESYSTEMControlSet001ServicesSharedAccessParametersFirewallPolicyStandardProfileAuthorizedApplicationsList. Value <$PROGRAMFILES>Windows jZip ToolbarToolBardtUser.exe at HKEY_LOCAL_MACHINESYSTEMControlSet002ServicesSharedAccessParametersFirewallPolicyStandardProfileAuthorizedApplicationsList. Value <$PROGRAMFILES>Windows jZip ToolbarToolBardtUser.exe at HKEY_LOCAL_MACHINESYSTEMControlSet003ServicesSharedAccessParametersFirewallPolicyStandardProfileAuthorizedApplicationsList. Value <$PROGRAMFILES>Windows jZip ToolbarToolBardtUser.exe at HKEY_LOCAL_MACHINESYSTEMCurrentControlSetServicesSharedAccessParametersFirewallPolicyStandardProfileAuthorizedApplicationsList. Remove <$PROGRAMFILES>WINDOW~4Datamngrdatamngr.dll <$PROGRAMFILES>WINDOW~4DatamngrIEBHO.dll from registry value AppInit_DLLs at HKEY_LOCAL_MACHINESOFTWAREMicrosoftWindows NTCurrentVersionWindows.
Read More
A Quick Guide to Repair User32.dll Error Code

Fix User32.dll Error Code

User32.dll Error Code - What is it?

User32.dll is a Dynamic Link Library file. Windows stores instructions for graphical elements such as dialog boxes and Windows in this file. This file is a crucial file, necessary to run Windows operations. If this file is damaged, deleted, or removed from the system you may not be able to run the programs on your system that use and share the User32.dll file thereby causing you inconvenience. The User32.dll file error is displayed in the following format:

“This application has failed to start because USER32.dll was not found. Reinstalling the application may fix this problem.”

Or

“[Program] illegal system DLL relocation”

Program here refers to the name of a program that caused the User32.dll error message.

Solution

Restoro box imageError Causes

User32.dll errors are triggered by the following reasons:
  • Missing and damaged .dll files
  • Viral infection
  • Registry corruption
User32.dll error is also referred to as C0000135 blue screen of death error. When the User32.dll error occurs it not only locks you out of your desired program but also turns your computer screen blue. If the error is not repaired timely it may expose your PC to serious threats such as abrupt system shutdowns, system failure, and crash.

Further Information and Manual Repair

To resolve the User32.dll error on your PC, try the following solutions:

1. Reinstall Programs Causing User32.dll errors

Sometimes User32.dll error may occur due to missing DLL files.  This happens when you delete a program from your PC and accidentally the DLL file also gets deleted which is shared by other programs on your system. Therefore to resolve this first find out what programs on your system use User32.dll to load and run on your system. To do this use the Tasklist command-line tool. It displays the names of all the programs that currently use the User32.dll file. After this, reinstall the programs that use User32.dll files on your system. This will hopefully resolve the error.

2. Install and Run Restoro

If it doesn’t, then this probably means that the damage is deep-rooted. It is related to the damaged DLL files, registry corruption, or viral infection. To resolve all of these causes in one go, it is best to download Restoro instead of downloading 3 different software to resolve each cause for the error separately. This is basically an advanced, innovative, and multi-functional PC repair tool embedded with multiple powerful utilities including a registry cleaner, and a system optimizer. It is a one-stop solution for all your PC-related problems including the User32.dll error. The registry cleaner wipes the clutter and obsolete files damaging the hard disk and simultaneously repairs the DLL files and the registry. The antivirus feature removes all the viruses on your system while the system stability utility boosts the PC speed significantly. It is safe, user-friendly, and compatible with all Windows versions including Windows Vista, XP, Windows 7, 8, 8.1, and 10. Click here to download Total System Care to resolve the User32.dll error right away.
Read More
How to Fix CPU Not Compatible Error Message On Windows 10

CPU Not Compatible – What Is It

Some users wanting to upgrade to Windows 10 from Windows 7 or Windows 8.1 experienced errors with installation. One of these errors is CPU Not Compatible. When you click and run the “Get Windows 10” from your system tray bar, you’ll receive the “CPU is not compatible with Windows 10” error. When this happens, it might be good to check if there’s a bug or if your NX feature (a requirement for the Windows 10 installation) is enabled.

Solution

Restoro box imageError Causes

The “CPU is not compatible with Windows 10” error normally occurs when:

  • NX feature is not enabled
  • You experienced the Windows 10 bug

Further Information and Manual Repair

To successfully upgrade to Windows 10, your CPU must support Physical Address Extension (PAE), SSE2, and NX features. If any of these features are not activated on your system, it’ll cause the CPU not compatible error. However, some users still reported experiencing this error even though their CPU has these features activated. Normally, this is due to the bug that Windows acknowledged.

If any of these two scenarios apply to your computer, the following methods will help you fix the problem:

Method 1 – Check for bugs

The bug applies to some Windows 7 and Windows 8.1 systems. The bug occurs when the “Get Windows 10” app fails to recognize CPUs as being compatible. This produces a false negative result with a message, “Here’s why Windows 10 cannot be installed on this PC: The CPU isn’t supported”. To fix this bug, Microsoft released an update.

Unfortunately, the patch update (KB2976978 for Windows 8/8.1 and KB2952664 for Windows 7 SP1) to fix the bug may not be automatically downloaded to your computer. If this is the case, you need to verify first if the patch was installed correctly. To do this, follow the steps below:

  1. Click ‘Start’ and type in View Installed Updates. The “View installed updates” icon should appear. Click the icon.
  1. Go to the Search bar (Top right portion) then type the patch name for your system. Make sure that you type the correct patch name for your system since Windows 7 and Windows 8/8.1 have different names. If you find the patch, it means it’s already installed. You can now upgrade to Windows 10 without the CPU not-compatible error.
  1. But, if you can’t find it you need to install the patch manually.
  1. Go to Windows Update then click the “Check for Updates” button.
  1. Browse through the available updates and look for KB2976978 for Windows 8/8.1 or KB2952664 for Windows 7 SP1
  1. Download the right patch. You may need to reboot your system once it’s done.
  1. The downloaded patch should be applied after a day or two with the Windows Task Scheduler. Once the patch is applied, you can now upgrade to Windows 10.

Method 2 – Check CPU features and activate them if needed

A major requirement for Windows 10 upgrade is for the CPU to have Physical Address Extension (PAE), SSE2, and NX features enabled on your system. If you receive the CPU not compatible error, one possible cause is that any of the mentioned features are not available OR not enabled on your system. Here’s how you can fix this:

  1. Verify if your CPU supports the three instruction sets. You can use software that provides information like this. If all three are available, proceed to the next step.
  1. Go to your computer’s BIOS. To do this, reboot your computer. You will need to press a key specific to your computer’s manufacturer (usually it’s F12, F8, F2, or DEL).
  1. Look for the NX (No Execute Bit) settings. This is normally found in the “Advanced Configuration” menu, or something similar to this. Just take note that the NX setting can be named differently in BIOS. Some other names include EDB (Execute Disabled Bit), EVP (Enhanced Virus Protection), Execute Disabled Memory Protection or No Excuse Memory Protect.
  1. Once you’re in the NX settings, make sure that it’s enabled.
  1. Exit the BIOS and SAVE your changes.
  1. Boot your computer normally, then try upgrading to Windows 10 again through the “Get Windows 10” app found in the system tray.

Method 3 – Force enabling NX Bit

If changing the settings in your BIOS doesn’t do the trick, your final option is to force enable the NX bit in your Windows system. However, this is only applicable IF and ONLY IF your CPU does support it. To force enable NX bit, do the following:

  1. Click Start and go to command prompt (Type “cmd” – no quotes) and press enter.
  1. Copy and paste the text below to the command prompt.bcdedit.exe /set {current} nx AlwaysOn
  1. Execute the command. You will need to reboot your computer once this is done.
  1. Download and install Windows 10

Method 4 – Use a trusted automated tool

If you still experience the error after doing the methods above, you might want to try a powerful and trusted automated tool to fix the job.
Read More
How to Fix Error 0x8024a206 in Windows
When you upgrade or update your Windows 10 computer but you suddenly got Error 0x8024a206 while trying to install the updates, it is due to a rouge update that was downloaded or because of some corrupted component in Windows. In case you don’t know, any file downloaded by Windows is verified for its integrity and if the files don’t pass the integrity test, then Error 0x8024a206 will most likely pop up during the Windows update or upgrade.

Option 1 – Reset the Windows Update components to the default

You have to stop a couple of services such as BITS, Cryptographic, MSI Installer, and Windows Update Services. And to do that, you need to flush the contents in the SoftwareDistribution folder. The Software Distribution folder in the Windows operating system is a folder that can be found in the Windows directory and is used to store files temporarily which might be required to install the Windows Update on your PC. Thus, it is required by the Windows Update and maintained by WUAgent. Aside from that, it also contains all the Windows Update History files and once you delete them, you will most likely lose the Update history. As a result, the next time you run the Windows Update, it may result in a longer detection time.
  • Open the WinX Menu.
  • From there, open Command Prompt as admin.
  • Then type in the following command – don’t forget to hit Enter right after typing each one of them.
net stop wuauserv net start cryptSvc net start bits net start msiserver
  • After entering these commands, it will stop the Windows Update Service, Background Intelligent Transfer Service (BITS), Cryptographic, and the MSI Installer
  • Next, go to the C:/Windows/SoftwareDistribution folder and get rid of all the folders and files thereby tapping the Ctrl + A keys to select them all and then click on Delete. Note that if the files are in use, you won’t be able to delete them.
After resetting the SoftwareDistribution folder, you need to reset the Catroot2 folder to restart the services you just stopped. To do that, follow these steps:
  • Type each one of the following commands.
net start wuauserv net start cryptSvc net start bits net start msiserver
  • After that, exit Command Prompt and restart your computer, and then try to run Windows Update once more.

Option 2 – Re-register DLLs related to Windows Update

DLL files, also known as Dynamic Link Library, are parts of applications that are separated from the core program so that they can be used again as well as independently be updated. The DLL files are loaded into memory and then used. Note that they have to be registered with Windows so they can be loaded. So if they’re not, the main program will fail. And this is the same with the DLL files related to the Windows Update. Thus, you need to register them in order to resolve Error 0x8024a206.
  • In the Cortana search box, type “command prompt”.
  • From the search results that appear, right-click on Command Prompt and select the “Run as administrator” option.
  • After that execute the commands listed below one after the other and don’t forget to hit Enter right after you key in each one of them.
    • regsvr32 JSCRIPT.DLL
    • regsvr32 MSXML3.DLL
    • regsvr32 WUPS2.DLL
    • regsvr32 WUPS.DLL
    • regsvr32 WUAUENG.DLL
    • regsvr32 WUAPI.DLL
    • regsvr32 WUCLTUX.DLL
    • regsvr32 WUWEBV.DLL
Note: You also have the option to run the commands together via a batch file. Simply create a batch file by copying all the commands in a notepad and then save it as “WURegisterDLL.bat”. After that, run the batch file and it will execute the commands all at the same time. Then you have to restart your computer and see if it has fixed the Error 0x8024a206.

Option 3 – Run the System File Checker

The SFC or System File Checker scan could detect and automatically repair damaged system files that could be causing the Error 0x8024a206. SFC is a built-in command utility that helps in restoring corrupted files as well as missing files. It replaces bad and corrupted system files to good system files. To run the SFC command, follow the steps given below.
  • Tap Win + R to launch Run.
  • Type in cmd in the field and tap Enter.
  • After opening Command Prompt, type in sfc /scannow and hit Enter.
The command will start a system scan which will take a few whiles before it finishes. Once it’s done, you could get the following results:
  1. Windows Resource Protection did not find any integrity violations.
  2. Windows Resource Protection found corrupt files and successfully repaired them.
  3. Windows Resource Protection found corrupt files but was unable to fix some of them.

Option 4 – Run the Windows Update Troubleshooter

Running the built-in Windows Update troubleshooter could also help you resolve the Windows Update Error 0x8024a206. To run it, go to Settings and then select Troubleshoot from the options. From there, click on Windows Update and then click the “Run the troubleshooter” button. After that, follow the next on-screen instructions and you should be good to go.
Read More
How to Fix the Error 0X80070005

Correct Error 0X80070005

0X80070005 - What is it?

0x8007005 is a Windows Error Code. You may come across this error if you don’t have the appropriate permission to install a particular Windows update. It is prompted as ‘Access Denied’ error message. Solution

Restoro box imageError Causes

The error code 0x80070005 usually triggered because of 2 reasons:
  1. Some updates require administrative permissions to be installed
  2. Due to malware and viruses

Further Information and Manual Repair

If you face this error while installing Windows updates on your PC, it is advisable to fix it immediately. By taking timely actions, you can update your PC easily and in case if the cause of the error code 0x80070005 is malware or some virus, you can stop it from causing more and serious damage to your system.  Sometimes malware and viruses can lead to data loss. To avoid such damages here’s what you need to do:

Cause: Updates require administrative permission

Quick Fix: If the 0x8007005 error occurs on your system due to administrative permission issues, then the best way to fix this error right away is to log on as an administrator. If there are many user accounts on your PC, then to resolve this error, make sure you log on using the user account that has administrator permissions on the computer. Once you log on as an administrator, now try to install the updates again.

Cause: Malware and Viruses

Quick Fix: If the error 0x80070005 occurs because of malware infection, the best way to resolve this error would then be to open your antivirus software and run a scan to detect the malware. However, if you don’t have antivirus software installed on your system, then it is advisable to download the software immediately. Download antivirus software. To be on the safe side download Microsoft Safety Scanner. Click on the run when prompted. Once the scanner is installed on your PC create a shortcut to Safety Scanner on your computer desktop so that it is easily accessible. Now double click on the icon and click on the full scan tab to start scanning for malware and viruses on your system. After the scan is complete, you will see a list of viruses on your PC. Now remove them all by hitting the delete tab and then repair. Now try installing the updates again. By following these quick-fix techniques, you can easily resolve the error 0x80070005 on your system by yourself, without calling an IT professional.
Read More
Nostalgia hit: Commodore 64 emulator and games
If you are a kid or in your teenage years you maybe will be not familiar with Commodore 64 but we are welcoming you anyway to go with us on this journey through time and find out about one of the most influential and beloved home computer of all time.

commodore 64
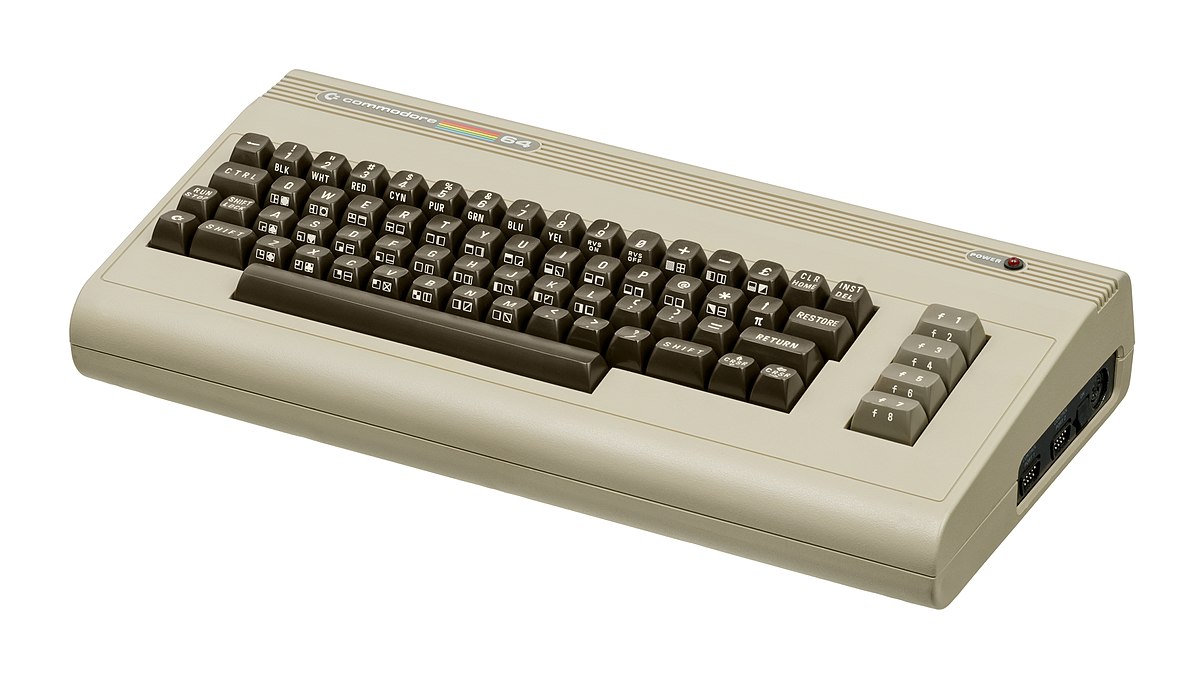
History of Commodore

Firstly shown to the world in January of 1982, at the Consumer Electronics Show, C64 caught attention right away with its low price of only $595. Although it had some issues like limited functionality in some fields and a non-wide range of use by 1984 its price dropped below $200 and it cemented itself as an affordable home computer for the middle class. In as same year Apple has released their Apple II computer with far superior capabilities, commodore 64 remains a middle-class favorite due to its price. Also, the company has decided to distribute its homemade computer via some other means including not only just electronics stores specialized in that kind of equipment but in general shops and big department stores, through toy stores and book shops as well as through specialized dealers. This has given C64 a more competitive edge and mixed with the affordable price it soon became a staple of home computing. c64 storeWith sales booming and the early reliability issues with the hardware addressed, software for the C64 began to grow in size and ambition during 1984. This growth shifted to the primary focus of most US game developers. The two holdouts were Sierra, who largely skipped over the C64 in favor of Apple and PC compatible machines, and Broderbund, who was heavily invested in educational software and developed primarily around the Apple II. In the North American market, the disk format had become nearly universal while cassette and cartridge-based software all but disappeared. So most US-developed games by this point grew large enough to require multi-loading. At a mid-1984 conference of game developers and experts at Origins Game Fair, Dan Bunten, Sid Meier, and a representative of Avalon Hill said that they were developing games for the C64 first as the most promising market. By 1985, games were an estimated 60 to 70% of Commodore 64 software. Over 35% of SSI's 1986 sales were for the C64, ten points higher than for the Apple II. 
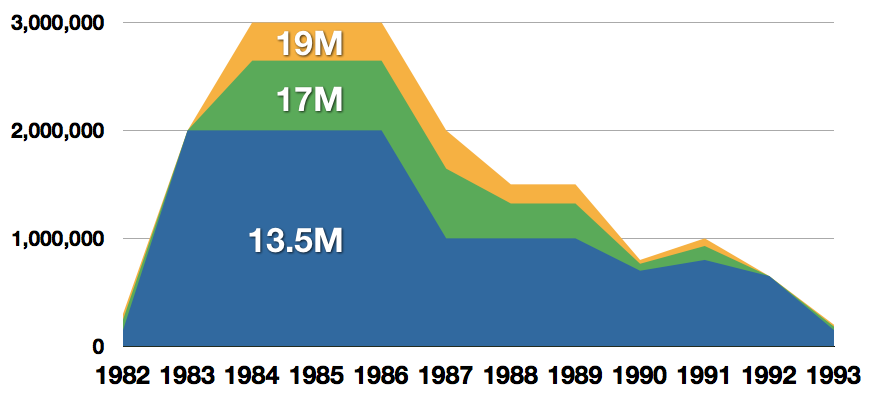
Everything was great for Commodore but the industry was moving forward and by the year 1988, PC compatible computers were stated to be the largest and fastest-growing home entertainment systems pushing C64 on to second place. Also, Nintendo’s gaming system has started to take hold in the world with amazing 7 million systems sold in 1988 only. By the year 1991, many developers exited the gaming market for Commodore 64 home computer system and its popularity started to fall due to lack of software and not so many hardware changes. commodore salesCommodore announced that the C64 would be finally discontinued in 1995. However, only one month later in April 1994, the company filed for bankruptcy. When Commodore went bankrupt, all production on their inventory, including the C64, was discontinued, thus ending the C64's 11 and a half year production.

Legendary titles

The history of Commodore 64 is interesting ones and I believe that it has done much for computers in general, yes it ran 11 years and that seems like a small-time, but remember that it was 11 years of C64 alone, there were other computers released by the company but none except arguably AMIGA 500 has not reached that much popularity as Commodore 64. That being said the system has left some of the great titles in its catalog that are great to be played even today and have been classic games on other platforms, even on PC itself. That being said I am giving you the top 100 games for Commodore 64:
  1. maggot
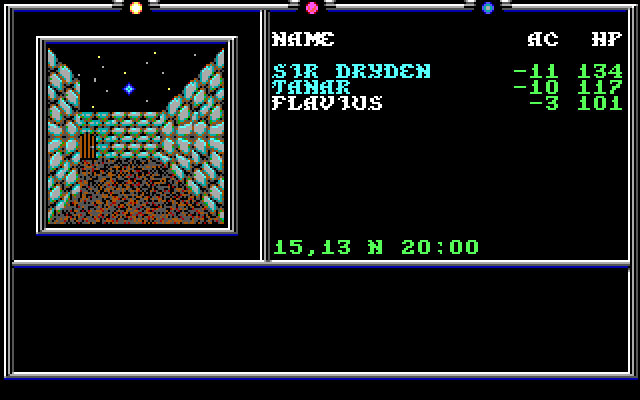
Zak McKracken and the Alien Mindbenders
  2. Pirates!
  3. Maniac Mansion
  4. IK+
  5. Bubble Booble
  6. Turrican II: The Final Fight
  7. Last Ninja 2
  8. Space Rogue
  9. Ultima IV: Quest of the Avatar
  10. Archon: The Light and the Dark
  11. Turrican
  12. Wasteland
  13. Defender of the Crown
  14. Elite
  15. Ultima V: Warriors of Destiny
  16. Laser Squad
  17. Prince of Persia
  18. Impossible Mission
  19. U.L.E.
  20. Pool of Radiance
  21. Bruce Lee
  22. Paradroid
  23. Project Stealth Fighter
  24. Curse of the Azure Bonds
  25. Ultima III: Exodus
  26. Legacy of the Ancients
  27. Winter Games
  28. Leaderboard Golf
  29. Supremacy
  30. Airborne Ranger
  31. Exile
  32. Last Ninja, The
  33. World Class Leader Board
  34. MicroProse Soccer
  35. Project Firestart
  36. Boulder Dash
  37. Summer Games 2
  38. Great Giana Sisters, The
  39. Neuromancer
  40. Mad Doctor
  41. Mail Order Monsters
  42. Zork I: The Great Underground Empire
  43. Buck Rogers: Countdown to Doomsday
  44. Katakis
  45. Bard's Tale, The: Tales of the Unknown
  46. WIzball
  47. Times of Lore
  48. Emlyn Hughes International Soccer
  49. Ultimate Wizard
  50. Alternate Reality: The Dungeonalternate reality dungeon
  51. World Games
  52. Leaderboard Executive
  53. California Games
  54. Samurai Warrior: The Battles of Usagi Yojimbo
  55. Summer Games
  56. Creatures 2: Torture Trouble
  57. Gunship
  58. Space Taxi
  59. International Karate
  60. Silent Service
  61. Bard's Tale III, The: Thief of Fate
  62. Seven Cities of Gold
  63. Armalyte
  64. Raid on Bungeling Bay
  65. Alter Ego: Male Version
  66. Enforcer: Fullmetal Megablaster
  67. Detective Game, The
  68. Creatures
  69. Skate or Die!
  70. Heart of Africa
  71. E.R.O. - Helicopter Emergency Rescue Operation
  72. Way of the Exploding Fist, The
  73. Stunt Car Racer
  74. Wizard of Wor
  75. Bard's Tale II, The: The Destiny Knight
  76. Mayhem in Monsterland
  77. Train, The: Escape to Normandy
  78. Jumpman
  79. Champions of Krynnchampions of krynn
  80. Pitstop II
  81. Barry McGuigan World Championship Boxing
  82. Montezuma's Revenge
  83. Boulder Dash II: Rockford's Revenge
  84. Spy vs Spy
  85. Mercenary: Escape from Targ
  86. Midnight Resistance
  87. Lords of Midnight
  88. Lode Runner
  89. Castles of Doctor Creep, The
  90. Boulder Dash Construction Kit
  91. Buggy Boy
  92. Racing Destruction Set
  93. Dino Eggs
  94. Realm of Impossibility
  95. Rainbow Islands
  96. Beach-Head II: The Dictator Strikes Back
  97. Barbarian: The Ultimate Warrior
  98. Grand Prix Circuit
  99. Head Over Heels
  100. Sentinel, The

Commodore 64 emulator and game ROMs

Commodore 64 might be in the past but its legacy still lives on even today through emulators and ROMs for emulators. You can even purchase one in working condition if you want and relive the full experience as it once was. vice c64 emulator
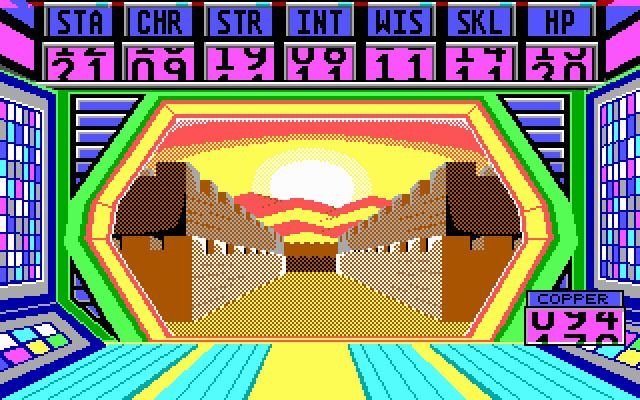
If you are not keen on spending money for reliving and checking games or software of C64 here are some links to help you to at least experience part of it completely free. 
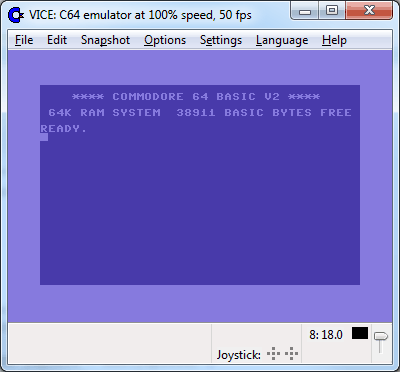
Commodore 64 Emulator C64 Game ROMs

Conclusion

It is without a doubt that the C64 home system has made a great mark on home computers echoing even today and I am very grateful that I have been part of it as a kid. Sometimes today I will still spin some old classic via emulator just for nostalgia and enjoy its simplicity. Thank you for reading the article and I hope to see you soon again.
Read More
Fix An internal error has occurred 0x80070716
If you see the following error message in the File History tab of the File Recovery utility of the Windows Backup module in your Windows 10 computer, read on as this post will guide you in fixing it with the help of two potential fixes.
“An internal error has occurred: The specified resource name cannot be found in the image file. (0x90070716).”
You can also encounter this error when you run the System Image Backup function. As mentioned, you can resolve this error using two potential fixes namely checking the status of the Windows Backup Service and checking the settings in the Windows Registry. For more details, refer to the instructions provided below but before you proceed, it would be better if you create a System Restore point first.

Option 1 – Try checking the status of the Windows Backup Service

  • First, you need to tap the Win + R keys on your keyboard to open the Run dialog box.
  • Next, type “services.msc” in the field and click OK or tap Enter to open the Windows Services Manager.
  • After that, you will see a list of services and from there, look for the Windows Backup Service and double click on it to open its Properties.
  • Then check if its Startup type is set to Disabled. If it is, then change it to “Manual”. Note that this service is essential as it provides backup and restores capabilities.
  • Now click on the Apply and OK buttons to save the changes made and then restart your computer. Check if the error is now gone.

Option 2 – Try checking the Registry setting of Windows Backup

  • Tap the Win + R keys to open the Run dialog box.
  • Then type “Regedit” in the field and tap Enter to open the Registry Editor.
  • After opening the Registry Editor, navigate to this registry key: HKEY_LOCAL_MACHINESOFTWAREMicrosoftWindowsCurrentVersionWindowsBackup
  • From there, look for DWORDs named “ValidConfig” and “ValidSystemImageBackup” located in the right-side panel.
  • Once you found them, delete them or set both of their values to “0” and make sure that the base is Hexadecimal and click OK.
  • Now exit the Registry Editor and restart your computer to apply the changes made.
Read More
Fix cannot load the Device Driver Code 38
Each you connect time external devices like scanners, printers, and the likes to a Windows 10 computer, the device either pushes the drivers through the USB or any other port, or you are expected to install the drivers through external media. In both cases, the driver will be loaded into the system, allowing you to use the device. However, it doesn’t always go smoothly as you could encounter some errors like the “Windows cannot load the Device Driver for this hardware because a previous instance of the Device Driver is still in memory ( Code 38 )”. If you encounter such an error in the Device Manager, then this means that a previous version of the device driver is still in memory and that each time the device is used, that previous version is loaded into memory and then unloaded which triggers the “Windows cannot load the Device Driver for this hardware because a previous instance of the Device Driver is still in memory (Code 38)” error. This kind of error occurs if the operating system loads the unwanted driver or if it fails to unload the driver. It could be that there is an obsolete version of the driver that’s still installed in the system or it could also be that you need to update your USB drivers as they could be outdated or the problem could also be due to some third party program that is interfering with the installation. Whatever the cause is, here are some suggestions you can check out to resolve the problem.

Option 1 – Uninstall previously installed drivers and reinstall their latest working version from the manufacturer’s website

The first thing you can do is to uninstall the drivers that are currently installed on your computer and then reinstall their latest working versions from their official sites. This kind of error is commonly encountered while loading drivers for scanners and printers. This is due to the fact that their drivers and software come along with a package which is usually in external media like CD or DVD. So when you install the software package, there’s a possibility that a newer version has been launched by its manufacturer. When that happens, you have to uninstall the previously installed driver package and then download the drivers from the manufacturer’s website and install them.

Option 2 – Run the Hardware and Devices Troubleshooter

  • The first thing you need to do is click on Start and then on the gear-like icon to pull up the window for Settings.
  • After opening Settings, look for the Update and Security option and select it.
  • From there, go to the Troubleshoot option located on the left-hand side of the list.
  • Next, select Hardware and Devices from the list and open the Troubleshooter and run it. Once it is doing its job, wait for it to complete the process and then restart the system.
  • After the system restarts, check if the problem’s now fixed. If not, refer to the next option given below.

Option 3 – Update or reinstall the Universal Serial Bus Controller driver

Since it could be a driver issue, you can try to update or reinstall the Universal Serial Bus Controller drivers using the Device Manager. Refer to the following steps:
  • First, click the Start button and type “device manager”.
  • Then click on the “Device Manager” from the search results to open it.
  • From there, look for the “Universal Serial Bus controllers” option and then right-click on each one of the USB drivers and select the Update Driver from the menu.
Note: If it is a regular USB drive, then it will be listed as a USB Mass Storage Device but if you have a USB 3.0 device, then look for a USB 3.0 Extensible Host Controller.
  • Restart your PC and then click the “Search automatically for updated driver software” option.
Note: If updating the USB Controller drivers didn’t work, you can try to reinstall them instead.

Option 4 – Restart your computer in a Clean Boot State

If the first three given options didn’t work and you still see the error when you connect external devices, you can try putting your computer in a Clean Boot State and then try connecting them again.
  • Log onto your PC as an administrator.
  • Type in MSConfig in the Start Search to open the System Configuration utility.
  • From there, go to the General tab and click “Selective startup”.
  • Clear the “Load Startup items” check box and make sure that the “Load System Services” and “Use Original boot configuration” options are checked.
  • Next, click the Services tab and select the “Hide All Microsoft Services” check box.
  • Click Disable all.
  • Click on Apply/OK and restart your PC. (This will put your PC into a Clean Boot State. And configure Windows to use the usual startup, just simply undo the changes.)
  • Now try to connect the external devices and check if the error is now gone.
Read More
Fixing Windows Update Error 80244019
As you know, Windows Update is the source for everything latest for Windows from Microsoft. Your computer receives essential updates frequently because of the Windows Update service and this Windows Update mechanism depends on various services such as Background Intelligent Transfer Service or BITS, Windows Server Update Service, Windows Update service, and many more. Although it may seem like a complex delivery system, it is a very efficient one. However, it is not without its issues as it still encounters errors every now and then. One of these errors is 80244019 which applies only to the Windows Server operating systems and to resolve it, you need to determine its cause. The Windows Update Error 80244019 is most likely caused by faulty and corrupted DLL files or Registry Entries, connectivity issues, and outdated configuration of Windows Update service on the client end. Moreover, the error can also be caused by malware or if a file is not found on the server. This error can lead to a number of system issues like Startup and shutdown issues, software installation errors, external devices connection, system lags, unexpected application, and program issues, and many more. To resolve the problem, refer to the options given below.

Option 1 – Restart some Windows Update services

The first thing you have to do is to restart Windows Update-related services. Refer to the steps below to do so.
  • Open the WinX Menu.
  • From there, open Command Prompt as admin.
  • Then type in the following command – don’t forget to hit Enter right after typing each one of them.
net stop wuauserv net stop bits
  • After entering these commands, it will stop the Windows Update Service and the Background Intelligent Transfer Service.
  • Next, go to the C:/Windows/SoftwareDistribution folder and get rid of all the folders and files there by tapping the Ctrl + A keys to select them all and then click on Delete. Note that if the files are in use, you won’t be able to delete them.
  • Once all the contents in the Software Distribution folder are deleted, restart your PC and then go back to Command Prompt and input the following commands again.
net start wuauserv net start bits
 Since the folder has already been flushed, it will be populated afresh the instant your restart your computer and open Windows Update.

Option 2 – Try turning on the Data Execution Prevention or DEP

The problem might be caused by disabled Data Execution Prevention which is why you have to make sure that it’s turned on.

Option 3 – Run the Windows Update Troubleshooter

You might also want to run the Windows Update Troubleshooter as it could also help in fixing Windows Update Error 80244019. To run it, go to Settings and then select Troubleshoot from the options. From there, click on Windows Update and then click the “Run the troubleshooter” button. After that, follow the next on-screen instructions and you should be good to go.

Option 4 – Try reconfiguring the Windows Update Settings

You can also try to reconfigure the settings in the Windows Update section to resolve the error.
  • Tap the Win + I keys to open the Windows Settings.
  • Next, click on Update & Security > Windows Updates > Update Settings and from there, click on the Advanced Options.
  • After that, uncheck the “Give me updates for other Microsoft Products when I update Windows” option.
  • Now restart your computer to successfully apply the changes made and then check if the Windows Update error is now fixed.

Option 5 – Try to manually install the Windows Updates

Windows Update Error 80244019 might be due to a Windows Update that has failed. So if it is not a feature update and only a cumulative update, you can download the Windows Update and install it manually. But first, you need to find out which update has failed, and to do so, refer to the following steps:
  • Go to Settings and from there go to Update and Security > View Update History.
  • Next, check which particular update has failed. Note that Updates that have failed to install will be displayed under the Status column which has a label of “Failed”.
  • After that, go to the Microsoft Download Center and look for that update using its KB number and once you find it, download and then install it manually.
Note: You can also use the Microsoft Update Catalog, a service from Microsoft that provides a list of software updates that can be distributed over a corporate network. With the help of this service, it can be easier for you to find Microsoft software updates, drivers as well as fixes.
Read More
1 2 3 162
Logo
Copyright © 2022, ErrorTools. All Rights Reserved
Trademarks: Microsoft Windows logos are registered trademarks of Microsoft. Disclaimer: ErrorTools.com is not affiliated with Microsoft, nor claim direct affiliation.
The information on this page is provided for information purposes only.
DMCA.com Protection Status