Could not configure one or more components

If you are trying to install or upgrade your Windows 10 computer but suddenly encountered an error message saying, “Windows could not configure one or more system components”, read on as this post will show you how you can fix the problem.

You are not alone in experiencing this problem as other users also reported having the same scenario. Some of them reported getting the following error message:

“Windows could not configure one or more system components. To install Windows restart the computer with error code 0xc1900101-0x30018.”

When you check on the Windows 10 rollback log, you will see a part with the “iisetup.exe” that’s related to the abort. Usually, the upgrade process completes over 50% and gets stuck and then rolls back later on and generates the error logs. This kind of error, in most cases, appears during the upgrade of Windows 10 and is related with the Internet Information Services or IIS in Windows 10. For some unknown reason, it restricts the installation or the upgrade which causes the error to appear. To fix the “Windows could not configure one or more system components” error, you can try to remove the IIS from the Windows Features or rename the “inetsrv” folder. You could also move all the folders related to IIS to another drive. For more details, refer to the options provided below.

Option 1 – Try to remove the IIS from Windows Features

The IIS is installed from the Windows Features and you can find it at Control Panel > Programs. From there, uncheck the checkbox for the Internet Information Services. Once done, click on the OK button to save the changes. Note that this process will get rid of all the related programs, services, and folders from Windows 10. So if you want to, you can just install them later on or use an offline installer from the official site of Microsoft.

Option 2 – Try renaming the inetsrv folder

The next option you can check out to resolve the problem is to rename the “inetsrv” folder. If you have uninstalled IIS from the Windows Features, this should remove the folders as well, however, it didn’t remove the folder then you have to delete the folders that are related to the IIS by following these steps:

  • First, you have to boot into the Advanced Recovery Mode and from there, open Command Prompt.
  • Next, execute this command to rename the folder from this location, C:Windowssystem32inetsrv: rename C:/Windows/system32/inetsrv/inetsrv.old
  • Once done, boot into your computer normally and try to upgrade Windows 10 again, and check if the problem is fixed or not.

Option 3 – Try to move the folders related to IIS to a different drive

  • Tap the Win + R keys to launch the Run utility and type “services.msc” in the field and hit Enter to open the Windows Services Manager.
  • Next, look for the Application Host Helper Service from the list of services and stop it.
  • Once done, take ownership of the “WinSxS” folder and then move the *windows-iis*.*” folders to another drive. You can just search using the “*windows-iis*.*” keyword in the Start Search.
  • Next, tap the Ctrl + X keys and paste the folders to another drive.
  • After that, start the update process for Windows 10 again.
If you like to learn and find out more about various Windows errors, and how to repair them go to our vast archive or use search to find articles that will explain and help you in solving your issue.
However, if you prefer to do things fast and with automatization then we are proposing to use an automated solution for your issues. The application that we are recommending is Advanced System Repair Pro
Advanced System Repair utilizes multiple tools all in one to give you a quick, simple, reliable, and very thorough diagnosis of your PC. It brings you all the tools you need in one program to clean, fix, protect, optimize and boost your PC!
1-Click Maintenance
All the tools to make it simple and easy! It's like having a professional technician at the click of a mouse.

Junk Cleaner
Keeping your computer free from unnecessary clutter also helps make your computer last longer. Like any other machine, if you keep it clean and take care of it, it will serve you better for longer!

Optimize background apps
Optimize applications background activity with the built-in Application Optimizer feature.

Disk Defrag
With a simple 1-click, Advanced System Repair speeds up your PC by assembling fragmented files on your machine and organizing them more efficiently.

Malware Removal
Finds and removes all types of harmful malware including trojans, worms, bots, adware, spyware, PUPs, and more!

Privacy Cleaner
The all-in-one privacy suite to Clean Your Tracks & Protect Your Privacy! Make your computer safe, secure, and more efficient!

System Tweak/Optimizer
ASR will analyze your complete system and settings to adjust your PC to function at its maximum performance.

Registry Cleaner
Over time, as you install and uninstall applications, the registry can become cluttered with old entries and broken settings which can result in program crashes, and annoying messages and slow the computer down.
Visit our Advanced System Repair Pro Download page to inform yourself about all the benefits of this software and get a free trial copy of it.
advanced system repair pro

Advanced System Repair Pro

One-click automated PC repair solution
ASR logo
With Advanced System Repair Pro you can easily
Replace damaged files
Restore performance
Free disk space
Remove Malware
Protects WEB browser
Remove Viruses
Stop PC freezing
DOWNLOAD
Privacy Policy | Terms of Use | Uinstall
Advanced System Repair Pro is compatible with all versions of Microsoft Windows including Windows 11

Share this article:

You might also like

How to move Taskbar to the left in Windows 11
The standard icon place in the Taskbar inside Windows 11 is in the center. Some users welcomed this change, some not so much. If you are part of the user base that is not so much thrilled with this Microsoft’s idea of innovation, do not worry, there is an easy way to move all icons and start button on the left inside Taskbar.

Taskbar icons on left
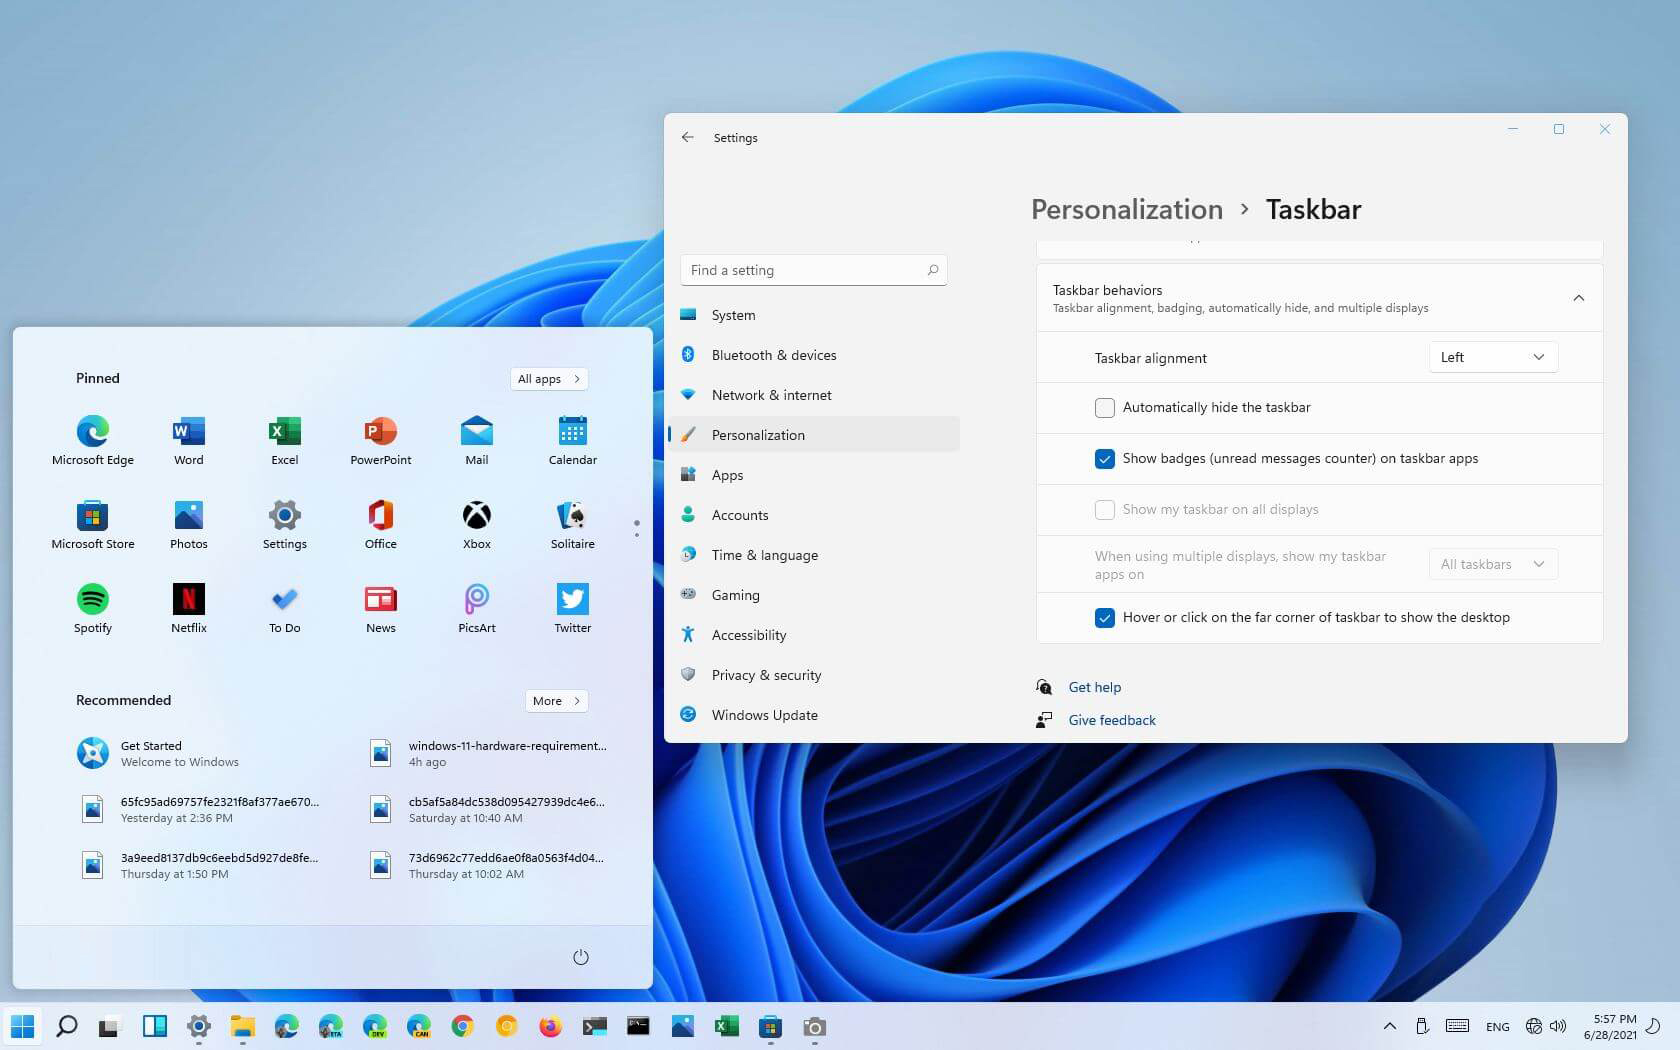
Moving icons in Taskbar

  1. Open Windows settings by using ⊞ WINDOWS + I key combination
  2. Click on Personalization
  3. Select Taskbar
  4. Click on Taskbar Behaviors
  5. Click on the drop-down menu beside Taskbar Alignment
  6. Select your desired option of icon alignment
  7. Close settings
Your options will be active right away and you will see icons switching to the position of your choosing.
Read More
How to Fix Error Code 0x803f7001 in Windows

Error Code 0x803f7001 – What is it?

Error code 0x803f7001 results when users fail to update their Windows operating system. This often occurs when they seek to update from Windows 8 or 8.1 to Windows 10. Users will be able to identify error code 0x803f7001 because of the following common symptoms which occur:

  • Inability to upgrade your Windows operating system to Windows 10
  • Message box with error code 0x803f7001

Solution

Restoro box imageError Causes

The causes for error code 0x803f7001 are usually associated with the use of an unlicensed version of Windows 8 when upgrading to Windows 10. In such cases, the error code occurs when there is no valid Windows license or product key on your device.

Further Information and Manual Repair

To fix error code 0x803f7001, users may not necessarily need technical knowledge or the help of a Windows repair technician. Usually, the process is simple and can be resolved with the use of a valid product key. However, if users have trouble implementing the instructions found in the manual repair methods listed below, contact a Windows repair specialist for help or use an automated tool that provides the best solutions for problems like error code 0x803f7001.

Method One: Use a Valid Product Key

A product key is a 25-character code that enables users to activate their Windows operating system. To successfully activate your operating system and resolve error code 0x803f7001, enter the product key in the correct order. Once you have a valid product key in your possession, begin to resolve the error code by following the instructions below:

  • Step one: Click the Start button then select Settings
  • Step two: Select Update & security then Activation
  • Step three: Click the Change product key
  • Step four: Type in your valid product key. (Ensure you include the 25 characters of your product key in the correct order.)

Once you type in the valid product key, you should be able to successfully upgrade to the latest version of Windows. However, this method is only effective if the error code 0x803f7001 on your device is caused by issues related to the product key.

If the error code reappears after attempting manual repair method one, move to the next manual method suggested below.

Method Two: Reinstall Genuine Version of Windows 8

This method is crucial for you to perform if method one was not successful. Begin the reinstallation process by ensuring you have a genuine version of Windows 8. After reinstalling this version of your Windows operating system, attempt to upgrade to Windows 10 by following the instructions below:

  • Step one: Type Settings in the search box near the Start button or click the Start button and select Settings
  • Step two: After clicking Settings, select Update & Security
  • Step three: Select Windows Update then the Check for updates tab
  • Step four: Activate Windows 10 update

If this method is successful, you will no longer see error code 0x803f7001 pop up in a message box. You will also be able to access Windows 10, and all the benefits it provides users, on your device.

Method Three: Install an Automated Tool

Automated tools help PC users eliminate common issues such as Windows error codes. To address or rectify error codes like error code 0x803f7001 download a powerful automated tool on your machine. This tool enables users to access quick solutions. It also scans for and corrects issues that may result in error codes or poor PC performance.

Read More
Fixing 0x00000050 Stop Error – A How to Guide

What Is 0x00000050 Stop Error?

While running your Windows 7/Windows Server 2008 R2, your system suddenly stops responding out of complete randomness and you see an error message popping up which says something like this:

0x00000050 (parameter1, parameter2, parameter3, parameter4)

Solution

Restoro box imageError Causes

The stop error 0x00000050 signifies that there’s a PAGE_FAULT_IN_NONPAGED_AREA problem. If you’ve seen this error on different occasions then you will find the parameters in the message to be varying. That is because they are dependent on your PC’s configuration. Not all Stop errors "0x00000050” occur due to a single issue.

However, the most common problem which is encountered which results in the stop error popping up is due to a pool corruption occurring in the Srvnet.sys file.

This issue might be caused because of software incompatibility or a defective physical memory which resulted in requests for data for a hardware driver or service which was not found in the memory.

If you find the error occurring after you’ve installed a new application or a device driver then you should access Safe Mode and uninstall, disable or remove that application or driver.

Further Information and Manual Repair

In order to fix this issue, you should try booting your computer to the “Last Known-Good Configuration” as listed during startup.

For this you have to follow the below-mentioned steps:

  1. Start your system.
  2. When you see the message which says “For Troubleshooting And Advanced Startup Options For Windows, Press F8” hit F8 and proceed.
  3. Use the up and down arrow keys to highlight “Last Known-Good Configuration” and hit enter (This method will only work if your system boot was not successfully carried out ever since you made any specific changes).
  4. When you are starting the computer, press F12 and proceed with the PSA/32 Bit Diagnostics.
  5. Do the following so that a clean boot can be performed:
  • Go to the Start menu when the Windows 7 desktop shows up.
  • On the search bar, type “msconfig” and hit search.
  • Disable all the applications which are listed on the “Startup” tab.
  • Now head over to the “Services” tab and mark the option which reads "Hide all Microsoft Service".
  • Select the “Disable All Services” option.
  • Apply the changes by clicking on “Apply” then restart your PC. You should now check the performance of your computer. If you don’t see a BSOD then you start re-enabling all the Services and Startup applications one by one until you finally figure out which one is causing the BSOD to appear.
6. Update your Windows with “Windows Updates”.
Read More
Fix Chassis Intruded…Fatal Error…System Halted
When you encounter an error message that says, Chassis Intruded…Fatal Error…System Halted on your monitor then it indicates that the Chassis or the cabinet that holds the CPU, GPU, motherboard, and many more is open. It is a security feature offered by OEMs wherein a connector that is found in the motherboard can detect if the chassis component has been replaced or removed. There are a few OEMs that offer onboard speaker or PC chassis speaker which goes off in this kind of situation. Obviously, the problem has something to do with the hardware and in most cases, you have to put the jumper back on the motherboard with the pin-labeled chassis signal and ground. There are times when some OEMs offer a simple switch that is armed automatically when you properly close the chassis. Thus, you need to check if this switch has something to do with the error. If there is no switch or if it doesn’t resolve the issue, although you may be able to get into Windows with a warm boot, the normal Windows boot won’t really work unless you fix the problem. It is rather false positive and has something to do with the RTC RAM state or the BIOS. You might need to completely disable the Chassis intrusion feature to fix the error. Refer to the suggestions given below to try and fix the “Chassis Intruded, Fatal Error … System Halted” error.

Option 1 – Try to clear CMOS

You can easily clear CMOS by shorting two pins which can be found side by side on the motherboard. Keep in mind that it may vary from OEM to OEM although the basics are still the same to clear CMOS. In addition, you might also have to download the manual from the OEM’s website so that you’ll know its exact location.

Option 2 – Try booting into the BIOS

You can also try booting into the BIOS. All you have to do is tap either the DEL or F2 keys to get there. Note that everything will be set back to their default setting after you reset the CMOS.

Option 3 – Try disabling Chassis intrusion

In this option, you have to look for the Chassis intrusion feature in your BIOS. It might be located under security. From there, disable it and check if the problem’s fixed.

Option 4 – Try to reconfigure the BIOS

Once you have disabled the Chassis feature, you need to reconfigure the BIOS the way you expect it to be or to what it was before the reset.
Read More
How to Repair Windows 10 Upgrade Error Code 0x80200056

Repair Windows 10 Upgrade Error Code 0x80200056

Code 0x80200056 – What is it?

The Error Code 0x80200056 will appear in a few different instances, though always applies to an interrupted download.   Windows 10 will quickly discover that their upgrade and/or download did not work correctly. Not every user who upgrades to Microsoft Windows 10 will face this issue, only a select few random instances will occur. Common symptoms include:
  • A dialog box appears with the Error Code 0x80200056
  • Microsoft Windows 10 upgrade is unsuccessful
  • Users are unable to open any applications after completing the Microsoft Windows 10 install

Solution

Restoro box imageError Causes

This error can be caused by a number of common problems, the first of which is the easiest to diagnose.
  • If during the upgrade process, you accidentally restarted your PC, or inadvertently signed out of your PC, the error will occur.
  • Third-party software conflicts can cause this error message during the Microsoft Windows 10 upgrade.
  • Error Code 0x80200056 may also appear if you have corrupted system files on your PC.
  • A change in date and time during the Microsoft Windows 10 upgrade could potentially cause this error.
None of these causes should overtly affect the operation of your PC, but merely prevent the upgrade and/or download from functioning correctly. If your PC is exhibiting other operating system errors in addition to Error Code 0x80200056, it would be wise to contact Microsoft Support before the issues lead to a possible catastrophic failure.

Further Information and Manual Repair

With the very recent release of Microsoft Windows 10, we are seeing a number of users discuss Error Code 0x80200056. Luckily, there are three different methods that any home user can perform to alleviate the error and complete the Microsoft Windows 10 download successfully.

Method 1

Use if your PC restarted accidentally during the upgrade, or if you accidentally signed out of Windows during the upgrade.
  1. Make sure that your PC or Laptop is plugged in, to avoid another accidental restart.
  2. Turn your PC on, or make sure that it is running. (Close any and all unnecessary programs)
  3. Attempt the upgrade again, you should be able to run the upgrade successfully without further issue.
The following solution methods will apply if corrupted files, date/time changes, or third-party software interference is the issue causing Error Code 0x80200056.

Method 2

The following solution methods will apply if corrupted files, date/time changes, or third-party software interference is the issue causing Error Code 0x80200056.
  1. Click on your “start” icon and choose the CMD (command prompt) option.
  2. Right-click on “command prompt” and choose “run as administrator”.
  3. Paste the command “bitsadmin.exe /reset /allusers” into the command prompt and press ENTER.
  4. Restart your PC and attempt the Microsoft Windows 10 upgrade again.

Method 3

  1. Click on your “start” icon and choose the CMD (command prompt) option.
  2. Select “run as administrator” (enter a password if asked to do so).
  3. Enter the following command into the command prompt- “sfc/scannow”, press ENTER.
  4. Do not close the command prompt window until the entire process is complete.
  5. The scan will determine if you have any missing or corrupted files. You will receive a message that says either: “Windows Resource Protection did not find any integrity violations”.Or “Windows Resource Protection could not perform the requested operation”.
  6. If you received the first message, then your files are fine. The second message indicates that there are file corruption issues.
  7. To repair the disjointed files, restart your PC in SAFE MODE, and reopen the command prompt window.
  8. Enter the following command into the command prompt- “sfc/scannow”, press ENTER.
  9. After the scan is run again, you will receive a message stating that the files have been successfully repaired.
  10. Restart your PC in normal mode and start the Microsoft Windows 10 upgrade again.
To use a powerful tool to resolve Windows 10 upgrade Error Code 0x80200056 issue, download a powerful tool. Click here to download Restoro. If any of these methods do not allow for the successful upgrading of your Windows system, contact the Microsoft Support team. Make sure to include in your message to support what fixes you have attempted, and what the outcomes were. As Microsoft Windows 10 is so incredibly new, there are bound to be issued while the program is in its infancy. Fortunately, a majority of these issues should be worked out by Microsoft relatively quickly.
Read More
Taskbar is not visible in Remote Desktop
Recently, several users reported an issue on their Windows 10 computers where the taskbar is not visible when they tried to connect to a computer via Remote Desktop Protocol or RDP. The Remote Desktop Connection feature uses the RDP which allows users to access a computer remotely. This is actually different from the taskbar being hidden automatically until the pointer hovers on it since, in this scenario, the taskbar is completely not accessible which makes using the remote computer entirely difficult, if not impossible. There are several suggestions you can check out to resolve this problem, you can try to restart the process of Windows Explorer via Task Manager or you could clear the cache for multiple processes. You could also try to reinstall the Shell Experience components or show the local taskbar in the Remote desktop. Moreover, you could also try to update, uninstall or roll back the display driver/graphics card driver. For more details, refer to each one of the options given below.

Option 1 – Try to restart the Windows Explorer process

The first option you have to try to fix the problem with the taskbar is to simply restart the Windows Explorer process in the Task Manager.
  • Tap the Ctrl + Shift + Esc keys to open the Task Manager.
  • Next, go to the Processes tab and find the process of Windows Explorer.
  • Once you find it, right-click on it and select Restart to restart its process.
  • After that, restart your computer and see if you can now see the Taskbar.

Option 2 – Try clearing the cache of multiple processes

The next thing you can do to resolve the problem is to clear the cache of many processes in your computer. To do so, follow these steps:
  • Open the Notepad app and paste the following content in the text area:
@echo off taskkill /f /im explorer.exe taskkill /f /im shellexperiencehost.exe timeout /t 3 /NOBREAK > nul del %localappdata%PackagesMicrosoft.Windows.ShellExperienceHost_cw5n1h2txyewyTempState* /q timeout /t 2 /NOBREAK > nul start explorer @echo on
  • After that, tap the Ctrl + S keys to save the changes you’ve made in Notepad and select the “All files” as its file type, and then name it “CacheClearTWC.bat”.
  • Next, go to the location where you saved the file using File Explorer and then run it. This will run a couple of batch scripts which will clear the cache of multiple processes in the system.
  • Tap the Win + X keys and select the “Windows PowerShell (Admin)” option to open PowerShell as admin.
  • Next, execute this command in the command line: Get-appxpackage -all *shellexperience* -packagetype bundle |% {add-appxpackage -register -disabledevelopmentmode ($_.installlocation + “appxmetadataappxbundlemanifest.xml”)}
  • After the command has been executed, this will reinstall the Shell Experience components and should fix the problem with the taskbar.

Option 4 – Update, uninstall or rollback the Graphics card drivers

  • First, boot your computer into Safe Mode.
  • After that, tap the Win + R keys to launch Run.
  • Type in MSC into the box and tap Enter or click OK to open the Device Manager.
  • After that, a list of device drivers will be displayed. From there, look for the Display Adapters and click on them.
  • After that, right-click on each entry under the Display Adapters and select the “Uninstall Device” option from the menu.
  • Now restart your computer.
  • After restarting your computer, go to the Settings app and Check for Updates in the Windows Update section.
Note: You also have the option to go directly to the website of your graphics card manufacturers like NVIDIA, Intel, or AMD and go to the section called Drivers then check if there’s a new available update – if there is, download and install it.
Read More
Razer Iskur gaming chair for healthy gaming
Razer Iskur
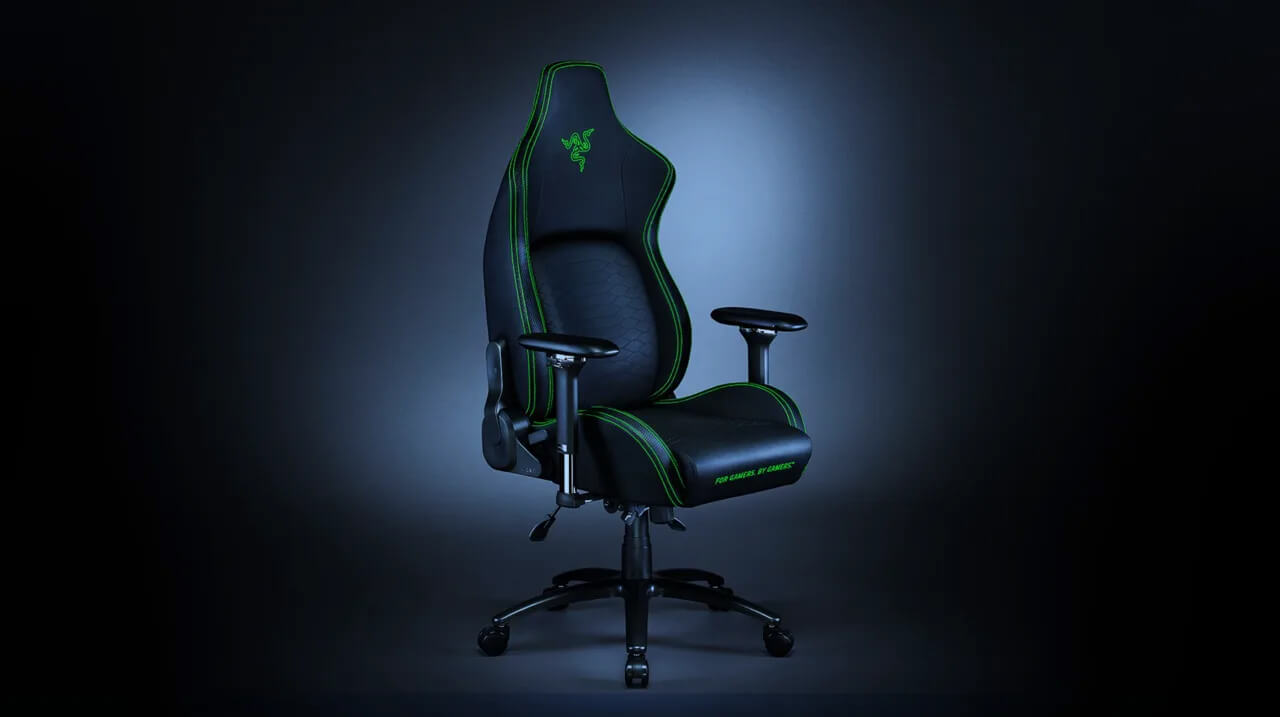
It seems that last few days we were riding some Razer bandwagon but rest assured that we are not sponsored by them in any way, truth is that simply they come up with some interesting accessories which I believe are worth covering. Gaming Chair itself comes in two colors, fully black and green black combination and it is not really an entry-level chair if we are talking about price. The chair itself is around 600USD depending on the distributor and considering that price range it is placed in more top cream of gaming chairs but it is worth every dime.

Iskur Specifications

Iskur is made of a steel frame with a reinforced plywood lumbar support frame for added weight tolerance. Frame and lumbar support are surrounded with memory foam and all of that is wrapped in cotton and polyester layer which is again wrapped in multi-layer synthetic leather making the chair very durable for long hours of daily use. The chair also comes with a memory foam head cushion which is detachable and removable if you do not wish to use it. On the Razer website among specifications, it stands that the chair is best suited for persons from 5’6” – 6’2” (170 – 190cm) height and up to 299lbs (136kg).

Features

The chair has, of course, height adjustment as any gaming chair and surprisingly it has great control for the armrest. The armrest can be adjusted in 4 different ways: up & down, left & right, forward & backward, and inward & outward. The backrest can be also tilted up to 26 degrees angle. All of these features are great and good but there is one more feature that really makes this chair stand out from rest and it is Lumbar support. Iskur has an adjustable lumbar support system on the lower part of the backrest. With your lumbar support secured, you can then make the necessary tweaks to optimize the rest of your posture using the Razer Iskur’s adjustable height, backrest, and armrests.

Conclusion

Razer Iskur is neither cheapest nor perhaps the best gaming chair you can buy, but it is a really good one. It is well manufactured and made to feel and look like a premium product that actually it is.
Read More
How To Fix Error 504

Troubleshooting Error 504

Error 504 - What is it?

Error 504 is a type of runtime error that occurs on Windows PC. A runtime error is a bug that causes software or hardware problems thereby preventing programs from working on your PC correctly. This error may occur during the execution of the program.  It also slows down your PC performance.

Solution

Restoro box imageError Causes

Error 504 can be triggered by many causes such as:
  • Incompatibility between 2 software programs
  • Malicious software
  • Missing DLL files
  • Registry issues

Further Information and Manual Repair

Whenever you experience the error 504 on your system, it is advisable to resolve it immediately, typically because runtime errors like error 504 can lead to system failure and valuable data loss which is more than often hard to recover. To resolve this error code, you don’t necessarily have to hire a professional for the job. In fact, here are some solutions that you can try to fix by yourself, even if you are not a computer programmer.

1. Get the latest updates for Windows and for the program showing the error

This is a quick way to resolve runtime error 504 on Windows PC. To update the latest updates for Windows and for the program causing the error, open Windows Update by going to the start menu. In the search box type ‘update’ and then in the list of results click Windows Update.  In the left pane click on check for updates, wait while Windows looks for the latest updates. It will show you a list of updates available select the important updates that you want to install. Then click ok and then click install updates. After the updates are successfully complete, restart your PC and try running the application. If the error still persists, then try the solution given below.

2. Scan For Malicious Software

Sometimes the runtime error 504 may occur due to viral infection and malware. So, to resolve it download an antivirus. However, the antivirus can also slow down your PC performance.

3. Scan for Registry Issues

Another way to resolve it is to scan for registry issues. The registry and DLL files get damaged when it overloads with too much data. This particularly includes irrelevant and obsolete files. Registry issues trigger runtime errors like 504. The best way to resolve it is to download Restoro. This is an advanced and multi-functional PC Fixer embedded with multiple utilities like a registry cleaner, an antivirus, and a system optimizer. The registry cleaning utility resolves registry issues by removing the unnecessary files completely and repairing the damaged dll files. The antivirus module scans and removes all kinds of malicious software on your PC like viruses and Trojans, thereby resolving the runtime error 504 in seconds. As for speed, Restoro also functions as a system optimizer which boosts the performance of your system significantly. Restoro is safe and bug-free software. It has simple navigation and a user-friendly interface which makes it very easy to operate and workaround. It is compatible with all Windows versions. Click here to download Restoro and resolve error 504 today!
Read More
How to Fix Installation Error 1628

Repair Error 1628

What Is Installation Error 1628?

Installation Error 1628 is, as the name suggests, an installation error. When it occurs, a generic 1628 message is displayed to the user. When this message appears, it is either a problem with the install files or an issue with the InstallShield.

Solution

Restoro box imageError Causes

Installation Error 1628 is caused because every Windows-based program or application has been designed that such that it has to be installed on the computer for use. This installation process is important because it not only moves files to the appropriate location on one’s hard drive but also because the process creates registry entries in Windows System files. A vast majority of these programs and applications have a built-in tool that’s responsible for aptly performing this installation. This built-in tool is the InstallShield. This establishes that when this error occurs, it is either because of some unforeseen issue that occurred during the installation process or because of some problem with the InstallShield.

Further Information and Manual Repair

In order to keep this error from occurring in the future, some recommendations are outlined below.
  • Check the installation disc and determine if there are any smudges, scratches, or fingerprints on it. If the system is unable to read data from the disc, Installation Error 1628 will be generated. In order to ensure that the Installation Disc is clean, use a microfiber cloth. Dampen it lightly with water and clean the disc. Wipe the inside of the disc lightly in an outward direction, making sure that it is not wiped in a circular pattern. Try to reinstall the application or program after cleaning the disc. The issue should be resolved. However, if it persists, some problems may be with the InstallShield.
  • The alternative solution is to repair the InstallShield and the procedure goes as follows.
  1. Stop InstallShield’s running process. It may have been crashed and simply needs to be restarted. Now access task manager. Press Ctrl+Alt+Del and the task manager will open. Now go to the processes tab and disable ‘idriver.exe’ and ‘msiexec.exe’ from here.
  2. Now go to ‘C: Program Files/Common Files’. Here you will find the ‘InstallShield’ folder. Select ‘rename’ and modify the folder name to ‘InstallShield1’. Confirm rename and start the installation process again. Now Windows will try to re-install any InstallShield files one needs.
  3. If the error persists after renaming the InstallShield folder, download the Windows Installer from Microsoft’s website. This file will determine whether or not your version is valid. Old versions often have bugs that cause problems. Your system is now ready to be used.
Read More
Headphones are not visible in playback devices
If you connected headphones to your Windows 10 computer to listen to audio but when you check it in the playback devices, you’re not able to find it, read on as this post will guide you in what you can do to figure out what exactly caused this kind of problem and how you can resolve it. This kind of issue could simply be with the headphone itself or the headphone port or your operating system. So if it turns out that the problem is with the hardware, you might have to replace the components. However, it is recommended that you troubleshoot the problem first before doing that. The most basic thing you can do is to try changing the headphone port, although this can be quite difficult since most computers don’t have any extra port for headphones if your computer has one, then give it a go. If it still didn’t work, follow each one of the options provided below.

Option 1 – Try to run the Playing Audio troubleshooter

Since the Windows 10 operating system has the Playing Audio Troubleshooter, you can use this troubleshooter to try and fix the problem with the “No Audio Output Device is installed” error. You can access this tool in the Control Panel or in the Taskbar Search and even on the Troubleshooters page of Windows 10. Run this troubleshooter and see if it can fix the issue or not.

Option 2 – Try to update the Audio driver

If the error has something to do with software, chances are it might be related to the audio driver – it could be that the newest version of your Windows 10 does not work well with the old version of the driver. This is why you have to update your audio driver to the newest available version.
  • Tap the Win + R keys to open the Run dialog box and then type in MSC and tap Enter or click OK to open the Device Manager.
  • Expand the section of the Audio inputs and outputs.
  • And then from the drop-down menu, select the Update Driver option and follow the on-screen instructions to install the latest version of the driver.
  • Then also click on the option, “Search automatically for updated driver software.
  • Restart your PC after the installation.
Note: If updating the Audio driver didn’t work, you can go to the website of your PC manufacturer and look for the support section where you can download the drivers for your computer. You just need to take note of your PC’s correct model and model number so you can find the appropriate driver.

Option 3 – Try enabling the headphones from the playback devices

  • Tap the Win + R keys to open the Run dialog box and type the “CPL” command.
  • Tap Enter to open the Playback devices.
  • Next, right-click on any open space section and check the boxes for the “Show Disconnected Devices” and “Show Disabled Devices” options.
  • After that, this should help in displaying the headphones in the section of Playback devices.
  • And if they are disabled, you can just right-click them to have them enabled.
Read More
1 2 3 162
Logo
Copyright © 2022, ErrorTools. All Rights Reserved
Trademarks: Microsoft Windows logos are registered trademarks of Microsoft. Disclaimer: ErrorTools.com is not affiliated with Microsoft, nor claim direct affiliation.
The information on this page is provided for information purposes only.
DMCA.com Protection Status